1
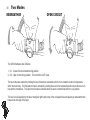
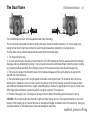
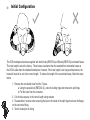
Open Circuit Bailout
Instruction Manual
ambient pressure diving
p2
Copyright Notice
This Instruction Manual is copyrighted, all rights reserved. It may not, in whole or in part, be copied,
photocopied, reproduced, translated, or reduced to any electronic medium or machine readable form
without prior consent in writing from Ambient Pressure Diving.
© 2008 Ambient Pressure Diving
OCB Instruction Manual
Please read the instructions in this manual carefully before using the Open Circuit Bailout (OCB)
mouthpiece.
Applicable Law:
All products are sold on the strict understanding that only English Law applies in cases of warranty
claims and product liability, regardless of where the equipment is purchased or used. Should a claim
be made then the venue for this would be in Truro, England.
If this clause is not acceptable to you or your family then return the product unused to your place of
purchase for a refund.
Contents
OCB Instruction Manual
General Precautions and Warnings................4
Introduction.......................................................5
Section 1 Overview of Features
Two Modes...............................6
Dual Valve................................7
Section 2 Preparation and Setup
Initial Configuration...................8
Preparation and Setup ............10
Section 3 During the Dive
Diving with Nitrox......................16
Diving in Cold Water.................17
Section 4 Post Dive
General Notes..........................18
Maintenance Schedule.............19
Factory Service.........................20
p3
Section 5 Parts List / Drawings
Main Assembly.........................22
Dual Valve Assembly................24
Front Cover Assembly..............25
Warranty Information.......................................26
ambient pressure diving
p4
General Precautions and Warnings
Before using this OCB mouthpiece, you must receive instruction and certification in diving rebreathers from a recognised training agency.
Use of this OCB by uncertified or untrained persons is dangerous and can result in injury or death. It is very easy to configure the OCB
and/or use it in an unsafe manner. Even if specific training is undertaken in it’s configuration and use it is still possible to injure yourself
through carelessness.
The Inspiration, Evolution and Evolution+ closed circuit rebreathers’ CE certification to EN14143 is unaffected by the addition of this OCB
mouthpiece. OCB maximum certified depths: Closed Circuit = 100m. Open Circuit = 50m.
This OCB mouthpiece meets the requirements of the Personal Protective Equipment Directive 89/686/EEC – CE certification when fitted
to a first stage regulator conforming to EN250 or EN13949 and to an Ambient Pressure Diving rebreather.
This OCB mouthpiece is not configured for buddy-breathing (multiple users).
Factory / Dealer prescribed service for this OCB mouthpiece is recommended at least once annually by a factory trained Ambient
Pressure Diving service technician. Disassembly or repair must not be attempted by persons who are not factory trained and authorised
by Ambient Pressure Diving.
Warning! Training alone, is not sufficient to ensure your safety. Correct maintenance and diligent use of the equipment is essential. If
sufficient forethought has not been given to equipment configuration, risk analysis, dive and emergency planning you could with one
simple operation – changing from CC mode to OC mode – feed yourself gas which will not support life. DO NOT underestimate your
capacity for doing something stupid. Everyone makes mistakes, but making a mistake with the OCB can prove fatal.
Warning! If additional components are used in the medium pressure gas supply, for instance a gas connection system or gas switching
block, it is important to realise that these may interfere with the gas flow to the OCB and degrade the breathing performance preventing
the OCB from supplying sufficient gas to a hard working diver at depth. Additionally, if they interrupt the gas supply the OCB may be
critically damaged on descents.
Warning! DIVING WITH HYPOXIC GASES
Know your maximum and minimum operating depths of the gas connected
Using Hypoxic Gases ON or NEAR the surface has and will KILL!!
Check and double check – don’t underestimate your capacity for doing something stupid !
Introduction
OCB Instruction Manual
p5
Introduction
Thank you for choosing an Ambient Pressure Diving product. This OCB mouthpiece has been designed and
manufactured with pride under a Lloyds Quality Assured BS EN ISO 9001 quality control system.
This OCB mouthpiece is covered by Ambient Pressure Diving’s 2 year warranty against defects in materials
or workmanship. This warranty is only extended to the original purchaser, and is not transferable. For more
information, be sure to read the warranty section of this manual, and remember to save your sales receipt. A
copy of the receipt must be presented whenever obtaining warranty service.
The function and performance of the OCB relies greatly on the care and maintenance it receives, in addition
to regularly scheduled factory / dealer service.
Before you dive with your new OCB mouthpiece, it is important to read this manual in it’s entirety to become
familiar with it’s features, as well as the correct procedures for setup, pre-dive inspection and post-dive
maintenance.
Please read on to learn how you can obtain the maximum functionality from your OCB mouthpiece, and
maintain it’s like-new performance for many years to come.
ambient pressure diving
p6
Two Modes
REBREATHER
OPEN CIRCUIT
The OCB Mouthpiece has 2 Modes:
1. CC. Closed Circuit rebreather diving position.
2. OC. Open Circuit diving position. This is the BAIL-OUT mode.
The two modes are selected by rotating the lever forwards or backwards, which in turn rotates the internal components
within the main body. The Rebreather mode is activated by rotating the lever to the backward position where the lever is in
line with the mouthpiece. The Open circuit mode is activated when the lever is rotated forward to the ‘up’ position.
The lever is best operated by the diver resting his right hand on top of the corrugated hose and placing an extended thumb
between the two lugs of the lever.
The Dual Valve
OCB Instruction Manual
LEFT
p7
RIGHT
The OCB Mouthpiece utilises ‘AP’s new patented Dual Valve Technology.
This new demand valve enables the diver to quickly and easily change the medium pressure (7 to 14 bar) supply hose
routing from left hand to right hand, without the need for major disassembly, adjustment or any special tools.
The Dual Valve can be switched between left hand and right hand in simple steps:
1. Turn the gas off and purge.
2. Unscrew (anti-clockwise) the supply hose and then the 9/16” UNF blanking cap from the opposite end until the threads
disengage and pull, withdrawing the plunger. (If a tool needs to be used to undo these fittings, protect the plastic moulding
by preventing the Dual Valve Body from rotating by using a 17mm spanner/wrench on the adjacent hexagon nut).
3. Fully screw the plunger into the blanking cap until the threads disengage and then gently slide the plunger into the
opposite side of the dual valve.
4. Screw the blanking cap on until it is tight against the shoulder, covering the thread. You should be able to do this up
without tools. If resistance is met, you need to ensure the plunger is fully into the blanking cap and the threads are clean
and sufficiently lubricated with silicone or oxygen compatible grease, whichever is appropriate for the gas you intend to use.
While finger-tight is sufficient it is prudent to just nip it up lightly using two 17mm spanners.
5. Reconnect the supply hose. Turn the gas on slowly and test for leaks and breathing performance prior to diving.
CAUTION: When switching the valve from left to right hand hose routing, use two 17mm spanners/wrenches, one on the
hexagon of the blanking cap or hose and the other on the adjacent hexagon immediately next to the valve body. Using just
one spanner/wrench on the blanking cap or hose may damage the valve body.
ambient pressure diving
p8
Initial Configuration
The OCB mouthpiece has been supplied with both Inhale (RB07/03) and Exhale (RB/07/04) convoluted hoses.
The hose length is set at the factory. These hoses are shorter than the standard front rebreather hoses as
the OCB is wider than the standard mouthpiece. However, if the hose length is too long as shown above, the
hoses will need to be cut to the correct length. To reduce the length of the convoluted hoses, follow the steps
below:
1. Remove the convoluted hose from the T piece.
a. Using the special tool (RBTOOL12), undo the locking rings and remove the split rings.
b. Pull the hose from the connector.
2. Cut the hose square, to the correct length using scissors.
3. Re-assemble in reverse order, ensuring the lips on the inside of the split rings hook over the flange on the connector fitting.
4. Test for leaks prior to diving.
Initial Configuration
OCB Instruction Manual
p9
The OCB mouthpiece has been supplied with a 1.5m Medium Pressure (7 to
14 bar) Hose (AP300/59), so it can be used to supply gas from a side-mounted
cylinder. For supply from an onboard cylinder the hose may have to be shortened
depending on the hose routing and whether you connect direct to the first stage or
to the manifold. Other lengths of pre-made hoses are available from APD.
The APD hose features the 3/8”UNF re-usable fitting, which allows the hose to be
easily shortened to the required length.
It is most likely that you will need to cut the hose to the correct length to suit your particular setup. It can be
reduced in length as follows:
1. Using 2 x 17mm spanners undo (anti-clockwise) the 3/8”UNF threaded end-fitting. Once removed, the hose
collar will unscrew from the hose (clockwise).
2. Take a SHARP stanley knife and cut the hose (with a square end) to the correct length.
3. Screw the hose collar anti-clockwise onto the fresh hose end.
4. Very lightly lubricate the stem of the end fitting using an appropriate grease (silicon grease for Normoxic
applications, O2 compatible grease for gases with an oxygen content greater than 40% O2). Whilst holding the
hose firmly into the hose collar, screw (using 17mm spanners/wrenches) the end fitting clockwise into the end
of the hose collar and keep going until the faces of the two metal parts meet.
5. Leak test before use.
ambient pressure diving
p10
•
•
•
•
•
•
Preparation and Setup 1
Careful consideration needs to be given to your intended use and purpose for this product as this will greatly
affect the setup and configuration.
a. Gas volumes available, particularly at depth, need to be considered and be adequate for the intended use.
b. Similarly, gas types must be considered and be adequate for the intended dive. e.g. Hypoxic gases fed
through a 2nd stage are very dangerous in the shallows allowing normal breathing right up until you lose
consciousness.
It is very easy to make a mistake in the setup, particularly when changing from a deep dive to a shallow dive
and vice versa as the setup may be different for each dive and you can easily introduce extra dangers if you
keep the same configuration.
Training and planning are essential and it is not within the scope of this user manual to offer advice as to the
best configuration for all dives but it is essential to ensure you have a respirable gas mixture available at all
depths AND ensure you breathe the appropriate gas at the appropriate depth. Failure to do so may result in
loss of life.
Risk analysis is an essential part of dive planning. By using this type of valve you have a single point failure
for both open circuit gas and closed circuit. It is recommended to include this fact in your risk analysis and
consider having an additional 2nd stage regulator on each cylinder intended for open circuit breathing.
Whether you choose to feed the gas from an offboard cylinder or onboard – the supply hose must be fitted
to a suitable 3/8” UNF threaded outlet, designated Low Pressure (LP) or Medium Pressure (MP). The supply
pressure must fall within the range 7 to 14 bar, nominally 9.5 bar. The valve is balanced and should need no
adjustment for the different pressures.
Warning! When in CC mode, the open circuit part of the valve is sealed, unlike a normal 2nd stage which is
always at ambient pressure. Therefore it is essential to ensure the gas is switched on for the entire dive. If you
leave it switched off you will catastrophically damage the diaphragm. Switching the gas on then off should also
be avoided as catastrophic damage will still occur to the diaphragm, it will just occur deeper than if you hadn’t
turned the gas on.
Preparation and Setup 2
•
•
•
•
•
•
OCB Instruction Manual
p11
It is recommended that you DO NOT fit an isolation valve, such as a flow-stop slide valve, between the 1st stage
and the OCB for three reasons:
1. If you do fit one and dive with it closed, the diaphragm will be catastrophically damaged as you descend.
2. When it is closed the OCB’s pressure relief valve (which normally operates at around 18 bar) cannot operate
in the event of a first stage “HP seat leak”.
3. If it is closed, you have turned a “one action to go to open circuit” into a two action procedure.
However, if you fit an isolation valve, such as a Flow-stop slider, ensure:
a You dive with it OPEN.
b You fit an additional pressure relief valve, such as the APD RB17, to the first stage.
c. You practice it’s operation often so you know for sure which way is open.
Ensure the blanking cap has been securely screwed into the opposite side of the dual valve from the medium
pressure hose. If this is not correctly located the OC demand valve will “free-flow”.
Warning! Check the medium pressure supply hose is connected onto the OCB before opening the cylinder
valve. If this is disconnected the flailing hose end can cause serious damage to eyes or objects nearby.
Check for leaks by immersing in water.
Make sure the OCB mouthpiece is in the OPEN circuit position then depress the purge button momentarily to
blow out any dust, debris or water which may have entered. Release the purge button and listen to ensure that
the OCB mouthpiece does not continue to flow air after the purge button is released. If it free-flows due to the
venturi, simply placing a finger over the mouthpiece opening should be sufficient to disrupt the venturi effect
and allow the valve to close, the same as any normal high performance 2nd stage.
ambient pressure diving
p12
Preparation and Setup 3
PRE-DIVE INSPECTION check list
It is essential to perform a complete pre-dive inspection of your OCB mouthpiece before every dive. NEVER
dive with any diving equipment that shows signs of damage, debris, loose connections or unsatisfactory
performance.
As this valve has 2 modes, OC and CC, both modes must be checked prior to diving as well as the switch-over.
1. Is it connected to the correct gas supply?
2. Is there sufficient gas volume and pressure?
3. Carefully inspect all hose fittings to ensure they are securely connected at both ends. Inspect along the
length of each hose to ensure that the hoses are not blistered, cut, or otherwise damaged.
4. Visually inspect the OCB for any signs of external damage or debris.
5. Visually inspect the mouthpiece bite for damage or cuts and ensure it is securely fastened to the OCB.
Preparation and Setup 4
OCB Instruction Manual p13
6. Check the rebreather non-return valves for back leaks. Located at each end of the
rotating inner are non-return valves which are keyed to prevent incorrect assembly.
If disassembled, take care when inserting the inhale (blue) non-return valve into
the left (inhale) side of the mouthpiece as the slot in the blue valve holder MUST
align with the ridge in the mouthpiece tube. If it is inserted out of line, the blue
holder can be damaged irreparably increasing the inhaled CO2. It is essential to
check the direction of gas flow and check the proper operation of the nonreturn valves prior to each dive. The valves can leak due to debris left over from
cleaning, due to faulty assembly, worn components or due to being frozen open (in
freezing conditions). This check can be easily carried out by disconnecting the hose
connectors from the T piece and gently blowing and sucking against the connectors.
The direction of gas flow for the Ambient Pressure Diving rebreathers is clockwise
when looking down on the unit. i.e. you exhale over your right shoulder. The correct flow direction is indicated by the arrow on the mouthpiece moulding when the arrow is on top. Therefore, when blowing into
the right hand side hose connector the non-return valve will close and it should open when air is sucked
from the connector. The non-return valve on the other end of the mouthpiece inner tube should close
when air is sucked from the left hand connector and open when air is blown into the connector. After
reassembling the hose to the unit check for correct operation by alternately squeezing the inhale and
exhale tubes as you inhale and exhale. Gas must come from the left and go out to the right. You must
not be able to inhale gas from the exhale tube and exhale gas into the inhale tube.
NOTE: If reverse gas flow is required, i.e. for fitting to another make of rebreather, the end of the white
keyway should be cut out of the bore so that it doesn’t interfere with the non-return valve holder.
ambient pressure diving
p14
Preparation and Setup 5
7. Ensure the blanking cap has been securely screwed into the opposite side of the dual valve from the medium
pressure hose. If this is not correctly located the OC demand valve will “free-flow”.
8. Check for a smooth and positive switching operation between OPEN and CLOSED modes.
9. Check the diaphragm and open circuit exhale valve for back leaks by blocking the MP inlet with your thumb and
inhaling. If the valve is in the open circuit position and you can draw air in, there is a problem with the OCB which
must be addressed before diving. If you block the gas supply by simply closing the supply valve you are likely to
draw air in passed the 1st stage to tank valve seal so it is unlikely that a proper negative pressure check can be
achieved.
10. In the CLOSED circuit position carry out a positive and negative pressure test of the breathing loop.
11. WARNING! Re-check the medium pressure supply hose is securely connected onto the OCB before opening the
cylinder valve. If this is disconnected or comes loose the flailing hose end can cause serious damage to
eyes or objects nearby.
12. Check to ensure that the submersible pressure gauge is displaying zero pressure. If the system is depressurised
and the gauge indicates a pressure, the gauge must be replaced before diving.
13. SLOWLY open the cylinder valve to pressurise the OCB mouthpiece. Continue to open the valve anti-clock-wise
until the valve is fully open. It is essential to dive with the supply valve open. By closing the supply valve the OC
portion of the OCB cannot equalise as you descend and the diaphragm will eventually implode. Also, you introduce the need for another action in the event of an emergency defeating the idea of the OCB from which you
can breathe open circuit gas by one simple action.
Preparation and Setup 6
OCB Instruction Manual p15
14. Check the submersible pressure gauge is displaying an accurate measurement of the air pressure inside the
cylinder (ON and OFF board).
15. Make sure the OCB mouthpiece is in the OPEN circuit position then depress the purge button momentarily to
blow out any dust, debris or water which may have entered the OCB mouthpiece. Release the purge button and
listen to ensure that the OCB mouthpiece does not continue to flow any air after the purge button is released. A
venturi induced free-flow may be stopped by simply placing a finger over the mouthpiece orifice. (if this occurs
underwater, for instance when you remove it from your mouth and allow the mouthpiece to point upwards simply
rotate the OCB so the mouthpiece is pointing downwards to stop the venturi, as you would with a normal second
stage).
16. Still in the Open Circuit position inhale slowly and deeply from the OCB mouthpiece several times. The OCB
mouthpiece must deliver enough air for you to breathe easily without noticeable resistance.
17. Is the gas turned on?
18. Ensure you can see the Head Up Display. The OCB is wider than the standard mouthpiece, so the HUD may
need to slide across in it’s holder towards the centre.
ambient pressure diving
p16
Diving With Nitrox
Your OCB mouthpiece has been prepared for use with 100% oxygen. This is possible because each OCB is
built to a high standard of cleanliness using oxygen compatible components and lubricants. In addition, each
OCB mouthpiece has passed stringent adiabatic compression testing to ensure its safety and compatibility
with increased percentages of oxygen.
If it is your intention to use your new OCB mouthpiece with oxygen content higher than 21%, it is imperative
that you maintain the internal cleanliness of the OCB mouthpiece and EN250, EN13949 certified First Stage.
If it is your intent to use the OCB mouthpiece interchangeably with breathing air, the breathing air should be
oxygen-compatible or “hyper filtered” with condensed hydrocarbons not exceeding 0.01 mg/m3. Standard
compressed breathing air, often referred to as Grade E, does not necessarily meet this criterion.
Warning! At all times remember the maximum / minimum operating depth and exposure time for the 02
content of the breathing gas you are using.
Warning! When using gases with a high Oxygen content take EXTRA care to open cylinder valves VERY
slowly.
Warning! If the OCB mouthpiece is ever used with an oil contaminated gas supply the complete valve will
need a complete overhaul and re-clean before being used with oxygen or oxygen enriched gases.
Cold Water Diving
OCB Instruction Manual
p17
The C.E.N. standards define cold water as 10°C or lower. In such conditions, particularly in fresh water,
which has a higher freezing point and more severe thermoclines, there is a risk of freeze-up resulting in free
flow and a rapid loss of gas.
It is possible for icing or freeze-up to occur in the mouthpiece, even though the OCB has been specially
designed for cold water use. The following measures will reduce the risk of freeze:
1.
2.
3.
4.
5.
6.
Request verification from your dive store that the air in your cylinder(s) is dry. It should have a dew
point below -54°C. Excess water vapour can freeze, causing a freeflow condition, or blocking the
flow of air entirely.
Protect your OCB mouthpiece from any contact with water until the moment that you are ready to
begin your dive.
Protect your equipment from cold temperatures before the dive. Keep your OCB mouthpiece in a
warm dry place.
Avoid breathing through the OCB mouthpiece or pressing the purge button in very cold air before
entering the water.
Avoid removing the OCB mouthpiece from your mouth during the dive. This will prevent cold water
from entering the OCB mouthpiece.
Try to avoid heavy exertion during the dive in order to minimise the volume of air flowing through the
OCB mouthpiece. Avoid discharges of air on the surface. Do not continually press the purge button.
ambient pressure diving
p18
Post Dive
It is important to provide the proper preventative maintenance in order to ensure the best possible
performance and maximum life of your OCB mouthpiece. The following maintenance procedures should be
performed routinely after each use to ensure that the OCB mouthpiece is cleaned, inspected, and prepared for
the next use or for storage:
1. As soon as possible after diving, the OCB mouthpiece should be rinsed thoroughly with fresh water while
it is attached to a cylinder and pressurised with air. If disconnected ensure water does not enter.
2. However, rinsing alone will not sufficiently clean the OCB mouthpiece. To clean the OCB mouthpiece as
thoroughly as possible, it is necessary to soak it in warm fresh tap water for at least one hour.
3. After rinsing be sure to check the Closed Circuit non-return valves are not back-leaking.
4. Wipe the OCB mouthpiece as dry as possible and hang in the OPEN mode to ensure all remaining
moisture drains from the mouthpiece.
5. Store the OCB mouthpiece in a clean, dry place. Do not store the OCB mouthpiece where it may be
exposed to: extreme heat, ozone (electric motor), chlorine or ultra violet rays.
6. Do not use any type of solvent or petroleum based substances to clean or lubricate any part of the OCB
mouthpiece. Do not expose any part to aerosol spray.
Maintenance Schedule
OCB Instruction Manual p19
To keep the OCB Mouthpiece running smoothly and efficiently it is imperative to thoroughly wash and dry
the unit after each dive as described on page 18. The OCB mouthpiece also requires periodic dis-assembly
and re-greasing of O rings 1,2 and 3, shown in the diagram below. The time-spans between dis-assembly
and re-greasing will vary depending on usage patterns. It is best to clean the components in fresh water and
re-grease the O rings whenever any excessive stiffness or stickiness is felt, when rotating between the two
modes.
Dis-Assembly and Re-Greasing Instructions:
1
3
1. Remove all hoses. The two convoluted hose nuts can be unscrewed once
2
the stainless steel locking screws have been removed.
2. Remove the location screw using a small screwdriver.
3. Withdraw the inner component from the outer, carefully.
4. Remove the 3 O rings and clean all components in fresh water.
5. Apply a smear of fresh Silicon Grease to the 3 O rings and re-assemble.
Applying excessive grease can cause problems, especially when diving in
cold water.
6. CAREFULLY re-insert the inner into the outer, taking care not to scratch the
bore or dislodge any of the O rings.
7. Align the groove in the inner component with the hole for the location screw and re-insert the location
screw into the outer, taking care with the O ring and ensuring you do not over-tighten.
8. Re-connect all hoses. Rotate the convoluted hose nuts so the stainless steel locking screws can go in
the same holes they came from.
ambient pressure diving
p20
Factory Service and Repair
Dealer Service & Repair
1.
2.
3.
4.
It cannot be assumed that any diving equipment is in good working order on the basis that it has
received little use since it was last serviced. Remember that prolonged or improper storage can still
result in internal corrosion and/or deterioration of O-ring seals.
We recommend you obtain factory prescribed service for your OCB mouthpiece at least once a year
from an authorised dealer, regardless of the amount of use it has received. Your OCB mouthpiece
may require this service more frequently, depending on the amount of use it receives and the
environmental conditions in which it is used.
If the OCB mouthpiece is used for rental or training purposes, it will require complete overhaul
and factory prescribed service every three to six months or 50 hours continual use. Chlorinated
swimming pool water is an especially damaging environment for diving equipment due to the high
levels of chlorine and pH balancing chemicals which cause certain components to rapidly deteriorate.
If water is allowed in the Medium Pressure gas inlet then more frequent servicing will be required.
We recommend obtaining service for your Open Circuit Bailout mouthpiece at least
once a year, from the factory or an authorised dealer. Your personal safety and the
mechanical integrity of your OCB mouthpiece may depend on it.
Factory Service and Repair
OCB Instruction Manual p21
Returning Your OCB mouthpiece for Service
Whenever your OCB mouthpiece requires annual service take it or send it, postage paid, to the factory or
an authorised Ambient Pressure Diving dealer. For help in finding a dealer in your area, please contact your
local distributor. Your distributor details can be found on our website www.apdiving.com or by contacting
the factory.
ambient pressure diving
p22
RB110 Main Assembly
17
15
6
9
16
5
14
12
13
10
18
1
2
11
3
8
4
15
7
19
OCB Instruction Manual p23
No
DWG_NO
DESCRIPTION
QTY
1
AP_300
Inflator Hose Assembly
1
2
RB_111
Dual Valve Assembly
1
3
RB_112
Front Cover Assembly
1
4
RB_114_1
Location Screw
1
5
RB_116
Inner
1
6
RB_02_04
One Way Valve Holder RH
1
7
RB_02_03
One Way Valve Holder LH
1
8
BS_010
O Ring
1
9
BS_029
One Way Holder Seal
2
10 BS_125
Mouthpiece Seal
1
11 BS_48x2_5
Inner / Outer Seal
2
12 RB_115
Main Outer
1
13 AP_21
Ty-Rap
1
14 AP_16
Mouthpiece
1
15 RB_02_05
One Way Valve
2
16 RB_116_1
Inner Lever
1
17 RB_07_03
Exhale Hose Assembly
1
18 SC_102
19 RB_07_04
Hose Collar Screw
Inhale Hose Assembly
2
1
Ordering Spares
Spares and service kits are
available directly from the
factory or your Ambient
Pressure Diving retailer
Tel (+44) 01326 563834
Fax (+44) 01326 565945
email: [email protected]
www.apdivingdirect.com
ambient pressure diving
p24
RB111 Dual Valve Assembly
No DWG No
DESCRIPTION
QTY
1
APV_100_23
Silicone Valve Seat
2
2
BS_2_6x1
O Ring
1
3
BS_010
O Ring
3
4
BS_14_5x2_5
O Ring
2
5
RB_111_1
Valve Body
1
6
RB_111_10
Plunger
1
7
RB_111_11
9/16" Blanking Plug
1
8
RB_111_12
Lever Foot Insert
1
9
RB_111_2
Counter Balance Piston
1
10 RB_111_3
Counter Balance Cylinder 1
11 RB_111_5
Dual Valve Spring
1
12 RB_111_6
Lever
1
13 RB_111_7
Valve Body End
1
14 RB_111_8
Valve Locking Nut
1
15 RB_111_9
Valve Seat Adjuster
2
1
3
13
4
10
12
11
2
9
8
5
15
14
6
7
RB112 Front Cover Assembly
No
DWG_No
DESCRIPTION
QTY
Diaphragm Lever Pad
1
2 RB_112_1
Locking Ring
1
3 RB_112_5
Diaphragm
1
4 RB_112_5_1
Exhaust Valve Insert
1
5 RB_112_3
Skid Disk
1
6 RB_112_4
Exhaust Diaphragm
1
7 RB_112_2
Rubber Cover
1
1 RB_112_6
OCB Instruction Manual p25
2
7
5
Ordering Spares
Spares and service kits are
available directly from the
factory or your Ambient
Pressure Diving retailer
6
4
3
Tel (+44) 01326 563834
Fax (+44) 01326 565945
email: [email protected]
www.apdivingdirect.com
1
ambient pressure diving
p26
Warranty Information
The OCB Mouthpiece is warranted for the first owner for 24 months from the date of purchase.
Conditions:
All warranty work must be authorised by Ambient Pressure Diving. Before returning the apparatus for any
reason, please contact the factory for advice. If it is deemed that a factory repair is required the product
should be returned, postage and insurance paid, with a copy of the purchase receipt, directly to the factory or
the Country distributor (see website www.apdiving.com).
1. This warranty does not apply to units subjected to misuse, abuse, neglect, modification, or
unauthorised service.
2. This warranty is not transferable.
3. This warranty does not cover normal wear. Factory prescribed service by an authorised dealer is
recommended at least once annually.
4. This warranty does not extend to damages caused by improper use, improper maintenance, neglect,
unauthorised repairs, modifications, accidents, fire, or casualty.
5. Cosmetic damage such as scratches, dents and nicks are not covered by this warranty.
6. This warranty does not extend to equipment used for rental, commercial or military purposes.
Your statutory rights are unaffected.
Warranty Information
OCB Instruction Manual p27
Applicable Law:
All products are strictly sold on the understanding that only English Law applies in cases of warranty claims
and product liability, regardless of where the equipment is purchased or where used. Should a claim be
made the venue for this will be Truro, England.
If this clause is not acceptable to you or your family then return the product unused to your place of purchase
for a refund.
WARNING: It is dangerous for untrained and uncertified persons to use the equipment covered
by this warranty. Therefore, use of this equipment by an untrained person renders any and all
warranties null and void.
ambient pressure diving
Ambient Pressure Diving Ltd.
Water-Ma-Trout Industrial Estate
Helston
Cornwall
UK
TR13 0LW
Telephone: +44 (0)1326 563 834
Fax: +44 (0)1326 565 945
e-mail: [email protected]
web: www.apdiving.com
Edition
1 (July 2008)
Patent Application No EPO7253967
US11/931105
Tested and Certified to EN 250:2000
EN 13949:2003
EN 14143:2003
EC Type Examination By;
SGS United Kingdom Ltd
Weston -Super-Mare
Somerset
BS22 6WA
Notified Body Number 0120