1
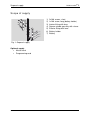
Assembly and operating instructions EDV-Nr. 298551 / 0 / d / 09.13 DOM Guardian S® DOM Guardian ® S Contents Contents SCOPE OF SUPPLY .................................................................................................. 2 PRODUCT DESCRIPTION ........................................................................................ 3 FOR YOUR SAFETY ................................................................................................. 4 IMPORTANT INFORMATION .................................................................................... 4 TOOLS ....................................................................................................................... 6 INSTALLATION ......................................................................................................... 7 COMMISSIONING .................................................................................................... 10 OPERATION ............................................................................................................ 11 Signalling and acknowledging aborts .................................................................................12 Opening .............................................................................................................................12 Setting the coupling time ...................................................................................................13 Creating key devices or programming tools .......................................................................14 Deleting key devices or programming tools .......................................................................15 Deleting all key devices or programming tools ...................................................................16 PROGRAMMING AND ADMINISTRATION USING SOFTWARE ........................... 17 MAINTENANCE ....................................................................................................... 18 Battery replacement...........................................................................................................19 STORAGE/CARE ..................................................................................................... 21 DISPOSAL ............................................................................................................... 21 TECHNICAL DETAILS ............................................................................................ 22 WARRANTY............................................................................................................. 23 1 Scope of supply DOM Guardian ® S Scope of supply 1) 2) 3) 4) 5) 6) 7) Fig. 1: Scope of supply Optional supply • Master card • Programming card 2 2x M6 screws, short 1x M6 screw, long (battery holder) Interior fitting with lever Square spindle, possibly with sleeve Exterior fitting with lever Battery holder Battery DOM Guardian ® S Product description Product description All DOM access control components, including the DOM Guardian® S, leave the factory in neutral condition. They are only initialised, i.e. assigned to a master card, shortly before installation. From this time on, programming changes can only be made to the installed unit via this master card, via a programming card authorised using this master card, or via DOM ELS software or ELSmobile software. Consequently, the holder of the master card is the sole person able to make allocations and assign rights. Alternatively, authorisations can be configured on the transponders (please refer to the user manual for DOM’s ELS software for details). With the new DOM Guardian® S, DOM Sicherheitstechnik has succeeded in including its complete range of electronic features in a single lock unit. The reader unit, functional parts, mechatronics and the battery holder are located in the exterior fitting. Locking authorisations are managed via the master card, using DOM ELS software (PC) or via DOM ELSmobile software on a laptop/netbook. 3 DOM Guardian ® S For your safety/Important information For your safety Please always comply with the instructions and safety information! Some of the sections in these assembly and operating instructions are highlighted by symbols. Please familiarise yourself thoroughly with these symbols and their meaning: Caution! This symbol indicates a possible hazard and/or refers to an action that may cause damage to the DOM Guardian S unit or other objects. Note! This symbol indicates information that is useful during assembly or operation. Important information Caution! Small children should not be allowed to play with key devices. There is a risk swallowing small parts. Caution! Equipment damage caused by incorrect storage. If the DOM Guardian® S is to be placed in storage for a protracted period of time before fitting, please store all of the components in their original packaging at room temperature and in dry, dust-free conditions (see also the section on storage/care). Caution! Damage caused by inexpert fitting and operation. Read these instructions fully and completely before proceeding to fit and commission the equipment. Follow the instructions step by step. The manufacturer accepts no liability for damage caused by inexpert fitting or operation. Caution! Damage due to improper use. Never throw or drop the DOM Guardian® S. Never use force when fitting. Caution! The DOM Guardian® S may not be operated in areas where there is an explosion hazard. Note! Incorrect installation of the DOM Guardian® S will prevent achievement of the intended locking function. 4 DOM Guardian ® S Zu Ihrer Sicherheit/Wichtige Hinweise Caution! Electronic components can be destroyed by electrostatic discharge (sparks or insulation breakdown). Therefore, before fitting or dismantling the electronic components, take steps to prevent the build-up of electrostatic charge, or touch a conductive, earthed object beforehand (e.g., a water pipe, radiator) in order to discharge any electrostatic electricity on your person to earth. Never touch the electronic components with your fingers. Caution! Always store the key devices in a safe place so that they may only be accessed by authorised persons. Caution! If a key device is lost or misplaced, it must be deleted or disabled immediately. Caution! The DOM Guardian® S may not be lubricated with oil or grease. Caution! The DOM Guardian® S must always be kept at a suitable distance from the master card in order to prevent unintentional initialisation. 5 Benötigte Werkzeuge Tools The following tools are required for correct installation: 10 mm drill bit Phillips screwdriver For attaching the fittings. 3 mm Allen key For attaching the lever. 6 DOM Guardian ® S DOM Guardian ® S Installation Installation Proceed according to the described sequence and take note of the instructions and illustrations. Caution! Damage caused by overtightening screw joints. Caution! Correct lock operation must be checked before installing the DOM Guardian® S. The lock must be securely attached in the final installation position. Caution! The DOM Guardian® S is suitable for use with doors of a thickness ranging between 39 mm and 118 mm where the distance from the lever to the lock cylinder lies between 75.5 mm and 113 mm (see Technical Details). Note! The interior lever and the exterior lever are different lengths. Proceed as described in the steps below: Note! When inserting the square spindle into the coupling module, an adapter sleeve may be required depending on the installation situation (lock variant): - 9 mm square spindle: no adapter sleeve required - 8 mm square spindle: 9 to 8 mm adapter sleeve in the coupling module - 10 mm square spindle: 9 to 10 sleeve in lock follower (retain to prevent sliding out of position) Fig. 2: Insert square spindle Note! Always verify the position of the grub screw for retaining the square spindle. The grub screw must be at the top (12 o'clock position) of the coupling module. 1. Insert the square spindle, possibly with an adapter sleeve, into the coupling module: When doing so, make sure that the eccentric drilling on the square spindle for the grub screw points towards the interior lever side! 2. Secure the square spindle using the grub screw (2 mm). 7 Installation DOM Guardian ® S Note! Always fit the DOM Guardian® S to a door when open in order to avoid locking yourself out. 3. Push the exterior fitting into the appropriately prepared door leaf. Fig. 3: Position exterior fitting 4. Push the interior fitting onto the door leaf and attach it with the upper screws (short). Fig. 4: Attach interior fitting 5. Connect the battery to the connecting wire: the DOM Guardian® S runs through a self-test routine. The indicator light flashes: Green: if the set time setting is correct. Red: if the time setting needs to be adjusted Fig. 5: Connect battery 8 Note! Power is now fed to the coupling module. This makes a clearly audible noise and is not indicative of a fault! DOM Guardian ® S Installation 6. Insert the battery into the battery holder. 7. Slide the battery holder into the hardware fitting and secure it against dropping out. Abb. 6: Insert battery holder 8. Insert the lower screw (long) and fasten the battery holder in place. Fig. 7: Fasten battery holder Note! For details of programming, refer to the chapter entitled Operation. Note! Keep the original packaging for use as protection if you need to store the DOM Guardian® S at any time. 9 Commissioning CommissioningDOM Guardian® Commissioning After installing the DOM Guardian® S according to the instructions, you can commission the unit. Caution! You need the master card in order to commission the DOM Guardian® S. The card is used to set allocation within the system. This is a one-off procedure, which is mandatory. Note! Always program the unit with the door open in order to avoid locking yourself out. Proceed as follows in order to initialise the DOM Guardian® S: Hold the master card directly in front of the reader module (approximately 1 cm). The green LED flashes three times; two short flashes and one long flash. The DOM Guardian S® has now been initialised. Note! Keep the master card in a secure location that may only be accessed by authorised persons. The master card has no key device function! Please contact your supplier if you lose the master card. The system will have to be reprogrammed, which is a complex and laborious task. 10 DOM Guardian ® S Operation Operation You can now use the master card to create programming cards, which you can use to create/configure key devices. Note! Neither the master card nor the programming card has a key device function! Master card The master card has the following functions: - Initialisation of the DOM Guardian® S; - Setting the coupling time; - Creating/configuring or deleting individual key devices and programming tools (programming card, software solutions); - Deleting all key devices and programming tools (programming card, software solutions) simultaneously. Programming card The programming card has the following functions: - Configuring or deleting individual key devices; - Deleting all key devices. Key device (key fob, Clip Tac, card, etc.) - Closing and opening. Continuously-open card or Tac The continuously-open card has the following functions: - Switching the electronics to the continuously-open position; - Resetting the electronics to the default settings; - Changing from the continuously-closed to the continuously-open position. Continuously-closed card or Tac - Switching the electronics to the continuously-closed position; - Resetting the electronics to the default settings; - Changing from the continuously-closed to the continuously-open position. 11 Operation DOM Guardian ® Signalling and acknowledging aborts In general, an abort occurs when one of the time windows that has been set in the different programming modes is overrun (removing or presenting the master card, a programming card or a key device). The red LED flashes twice to signal and acknowledge an abort of this type. Time window overrun Opening In order to open the door, you must hold an authorised key device in close proximity to the reading module. 12 S DOM Guardian ® S Operation Setting the coupling time Note! The coupling time is the period of time during which the DOM Guardian® S can be operated following presentation of an authorised transponder. The factory setting for the coupling time is 5 seconds. You only require the master card. Proceed as described in the steps below: 1. Hold the master card flat in close proximity to the reader module. Presentation is confirmed by two green flashes. 2. Now hold the master card in front of the reader module again while keeping it in the reader module’s reading field. The green LED flashes three times. Followed by the red LED, which flashes once a second. Each flash corresponds to 1 second for the coupling time setting. Hold the master card in front of the reader module for the period of time corresponding to the desired coupling time setting (maximum of 30 seconds). 3. Remove the master card as soon as the desired coupling time has elapsed. The green LED flashes twice in confirmation. The coupling time has been set. Set the coupling time: Hold in reading field Continue to hold in reading field ... . As soon as the desired coupling time has elapsed, remove the master card 13 Operation DOM Guardian ® Creating key devices or programming tools You need the master card or programming card and the key devices you want to create/configure. Note! You can create a maximum of five programming cards and 5 software solutions (PC software, ELS-Mobile). Once you have created a programming card, you can also use it to perform further programming operations. Proceed as described in the steps below: 4. Hold the master card or programming card flat in close proximity to the reader module: presentation is confirmed by two green flashes. 5. Next, present the programming tools or transponders that you want to create/configure: presentation of each programming tool or transponder is confirmed by three green flashes. The programming procedure ends after a pause of five seconds, or upon presentation of the master card or programming card. Create/configure programming tools: ... Wait for 5 seconds or Create/configure key devices: ... Wait for 5 seconds or 14 S DOM Guardian ® S Operation Deleting key devices or programming tools You need a master card or programming card and the (key) devices you want to create/configure. Proceed as described in the steps below: 6. Hold the master card or programming card flat in close proximity to the reader module on two successive occasions: presentation is confirmed on each occasion by two green flashes. 7. Next, present the programming tools or transponders that you want to delete one after the other: presentation of each programming tool or transponder is confirmed by three red flashes. The programming procedure ends after a pause of five seconds, or upon presentation of the master card or programming card. Delete programming tools: ... Wait for 5 seconds or Delete key devices: ... Wait for 5 seconds or 15 Operation DOM Guardian ® S Deleting all key devices or programming tools If you lose a key device, it can no longer be deleted individually (without DOM ELS software). In this situation, you must delete all key devices and recreate/reconfigure the key devices that are still available. You only require a programming card for this procedure. Note! If you use the master card instead of a programming card, all of the programming tools will also be deleted. Proceed as described in the steps below: 8. Hold the programming card flat in close proximity to the reader module on two successive occasions. presentation is confirmed on each occasion by two green flashes. 9. Hold the programming card flat in close proximity to the reader module for a third time: The red LED flashes twice in confirmation. All key devices or programming tools are deleted. Delete all key devices: Delete all key devices and programming tools: Note! You must now recreate/reconfigure the key devices that you want to re-authorise (see page 14). 16 DOM Guardian ® Programming and administration using software Programming and administration using software The DOM Guardian S® is equipped with an infrared interface. This interface can be used to exchange data with a PC/laptop. When using a PC/laptop, you will require a serial or USB infrared adapter, which is connected to the serial interface on the PC or laptop. If you have a DOM ELS software program at your disposal, it can be used to administer and program your DOM Guardian® S. You can administer both key devices and authorisation rights, and further functions which are only available via the software. These include: ♦ ♦ ♦ ♦ Programming Microsoft Office functions Viewing the event log Allocating time zones Deleting individual key devices that are no longer available Furthermore, using the software to administer more extensive systems offers greater convenience and simplicity compared to the master card. Note! The software manual describes how to program and administer the DOM Guardian® S using DOM ELS software. Note! Problem-free communication between a PC/laptop and the DOM Guardian® S is only guaranteed subject to use of the infrared adapter recommended by DOM. Information on this subject can be found in the software manual or obtained directly from DOM Sicherheitstechnik. The effective range of the infrared connection is limited to 1 metre. Note! The infrared connection may be adversely affected by artificial lighting (e.g. fluorescent tubes). Note! Correct operation of the infrared connection may be adversely affected by dirt on the infrared module and/or the reading module. 17 Maintenance DOM Guardian ® S Maintenance The DOM Guardian S® is a zero-maintenance product. The energy supply for the DOM Guardian® S is provided by a 3 volt lithium battery. The battery only needs to be changed when the battery-low warning signal appears. The DOM Guardian S® is equipped with a three-stage warning system. Note! When warning stages 1 and 2 are active, at least 100 opening operations are still possible. When warning stage 3 is active, opening is only possible using a master card or programming card. Warning stage 1: The red and green LEDs flash alternately before signalling an authorised or unauthorised transponder and, if appropriate, before coupling takes place. ... Coupling takes place after this. Warning stage 2: The authorised transponder must be presented twice. The battery-low warning signal is displayed (immediately) after the first presentation. ... Coupling takes place after this. Warning stage 3: Opening is only possible using a master card or programming card! ... The battery-low warning signal is displayed (once) after the card has been recognised. Coupling takes place after this. 18 DOM Guardian ® S Maintenance/Changing the battery Battery replacement Proceed as follows in order to replace the battery: Caution! Electronic components can be destroyed by electrostatic discharge (sparks or insulation breakdown). Therefore, before fitting or dismantling electronic components, take steps to prevent the build-up of electrostatic charge, or touch a conductive, earthed object beforehand (e.g., a water pipe, radiator) in order to discharge any electrostatic electricity on your person to earth. Note! Only use the 3 volt lithium batteries supplied by DOM Sicherheitstechnik, which come with a pre-fitted connection cable. 10.Loosen the bottom screw and unscrew it until it protrudes approximately 15 mm: You can remove the battery holder now. Fig. 8: Remove battery holder 19 Maintenance/Changing the battery DOM Guardian ® S 11. Remove the old battery from the battery holder. 12. Carefully undo the connection cable. 13. Dispose of the battery according to regulations. 14. Connect the new battery to the connecting wire: The DOM Guardian® S runs through a self-test routine. The indicator light flashes: Fig. 9: Change battery Green: if the set time setting is correct. Red: if the time setting needs to be adjusted Note! Power is now fed to the coupling module. This makes a clearly audible noise and is not indicative of a fault! 15. Insert the new battery into the battery holder. 16.Slide the battery holder into place and secure it against dropping out. 17.Insert the lower screw and fasten the battery holder in place. Fig. 10: Secure battery holder 20 DOM Guardian ® S Lagerung/Pflege/Entsorgung Storage/care If the DOM Guardian® S is to be placed in storage for a protracted period of time before fitting or after use, all of the components should be stored in their original packaging at room temperature and in dry, dust-free conditions. Caution! Damage caused by the use of aggressive cleaning agents. Do not use aggressive cleaning agents, graphite or oil. You may only clean the housing and key devices with a damp, soft leather cloth without using a cleaning agent. Disposal Please note that the DOM Guardian® S contains electronic components which must be disposed of in a special manner. When disposing of the product, make sure you comply with all the environmental regulations that apply in your province/country. You can send the components of your DOM Guardian® S back to the manufacturer in the original packaging. 21 Technische Date DOM Guardian Technical Details Note! Up-to-date technical data sheets are available on the website of DOM Sicherheitstechnik GmbH. 22 ® S DOM Guardian ® S Gewährleistung Warranty The customer's right to replacement or repair of defects under warranty expires twelve months after delivery of the product to the customer. The statutory periods of prescription apply in the case of damage compensation claims lodged by the purchaser for reasons other than product faults and to the purchaser's rights with regard to faults that have been wilfully concealed or caused intentionally. The periods of prescription stipulated in article 479 of the German Civil Code (BGB) remain applicable notwithstanding. 23 Addresses DOM Guardian ® If you have any questions about the information presented in these assembly and operating instructions, please contact the DOM subsidiary/agent in your country. DOM Sicherheitstechnik GmbH & Co. KG PO Box 1129 D-50301 Brühl/Köln, Germany Tel. (0049)2232/704-0 Fax (0049)2232/704375 www.dom-sicherheitstechnik.com [email protected] DOM Nederland Tiber 32-34 2491 DH The Hague, Netherlands Tel. +31(0)70 – 3193006 Fax +31(0)70 – 3996903 www.dom-nederland.nl [email protected] Published by DOM Sicherheitstechnik GmbH & Co. KG, 50301 Brühl, Germany This documentation may not be reproduced, stored in a retrieval system, transferred in any form whatsoever or by means of any kind of medium, scanned or translated, in full or in part, without first obtaining written possession from DOM Sicherheitstechnik GmbH & Co. KG. Important Information This documentation is updated regularly. The publisher always welcomes reports of possible errors, or suggestions regarding this documentation. © DOM Sicherheitstechnik GmbH & Co. KG, 50301 Brühl, Germany 24