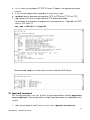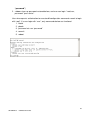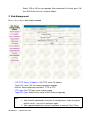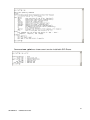
1
SIP-Phone
User Manual
Chapter 1 Overview of the SIP-Phone________________________________________________ 4
1. Hardware Overview ________________________________________________________ 5
1.Front View and Keypad function __________________________________________ 5
2.Back View ____________________________________________________________ 9
3.Specification of connector _______________________________________________ 9
2. Software Features and Specification __________________________________________ 11
3. Physical specification & Environment_________________________________________ 13
Chapter 2 Configuring the SIP-Phone through LCD Phone menus_________________________
1. Initialize SIP-Phone _______________________________________________________
2. LCD Menu Configuration __________________________________________________
Chapter 3 Configuring the SIP-Phone through Web Pages _______________________________
14
14
16
22
Step 1. Browse the IP Address predefined via Keypad ______________________________ 23
Step 2. Input the login name and password _______________________________________ 24
Step 3. Enter the web interface main screen ______________________________________ 25
Step 4. Start to configure _____________________________________________________ 25
1. Network Interface ____________________________________________________ 26
2. SIP Information ______________________________________________________ 29
3. System Configuration _________________________________________________
4. PPPoE Configure _____________________________________________________
6. Phone Book _________________________________________________________
7.Prefix Configuration ___________________________________________________
31
32
34
35
8. DDNS Configuration __________________________________________________
9. DSCP Configuration __________________________________________________
10. Password __________________________________________________________
11. Rom Configuration___________________________________________________
36
37
39
40
12. Flash Clean_________________________________________________________
13. Reboot System ______________________________________________________
Chapter 4 Configuring the SIP-Phone through Telnet command lines ______________________
1. [help] command __________________________________________________________
2. [quit] command __________________________________________________________
3. [debug] command ________________________________________________________
41
42
43
43
44
44
4. [reboot] command ________________________________________________________ 44
5. [pbook] command ________________________________________________________ 44
6. [commit] command _______________________________________________________ 45
7. [ping] command __________________________________________________________
8. [time] command __________________________________________________________
9. [ifaddr] command_________________________________________________________
10. [pppoe] command _______________________________________________________
46
46
46
48
1
SIP SIP-Phone
Administration Guide
11. [flash] command_________________________________________________________ 48
12. [sysconf] command ______________________________________________________
13. [sip] command __________________________________________________________
14. [security] command ______________________________________________________
15. [voice] command ________________________________________________________
49
50
51
52
16. [tos] command __________________________________________________________
17. [ddns] command_________________________________________________________
18. [vlan] command _________________________________________________________
19. [bureau] command _______________________________________________________
53
55
56
57
20. [prefix] command________________________________________________________
21. [rom] command _________________________________________________________
22. [passwd] command ______________________________________________________
Chapter 5 Upgrading Software on the SIP-Phone ______________________________________
58
58
59
61
1.From LCD Phone Menu ____________________________________________________ 61
2. Web Management_________________________________________________________ 62
3. Remote Control: Telnet ____________________________________________________ 63
2
SIP SIP-Phone
Administration Guide
Revision History
Version
Date
Author
Software Version
Note
LP_SIP_100
2004/03
Sabrina
For test version
only.
First released for software
test version.
LP_SIP_100a
2004/04/07
Sabrina
LP_SIP_101
2004/12/1
Sabrina
lp101/201sip.100 For first formal released
software.
lp201sip.101
Modify:
1. Forward function
2. Call list function
3. LCD menu firmware
upgrading section.
4. Add DDNS function
5. Add VLAN function
LP_SIP_102
2005/3/10
Sabrina
lp201sip.102
Modify:
1.
2.
3.
4.
LP_SIP_103
2005/12/28
Jason
lp201sip.104
PPPoE Echo
EMS
SIP-Info DTMF
2 level access
Modify:
1.
2.
3.
4.
LCD interface can
upgrade new firmware
successfully.
When LP201 is under
P2P mode, it can show
SIP listen port.
Add secondary proxy.
Delete Session Expire
function.
3
SIP SIP-Phone
Administration Guide
Chapter 1 Overview of the SIP-Phone
SIP-Phone is a full-featured IP-based telephone set via Ethernet base communication. Over
the office LAN connection, it provides IP-PBX solution such as station-to-station call, IP call
and local PSTN/PBX Extension call via PSTN Gateway.
SIP-Phone provides two 10/100BaseT switch/hub RJ-45 ports allow connecting to office
LAN and PC simultaneously. It is compatible with ADSL or Cable Modem provided by ITSP,
ISP or Carrier Company to provide VoIP services to residential and SOHO application.
SIP-Phone is also an integrated Analog Phone provides IP call or PSTN call selection.
When external power is down, it can be a Plain Old Telephone set (POTs).
It provides internal high-quality speakerphone, programmable keys and feature buttons.
SIP-Phone also embedded with a dot matrix of two lines 24 characters LCD, which can
display date and time, calling party name, calling party number, and digits dialed and etc.
4
SIP SIP-Phone
Administration Guide
1. Hardware Overview
1.Front View and Keypad function
♦
♦
LCD: 2 lines, 24 character Dot Matrix display.
C: Jump out current LCD menu.
♦
♦
♦
: Move to previous selection or clear previous data.
: Move to right or next selection.
OK: Press OK to confirm the modification.
♦
Direct Line (DL) Button 1 – 10: User press DL button after off-hook to do speed dial
according to phone book data from 1-10 (please refer to LCD configuration-3.Phone
Book; Advanced Configurations via Telnet- 10.[pbook] command, or Web
Configuration-Phone Book chapter.
5
SIP SIP-Phone
Administration Guide
♦
Number 1 –10, * and #: The function is the same as the general phone set.
Corresponding list of keypad and symbol:
(1) Character mode:
1
“1”
2
“A” ; “ B” ; “C” ; “2”
3
“D” ; “E” ; “F” ; “3”
4
“G” ; “H” ; “I” ; “4”
5
“J” ; “K” ; “L” ; “5”
6
“M” ; “N” ; “O” ; “6”
7
“P” ; “Q” ; “R” ; “S” ; “7”
8
“T” ; “U” ; “V” ; “8”
9
“W” ; “X” ; “Y” ; “Z” ; “9”
*
“.” ; “@” ; “_” ; ”-“ ; “,” ; “!” ; “?” ; “*” ; “’” ; “+” ; “$” ; “*”
0
“Space” ; “0”
#
“#”
(2) Digit mode:
1
“1”
2
“2”
3
“3”
4
“4”
5
“5”
6
“6”
7
“7”
8
“8”
9
“9”
*
“.”
0
“0”
#
♦
MUTE: Mute the voice of MIC and let others can’t hear from user in communication.
♦
PSTN: Press PSTN to switch SIP-Phone as PSTN or IP Phone Mode. In PSTN mode,
“PSTN” characters will be displayed on LCD left bottom side, then users can dial out as
if standard telephone set in PSTN; in IP Phone mode, “PROXY ” characters will be
displayed on LCD left bottom side.
Note:
6
SIP SIP-Phone
Administration Guide
1. When SIP-Phone is in PSTN mode, only PSTN and SPEAKER function key can work.
2. On LCD will display ”…Incoming Call... ” to inform user when SIP-Phone has both IP and
PSTN side incoming calls.
3. If in communication with IP side, user can press HOLD to hold IP side, then press PSTN
to pick up PSTN side, after that can press HOLD again to retrieve IP side.
4. If in communication with PSTN side, user must hang up PSTN side before pick up IP
side.
♦
♦
HOLD: To hold a call, after press HOLD button, both sides will hear hold tone.
SPEED:
1. Press SPEED and number (Phone book index) after off-hook can do speed dial
according to phone book data (please refer to 3.LCD configuration-6. Phone Book
or Advanced Configurations via 4.Telnet- 10. [pbook] command).
2. Switch input mode between character mode or digit mode, e.g., when user wants to
input phone number can press SPEED to switch input mode as digit mode; when
user wants to input name can also press SPEED to switch input mode as character
mode.
♦
FORWARD: Forward an incoming call to another IP device. (Please refer to LCD
configuration-Forward Type)
♦
MESSAGE and its indicated LED light: When having missed incoming calls, the
MESSAGE LED will be flashing. User can check the information of missed calls by
pressing the MESSAGE button.
♦
TRANSFER:
1. Transfer a call to the third site. When A and B are in communication, A wants to
transfer this call to C, A can press TRANSFER button, now B will hear hold tone,
and A will hear dial tone, then A can press phone number of C, after C picks up, A
can talk with C, after A hangs up, B and C can be connected.
Note:
1. A cannot press phone number of C before hearing dial tone.
2. If A press TRANSFER and number, press TRANSFER again can cancel
transferring and retrieve call with B.
3. If A press TRANSFER and number of C, C is ringing, press TRANSFER
again C will return to standby mode and A can retrieve call with B.
4. Before C picks up, A cannot hangs up the phone.
2. Change characters to be capital or lowercase: when pressing TRANSFER before
7
SIP SIP-Phone
Administration Guide
press letters can switch input type of letters.
♦
♦
REDIAL: Redial the last outgoing call.
+ And -: Adjust the voice volume heard of communication.
♦
SPEAKER: Hand free mode. User can talk without picking up handset.
Note:
1. All function keys mentioned above (except dialing keypad) are effective only in IP
Phone mode.
2. When SIP Phone fail to register to Proxy server under Proxy mode, when user
wants to dial out, SIP Phone will play busy tone, and on LCD will display
“Register Failed.”
8
SIP SIP-Phone
Administration Guide
2.Back View
♦
♦
DC 9V: DC 9V power input outlet
LAN: RJ-45 connector, connected directly to the Hub through the straight CAT-5
cable.
♦
♦
PC: RJ-45 connector, connected directly to the PC through the straight CAT-5 cable
Line: RJ-11 connector, connected directly to the PSTN analog line.
Note:
There are two LED indicated lights: LINK/ACT and 10/100 for LAN port and PC port.
When network status is regular, LED of LINK/ACT will light on; when SIP-Phone is
transmitting or receiving data, LED will be flashing; when transmit rate is in 10 mbps or
100mbps, LED of 10/100 will light off or light on.
3.Specification of connector
1、 Ethernet Port:
Ethernet port is for connecting SIP-Phone to network, transmit rate supports 10/100
Base-T.
Ethernet connector(LAN)
2、 RJ-11connector:
9
SIP SIP-Phone
Administration Guide
RJ-11 connector is for connecting SIP-Phone with PSTN.
RJ11connector
10
SIP SIP-Phone
Administration Guide
2. Software Features and Specification
Application:
ISP/ITSP (Internet Telephony Service Provider)
IP-PBX with office telephony services
Multi-nation enterprise communication
SOHO Telephony
Calling Features
Call Hold
Call Transfer
Call Forward
10 sets last number Redial
Ten configurable speed dials
Network Supported
Fixed IP
Dynamic Host Configuration Protocol (DHCP)
PPPoE connection (When PPPoE disconnect, SIP-Phone can automatically
re-connect)
Behind NAT IP Sharing Device
Support QOS by setting DSCP (Differentiated Service Code Point) parameters of VoIP
packet
Support 802.1p1q (VLAN)
Audio Features
G.711 a/µ-Law, G.723.1, G.729, G.729a
VAD, CNG
G.165/G.168 compliant echo cancellation
Programmable Dynamic Jitter Buffer
Bad Frame Interpolation
Gain/Attenuation Settings
11
SIP SIP-Phone
Administration Guide
Provisioning and Configuration
SIP (RFC3261) compliance
LCD configuration password protection
Provide Proxy Mode or Peer-to-Peer Mode (Non Proxy Server needed) selection
Ring tone, Speaker and Handset volume adjustable
Dial path selection (PSTN or IP mode)
Support DNS server inquiry
Management Features:
Software Upgrade: TFTP/FTP download
Three easy ways for system configuration
-
LCD Front Panel
Web Browser
TELNET
Certification
CE, 3C
12
SIP SIP-Phone
Administration Guide
3. Physical specification & Environment
Dimension:
215mm(W) x 71mm(H) x 198mm(D)
Weight:
834 grams (unit)
Power Supply:
DC 9V output adaptor, AC 120Vac input
Operation Environment:
Humidity: 10 to 90 % (Non-condensing)
Operational Temperature: 0 to +40 °C
Storage Environment:
Humidity: 10 to 90 % (Non-condensing)
Storage Temperature: -10 to +50 °C
Analog Specification:
2 wires (RJ-11) *1 (Voltage: -48V)
AC Impedance 600Ω
13
SIP SIP-Phone
Administration Guide
Chapter 2 Configuring the SIP-Phone through LCD Phone
menus
Note:
1. After any configuration is made for the SIP-Phone, user has to do Reboot in the
selection 7 “Reboot”.
2. We suggest user to set IP address via LCD menu 5→
→2.3.4.5 first, then go to
chapter 3 to do other detail configurations via web browser.
1. Initialize SIP-Phone
1. When power on the SIP-Phone, the LCD screen shows as below. Now SIP-Phone is
running Boot sector program.
IP-Phone
Board Start Booting
2. When SIP-Phone finishes boot program initialization. User can see flashing greeting
as below:
System Initializing…………..
3. Then SIP-Phone get into standby mode:
Proxy
SIP-Phone
10:10:10 AM
The main LCD screen would be shown as similar as above. “Proxy” means the
SIP-Phone is in Proxy Mode, and when SIP-Phone is connected to SNTP server, on
LCD will show current time captured from SNTP server.
4. When SIP-Phone is under peer-to-peer mode, on LCD will show “P2P” instead of
“Proxy”.
P2P
SIP-Phone
10:10:10 AM
5. After pressing the PSTN button, the “Proxy” or “P2P” will be replaced by “PSTN”.
14
SIP SIP-Phone
Administration Guide
Please notice that user must plug PSTN line in RJ-11 port when SIP-Phone is in
PSTN mode. SIP Phone will always stay in IP mode, after a PSTN call is finished,
SIP Phone will automatically return to IP mode..
PSTN
IP-Phone
10:10:10 AM
6. Press or to enter configuration mode then press OK button to enter sub menus;
press C can jump out current menu to previous level.
1.
Call List
2.
3.
4.
Forward Type
Phone Book
Ringer Settings
5.
6.
7.
Network
Advanced Settings (protected by password)
Reboot
15
SIP SIP-Phone
Administration Guide
2. LCD Menu Configuration
User can set the following configurations by LCD keypad.
Note:
1. Press TRANSFER before input data can switch characters to be capital or
lowercase.
2. Press SPEED before input data can switch input mode as character mode or
digit mode; for example, user wants to enter IP address, after pressing SPEED
can enter digits directly.
3. When user is inputting data, press C will jump out to menu list, press will
clear previous input data.
1. Call List
If there is an unanswered IP call, it will be kept in message box. MESSAGE LED will
be flashing until user press MESSAGE to check miss call and re-press MESSAGE
to return to main screen.
(1) Missed Calls:
:to see all missed calls in message box.
(2) Received Calls:
:to see all received calls in message box.
(3) Dialed Numbers: to see all dialed calls in message box.
2. Forward Type
There are 3 selections in Forward type, user must select under which condition to
forward calls.
(1) Busy
When SIP-Phone is in busy status, the incoming call will be
forwarded to the assigned phone number.
A. Activate
Enter a forwarded phone number to activate busy forward function.
B. Deactivate
Deactivate Busy Forward function.
(2) No Response
When SIP-Phone hasn’t been picked up for around 10 seconds, the
incoming call will be forwarded to the assigned phone number.
A. Activate
Enter a forwarded phone number to activate no response forward
function.
B. Deactivate
16
SIP SIP-Phone
Administration Guide
Deactivate No Response Forward function.
(3) Unconditional
It is included the above two types. Whether the SIP-Phone is in
which status, calls will be automatically forwarded to the assigned
phone number.
A. Activate
Enter a forwarded phone number to activate Unconditional Forward
function.
B. Deactivate
Deactivate Unconditional Forward function.
3. Phone Book
1. List
List all records of name, telephone number, and IP address in the phone
address book.
2.
Edit/Delete
Edit or delete a record of name, telephone number, and IP address of the
phone address book.
3.
New
Add a new record of name, telephone number, and IP address of the phone
address book.
4. Ringer Settings
1. Volume
User can adjust ring volume by press or on the keypad to decrease or
increase ringer volume.
2.
Style
There are three tone styles for SIP-Phone. Move the “>” symbol by press or on the keypad to select the tone style preferred, then press OK to
confirm it.
5. Network
1. Information
17
SIP SIP-Phone
Administration Guide
User can press or to check current network status:
(1) Mode: Display current network connection mode of SIP-Phone to be
Static (Fixed IP), DHCP, or PPPoE.
Note:
When SIP-Phone is under DHCP mode, then change to Static mode,
the following items: IP address, Subnet Mask, Default Gateway, will
display empty, after reboot, user can see information again.
(2) IP, Mask, Gateway: display current IP information.
2.
Network Mode
Set network mode of SIP-Phone to be Static (Fixed IP), DHCP, or PPPoE.
3.
IP address
Set IP address of SIP-Phone.
4.
Subnet Mask:
Set subnet mask address of SIP-Phone.
5.
Default Gateway
Set default gateway address of SIP-Phone.
6.
Domain Name Server
Set IP address of Domain Name Server. Once SIP-Phone can connect to
DNS server, user can set URL address for Proxy server or Phone book
instead of IP address.
7.
PPPoE Configuration
(1) User Name
Set PPPoE connection authentication user name.
(2) Password
Set PPPoE connection authentication password.
(3) Auto Re-connect
Choose ON or OFF to enable or disable this function. If user enables this
function, after PPPoE disconnected, SIP-Phone will automatically reboot
to re-connect, and after reboot, if SIP-Phone still can’t connect with server,
SIP-Phone will keep trying to connect. On the other hand, if user disables
this function, SIP-Phone won’t reboot and keep trying to connect.
8.
SNTP Configuration
(1) SNTP Mode:
User can set SNTP function to be on or off, which means SIP-Phone will
18
SIP SIP-Phone
Administration Guide
capture current time from SNTP server or not.
(2) SNTP Server:
User can specify a SNTP server for SIP-Phone to capture current time.
(3) Time Zone:
User can set time zone via pressing or according to the location
SIP-Phone is. For example, in Taiwan the time zone should be set as
GMT+8:00.
9.
Behind IP-Sharing
(1) If SIP-Phone is behind IP sharing or NAT device, on IP sharing must
enable “DMZ” function or set “Virtual Server” to open ports (UDP port:
5060 and 16384).
(2) User must enter public IP address of IP sharing.
6. Advanced Settings (protected by password)
Please Enter Password:
User must key in password to enter this menu, selections under this
command are all important ones, which can only be configured by advanced
users.
Note:
1. Default Password is empty, user can enter this sub-menu directly, once
password has been set in 3.LCD Menu password, user must input
password before enter this sub-menu.
2. If user forget password, please contact with the distributor, we will
generate a specific password according to your MAC address of
SIP-Phone.
3. User can also try to configure SIP-Phone via Telnet or Web browser with
default IP address: 10.1.1.3. (This only works when default IP address
hasn’t been changed.)
1.
SIP Settings
(1) Connect Mode
Select SIP connection mode to be peer-to-peer mode or Proxy mode.
(2) Proxy
A. Proxy
Set Proxy IP address or Domain Name.
B. Outbound proxy
19
SIP SIP-Phone
Administration Guide
Set Outbound Proxy IP address or Domain Name.
C. Proxy port
Set Proxy port for SIP-Phone to send messages.
D. Expire (in seconds)
Set expire time of registration, in the duration of 2/3 expire time,
SIP-Phone will re-register to Proxy Server again.
(3) User Info
A. User Name
Set User Name of SIP-Phone to register to Proxy Server. If Proxy
server doesn’t request specific User name, please enter Line
number here.
B. Line Number
Set Line Number of SIP-Phone to register to Proxy Server.
C. Password
Set User Password of SIP-Phone to register to Proxy Server.
This configuration is not necessary, if Proxy server doesn’t
request client to set password, user only has to set User Name
the same as Line Number.
2.
Firmware Update
(1) Download method
There are two methods to download new version file, please move the
“>“ symbol by press or on the keypad to select TFTP or FTP
method, then press OK to confirm it.
(2) FTP/TFTP Sever
User has to offer one TFTP/FTP server IP Address and set this IP
Address via keypad. The IP Address is necessary for upgrading
SIP-Phone new application rom file.
(3) FTP Account
User has to input user name for FTP server login .It is necessary for
upgrading SIP-Phone new application rom file via FTP method.
(4) FTP Password
User has to input password for FTP server login .It is necessary for
upgrading SIP-Phone new application rom file via FTP method.
(5) File Name
User has to press the file name of new application rom file prepared for
upgrading
(6) Application Version
Show current version of application.
20
SIP SIP-Phone
Administration Guide
(7) Start to Upgrade
Select YES or NO to start upgrade.
Note:
Download via LCD command can only upgrade new application rom file.
4.
LCD Menu Password
Set entry password of phone LCD menu.
7. Reboot
Reboot machine. It is necessary and important for user to reboot SIP-Phone
after any configurations has been made. SIP-Phone will ask user again before
reboot.
21
SIP SIP-Phone
Administration Guide
Chapter 3 Configuring the SIP-Phone through Web Pages
The HTTPD web management interface provides user an easier way to configure rather
than command line method through TELNET.
The configuration function and steps are similar with the way through command line. Please
refer to the chapter 4-Configuring the SIP-Phone through Telnet command lines for more
detail information. Below is a guide for user to configure via web interface.
22
SIP SIP-Phone
Administration Guide
Step 1. Browse the IP Address predefined via Keypad
Please enter IP address (user have to set via LCD menu first) of SIP-Phone in web browser.
If user failed to set IP address via LCD menu, the default IP address of SIP-Phone is
10.1.1.3, user can try to connect to SIP-Phone via this default IP via web interface.
23
SIP SIP-Phone
Administration Guide
Step 2. Input the login name and password
Login name: root / user
Note:
Login with “user” only has authority as below:
1. Modify network configuration
2. Modify Phone Book
3. Change login password of “user”
4. Reboot
Password (The same with TELNET): Null (just press confirm, no need to key in
password in default value)
Note: User can set password later in 8.PASSWORD via web interface.
24
SIP SIP-Phone
Administration Guide
Step 3. Enter the web interface main screen
After enter login name and password, user can see web interface main screen as below.
Step 4. Start to configure
Most important items are Network Interface, SIP Information, and Phone Book (in
Peer-to-Peer mode). Please remember to configure these commands before start to work
with SIP-Phone.
Note:
After change any settings, please remember to reboot (in Reboot System) SIP-Phone so
that changes can take effect.
25
SIP SIP-Phone
Administration Guide
1. Network Interface
Please refer to chapter 4.9 [ifaddr] command.
-
IP Address: Set IP Address of SIP-Phone
Subnet Mask: Set the Subnet Mask of SIP-Phone
Default routing gateway: Set Default routing gateway of SIP-Phone
Get IP Mode: User has to set SIP-Phone to use which network mode.
1. Fixed IP: User has to assign a fixed IP to SIP-Phone.
2. DHCP: When DHCP function enables, SIP-Phone will automatically search
DHCP server after reboot.
3. PPPoE: If SIP-Phone is working with PPPoE connection, user have to set
related parameters in “PPPoE Configure “page.
Note:
If User set “Get IP mode” as DHCP or PPPoE, IP address, Subnet Mask, and
Default routing gateway will become 0.0.0.0 and not allow to be configured.
26
SIP SIP-Phone
Administration Guide
27
SIP SIP-Phone
Administration Guide
-
-
-
-
SNTP: Enable / Disable the Simple Network Time Protocol function
SNTP Server Address: Set SNTP Server Address
When SNTP server is available, enable SIP-Phone SNTP function to point to SNTP
server IP address so that SIP-Phone can get correct current time.
GMT: Set time zone for SNTP Server time
User can set different time zone according to the location of SIP-Phone. For
example, in Taiwan the time zone should be set as 8,which means GMT+8.
IP Sharing: Enable it if SIP-Phone is behind IP Sharing router.
UPnP: Enable it if IP sharing or NAT device supports UPnP function so that no need
to configure IP sharing or SIP-Phone when SIP-Phone is behind NAT device.
IP Sharing Server Address: Set Public IP Address of IP Sharing router for
SIP-Phone to work behind IP sharing.
Primary DNS Server: Set Primary Domain Name Server IP address.
User can set Domain Name Server IP address. Once SIP-Phone can connect with
DNS server, user can specify URL address instead of IP address for Proxy and
phone book IP address.
Secondary DNS Server: Set Secondary Domain Name Server IP address.
28
SIP SIP-Phone
Administration Guide
2. SIP Information
Please refer to chapter 4.13 [SIP] command
-
Run Mode: Select SIP-Phone to work under Peer-to-Peer mode or Proxy mode.
Primary Proxy IP Address: Set Primary Proxy IP Address or URL address (Domain
Name Server must be configured. Please refer to Network Interface).
Proxy port: Set Proxy port for SIP-Phone to send message, default value is 5060, if
there is no special request of Proxy server, please don’t change this value.
Secondary Proxy IP Address: Set secondary proxy IP Address or URL address
(Domain Name Server must be configured. Please refer to Network Interface).
When LP201 fail to register to primary proxy. It will try to register to secondary Proxy,
when it fail again, it will retry to register to primary Proxy.
-
Secondary Proxy port: Set the secondary proxy port for every SIP massage, default
29
SIP SIP-Phone
Administration Guide
-
value is 5060.
Outbound Proxy: Set IP Address or URL address (Domain Name Server must be
-
configured. Please refer to Network Configure) of outbound Proxy server.
Outbount Proxy port: Set outbound proxy port for LP201to send message, default
value is 5060, if there is no special request of proxy server, please don’t change this
value .
Phone Book Search: enable/disable phone book search function. If user enabled
-
this function, SIP-Phone will search dialed number in phone book to see if there is
any matched table before send to Proxy server, and if there is a matched data in
phone book, SIP-Phone will make call to related IP address.
Prefix String: set prefix string. If user ID contains alphabets, user can set it as prefix
-
string here. For example, if Account Name is 123, SIP-Phone will sent out
messages as Account Name @”IP address of Proxy”, if user set prefix as abc,
SIP-Phone will set out as abc123@”IP address of Proxy”. This function is for special
-
-
proxy server.
Line Number: identify one number for the SIP-Phone to register to the Proxy.
Line Account: set user name of SIP-Phone for registering. User can set user name
and password for registering. If password is no need, please set user name the
same as line number or SIP-Phone won’t register successfully.
Line Password: set password for registering.
SIP Port: set SIP UDP port.
RTP Port: set RTP port for sending voice data.
Expire: set expire time of registration. SIP-Phone will keep re-registering to proxy
server before expire timed out
30
SIP SIP-Phone
Administration Guide
3. System Configuration
Please refer to chapter 4.12 [sysconf] command
-
-
Keypad DTMF Type: set DTMF type. User can select DTMF type SIP-Phone
transmits.
RFC2833 Payload Type: change RFC2833 Payload type. This is for special request
from the other site, if RFC2833 payload types of 2 sites are different, it may cause
some problem of connection.
Inter Digit Time: Set the DTMF inter digit time (second)
To set the duration (in second) of two pressed digits in dial mode as timed out. If
after the duration user hasn’t pressed next number, SIP-Phone will dial out all
number pressed.
-
End of Dial Digit: select end of dialing key, e.g. set end of dial key as * button, after
finished pressing dialing number then press * will dial out.
31
SIP SIP-Phone
Administration Guide
4. PPPoE Configure
Please refer to chapter 4.10[pppoe] command
-
-
User Name: Set PPPoE authentication User Name.
Password: Set PPPoE authentication password.
Reboot After Remote Host Disconnection: Enable/Disable auto reboot after PPPoE
disconnection
If user enables this function, after PPPoE being disconnected, SIP-Phone will
automatically reboot to re-connect, and after reboot, if SIP-Phone still can’t get
contact with server, SIP-Phone will keep trying to connect. After re-connected,
SIP-Phone will also restart system. On the other hand, if user disables this function,
SIP-Phone won’t reboot and keep trying to connect.
PPPoE Echo: Enable or Disable PPPoE Echo function. If user enabled this feature,
SIP Phone will send out echo request to check PPPoE connection status. Please
notice that if user disables this function, SIP Phone cannot detect if PPPoE
connection is still alive or not.
- Other items: for reference only, cannot allow to be configured.
32
SIP SIP-Phone
Administration Guide
5. Voice Setting
Please refer to chapter 4.15 [voice] command
-
-
Codec Priority: set codecs priority in order. Please notice that user can set from 1 to
5 codecs as their need. For example, user can only set first priority as G.723.1, and
set the others as x, that means only G.723.1 is available.
Frame Size: User can set different packet size for each codec.
G.723 Silence Suppression: Enable / Disable sound compression and comfort noise
generation. It is only for codec G.723.1
Volume: Adjust the volume in “Voice” (sending out); “Input” (receiving); “ DTMF”
(DTMF sending out).
Echo Cancelor: Enable / Disable (suggested always Enable this function).
Jitter Buffer: Set Min. Delay and Max. Delay of Jitter Buffer for voice packets.
Optimized Factor (Jitter): Set Optimized Factor of voice, this is for advanced user
only, please contact with your distributor before making any change.
33
SIP SIP-Phone
Administration Guide
6. Phone Book
Please refer to chapter 4.5 [pbook] command
-
Add Data: User can specify 20 sets of phone book via web interface. Please input
index, Name, IP Address and E.164 number of the destination device.
Delete Date: User can delete any configured phone book data by index.
34
SIP SIP-Phone
Administration Guide
7.Prefix Configuration
Please refer to chapter 4.20 [prefix] command
-
Index: The list number of the Phone Book.
Prefix: The prefix number of the whole numbers that could be into this lan-phone.
Drop: The drop function. Enable this function by the Enable button; Disable this
function by the Disable button.
Insert: The insert function. Users could enter the digits that you want to insert in this
number.
Add Data: Press this button if users fill the entire information table above.
Delete Data: If users want to delete the record form the table, enter the index
number first and press this button. The record will be delete.
35
SIP SIP-Phone
Administration Guide
8. DDNS Configuration
Please refer to chapter 4.17 [ddns] command
-
Status: to enable/disable DDNS function
Server: to choose one DDNS server, on which user has already registered. (Now
only one DDNS server is available---www.dyndns.org)
Host Name: to set the registered Domain Name of SIP Phone
ID: to set login ID of registered account to log in DDNS server
Password: set password of registered account to log in DDNS server
Check IP: to enable/disable check IP function. If SIP Phone is behind IP sharing,
when this function is enabled, SIP Phone will check it’s public IP address by asking
IP address check server and send to DDNS server to update DDNS data. If this
function is disabled, when SIP Phone is behind IP sharing, it will send it’s private IP
address to DDNS server
-
IP Check Server 1: to set IP address check server
IP Check Server 2: to set secondary IP address check server
Check every /minutes /hours /off: to set the update interval time. SIP Phone will
re-update its IP address in this time.
36
SIP SIP-Phone
Administration Guide
9. DSCP Configuration
Please refer to chapter 4.16 [tos] command
Set Signal or RTP Packet DSCP value:
- Assured Forwarding (AF) PHB: Select Delay priority and Drop Precedence
- Expedited Forwarding (EF) PHB: Select TOS value as EF
- Default: Select TOS value as 0
- User Assign Special DSCP Code: User can set other unspecified value here.
TOS/DiffServ (DS) priority function can discriminate the Differentiated Service Code
Point (DSCP) of the DS field in the IP packet header, and map each Code Point to a
corresponding egress traffic priority. As per the definition in RFC2474, the DS field is
Type-of-Service (TOS) octet in IPv4. The recommended DiffServ Code Point is defined
in RFC2597 to classify the traffic into different service classes. The mapping of Code
Point value of DS-field to egress traffic priorities is shown as follows.
37
SIP SIP-Phone
Administration Guide
DROP Precedence
Class #1
Class #2
Class #3
Class #4
Low Drop Precedence
(AF11)
(AF21)
(AF31)
(AF41)
001010
010010
011010
100010
(AF12)
(AF22)
(AF32)
(AF42)
001100
010100
011100
100100
(AF13)
(AF23)
(AF33)
(AF43)
001110
010110
011110
100110
Medium Drop Precedence
High Drop Precedence
Please refer to RFC standard documents for more information about what is DSCP.
38
SIP SIP-Phone
Administration Guide
10. Password
Please refer to chapter 4.22 [password] command
-
Change: First select login name as root or user, then enter current password, new
password and confirm new password again to set new password.
Abort: Press abort will clean all inputs.
39
SIP SIP-Phone
Administration Guide
11. Rom Configuration
Please refer to chapter 4.21 [rom] command
-
FTP/TFTP Server IP Address: Set TFTP server IP address
Target File name: Set file name prepared to upgrade
Method: Select download method as TFTP or FTP
FTP Login: Set FTP login name and password
Target File Type: Select which sector of SIP-Phone to upgrade
Note:
1. After 2mb file download is finished, all configurations might change to
default values, user has to configure again.
2. After upgrade Application, please remember to execute Flash Clean,
which will clean all configurations become factory values except IP
address.
40
SIP SIP-Phone
Administration Guide
12. Flash Clean
Please refer to 4.11 [flash] command.
-
Press CLEAN will clean all configurations of SIP-Phone and reset to factory default
value.
Note: User must re-configure all commands all over again (except Network Configure)
once execute this function,
41
SIP SIP-Phone
Administration Guide
13. Reboot System
-
Press reboot will reset SIP-Phone.
Note: To execute reboot via web browser, SIP-Phone will automatically save all data
before reboot. To execute reboot via TELNET command, please remember to do
Commit Data before Reboot System.
42
SIP SIP-Phone
Administration Guide
Chapter 4 Configuring the SIP-Phone through Telnet command
lines
After setting the IP Address of SIP-Phone and reboot, (please refer to LCD Menu: 5-3.4.5),
user can enter into Telnet command lines.
Note:
1. After user enter SIP-Phone configuration via telnet, please use login: ”root”,
password: null, press enter to enter command lines. If user forgets password,
please contact with the distributor, we will generate a specific password
according to your MAC address of SIP-Phone.
2. User must input lower-case command, but contents of configurations such as SIP
alias or user name etc, user can set as capital case.
3. After any change of configuration, please remember to do commit command to
save changes and then reboot command to reboot system.
1. [help] command
Type help or man or ? to display all the command lists. The following figure is shown
all commands of SIP-Phone.
43
SIP SIP-Phone
Administration Guide
2. [quit] command
Type quit/exit/close will logout SIP-Phone and Telnet Program.
3. [debug] command
This command is for engineers to debug system of SIP-Phone. User can add debug
flag via command debug –add “debug flags”, and then start debug function via
command debug –open. When SIP-Phone is working on screen will display related
debug messages. Most frequently used debug flag are “sip”, “fsm”, “msg”…etc.
4. [reboot] command
After typing commit command, type reboot to restart the SIP-Phone.
Sometimes after user type reboot, on terminal screen will display: "Data modified,
commit to flash rom?” which means SIP-Phone will record call history or not. (Ex.
REDIAL, outgoing and incoming call data)
5. [pbook] command
This command is functional both in Proxy mode and Peer-to-Peer mode. In proxy mode,
use speed dial or 10 DL button will dial out e.164 number in phone book. In the other
hand, in peer-to-peer mode, SIP-Phone will dial out IP address.
1. -print: display phone book data. User can print all data in phone book by command
(pbook –print). Furthermore, user can also print only a section of data by indicate
parameter “start index” and “end index” (pbook –print “start index” “end index”).
If parameter “end index” is omitted, only record “start index” will be displayed.
(pbook –print “start prefix”).
2. -add: add a new record in phone book table by giving name, IP address, and e.164
number of callee endpoint.
44
SIP SIP-Phone
Administration Guide
(pbook –add name “X” ip “xxx.xxx.xxx.xxx” e164 “X”)
3. -search: search any record in the phone book according to IP address, name or
e164 number
4. -delete: delete a record of certain listed index in phone book table. (pbook –delete
“index number”)
5. -insert: insert a record in specified index of phone book.
6. -modify: modify record of a certain index in phone book. Please notice that the
name, IP address and e164 number must be modified together; user cannot just
modify one parameter only.
(pbook –modify “index” name “X” ip “xxx.xxx.xxx.xxx” e164 “X”)
6. [commit] command
Save any changes after configuring the SIP-Phone.
45
SIP SIP-Phone
Administration Guide
7. [ping] command
Command ping can test which the IP address is reachable or not.
Usage: ping “IP address”
The message will display packets transmitting condition or no answer from the IP
address.
8. [time] command
When SIP-Phone enables SNTP function and be able to connect with SNTP server, type time
command will show the current time retrieved from SNTP server.
9. [ifaddr] command
Configure and display the SIP-Phone IP information.
1. –print: print out all current configurations of ifaddr command.
2. -ip, -mask, -gate: Set SIP-Phone IP Address, subnet mask and default gateway
respectively.
5. -ipmode: Set SIP-Phone network mode to be Fixed IP, DHCP or PPPoE.
When User set IP mode to be fixed IP, please set IP, subnet Mask, default gateway
as mentioned in item 2.
If User set IP mode to be DHCP, SIP-Phone will search for DHCP server to capture
IP address after reboot.
If user set IP mode to be PPPoE, please remember to set related parameters under
[pppoe] command.
6. -sntp: When SNTP server is available, enable SIP-Phone SNTP function and
assign SNTP server IP address so that SIP-Phone can capture current time from
SNTP server. (ifaddr –sntp 1 “xxx.xxx.xxx.xxx”)
7. -dns: User can set Domain Name Server IP address. Once SIP-Phone can connect
with DNS server, user can specify URL address instead of IP address for Proxy
Server and phone book IP address...etc.
46
SIP SIP-Phone
Administration Guide
8. –timezone: User can set different time zone according to the location SIP-Phone is.
For example, in Taiwan the time zone should be set as 8,which means GMT+8.
(GMT-8: ifaddr –timezone -8)
9. -ipsharing: If SIP-Phone is behind an IP-sharing, user must enable IP sharing
function and specify public IP address. (ifaddr –ipsharing 0/1 “public IP address
of IP sharing”, 0 for disable and 1 for enable)
Note:
Some Proxy servers support endpoint behind NAT function, in this case SIP-Phone
doesn’t have to enable IP sharing function, please contact with your Proxy Server
vendor.
10. –upnp: enable/disable UPnP function. If the IP sharing or NAT device supports
UPnP, user can enable UPnP function so that SIP-Phone will automatically connect
with NAT device without configuration in SIP Phone and NAT device.
11. –server: set EMS server IP address.
12. –id: set EMS login user ID.
13. –pwd: set EMS login user password.
14. –emstime: set EMS server recycle time.
47
SIP SIP-Phone
Administration Guide
10. [pppoe] command
1. -print: display all current configurations and information.
2. –id: to set PPPoE authentication user name.
3. –pwd: to set PPPoE authentication password.
4. –reboot: Choose enable or disable this function. If user enables this function, after
PPPoE disconnected, SIP-Phone will automatically reboot to re-connect, and after
reboot, if SIP-Phone still can’t connect with server, SIP-Phone will keep trying to
connect. On the other hand, if user disables this function, SIP-Phone won’t reboot
and keep trying to connect. (pppoe –reboot 0/1)
5. –echo: Enable or Disable PPPoE Echo function. If user enabled this feature, SIP
Phone will send out echo request to check PPPoE connection status. Please notice
that if user disables this function, SIP Phone cannot detect if PPPoE connection is
still alive or not. (pppoe –echo 0/1)
11. [flash] command
This command will clean the configuration stored in the flash rom to default value and
reboot the SIP-Phone.
Note:
1. After user upgrade new software version, suggested to execute this command to
make sure new software work well on SIP-Phone.
2. To execute the command flash –clean, all configuration of SIP-Phone stored in
flash will be cleaned. It is authorized for the user whose login name is “root” only.
48
SIP SIP-Phone
Administration Guide
12. [sysconf] command
1. -print: display all current configurations.
2. -idtime: set the duration (in second) of two pressed digits in dial mode as timed out.
If after the duration user hasn’t pressed next number, SIP-Phone will dial out all
number pressed.
3. –service: set SIP Phone to work as normal mode or hotline mode. If user wants to
use hotline function, please set service to be 1, and set bureau related configuration.
Please refer to 19. [bureau] command.
4. -keypad: set DTMF type. User can select DTMF type SIP-Phone receive and
transmit. (sysconf –keypad 0/1, 0 for in band, 1 for RFC2833, 2 for SIP-Info.)
5. -2833type: change RFC2833 Payload type.
6. -eod: select end of dialing key, e.g. set end of dial key as “*” button, after finished
pressing dialing number then press “*” will dial out. (sysconf –eod 0/1/2 , 0 for no
end of dial key , 1 for “*” button, 2 for “#” button )
7. –service: set SIP Phone to be normal mode or under hotline mode.
(sysconf –service 0/1, 0 for normal service, 1 for hotline service.)
Note:
To set SIP-Phone as hotline mode, user has to set SIP-Phone as Peer-to-Peer
mode, and hotline table under bureau command.
49
SIP SIP-Phone
Administration Guide
13. [sip] command
1. –print: display all current configurations.
2. –mode: configure SIP-Phone as Proxy or Peer-to-Peer Mode.
Usage: sip –mode 0/1(1 for Proxy mode, 0 for Peer-to-Peer mode)
3. –px: set Primary Proxy server IP address or URL address (sip –px “IP address or
URL of Proxy server”).
4. –pxport: set listening port of Primary Proxy server.
5. –px2: set secondary proxy server IP address or URL address (sip –px “IP address
or URL of Proxy server”).
6. –px2port: set listening port of Secondarry Proxy server.
7. –outpx: set IP address of outbound proxy server. After user set outbound proxy, all
packets form SIP-Phone will be sent to outbound proxy server.
8. –outpxport: set listening port of Outbound Proxy server.
9. –prefix: set prefix string. If user ID contains alphabets, user can set it as prefix
string here. For example, if Account Name is 123, SIP-Phone will sent out
messages as Account Name @”IP address of Proxy”, if user set prefix as abc,
SIP-Phone will set out as abc123@”IP address of Proxy”. This function is for special
proxy server.
10. –line: identify one number for the SIP-Phone to register to the Proxy (SIP –line
“line number”).
Note: In proxy mode please remember to set user account information under
security command.
50
SIP SIP-Phone
Administration Guide
11. –pbsearch: enable/disable phone book search function under Proxy Mode. If user
enabled this function, SIP-Phone will search dialed number in phone book to see if
there is any matched table before send to Proxy server, and if there is a matched
data in phone book, SIP-Phone will make call to related IP address.
12. –expire: set expire time of registration. SIP-Phone will keep re-registering to proxy
server before expire timed out.
13. –port: set listening UDP port or SIP-Phone.
14. –rtp: set RTP port number. SIP-Phone will use this port to send and receive voice.
14. [security] command
1. –print: display all current configurations.
2. -name: set user ID of SIP-Phone for registering. User can set user name and
password for registering. If password is no need, please set user name the same as
line number or SIP-Phone won’t register successfully.
3. –pwd: set account password for registering.
51
SIP SIP-Phone
Administration Guide
15. [voice] command
The voice command is associated with the voice codec setting information.
1. -print: display voice codec information and configuration.
2. -send: three voice packet size can be configured as 20 ms, 40 ms or 60 ms. (only
30 and 60 ms for G.723.1)
3. -priority: set codecs priority in order. Please notice that user can set from 1 to 5
codecs as their need, for example, voice –priority g723 or voice –priority g723
711a g711u g729 g729a means SIP-Phone can support only one codec up to five
codecs.
4. -volume: There are three types can be adjustable, voice volume, ring volume, input
gain and DTMF volume. Voice volume means the volume user can hear, input gain
means the volume the other side can hear from SIP-Phone, DTMF means DTMF
transmitting volume. (voice –volume voice “value of volume”, voice –volume
ring “value of volume”, voice –volume input “value of volume”,
voice –volume dtmf “value of volume”)
Note:
If value of volume set as 0 means –32db, 1 means –31db…etc.
5. -nscng: enable or disable sound compression and comfort noise generation. It is
only for codec G.723.1. (0 for off, 1 for on)
6. -echo: enable or disable echo cancellation function .
7. -mindelay: set minimum delay of jitter buffer(0~150)
8. -maxdealy: set maximum delay of jitter buffer(0~150)
Note: It is for advanced administrator use only. Please ask your distributor
before changing any settings of this command.
52
SIP SIP-Phone
Administration Guide
16. [tos] command
TOS/DiffServ (DS) priority function can discriminate the Differentiated Service Code
Point (DSCP) of the DS field in the IP packet header, and map each Code Point to a
corresponding egress traffic priority. As per the definition in RFC2474, the DS field is
Type-of-Service (TOS) octet in IPv4. The recommended DiffServ Code Point is defined
in RFC2597 to classify the traffic into different service classes. The mapping of Code
Point value of DS-field to egress traffic priorities is shown as follows.
1. High priority with DS-field.
Expected Forwarding (EF) 101110
====>
Assured Forwarding (AF) 001010 ====>
010010 ====>
011010 ====>
100010
2. Low Priority with DS-field:
Assured Forwarding (AF)
46 (Decimal System)
10 (Decimal System)
18 (Decimal System)
26 (Decimal System)
====> 34 (Decimal System)
001100
====> 12 (Decimal System)
010100
011100
100100
001110
====>
====>
====>
====>
010110
====> 22 (Decimal System)
20 (Decimal System)
28 (Decimal System)
36 (Decimal System)
14 (Decimal System)
53
SIP SIP-Phone
Administration Guide
011110
100110
000000
====> 30 (Decimal System)
====> 38 (Decimal System)
====> 0 (Decimal System)
DROP Precedence
Class #1
Class #2
Class #3
Class #4
Low Drop Precedence
(AF11)
(AF21)
(AF31)
(AF41)
001010
010010
011010
100010
(AF12)
(AF22)
(AF32)
(AF42)
001100
010100
011100
100100
(AF13)
(AF23)
(AF33)
(AF43)
001110
010110
011110
100110
Medium Drop Precedence
High Drop Precedence
1. -print : display all current configurations.
2. –rtptype: set DSCP value of signaling packets from 0 to 63
3. –siptype: set DSCP value of RTP packets from 0 to 63
Note:
1. This command won’t be functional until network environment can be capable
with DSCP function.
2. tos -rtptype 14 -sigtype 10 is top priority of package.
54
SIP SIP-Phone
Administration Guide
17. [ddns] command
This function is for Dynamic Domain Name Server service. Once user register to
one DDNS server, he can specify domain name for the SIP Phone. When SIP Phone
reboot, it will automatically update it’s IP address to DDNS server. In this way, even SIP
Phone is using dynamic IP address, other endpoint can locate this SIP Phone by its
domain name.
1. -print: display DDNS overall information and configuration.
2. –enable: to enable/disable DDNS function.(ddns –enable 0/1, 0 for disable and 1
for enable).
3. -server: to set IP address of DDNS login server. (Now only one DDNS server is
available---www.dyndns.org)
4. -hostname: to set the registered Domain Name of SIP Phone. (Ex.
ddns –lp001.ddns.org)
5. –id: to set login ID of registered account to log in DDNS server.
6. –passwd: to set password of registered account to log in DDNS server.
7. –checkip: to enable/disable check IP function. If SIP Phone is behind IP sharing,
when this function is enabled, SIP Phone will check it’s public IP address by asking
IP address check server and send to DDNS server to update DDNS data. If this
function is disabled, when SIP Phone is behind IP sharing, it will send it’s private IP
address to DDNS server.
8. –checkipsrv1/2: to set IP address of primary and secondary IP address check
server.
9. -delay: to set the update interval time. SIP Phone will re-update its IP address in
this time. (ddns –delay 1-59m/1-24h , m means minute, h means hour)
10. –force: to force to execute DDNS update. Once user enters this command, SIP
Phone will update DDNS data immediately. (ddns –force “IP address of SIP
Phone”)
Note:
1. For now we only support DDNS server as www.dyndns.org.
2. User must register to DDNS server first, and specify user name and password in ddns
-id and ddns –passwd.
3. The default IP address of DDNS login server is member.dyndns.org.
4. User has to specify domain name applied for SIP Phone in ddns –hostname.
5. The default IP address of check IP server in is checkip.dyndns.org.
55
SIP SIP-Phone
Administration Guide
18. [vlan] command
1. -print: display current VLAN configuration settings.
2. -dev: enable/disable VLAN configuration.
3. –vid: set CPU VLAN ID number.
4. –pcvid: set PC port VLAN ID number.
Note: Only when vid numbers are the same, network can connect. For example, if PC A
connect to PC port of SIP Phone A, and vid of pcvid are different, this PC can’t reach this
SIP Phone, however, if PC B connect to SIP Phone B, and pcvid of SIP Phone B is the
same with vid of SIP Phone A, PC B can reach SIP Phone A.
NET
PC A
PCVID:1
PC B
SIP PHONE A
PCVID:2
SIP PHONE B
VID:2
5. –priority: set CPU packets priority number.(From 0 to 7, 7 is the highest priority.)
6. –pcpriority : set pc port priority number. (From 0 to 7, 7 is the highest priority.)
7. –pcdroptag: enable/disable pc port drop tag function. If this function is enabled,
SIP Phone will drop priority tag on packets sending out from PC port.
56
SIP SIP-Phone
Administration Guide
19. [bureau] command
1. -print: show all current configurations.
2. -hotline: set hotline table. User can set hotline function to specify one IP address
for SIP-Phone to dial out directly. Once user picks up SIP-Phone, it will
automatically dial out to the assigned IP address and number.
(bureau –hotline “IP address” “phone number of remote site”)
Note:
To set SIP-Phone as hotline mode, user has to set SIP-Phone as Peer-to-Peer
mode, and sysconf –service 2 command.
57
SIP SIP-Phone
Administration Guide
20. [prefix] command
1. -print: show all current configurations.
2. -add: add a rule to drop or insert prefix digits of out going call. (prefix –add prefix
“prefix number” drop 0/1 insert “insert number”).
3. -delete:delete arule to drop or insert prefix digits of out going call.(prefix –delete
prefix “prefix number”).
4. -modify: modify a rule to drop or insert prefix digits of out going call.(prefix –modify
prefix “prefix number” drop 0/1 insert “insert number”)
5. -prefix: set which prefix number to implement prefix rule.
6. -drop: enable or disable drop function. If this function is enable, Lan-Phone will
drop prefix number on out going call.
7. -insert: set which digit to insert on out going call.
21. [rom] command
8. -print: show all current configurations and version information.
9. -app,-boot, -dsptest, -dspcore, -dspapp,: upgrade main boot code, main
application code, DSP testing code, DSP kernel code, DSP application code, Ring
Back Tone PCM file and Hold Tone .
Note:
After upgrade Application, please remember to execute flash –clean command,
which will clean all configurations become factory values except IP address.
3. -boot2m: to upgrade 2mb rom file, which includes all firmware file mentioned in
item 2.
58
SIP SIP-Phone
Administration Guide
4. -s: it is necessary to prepare TFTP/FTP server IP address for upgrading firmware
rom file.
5. -f: the file name prepared for upgrading is necessary as well.
6. –method: specify download method to be TFTP or FTP(0 for TFTP.1 for FTP)
7. –ftp: specify user name and password for FTP download method.
For example: User prepares to upgrade the latest app rom file – siplp.100, the TFTP
server is 192.168.4.1.1.
rom –app –s 192.168.1.1 –f siplp.100
Command rom –print can show current version installed in SIP-Phone .
22. [passwd] command
For security protection, user has to input the password before entering application
user/config mode. Two configurations of login name/password are supported by the
system.
1. –set: set password of “root” users or “user” users. (passwd –set root/user
59
SIP SIP-Phone
Administration Guide
“password”)
2. –clean: clean up password restored before, and user can login :”root/user,
password: ”press enter”.
User who requests authorization to execute all configuration commands needs to login
with “root”. If a user login with “user”, only commands below are functional:
1. ifaddr
2.
3.
4.
5.
pbook
password set user “password”
commit
reboot
60
SIP SIP-Phone
Administration Guide
Chapter 5 Upgrading Software on the SIP-Phone
SIP-Phone supports three methods to upgrade the new version. All methods are necessary
to prepare the TFTP or FTP program on the host PC as TFTP/FTP server. After installing
TFTP/FTP program on one PC and connecting to network, SIP-Phone is ready to be
upgraded.
1. LCD Panel Control
2. Remote Control: Telnet
3. Web Management
1.From LCD Phone Menu
Please choose the 6→2 selection-Firmware Upgrade. Press OK to enter into the
sub-selection as below.
1.
Firmware Update
(1) Download method
There are two methods to download new version file, please move the
“>“ symbol by press or on the keypad to select TFTP or FTP
method, then press OK to confirm it.
(2) FTP/TFTP Sever
User has to offer one TFTP/FTP server IP Address and set this IP
Address via keypad. The IP Address is necessary for upgrading
SIP-Phone new application rom file.
(3) FTP Account
User has to input user name for FTP server login .It is necessary for
upgrading SIP-Phone new application rom file via FTP method.
(4) FTP Password
User has to input password for FTP server login .It is necessary for
upgrading SIP-Phone new application rom file via FTP method.
(5) File Name
User has to press the file name of new application rom file prepared for
upgrading
(6) Application Version
Show versions of application software.
Note:
Download via LCD command can only upgrade new application rom file.
(7) Start to Upgrade
61
SIP SIP-Phone
Administration Guide
Select YES or NO to start upgrade. After download is finished, press OK
then SIP-Phone will ask if need to reboot.
2. Web Management
Please refer to chapter 4.18 [rom] command
-
FTP/TFTP Server IP Address: Set TFTP server IP address
Target File name: Set file name prepared to upgrade
Method: Select download method as TFTP or FTP
FTP Login: Set FTP login name and password
Target File Type: Select which sector of SIP-Phone to upgrade
Note:
1. After 2mb file download is finished, all configurations might change to
default values, user has to configure again.
2. After upgrade Application, please remember to execute Flash Clean,
62
SIP SIP-Phone
Administration Guide
which will clean all configurations become factory values except IP
address.
3. Remote Control: Telnet
Please refer to chapter 4.18 [rom] command
1. -print: show all current configurations and version information.
2. -app,-boot, -dsptest, -dspcore, -dspapp,: upgrade main boot code, main
application code, DSP testing code, DSP kernel code, DSP application code, Ring
Back Tone PCM file and Hold Tone .
Note:
After upgrade Application, please remember to execute flash –clean command,
which will clean all configurations become factory values except IP address.
3. -boot2m: to upgrade 2mb rom file, which includes all firmware file mentioned in
item 2.
4. -s: it is necessary to prepare TFTP/FTP server IP address for upgrading firmware
rom file.
5. -f: the file name prepared for upgrading is necessary as well.
6. –method: specify download method to be TFTP or FTP(0 for TFTP.1 for FTP)
7. –ftp: specify user name and password for FTP download method.
For example: User prepares to upgrade the latest app rom file – siplp.100, the TFTP
server is 192.168.4.1.1.
rom –app –s 192.168.1.1 –f siplp.100
63
SIP SIP-Phone
Administration Guide
Command rom –print can show current version installed in SIP-Phone .
64
SIP SIP-Phone
Administration Guide