1
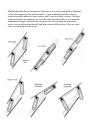
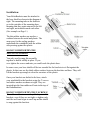
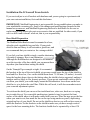
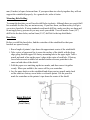
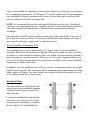
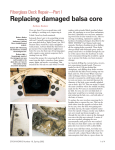
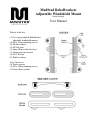
MadStad RoboBrackets
Adjustable Windshield Mount
(Patent Pending)
™
What is in the box:
(1) Set of preassembled RoboBracket
adjustable windshield mounts
(4) M6 x 12mm mounting screws
(4) M6 flat washers
(4) M6 lock nuts
(1) 4mm Allen wrench (hex key)
(1) 10mm open-end wrench
(4) M5 T-Screws
(8) Rubber washers
Extra Hardware:
(4) Plastic spacers
(4) M6 x 20mm mounting screws
(1) Extra rubber washers
User Manual
MadStad RoboBrackets are designed to bolt down to your stock windshield or dashboard
via the mounting tabs on the bottom brackets. A new windshield attaches to the top
brackets using the rubber well nuts, washers and T-screws to hold it in place. The upper
and lower brackets are connected via moveable link arms which allow you to adjust the
windshield for height, tilt and distance from the rider. By loosening the adjustment
screws you can slide and position the link arms in many different ways. Here are some
side views showing how this works:
Installation:
Your RoboBrackets must be attached to
the base shield as shown in the diagram at
right. The mounting tabs on the brackets
go to the outsides of the mounting base,
meaning that they point outward to the left
and right, not inward toward each other.
(See example on Page 5.)
The thin rubber washers are used as a
cushion between the metal and plastic. The
same goes for the sealing washers
underneath the windshield with the rubber
side pressing against the plastic.
DO NOT OVERTIGHTEN THE
MOUNTING SCREWS!
You only need to snug this assembly
together to hold it solidly in place. If you
over tighten the screws and nuts you could crack the plastic base.
In some cases your base shield will be too rounded for the brackets to sit flat against the
plastic. In that case use the thick rubber washers between the brackets and base. They will
lift the brackets up enough to clear the curvature of the plastic.
Once your brackets are bolted to the base, attach
your windshield to the brackets using the T-screws
and rubber washers as shown at right. They are
inserted into the four rubber well nuts in the top of
the RoboBrackets.
DO NOT OVERTIGHTEN THE T-SCREWS!
The rubber well nuts cannot be pulled up out of the
brackets, even if they are not tight, so tighten only
until the well nuts begin to swell up and the shield
is snug against the brackets.
Installation: Do-It-Yourself From Scratch
If you received just a set of brackets with hardware and you are going to experiment with
your own custom installation, first read this disclaimer:
IMPORTANT: MadStad Engineering is not responsible for any modifications you make to
your windshields or motorcycle. Some of the changes and modifications discussed in this
manual are permanent, and MadStad Engineering shall not be held liable for the cost or
replacement of any motorcycle parts or accessories that are modified. In other words, if you
cut it or drill it and it doesn’t work out, that is your responsibility.
Base Shield Preparation
The MadStad RoboBrackets must be mounted to a base,
often the stock windshield on your bike. If your stock
shield is thin and flimsy it will not make a good base, and
we recommend that you contact us for a stronger shield.
If you feel your base shield is sturdy, consider shortening
it to make it stronger. Here is an illustration:
Although the RoboBrackets are designed to be mounted
up at the top edge of the base shield, you can mount them
anywhere you want without cutting the shield.
On the Triumph Tiger example at right, if we mounted
the brackets at the top of the stock shield, air pressure would cause the top of that shield to
bend and flex. However, if we cut the shield down about 75-100 mm (3-4 inches), it would
bring the brackets down closer to the fairing where the shield is better supported, making it
stronger and less likely to flex from air pressure. If you are not comfortable with or able to
cut down your shield, you could simply mount the RoboBrackets lower down on the base
shield as-is, at or below the cutoff line. While this will work, it will also somewhat restrict
your rearward adjustment options.
To cut down the shield you can use a fine-tooth band saw, sabre saw, hack saw or coping
saw to make the cut. Use removable masking tape (painter’s tape) to protect the front
surface of the shield where it will make contact with your saw. Place the tape across the line
where you want to cut, then mark the line on the tape using marker or pencil, duplicating
original top line of your shield. Do not cut the shield too short or you will not have room to
attach the brackets. Set the brackets on the shield to make sure you have enough vertical
space for the base mounting holes. The brackets should also be separated by at least 130
mm (5 inches) of space between them. If you space them too closely together they will not
support the windshield properly. As a general rule, wider is better.
Mounting Hole Drilling
To mount the brackets you will need to drill holes in plastic. Although there are special drill
bits available for this, they are not necessary. If you have them, use them as they will give
you a nice clean hole. If using standard wood/metal drill bits, make sure they are sharp and
do not apply heavy pressure or you may crack your shield. You will need a 6 mm (1/4”)
drill bit for the base holes, and an 8mm (5/16”) drill bit for the top shield holes.
Base Holes
Before you drill the base holes, find the centerline of the windshield so that your
brackets are spaced evenly:
1. Run a length of painter’s tape down the approximate center of the windshield.
2. Take a piece of paper and lay it across the surface of the shield, with the long
edge going from the upper left factory mounting hole to the upper right. Take a
pencil and mark a line on the paper’s edge at the center of each hole. If factory
screw holes are not available use another similar reference point that is the
same on both sides of the shield.
3. Fold the paper over matching up the two marks, and then crease it together
evenly. When you unfold it, the crease will be your centerline.
4. Lay the paper back over the windshield and align your two pencil marks back
on the same two factory screw holes or reference points. Use the pencil to
mark the centerline on the painter’s tape down the center of the shield.
Base Bracket
Alignment
(Front View)
Once you have found the centerline you can measure outward to evenly space your brackets.
We recommend a separation of 130-200 mm (5-8”) but this could vary a bit depending upon
your windshield. Generally speaking wider is better, but you also want to make sure that
your top shield will fit on this spacing as well.
NOTE: We recommend that you first mark and drill only the top holes first. Windshield
curvatures can distort parallel lines so it would be better to set the actual brackets parallel to
each other using the top mounting holes. Then afterward you can mark the bottoms
accordingly.
Once the holes are drilled, bolt the brackets in and check if they are parallel. If they are off
just a little bit it is not a problem. You can always drill the base holes another size larger to
give yourself some extra “wiggle room” to align the brackets.
A Note Regarding the Mounting Tabs
The mounting tabs are bent at approximately a 70 degree angle. For most windshield
curvatures, this will set the brackets in an upright (90 degree) position once they are bolted
on. However, if you find that the brackets seem to be angled too much inward or outward, it
may be necessary to bend the tabs a bit. This is not very easy with 14 gauge stainless steel,
so if you do not have the appropriate tools and expertise available, please contact MadStad
Engineering for further instructions.
In addition, your base shield may have a bit of a vertical curvature that prevents the straight
brackets from laying flat. You can remedy this by shimming up the top mounting tabs with a
rubber washer as a spacer. Two extra washers have been provided for this purpose, as well
as two slightly longer M6 x 16mm screws.
Windshield Holes
Once the brackets are bolted down, fold
and set them so the windshield mounting
well nuts are directly across from each
other, like this:
Lay the top windshield over the brackets
and center it up as best you can. (If you
need to, mark a centerline as you did for
the base shield.) The windshield holes
should be in the bottom 1/3 of the windshield, but leave at least 1-1/2” (35mm) of space
from the bottom, and drill no closer than 1” (25mm) to any outer edge of the shield.
Once the shield is aligned to your satisfaction, use a marker to mark each hole location over
the four well nuts, then drill the 5/16” (8mm) holes.
Adjusting the RoboBrackets
The four screws connecting the link arms to the bottom brackets are the main points
of adjustment. These screws provide both the sliding (height) and link arm pivot
adjustment. The top four screws connecting the link arms to the top brackets must be
loosened slightly to allow the link arms to pivot. If they are fully tightened then you
will only be able to adjust the height of your windshield.
NOTE: Two wrenches have been provided for bracket adjustment. If the brackets
are collapsed to the point where you cannot get your hands underneath to make the
adjustments, you will need to remove the windshield first. This is an easy procedure
as the four T-screws holding the windshield on come off quickly and without tools.
Step 1 - Loosen all four bottom screws using the tools provided. It is not necessary
to loosen each screw completely, just enough to allow them to slide back and forth.
Step 2 – Move the link arms to position your windshield at the desired height, depth
and angle. The top four screws should be snug enough to hold the brackets in
position, yet just loose enough to rotate. Be aware that the link arms will not pivot
unless the bottom screws are at the very end of the link arm slot. If you have
removed the windshield, position both sides in parallel, at the same angle.
Step 3 – Tighten all four bottom screws and all four top screws for maximum
holding strength. Re-attach the windshield if it was removed for the adjustment. Use
the rubber washers for cushioning above and below the windshield mounting holes.
You may have to take several test rides to find an ideal windshield position and angle.
There are many factors that affect airflow including your height and riding position.
Start your adjustable shield out in a lower position rather than higher as you will likely
discover that you don’t need a tall windshield to get great airflow and wind protection.
THE LATEST USER MANUAL CAN BE DOWNLOADED AT
http://www.robobrackets.com
Disclaimer
Neither MadStad Engineering nor its owners shall be liable for any damages, consequential
or inconsequential, resulting from the use of our products. Installation of any of our products
constitutes acceptance of these terms.
It is the responsibility of the user to make sure all fasteners are tightened securely, the
windshield mounted properly and the adjusters tightened snugly before putting the
motorcycle in motion. The MadStad mount IS NOT intended to be adjusted while the
motorcycle is in motion; you must pull over out of the way of traffic and come to a complete
stop before making any adjustments. The user must never place the windshield in such a
position as to interfere with the safe and complete movement of the handlebars.
We welcome all comments and suggestions!
MadStad Engineering
5312 Azalea Circle, Ridge Manor, FL 33523 U.S.A.
Phone: 352-608-4069
Fax: 352-608-4195
Web Site: http://www.madstad.com
Email: [email protected]
Thank you for your support, and ride safely!
™