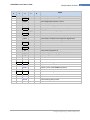
1
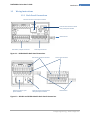
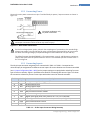
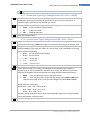
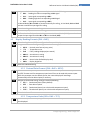
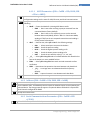
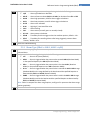
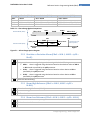
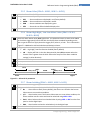
DP32Pt, DP16Pt, DP8Pt
Temperature & Process Meters
The information contained in this document is believed to be correct, but OMEGA accepts no liability for any errors it contains, and
reserves the right to alter specifications without notice.
Omega Engineering | www.omega.com
PLATINUMTM Series User’s Guide
Introduction
Contents
1.
2.
3.
4.
Introduction .......................................................................................................................................... 6
1.1
Using This Manual ......................................................................................................................... 6
1.2
Safety Considerations ................................................................................................................... 7
1.3
Wiring Instructions ........................................................................................................................ 8
1.3.1
Back Panel Connections ........................................................................................................ 8
1.3.2
Connecting Power ................................................................................................................. 9
1.3.3
Connecting Inputs ................................................................................................................. 9
1.3.4
Connecting Outputs on Units with Alarm Relays ............................................................ 11
Navigation ........................................................................................................................................... 11
2.1
Description of Button Actions ..................................................................................................... 11
2.2
Menu Structure ........................................................................................................................... 11
2.3
Level 1 Menu ............................................................................................................................... 12
2.4
Circular Flow of Menus ............................................................................................................... 12
Complete Menu Structure .................................................................................................................. 13
3.1
Initialization Mode Menu (INIt) .................................................................................................. 13
3.2
Programming Mode Menu (PRoG) ............................................................................................. 16
3.3
Operating Mode Menu (oPER) .................................................................................................... 18
Reference Section: Initialization Mode (INIt) ..................................................................................... 19
4.1
Input Configuration (INIt > INPt) ................................................................................................. 19
4.1.1
Thermocouple Input Type (INIt > INPt > t.C.) ..................................................................... 19
4.1.2
Resistance Temperature Detector (RTD) Input Type (INIt > INPt > Rtd) ............................ 20
4.1.3
Thermistor Input Type Configuration (INIt > INPt > tHRM) ................................................ 21
4.1.4
Process Input Type Configuration (INIt > INPt > PRoC)....................................................... 21
4.2
Display Reading Formats (INIt > RdG) ......................................................................................... 22
4.2.1
Decimal Point Format (INIt > RdG > dEC.P)......................................................................... 22
4.2.2
Temperature Units (INIt > RdG > °F°C)................................................................................ 22
4.2.3
Filter (INIt > RdG > FLtR)...................................................................................................... 23
4.2.4
Normal Color (INIt > RdG > NCLR) ....................................................................................... 23
4.2.5
Brightness (INIt > RdG > bRGt) ............................................................................................ 23
4.3
Excitation Voltage (INIt > ECtN) .................................................................................................. 24
4.4
Communication (INIt > CoMM)................................................................................................... 24
Omega Engineering | www.omega.com
3
PLATINUMTM Series User’s Guide
4.4.1
Protocol (INIt > CoMM > USb, EtHN, SER > PRot) ............................................................... 24
4.4.2
Address (INIt > CoMM > USb, EtHN, SER > AddR) ............................................................... 25
4.4.3
Serial Communications Parameters (INIt > CoMM > SER >C.PAR) ..................................... 25
4.5
Safety Features (INIt > SFty)........................................................................................................ 27
4.5.1
Power On Confirmation (INIt > SFty > PwoN) ..................................................................... 27
4.5.2
Operating Mode Confirmation (INIt > SFty > oPER)............................................................ 27
4.5.3
Setpoint Limits (INIt > SFty > SP.LM) ................................................................................... 27
4.5.4
Loop Break Timeout (INIt > SFty > LPbk) ............................................................................. 28
4.5.5
Open Circuit (INIt > SFty > o.CRk)........................................................................................ 28
4.6
5.
Introduction
Manual Temperature Calibration (INIt > t.CAL) .......................................................................... 28
4.6.1
No Manual Temperature Calibration Adjustment (INIt > t.CAL > NoNE)............................ 29
4.6.2
Manual Temperature Calibration Offset Adjustment (INIt > t.CAL > 1.PNt) ...................... 29
4.6.3
Manual Temperature Calibration Offset and Slope Adjustment (INIt > t.CAL > 2.PNt)...... 29
4.6.4
Temperature Ice Point Calibration (INIt > t.CAL > ICE.P) .................................................... 29
4.7
Save Current Configuration for All Parameters to a File (INIt > SAVE) ....................................... 29
4.8
Load a Configuration for All Parameters from a File (INIt > LoAd) ............................................. 30
4.9
Display Firmware Revision Number (INIt > VER.N) ..................................................................... 30
4.10
Update Firmware Revision (INIt > VER.U) ................................................................................... 30
4.11
Reset to Factory Default Parameters (INIt > F.dFt)..................................................................... 30
4.12
Password-Protect Initialization Mode Access (INIt > I.Pwd) ....................................................... 30
4.13
Password-Protect Programming Mode Access (INIt > P.Pwd) .................................................... 30
Reference Section: Programming Mode (PRoG) ................................................................................ 31
5.1
Setpoint 1 Configuration (PRoG > SP1) ....................................................................................... 31
5.2
Setpoint 2 Configuration (PRoG > SP2) ....................................................................................... 31
5.3
Alarm Mode Configuration (PRoG > ALM.1, ALM.2)................................................................... 31
5.3.1
Alarm Type (PRoG > ALM.1, ALM.2 > tyPE)......................................................................... 32
5.3.2
Absolute or Deviation Alarm (PRoG > ALM.1, ALM.2 > tyPE > Ab.dV)................................ 33
5.3.3
Alarm High Reference (PRoG > ALM.1, ALM.2 > tyPE > ALR.H) .......................................... 33
5.3.4
Alarm Low Reference (PRoG > ALM.1, ALM.2 > tyPE > ALR.L) ............................................ 33
5.3.5
Alarm Color (PRoG > ALM.1, ALM.2 > A.CLR)...................................................................... 34
5.3.6
Alarm High High / Low Low Offset Value (PRoG > ALM.1, ALM.2 > HI.HI) ......................... 34
5.3.7
Alarm Latching (PRoG > ALM.1, ALM.2 > LtCH) .................................................................. 34
Omega Engineering | www.omega.com
4
PLATINUMTM Series User’s Guide
5.3.8
Alarm Normally Closed, Normally Open (PRoG > ALM.1, ALM.2 > CtCL) ........................... 35
5.3.9
Alarm Power-On Behavior (PRoG > ALM.1, ALM.2 > A.P.oN) ............................................. 35
5.3.10
Alarm On Delay (PRoG > ALM.1, ALM.2 > dE.oN) ............................................................... 35
5.3.11
Alarm Off Delay (PRoG > ALM.1, ALM.2 > dE.oF) ............................................................... 35
5.4
Output Channel Configuration (PRoG > dtR1 or PRoG > dtR2)................................................... 35
5.4.1
6.
7.
8.
Introduction
Output Channel Mode (PRoG > dtR1, dtR2 > ModE) .......................................................... 36
Reference Section: Operating Mode (oPER)....................................................................................... 36
6.1
Normal Run Mode (oPER > RUN) ................................................................................................ 36
6.2
Change Setpoint 1 (oPER > SP1).................................................................................................. 37
6.3
Change Setpoint 2 (oPER > SP2).................................................................................................. 37
6.4
Clear Latched Alarms (oPER > L.RSt) ........................................................................................... 37
6.5
Display Valley Reading (oPER > VALy) ......................................................................................... 37
6.6
Display Peak Reading (oPER > PEAk) ........................................................................................... 37
6.7
Standby Mode (oPER > Stby) ...................................................................................................... 38
Specifications ...................................................................................................................................... 39
7.1
Inputs .......................................................................................................................................... 39
7.2
Outputs (Optional with “-AL” Configurations) ............................................................................ 39
7.3
Communications (USB Standard, Optional Serial and Ethernet) ................................................ 39
7.4
Isolation....................................................................................................................................... 39
7.5
General ........................................................................................................................................ 40
Approvals Information ........................................................................................................................ 42
Omega Engineering | www.omega.com
5
PLATINUMTM Series User’s Guide
Introduction
1. Introduction
1.1
Using This Manual
This initial section of the manual will cover the back panel connections and wiring instructions. A quick
overview of how to navigate the PLATINUMTM Series menu structure follows in Section 2. This is
followed in Section 3 by the complete PLATINUMTM Series menu tree. Remember, not all commands and
parameters in that menu tree will show up on your unit, as those that are not available with your
configuration are automatically hidden. Repetitive menu structures are highlighted in gray and only
shown once but are used multiple times; examples include scaling process inputs for the different
process input ranges, setting up the data communications protocol for each of the communications
channels, configuration for multiple outputs, etc.
This manual is optimized for online use. Therefore, the blue entries in the Section 2 menu tree are
hyperlinks that take you straight to the corresponding reference section entry when you click on them.
The Reference Section—encompassing Initialization Mode in Section 4, Programming Mode in Section 5,
and Operating Mode in Section 6—will provide more detail on what parameter and command choices
you have, how they operate, and why you might want to choose a specific value. There are also blue
cross-references embedded in the Reference Section (the blue section headers however, are not
hyperlinks). In addition, the Table of Contents on pages 3 through 6 is hyperlinked to all of the entries
throughout the manual that are listed in it.
Omega Engineering | www.omega.com
6
PLATINUMTM Series User’s Guide
1.2
Introduction
Safety Considerations
This device is marked with the international caution symbol. It is important to read this manual before
installing or commissioning this device as it contains important information relating to Safety and EMC
(Electromagnetic Compatibility).
This instrument is a panel mount device protected in accordance with EN 61010-1:2010, electrical safety
requirements for electrical equipment for measurement, control, and laboratory use. Installation of this
instrument should be done by qualified personnel.
In order to ensure safe operation, the following instructions must be followed and warnings
observed:
This instrument has no power-on switch. An external switch or circuit-breaker must be included in the
building installation as a disconnecting device. It must be marked to indicate this function, and it must
be in close proximity to the equipment within easy reach of the operator. The switch or circuit-breaker
must comply with the relevant requirements of IEC 947–1 and IEC 947-3 (International Electrotechnical
Commission). The switch must not be incorporated in the main supply cord.
Furthermore, to provide protection against excessive energy being drawn from the main supply in case
of a fault in the equipment, an overcurrent protection device must be installed.
•
•
•
•
•
•
•
Do not exceed the voltage rating on the label located on the top of the instrument housing.
Always disconnect the power before changing the signal and power connections.
Do not use this instrument on a work bench without its case for safety reasons.
Do not operate this instrument in flammable or explosive atmospheres.
Do not expose this instrument to rain or moisture.
Unit mounting should allow for adequate ventilation to ensure that the instrument does not
exceed the operating temperature rating.
Use electrical wires with adequate size to handle mechanical strain and power requirements.
Install this instrument without exposing the bare wire outside the connector to minimize
electrical shock hazards.
EMC Considerations
•
•
•
•
Whenever EMC is an issue, always use shielded cables.
Never run signal and power wires in the same conduit.
Use signal wire connections with twisted-pair cables.
Install Ferrite Beads on signal wires close to the instrument if EMC problems persist.
Failure to follow all instructions and warnings is at your own risk and may result in property
damage, bodily injury and/or death. Omega Engineering is not responsible for any damages or
loss arising or resulting from any failure to follow any and all instructions or observe any and all
warnings.
Omega Engineering | www.omega.com
7
PLATINUMTM Series User’s Guide
1.3
Introduction
Wiring Instructions
1.3.1 Back Panel Connections
Ethernet Connector if EIP Option Installed
Ethernet Communications Status
LEDs if EIP Option Installed
USB Connector
8-Pin Power / Outputs Connector
10-Pin Input Connector
Figure 1.1 – DP8Pt Models: Back Panel Connections
8-Pin Power / Outputs Connector
Ethernet Connector if EIP
Option Installed
10-Pin Input Connector
Ethernet Communications Status
LEDs if EIP Option Installed
USB Connector
Figure 1.2 – DP16Pt and DP32Pt Models: Back Panel Connections
Omega Engineering | www.omega.com
8
PLATINUMTM Series User’s Guide
Introduction
1.3.2 Connecting Power
Connect the main power connections to pins 7 and 8 of the 8-pin power / output connector as shown in
Figure 1.3.
Use copper conductors only
for power connections
Caution: Do not connect power to your device until you have completed all input
and output connections. Failure to do so may result in injury!
Figure 1.3 – Main Power Connections
For the low-voltage power option, maintain the same degree of protection as the standard highvoltage input power units (90–240 Vac) by using a Safety Agency Approved DC or AC source with
the same Overvoltage Category and pollution degree as the standard AC unit (90–240 Vac).
The Safety European Standard EN61010-1 for measurement, control, and laboratory equipment
requires that fuses must be specified based on IEC127. This standard specifies the letter code “T”
for a Time-lag fuse.
1.3.3 Connecting Inputs
The 10-pin input connector assignments are summarized in Table 1.1. Table 1.2 summarizes the
universal input pin assignments for different sensor inputs. All sensor selections are firmware-controlled
(see 4.1 Input Configuration (INIt > INPt)) and no jumper settings are required when switching from one
type of sensor to another. Figure 1.4 provides more detail for connecting RTD sensors. Figure 1.5 shows
the connection scheme for process current input with either internal or external excitation.
Pin No.
Code
1
2
3
ARTN
AIN+
AIN-
4
5
6
7
8
9
APWR
AUX
EXCT
DIN
ISO GND
RX/A
10
TX/B
Description
Analog return signal (analog ground) for sensors
Analog positive input
Analog negative input
Analog power currently only used for 4-wire RTDs
Only used with controller models
Excitation voltage output referenced to ISO GND
Digital input signal (latch reset), Positive at > 2.5V, ref. to ISO GND
Isolated ground for serial communications, excitation, and digital input
Serial communications receive
Serial communications transmit
Table 1.1 – 10-Pin Input Connector Wiring Summary
Omega Engineering | www.omega.com
9
PLATINUMTM Series User’s Guide
Pin
Number
Process
Voltage
1
2
3
4
Rtn
Vin +/-
Process
Current
Introduction
Thermocouple
I+
I-
T/C+
T/C-
2-Wire
RTD
3-Wire
RTD
4-Wire
RTD
Thermistor
**
RTD1+
RTD2RTD1+
TH+
TH-
RTD1-
RTD1-
RTD2+
RTD1+
RTD2RTD1-
** Requires external connection to pin 4
Table 1.2 – Interfacing Sensors to the Input Connector
1
2
3
4
5
6
7
8
9
10
RTD (100 Ω) 4-WIRE
RTD (100 Ω) 3-WIRE
RTD (100 Ω) 2-WIRE (requires pin 1
to be jumpered to pin 4)
Figure 1.4 – RTD Wiring Diagram
0–24 mA
Internal
Excitation
1
2
3
4
5
6
Jumper
7
8
9
10
1
2
3
4
5
6
7
8
9
10
External
Excitation
Figure 1.5 – Process Current Wiring Hookup with Internal and External Excitation
Omega Engineering | www.omega.com
10
PLATINUMTM Series User’s Guide
Navigation
1.3.4 Connecting Outputs on Units with Alarm Relays
The PLATINUMTM Series Meters can be configured with two alarm only Single Pole Double Throw
Mechanical Relays. This is the “-330” option and these SPDT relays have snubbers built in, but only on
the normally open contact side.
Power
Config.
Description
8
Output Pin Number
7
6
5
4
3
AC+
ACor
or
-330
SPDT, SPDT
N.O
Com
N.C
N.O
DC+
DCTable 1.3 – 8 Pin Output/Power Connector Wiring Summary by Configuration
2
1
Com
N.C
Base Meter – No Outputs
Code
N.O.
Com
N.C.
Definition
Normally open relay/SSR load
Relay Common/SSR AC power
Normally closed relay load
Code
ACAC+
DCDC+
Table 1.4 – Definitions for Abbreviations in Table 1.3
Definition
AC power neutral in pin
AC power hot in pin
Negative DC power in pin
Positive DC power in pin
2. Navigation
2.1
Description of Button Actions
The UP button moves up a level in the menu structure. Pressing and holding the UP button
navigates to the top level of any menu (oPER, PRoG, or INIt). This can be a useful way of
reorienting yourself if you get lost in the menu structure.
The LEFT button moves across a set of menu choices at a given level (up in the Section 4
menu structure tables). When changing numerical settings, press the LEFT button to make
the next digit (one digit to the left) active.
The RIGHT button across a set of menu choices at a given level (down in the Section 4
menu structure tables. The RIGHT button also scrolls numerical values up with overflow to
0 for the flashing digit selected.
The ENTER button selects a menu item and goes down a level, or it enters a numerical
value or parameter choice.
2.2
Menu Structure
The menu structure of the PLATINUMTM Series is divided into 3 main Level 1 groups, which are
Initialization, Programming, and Operating. They are described in Section 2.3. The complete menu
structure for levels 2-8 for each of the three Level 1 groups is detailed in Section 3.1, 3.2, and 3.3. Levels
2 through 8 represent sequentially deeper levels of navigation. Values with a dark box around them are
default values or submenu entry points. Blank lines indicate user-provided information. Some menu
Omega Engineering | www.omega.com
11
PLATINUMTM Series User’s Guide
Navigation
items include links to reference information elsewhere in this user manual. The information in the Notes
column defines each menu choice.
2.3
Level 1 Menu
INIt
Initialization Mode: These settings are rarely changed after initial setup. They include
transducer types, calibration, etc. These settings can be password-protected.
PRoG
Programming Mode: These settings are frequently changed. They include Setpoints,
Control Modes, Alarms, etc. These settings can be password-protected.
oPER
Operating Mode: This mode allows users to switch between Run Mode, Standby Mode,
Manual Mode, etc.
2.4
Circular Flow of Menus
The following diagram shows how to use the LEFT and RIGHT buttons to navigate around a menu.
Press the ENTER button on
oPER to select and enter RUN
Mode.
oPER
Press the LEFT and RIGHT
buttons to navigate around
the Operating Mode options.
RUN
Stby
PEAk
Press the UP button to
navigate back up a level.
SP1
It is possible to cycle through
any menu in both directions.
SP2
VALy
L.RST
Figure 2.1 – Circular Flow of Menus
Omega Engineering | www.omega.com
12
PLATINUMTM Series User’s Guide
Complete Menu Structure
3. Complete Menu Structure
3.1
Initialization Mode Menu (INIt)
The following table maps the Initialization Mode (INIt) navigation:
Level
2
Level
3
Level
4
INPt
t.C.
k
J
t
E
N
R
S
b
C
N.wIR
Rtd
A.CRV
tHRM
PRoC
2.25k
5k
10k
4–20
0–24
+-10
+-1
+-0.1
Level
5
Level
6
Level
7
Level
8
Notes
Type K thermocouple
Type J thermocouple
Type T thermocouple
Type E thermocouple
Type N thermocouple
Type R thermocouple
Type S thermocouple
Type B thermocouple
Type C thermocouple
3 wI
3-wire RTD
4 wI
4-wire RTD
2 wI
2-wire RTD
385.1
385 calibration curve, 100 Ω
385.5
385 calibration curve, 500 Ω
385.t
385 calibration curve, 1000 Ω
392
392 calibration curve, 100 Ω
3916
391.6 calibration curve, 100 Ω
2250 Ω thermistor
5000 Ω thermistor
10,000 Ω thermistor
Process input range: 4 to 20 mA
Note: This Manual and Live Scaling submenu is the same for all PRoC ranges.
MANL
Rd.1
____
Low display reading
IN.1
____
Manual input for Rd.1
Rd.2
____
High display reading
IN.2
____
Manual input for Rd.2
LIVE
Rd.1
____
Low display reading
IN.1
____
Live Rd.1 input, ENTER for current
Rd.2
____
High display reading
IN.2
____
Live Rd.2 input, ENTER for current
Process input range: 0 to 24 mA
Process input range: -10 to +10 mA
Process input range: -1 to +1 mA
Process input range: -0.1 to +0.1 mA
Omega Engineering | www.omega.com
13
PLATINUMTM Series User’s Guide
Level
2
Level
3
Level
4
RdG
dEC.P
FFF.F
FFFF
FF.FF
F.FFF
°F
°C
NoNE
8
16
32
64
128
1
2
4
GRN
REd
AMbR
HIGH
MEd
Low
°F°C
FLtR
NCLR
bRGt
ECtN
CoMM
5V
10 V
12 V
24 V
0V
USb
Level
5
Complete Menu Structure
Level
6
Level
7
Level
8
Notes
Reading format -999.9 to +999.9
Reading format -9999 to +9999
Reading format -99.99 to +99.99
Reading format -9.999 to +9.999
Activates degrees Fahrenheit
Degrees Celsius annunciator
Default for INPt = PRoC
Readings per displayed value: 8
16
32
64
128
2
3
4
Default display color: Green
Red
Amber
High display brightness
Medium display brightness
Low display brightness
Excitation voltage: 5 V
10 V
12 V
24 V
Excitation off
Configure the USB port
Note: This PRot submenu is the same for USB, Ethernet, and Serial ports.
PRot
oMEG ModE
CMd
Waits for commands from other end
CoNt
____ Transmit continuously every ###.# sec
dAt.F
StAt
No
yES
Includes Alarm status bytes
RdNG
yES
Includes process reading
No
PEAk
No
yES
Includes highest process reading
VALy
No
yES
Includes lowest process reading
Omega Engineering | www.omega.com
14
PLATINUMTM Series User’s Guide
Level
2
Level
3
Level
4
Level
5
Complete Menu Structure
Level
6
_LF_
ECHo
SEPR
M.bUS
EtHN
SER
AddR
PRot
AddR
PRot
C.PAR
____
____
bUS.F
bAUd
PRty
dAtA
StoP
SFty
PwoN
RUN.M
SP.LM
AddR
dSbL
ENbL
dSbL
ENbL
SP.Lo
SP.HI
RtU
ASCI
____
____
____
232C
485
19.2
9600
4800
2400
1200
57.6
115.2
odd
EVEN
NoNE
oFF
8bIt
7bIt
1bIt
2bIt
Level
7
Level
8
UNIt
No
yES
No
yES
yES
No
_CR_
SPCE
Notes
Send unit with value (F, C, V, mV, mA)
Appends line feed after each send
Retransmits received commands
Carriage Return separator in CoNt
Space separator in CoNt Mode
Standard Modbus protocol
Omega ASCII protocol
USB requires Address
Ethernet port configuration
Ethernet “Telnet” requires Address
Serial port configuration
Single device Serial Comm Mode
Multiple devices Serial Comm Mode
Baud rate: 19,200 Bd
9,600 Bd
4,800 Bd
2,400 Bd
1,200 Bd
57,600 Bd
115,200 Bd
Odd parity check used
Even parity check used
No parity bit is used
Parity bit is fixed as a zero
8 bit data format
7 bit data format
1 stop bit
2 stop bits gives a “force 1” parity bit
Address for 485, placeholder for 232
Turn on: in oPER Mode, ENTER to run
Turn on: program runs automatically
ENTER in Stby, PAUS, StoP runs
ENTER in modes above displays RUN
Low Setpoint limit
High Setpoint limit
Omega Engineering | www.omega.com
15
PLATINUMTM Series User’s Guide
Level
2
Level
3
Level
4
LPbk
dSbL
ENbL
ENbl
dSbL
o.CRk
t.CAL
SAVE
LoAd
VER.N
VER.U
F.dFt
I.Pwd
P.Pwd
3.2
NoNE
1.PNt
2.PNt
ICE.P
____
____
1.00.0
ok?
ok?
No
yES
No
yES
Level
5
Complete Menu Structure
Level
6
Level
7
____
R.Lo
R.HI
ok?
____
____
Level
8
Notes
Loop break timeout disabled
Loop break timeout value (MM.SS)
Open Input circuit detection enabled
Open Input circuit detection disabled
Manual temperature calibration
Set offset, default = 0
Set range low point, default = 0
Set range high point, default = 999.9
Reset 32°F/0°C reference value
Download current settings to USB
Upload settings from USB stick
Displays firmware revision number
ENTER downloads firmware update
ENTER resets to factory defaults
No required password for INIt Mode
Set password for INIt Mode
No password for PRoG Mode
Set password for PRoG Mode
Programming Mode Menu (PRoG)
The following table maps the Programming Mode (PRoG) navigation:
Level
2
SP1
SP2
ALM.1
Level Level Level Level
Notes
3
4
5
6
____
Process goal for PID, default goal for oN.oF
ASbo
Setpoint 2 value can track SP1, SP2 is an absolute value
dEVI
SP2 is a deviation value
Note: This submenu is the same for all other Alarm configurations.
tyPE
oFF
ALM.1 is not used for display or outputs
AboV
Alarm: process value above Alarm trigger
bELo
Alarm: process value below Alarm trigger
HI.Lo.
Alarm: process value outside Alarm triggers
bANd
Alarm: process value between Alarm triggers
Ab.dV AbSo
Absolute Mode; use ALR.H and ALR.L as triggers
d.SP1
Deviation Mode; triggers are deviations from SP1
d.SP2
Deviation Mode; triggers are deviations from SP2
ALR.H ____
Alarm high parameter for trigger calculations
Omega Engineering | www.omega.com
16
PLATINUMTM Series User’s Guide
Level
2
Level
3
ALR.L
A.CLR
Level
4
____
REd
AMbR
GRN
dEFt
HI.HI
oFF
oN
LtCH
No
yES
botH
RMt
CtCL
N.o.
N.C.
A.P.oN yES
No
dE.oN ____
dE.oF ____
ALM.2
DTR1
ModE
oFF
ALM.1
ALM.2
ModE
oFF
DTR2
ALM.1
ALM.2
RE.oN
Level
5
____
Complete Menu Structure
Level
6
Notes
Alarm low parameter for trigger calculations
Red display when Alarm is active
Amber display when Alarm is active
Green display when Alarm is active
Color does not change for Alarm
High High / Low Low Alarm Mode turned off
Offset value for active High High / Low Low Mode
Alarm does not latch
Alarm latches until cleared via front panel
Alarm latches, cleared via front panel or digital input
Alarm latches until cleared via digital input
Output activated with Alarm
Output deactivated with Alarm
Alarm active at power on
Alarm inactive at power on
Delay turning off Alarm (sec), default = 1.0
Delay turning off Alarm (sec), default = 0.0
Alarm 2
Double Throw Relay 1 with “–330” units
Output does nothing
Output is active under ALM.1 conditions
Output is active under ALM.2 conditions
Double Throw Relay 2 with “–330” units
Output does nothing
Output is active under ALM.1 conditions
Output is active under ALM.2 conditions
Activate during Ramp events
Omega Engineering | www.omega.com
17
PLATINUMTM Series User’s Guide
3.3
18
Operating Mode Menu (oPER)
The following table maps the Operating Mode (oPER) navigation:
Level
2
RUN
SP1
SP2
MANL
PAUS
StoP
L.RSt
VALy
PEAk
Stby
Level
3
____
____
M.CNt
M.INP
Level
4
____
____
Notes
Normal Run Mode, process value displayed, SP1 in optional secondary display
Shortcut to change Setpoint 1, current Setpoint 1 value in main display
Shortcut to change Setpoint 2, current Setpoint 2 value in main display
Manual Mode, the RIGHT and LEFT buttons control output, displays M##.#
Manual Mode, the RIGHT and LEFT buttons simulate the input for testing
Pause and hold at current process value, display flashes
Stop controlling, turn off outputs, process value rotating flash, Alarms remain
Clears any latched Alarms; Alarms menu also allows digital input reset
Displays the lowest input reading since the VALy was last cleared
Displays the highest input reading since the PEAk was last cleared
Standby Mode, outputs, and Alarm conditions disabled, displays Stby
Omega Engineering | www.omega.com
PLATINUMTM Series User’s Guide
Reference Section: Initialization Mode (INIt)
4. Reference Section: Initialization Mode (INIt)
Use Initialization Mode to set the following parameters and perform the following functions:
4.1
Input Configuration (INIt > INPt) ................................................................................................. 19
4.2
Display Reading Formats (INIt > RdG) ......................................................................................... 22
4.3
Excitation Voltage (INIt > ECtN) .................................................................................................. 24
4.4
Communication (INIt > CoMM)................................................................................................... 24
4.5
Safety Features (INIt > SFty)........................................................................................................ 27
4.6
Manual Temperature Calibration (INIt > t.CAL) .......................................................................... 28
4.7
Save Current Configuration for All Parameters to a File (INIt > SAVE) ....................................... 29
4.8
Load a Configuration for All Parameters from a File (INIt > LoAd) ............................................. 30
4.9
Display Firmware Revision Number (INIt > VER.N) ..................................................................... 30
4.10
Update Firmware Revision (INIt > VER.U) ................................................................................... 30
4.11
Reset to Factory Default Parameters (INIt > F.dFt)..................................................................... 30
4.12
Password-Protect Initialization Mode Access (INIt > I.Pwd) ....................................................... 30
4.13
Password-Protect Programming Mode Access (INIt > P.Pwd) .................................................... 30
4.1
Input Configuration (INIt > INPt)
Select the Input parameter (INPt) to configure the input.
Navigate to the correct setting. Settings include the following:
• t.C.
– Thermocouple Temperature Sensor (entry point)
• Rtd – Resistance Temperature Detector (RTD)
• tHRM – Thermistor Temperature Sensor
• PRoC – Process Voltage or Current Input
Select the indicated setting.
4.1.1 Thermocouple Input Type (INIt > INPt > t.C.)
Select Thermocouple (t.C.) as the input type (factory default). Then specify a specific type of
thermocouple or the last selected type will be used.
Omega Engineering | www.omega.com
19
PLATINUMTM Series User’s Guide
Reference Section: Initialization Mode (INIt)
Navigate to the installed thermocouple type. Supported types are as follows:
• k
– Type K (factory default)
• J
– Type J
• t
– Type T
• E
– Type E
• N – Type N
• R
– Type R
• S
– Type S
• b
– Type B
• C
– Type C
Select the indicated type.
4.1.2 Resistance Temperature Detector (RTD) Input Type (INIt >
INPt > Rtd)
Select Rtd as the input type. Factory default configuration settings are three-wire, 100 Ω,
using the European standard 385 curve. Note that the 392 and 3916 curves are only available
for 100 Ω RTDs. If Rtd is selected and a specific configuration is not changed, the last saved
configuration will be used.
Navigate to the desired configuration parameter:
• N.wIR – Firmware selection of the number of wires for RTD connection (no jumpers
needed)
• A.CRV – Calibration curve covering both the international standard and the
resistance of the RTD
Select the option.
4.1.2.1 Number of RTD Wires (INIt > INPt > Rtd >
N.wIR)
Navigate to the desired setting. Settings include the following:
• 3 wI – Three-wire RTD (factory default)
• 4 wI – Four-wire RTD
• 2 wI – Two-wire RTD
Select the indicated option.
4.1.2.2
Calibration Curve (INIt > INPt > Rtd > A.CRV)
Navigate to the desired setting. Settings include the following:
• 385.1 – European and most common standard at the conventional
resistance of 100 Ω (factory default)
• 385.5 – European curve for 500 Ω
• 385.t – European curve for 1000 Ω
• 392 – Old US standard (rarely used), at 100 Ω only
• 3916 – Japanese standard, at 100 Ω only
Omega Engineering | www.omega.com
20
PLATINUMTM Series User’s Guide
Reference Section: Initialization Mode (INIt)
Select the indicated option.
4.1.3 Thermistor Input Type Configuration (INIt > INPt > tHRM)
Select Thermistor (tHRM) as the input type. This sets up the unit for thermistor-based
temperature measurement and then the specific thermistor type can be specified. If no
thermistor type is specified, the last selected type is used.
Navigate to the correct setting. Settings include the following:
• 2.25k – 2,250 Ω thermistor (factory default)
• 5k
– 5,000 Ω thermistor
• 10k – 10,000 Ω thermistor
Select the indicated option.
4.1.4 Process Input Type Configuration (INIt > INPt > PRoC)
Select Process (PRoC) as the input type. Then select the process input range and scale it. If
you stop after selecting the PRoC input type, the last selected input range and scaling is used.
Navigate to the voltage or current range of the process input. Any signal input outside of the
specified hardware input range will result in an “out-of-range” error (code E009). Input range
choices include the following:
• 4–20 – 4 mA to 20 mA (factory default)
• 0–24 – 0 mA to 24 mA
• +–10 – -10 V to +10 V
• +–1 – -1 V to +1 V
• +–0.1 – -1 mV to +1 mV
Select the desired range.
Choose either manual or live scaling. The scaling functions translate process values to
engineering units and are available for all process input ranges. The defaults for each input
range are the hardware minimum and maximum. Scaling methods include the following:
• MANL – User manually enters all four scaling parameters
• LIVE – User manually enters the low and high display values (RD.1 and RD.2) but
reads the input signal directly to set the low and high input values (IN.1 and IN.2)
Scaled values are calculated as:
Scaled Value = Input * Gain + Offset, where:
Gain = (Rd.2 – Rd.1) / (IN.2 – IN.1)
Offset = Rd.1 – (Gain * IN.1)
Therefore scaling can be done over a subset of the applicable range as this scaling calculation
linearly extrapolates in both directions.
Select the scaling method to be used.
Omega Engineering | www.omega.com
21
PLATINUMTM Series User’s Guide
Reference Section: Initialization Mode (INIt)
Navigate to the desired scaling parameter. Options include the following:
• Rd.1 – Reading low value corresponding to IN.1 signal
• IN.1 – Input signal corresponding to RD.1
• Rd.2 – Reading high value corresponding to IN.2 signal
• IN.2 – Input signal corresponding to RD.2
In Manual Mode, IN.1 and IN.2 are entered manually for scaling;, in Live Mode, IN.1 and IN.2
activate a read of the input signal for scaling.
Select the scaling parameter to change.
For manual inputs, set the selected scaling parameter to the desired value.
Confirm the value for the selected scaling parameter in Manual Mode (MANL), or read and
accept the input signal for either IN.1 or IN.2 in Live Mode (LIVE).
4.2
Display Reading Formats (INIt > RdG)
Select Reading Formats (RdG) to configure the front panel display.
Navigate to the desired setting. Settings include the following:
• dEC.P – Decimal-point format (entry point)
• °F°C – Temperature units
• FLtR – Filter (readings displayed per second)
• ANN.1 – Annunciator 1 setting
• ANN.2 – Annunciator 2 setting
• NCLR – Normal color (default display color)
• bRGt – Display brightness
Select the indicated setting.
4.2.1 Decimal Point Format (INIt > RdG > dEC.P)
Select Decimal Point (dEC.P) and then select the desired decimal-point format. Only the FFF.F
and FFFF formats work for temperature inputs but all four can be used with process inputs.
While this parameter sets the default format, the numeric display will autorange
(automatically shift the decimal point) if necessary.
Navigate to the desired setting. Settings include the following:
• FFF.F – One decimal place (factory default)
• FFFF – Zero decimal places
• FF.FF – Two decimal places (not a choice with temperature inputs)
• F.FFF – Three decimal places (not a choice with temperature inputs)
Select the indicated format.
4.2.2 Temperature Units (INIt > RdG > °F°C)
Select the Temperature Units (°F°C) parameter, and the current temperature unit selection is
then displayed.
Omega Engineering | www.omega.com
22
PLATINUMTM Series User’s Guide
Reference Section: Initialization Mode (INIt)
Navigate to the desired setting. Settings include the following:
• °F
– Degrees Fahrenheit (factory default), °F annunciator turned on
• °C
– Degrees Celsius, °C annunciator turned on
• NoNE – Default for INPt = PRoC, both temp unit annunciators turned off; if the
process level input signal corresponds to a temperature (temperature transmitters for
example), the appropriate temperature type annunciator can be chosen
Select the indicated option.
4.2.3 Filter (INIt > RdG > FLtR)
Select the Filter (FLtR) parameter. Filtering averages multiple input analog to digital
conversions, which can suppress noise in the input signal. This should be set to an appropriate
value depending on the response time of the input.
Navigate to the desired setting corresponding to the number of readings per displayed value.
Settings include the following (calculated times between display value updates are shown for
each setting as well):
• 8 – 0.4 s (factory default)
• 16 – 0.8 s
• 32 – 1.6 s
• 64 – 3.2 s
• 128 – 6.4 s
• 1 – 0.05 s
• 2 – 0.1 s
• 4 – 0.2 s
Select the indicated option.
4.2.4 Normal Color (INIt > RdG > NCLR)
Select the Normal Color (NCLR) parameter. This controls the default display color, which can
then be overridden by Alarms.
Navigate to the desired setting. Settings include the following:
• GRN – Green (factory default)
• REd – Red
• AMbR – Amber
Select the indicated option.
4.2.5 Brightness (INIt > RdG > bRGt)
Select the Brightness (bRGt) parameter.
Navigate to the desired setting. Settings include the following:
• HIGH – High display brightness (factory default)
• MEd – Medium display brightness
• Low – Low display brightness
Select the indicated option.
Omega Engineering | www.omega.com
23
PLATINUMTM Series User’s Guide
4.3
Reference Section: Initialization Mode (INIt)
Excitation Voltage (INIt > ECtN)
Select the Excitation Voltage (ECtN) parameter.
Navigate to the correct setting. Settings include the following:
• 5 V – 5 Volt excitation voltage (factory default)
• 10 V – 10 Volt excitation voltage
• 12 V – 12 Volt excitation voltage
• 24 V – 24 Volt excitation voltage
• 0 V – Excitation turned off
Select the indicated option.
4.4
Communication (INIt > CoMM)
Select the Communication Type (CoMM) to configure. Only installed communications options
show up for configuration (USB is always present). If more than one communications option is
installed, any or all of them can be configured for simultaneous operation.
Navigate to the correct option. Options include the following:
• USb – Universal Serial Bus (USB) communications (factory default)
• EtHN – Ethernet communications configuration
• SER – Serial (either RS232 or RS485) communications configuration
Select the indicated option.
Navigate to the desired parameter submenu. Options include the following:
• PRot – Protocol
• AddR – Address
Note: The serial communications (SER) option above also includes the following parameter:
• C.PAR – Communications parameters only applicable to serial communications
Select the indicated option.
4.4.1 Protocol (INIt > CoMM > USb, EtHN, SER > PRot)
Select the Protocol (PRot) parameter.
Navigate to the desired setting. Settings include the following:
• oMEG – (factory default) Omega’s Protocol, using standard ASCII encoding. Further
detail on this format is covered in the Communications Manual.
• M.bUS – Modbus protocol, available as Modbus RTU (RtU, default) or
Modbus/ASCII (ASCI). The Ethernet option supports Modbus/TCPIP. More detail on
using this protocol can be found in the Communications Manual.
Select the desired setting.
Omega Engineering | www.omega.com
24
PLATINUMTM Series User’s Guide
Reference Section: Initialization Mode (INIt)
4.4.1.1 ASCII Parameters (INIt > CoMM > USb, EtHN, SER
> PRot > oMEG)
Select oMEG to configure Omega ASCII mode communications parameters. These
configuration settings are the same for USB, Ethernet, and Serial communications.
Navigate to the desired parameter. Parameters and sub-parameters include the
following:
• ModE – Choose the Mode for initiating ASCII data transfer:
o CMd – Data is sent after receiving a prompt command from the
connected device (factory default).
o CoNt – Data is sent as it is collected; you can set the seconds
between data sends (###.#), default = 001.0. In Continuous Mode,
sending a CTRL/Q to the unit suspends transmission and sending a
CTRL/S restarts transmission.
• dAt.F – Data Format; select yES or No for the following settings:
o StAt – Alarm status bytes are sent with the data
o RdNG – Sends the process reading
o PEAk – Sends the highest process reading so far
o VALy – Sends the lowest process reading so far
o UNIt – Sends the unit with the value (F, C, V, mV, mA)
• _LF_ – Select yES or No; yES sends a line feed between each data block to
format the output in a more readable fashion.
• ECHo – Select yES or No; yES echoes each received command to allow
verification.
• SEPR – Determines the separation character between each data block:
o _CR_ – A carriage return sent between data blocks (factory
default).
o SPCE – A space character is sent between each data block.
Select the indicated option, and manage submenus and parameters as required.
4.4.2 Address (INIt > CoMM > USb, EtHN, SER > AddR)
Select the Address (AddR) parameter.
Set the Address value. The Modbus protocol requires an address field to correctly identify the
selected device. The Omega protocol supports an optional address field which is required for
Serial channels configured for RS485.
Accept the entered value.
4.4.3 Serial Communications Parameters (INIt > CoMM > SER
>C.PAR)
Select C.PAR. Then, select individual parameters to configure the serial communications.
Omega Engineering | www.omega.com
25
PLATINUMTM Series User’s Guide
Reference Section: Initialization Mode (INIt)
Navigate to the correct setting. Settings include the following:
• bUS.F – Specify RS232 or RS485 serial communications
• bAUd – Baud rate (transmission rate)
• PRty – Parity (used for transmission error checking)
• dAtA – Number of bits per data point
• StoP – Number of stop bits between data points
Select the desired setting.
4.4.3.1 Serial Bus Format (INIt > CoMM > SER > C.PAR >
bUS.F)
Select the Bus Format (bUS.F) parameter.
Navigate to the desired setting. Settings include the following:
• 232C – Allows one-to-one serial communications (factory default)
• 485 – Allows multiple devices to operate on a single pair of wires
Select the indicated option.
4.4.3.2
Baud Rate (INIt > CoMM > SER > C.PAR > bAUd)
Select the Baud Rate (bAUd) parameter. The device being communicated to
determines how fast you can set the Baud Rate.
Navigate to the desired setting for Baud rate (bits per second):
• 19.2 – 19,200 Baud (factory default)
• 9600 – 9,600 Baud
• 4800 – 4,800 Baud
• 2400 – 2,400 Baud
• 1200 – 1,200 Baud
• 57.6 – 57,600 Baud
• 115.2 – 115,200 Baud
Select the indicated option.
4.4.3.3
Parity (INIt > CoMM > SER > C.PAR > PRty)
Select the Parity (PRty) parameter.
Navigate to the desired setting. Settings include the following:
• odd – Odd parity used to verify communications (factory default)
• EVEN – Even parity used to verify communications
• NoNE – Parity is not used to verify communications
Select the indicated option.
4.4.3.4
Data Bits (INIt > CoMM > SER > C.PAR > dAtA)
Select the number of Data Bits (dAtA).
Omega Engineering | www.omega.com
26
PLATINUMTM Series User’s Guide
Reference Section: Initialization Mode (INIt)
Navigate to the desired setting. Settings include the following:
• 8bIt – 8 bits used per data character (factory default)
• 8bIt – 7 bits used per data character
Select the indicated option.
4.4.3.5
Stop Bits (INIt > CoMM > SER > C.PAR > StoP)
Select the number of Stop Bits (StoP).
Navigate to the desired setting. Settings include the following:
• 1bIt – 1 stop bit (factory default)
• 2bIt – 2 stop bits (provides a “force 1” parity bit)
Select the indicated option.
4.5
Safety Features (INIt > SFty)
Select Safety Features (SFty).
Navigate to the desired parameter. Parameters include the following:
• PwoN – Requires confirmation before running automatically at startup
• oPER – User must select RUN when exiting from the Stby, PAUS, or StoP Modes
• SP.LM – Setpoint limits can be set to limit the values that can be entered
• LPbk – Loop break enable/disable and timeout value
• o.CRk – Open circuit detection enable/disable
Select the indicated option.
4.5.1 Power On Confirmation (INIt > SFty > PwoN)
Select Power On Confirmation (PwoN).
Navigate to the desired setting. Settings include the following:
• dSbL – Program runs automatically at startup (factory default)
• ENbL – The unit powers on and then displays RUN; press the ENTER button to run
the program
Select the desired setting.
4.5.2 Operating Mode Confirmation (INIt > SFty > oPER)
Select the Operating Mode Confirmation (oPER) parameter.
Navigate to the desired setting. Settings include the following:
• dSbL – Pressing the ENTER button in Stby, PAUS, or StoP Modes will start running
the current program immediately (factory default)
• ENbL – Pressing the ENTER button in any Operating Menu Mode will display RUN;
pressing the ENTER button again will start running the current program
Select the desired setting.
4.5.3 Setpoint Limits (INIt > SFty > SP.LM)
Select Setpoint Limits (SP.LM) to set limits on the values that can be used for the all Setpoints.
Omega Engineering | www.omega.com
27
PLATINUMTM Series User’s Guide
Reference Section: Initialization Mode (INIt)
Navigate to the desired setting. Settings include the following:
• SP.Lo – Set the minimum possible Setpoint value
• SP.HI – Set the maximum possible Setpoint value
Select the desired setting.
Set the Setpoint limit value.
Confirm the value.
4.5.4 Loop Break Timeout (INIt > SFty > LPbk)
Select the loop break (LPbk) parameter. When enabled, this parameter specifies the amount
of time in Run Mode without a change in input value that would signify a sensor malfunction.
For example, if there were a problem in a thermocouple, the input would not change over
time.
Navigate to the desired setting. Settings include the following:
• dSbL – No loop break timeout protection (factory default)
• ENbL – Set loop break timeout value
Select the indicated setting.
If ENbL, Set the loop break timeout value in minutes and seconds (MM.SS)
Confirm the value.
4.5.5 Open Circuit (INIt > SFty > o.CRk)
Select the open circuit (o.CRk) parameter. When o.CRk is enabled, the unit will monitor
Thermocouples, RTD, and Thermistors for an open circuit condition.
Navigate to the desired setting. Settings include the following:
• ENbL – Open circuit conditions will stop the program and display oPEN (factory
default)
• dSbL – No open circuit protection (may be necessary when using high impedance
infrared thermocouples or thermistors).
Confirm the value.
4.6
Manual Temperature Calibration (INIt > t.CAL)
Select the Manual Temperature Calibration (t.CAL) submenu. This parameter allows you to
manually adjust the thermocouple, RTD, or Thermistor calibration curves provided with the
unit. Once a curve has been manually adjusted, this setting can be set to NoNE to disable the
manual adjustment (resetting to factory defaults will remove any manually adjustment
factors).
Navigate to the desired setting. Settings include:
• NoNE – No manual calibration (factory default)
• 1.PNt – Manually create a 1-point calibration
• 2.PNt – Manually create a 2-point calibration
• ICE.P – Manually create a 1-point calibration at 0oC
Select the indicated option.
Omega Engineering | www.omega.com
28
PLATINUMTM Series User’s Guide
Reference Section: Initialization Mode (INIt)
4.6.1 No Manual Temperature Calibration Adjustment (INIt >
t.CAL > NoNE)
Select NoNE to use the standard temperature sensor calibration curves. This mode will be
used by most users.
4.6.2 Manual Temperature Calibration Offset Adjustment (INIt >
t.CAL > 1.PNt)
Select 1.PNt to manually adjust the offset of the calibration curve base on the current
reading.
Set the Manual Thermocouple Calibration Offset value in degrees.
Confirm the Offset value and pair it with the current input reading.
4.6.3 Manual Temperature Calibration Offset and Slope
Adjustment (INIt > t.CAL > 2.PNt)
Select 2.PNt to use 2 points to manually adjust both the offset and slope of the calibration
curve.
Navigate to the desired setting. Settings include the following:
• R.Lo – Set low point in degrees, default = 0, and associate with input reading
• R.HI – Set high point in degrees, default = 999.9, and associate with input reading
Select the indicated setting.
Set the Temperature for R.Lo or R.HI.
Confirm the value and pair it with the current input reading.
4.6.4 Temperature Ice Point Calibration (INIt > t.CAL > ICE.P)
Select ICE.P to calibrate the zero point for the temperature sensor. This function basically
operates the same as a 1.PNT offset adjustment restricted to a measurement at the freezing
point of water.
The LED display shows ok? and requires confirmation. Confirm the Ice Point reset.
4.7
Save Current Configuration for All Parameters to a File (INIt > SAVE)
Select Save Current Configuration Settings (SAVE) as the command to execute. If no thumb
drive is present the failure code E010 is displayed. Otherwise, a numeric designation for the
save file is then specified and confirmed before the SAVE command executes.
Important Note: The configuration file is a tab separated text file with a “.TXT” extension. It
can be loaded onto a PC, read into Excel then modified there. Once modified, save it back as
a tab separated .TXT file and it can then be loaded back into the unit using the INIt > LoAd
command. This capability can be especially useful for editing complex multi ramp and soak
programs. For more information on the configuration file format, see the “Load and Save File
Format Manual”.
Select a numeric file name from the range 0–99.
Omega Engineering | www.omega.com
29
PLATINUMTM Series User’s Guide
Reference Section: Initialization Mode (INIt)
Confirm the SAVE command. This saves the configuration to the file number specified. If the
SAVE operation fails, the failure code w004 is displayed. If the SAVE operation is successful,
doNE is displayed.
4.8
Load a Configuration for All Parameters from a File (INIt > LoAd)
Select the Load a Configuration (LoAd) command. If no thumb drive is present the failure code
E010 is displayed. Otherwise, a numeric designation for the file to be loaded is then specified
and confirmed before the LoAd command executes.
Select a numeric file name from the range 0–99.
Confirm the LoAd command. This loads the configuration from the file number specified. If
the LoAd operation fails, the failure code w003 is displayed. If the LoAd operation is
successful, doNE is displayed.
4.9
Display Firmware Revision Number (INIt > VER.N)
Select the Display Firmware Revision Number (VER.N) function. The currently installed version
number is displayed in the format 1.23.4 where “1” is the major revision number, “23” is the
minor revision number, and “4” is the bug fix update number.
4.10 Update Firmware Revision (INIt > VER.U)
Select the Update Firmware Revision (VER.U) function. Note that updating your firmware will
reset the unit to factory defaults as well. If you want to keep you configuration settings, save
them before installing new firmware.
The LED display shows ok? and requires confirmation. Confirm the firmware update. New
firmware will then be read from a thumb drive connected to the USB port.
4.11 Reset to Factory Default Parameters (INIt > F.dFt)
Select the Reset to Factory Default Parameters (F.dFt) function. The LED display shows ok?
and requires confirmation.
Confirm the parameter reset.
4.12 Password-Protect Initialization Mode Access (INIt > I.Pwd)
Select the Password Protect Initialization Mode Access (I.Pwd) function.
Navigate to the desired setting. Settings include the following:
• No – Do not require a password for INIt Mode (factory default)
• yES – Require a password for INIt Mode; users will be prompted for this password
when selecting INIt
Select the indicated setting.
If yES, set the numeric password from the range 0000–9999.
Confirm the password.
4.13 Password-Protect Programming Mode Access (INIt > P.Pwd)
Select the Password Protect Programming Mode Access (P.Pwd) function.
Omega Engineering | www.omega.com
30
PLATINUMTM Series User’s Guide
Reference Section: Programming Mode (PRoG)
Navigate to the desired setting. Settings include the following:
• No – Do not require a password for PRoG Mode (factory default)
• yES – Require a password for PRoG Mode; users will be prompted for this password
when selecting PRoG
Select the indicated setting.
If yES, set the numeric password from the range 0000–9999.
Confirm the password.
5. Reference Section: Programming Mode (PRoG)
Use Programming Mode to set the following parameters and perform the following functions:
5.1
Setpoint 1 Configuration (PRoG > SP1) ....................................................................................... 31
5.2
Setpoint 2 Configuration (PRoG > SP2) ....................................................................................... 31
5.3
Alarm Mode Configuration (PRoG > ALM.1, ALM.2)................................................................... 31
5.4
Output Channel Configuration (PRoG > dtR1 or PRoG > dtR2)................................................... 35
5.1
Setpoint 1 Configuration (PRoG > SP1)
Select the Setpoint 1 (SP1) parameter.
Set the process goal value for PId or oN.oF control.
Confirm the value.
5.2
Setpoint 2 Configuration (PRoG > SP2)
Select the Setpoint 2 (SP2) parameter. SP2 is used with Alarm functions and with on/off
control when setting up for Heat/Cool Control Mode.
Navigate to the desired setting. Settings include the following:
• ASbo – The value for SP2 is specified in Absolute Mode (factory default)
• dEVI – The value specified for SP2 indicates an offset (positive or negative) from
SP1; this allows SP2 to track any changes to SP1 automatically
Select the indicated setting.
Set the correct value.
Confirm the value.
5.3
Alarm Mode Configuration (PRoG > ALM.1, ALM.2)
Select Alarm Configuration 1 (ALM.1) or Alarm Configuration 2 (ALM.2) in order to set up,
change, enable, or disable Alarms. Either or both Alarms can be assigned to trigger display
color changes, annunciators, and / or outputs. Either or both Alarm configurations can be
assigned to multiple outputs. The ALM.1 and ALM.2 configuration menus have all of the
same settings and function in the same manner.
Omega Engineering | www.omega.com
31
PLATINUMTM Series User’s Guide
Reference Section: Programming Mode (PRoG)
Navigate to the Alarm setting you want to change. Settings include the following:
• tyPE – Alarm type absolute or deviation
• Ab.dV – Alarm references values (ALR.H and ALR.L) or deviation from SP1 or SP2
• ALR.H – Alarm high parameter, used for Alarm trigger calculations
• ALR.L – Alarm low parameter, used for Alarm trigger calculations
• A.CLR – Alarm color indication
• HI.HI – High High / Low Low offset value
• LtCH – Alarm latching
• CtCL – Alarm action (normally open or normally closed)
• A.P.oN – Alarm power-on behavior
• dE.oN – Time delay for Alarm trigger unless the condition persists, default = 1.0 s
• dE.oF – Time delay for cancelling Alarms after being triggered; prevents Alarm
“chatter,” default = 0.0 s
Select the indicated setting.
5.3.1 Alarm Type (PRoG > ALM.1, ALM.2 > tyPE)
Select the Alarm Type (tyPE) parameter. This parameter will control the basic behavior of the
selected alarm.
Navigate to the desired setting. Settings include the following:
• oFF – Alarm is off (factory default)
• AboV – Alarm is triggered when the process value exceeds ALR.H (Absolute Mode)
or the specified Setpoint plus ALR.H (Deviation Mode)
• bELo – Alarm is triggered when the process value is less than ALR.L (Absolute
Mode) or the specified Setpoint minus ALR.L (Deviation Mode)
• HI.Lo. – Alarm is triggered when the process value is outside the ALR.L–ALR.H range
(Absolute Mode) or the range defined by the band around the specified Setpoint as
determined by ALR.L and ALR.H (Deviation Mode)
• bANd – Alarm is triggered when the process value is within the ALR.L–ALR.H range
(Absolute Mode) or within the band around the specified Setpoint as determined by
ALR.L and ALR.H (Deviation Mode)
Note: Table 5.1 compares the Alarm range options, and Figure 5.1 represents the Alarm range
options graphically.
Select the indicated setting.
Omega Engineering | www.omega.com
32
PLATINUMTM Series User’s Guide
Setting
AboV
bELo
HI.Lo.
bANd
Absolute (AbSo)
> ALR.H
< ALR.L
< ALR.L or > ALR.H
> ALR.L and < ALR.H
Reference Section: Programming Mode (PRoG)
Deviation (d.SP1)
> SP1 + ALR.H
< SP1 - ALR.L
< SP1 - ALR.L or > SP1 + ALR.H
> SP1 - ALR.L and < SP1 + ALR.H
Deviation (d.SP2)
> SP2 + ALR.H
< SP2 - ALR.L
< SP2 - ALR.L or > SP2 + ALR.H
> SP2 - ALR.L and < SP2 + ALR.H
Table 5.1 – Alarm Range Option Comparison
Absolute Mode (AbSo)
ALR.L
bELo, HI.Lo.
bANd
ALR.H
AboV, HI.Lo.
Lower
Deviation Mode (dEVI)
bELo, HI.Lo.
Higher
bANd
ALR.L
SP1
SP2
ALR.H
Lower
AboV, HI.Lo.
(SP2 has the same
alarm options.)
Higher
Figure 5.1 – Alarm Range Option Diagram
5.3.2 Absolute or Deviation Alarm (PRoG > ALM.1, ALM.2 > tyPE >
Ab.dV)
Select the Absolute or Deviation Alarm (Ab.dV) parameter.
Navigate to the correct setting. Settings and subsettings include the following:
• AbSo – Alarm is triggered using calculations based on the absolute values of ALR.H
or ALR.L used as specified by the tyPE parameter
• d.SP1 – Alarm is triggered using calculations based on values relative to SP1 as
specified by the tyPE parameter
• d.SP2 – Alarm is triggered using calculations based on values relative to SP2 as
specified by the tyPE parameter
Select the desired setting.
5.3.3 Alarm High Reference (PRoG > ALM.1, ALM.2 > tyPE >
ALR.H)
Select the Alarm High Reference (ALR.H) parameter.
Set the Alarm High Reference value.
Confirm the value.
5.3.4 Alarm Low Reference (PRoG > ALM.1, ALM.2 > tyPE > ALR.L)
Select the Alarm Low Reference (ALR.L) parameter.
Set the Alarm Low Reference value.
Confirm the value.
Omega Engineering | www.omega.com
33
PLATINUMTM Series User’s Guide
Reference Section: Programming Mode (PRoG)
5.3.5 Alarm Color (PRoG > ALM.1, ALM.2 > A.CLR)
Select the Alarm Color (A.CLR) parameter.
Navigate to the desired option. Options include the following:
• REd – Alarm conditions are displayed in red (factory default)
• AMbR – Alarm conditions are displayed in amber
• GRN – Alarms conditions are displayed in green
• dEFt – Alarms do not affect the default display color
Select the desired option.
5.3.6 Alarm High High / Low Low Offset Value (PRoG > ALM.1,
ALM.2 > HI.HI)
Select the Alarm Offset Value (HI.HI) parameter. This parameter allows an offset to be added
to the Alarm trigger point(s) which will flash the display when exceeded. Depending on the
Alarm type the offset can apply above the trigger point, below it, or both. This is illustrated in
Figure 5.2. HI.HI works with both absolute and deviation Alarms.
Navigate to the correct option. Options include the following:
• oFF – High High / Low Low function disabled (factory default)
• oN – Display will flash in the color determined by the A.CLR parameter when the
Process Value is greater than the HI.HI offset value away from the Alarm condition
settings (in either direction)
Select the indicated option.
For oN, set the offset value.
Confirm the value.
Lo.Lo
ALR.L
bELo, HI.Lo.
bANd
ALR.H
AboV, HI.Lo.
HI.HI
Lower
Higher
Figure 5.2 – Alarm HI.HI parameter
5.3.7 Alarm Latching (PRoG > ALM.1, ALM.2 > LtCH)
Select the Alarm Latching (LtCH) parameter.
Navigate to the desired option. Options include the following:
• No – Alarm does not latch (factory default); the Alarm turns off when the Process
Value returns to a non-Alarm condition
• yES – Alarm latches; even if the Process Value returns to a non-Alarm condition, the
Alarm condition remains active and must be unlatched using oPER > L.RSt
• botH – Alarm latches and can be unlatched either by using oPER > L.RSt from the front
panel or via the digital input
• RMt – Alarm latches and can be unlatched only via the digital input
Select the indicated option.
Omega Engineering | www.omega.com
34
PLATINUMTM Series User’s Guide
Reference Section: Programming Mode (PRoG)
5.3.8 Alarm Normally Closed, Normally Open (PRoG > ALM.1,
ALM.2 > CtCL)
Select the Alarm Normally Open or Normally Closed (CtCL) parameter.
Navigate to the desired option. Options include the following:
• N.o. – Normally open: output is activated when the Alarm condition is met (factory
default)
• N.C. – Normally closed: output is activated in normal conditions, but turned off in
the Alarm condition
Select the indicated option.
5.3.9 Alarm Power-On Behavior (PRoG > ALM.1, ALM.2 > A.P.oN)
Select the Alarm Power-On Behavior (A.P.oN) parameter.
Navigate to the desired option. Option include:
• yES – Alarms are active at power-on and do not require crossing the Setpoint
(factory default)
• No – Alarms are inactive at power-on; the process reading must cross the Alarm
condition before being activated
Select the indicated option.
5.3.10 Alarm On Delay (PRoG > ALM.1, ALM.2 > dE.oN)
Select the Alarm On Delay (dE.oN) parameter.
Set the number of seconds to delay triggering the Alarm. (The default is 0.) This setting can be
used to prevent false Alarm triggering when the Process Value only briefly enters an Alarm
condition.
Confirm the value.
5.3.11 Alarm Off Delay (PRoG > ALM.1, ALM.2 > dE.oF)
Select the Alarm Off Delay (dE.oF) parameter.
Set the number of seconds to delay cancelling the Alarm. (The default is 0.) This setting can be
used to prevent Alarm chatter.
Confirm the value.
5.4
Output Channel Configuration (PRoG > dtR1 or PRoG > dtR2)
The Output Configuration submenus are only available if panel meter unit is a “-330” version
with two Double Throw Mechanical Relays installed. Navigate to the desired output channel
in order to configure that output.
• dtR1 – Double Throw Mechanical Relay number 1
• dtR2 – Double Throw Mechanical Relay number 2
Note: Both relays have the same menu structure.
Select the indicated relay and then select ModE in order to change the configuration of that
relay.
Omega Engineering | www.omega.com
35
PLATINUMTM Series User’s Guide
Reference Section: Operating Mode (oPER)
5.4.1 Output Channel Mode (PRoG > dtR1, dtR2 > ModE)
Select Output Channel Mode (ModE) to configure the specified output.
Navigate to the desired setting. Settings include the following:
• oFF – Turn off the output channel (factory default)
• ALM.1 – Set the output to be an Alarm, activating when alarm conditions according
to the ALM.1 configuration parameters are active.
• ALM.2 – Set the output to be an Alarm, activating when alarm conditions according
to the ALM.2 configuration parameters are active.
Select the indicated setting.
6. Reference Section: Operating Mode (oPER)
Operating Mode is used to activate the unit’s monitoring and controlling functions. It also allows
shortcut access to the Setpoint parameters while still running. Use Operating Mode to set the following
parameters and perform the following functions:
6.1
Normal Run Mode (oPER > RUN) ................................................................................................ 36
6.2
Change Setpoint 1 (oPER > SP1).................................................................................................. 37
6.3
Change Setpoint 2 (oPER > SP2).................................................................................................. 37
6.4
Clear Latched Alarms (oPER > L.RSt) ........................................................................................... 37
6.5
Display Valley Reading (oPER > VALy) ......................................................................................... 37
6.6
Display Peak Reading (oPER > PEAk) ........................................................................................... 37
6.7
Standby Mode (oPER > Stby) ...................................................................................................... 38
6.1
Normal Run Mode (oPER > RUN)
Select Normal Run Mode (RUN). The ENTER button starts the unit operating according to the
current input, output, and communications settings. Run Mode will automatically be entered
and activated at unit power-on if the Power on Confirmation (4.5.1 Power On Confirmation
(INIt > SFty > PwoN)) parameter is set to dSbL. The process value is displayed in the main
display, and if the unit uses dual displays, the current Setpoint value is displayed in the
secondary display. With the unit remaining active, the oPER menu selections can be navigated
to using the LEFT and RIGHT buttons.
Omega Engineering | www.omega.com
36
PLATINUMTM Series User’s Guide
6.2
Reference Section: Operating Mode (oPER)
Change Setpoint 1 (oPER > SP1)
Select the Change Setpoint 1 (SP1) parameter. This function allows Setpoint 1 to be changed
while remaining in Run Mode. Pressing the ENTER button after changing a Setpoint while in
RUN Mode returns you to RUN Mode with no interruption in monitoring, control, or
communications operations. If remote Setpoint is enabled, Setpoint 1 cannot be changed
here and the display will flash.
Set the desired value for Setpoint 1. When changing the setpoints from the operating mode
menu, the left arrow decreases the value with acceleration and the right arrow increases the
value with acceleration. This is different from the decimal place switching numeric change
control in other places as changes made here are usually limited.
Confirm the value.
6.3
Change Setpoint 2 (oPER > SP2)
Select the Change Setpoint 2 (SP2) parameter. This function allows Setpoint 2 to be changed
while remaining in RUN Mode. The current value for Setpoint 2 flashes in the main display.
Setpoint 2 is only used for Alarms and as the cooling Setpoint in Heat/Cool Control Mode. See
6.2 Change Setpoint 1 (oPER > SP1) for additional information.
Set the desired value for Setpoint 2.
Confirm the value.
6.4
Clear Latched Alarms (oPER > L.RSt)
Select the Clear Latched Alarms command (L.RSt) to clear currently latched Alarms.
Alternatively, use digital input to activate the L.RSt command if configured in the PRoG menu
as explained in 5.3.4 Alarm Latching (PRoG > ALM.1, ALM.2 > LtCH).
Return to RUN Mode or to displaying “RUN” depending on the Operating Safety parameter
setting (4.5.2 Operating Mode Confirmation (INIt > SFty > oPER)).
6.5
Display Valley Reading (oPER > VALy)
Select Display Valley Reading (VALy) to change the process value displayed to the lowest
reading since VALy was last cleared.
Clear the VALy reading buffer. Return to RUN Mode or to displaying “RUN” depending on the
Operating Safety parameter setting (4.5.2 Operating Mode Confirmation (INIt > SFty > oPER)).
Note: Using the other buttons to navigate away from VALy does not clear the VALy reading
buffer.
6.6
Display Peak Reading (oPER > PEAk)
Select Display Peak Reading (PEAk) to change the process value displayed to the highest
reading since PEAk was last cleared.
Clear the PEAk reading buffer. Return to RUN Mode or to displaying “RUN” depending on the
Operating Safety parameter setting (4.5.2 Operating Mode Confirmation (INIt > SFty > oPER)).
Note: Using the other buttons to navigate away from PEAk does not clear the PEAk reading
buffer.
Omega Engineering | www.omega.com
37
PLATINUMTM Series User’s Guide
6.7
Reference Section: Operating Mode (oPER)
Standby Mode (oPER > Stby)
Select Standby Mode (Stby) to disable outputs and Alarm conditions. Stby is displayed until
navigating elsewhere. Navigate to any desired initialization or programming settings to
change them or to adjust the process.
Return to RUN Mode or to displaying “RUN” depending on the Operating Safety parameter
setting (4.5.2 Operating Mode Confirmation (INIt > SFty > oPER)).
Omega Engineering | www.omega.com
38
PLATINUMTM Series User’s Guide
Specifications
7. Specifications
7.1
Inputs
Input Types
Current Input
Voltage Input
Thermocouple Input
(ITS 90)
RTD Input (ITS 90)
Configuration
Polarity
Accuracy
Resolution
Input Impedances
Temperature
Stability
A/D Conversion
Reading Rate
Digital Filter
CMRR
Excitation
Setpoint Adjustment
Warm Up to Rated
Accuracy
7.2
Single pole, double throw mechanical relay, 250 Vac or 30 Vdc at 3 A
(Resistive Load)
Communications (USB Standard, Optional Serial and Ethernet)
Connection
USB
Ethernet
Serial
Protocols
7.4
100/500/1000 Ω Pt sensor, 2-, 3- or 4-wire; 0.00385 (100 Ω only), 0.00392
(100 Ω only), or 0.003916 (100 Ω only) curves
Differential
Bipolar
Refer to Table 7.1
0.1°F/°C temperature; 10 µV process
Process Voltage: 10 MΩ for +/- 100 mV
Process Voltage: 1 MΩ for other voltage ranges
Process Current: 5 Ω
Thermocouple: 10 KΩ max
• RTD: 0.04°C/°C
• TC at 25°C (77°F): 0.05°C/°C (cold junction compensation)
• Process: 50 ppm/°C
24 bit Sigma Delta
20 samples per second
Programmable from 0.05 seconds (filter = 1) to 6.4 seconds (filter = 128)
120 dB
Firmware selectable (no jumpers to set) to 5, 10, 12, and 24 Vdc @ 25 mA
-9999 to +9999 counts
30 min
Outputs (Optional with “-AL” Configurations)
SPDT Relay
7.3
Thermocouple, RTD, Thermistor, Analog Voltage, Analog Current
4 to 20 mA, 0 to 24 mA Scalable
-100 to 100 mV, -1 to 1 V, -10 to 10 Vdc Scalable
K, J, T, E, R, S, B, C, N
USB: Female Micro-USB, Ethernet: Standard RJ45, Serial: Screw terminals
USB 2.0 Host or Device
Standards Compliance IEEE 802.3 10/100 Base-T Auto-switching, TCP/IP, ARP,
HTTPGET
Software Selectable RS/232 or RS/485. Programmable 1200 to 115.2 K baud.
Omega ASCII, Modbus ASCII / RTU
Isolation
Approvals
UL, C-UL, and CE (8. Approvals Information)
Omega Engineering | www.omega.com
39
PLATINUMTM Series User’s Guide
Power to
Input/Output
Power to Relays/SSR
Outputs
Relays/SSR to
Relay/SSR Outputs
RS-232/485 to
Inputs/Outputs
7.5
• 2300 Vac per 1 min test
• 1500 Vac per 1 min test (Low-Voltage/Power Option)
2300 Vac per 1 min test
2300 Vac per 1 min test
500 Vac per 1 min test
General
Display
Dimensions
Panel Cutout
Environmental
Conditions
External Fuse
Required
Line Voltage/Power
Low-Voltage/Power
Option
Protection
Weight
1
Specifications
4-digit, 9-segment LED; red, green, and amber programmable colors for process
variable, Setpoint, and temperature units
• 10.2 mm (0.40"): 32Pt, 16Pt
• 21 mm (0.83"): 8Pt
• 8Pt Series: 48 H x 96 W x 127 mm D, (1.89 x 3.78 x 5")
• 16Pt Series: 48 H x 48 W x 127 mm D, (1.89 x 1.89 x 5")
• 32Pt Series: 25.4 H x 48 W x 127 mm D, (1.0 x 1.89 x 5")
• 8Pt Series: 45 H x 92 mm W (1.772" x 3.622"), 1/8 DIN
• 16Pt Series: 45 mm (1.772") square, 1/16 DIN
• 32Pt Series: 22.5 H x 45 mm W (0.886" x 1.772"), 1/32 DIN
All Models: 0–50°C (32–122°F), 90% RH non-condensing
Time-Delay, UL 248-14 listed:
• 100 mA/250 V
• 400 mA/250 V (Low-Voltage Option)
Time-Lag, IEC 127-3 recognized:
• 100 mA/250 V
• 400 mA/250 V (Low-Voltage Option)
• 90–240 Vac +/-10%, 50-400 Hz 1
• 110–375 Vdc, equivalent voltage
• 4 W: power for 8Pt, 16Pt, 32Pt Models
• 5 W: power for 8DPt, 16DPt Models
External power source must meet Safety Agency Approvals. Units can be
powered safely with 24 Vac power, but no certification for CE/UL is claimed.
• 12–36 Vdc: 3 W power for 8Pt, 16Pt, 32Pt
• NEMA-4x/Type 4x/IP65 front bezel: 32Pt, 16Pt
• NEMA-1/Type 1 front bezel: 8Pt
• 8Pt Series: 295 g (0.65 lb)
• 16Pt Series: 159 g (0.35 lb)
• 32Pt Series: 127 g (0.28 lb)
No CE compliance above 60 Hz
Omega Engineering | www.omega.com
40
PLATINUMTM Series User’s Guide
Input Type
Process
Process
J Type T/C
K Type T/C
Specifications
Description
Process Voltage
Process Current
Iron-Constantan
CHROMEGA®-ALOMEGA®
Range
+/-100 mV, +/-1, +/-10 Vdc
Scalable within 0 to 24 mA
-210 to 1200°C / -346 to 2192°F
-270 to -160°C / -454 to -256°F
-160 to -1372°C / -256 to 2502°F
T Type T/C
Copper-Constantan
-270 to -190°C / -454 to -310°F
-190 to 400°C / -310 to 752°F
E Type T/C
CHROMEGA®-Constantan
-270 to -220°C / -454 to -364°F
-220 to 1000°C / -364 to 1832°F
R Type T/C
Pt/13%Rh-Pt
-50 to 40°C / -58 to 104°F
40 to 1788°C / 104 to 3250°F
S Type T/C
Pt/10%Rh-Pt
-50 to 100°C / -58 to 212°F
100 to1768°C / 212 to 3214°F
B Type T/C
30%Rh-Pt/6%Rh-Pt
100 to 640°C / 212 to 1184°F
640 to 1820°C / 1184 to 3308°F
C Type T/C
5%Re-W/26%Re-W
0 to 2320°C / 32 to 4208°F
N Type T/C
Nicrosil-Nisil
-250 to -100°C / -418 to -148°F
-100 to 1300°C / -148 to 2372°F
RTD
Pt, 0.00385, 100 Ω, 500 Ω, 1000 Ω -200 to 850°C / -328 to 1562°F
RTD
Pt, 0.003916, 100 Ω
-200 to 660°C / -328 to 1220°F
RTD
Pt, 0.00392, 100 Ω
-200 to 660°C / -328 to 1220°F
Thermistor
2252 Ω
-40 to 120C / -40 to 248F
Thermistor
5K Ω
-30 to 140C / -22 to 284F
Thermistor
10K Ω
-20 to 150C / -4 to 302F
Table 7.1 – Ranges and Accuracies for Supported Inputs
41
Accuracy
0.03% Rdg
0.03% Rdg
0.4°C / 0.7°F
1.0°C / 1.8°F
0.4°C / 0.7°F
1.0°C / 1.8°F
0.4°C / 0.7°F
1.0°C / 1.8°F
0.4°C / 0.7°F
1.0°C / 1.8°F
0.5°C / 0.9°F
1.0°C / 1.8°F
0.5°C / 0.9°F
1.0°C / 1.8°F
0.5°C / 0.9°F
0.4°C / 0.7°F
1.0°C / 1.8°F
0.4°C / 0.7°F
0.3°C / 0.5°F
0.3°C / 0.5°F
0.3°C / 0.5°F
0.2°C / 0.35°F
0.2°C / 0.35°F
0.2°C / 0.35°F
Code
Error Code Descriptions
E001
File not found during load operation
E002
Bad file format during load operation
E003
File read error during load operation
E004
File write error during save operation
E005
Device not found for read or write operation
E006
Loop break timeout
E009
Input signal out of range
E010
Communications device not ready (USB, Serial, etc)
E011
Communications install error
E012
Failed attempt to open a communications device
E013
Failed attempt to read from a communications device
E014
Failed attempt to write to a communications device
E015
Bad reboot, attempt to reboot from an unknown source
Table 7.2 – Error Code Descriptions
Omega Engineering | www.omega.com
PLATINUMTM Series User’s Guide
Approvals Information
8. Approvals Information
This product conforms to the EMC directive 89/336/EEC amended by 93/68/EEC and with the
European Low-Voltage Directive 72/23/EEC.
Electrical Safety EN61010-1:2010
Safety requirements for electrical equipment for measurement, control, and laboratory
Double Insulation; Pollution Degree 2
Dielectric withstand Test per 1 min
•
•
•
•
•
•
•
Power to Input/Output:
Power to Input/Output 2:
Power to Relays/SSR Output:
Ethernet to Inputs:
Isolated RS232 to Inputs:
Isolated Analog to Inputs:
Analog/Pulse to Inputs:
2300 Vac (3250 Vdc)
1500 Vac (2120 Vdc)
2300 Vac (3250 Vdc)
1500 Vac (2120 Vdc)
500 Vac (720 Vdc)
500 Vac (720 Vdc)
No Isolation
Measurement Category I
Category I includes measurements performed on circuits not directly connected to the Mains Supply
(power). Maximum Line-to-Neutral working voltage is 50Vac/dc. This unit should not be used in
Measurement Categories II, III, and IV.
Transients Overvoltage Surge (1.2 / 50uS pulse)
• Input Power:
2500 V
3
1500 V
• Input Power :
• Ethernet:
1500 V
• Input/Output Signals:
500 V
EMC EN61326:1997 + and A1:1998 + A2:2001
Immunity and Emissions requirements for electrical equipment for measurement, control, and
laboratory are as follows:
•
•
EMC Emissions Table 4, Class A of EN61326
EMC Immunity 4 Table 1 of EN61326
UL File Number: E209855
2
Low-voltage DC power option: Units configured for external low power DC voltage, 12–36Vdc.
Ibid.
4
I/O signal and control lines require shielded cables, and these cables must be located on conductive cable trays or
in conduits. The length of these cables should not exceed 30 meters.
3
Omega Engineering | www.omega.com
42
Omega Engineering | www.omega.com
M5460/0415
Omega Engineering | www.omega.com