1
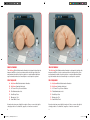
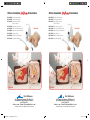
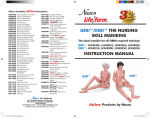
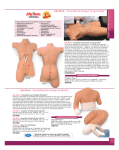
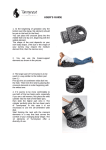
Male Catheterization Simulator LF00855U Instruction Manual Products by Nasco NP158_RV7_14_LF00855_MaleCath.indd 1 Male Catheterization Simulator LF00855U Instruction Manual Products by Nasco 3/12/15 9:10 AM E. E. A. A. B. B. C. C. F. F. D. D. G. G. About the Simulator About the Simulator The Life/form® Male Catheterization Simulator is designed to duplicate the human condition as closely as modern plastics technology allows. Care and treatment should be used since abuse or rough treatment will damage the simulator almost as it would injure or cause pain to a patient. The Life/form® Male Catheterization Simulator is designed to duplicate the human condition as closely as modern plastics technology allows. Care and treatment should be used since abuse or rough treatment will damage the simulator almost as it would injure or cause pain to a patient. List of Components List of Components A. Life/form® Male Catheterization Simulator A. Life/form® Male Catheterization Simulator B. Life/form® Simulator Lubricant B. Life/form® Simulator Lubricant C. 16 French Foley Silicone Catheter C. 16 French Foley Silicone Catheter D. Fluid Administration Set D. Fluid Administration Set E. Hard Carry Case E. Hard Carry Case F. Obstruction Tool F. Obstruction Tool G. Small White Towel G. Small White Towel Actual product may vary slightly from photo. Nasco reserves the right to change product color, materials, supplies, or function as needed. Actual product may vary slightly from photo. Nasco reserves the right to change product color, materials, supplies, or function as needed. 2 2 NP158_RV7_14_LF00855_MaleCath.indd 2 3/12/15 9:10 AM Figure 1 Figure 1 Figure 2 Figure 2 Internal Structure Internal Structure Set Up Set Up A. To fill the Simulated Bladder 1. Hang the fluid administration set 18" above the simulator. Use Fluid Supply Stand (LF01022U shown, sold separately) or similar device. Note: Hanging the fluid administration set higher increases the water pressure and may cause leaking. 2. Close the slide clamp on the tube of the fluid administration set. 3. Squeeze open the top of the bag and fill with water. (To extend the useful life of your simulator, Nasco recommends distilled water.) 4. Close the pinch clamp on the drain tube from the male catheter ization Simulator. 5. Connect the quick disconnect fittings of the administration set and simulator tubing. (See figure 1.) 6. Open the slide clamp on the administration unit and the pinch clamp on the simulator drain tube. 7. Allow water to flow through the simulator until it exits the drain tube. Close pinch clamp. (See figure 2.) The system is now filled with water and pressurized. A. To fill the Simulated Bladder 1. Hang the fluid administration set 18" above the simulator. Use Fluid Supply Stand (LF01022U shown, sold separately) or similar device. Note: Hanging the fluid administration set higher increases the water pressure and may cause leaking. 2. Close the slide clamp on the tube of the fluid administration set. 3. Squeeze open the top of the bag and fill with water. (To extend the useful life of your simulator, Nasco recommends distilled water.) 4. Close the pinch clamp on the drain tube from the male catheter ization Simulator. 5. Connect the quick disconnect fittings of the administration set and simulator tubing. (See figure 1.) 6. Open the slide clamp on the administration unit and the pinch clamp on the simulator drain tube. 7. Allow water to flow through the simulator until it exits the drain tube. Close pinch clamp. (See figure 2.) The system is now filled with water and pressurized. • • • • • • • • Simulator bladder Simulated mucosal folds Simulated bulbous urethra Simulated internal urethral sphincter 3 NP158_RV7_14_LF00855_MaleCath.indd 3 Simulator bladder Simulated mucosal folds Simulated bulbous urethra Simulated internal urethral sphincter 3 3/12/15 9:11 AM B. Catheter Selection 1. Use only 16 French Foley catheters. The Male Catheterization Simulator is precisely engineered to provide the most lifelike experience possible. Use of the 16 French Foley catheter facilitates catheterization and helps minimize damage to the simulated urethra. Use of larger catheters results in unnecessarily difficult catheter ization procedures. Use off smaller sizes will result in leakage around the catheter. 2. Only silicone catheters should be used. Latex catheters, if left in contact with the simulator, will damage the simulator and void the warranty. B. Catheter Selection 1. Use only 16 French Foley catheters. The Male Catheterization Simulator is precisely engineered to provide the most lifelike experience possible. Use of the 16 French Foley catheter facilitates catheterization and helps minimize damage to the simulated urethra. Use of larger catheters results in unnecessarily difficult catheter ization procedures. Use off smaller sizes will result in leakage around the catheter. 2. Only silicone catheters should be used. Latex catheters, if left in contact with the simulator, will damage the simulator and void the warranty. C.Lubrication 1. Lubricate the simulator’s urethra and the catheter liberally EVERY TIME a catheterization procedure is attempted. This provides max imum realism and minimizes damage to the urethra wall of the simulator. 2. Use only Life/form® Simulator Lubricant (LF00985U). Make NO OTHER substitutions. Even water-soluble lubricants tend to build up in the urethra over a period of time. 3. Initial use after long storage or heavy usage during a long class session will require heavy lubrication. Do this by inserting the lubricated catheter about half way, then remove and relubricate several times before inserting the catheter fully. C.Lubrication 1. Lubricate the simulator’s urethra and the catheter liberally EVERY TIME a catheterization procedure is attempted. This provides max imum realism and minimizes damage to the urethra wall of the simulator. 2. Use only Life/form® Simulator Lubricant (LF00985U). Make NO OTHER substitutions. Even water-soluble lubricants tend to build up in the urethra over a period of time. 3. Initial use after long storage or heavy usage during a long class session will require heavy lubrication. Do this by inserting the lubricated catheter about half way, then remove and relubricate several times before inserting the catheter fully. Figure 3 Figure 3 Figure 4 Figure 4 General Instructions for Use General Instructions for Use Catheterization Procedure Note: To avoid the possibility of leakage, be sure to use a 16 French silicone Foley catheter (supplied with the simulator). A.Lubricate catheter by coating with Life/form® simulator lubricant. (See figure 3.) (Obtain a catheter bag or water-safe container; not included.) B.Slowly insert the catheter about 2" into the urethra with the penis in the normal hanging position until the restriction simulating the mucosal fold is encountered. (See figure 4.) Catheterization Procedure Note: To avoid the possibility of leakage, be sure to use a 16 French silicone Foley catheter (supplied with the simulator). A.Lubricate catheter by coating with Life/form® simulator lubricant. (See figure 3.) (Obtain a catheter bag or water-safe container; not included.) B.Slowly insert the catheter about 2" into the urethra with the penis in the normal hanging position until the restriction simulating the mucosal fold is encountered. (See figure 4.) 4 4 NP158_RV7_14_LF00855_MaleCath.indd 4 3/12/15 9:11 AM Figure 5 Figure 5 Figure 6 Figure 7 Figure 6 Note: It may be necessary to withdraw the catheter a little and stretch the penis slightly to straighten the blockage of the mucosal fold. (See figure 5.) Note: It may be necessary to withdraw the catheter a little and stretch the penis slightly to straighten the blockage of the mucosal fold. (See figure 5.) C.Proceed by inserting the catheter another 2". You have now approached the bulbous urethra. Elevate the penis about 60 degrees to straighten the urethra and proceed with the insertion. (See figure 6.) C.Proceed by inserting the catheter another 2". You have now approached the bulbous urethra. Elevate the penis about 60 degrees to straighten the urethra and proceed with the insertion. (See figure 6.) D.The next restriction is the simulated sphincter entering the bladder. With experience, you will feel a “pop” as the catheter passes into the bladder. It will require approximately 7"-8" of catheter. Continue insertion until water flows from the catheter. (See figure 7.) (Use a catheter bag or water-safe container; not included.) Note: Special care should be taken when using a Foley catheter. Cuff inflation should only be attempted when the catheter is in the proper position inside the bladder. Just as in a real patient, the cuff must be completely deflated before the catheter is removed. Improper use of a Foley catheter can result in damage to the simulator. Figure 7 D.The next restriction is the simulated sphincter entering the bladder. With experience, you will feel a “pop” as the catheter passes into the bladder. It will require approximately 7"-8" of catheter. Continue insertion until water flows from the catheter. (See figure 7.) (Use a catheter bag or water-safe container; not included.) Note: Special care should be taken when using a Foley catheter. Cuff inflation should only be attempted when the catheter is in the proper position inside the bladder. Just as in a real patient, the cuff must be completely deflated before the catheter is removed. Improper use of a Foley catheter can result in damage to the simulator. User Assistance User Assistance • Lack of sufficient lubrication may make inserting the catheter difficult — see Set Up — C. Lubrication • Water does not flow even after proper insertion — check fluid administration set water level. If there is still no water, remove catheter and repressurize the system following Set Up— A. To fill the Simulated Bladder • Dried Lubricant Obstruction. Use the supplied obstruction tool to clear dried lubricant from the simulated urethra. Follow Lubrication and Catherization Procedures using the obstruction tool. Flush the system with warm water to completely clear the obstruction and any added lubrication. • Lack of sufficient lubrication may make inserting the catheter difficult — see Set Up — C. Lubrication • Water does not flow even after proper insertion — check fluid administration set water level. If there is still no water, remove catheter and repressurize the system following Set Up— A. To fill the Simulated Bladder • Dried Lubricant Obstruction. Use the supplied obstruction tool to clear dried lubricant from the simulated urethra. Follow Lubrication and Catherization Procedures using the obstruction tool. Flush the system with warm water to completely clear the obstruction and any added lubrication. 5 5 NP158_RV7_14_LF00855_MaleCath.indd 5 3/12/15 9:11 AM Figure 8 Figure 8 Care and Maintenance Care and Maintenance Cleaning Normal soil on the surface of the simulator can be removed with mild soap and warm water. Use Nasco Figure 9 Cleaner (LF09919U) to remove stubborn stains from simulator. Simply apply Nasco Cleaner to the soiled area and wipe clean with cloth or paper towels. Cleaning Normal soil on the surface of the simulator can be removed with mild soap and warm water. Use Nasco Figure 9 Cleaner (LF09919U) to remove stubborn stains from simulator. Simply apply Nasco Cleaner to the soiled area and wipe clean with cloth or paper towels. Storage Before storage, be sure to remove the catheter from the urethra. The lubricant can dry out and act as a mild adhesive if the catheter is left in place. This results in damage to the simulator when removed. Do not store simulator for extended periods of time with water in the unit. Before returning simulator to case, drain as much liquid as possible from the bladder. 1. Close the slide clamp on the fluid administration set. (See figure 8.) 2. Remove the catheter. 3. Stand simulator on its plastic base and elevate placing both tubes in a water-safe container. (See figure 9.) (Water-safe container not included.) 4. Open the slide clamp on the fluid administration set, and the pinch clamp on the drain tube and allow system to drain. (See figure 9.) Any residual water inside the simulator should drain out through the quick-disconnect fitting and drain tube. 5. Dry all surfaces to prevent mildew formation while stored in the case. Storage Before storage, be sure to remove the catheter from the urethra. The lubricant can dry out and act as a mild adhesive if the catheter is left in place. This results in damage to the simulator when removed. Do not store simulator for extended periods of time with water in the unit. Before returning simulator to case, drain as much liquid as possible from the bladder. 1. Close the slide clamp on the fluid administration set. (See figure 8.) 2. Remove the catheter. 3. Stand simulator on its plastic base and elevate placing both tubes in a water-safe container. (See figure 9.) (Water-safe container not included.) 4. Open the slide clamp on the fluid administration set, and the pinch clamp on the drain tube and allow system to drain. (See figure 9.) Any residual water inside the simulator should drain out through the quick-disconnect fitting and drain tube. 5. Dry all surfaces to prevent mildew formation while stored in the case. Caution Caution Solvents or corrosive materials will damage the simulator. Never place simulator on any kind of printed paper or plastic. These materials will transfer indelible stains. Ball-point pens will also make indelible stains. 6 NP158_RV7_14_LF00855_MaleCath.indd 6 Solvents or corrosive materials will damage the simulator. Never place simulator on any kind of printed paper or plastic. These materials will transfer indelible stains. Ball-point pens will also make indelible stains. 6 3/12/15 9:11 AM Supplies/Replacement Parts for Male Catheterization Simulator Supplies/Replacement Parts for Male Catheterization Simulator LF00844U Obstruction Tool Kit (1 obstruction tool and 2 oz. lubricant) LF00844U Obstruction Tool Kit (1 obstruction tool and 2 oz. lubricant) LF00985U Life/form® Simulator Lubricant Kit LF00985U Life/form® Simulator Lubricant Kit LF01022U Fluid Supply Stand LF01022U Fluid Supply Stand LF01098U Fluid Administration Set LF01098U Fluid Administration Set LF01127U Foley Urethral Catheters (pkg. of 1) LF01127U Foley Urethral Catheters (pkg. of 1) LF01128U Foley Urethral Catheters (pkg. of 10) LF01128U Foley Urethral Catheters (pkg. of 10) LF09919U Nasco Cleaner LF09919U Nasco Cleaner 7 NP158_RV7_14_LF00855_MaleCath.indd 7 7 3/12/15 9:11 AM Other Available Simulators Other Available LF00856U Female Catheterization LF00856U Female Catheterization LF00957U Enema Administration LF00957U Enema Administration LF01035U Infant Male & Female Catheter Trainer LF01035U Infant Male & Female Catheter Trainer LF01038U Episiotomy Suturing Set LF01038U Episiotomy Suturing Set LF01062U Pelvic, Normal & Abnormal LF01035U LF01062U Pelvic, Normal & Abnormal LF01084U Sigmoidoscopic Examination LF01084U Sigmoidoscopic Examination LF01143U Testicular Exam LF01143U Testicular Exam LF01152U Male & Female Catheter LF01152U Male & Female Catheter LF01193U Special Needs Baby LF01193U Special Needs Baby LF01152U Simulators LF01035U LF01152U Fort Atkinson 901 Janesville Avenue, P.O. Box 901 Fort Atkinson, Wisconsin 53538-0901 1.800.558.9595 eNasco.com • E-mail: [email protected] COPYRIGHT © NASCO 2014 PRINTED IN U.S.A. NP 158/RV 3-15 NP158_RV7_14_LF00855_MaleCath.indd 8 Fort Atkinson 901 Janesville Avenue, P.O. Box 901 Fort Atkinson, Wisconsin 53538-0901 1.800.558.9595 eNasco.com • E-mail: [email protected] COPYRIGHT © NASCO 2014 PRINTED IN U.S.A. NP 158/RV 3-15 3/12/15 9:11 AM