1
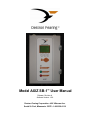
Model AXIZ SB-1™ User Manual
Release: Revision A
Software Version: 1.00
Destron Fearing Corporation • 490 Villaume Ave.
South St. Paul, Minnesota 55075 • 1-800-328-0118
Destron Fearing
User Manual
Copyright
© Copyright 2007 Destron Fearing Corporation. All rights reserved. This manual contains
valuable proprietary information. It should not be published, copied, or communicated to any
person without prior authorization from Destron Fearing.
Trademarks
AXIZ SB-1 and Destron Fearing are trademarks of Digital Angel Corporation.
Microsoft and Windows are registered trademarks of Microsoft Corporation.
All other trademarks, trade names, or images mentioned herein belong to their respective
owners.
Document History
Release Date
Doc Version
Software Version
Comments
March 12, 2008
Revision A
1.00
Cleanup and corrections.
October 19, 2007
Preliminary Draft
1.00
Initial release of this manual.
READ THROUGH THIS ENTIRE MANUAL BEFORE INSTALLING AND
OPERATING YOUR UNIT. FOLLOW ALL STEPS EXACTLY.
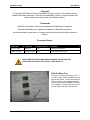
Fold Out Menu Tree
To aid you in learning the screens, an 11” x
17” fold out Menu Tree is located on the last
page of this manual. You are encouraged to
refer to it while you are paging through the
manual and learning to navigate the screens
of your Reader. Continue referring to it until
you are familiar with all screen locations.
Fold out Menu tree
.
Model AXIZ SB-1 User Manual - 03-13-2008 – Revision A
2
Destron Fearing
User Manual
Table of Contents
PRODUCT DESCRIPTION........................................................................................................................... 4
Main Features............................................................................................................................ 4
Specifications ............................................................................................................................ 7
ASSEMBLY INSTRUCTIONS ...................................................................................................................... 8
OPERATING INSTRUCTIONS..................................................................................................................... 9
SCREEN DISPLAY DESCRIPTIONS ........................................................................................................ 10
Main Screen .................................................................................................................................. 10
View Tags Screens.................................................................................................................. 11
Status Screens ........................................................................................................................ 12
User Setup Screens ................................................................................................................ 13
File Screens .................................................................................................................................. 14
Store Mode Screens................................................................................................................ 15
Create A File Screens ............................................................................................................. 16
Download File Screens ........................................................................................................... 17
Select Active File Screens....................................................................................................... 19
View File Screens.................................................................................................................... 20
Delete A File Screens.............................................................................................................. 21
Reader Set Up Screens................................................................................................................ 22
Tags Selection Screens .......................................................................................................... 23
Unique Mode Screens ............................................................................................................. 24
Display Time Tag Screens ...................................................................................................... 26
Tag Counter Enable Screens .................................................................................................. 27
Reset Tag Counter Screens.................................................................................................... 28
Break Mode Delay Screen ...................................................................................................... 29
Reader ID Screens .................................................................................................................. 30
Site ID Screens........................................................................................................................ 31
Continuous Tuning Screens .................................................................................................... 32
Communication Setup Screens .................................................................................................. 33
Baud Rate Screen ................................................................................................................... 34
Send Tag Screen..................................................................................................................... 35
Sec. Console Screen............................................................................................................... 36
Display Screens............................................................................................................................ 37
Tag Mode ID Screen ............................................................................................................... 38
Beep Sound Screen ................................................................................................................ 39
Back Light Screen ................................................................................................................... 40
Read LED ACT Time Screen .................................................................................................. 41
ALARMS..................................................................................................................................................... 42
SERIAL PORT COMMANDS ..................................................................................................................... 43
INDEX ......................................................................................................................................................... 47
Model AXIZ SB-1 User Manual - 03-13-2008 – Revision A
3
Destron Fearing
User Manual
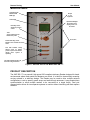
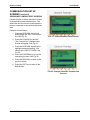
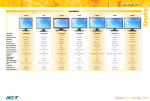
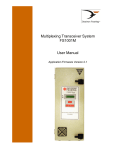
MAIN FEATURES
Compatible with
FDX and HDX
RFID tags
Simple
“1-2-3”
keyboard
LCD display
Up/Down/Left/Right
Arrow Keys move
display cursor in 4
directions
Back Key moves
display to previous
screen
This LED indicator
glows amber when the
Reader has power
Door latch
Power Reset Key, resets
Reader in the constant ON
mode
This LED indicator slowly
flashes green as system
powers up and then flickers
rapidly when system is
operating
This LED indicator flashes red
each time a tag is detected
Figure 1: External View of the Model AXIZ SB-1™
PRODUCT DESCRIPTION
The AXIZ SB-1™ is a powerful, high speed ISO compliant stationary Reader designed for harsh
environments where read speed and distance are critical. It is ideal for electronically scanning
moving animals in a walk-way design. The Reader may be used to drive multiple antenna
configurations, such as pass-by panel arrays and walk-through antennas. It uses master/slave
synchronization to allow multiple readers to be connected at a single facility. Dual port
communication allows for two separate systems to monitor without interfering with data capture
software.
Model AXIZ SB-1 User Manual - 03-13-2008 – Revision A
4
Destron Fearing
User Manual
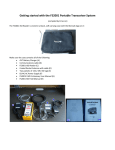
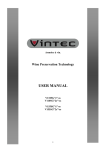
1) Display
2) Status Key
6.) Back Key
3) Setup Key
7.) ON/OFF Indicator
4) Standby Key
8.) Power/Reset Key
9.) System Ready Indicator
5) Up/Down/Left/Right
Arrow Keys
10.) Tag Detected
Indicator
FIG. 2: Control Panel Component Identification
CONTROL PANEL COMPONENT IDENTIFICATION
1.
Display: LCD Display.
2.
Status Key: Pressing this key enables the operator to check the status of current reader
settings.
3.
Setup Key: Pressing this key enables the operator to change current reader parameters.
4.
Standby Key: Pressing this button moves the reader into a standby mode.
5.
Up/Down/Left/Right Arrow Keys: Moves the cursor around the display.
6.
Back Key: Moves the display to the previous screen.
7.
On/Off Indicator: This LED glows solid amber when power is turned on to the unit.
8.
Power/Reset Key: Pressing this key turns the unit on or resets the Reader when it’s in
constant ON mode.
9.
System Ready Indicator: This LED indicator slowly flashes green as the system powers
up, then flickers rapidly when the system is up and operational.
10. Tag Detected Indicator: This LED indicator flashes red each time a tag is detected.
Model AXIZ SB-1 User Manual - 03-13-2008 – Revision A
5
Destron Fearing
User Manual
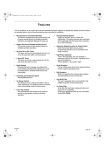
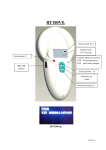
Spare
Connection
Point
USB Connection
(inside box)
Antenna
Connections
Power Cord
Spare
Connection
Point
RS232 Communication
Port
Antenna
Cable
FIG. 3: Component Identification
Sync
Connection
Port
COMPONENT IDENTIFICATION (CONTINUED)
Antenna Connection/Cable: Two antenna connections are located in the center, on the
bottom of the Reader.
RS232 Communication Port: A RS232 communication port is located on the bottom of the
Reader in the right corner.
Power Cord Connection Point: The power cord attaches at this connection point.
Sync Connection Port: A mini USB connection is located inside the Reader’s housing in the
lower left corner. Contact Destron Fearing for assistance in installing cable.
Spare Connection Points: Two spare connection points are included for additional
applications. Contact Destron Fearing for assistance in installing cable.
Model AXIZ SB-1 User Manual - 03-13-2008 – Revision A
6
Destron Fearing
User Manual
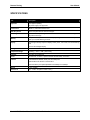
SPECIFICATIONS
Item
Description
Approvals
FCC approval pending
AC power supply is UL approved
Construction
NEMA 4x, IP66 rated aluminum box
RFID Acquisition
All ISO-compliant FDX, & HDX technologies
Read range
Up to 4 feet. at optimal tag orientation. User environment and antenna configuration
may affect read range
Memory
Ability to create up to 99 individual files (depending on the software version) and to
store up to 16,500 RFID tag numbers
Display
Internal high intensity lamps that display reader power, scan mode, and successful tag
read
Internal LCD backlight display
Tuning
Automatic or Manual
Temperature Range
Operating: -22F to +158F (-30C to70C)
Humidity
10%-90% non-condensing
Power
100-240 VAC, 47-63 Hz, Optional 12VDC external battery connection
Interface
Individual RS232, RS485, serial ports, and USB ports
Optional Bluetooth wireless communication
Communications port speed adjustable from 2400bps to 57,600bps
Weight
11 lbs. (4.99kg )
Dimensions
12”L x 8”W x 4”D (30cm x 20cm x 9cm )
Model AXIZ SB-1 User Manual - 03-13-2008 – Revision A
7
Destron Fearing
User Manual
Upper
Mounting
Bracket
Upper
Mounting
Bracket
Lower
Mounting
Bracket
(Not Shown
See Fig. 5)
Lower
Mounting
Bracket
(Not Shown
See Fig. 5)
FIG. 4: Mounting Brackets
ASSEMBLY / INSTALLATION
1. Remove Reader and all items from the shipping carton.
2. Check for correct shipment of items.
3. Locate area to mount the Reader. Locate the four mounting brackets on each corner of the Reader.
See Fig. 4 and 5. The Reader should be mounted on a vertical surface within 12 feet of a grounded
power source. NOTE: The power cord is 12 ft. long.
4. Install the power cord and plug power cord into power source. See Fig. 5. NOTE: The power cord
plugs into the mounting socket at first, then screws to lock in place.
5. Install the antenna cable. See Fig. 5. NOTE: The antenna cable plugs into the mounting socket at
first, then screws to lock in place. There are two identical antenna sockets on the bottom of the
Reader. NOTE: It does not matter which socket you use.
6. Mount the antenna.
7. If desired, a computer can be connected to the Reader using a RS232 cable. The RS232 connector
point is located on the bottom right corner of the Reader. See Fig. 5. The RS232 connection also has
a powered #9 pin for powering a Bluetooth wireless device if desired.
Spare Connection
Point
Antenna Ports
Spare Connection
Point
Power Cord
RS232
Communication
Port
Mounting Bracket
Antenna Cable
Mounting Bracket
FIG. 5: Cable Connections
Model AXIZ SB-1 User Manual - 03-13-2008 – Revision A
8
Destron Fearing
User Manual
Power/Reset Key
FIG. 6: Power/Reset Key
OPERATING INSTRUCTIONS
1. Insure that the antenna cable is connected.
2. Insure that the RS232 or USB cable is connected as needed.
3. Press the POWER/RESET Key.
4. Use display as required for the following functions:
•
Scan tags. See page 10.
•
View tags. See page 11.
•
Check miscellaneous status items of Reader. See page 12.
•
Create, download, store, delete and view files. See page 14-21.
•
Reader set up. See page 22-32.
•
Communication ports set up. See page 33-36.
•
Change display, beep sound, display, backlighting, and Tag ID.
See page 37-41.
Model AXIZ SB-1 User Manual - 03-13-2008 – Revision A
9
Destron Fearing
User Manual
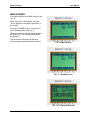
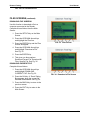
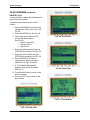
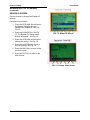
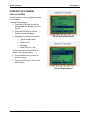
MAIN SCREEN
The reader defaults to the Main Screen. See
Fig. 10.
When the unit is is Scan Mode, the word
“Scan” appears in the upper right corner of
the screen.
Press the STANDBY Key to move the unit
into a Standby Mode. See Fig. 11.
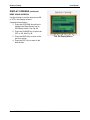
When a tag is detected, the screen appears
as shown in Fig. 12, exibiting the animals
tag number.
The second line contains bins showing
received signal levels and antenna current.
FIG. 10: Main Screen
FIG. 11: Standby Screen
FIG. 12: Tag Detected Screen
Model AXIZ SB-1 User Manual - 03-13-2008 – Revision A
10
Destron Fearing
User Manual
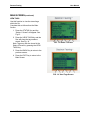
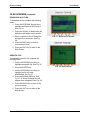
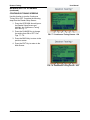
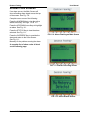
MAIN SCREEN (continued)
VIEW TAGS
Use this function to view the stored tags
within the file.
Complete this as follows from the Main
Screen:
1. Press the STATUS Key and the
“Status 1 Screen” will appear. See
Fig.13.
2. Press the VIEW TAGS Key and the
files will show the tag numbers
stored. See Fig. 14.
Note: Tags may also be viewed in the
Status 2 Screen by pressing the VIEW
TAGS Key.
FIG. 13: Status 1 Screen
3. Press the BACK Key to return to the
previous screen.
4. Press the EXIT Key to return to the
Main Screen.
FIG. 14: View Tags Screen
Model AXIZ SB-1 User Manual - 03-13-2008 – Revision A
11
Destron Fearing
User Manual
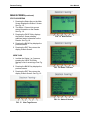
MAIN SCREEN (continued)
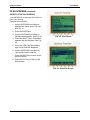
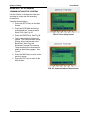
STATUS SCREENS
1. Pressing the Status Key on the Main
Screen displays the Status 1 Screen.
See Fig. 15.
2. The Status 1 Screen lists current
status information on the Reader.
See Fig. 16.
3. Pressing the PAGE 2 Key displays
the Status 2 Screen showing
additional status information on the
Reader. See Fig. 18.
FIG. 15: Main Screen
4. Pressing the BACK Key displays the
previous screen.
5. Pressing the EXIT Key returns the
display to Main Screen.
VIEW TAGS
1. In either the Status 1 or 2 screens,
pressing the VIEW TAGS Key
displays a list of recent tags. See Fig.
17.
2. Pressing the BACK Key displays the
previous screen.
FIG. 16: Status 1 Screen
3. Pressing the EXIT Key returns the
display to Main Screen. See Fig. 15.
FIG. 18: Status 2 Screen
FIG. 17: View Tags Screen
Model AXIZ SB-1 User Manual - 03-13-2008 – Revision A
12
Destron Fearing
User Manual
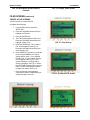
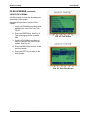
MAIN SCREEN (continued)
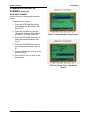
USER SET UP SCREENS
Press the SET UP Key on the Main Screen
to display the User Set Up Screen. See Fig.
22-23.
In the User Set Up Screen you have the
following five options.
Note: These screens will be discussed in
detail on the following pages:
1. Files – Accessing this area allows you to
store, create, download and view files.
2. Reader Set Up – Accessing this area
allows you to change current Reader
settings.
FIG. 22: Main Screen
3. Communication Set Up – Accessing this
area allows you to change current
communication settings.
4. Display – Accessing this area allows you
to change current display settings.
5. Advanced Set Up - This area is access
guarded. Contact Destron Fearing to gain
access to the Advanced Setup Menu.
FIG. 23: Set Up Screen
Model AXIZ SB-1 User Manual - 03-13-2008 – Revision A
13
Destron Fearing
User Manual
USER SET UP SCREENS
FILES SCREEN
Use this function to store, create, download,
select active files, delete files and view files.
Complete this as follows:
1. Press the SET UP Key on the Main
Screen. See Fig. 24.
2. Select FILES using the UP/DOWN
Keys. See Fig. 25.
3. Press the ENTER Key. The Files
Screen will appear. On this screen
you have 6 areas that can be
accessed. See Fig. 26
•
Store Mode
•
Create a File
•
Download a File
•
Select Active File
•
View Files
•
Delete a File
FIG. 24: Main Screen
These functions will be discussed in detail
on the following pages.
FIG. 25: User Set up Screen
FIG. 26: Files Screen
Model AXIZ SB-1 User Manual - 03-13-2008 – Revision A
14
Destron Fearing
User Manual
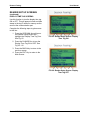
FIG. 29: Store Mode Screen with Unique
Selected
FILE SCREENS (continued)
STORE MODE FILE SCREENS
Use this function to change the mode of
storing files from ID, All, Unique or Off
settings.
Complete this as follows from the File
Screen:
1. Press the UP/DOWN Arrow Keys
until you have highlighted the
“Store Mode” line. See Fig. 26.
2. Press the CHANGE Key. See Fig.
26. This will bring up the “Change
Value Store Mode” Screen. It will
list the current store mode value.
See Fig. 28.
FIG. 27: Store Mode Screen with ID
Selected
3. Use the UP/DOWN Arrow Keys
and select the ID, All, Unique or Off
mode. See Figs. 27, 28, 29, 30.
4. Press the CONFIRM Key to lock in
the new setting. See Figs. 27, 28,
29, 30.
5. Press the BACK Key to return to
the previous screen.
6. Press the EXIT Key to return to the
Main Screen.
FIG. 28: Store Mode Screen with All
Selected
Model AXIZ SB-1 User Manual - 03-13-2008 – Revision A
15
Destron Fearing
FIG. 30: Store Mode Screen with Off
Selected
User Manual
FIG. 33: Change Value Screen
FILES SCREEN (continued)
CREATE A FILE SCREENS
Use this function to create new files.
Complete this as follows:
1. From the Main Screen, press the
SETUP Key.
2. Press the UP/DOWN Arrows until you
highlight the Files line.
3. Press the ENTER Key.
4. The Files Screen appears. See Fig. 31.
Press the UP/DOWN Arrow Keys and
highlight Create a File.
FIG. 31: Files Screen
5. Press the ENTER Key. The “Create a
File” Screen appears. See Fig. 32.
Press the UP/DOWN Arrow Keys and
select Create a File.
6. Press CREATE if you want to create the
file or press CHANGE if you want to
change the file name. If you selected
Create a File, a “File Created” dialogue
box will appear. See Fig. 34. If you
selected Change, a “Change Value”
Screen will appear. See Fig. 33. Press
the LEFT/RIGHT Arrow Keys to select a
letter. Use the UP/DOWN Arrow Keys
to select new letters. See Fig. 33.
7. Once the new file name has been
completed, press the CONFIRM Key to
change the name of the file.
Model AXIZ SB-1 User Manual - 03-13-2008 – Revision A
FIG. 32: Create the File Screen
16
Destron Fearing
User Manual
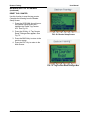
FIG. 34: File Created Screen
FILES SCREENS (continued)
DOWNLOAD FILE SCREENS
Use this function to download a file to a
computer connected to the Reader.
Complete this as follows from the Main
Screen:
1. Press the SETUP Key on the Main
Screen.
2. Press the UP/DOWN Arrow Keys
and highlight the Files line.
3. Press the ENTER Key and the Files
Screen will appear.
FIG. 35: Files Screen
4. Press the UP/DOWN Arrow Keys
and highlight “Download a File”.
See Fig. 35.
5. Press the ENTER Key.
6. This gives you three options:
Download Current File, Download All
Files, Specific File. See Fig. 36.
DOWNLOAD CURRENT FILE
Complete this as follows:
1. Press the UP/DOWN Arrow Keys
and highlight DOWNLOAD
CURRENT FILE. See Fig. 36.
FIG. 36: Download a File Screen
2. Press the OK Key. A “Done” Dialog
Box appears when the current file
has been downloaded. See Fig. 38.
3. Press the BACK Key to return to the
previous screen.
4. Press the EXIT Key to return to the
Main Screen.
Model AXIZ SB-1 User Manual - 03-13-2008 – Revision A
17
Destron Fearing
User Manual
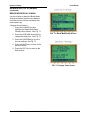
FILES SCREENS (continued)
DOWNLOAD ALL FILES
To download all files complete the following
steps:
1. Press the UP/DOWN Arrow Keys to
highlight the Download All Files line.
See Fig. 36.
2. Press the OK Key. A downloading file
dialog box will appear on the screen.
3. When complete a “Done” Dialog Box
will appear on the screen. See Fig.
38.
FIG. 37: Select a File Screen
4. Press the BACK Key to return to
the previous screen.
5. Press the EXIT Key to return to the
Main Screen.
SPECIFIC FILE:
To download a specific file, complete the
following steps:
1. Use the UP/DOWN Arrow Keys to
highlight the specific file. See Fig. 36.
2. Press the ENTER Key.
FIG. 38: Done Screen
3. Use the UP/DOWN Arrow Keys to
highlight the file you want
downloaded. See Fig. 37.
4. Press the DOWNLOAD Key. See
Fig. 37. A “Done” Dialogue Box will
appear when completed. See Fig. 38.
5. Press the BACK Key to return to the
previous screen.
6. Press the EXIT Key to return to the
Main Screen.
Model AXIZ SB-1 User Manual - 03-13-2008 – Revision A
18
Destron Fearing
User Manual
FILES SCREENS (continued)
SELECT ACTIVE FILE SCREENS
Use this function to select an active file and
open it for viewing.
Complete this as follows:
1. Use the UP/DOWN Arrow Keys to
highlight the “Select Active File” line.
See Fig. 39.
2. Press the ENTER Key.
3. Use the UP/DOWN Arrow Keys to
highlight the desired file. See Fig. 40.
FIG. 39: Files Screen
4. Press the SELECT Key. An asterisk
appears after the file name. See Fig.
40.
5. Press the VIEW Tags Key and the
tags in that file will be displayed.
6. Use the UP/DOWN Arrow Keys to
view the all of tags in that file.
7. Press the BACK Key to return to the
previous screen.
8. Press the EXIT Key to return to the
Main Screen.
FIG. 40: Select File Screen
Model AXIZ SB-1 User Manual - 03-13-2008 – Revision A
19
Destron Fearing
User Manual
FILES SCREENS (continued)
VIEW FILES SCREENS
Use this function to view the miscellaneous
stored files in the system.
Complete this as follows from the Files
Screen:
1. Use the UP/DOWN Arrow Keys and
highlight the “View Files” line. See
Fig. 41.
2. Press the ENTER Key. See Fig. 41.
This will bring up the list of stored
files.
FIG. 41: Files Screen
3. Use the UP/DOWN Arrow Keys to
scroll to view the files stored in the
system. See Fig. 42.
4. Press the BACK Key to return to the
previous screen.
5. Press the EXIT Key to return to the
Main Screen.
FIG. 42: View Files Screen
Model AXIZ SB-1 User Manual - 03-13-2008 – Revision A
20
Destron Fearing
User Manual
FILES SCREENS (continued)
DELETE A FILE
Use this function to delete the miscellaneous
stored files in the system.
Complete this as follows from the Files
Screen:
1. Use the UP/DOWN Arrow Keys and
highlight the “Delete a File” line. See
Fig. 48.
2. Press the ENTER Key. See Fig. 48.
3. This brings up the “Delete a File”
Screen with three options:
See Fig. 49.
• Delete Current File
• Delete All Files
• Specific File
FIG. 48: Files Screen
4. Select the desired option using the
UP/DOWN Arrow Keys. See Fig. 49.
5. Select the File to delete using the
UP/DOWN Arrow Keys. See Fig. 50.
6. Press the DELETE or OK Key
(depending on which option was
selected). See Figs. 49 and 50.
7. A “File Deleted” Dialogue Box
appears when the file is deleted.
See Fig. 51.
FIG. 49: Delete Files
8. Press the BACK Key to return to the
previous screen.
9. Press the EXIT Key to return to the
Main Screen.
FIG. 51: Files Deleted
FIG. 50: Delete a File
Model AXIZ SB-1 User Manual - 03-13-2008 – Revision A
21
Destron Fearing
User Manual
USER SET UP SCREENS
READER SET UP SCREENS
Use this function to change an individual
setup on the Reader. You can change the
following:
•
Tags Selection
•
Unique Mode
•
Display Time Tag
•
Tag Counter Enable
•
Reset Tag Counter
•
Break Mode Delay
•
Reader ID
•
Site ID
•
Continuous Tuning
FIG. 55: Main Screen
These functions will be discussed in
detail on the following pages.
Complete as follows:
1. Press the SETUP Key. See Fig. 55.
2. Press the UP/DOWN Arrow Keys to
highlight the “Reader Setup line”.
See Fig. 56.
3. Press the ENTER Key. See Fig. 56.
FIG. 56: User Set Up Screen
4. The Reader Setup Screen will
appear. See Fig. 57.
Model AXIZ SB-1 User Manual - 03-13-2008 – Revision A
22
Destron Fearing
User Manual
READER SET UP SCREENS
(continued)
TAGS SELECTION SCREEN
Use this function to determine which type of
tags will be identified by the Reader.
Complete this as follows:
1. Press the UP/DOWN Arrow Keys
and select the “Tag Selection” line.
2. Press the ENTER Key and the Tags
Selection Screen will appear. See
Fig. 57.
3. Press the UP/DOWN Arrow Keys to
highlight FDX decoding or HDX
decoding. See Fig. 58.
FIG. 57: Reader Set Up Screen
4. Press the CHANGE Key to turn the
decoding ON or OFF on the line
highlighted. See Fig. 58.
FIG. 58: Tag Selection Screen
Model AXIZ SB-1 User Manual - 03-13-2008 – Revision A
23
Destron Fearing
User Manual
READER SET UP SCREENS
(continued)
UNIQUE MODE SCREEN
Use this function to change how the unit
reads a tag:
•
Last five tags: The reader will read
a tag once, and then not read that
tag again until it has read 5 other
tags.
•
Last tag: The reader will read a tag
once, and then not read that tag
again until another tag is read.
•
Delay: The reader will read a tag
once, and then not read that tag
again until the preset amount of
delay time has occurred.
•
Turn it off: The reader will read a tag
continuously.
FIG. 59: Reader Set Up Screen
Complete this as follows from the Reader
Setup Screen:
1. Press the UP/DOWN Arrow Keys
until you have highlighted the
“Unique Mode” line. See Fig. 59.
2. Press the CHANGE Key and the
Change Value Unique Mode Screen
will appear. See Fig. 59.
3. Press the UP/DOWN Arrow Keys to
highlight desired setting. See Figs.
60, 61, 62, and 63.
FIG. 60: Change Value – Unique Mode –
Last Tag Screen
4. Press the CONFIRM Key to lock in
the new setting. See Fig. 60.
5. Press the BACK Key to return to the
previous screen.
6. Press the EXIT Key to return to the
Main Screen.
FIG. 61: Change Value Screen
Model AXIZ SB-1 User Manual - 03-13-2008 – Revision A
24
Destron Fearing
User Manual
READER SET UP SCREENS
(continued)
UNIQUE MODE SCREEN
Use this function to delay the Unique Mode
settings and select the amount of delayed
time.
Complete this as follows:
1. Press the SET DELAY Key which
brings up the Unique Mode Delay
Screen. See Fig. 63.
2. Press the UP/DOWN Arrow Keys to
change the delay time. See Fig. 64.
FIG: 62: Change Value Screen
3. Press the CONFIRM Key to lock in
the new setting. See Fig. 64.
4. Press the BACK Key to return to the
previous screen.
5. Press the EXIT Key to return to the
Main Screen.
FIG. 63: Change Value – Unique Mode –
Delay Screen
FIG: 64: Change Value Screen
Model AXIZ SB-1 User Manual - 03-13-2008 – Revision A
25
Destron Fearing
User Manual
READER SET UP SCREENS
(continued)
DISPLAY TIME TAG SCREENS
Use this function to turn the display time tag
ON or OFF. This will append a time and date
stamp to the tag ID stored in memory and/or
sent out the communication port.
Complete the following steps to gain access
to this line:
1. Press the UP/DOWN Arrow Keys on
the Reader Setup Screen and
highlight the “Display Time Tag” line.
See Fig. 65.
FIG. 65: Reader Setup Screen: Display
Time Tag ON
2. Press the CHANGE Key to turn the
Display Time Tag ON or OFF. See
Fig. 65 - 66.
3. Press the BACK Key to return to the
previous screen.
4. Press the EXIT Key to return to the
Main Screen.
FIG. 66: Reader Setup Screen: Display
Time Tag OFF
Model AXIZ SB-1 User Manual - 03-13-2008 – Revision A
26
Destron Fearing
User Manual
READER SET UP SCREENS
(continued)
TAG COUNTER ENABLE SCREENS
Use this function to turn the Tag Counter
Enable ON or OFF. Complete the following
steps from the Reader Setup Screen:
1. Press the UP/DOWN Arrow Keys on
the Reader Setup Screen and
highlight the “Tag Counter Enable”
line. See Fig. 67.
2. Press the CHANGE Key to select ON
or OFF. See Figs. 67-68.
3. Press the BACK Key to return to the
previous screen.
FIG. 67: Reader Setup Screen: Tag
Counter Enable ON
4. Press the EXIT Key to return to the
Main Screen.
FIG. 68: Reader Setup Screen: Tag
Counter Enable OFF
Model AXIZ SB-1 User Manual - 03-13-2008 – Revision A
27
Destron Fearing
User Manual
READER SET UP SCREENS
(continued)
RESET TAG COUNTER
Use this function to reset the tag counter.
Complete the following from the Reader
Setup Screen:
1. Press the UP/DOWN Arrow Keys on
the Reader Setup Screen and
highlight the “Reset Tag Counter
line”. See Fig. 69.
2. Press the OK Key. A “Tag Counter
Reset” Dialogue Box appears. See
Fig. 70.
FIG. 69: Reader Setup Screen
3. Press the BACK Key to return to the
previous screen.
4. Press the EXIT Key to return to the
Main Screen.
FIG. 70: Tag Counter Reset Dialogue Box
Model AXIZ SB-1 User Manual - 03-13-2008 – Revision A
28
Destron Fearing
User Manual
READER SET UP SCREENS
(continued)
BREAK MODE DELAY SCREEN
Use this function to delay the Break Mode
settings and select the amount of delayed
time that will occur before the Reader can
read another tag.
Complete this as follows:
1. Press the CHANGE Key and
highlight the “Break Mode Delay”
Change Value Screen. See Fig. 71.
2. Press the UP/DOWN Arrow Keys to
change the delay time. See Fig. 72.
FIG. 71: Break Mode Delay Screen
3. Press the CONFIRM Key to lock in
the new settings. See Fig. 72.
4. Press the BACK Key to return to the
previous screen.
5. Press the EXIT Key to return to the
Main Screen.
FIG. 72: Change Value Screen
Model AXIZ SB-1 User Manual - 03-13-2008 – Revision A
29
Destron Fearing
User Manual
READER SET UP SCREENS
(continued)
READER ID SCREEN
Use this function to change the Reader ID
settings.
Complete this as follows:
1. Press the UP/DOWN Arrow Keys on
the Reader Setup Screen and
highlight the “Reader ID” line. See
Fig. 73.
2. Press the CHANGE Key. See Fig.
73. The Reader ID Change Value
Screen will appear. See Fig. 74.
FIG. 73: Reader ID Screen
3. Press the UP/DOWN Arrow Keys to
change the setting. See Fig. 74.
4. Press the CONFIRM Key to lock in
the new settings. See Fig. 74.
5. Press the BACK Key to return to the
previous screen.
6. Press the EXIT Key to return to the
Main Screen.
FIG. 74: Change Value Screen
Model AXIZ SB-1 User Manual - 03-13-2008 – Revision A
30
Destron Fearing
User Manual
READER SET UP SCREENS
(continued)
SITE ID SCREEN
Use this function to change the Site ID
settings.
Complete this as follows:
1. Press the UP/DOWN Arrow Keys on
the Reader Setup Screen and
highlight the “Site ID” line. See Fig.
75.
2. Press the CHANGE Key. See Fig.
75. The “Reader ID” Change Value
Screen will appear. See Fig. 76.
FIG. 75: Site ID Screen
3. Press the UP/DOWN Arrow Keys to
change the delay time. See Fig. 76.
4. Press the CONFIRM Key to lock in
the new settings. See Fig. 76.
5. Press the BACK Key to return to the
previous screen.
6. Press the EXIT Key to return to the
Main Screen
FIG. 76: Change Value Screen
Model AXIZ SB-1 User Manual - 03-13-2008 – Revision A
31
Destron Fearing
User Manual
READER SET UP SCREENS
(continued)
CONTINUOUS TUNING SCREENS
Use this function to turn the Continuous
Tuning ON or OFF. Complete the following
steps from the Reader Setup Screen:
1. Press the UP/DOWN Arrow Keys on
the Reader Setup Screen and
highlight the “Continuous Tuning”
line. See Fig. 77.
2. Press the CHANGE Key to change
the setting from ON or OFF. See
Figs. 77 - 78.
FIG. 77: Continuous Tuning Screen - ON
3. Press the BACK Key to return to the
previous screen.
4. Press the EXIT Key to return to the
Main Screen.
FIG. 78: Continuous Tuning Screen - OFF
Model AXIZ SB-1 User Manual - 03-13-2008 – Revision A
32
Destron Fearing
User Manual
USER SET UP SCREENS
COMMUNICATION SETUP SCREENS
Use this function to change the baud rate,
send tag on comm and the secondary
console port.
Complete this as follows:
1. Press the SETUP Key on the Main
Screen.
2. Press the UP/DOWN Arrow Keys
and highlight the “Communication
Setup” Line. See Fig. 85.
FIG. 85: User Setup Screen
3. Press the ENTER Key. See Fig. 86.
4. The Communications Screen will
appear. The Communication Setup
Screen will provide access to the
Baud Rate, Send Tag, and
Secondary Console Port screens.
These screens will be discussed in
detail on the following pages. See
Fig. 86.
5. Press the BACK Key to return to the
previous screen.
6. Press the EXIT Key to return to the
Main Screen.
FIG. 86: Communications Setup Screen
Model AXIZ SB-1 User Manual - 03-13-2008 – Revision A
33
Destron Fearing
User Manual
COMMUNICATION SET UP
SCREENS (continued)
BAUD RATE SCREEN
Use this function to change the baud rate
setting.
Complete this as follows:
1. Press the UP/DOWN Arrow Keys
and highlight the “Baud Rate” line.
See Fig. 87.
2. Press the CHANGE Key and the
“Baud Rate” Change Value Screen
will appear. See Figs. 87and 88.
FIG. 87: Communications Setup Screen
3. Press the UP/DOWN Arrow Key to
select the desired baud rate. See
Fig. 87.
4. Press the CONFIRM Key to lock in
the new baud rate setting. See Fig.
87.
5. Press the BACK Key to return to the
previous screen.
6. Press the EXIT Key to return to the
Main Screen.
FIG. 88: Change Value – Baud Rate
Screen
Model AXIZ SB-1 User Manual - 03-13-2008 – Revision A
34
Destron Fearing
User Manual
COMMUNICATION SET UP
SCREENS (continued)
SEND TAG SCREENS
Use this function to turn the Send Tag line to
ON or OFF.
Complete this as follows:
1. On the Communication Setup Screen,
press the UP AND DOWN Arrow Keys
to highlight the “Send Tag“ line. See
Fig. 89.
2. Press the CHANGE Key and the Send
Tag Change Value Screen will appear.
See Fig. 90.
FIG. 89: Communication Setup Screen
3. Press the UP/DOWN Arrow Keys and
select from Form 1, Form 2, Form 3, or
OFF.
Form 1: The tag ID is sent out the
communications port with a decimal
point (i.e. 985.120123456789).
Form 2: The decimal point is not sent
(i.e. 985120123456789).
Form 3: Is for future use, currently it is
identical to form 2.
Off: No tag numbers will be sent out the
communication port. See Fig. 90.
FIG. 90: Change Value – Send Tag Screen
4. Press the CONFIRM Key to lock in the
new setting. See Fig. 90.
5. Press the BACK Key to return to the
previous screen.
6. Press the EXIT Key to return to the
Main Screen.
Model AXIZ SB-1 User Manual - 03-13-2008 – Revision A
35
Destron Fearing
User Manual
COMMUNICATION SET UP
SCREENS (continued)
SECONDARY CONSOLE PORT SCREENS
Use this function to select which port is used
as a secondary communications port. This
allows the user to have two communications
devices connected to the reader at the same
time.
Complete this as follows:
1. Press the UP/DOWN Arrow Keys
and highlight the “Sec. Console Port”
line. See Fig. 91.
FIG. 91: Communications Setup Screen
2. Press the CHANGE Key and the
“Sec Console Port” Change Value
Screen will appear. See Fig. 91.
3. Press the UP/DOWN Arrow Keys to
highlight the desired setting. Your
choices are: USB, RF, RS485. See
Fig. 92.
4. Press the CONFIRM Key to lock the
new setting in place. See Fig. 92.
5. Press the BACK Key to return to the
previous screen.
6. Press the EXIT Key to return to the
Main Screen.
FIG. 92: Change Value SEC Console Port
Screens
Model AXIZ SB-1 User Manual - 03-13-2008 – Revision A
36
Destron Fearing
User Manual
USER SET UP SCREENS
DISPLAY SCREENS
Use this function to change display settings
in the Reader.
Complete this as follows:
1. Press the UP/DOWN Arrow Keys
and highlight the “Display” line. See
Fig. 95.
2. Press the ENTER Key and the
Display Screen will appear.
3. Highlight one of these four options:
•
Tag ID Display Mode
•
Beep Sound
•
Backlight
•
Read LED Act. Time
FIG. 95: User Set Up Screen
These functions will be discussed in
detail on the following pages.
4. Press the BACK Key to return to
previous screen.
5. Press the EXIT Key to return to the
Main Screen.
FIG. 96: Display Screen
Model AXIZ SB-1 User Manual - 03-13-2008 – Revision A
37
Destron Fearing
User Manual
DISPLAY SCREENS (continued)
TAG ID MODE SCREENS
Use this function to change the display from
decimal to hexadecimal.
In decimal mode the tag ID is displayed and
stored as a decimal value.
(i.e. 985.054975585403).
In hexadecimal mode the Tag ID is
displayed and stored as a hexadecimal
value (i.e. 3D9.0CCCCCDC7B). A
hexadecimal value is represented by
numbers 0 through 9 and letter A through F
– base 16).
FIG. 97: Display Screen
Complete this as follows:
1. Press the UP/DOWN Arrow Keys to
highlight the “Tag ID Display Mode”.
See Fig. 97.
2. Press the CHANGE Key and the
“Tag ID Display Mode” Change Value
Screen will appear. See Figs. 97 and
98.
3. Press the UP/DOWN Arrow Keys to
select decimal or hexi decimal
readings. See Fig. 98.
4. Press the CONFIRM Key to lock in
the new setting. See Fig. 98.
FIG. 98: Change Value ID Display Mode
5. Press the BACK Key to return to
previous screen.
6. Press the EXIT Key to return to the
Main Screen.
Model AXIZ SB-1 User Manual - 03-13-2008 – Revision A
38
Destron Fearing
User Manual
DISPLAY SCREENS (continued)
BEEP SOUND SCREENS
Use this function to turn the beep sound ON
or OFF in the Display Screens.
Complete this as follows:
1. Press the UP/DOWN Arrow Keys to
highlight the ”Beep Sound” line on
the Display Screen. See Fig. 99.
2. Press the CHANGE Key to select the
OFF or ON. See Fig. 99.
3. Press the BACK Key to return to the
previous screen.
FIG. 99: Display Screen
4. Press the EXIT Key to return to the
Main Screen.
Model AXIZ SB-1 User Manual - 03-13-2008 – Revision A
39
Destron Fearing
User Manual
DISPLAY SCREENS (continued)
BACK LIGHT SCREENS
Use this function to turn the back light
setting from ON to OFF.
Complete this as follows:
1. Press the UP/DOWN Arrow Keys
and highlight the “Backlight” line on
the Display Screen. See Fig. 100.
2. Press the CHANGE Key.
3. The Back Light Change Value
Screen will appear where you have 3
options to select from: ON, SAVING
or OFF. See Fig. 101. Press the
UP/DOWN Arrow Keys to select the
desired setting.
FIG. 100: Display Screen
4. Press the CONFIRM Key to lock in
the new setting. See Fig. 101.
5. Press the BACK Key to return to the
previous screen.
6. Press the EXIT Key to return to the
Main Screen.
FIG. 101: Change Value Back Light
Screen
Model AXIZ SB-1 User Manual - 03-13-2008 – Revision A
40
Destron Fearing
User Manual
DISPLAY SCREENS (continued)
READ LED ACT. TIME SCREENS
Use this function to change the Read LED
ACT Time.
Complete this as follows:
1. Press the UP/DOWN Arrow Keys
and highlight “Read LED ACT. Time”
line on the Display Screen.
2. Press the CHANGE Key. The “Read
LED ACT. Time” Change Value
Screen will appear. See Figs. 102
and 103.
FIG. 102: Display Screen
3. Press the UP/DOWN Arrow Keys to
highlight the desired setting.
4. Press the CONFIRM Key to lock in
the new setting. See Fig. 103.
5. Press the BACK Key to return to the
previous screen.
6. Press the EXIT Key to return to the
Main Screen.
FIG. 103: Change Value Screen
Model AXIZ SB-1 User Manual - 03-13-2008 – Revision A
41
Destron Fearing
User Manual
ALARMS CODE SCREENS
If an alarm occurs, the Main Screen will
show a flashing alarm signal across the top
of the screen. See Fig. 110.
Complete one or more of the following:
Press the ALARMS Key to view the active
alarms occurring. See Figs. 110 & 111.
Press the UP/DOWN Arrow Keys to highlight
an alarm. See Fig. 111.
Press the STATUS Key to view the alarm
selected. See Fig. 111.
Press the OVERRIDE Key to override the
alarm and return to the Scan Screen.
See Fig. 111.
FIG. 110: Alarm Flashing on Main Screen
Manually fix the problem causing the alarm.
A complete list of alarm codes is listed
on the following page.
FIG. 111: Alarms Occurring Screen
FIG. 112: Active Alarms Screen
Model AXIZ SB-1 User Manual - 03-13-2008 – Revision A
42
Destron Fearing
User Manual
ALARMS
DESCRIPTION
Lithium low
Battery voltage is under 2V.
FDXA Buffer overrun
Noise level is too high
FDXA Capture overrun
Noise level is too high
FDXB Buffer overrun
Noise level is too high
FDXB Capture overrun
Noise level is too high
AVID Buffer overrun
Noise level is too high
HDX Buffer overrun
Noise level is too high
HDX Capture overrun
Noise level is too high
No antenna connected
No antenna detected during auto-tune
Antenna Power Low
Current is lower that current alarm parameter value
Memory low
Memory used is equal or higher than 90%
Memory full
Memory used is 100%
Missing file
No file defined when writing a tag
Test Tag Failed
Test tag read back failed
RTC Comm. Failed
Clock loss (no lithium battery) or a hardware problem with RTC
High Noise
B signal is higher than noise parameter value and no B tags are
detected
DSP reset
DSP reset
Synch. Parameters error
HDX is enabled on unit but is disabled on master unit
Or
HDX is disabled on unit but is enabled on master unit
Auto-Tune Timeout
Reader set in slave mode
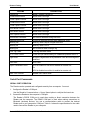
Serial Port Commands
SERIAL PORT OPERATION
The Reader can be operated and configured remotely from a computer. You must:
1. Configure the Reader’s COM port.
Use the Reader’s Communications > Comm Speed option to verify/set the baud rate.
2. Connect the Reader to the computer’s COM port.
The Reader’s RS232 COM port is used when making a direct connection between the
Reader and the computer. The RS485 COM port is used when making connections to
Bluetooth (wireless) devices. You use a communications cable to connect the desired
Reader port to your computer’s COM port. Table A-1 shows the specifications for the cable
used to connect the Reader to your computer.
Model AXIZ SB-1 User Manual - 03-13-2008 – Revision A
43
Destron Fearing
User Manual
Table A-1: COM1 Port Connections (DB9 connector)
DB9 Pin
number
EIA 232
signal
name
Description
Reader
signal
direction
PC Computer
connection
(9-pin)
2
RD
Receive Data
Output
2
3
TD
Transmit Data
Input
3
5
GND
Signal Ground
None
5
9
+12v
+12Vdc (Used only with custom
software
for
Bluetooth
connections)
None
9
3. Start and configure a communications software package on the computer.
Most standard communication programs can be used, including Terminal, HyperTerminal,
and ProComm. Configure the communication program as follows:
•
Bits per second = Match the baud rate set on the Reader
•
Data bits = 8
•
Parity = None
•
Stop bits = 1
•
Flow control = None
4. Type Reader commands to perform the desired actions.
To verify the connection between the computer and the Reader, type h at the
communications program and then press ENTER. If a list of available commands is
displayed you know you have a working connection.
The valid Reader commands are described in the remainder of this appendix.
Model AXIZ SB-1 User Manual - 03-13-2008 – Revision A
44
Destron Fearing
User Manual
GENERAL COMMAND FORMAT
The Reader commands are made of two or more characters followed by a carriage return, as
illustrated in the following example:
RA1↵
Generally, the first two letters designate the command group and the remaining letters/digits
designate the command parameters. The commands are not case sensitive and are echoed as
they are typed. The backspace key can be used to correct an improper command.
READER PROMPT
After pressing the Enter Key on the keyboard, the Reader returns a prompt that indicates the
profile number currently selected.
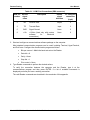
The following table is a list of the serial console port commands.
AU
Auto Tuning
BL
{1|0|S}
Display Backlight {1} On,{0} Off,{S} Saving
CE
{1|0}
Tags Counter {1} On,{0} Off
CO
{U|R|S}
Secondary console port {U} USB,{R} RF,{S} RS-485
CS
{bps}
Set Serial Communication Speed
DF
{H|D}
Display Tag ID {H} Hexadecimal,{D} Decimal
DT
Display Current Date and Time
DU
{HH:MM:SS}
Unique Mode Delay in Seconds
FC
{SS,NAME}
File Close and Create New {SiteID, File Name}
FD
{number|A|C}
File Download {number},{A} All,{C} Current Files
FE
{number|A|C}
File Erase {number} {A} All,{C} Current Files
LD
{1|2|3}
Read Led Act Time {1} 30ms, {2} 250ms, {3} 500ms
MB
{HH:MM:SS}
Break Mode Time in Seconds
MS
{0|A|U|I}
Store Mode {0} Off,{A} All,{U} Unique,{I} Id
MU
{5|1|0|D}
Unique Mode {5} 5 Tags,{1} 1 Tag,{0} Off,{D} Delay
RA
{1|0|Z}
Reader Active {1} On,{2} Off,{Z} Shutdown
RB
{1|0}
Reader Beeper {1} On,{0} Off
RC
Reset tag counter
RI
{0-255}
Change Reader ID
SI
{0-100}
Change Site ID
Model AXIZ SB-1 User Manual - 03-13-2008 – Revision A
45
Destron Fearing
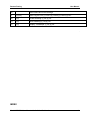
SS
User Manual
Send Status and Profile Settings
ST
{1|2|3|0}
Send Tag on Com {1} Form1,{2} Form2,{3} Form3,{0} OFF
TB
{1|0}
FDXB Decoding {1} On,{0} Off
TH
{1|0}
HDX Decoding {1} On,{0} Off
TS
{1|0}
Display Timestamps {1} On,{0} Off
`
INDEX
Model AXIZ SB-1 User Manual - 03-13-2008 – Revision A
46
Destron Fearing
User Manual
.
A
Alarms Code List, 43
Assembly Installation, 8
B
Back Light Screens, 40
Baud Rate Screens, 34
Beep Sound Screens, 39
Break Mode Delay Screen, 29
C
Communication Setup Screens, 33
Component Identification, 5
Continuous Tuning Screens, 32
Copyright, 2
Create A File Screens, 16
D
Delete A File, 21
Description, 4
Display Screens, 37
Display Time Tag Screens, 26
Document History, 2
Download All Files, 18
Download Current File, 17
Download File Screens, 17
F
Features, 4
Files Screen, 14
M
Main Screen, 10
O
Operating Instructions, 9
R
Read Led Act. Time Screens, 41
Reader ID Screen, 30
Reader Set Up Screens, 22
Reset Tag Counter, 28
S
Sec. Console Port Screens, 36
Select Active File Screens, 19
Send Tag Screens, 35
Serial Console Port Commands, 45
Serial Port Commands, 43
Serial Port Operation, 43
Site ID Screen, 31
Specific File, 18
Specifications, 7
Status Screens, 12
Store Mode File Screens, 15
T
Table Of Contents, 3
Tag Counter Enable Screens, 27
Tag ID Mode Screens, 38
Tags Selection Screen, 23
Trademarks, 2
U
Unique Mode Screen, 24, 25
User Set Up Screens, 13
V
View Files Screens, 20
View Tags, 12
View Tags Screen, 11
Model AXIZ SB-1 User Manual - 03-13-2008 – Revision A
47
Destron Fearing
User Manual
For questions regarding this product, contact:
DESTRON FEARING
490 Villaume Ave.
South Saint Paul, Minnesota 55075
1-800-328-0118
919-0200-00
Model AXIZ SB-1 User Manual - 03-13-2008 – Revision A
48
MAIN
SCREEN
USER
SETUP
STATUS
Model
AXIZ SB-1™
Menu Tree
STANDBY
SCREEN
STATUS 1
SCREEN
STATUS 2
SCREEN
FILES
STORE
MODE
CREATE
FILE
CHANGE
VALUE
CHANGE
VALUE
DOWNLOAD
FILE
DOWNLOAD
FILE
CREATED
SELECT
ACTIVE FILE
VIEW FILES
SCREEN
SELECT
VIEW
DELETE
FILE
ENTER
DOWN
LOADING
DONE
READER
SETUP
COMMUNICATIONS
SETUP
DISPLAY
ADVANCED
SCREEN
TAGS
SELECT
UNIQUE
MODE
DISPLAY
TIME
TAG
COUNTER
RESET
TAG
BREAK
MODE
READER
ID
SITE
ID
CHANGE
VALUE
CHANGE
VALUE
CHANGE
VALUE
CHANGE
CHANGE
CHANGE
VALUE
CHANGE
VALUE
CHANGE
BAUD RATE
SEND TAG
CHANGE
VALUE
CHANGE
VALUE
TAG ID
BEEP
SOUND
CHANGE
VALUE
CHANGE
VALUE
SEC
CONSOLE
CHANGE
VALUE
BACKLIGHT
CHANGE
VALUE
Guarded Access- Call Service Department for access codes
READ LED
TIME
CHANGE
VALUE
CONT
TUNING
CHANGE