1
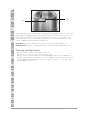
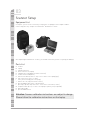
USER’S MANUAL
NOTICE
This is a highly sensitive
scientific measurement instrument.
Please handle with care.
CE marking on a product is a manufacturers declaration
that the product conforms with the requirements of
European Council Directives 73/23/EE and 89/336/EEC.
1
Scanner Technical Support 1.800.487.1000 (Outside U.S. and Canada 1.801.345.6670)
01 :: Warnings
Electrical Warnings................................................3
General Warnings ..................................................3
Servicing.................................................................4
02 :: Important Scanner Information
Calibration..............................................................5
Use and Handling of pCal Standards....................5
Scanner Accuracy and Repeatability ....................5
Laser Power Management ....................................6
Scanner Temperature Management.....................6
Scanner Lights ......................................................7
Traveling with the Scanner....................................8
03 :: Scanner Setup
Equipment List.......................................................9
Setup Instructions................................................11
Turning on the Laptop .........................................13
Setting up the Scanner Software ........................13
04 :: Performing a Scan
Scanning...............................................................18
05 :: Uploading Scans
Uploading Scanner Data......................................21
Viewing Scanner Data Reports ...........................22
Support .................................................................23
Shutting Down the Scanner ................................24
06 :: Important Scanner Tips
Tips .......................................................................26
07 :: Bar Code Reader Configuration
Instructions ..........................................................27
08 :: Troubleshooting/FAQ
Troubleshooting ...................................................28
Frequently Asked Questions (FAQ)......................32
General Specifications.........................................33
Scanner Technical Support Options
Scanner Email: Comments or Questions . . . . . . . [email protected]
Support Website and Live Chat. . . . . . . . . . . . . . . . http://distsupport.custhelp.com
Scanner Technical Support (U.S. and Canada) . . . 1.800.487.1000
Scanner Technical Support 1.800.487.1000 (Outside U.S. and Canada 1.801.345.6670)
2
01
Warnings
Electrical Warnings
Warning: To reduce the risk of fire or electric shock, do not expose the Scanner to rain or moisture.
Caution: To reduce the risk of electric shock, do not remove cover or bottom. No user serviceable parts
inside. Refer servicing to qualified Scanner Technical Support at 1.800.487.1000 (U.S./Canada only).
FCC Regulations state that unauthorized changes or modifications to this equipment may void the
user’s authority to operate it.
In addition to the careful attention devoted to quality standards in the manufacturing of the
Scanner, safety is a major factor in the design of every product.
A grounding type power plug (two blades and a round peg) will fit only into a grounding type receptacle with matching openings. This is a safety feature. Do not defeat it. If you need an extension
cord, use only a grounding type extension cord.
Do not overload wall outlets or extension cords as this can result in a risk of fire or electric shock.
Ventilation slots and openings in the Scanner cover are provided for ventilation to ensure reliable
operation of the Scanner and to protect it from overheating. These openings must not be blocked or
covered. Do not block by placing the product on a bed, sofa, rug, or other similar surface. This
product should never be placed near or over a radiator, a heat register, or any other heat source.
Water and Moisture—Do not use the Scanner near water. For example, do not use near a bathtub,
wash bowl, kitchen sink, laundry tub, in a wet basement, or near a swimming pool and the like.
General Warnings
WARNING, LASER, Avoid Direct Eye Exposure!
LASER RADIATION
AVOID EYE EXPOSURE TO BEAM
Under no circumstances should the laser shield be removed, modified, or circumvented. Do not attempt
to remove the outer cover of the Scanner. Doing so will create a significant eye hazard. If there is any
damage to the shield or outer cover, immediately turn off the Scanner and return it to Pharmanex.
This laser will be a potential eye hazard if viewed directly. Never point the laser beam at a person.
Never look directly into the laser beam. Never look directly into mirror-like (specular) reflections of
the laser beam. Do not wear any objects on your hands or wrists, such as watches or jewelry, that
may cause specular reflection. Do not insert anything with a flat, smooth surface into the path of
the laser beam as this will cause harmful specular reflections, which if viewed, can cause permanent eye damage.
3
Scanner Technical Support 1.800.487.1000 (Outside U.S. and Canada 1.801.345.6670)
:: Servicing of the Scanner is NOT to be performed by the user or any other third parties. If there are
any problems, contact the support line first. If needed, return the complete Scanner and laptop to
Pharmanex. Pharmanex will then send the Scanner to the manufacturer for any servicing.
:: Caution: Adhere to the instructions specified herein to avoid any harm to either you or the equipment. Inappropriate use of controls, adjustments, or performance of procedures other than those
specified herein may result in hazardous exposure.
:: Neither the laptop nor the Scanner should ever be opened or disassembled. The base plate of the
cover is sealed to protect against tampering. DO NOT ATTEMPT TO REMOVE OR TAMPER WITH
THE SEAL. The Scanner warranty is void if the seal has been tampered with in any way, if the bottom plate has been removed, or if there is evidence of attempts to remove the seal. NOTE: Not
only will the warranty be void, but the Scan Operator will be held responsible for the full cost of
the Scanner (e.g., $10,000 USD).
:: The Scanner has been set up to work only with the computer to which it is “assigned.” The
Scanner must never be plugged into another computer. This will render the Scanner inoperable.
:: As in the note above, the same applies to laptops. Laptops from another Scanner should never be used.
:: If it becomes necessary to return the system to Pharmanex, both the laptop and the Scanner
must be sent together.
Servicing
Do not attempt to service the Scanner yourself. Opening or removing covers may expose you to
dangerous voltage or other hazards and will damage the laser and void all warranties. Refer all
servicing to Scanner Technical Support at 1.800.487.1000 (U.S./Canada only).
Conditions requiring service—unplug the Scanner from the wall outlet and call Scanner Technical
Support at 1.800.487.1000 (U.S./Canada only) when and if any of the following occur:
a. The power supply cord or plug is damaged.
b. Liquid has been spilled on, or objects have fallen on or into the product.
c. The product has been exposed to rain or water.
d. The product does not operate normally when following the operating instructions. Adjust only
those controls that are covered by the operating instructions. Improper adjustment of other controls may result in damage and will often require extensive work by a qualified technician to restore
the product to its normal operation.
e. The product has been dropped or the cover has been damaged.
f. The product exhibits a distinct change in performance, such as the inability to perform basic functions.
Scanner Technical Support 1.800.487.1000 (Outside U.S. and Canada 1.801.345.6670)
4
02
Important Scanner Information
The Pharmanex BioPhotonic Scanner is an instrument that measures
carotenoid levels in the skin. The Pharmanex BioPhotonic Scanner is not
intended to be used for medical purposes. It is not a medical device or
diagnostic tool of any kind and is not intended to diagnose, treat, mitigate,
cure, or prevent any disease or condition, or affect the structure or function of any part of the body.
®
®
Calibration
All precision scientific instruments require calibration. Most are calibrated daily and some are calibrated before each measurement.
The BioPhotonic Scanner requires calibration before each scan session. The Scan Operator is
coached through the calibration procedure by the software on the laptop.
The calibration method utilizes a series of standards created from a silicone-based polymer. These
calibration standards are called pCal for “Polymer Based Calibration.” The pCal system is used to
make adjustments to the Scanner on a day to day basis and consists of four calibration standards
labeled blue, yellow, red, and white. Scanner measurements of these standards are used to establish
the daily calibration parameters.
After powering up the equipment, the software requires a 30-minute warm-up or equilibration time
prior to beginning the calibration process. It would be wise for the Scan Operator to begin setting
up the equipment at least one hour before the first scan is scheduled and as early as two hours in
advance if the equipment will be brought inside from a hot (greater than 85–100ºF/29.4–37.8ºC) or
cold (lower than 50–65ºF/10–18.3ºC) environment.
NOTE: Any time the Scanner is unplugged (i.e. the power is turned off) it MUST be recalibrated.
Use and Handling of pCal Standards
1. The pCal standards come in four tubes designated blue, yellow, red, and white.
2. Follow these instructions to remove the standards for use:
a. Thoroughly clean and dry your hands.
b. Clean the glass probe window with glass cleaner and a soft lint free tissue (both before and
after the calibration process).
c. Uncap the lid.
d. With your left hand grip the base of the lid (under the nozzle). Turn the stick clockwise slowly
with your right hand to begin dispensing a small amount.
NOTE: Air may be present inside the tube. If so, several turns of the stick will be required
before the pCal standard will begin dispensing (e.g. come out of the nozzle).
e. Once enough pCal standard has been dispensed, stop turning the stick immediately and back
it off by turning counter clockwise a quarter turn to release the built up pressure within the tube.
NOTE: If the pressure is not removed, the pCal standard may continue to dispense, causing waste.
3. The pCal standards are to be used only with the pCal cap. This cap fits over the laser probe and
forms a well in the center of the probe window. The bottom of the well is the glass from the
laser probe, and the sides are created from the hole in the cap. Filling this well with the calibration standard ensures you have placed the correct amount accurately.
5
Scanner Technical Support 1.800.487.1000 (Outside U.S. and Canada 1.801.345.6670)
4. When dispensing the pCal standard for calibration, use only enough pCal standard to completely
fill the well. Any less may cause an inaccurate calibration reading while more simply wastes
pCal standard (too much pCal standard will not negatively affect the measurement).
5. Do not store these tubes in extreme temperatures (e.g. less than 50°F, or greater than 100°F).
6. Each tube contains enough material for 40–60 calibration sessions.
7. The calibration material is extremely expensive so great care should be taken to not waste any
of the material. Do not use an unnecessarily large amount during the calibration procedure.
8. There is a clear section near the top of the pCal standard stick designed to notify the user that
the stick is running out and a new set needs to be ordered.
9. The pCal standard has a “shelf life” of one year. The expiration date (month/year) is stamped on
the bottom of each pCal standard tube.
10. To avoid mixing up the pCal standards, namely red and blue, place each standard on the corresponding cap. If you are not sure which standard is which, throw them out and start over with a
fresh sample
Scanner Accuracy and Repeatability
It is normal to have slight variations in the Skin Carotenoid Score due to several factors. First, skin
carotenoids vary slightly depending on the exact location on the palm of the hand being scanned.
Also, dietary changes, dietary supplementation, sun exposure, percent body fat, and tobacco use
causes more long-term changes in skin carotenoids that can result in a different score.
There are variations in all measurements. The Skin Carotenoid Score, which reflects the amount of
carotenoids in human skin, is a difficult measurement. The carotenoid response to the laser light
on the skin has an intensity of about 1/10,000th of the total light intensity coming from the illuminated spot on the skin. To return an accurate Skin Carotenoid Score value the Scanner hardware
and software must pick out the 0.01% percent carotenoid signal from the other 99.99% of the light,
and accurately measure the carotenoid Raman response.
Because of the nature of the Skin Carotenoid Score measurement, there are several additional
sources of variation in the measurement beyond those mentioned above. Some examples of these
variations are the following: non-uniform distribution of carotenoids in the skin, fluorescent properties
of the skin, thickness differences due to calluses, scarring, or crease-lines, incorrect positioning of
the hand, operation of the Scanner outside the approved temperature range, and any movement of
the hand during scanning.
What this means in practical terms:
:: A statistical analysis has been performed for Skin Carotenoid Score measurements on the same
subject over multiple properly calibrated and functioning BioPhotonic Scanners. It has been
determined that consecutive measurements on multiple Scanners (for a given individual) will fall
within one shade of each other 85% of the time.
:: Regular measurement of an individual over time will clearly show changes (or constancy) in their
Skin Carotenoid Score consistent with their eating habits and use of LifePak.®
Laser Power Management
Operation of the laser in the BioPhotonic Scanner is controlled by a microprocessor that determines the laser power output and the laser operating mode. The laser power must be precisely
controlled because the intensity of the carotenoid signal is directly proportional to the laser power.
The intensity of the laser output is monitored by a sensor; the signal from the sensor is fed continuously to the microprocessor. The microprocessor sets the laser operating parameters to ensure
the power output is stable within a very narrow operating range.
The red indicator light on the front of the Scanner (above the laser probe) indicates the laser microprocessor is in a self diagnostics mode. Scanning cannot be initiated when the red light is on. If it
comes on during a scan, the results will not be correct. The diagnostic mode will occur more frequently with a new or seldom-used Scanner than with one that is fully conditioned by frequent use.
The software will automatically detect this “red light” condition and notify the Scan Operator.
Scanning can continue once the red light turns off.
Scanner Technical Support 1.800.487.1000 (Outside U.S. and Canada 1.801.345.6670)
6
Scanner Temperature Management
The BioPhotonic Scanner is a very sensitive piece of equipment; therefore, it is necessary to control
the environment it is exposed to in both operational and non-operational conditions.
The operating conditions for the Scanner are as follows:
:: Temperature=70 to 75ºF (21 to 24°C)
:: Humidity=10 to 70 percent relative humidity
The Scanner must be set up and calibrated under the conditions in which it will be used. When a
Scanner has been stored at a temperature different than the operating conditions above (such as in
a car overnight), at least one hour additional start-up time is needed to permit the Scanner to
equilibrate in the operating environment before setup and calibration.
Non-operating environmental limits for the Scanner are the following:
:: Temperature=cannot be greater than 85–100ºF/29.4–37.8ºC or lower than 50–65ºF/10–18.3ºC
NOTE: These limits include short and long-term storage, as well as transportation. If the Scanner
is exposed to temperatures outside this range it may be permanently damaged.
The Scanner must be protected from environmental extremes such as cold, dust, shock, poorly
controlled power sources, and general mishandling. It should be treated as you would treat the
highest quality video camera.
The Scanner comes equipped with a USB thermometer (see Parts List on p. 10 for picture). This is
a USB device that must be present for the Scanner to operate. It will record the exact temperature
and humidity during each scan. Please pay close attention to the proper operating temperature
listed above. The software will closely monitor the temperature. This USB thermometer will display
the temperature along the bottom for the user software. Scan Operators will be evaluated for temperature compliance.
Scanner Lights
The light on the back of the Scanner above the serial port is an indication of laptop/Scanner communication. Yellow indicates data is being passed, and red indicates the Scanner is free to take
commands from the laptop. Please note that this light on the back of the Scanner will normally be
red, but will change to yellow during scans indicating the laptop and Scanner are passing data back
and forth.
There are two laser status lights located on the top, front of the Scanner. The yellow light indicates
the laser beam is being emitted. If the yellow light is not on, verify that the Scanner is plugged in,
the key is turned to the horizontal position, and the safety interlock plug is fully inserted.
The red light indicates the status of the laser’s microprocessor (see Laser Management for more
details). The red light will always come on for approximately 10 minutes when the Scanner is first
powered up and the laser key is turned to the on position. The software will wait until the red light
goes off. The red light can also come on at any time if the laser senses that it needs to be “retuned.” If this occurs prior to a scan, then the software will wait until it turns off before proceeding.
If the red light comes on during a scan the results will be ignored, the software will wait until the
red light turns off, and the scan will be repeated.
7
Scanner Technical Support 1.800.487.1000 (Outside U.S. and Canada 1.801.345.6670)
red
yellow
The red light may stay on for a few minutes, or up to two hours. During this time, scans will not be
possible AND it is important that the power remain on to allow the Scanner to finish the reset. If
the Scanner is turned off, the reset will be repeated when the Scanner is next turned on. If the
Scanner does not reset successfully and the red light stays on for more than two hours, contact
customer support at 1.800.487.1000 (U.S./Canada only).
Ready State: Blue laser is emitting from the front, yellow light is on, and red light is off.
Not Ready State: Blue laser is emitting from the front, yellow light is on, and red light is on.
Traveling with the Scanner
:: Only travel with the Scanner in the provided custom case.
:: Do NOT leave the Scanner in a car or in a hot or cold climate.
:: When the Scanner is transported by air, it should be brought along as carry-on luggage. This
minimizes any temperature fluctuations, as well as the added shock and jarring associated with
checked baggage. Remember that the Scanner is an extremely sensitive scientific device and
should always be treated as such.
Scanner Technical Support 1.800.487.1000 (Outside U.S. and Canada 1.801.345.6670)
8
03
Scanner Setup
Equipment List
A complete system consists of two major components—a laptop personal computer and the
Scanner. Together they comprise the Pharmanex® BioPhotonic Scanner.
After unpacking the BioPhotonic Scanner, you should confirm that you have everything listed below.
Parts List
A.
B.
C.
D.
E.
F.
G.
H.
I.
J.
K.
L.
M.
N.
O.
Scanner
Laptop
USB Thermometer
Power Converter for laptop
Laptop Power Cord (plugs into Power Converter)
Scanner Power Cord (black)
Data Serial Cable RS-232c to connect the Scanner to the laptop (gray)
Two Scanner Keys (one is a spare)
Safety Interlock Plug (1/8" stereo plug)
Dark Scan Lens Cap (tethered to Scanner)
pCal Standards (white, blue, red, and yellow)
pCal Cap (cap with small hole in the center that is tethered to Scanner)
Telephone Cable (RJ-11) to connect the laptop to a phone jack (for uploads)
Bar Code Reader
pCal Standards Pouch
Attention: Scanner calibration instructions are subject to change.
Please follow the calibration instructions on the laptop.
9
Scanner Technical Support 1.800.487.1000 (Outside U.S. and Canada 1.801.345.6670)
A. Scanner
F. Scanner Power Cord
K. pCal Standards
G. Data Serial Cable
L. pCal Cap
B. Laptop
H. Two Scanner Keys
C. USB Thermometer
M. Telephone Cable (for
uploads)
I. Safety Interlock Plug
D. Power Converter for Laptop
N. Bar Code Reader
J. Dark Scan Lens Cap
E. Power Cord for Laptop
O. pCal Standards Pouch
Scanner Technical Support 1.800.487.1000 (Outside U.S. and Canada 1.801.345.6670)
10
Setup Instructions
1. Plug one end of the Scanner power cord into the back of the Scanner and plug the other end
into an electrical outlet.
2. Connect one end of the gray data serial cable to the back of the Scanner and connect the other
end to the back of the laptop.
3. Connect the temperature/humidity USB thermometer to the USB connection on the laptop.
NOTE: The USB thermometer comes in two segments—a USB adapter, and the USB thermometer
itself. First, connect the USB thermometer to the USB adapter. Then plug the USB adapter into
the laptop.
11
Scanner Technical Support 1.800.487.1000 (Outside U.S. and Canada 1.801.345.6670)
4. Insert the safety interlock plug into the hole below the keyhole.
5. Insert the key into the keyhole.
6. Flip the black power rocker switch so that the top portion is pressed in. This will turn on the
main power of the Scanner and you should hear the cooling fan turn on.
Scanner Technical Support 1.800.487.1000 (Outside U.S. and Canada 1.801.345.6670)
12
7. Turn the key clockwise 90 degrees to the right (to the horizontal position).
NOTE: The Scanner is now turned on. There is a required Scanner warm-up and calibration
process before scanning can actually begin.
Turning on the Laptop
1. Plug laptop power cord into power converter.
2. Plug power converter into laptop and plug power cord into an electrical outlet.
3. Press the power button on the laptop.
4. When the login prompt comes up, two icons will appear. Click on the Scan Operator icon.
5. The Pharmanex® BioPhotonic Scanner software will automatically load.
Setting Up the Scanner Software
Warm-Up and Calibration Process
The calibration process ensures you are accurately reading carotenoid antioxidant levels in living
tissue for every scan session. Please allow more than the approximate times shown below for the
Scanner warm-up and calibration process. Please plan your meetings accordingly. Also, please
allow time for the Scanner unit to acclimate to a given venue before turning it on.
Warm-up and calibration consist of the following steps (approximate time):
:: Warm-Up (30 minutes)
:: Dark Scan (one minute)
:: White pCal (one minute)
:: Blue pCal (30 seconds)
:: Red pCal (30 seconds)
:: Blue pCal (30 seconds)
:: Red pCal (30 seconds)
:: Blue pCal (30 seconds)
:: Red pCal (30 seconds)
:: Yellow pCal (three minutes)
:: Operator Scan (three minutes)
This process will need to be repeated if any of the following occur:
:: Scanner or laptop is powered off
:: If you exit the Pharmanex® BioPhotonic Scanner software
:: If you end a scan session by clicking Exit Scan Session
13
Scanner Technical Support 1.800.487.1000 (Outside U.S. and Canada 1.801.345.6670)
1. Click Scan (upper left corner) to begin the warm-up and calibration setup process.
NOTE: The timer on the bottom of the screen displays the remaining time available until your next
upload. The version number indicates the current software version you are running (software
upgrades occur when you upload your scan information). Please note that you cannot upload and
scan at the same time.
2. The Scanner must warm-up before each scan session. Click Warm Up to begin the process.
Scanner Technical Support 1.800.487.1000 (Outside U.S. and Canada 1.801.345.6670)
14
3. The Scanner warm-up takes 30 minutes. A progress bar will continually indicate where you are in the
warming up process. The software will notify you when the warm-up is complete.
NOTE: IF THE WARM-UP PROCESS NEEDS TO BE TERMINATED, CLICK CANCEL TO ABORT THE
WARM-UP.
4. Once warm-up is complete, the software system displays the Calibration Process welcome page.
Select Start Calibration Process to continue.
15
Scanner Technical Support 1.800.487.1000 (Outside U.S. and Canada 1.801.345.6670)
5. Calibration—The software will walk you through the process of scanning the dark cap, and the four
pCal standards (white, blue, red, and yellow). Follow the on-screen instructions carefully. This procedure
sets the calibration parameters for the entire scan session.
During the calibration process you will be prompted to enter a lot number for
the blue, red and yellow pCal standards. The lot number is located on the bottom of every pCal Standard. Each lot number includes three characters
(Format: # letter #) and is located above the expiration date. It is critical that
you enter the correct lot number of each pCal standard that you are using during the calibration process to achieve an accurate calibration. Do not enter the
expiration date. You will only be prompted to enter each pCal standard (blue, red
and yellow) lot number once per calibration.
Caution: Inattention to detail during the calibration process can lead to inaccurate scoring until next
recalibration. See Section 2, “Use and Handling of pCal Standards,” for details on pCal standards usage.
6. When the calibration scans are complete, the screen is refreshed with a notice to the Scan Operator
that the Scanner is calibrated. At this point, an operator scan is required.
Scanner Technical Support 1.800.487.1000 (Outside U.S. and Canada 1.801.345.6670)
16
7. Operator Scan—The final step in the calibration process is scanning the operator’s own hand. At this
screen you will enter your first and last name, and distributor ID. Remove the pCal cap, and discard all
pCal standards. Position your hand on the laser lens as directed, and select OK to begin the operator
scan process.
NOTE: The operator scan will take approximately three minutes. The results are not displayed, but are
used for checking internal quality control.
17
Scanner Technical Support 1.800.487.1000 (Outside U.S. and Canada 1.801.345.6670)
04
Performing a Scan
Scanning
Setting up the Scanner is now complete. You are now ready to begin scanning.
1. A certificate number must be entered before every scan. Take the BioPhotonic Scan Certificate
from the scannee and type the certificate number in the provided field. If the number entered is
valid, the screen will refresh with additional fields.
NOTE: The certificate number can also be entered with a bar code reader.
NOTE: DO NOT press Exit Scan Session unless you are sure you want to exit. WARNING: Exiting a
scan session will require that you repeat the calibration process. Only exit a scan session if you
are done scanning.
NOTE: You can recalibrate the unit at any time. The Recalibrate option is found on the same screen
in which you enter the scan certificate number. By selecting Recalibrate, you will perform the entire
calibration procedure. The total time to recalibrate is about 30 minutes. We recommend that you
recalibrate the Scanner every four to five hours, especially if the room temperature changes dramatically (+/- 4 degrees from when you last calibrated the Scanner), or if you think there was an
operator error during the previous calibration.
2. Fill in all of the required fields indicated by * (an asterisk) and then click Continue.
NOTE: The demographic information will remain confidential and may be used in future studies of
carotenoid antioxidant consumption. Click Clear to remove the contents in each of the fields.
Scanner Technical Support 1.800.487.1000 (Outside U.S. and Canada 1.801.345.6670)
18
NOTE: The demographic information can be filled out during a scan. Completion of all fields is
required. A “No Answer” is acceptable, but “No Answer” must be selected from the drop-down menu.
3. Ask the scannee to place his or her hand on the Scanner with the skin completely against the
probe. No light should escape.
NOTE: The position of the probe on the hand is critical for accurate results. The location on the
hand where the scan should occur is defined using the “heart line” as a reference position. The
laser lens is placed so that the outside edge of the probe is just touching the line.
19
Scanner Technical Support 1.800.487.1000 (Outside U.S. and Canada 1.801.345.6670)
4. Once the scannee’s hand is in place, click the SCAN button.
5. The scan will take approximately three minutes, during which time you may complete the demographic section.
6. When the scan is complete, the scannee’s Carotenoid Antioxidant Score is displayed within the
appropriate color range. Please write down the scannee’s number and click Scan Another to scan
the next person.
7. You repeat steps 1–6 for each individual being scanned. Selecting End Session will take you back
to the main software page.
NOTE: Leaving the scan area of the software will prevent any further scanning until the next time
you calibrate.
Scanner Technical Support 1.800.487.1000 (Outside U.S. and Canada 1.801.345.6670)
20
05
Uploading Scans
Uploading
The uploading process is necessary to ensure each Scanner is up to date, efficient, and contains
the latest software available. A user can initiate an upload by simply selecting the Upload button
within the upload section of the software. Provided that the Scanner is connected to an analog
phone line, the laptop will connect to a server and begin uploading all the scans performed since
the last upload. The server then checks a database of Scanner accounts and authorizes the
Scanner for more scan time based on the information it receives from the account database. Once
the Scanner receives more scan time, it proceeds to check if updated software is available on the
server. If it is, the new software is downloaded and installed automatically. If no new software is
present, the process continues by resetting the laptop system clock to coincide with the server’s
clock. The upload process then ends by closing the dial-up connection and returning the user back
to the software.
Laptop Association
Each laptop and each Scanner cannot function properly independent of each other. The laptop software depends on the scan unit for a continuous flow of information in order to properly instruct the
user through the calibration and scanning process. Likewise, the scan unit must have a continuous
flow of information from the software in order to know how to proceed through the scanning
process. Information flow between the Scanner and laptop includes specific data such as detailed
parameters that cannot change over time in order to ensure accurate results. The need to keep
each Scanner connected to the same laptop prevents each laptop from being used with more than
one Scanner and likewise with the scan unit. In a process called “mating,” the laptop software is
built to detect the serial number of the Scanner it is mated with. If the serial number is incorrect,
the laptop shows the user an error stating the wrong Scanner or laptop is connected.
Uploading Scanner Data
Uploads must be completed within 72 hours from the last scan. The timer on the bottom of the
Pharmanex® BioPhotonic Scanner software indicates how much time you have before your next
upload is required. Pharmanex will not be able to process Scanner data until you perform an upload.
NOTE: Failure to upload within 72 hours will result in the Scanner being disabled. Please perform
the following steps to upload data to obtain another 72 hours.
21
Scanner Technical Support 1.800.487.1000 (Outside U.S. and Canada 1.801.345.6670)
1. Connect the laptop to an analog phone line. If you are unsure as to whether the line is analog or
not, check with the phone company or the owner of the line.
2. Add any dialing prefixes that may be needed to dial out on your line (many hotels require you dial
nine before dialing out).
NOTE: The upload phone number is preloaded. The default phone number is toll free. If for any reason
the toll free number is unavailable, the operator may select the alternate phone number.
NOTE: The alternate phone number is NOT a toll free phone number and is set up to dial the
server directly (in the United States). The operator will be responsible for all charges for this international call.
3. Click Upload Now.
4. The Pharmanex® BioPhotonic Scanner software will now dial out and connect to the Pharmanex
corporate servers. This process may take several minutes.
5. All scan records and calibration information will be uploaded to the Pharmanex corporate servers.
6. If upgrades are available for your system software, they will automatically be downloaded and
installed on your laptop. The software may ask you to reboot your computer at this time.
Viewing Scanner Data Reports
Along the top toolbar of the program you will see the View Reports option. By selecting this option,
you will be able to view Scanner session information from your previous scans. This status report
will aid the scan operator.
NOTE: You should save hard copies of each certificate. The report will contain the following:
:: Date of upload
:: All scan certificate numbers uploaded (ordered by date scanned)
:: Corresponding date of scan
:: Type of scan (initial or subsequent)
This page only records the uploads you have performed since obtaining the laptop. If, for some reason, you send your laptop back to the company and you receive a new one, you will not be able to
see old upload data.
Scanner Technical Support 1.800.487.1000 (Outside U.S. and Canada 1.801.345.6670)
22
1. Choose the From and To dates and then click Search.
NOTE: The View Reports page shows both the certificate numbers that have already been uploaded
and the scans that are waiting to be uploaded. The scans waiting to be uploaded will appear in a
list without an upload header.
Support
The Support button on the main toolbar takes the user to the Support page.
Override
If, for some reason, you were not able to upload scan information within the allotted time, there is an
emergency procedure available to continue using the Scanner. You will need to contact Scanner Technical
Support and a support technician will give you further instructions on how to proceed. If you have trouble
uploading, your modem is not performing correctly, or your environment does not allow you to upload,
choose the emergency Override option and you will be instructed to contact Scanner Technical Support.
23
Scanner Technical Support 1.800.487.1000 (Outside U.S. and Canada 1.801.345.6670)
Shutting Down the Scanner
1. From the Pharmanex® BioPhotonic Scanner software click Exit.
2. The software will exit and the laptop will shut down automatically.
3. On the back of the Scanner, turn the key 90 degrees to the vertical position and remove the key.
The blue laser should stop emitting from the front of the Scanner.
NOTE: If you do not remove the key from the back of the Scanner, you run the risk of breaking the
key when you place the Scanner in the Scanner case.
4. Remove the Safety Interlock Plug.
Scanner Technical Support 1.800.487.1000 (Outside U.S. and Canada 1.801.345.6670)
24
5. Flip the black power rocker switch so that the bottom portion is pressed in. This will turn the
main power of the Scanner off and you should hear the cooling fan also turn off.
6. Remove each of the power cords from the laptop and Scanner.
7. Remove the Scanner serial cable.
8. Place the Scanner, laptop, cables, and caps in their respective cases.
25
Scanner Technical Support 1.800.487.1000 (Outside U.S. and Canada 1.801.345.6670)
06
Important Scanner Tips
Tips
1. Many distributors find that using a UPS (Uninterruptible Power Supply) is a great help when running the Scanner. If the power goes out, even for a few seconds, the Scanner will reset and will
then need to be recalibrated. We encourage anyone wanting to use a UPS to do so. The use of a
UPS is not a requirement, but could save your meeting if the power were interrupted in any way.
2. On the back of the Scanner, just under the key, there is a small nut that holds the safety interlock plug socket in place. We have found that this nut can come loose and fall off. If this happens,
the plug socket will fall inside the back of the Scanner making the unit inoperable. The only way to
fix this problem is to return the unit for repair. Pharmanex will cover the shipping, but you will be
without a Scanner for several days. It is a good idea to regularly inspect this nut and make sure it is
tight. Turning it clockwise tightens the nut.
3. Under no circumstances should the cover of the Scanner be removed. There is a tamperproof
sticker that lets us know if the unit has been opened. If this sticker is broken, all warranties are
void. When the sticker is removed, we are required to pay the manufacturer for the cost of the unit
($10,000 USD). If it is removed, cut, or breached in any way the Scan Operator is liable for this
charge. This information is in the lease agreement and was in the initial training. As a reminder,
NEVER REMOVE THE COVER OF THE SCANNER. DOING SO WILL RESULT IN A $10,000 CHARGE!
4. Remember to remove the laser key and safety interlock plug from the BioPhotonic Scanner prior
to packing because they can be easily broken during transit if still inserted.
5. The dark scan cap is also designed to be a protective cover for the glass window on the laser
probe. When storing or traveling with the Pharmanex® BioPhotonic Scanner, the dark scan cap will
help minimize any possible damage to the unit. Put the dark cap on during warm-up or during any
prolonged period when the Scanner is not being used.
6. It is important to keep the glass window on the front of the Scanner clean and free of any oil
buildup. As you know, we all have oils in our skin. Upon repeated scanning, this oil can build up on
the front of the probe and interfere with the reading. Please remember to clean the glass window
on the front of the unit periodically for optimal performance. To clean this window, use a soft cloth
and glass cleaner. It is also a great idea to have individuals use Nu Skin’s Epoch® Antiseptic Hand
Sanitizer prior to being scanned. This will reduce the amount of oil being deposited on the Scanner
and may also prevent germ transfer from one individual to another.
7. Always wash your hands prior to handling the putty. Dirt or excess oils can be integrated into the
pCal standards, and cause an inaccurate measurement. If contamination of any of the four pCal
standards does occur, dispose of the standard in question, and obtain a fresh sample from the tube.
8. When removing the pCal standard from its tube, use the following instructions:
:: Ensure that your hands are VERY clean and dry
:: Open lid
:: Turn dial 1/4 of a turn clockwise
:: Wait 10 seconds for the standard to extrude from the nozzle
:: When the bead of standard is just large enough to fill the calibration cap hole, turn the dial 1/4 of
a turn counter clockwise to reduce the pressure inside the tube
:: Remove the bead of putty, and use in the calibration process as directed
:: Close the tube
:: Store in a cool, dry location
Scanner Technical Support 1.800.487.1000 (Outside U.S. and Canada 1.801.345.6670)
26
07
Bar Code Reader Configuration
Instructions
1. Make sure the Bar Code Reader is properly plugged into the back of the Laptop and the red laser
light is coming from the wand.
2. Place the bar code configuration sheet on a flat surface.
3. If you are using the ScanPlus 1800 Bar Code Reader, scan each of the bar codes on the configuration sheet beginning at the top and working down the page in sequence. After each scan, wait for
the Bar Code Reader to beep, and then move to the next bar code. If you are using the KANESCAN
Bar Code Reader, press the trigger and then scan the one “Default” bar code.
4. When you have finished scanning the last bar code on the configuration sheet, you are ready to
begin scanning Scanner Certificate Numbers.
ScanPlus 1800
KANESCAN
predefined terminal selections - keyboard
wedge - standard PC - QWERTY English
Use the Default found on page 9 of the Bar
Code Scanner Programming Manual.
\41\4A\03\08\60
Code 128 / EAN 128 - active
\41\5A\60
Code 39 - format - full ASCII
\42\4B\60
keyboard wedge - postamble - none
\45\54\3E\00\60
27
Scanner Technical Support 1.800.487.1000 (Outside U.S. and Canada 1.801.345.6670)
08
Troubleshooting/FAQ
Scanner Troubleshooting
Please follow these troubleshooting steps before contacting Scanner Technical Support at
1.800.487.1000 (U.S./Canada only).
Laptop/Pharmanex® BioPhotonic Scanner Software
Symptom:
Laptop will not turn on.
Solution:
1. Confirm that the laptop power cord is plugged into the power converter, the power converter is plugged into the back of the laptop,
and the other end of the power cord is plugged into the wall outlet.
The power converter has an LED on it.
2. Confirm that the wall outlet is working.
3. Press and hold the power button on the laptop for five seconds.
Release the button, then press the power button again.
Symptom:
The software will not load on the laptop.
Solution:
1. Confirm that the Scanner is powered up (you should hear a fan running in the Scanner).
2. Confirm that the key is in the back of the Scanner and it is in the
horizontal position.
3. Confirm that the safety interlock plug is inserted.
4. Confirm that the serial cable is securely connected to the laptop and
the Scanner.
5. Flip the black power rocker switch on the back of the Scanner to the
off position and then flip the power rocker switch to the on position.
Symptom:
A message is displayed saying the
Scanner has been disabled.
Solution:
This message indicates Pharmanex has disabled the Scanner for technical reasons. Please call 1.800.487.1000 (U.S./Canada only).
Symptom:
An error message is displayed saying,
“Timeout: The Scanner failed to respond
to the command in a timely manner.”
Solution:
1. Is the Scanner emitting the blue laser light? If not, make sure the
safety interlock plug is fully inserted and the key is turned to the
horizontal position. Also make sure the black power rocker switch
on the back of the Scanner is pushed in at the top and the gray
serial cable is securely fastened to the Scanner and laptop.
2. Confirm that the wall outlet is working and the Scanner is getting
electrical power from a valid power source. You should hear a cooling fan if the Scanner is on.
3. If this error comes up again, turn the laser key to the vertical position and press the black power rocker switch in at the bottom. After
the Scanner is completely off, press the black power rocker switch
in at the top, turn the laser key to the horizontal position and wait
for the red light to go out before continuing.
4. If the error comes up again, try setting up and using the Scanner in
a different location or plug the Scanner into a different three prong,
grounded power outlet.
Symptom:
An error message is displayed saying
the certificate number has been
previously used.
Solution:
1. Make sure you are typing the certificate in properly without dashes
or spaces.
2. Try entering a different, new certificate.
Symptom:
An error message is displayed saying the
certificate number entered is invalid.
Solution:
1. Make sure you are typing the certificate in properly without dashes
or spaces.
2. Try entering a different, new certificate.
Scanner Technical Support 1.800.487.1000 (Outside U.S. and Canada 1.801.345.6670)
28
Symptom:
An error message is displayed saying the
score was unexpectedly too low.
Solution:
1. Confirm that the Scanner is being used in the proper temperature
range of 70-75°F (21.1-23.8°C) and that the Scanner has never had
prolonged exposure to temperatures in excess of 100°F (37.7°C).
2. Clean out the dark scan cap with water or alcohol and clean out the
reference caps with a soft cloth. Recalibrate the Scanner, making
sure the caps are placed on properly.
3. If the error comes up again, try setting up and using the Scanner in
a different location or plug the Scanner into a different three prong,
grounded power outlet.
Symptom:
An error message is displayed saying the
results of the scan were not consistent.
Solution:
1. Confirm that the Scanner is being used in the proper temperature
range of 70-75°F (21.1-23.8°C) and that the Scanner has never received
prolonged exposure to temperatures in excess of 100°F (37.7°C).
2. Clean out the dark scan cap with water or alcohol and clean out the
reference caps with a soft cloth. Recalibrate the Scanner, making
sure the caps are placed on properly.
3. If the error comes up again, try setting up and using the Scanner in
a different location or plug the Scanner into a different three prong,
grounded power outlet.
Symptom:
I am unable to upload scans.
Solution:
1. Confirm that the telephone cord is plugged into an analog telephone
jack and the other end is plugged into the laptop analog telephone jack.
2. Confirm that the telephone line works.
3. Call Technical Support at 1.800.487.1000 (U.S./Canada only).
Symptom:
An error message is displayed saying the
laptop could not establish a connection.
Solution:
1. Confirm that the telephone cord is plugged into an analog telephone
jack and the other end is plugged into the laptop analog telephone jack.
2. Make sure the volume is turned up all the way on the laptop so you
can hear any connection tones. To do this, press and hold the “FN”
button and then press the “Page up” button repeatedly.
3. Unplug the phone cord from the laptop and reboot the laptop.
4. If the laptop still cannot make a connection, try uploading from a
different phone line in a different location.
Symptom:
An error message is displayed saying the
server does not answer.
Solution:
1. Please wait 10 minutes and try uploading again.
2. If the error message comes up again, please call 1.800.487.1000
(U.S. Canada only) for further assistance.
Symptom:
I am unable to continue scanning because
the time allotted for the next upload has
expired.
Solution:
1. If you are in the scanning process (performing a scan) or in a scan
session, the Scanner will continue to function properly even though
the time has expired for the next upload. Continue to scan until you
have completed scanning those waiting to be scanned, and then
upload the data on the laptop as soon as possible.
2. Find an analog phone line and upload the current data on the laptop. This will reset the clock back to 72 hours.
3. If an analog phone line is not available, call 1.800.487.1000
(U.S./Canada only) for further assistance.
Scanner
Symptom:
Scanner will not turn on or off.
29
Solution:
1. Is the Scanner emitting the blue laser light? If not, make sure the safety
interlock plug is fully inserted and the key is turned to the horizontal
position. Also make sure the black power rocker switch on the back of
the Scanner is pushed in at the top and the gray serial cable is securely
fastened to the Scanner and laptop.
2. Confirm that the wall outlet is working and the Scanner is getting electrical power from a valid power source. You should hear a cooling fan if
the Scanner is on.
3. If the Scanner still does not turn on, turn the laser key to the vertical
position and press the black power rocker switch in at the bottom. After
Scanner Technical Support 1.800.487.1000 (Outside U.S. and Canada 1.801.345.6670)
the Scanner is completely off, press the black power rocker switch
in at the top, turn the laser key to the horizontal position, and wait
for the red light to go out before continuing.
4. If the Scanner still does not turn on, try setting up and using the
Scanner in a different location or plug the Scanner into a different
three prong, grounded power outlet.
Symptom:
The laser is not emitting.
Solution:
1. Make sure the safety interlock plug is fully inserted and the key is
turned to the horizontal position. Also make sure the black power
rocker switch on the back of the Scanner is pushed in at the top and
the gray serial cable is securely fastened to the Scanner and laptop.
2. Confirm that the wall outlet is working and the Scanner is getting
electrical power from a valid power source. You should hear a cooling fan if the Scanner is on.
3. If the error comes up again, turn the laser key to the vertical position and press the black power rocker switch in at the bottom. After
the Scanner is completely off, press the black power rocker switch
in at the top, turn the laser key to the horizontal position, and wait
for the red light to go out before continuing.
4. If the error comes up again, try setting up and using the Scanner in
a different location or plug the Scanner into a different three prong,
grounded power outlet.
Solution:
Symptom:
1. Is the Scanner emitting the blue laser light? If not, make sure the
An error message is displayed saying the
safety interlock plug is fully inserted and the key is turned to the
laser was switched off and must be turned
horizontal position. Also make sure the black power rocker switch
back on.
on the back of the Scanner is pushed in at the top and the gray
serial cable is securely fastened to the Scanner and laptop.
2. Confirm that the wall outlet is working and the Scanner is getting
electrical power from a valid power source. You should hear a cooling fan if the Scanner is on.
3. If this error comes up again, turn the laser key to the vertical position and press the black power rocker switch in at the bottom. After
the Scanner is completely off, press the black power rocker switch
in at the top, turn the laser key to the horizontal position and wait
for the red light to go out before continuing.
4. If the error comes up again, try setting up and using the Scanner in
a different location or plug the Scanner into a different three prong,
grounded power outlet.
Symptom:
The red light on the front of the Scanner
stays on after warm-up or comes on after
warm-up.
Solution:
1. Is the Scanner emitting the blue laser light? If not, make sure the
safety interlock plug is fully inserted and the key is turned to the
horizontal position. Also make sure the black power rocker switch
on the back of the Scanner is pushed in at the top and the gray
serial cable is securely fastened to the Scanner and laptop.
2. Confirm that the Scanner is being used in the proper temperature
range of 70-75°F (21.1-23.8°C) and that the Scanner has never had
prolonged exposure to temperatures in excess of 100°F (37.7°C).
3. Please wait for two hours for the red light to go off. This will allow
the Scanner to fully adjust the laser to the correct power levels and
turn the red light off.
4. If the red light comes on unexpectedly during a scan session, please
wait for it to turn off.
5. If the red light does not turn off after waiting for two hours, clean
out the dark scan cap with water or alcohol and clean out the reference caps with a soft cloth. Recalibrate the Scanner, making sure
the caps are placed on properly.
6. Try setting up and using the Scanner in a different location or plug
the Scanner into a different three prong, grounded power outlet.
Symptom:
The calibration caps are physically damaged or broken.
Solution:
1. The Scanner will not work properly if this/these part(s) are damaged, or impaired in any way. Please call 1.800.487.1000 (U.S./
Canada only).
Scanner Technical Support 1.800.487.1000 (Outside U.S. and Canada 1.801.345.6670)
30
Symptom:
My scan scores do not seem accurate.
Solution:
1. Confirm that the scannee is placing his/her hand in the exact same
location as when they were previously scanned. For proper hand
placement please see page 19.
2. Confirm that the Scanner is properly calibrated by making sure the
temperature is within the acceptable range of 72 to 74°F and choose
the recalibrate option on the software.
3. Rescan the scannee.
4. For further information on variability, please see the Scanner
Accuracy and Repeatability section of this manual.
Bar Code Reader
31
Symptom:
My bar code reader light (red laser light)
does not come on.
Solution:
1. Confirm that the bar code reader cord is properly connected to the
computer. If the cord is a PS/2 cord (like a mouse cord) then it will
only fit in the PS/2 port on the laptop. If your laptop has USB ports
only, then your bar code reader should have come supplied with a
USB connection cable. Please call 1.800.487.1000 if you do not have
the proper cable.
2. Confirm that the bar code reader cord is connected securely to the
bar code reader wand. The wand separates from the cord when you
press the release button on the end of the cord.
3. Confirm that the laptop is properly powered up and the Scanner
software is running on the laptop before attempting to operate the
bar code reader.
Symptom:
My bar code reader light (red laser light)
comes on but it will not scan Scanner
Certificates.
Solution:
1. Confirm that the bar code reader cord is securely connected to the laptop and the red laser beam is emitting from the bar code reader wand.
2. Use the bar code reader configuration sheet supplied with this manual (see page 27) to configure the bar code reader for scanning
Scanner Certificates. Instructions for completing this procedure are
located on the configuration sheet.
Scanner Technical Support 1.800.487.1000 (Outside U.S. and Canada 1.801.345.6670)
FAQs
1. How do I know if the laser is on?
When the power rocker switch is turned on, the Scanner key is inserted and turned to the horizontal
position, and the safety interlock plug is inserted, you should hear the Scanner cooling fan and see
the blue laser emitting from the Scanner. Also, the yellow light on top of the Scanner should be lit.
2. What do the lights on the front of the Scanner mean?
On the top front of the Scanner there are two indicator lights. The yellow light will appear indicating
the Scanners’ laser is on. The red indicator light will appear when the Scanner is in a self diagnostics mode, and therefore not available for scanning.
Ready State: Blue laser is emitting, yellow light is on, and the red light is off.
Not Ready State: Blue laser is emitting, yellow light is on, and the red light is on.
3. What does the red light mean on the front of the Scanner?
When the red light on the front of the Scanner is on, the Scanner is NOT ready for scanning. The red
light should come on when the Scanner is turned on and will remain on until the warm-up time is
complete. If the red light comes on before you attempt a scan, the software should alert you that the
scan cannot take place until the red light turns off again. The light may be on for a couple of minutes
or up to two hours. If the red light comes on during a scan, the software will alert you to re-scan the
individual once the red light has turned off. If the Scanner is turned off while the red light is on, the
reset will be repeated when the Scanner is turned on again. If the Scanner does not reset successfully and the red light stays on for more than two hours, the Scanner will have to be replaced.
4. What does the light on the back of the Scanner indicate?
The light indicates the status of the communication between the laptop and the Scanner. The red
light indicates normal or ready status. The yellow light indicates the Scanner is communicating to
the laptop in the process of doing a scan.
5. Why does the Scanner need to be calibrated?
As with any measurement, there must be a reference from which the measurement is based. The
calibration guarantees that each instrument gives readings which are in the acceptable standard
deviation. In short, the calibration attempts to ensure accuracy for this tool.
6. Can I install Microsoft PowerPoint or other applications I use onto the laptop?
NO other applications may be installed onto the Pharmanex® BioPhotonic laptop. This laptop is
intended ONLY for use with the Scanner. Installing, changing any setting, or running any other program or application, other than the Pharmanex® BioPhotonic Scanner software, is strictly prohibited and will void all warranties.
7. Can I install the Scanner software on my own laptop or PC?
The Pharmanex® BioPhotonic Scanner software is not available to be installed on any other computer. You MUST use the laptop and software that was sent with your Scanner.
8. The Scanner laptop that was provided for my Scanner is having problems. Can I use someone
else’s Scanner laptop with my Pharmanex® BioPhotonic Scanner?
NO. You MUST use the Scanner laptop that was provided with your Pharmanex® BioPhotonic
Scanner. The laptop and Scanner that were provided to you were assigned together at Pharmanex.
The factory calibration that was performed at Pharmanex is VERY specific to your laptop and your
Scanner. If you try to switch laptops or Scanners the Scanner will go into a lockdown mode and will
not be unlocked until sent back to Pharmanex.
9. I cannot find my Pharmanex® pCal standards? Where can I purchase new ones?
Replacement pCal standards may be purchased by contacting 1.800.487.1000 (U.S./Canada only).
Scanner Technical Support 1.800.487.1000 (Outside U.S. and Canada 1.801.345.6670)
32
10. Can I use someone else’s pCal standards?
Yes. All pCal standards are identical, (e.g. all blue pCal standards can be used interchangeably) so
feel free to share these standards with your fellow distributors.
11. What should I do with the redeemed Pharmanex® BioPhotonic Scanner Certificates?
You should save all certificates you process for your official record.
12. How do I service my Scanner?
During the operation of the Scanner, data is gathered and stored on the computer. Parameters that
control the operation of the system are usually changed from their original factory settings.
There is NO service available for the user to perform and there are no third party service contracts.
The Scanner must be sent, by Pharmanex, to the manufacturer for any service.
Any time a Scanner or a laptop needs to be returned for any reason, including diagnosis or lease
expiration, the two components must be returned together. There are no exceptions to this. If you
experience any problem with the Pharmanex® BioPhotonic Scanner, call Scanner Technical
Support at 1.800.487.1000 (U.S./Canada only). Scanner Technical Support will troubleshoot the
problems and, if need be, create a Return Merchandise Authorization (RMA) number and send out a
replacement Scanner. You will then return the defective Scanner in the packaging material the
replacement Scanner arrived in. (See page 25 for proper placement in case.)
For a list of more FAQs, go to http://distsupport.custhelp.com. From the Product drop-down list,
select BioPhotonic Scanner, then click Search.
General Specifications
33
Environmental
Operating Temperature:
Storage Temperature:
Humidity:
Altitude:
EMC:
70 to 75ºF (21 to 24°C)
50 to 100ºF (7 to 38°C)
10 to 70 percent relative humidity
2000 M ( 6,560 ft)
EN 60950:1992, EN 55022:1994 with
A1:1995 and A2 1997, and EN 50082-1:1997
Physical
Weight:
Dimensions: (height x
width x depth)
10 lbs (4.5 kg)
9H x 7W x 16D inches nominal
(229H x 178W x 406D mm)
Power Requirements
Operating Voltage Range:
Operating Frequency Range:
Power Dissipation:
100 to 240 VAC
50 to 60 Hz
84 VA
Cooling Requirements
To provide adequate cooling, an air gap of approximately 3 inches should
be maintained around the vented section of the instrument.
Cleaning
Use a soft, clean, damp cloth to clean the outer shell of the Scanner.
Use
This instrument is designed for indoor use only.
Warning
This is a Safety Class I instrument (provided with a protective earthing
ground, incorporated in the power cord). The mains plug shall only be
inserted in a socket outlet provided with a protective earth contact. Any
interruption of the protective conductor inside or outside the instrument
is likely to make to make the instrument dangerous. Intentional interruption is prohibited.
Warning
This instrument is designed for use in Installation Category II and
Pollution Degree 2 environments.
Scanner Technical Support 1.800.487.1000 (Outside U.S. and Canada 1.801.345.6670)
NOTES
Scanner Technical Support 1.800.487.1000 (Outside U.S. and Canada 1.801.345.6670)
34
75 West Center, Provo, Utah 84601, U.S.A.
www.pharmanex.com
Scanner Technical Support 1.800.487.1000 (Outside U.S. and Canada 1.801.345.6670)
01 101520 90016877/2