1
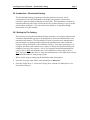
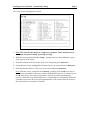
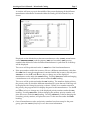
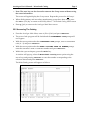
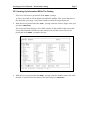
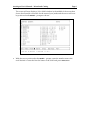
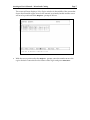
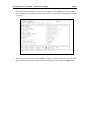
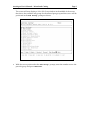
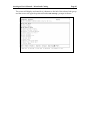
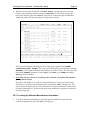
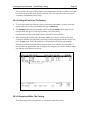
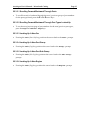
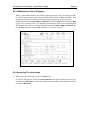
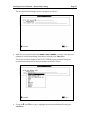
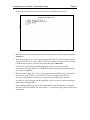
Autologue User’s Manual – Wrenchead Catalog
Page i
Table Of Contents
22. Introduction – Wrenchead Catalog ................................................................................ 1
22.1 Setting Up The Catalog .................................................................................................. 1
22.2 Accessing The Catalog.................................................................................................... 4
22.3 Looking Up Information Within The Catalog ........................................................... 5
22.3.1 Looking Up Alternate Manufacturer Information .......................................... 11
22.3.2 Selling A Part From The Catalog ........................................................................ 12
22.3.3 Navigating Within The Catalog .......................................................................... 12
22.3.3.1 Scrolling Forward/Backward Through Parts........................................... 13
22.3.3.2 Scrolling Forward/Backward Through Part Types Looked Up ........... 13
22.3.3.3 Looking Up A New Car ............................................................................... 13
22.3.3.4 Looking Up A New Part Group ................................................................. 13
22.3.3.5 Looking Up A New Part Sub-Group ........................................................ 13
22.3.3.6 Looking Up A New Engine......................................................................... 13
22.3.4 Manufacturer Prices Displayed........................................................................... 14
22.4 Accessing The Interchange ............................................................................................ 14
22.5 Updating The Catalog & Interchange.......................................................................... 16
22.6 Keyboard Functions ........................................................................................................ 18
22.7 Function Keys................................................................................................................... 18
Revision 08/04
Version 7.1
Autologue User’s Manual – Wrenchead Catalog
Page 1
22. Introduction – Wrenchead Catalog
The Wrenchead Catalog program provides the functions necessary for all
countermen to look up part numbers and display the quantity on hand and
customer’s prices for parts within the inventory file. This information can then be
transferred directly into Point of Sale and Invoices without having to re-type all the
selected parts and prices. The user also has the ability to lookup interchange
information for a part number.
22.1 Setting Up The Catalog
The first step in using the Wrenchead Catalog software is to setup the primary and
secondary manufacturer groups to be displayed as well as the manufacturer code
translation information. This information is used to prioritize how manufacturer
part information is displayed and translates the manufacturer codes within the
inventory file to the default codes within the Catalog. This step is necessary if, for
example, Wix Filter part numbers are to always come up first and Fram Filter part
numbers to always come up next. Also if, for example, the default manufacturer
code for Wix is WIX and manufacturer code within the inventory file for Wix is
WXF, the user would then have to setup the manufacturer code within the inventory
file within this table for each group of parts.
Below are the steps to setting up the translation table information:
•
From the Autologue Main Menu, enter 21 and press <Return>.
•
From the Utility Menu 5 – Wrenchead Catalog Menu, enter 4 (Set Manufacturers For
Wrenchead Catalogue).
Autologue User’s Manual – Wrenchead Catalog
Page 2
The Group screen will appear as shown:
) Note: The setup for the catalog is a single user program! There should never be
more than one person setting up catalog coverage.
•
With the cursor positioned at the Group: prompt, there are three different ways to
select a group to be setup.
1. Enter the number to the left of the Group to be setup and press <Return>.
2. Using the arrow keys, highlight the desired Group to be setup and press <Return>.
3. Enter the first few letters of the Group to be setup and press <Return>.
Note: With the cursor positioned at the Group: prompt, press the Î arrow key to
have the group number of the next column automatically entered. Continue to press
the Î arrow key to have the group number of the next column automatically
entered. When the next column entered is a column that is not displayed within the
viewable screen area, the screen will automatically scroll forward a whole screen so
the column that was entered is viewable.
Autologue User’s Manual – Wrenchead Catalog
Page 3
A window will now pop up in the middle of the screen displaying all the different
manufacturer information contained within the Catalog for the selected Group as
shown:
Displayed are the default three character manufacturer codes (CODE), manufacturer
names (MANUFACTURER), and the primary (PRI) and secondary (SEC) priority
numbers that define the order the different manufacturer’s parts that are looked up
will be displayed.
The cursor will be positioned on the 1st CODE line of the listed manufacturer.
•
If the part numbers within the inventory file use a different manufacturer code than
the CODE listed, enter the manufacturer contained within the inventory file and press
<Return> or use the Ï and Ð arrow keys to change any of the displayed
manufacturer codes under the CODE heading. Pressing <Return> without changing
a manufacturer code will place the cursor under the PRI heading.
The cursor will be positioned under the PRI heading. The numbers displayed show
the priority order in which the different manufacturer’s parts that are looked up will
be displayed with 1 being first priority on down. If there is no number entered in
the priority, the program will not display the parts for this manufacturer. Use the Ï
and Ð arrow keys to change any of the displayed priority numbers under the PRI
heading. Pressing <Return>, without changing the primary priority number, will
place the cursor under the SEC heading. Pressing <Return>, without changing the
secondary priority number, will place the cursor on the next line under the CODE
heading.
•
Once all manufacturer codes and priority numbers have been setup for the parts
group, press the <F10> (Save) key to save the screen information.
Autologue User’s Manual – Wrenchead Catalog
Page 4
) Note: The <F1> key can also be used to return to the Group screen without saving
the screen information.
The screen will again display the Group screen. Repeat this process for all Groups!
•
When all the primary and secondary manufacturer groups have been setup, press
the <F11> (Exit) key to return to the Utility Menu 5 – Wrenchead Catalog Menu screen.
•
Enter q (Quit) to return to the Autologue Main Menu screen.
22.2 Accessing The Catalog
•
From the Autologue Main Menu, enter 1 (Point of Sale) and press <Return>.
•
The point of sale program will be loaded and the COUNTERMAN CODE prompt will
now appear.
•
With the cursor positioned at the COUNTERMAN CODE prompt, enter a counterman
code (A - 9) and press <Return>.
•
With the cursor positioned at the ENTER CUSTOMER NAME OR NUMBER prompt,
enter the customer’s name or customer number and press <Return>.
•
Within the open workspace, press the <F16> key.
A window will pop-up, select the Wrenchead Catalog menu option using the
arrow keys and pressing <Return> or enter the number corresponding to the
selection desired and press <Return>.
The Main Catalog screen will appear as follows:
Autologue User’s Manual – Wrenchead Catalog
Page 5
22.3 Looking Up Information Within The Catalog
The cursor will now be positioned at the Year: prompt.
A Select Year window will be displayed within the middle of the screen that shows
the allowable year range. Only enter numbers within the range displayed.
•
With the cursor positioned at the Year: prompt, enter the last two digits of the year
and press <Return>.
The screen will now display a Select Make window in the middle of the screen that
shows the allowable car makes for the entered year and the cursor will now be
positioned at the Make: prompt as shown:
•
With the cursor positioned at the Make: prompt, enter the number next to the make
desired or enter the first few letters of the make and press <Return>.
Autologue User’s Manual – Wrenchead Catalog
Page 6
The screen will now display a Select Model window in the middle of the screen that
shows the allowable car models for the entered year/make and the cursor will now
be positioned at the Model: prompt as shown:
•
With the cursor positioned at the Model: prompt, enter the number next to the
model desired or enter the first few letters of the model and press <Return>.
Autologue User’s Manual – Wrenchead Catalog
Page 7
The screen will now display a Select Engine window in the middle of the screen that
shows the allowable engine sizes for the entered year/make/model and the cursor
will now be positioned at the Engine: prompt as shown:
•
With the cursor positioned at the Engine: prompt, enter the number next to the
engine desired or enter the first few letters of the engine and press <Return>.
Autologue User’s Manual – Wrenchead Catalog
Page 8
The screen will now display a Select Group window in the middle of the screen that
shows the main part groups and the cursor will be positioned at the Group: prompt
as shown:
•
With the cursor positioned at the Group: prompt, enter the number next to the part
group desired or enter the first few letters of the part group and press <Return>.
Autologue User’s Manual – Wrenchead Catalog
Page 9
The screen will now display a Select Sub Group window in the middle of the screen
that shows the available sub-groups for the entered part group and the cursor will be
positioned at the Sub Group: prompt as shown:
•
With the cursor positioned at the Sub Group: prompt, enter the number next to the
part sub-group and press <Return>.
Autologue User’s Manual – Wrenchead Catalog
Page 10
The screen will display and asterisk (*) character to the left of the selected sub-group
and the cursor will again be positioned at the Sub Group: prompt as shown:
Autologue User’s Manual – Wrenchead Catalog
•
Page 11
With the cursor again positioned at the Sub Group: prompt, the user can enter
another part sub-group number and press <Return> or once all the sub-groups
have been selected, press the <F10> (Lookup) key to lookup the parts information
within the catalog for the selected part sub-groups as shown:
The screen will display a heading for each of the types of parts listed (BRAKE
LINING/FRICTION, FRONT). The screen will also display a manufacturer heading
(WAGNER), a list of parts with their item number, footnotes (if any), the status for each
part listed (STATUS), quantity on hand (QTY), list (LIST), core (CORE) and selling
(SELL) price information.
) Note: The sell price shown is according to the customer’s exception and standard
pricing matrix setups!
Users have the ability to view the Secondary Manufacturer’s parts once the Primary
Manufacturer’s parts have been displayed by pressing the <F6> (Alt Mfg) key. The
screen will now display the Secondary Manufacturer’s parts information on the screen.
Secondary Manufacturer’s are those that were setup within the secondary list window
for the part groups.
22.3.1 Looking Up Alternate Manufacturer Information
•
To look up alternate manufacturer parts information within the catalog for the
current car application, press the <F6> (Alt Mfg) key.
Autologue User’s Manual – Wrenchead Catalog
Page 12
The program will begin looking up the parts information for the secondary lines that
have been setup for the parts groups selected. This can take a bit if there are many
secondary manufacturer lines setup.
22.3.2 Selling A Part From The Catalog
•
To sell a part listed and with the cursor positioned at the Part: prompt, enter the
item number next to the part number and press <Return>.
•
The STATUS field of the part number will now display SOLD and the part will be
brought back into point of sale upon exiting out of the catalog.
Continue this process until all the desired parts have been selected.
•
After selecting all desired parts, press the <F11> (Exit) key to return to the open
workspace and the first part that was selected will be displayed and the cursor will
be in the QTY field. Enter the quantity to sell and then extend the part number.
This process will be continued until all parts, that were selected, are extended. A
line will then be appended to the workspace showing the year, make, model, engine
size and car code number as shown:
22.3.3 Navigating Within The Catalog
The following sections describe how to navigate within the catalog.
Autologue User’s Manual – Wrenchead Catalog
Page 13
22.3.3.1 Scrolling Forward/Backward Through Parts
•
To scroll forward or backward through the next/ previous group of part numbers
for the part type listed, press the Ï and Ð arrow keys.
22.3.3.2 Scrolling Forward/Backward Through Part Types Looked Up
•
To see the next/previous page of part numbers for the next/previous part types,
press the Page and <Shift> Page keys.
22.3.3.3 Looking Up A New Car
•
Pressing the <F1> (New Car) key positions the cursor back to the Year: prompt.
22.3.3.4 Looking Up A New Part Group
•
Pressing the <F2> (Grp) key positions the cursor back to the Group: prompt.
22.3.3.5 Looking Up A New Part Sub-Group
•
Pressing the <F3> (Sub Grp) key positions the cursor back to the Sub Group:
prompt.
22.3.3.6 Looking Up A New Engine
•
Pressing the <F4> (Eng) key positions the cursor back to the Engine: prompt.
Autologue User’s Manual – Wrenchead Catalog
Page 14
22.3.4 Manufacturer Prices Displayed
When a part number listed is not found within the inventory file, the catalog will try
to read the manufacturer prices from the EPS (Electronic Price Sheet) database. If no
matching manufacturer price was found within the database, no prices will be
displayed under the LIST, CORE and SELL fields and the QTY field will display NIF
(Not In File) as shown below. If a matching manufacturer price was found within the
EPS database, the prices would be displayed under the LIST, CORE and SELL fields
and the QTY field will display EPS (Electronic Price Sheet) as shown:
22.4 Accessing The Interchange
•
Within the open workspace, press the <F16> key.
A window will pop-up, select the Interchange menu option using the arrow keys
and pressing <Return> or enter the number corresponding to the selection desired
and press <Return>.
Autologue User’s Manual – Wrenchead Catalog
Page 15
The Wrenchead Interchange screen will appear as follows:
•
With the cursor positioned at the ENTER PART NUMBER: prompt, enter the part
number to lookup interchange information for and press <Return>.
The screen will now display a MANUFACTURER pop up window listing the
available manufacturers for the part number entered as shown:
•
Using the Ï and Ð arrow keys, highlight the desired manufacturer and press
<Return>.
Autologue User’s Manual – Wrenchead Catalog
Page 16
The screen will now display the interchange part numbers and manufacturers for the
entered part number as shown:
•
To scroll forward or backward through the listed interchange part numbers, press
the Ï and Ð arrow keys or press the <F8> (Forward)/<F9> (Backward) keys for
whole pages.
•
Press the <F1> (Restart) key to lookup interchange information for another part or
press the <F11> (Exit) key to exit back to the open workspace.
22.5 Updating The Catalog & Interchange
The Wrenchead Catalog and Interchange information is updated on a monthly basis
via CD-ROM media. Listed below are the steps to update the information:
) Note: All users need to exit out of cataloging before starting the update process!
•
From the Autologue Main Menu, enter 21 and press <Return>.
•
From the Utility Menu 5 – Wrenchead Catalog Menu, enter 3 (Update Catalog).
Autologue User’s Manual – Wrenchead Catalog
Page 17
A Wrenchead Maintenance Menu screen will now be displayed as shown:
•
With the cursor positioned below the menu options, enter a menu option and press
<Return>.
•
If 1 (Install Catalog Disc (Disc 1)) was entered, and with the cursor positioned at the
PLEASE INSERT DISC 1 AND PRESS <ENTER> prompt, insert the All Parts Catalog
CD-ROM into the drive, close the drive and then press <Return>.
A serious of copy messages will be displayed on the screen as the catalog
information is being loaded. The CD-ROM will be automatically ejected from the
drive upon completion.
•
If 2 (Install Interchange Disc (Disc 1)) was entered, and with the cursor positioned at
the PLEASE INSERT DISC 2 AND PRESS <ENTER> prompt, insert the Part
Interchange CD-ROM into the drive, close the drive and then press <Return>.
A serious of copy messages will be displayed on the screen as the part interchange
information is being loaded.
The complete updating process will usually take from 15-30 minutes to complete.
The user will be returned to the Utility Menu 5 – Wrenchead Catalog Menu screen upon
completion.
Autologue User’s Manual – Wrenchead Catalog
Page 18
22.6 Keyboard Functions
Key
Function
<Up Arrow>
<Down Arrow>
<Return>
<Page Up>
<Page Down>
Move highlight up
Move highlight down
Accept current selection
Scrolls information up the screen
Scrolls information down the screen
22.7 Function Keys
The available function keys are displayed at the bottom of each screen. These will
change depending on the screen being displayed. In the lookup screen, the
following keys could be displayed:
<F1>
<F2>
<F3>
<F4>
<F6>
<F7>
<F7>
<F11>
<Enter>
NEW CAR
This starts a completely new car application lookup.
GROUP
Allows the user to select a new parts Group being looked up for the same vehicle.
SUB-GROUP
Allows the user to select a new part Sub-Group being looked up for the same vehicle.
ENGINE
Allows the user to select a new Engine size for the same vehicle.
ALT MFG
Displays the alternate/secondary manufacturer lines selected and then returns to the primary
lines.
PREV CAR
Displays the previous car applications looked up system wide.
CHANGE CAR
Allows the user to change the car application for the selected parts group.
EXIT
Exits out of the catalog and return the user back into the workspace.
Sells or imports the selected item numbers part number into the workspace.