1
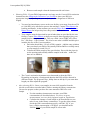
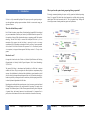
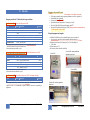
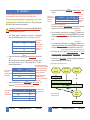
Last updated 20/11/2014 SEQUENCE CAPTURE PROCEDURE AT BOTAN *Keep in mind that this is just a general procedure and for individual samples you might have to do some adjustments. • DNA extraction o The DNA extraction is usually carried out with a Dneasy Plant Kit from Qiagen. Extractions are done in room 4230 “Pre-PCR-rum, DNA-prep” o Check the length of your DNA fragments on an agarose gel. If you have worked with e.g. herbarium material the DNA is usually already fragmented, but if you have fresh material you usually will have longer DNA fragments that must be sheared. Electrophoresis is done in room 4235. § § § § § § § Make a 1% agarose gel (ex Agarose: 0,7g + 70mL 1*TAE) Use 5 µL of a High Range Ladder in the first well in each row. Mix 5-7 µL of DNA with 2 µL Loading Buffer and transfer to well. Run the electrophoresis for 20-30 min. Put gel 10 min in ethidium bromide bath. Put gel 10 in in water bath. Check gel in UV-light machine. o Use the Nanodrop instrument (room 4237) to measure your DNA concentration. For more accurate measurements you can check fragment length on TapeStation. Place sample here § § § § § Take 1.5 µL of your DNA sample in a PCR strip and take it to the nanodrop room (this so that you do not take samples in and out of the extraction room). Start computer. User: nanodrop, Password: nanodrop Lounge nanodrop 2000. Calibration: Take 1 µL of the same solution that you eluted your DNA with (usually Elution Buffer or milliQ water) and place on the instrument. Press “Blank” and then “Measure” on the computer. Check that the DNA concentration is ca 0 ng/µL. Add 1 µL of your DNA sample on the instrument. Press “Measure” and note concentration (ng/µL) and the 260/280 ratio (the purity of your sample - Optimal is 1.8 but above is fine, lower is not that good). 1 Last updated 20/11/2014 § • Between each sample clean the instrument with soft tissue. Shearing DNA – If your DNA fragments are too long; use the Covaris S220 sonication instrument at the Sahlgrenska Genomics Core Facility to shear your DNA in appropriate length (depending on your analysis you want fragments of different length). o You need an introductory course at the core facility (cost range from about 550 to 1100 SEK) to be allowed to process the machine. Contact Ellen Hanson for booking and details. At the moment you can ask Filipe De Sousa or José Luis Blanco Pastor for help as they have the permission to use it. o Your samples must be deposited in special tubes that are provided by the core facility. Contact Ellen Hanson so that you can pick them up and prepare your samples before using the machine. They are called “microTUBE AFA Fiber Pre – Slit Snap – Cap 6*16mm”. The cost for one tube is 60SEK and this price includes the use of the Covaris machine. § Each tube should have 130 µL of DNA sample - Add the same solution that you eluted your DNA with (usually Elution Buffer or milliQ water) to your sample to reach 130 µL. § Transfer the DNA sample to the special tubes. Press with the pipet tip on the opening and carefully add the sample in the tube – make sure there are no bubbles! o The Covaris sonication instrument uses ultrasound to shear the DNA. Depending on intensity, vibration and duration the DNA will be sheared in different length. The program Filipe_400bp shear at 400 bp. If you want other length you must adjust the program. • After shearing DNA – Store your samples in room 4109 (transfer from the special covaris tubes to normal tubes). Before starting the library construction you need to prepare so that you have the same amount of DNA for each sample. § Use the nanodrop instrument to measure your DNA concentration (as described above). For more accurate measurements you can check fragment length on TapeStation. § Calculate the amount of each sample to be transferred to a new tube for use in the library construction. To get the right volume, divide the DNA concentration (ng/µL) with 500. E.g. if you have a DNA concentration of 20 ng/µL you should transfer 500/20=25µL of your DNA sample to a new tube. 2 Last updated 20/11/2014 • § Dry your DNA samples with the Speed Vacuum instrument (room 3204 “Cyanolab”) • Open the lid of your samples and place them in the centrifuge. Keep the lids towards the centre of the centrifuge. Close the centrifuge lid. • Turn on the centrifuge at “Med” drying rate and turn rotor on. • Turn on the Refrigerated Vapor Trap. • Set SAVANT Speedvac dryness controller on “MANUAL ON”. • Turn on VP100. • Close fume hood. • When finished, turn everything off in the opposite order. § Let your samples run until they are completely dry. This will vary from about 30 min to a few hours depending on the volume of the sample. When the samples are dry you will be left with the same DNA amount in each of your DNA samples and you are ready for library construction. Library construction – We use the NEXTflexTM DNA Rapid Sequencing Kits for library construction. Stored in the right freezer in room 4109. o Working with eight samples is a good option (maximum 16 since the magnetic stand only takes 16 samples at a time). Work on the bench opposite to the fume hood. o The procedure follows the NEXTflexTM Rapid DNA-Seq Kit, catalogue #: 5144-02. 2013 V14.02 (the manual comes with the kit – check if it is the same version as last time). Use only half of the reaction volumes! You find the full manual in the drawer under the bench. Read the full manual before you start – good information about the reagents and so on. o Option two is used when you want to size select your library. This protocol starts on page 12 and is described below. In this description we want to size select DNA fragments of 400-600bp. o In one day you can do step A2 – C2 (in fact you have to – samples can be safely stored after step C2). Step D2 + purification can also be done in one day. 3 NEXTflex Kits are in room 4109. Work on the bench opposite to fume hood. Except from the kit you also need ! - Agencourt AMPure XP Magnetic Beads (in fridge)! - NEXTflex DNA Barcodes (in freezer) Note: Step A2 - C2 is done in the same day Thaw on ice Usually this i) Kits are in the freezer to the right. Thaw Materials for step A2/B2 on ice Vortex prior to use and spin down. Make sure there are no precipitants! Dried DNA samples PCR-strip iii) Make a master mix of Buffer and Enzyme mix, distribute in PCR-strip - work on ice! iv) Transfer DNA sample to PCR-strip and perform thermocycler program Room 3315 16 25 ii) Add milliQH2O to your dried DNA samples (16µL) If the water in the kit is empty; you find milliQH2O in room 4236A 7.5 1.5 25 Master Mix * 8! 60 µL Buffer Mix! 12 µL Enzyme Mix! 72 µL 9 µL in each well Dilution likely not necessary Master Mix * 16! 120 µL Buffer Mix! 24 µL Enzyme Mix! 144 µL The thermocycler program is done on the Applied Biosystems machine in room 4218. The program is called "Filipe end-repair RAPID" Press Browse, select program, view/edit, run, reaction volume 25, Start run now. 9 µL in each well 25 24 1.3 50 For optimal mixing - Add barcode first, then enzyme. Thermocycler program: ! "Filipe ligation Illumina" (around 38 µL) i) Make a fresh dilution of 80% ethanol.! Take 40mL of 99.5% ethanol and 10mL milliQH2O (Extraction room). ii) Transfer your DNA samples from the PCR strip to easy-cap tubes (the magnetic stand can only have ependorf tubes) The shortest fragments (<400bp) are discarded with the supernatant. 100 iii) Start with step 1. Put samples in fume hood (turn on) for faster drying. 25 In the drawer under bench 50 The beads capture fragments >600 bp. 15 30 easy-cap tubes (around 72 µL) While waiting you can prepare the new tubes with 23 µL of AMPure XP beads. easy-cap tubes The supernatant now consists of 400-600 bp long fragments Keep samples on the stand while removing supernatant. 100 38.5 The beads now capture the 400-600 bp long fragments Put samples in fume hood (turn on) for faster drying. 25 23 easy-cap tubes (around 58 µL) The beads capture fragments from 400bp and above. 100 16.5 easy-cap tubes easy-cap tubes Put samples in fume hood (turn on) for faster drying. 10.5 i) Thaw your ligated DNA, PCR Master Mix and Primer Mix on ice. easy-cap tubes 10 safe-cap tube Room 4218 PCR strip Master Mix *8! 104 µL H2O! 48 µL PCR Master Mix! 8 µL Primer Mix! 5 160 µL 20 µL in each well Master Mix *16! 208 µL H2O! 96 µL PCR Master Mix! 16 µL Primer Mix! 320 µL 5 13 6 1 20 µL in each well ii) Make a Master Mix of PCR master mix and Primer mix and distribute in PCR-strip iii) Add your ligated DNA and mix 25 PCR program: ! "FILIPE pcr Illumina library"! (15 cycles) 3. Proceed with PCR purification using the QIAquick PCR Purification Kit. Room 4235! Kits in Kemikalieskåp 2 Tap the collection tube and QIAquick column on a piece of paper to get rid of all fluid. OBS! Always make aliquots of reagents: ! Buffer PB! Buffer PE (Ethanol added!)! Buffer EB Safe-cap 30 1 min 9. Use the centrifuge processing 125 µL 25 µL Use the nanodrop as previosly described and measure DNA concentration and 260/280 ratio (DNA purity). 10. If the DNA concentration is < 13µL you will need to redo the amplification for this sample, otherwise you do not have enough product for the sequence capture (you still have 5µL left from the library so you can perform one more amplification). Last updated 20/11/2014 • After library construction – Store your samples in room 4109. You can pool some of your DNA libraries before sequence capture. How many samples to pool will depend on your total target size (i.e. the total length of all selected regions). Previous work has shown that pooling 8 samples works well for a total target size of about 150 – 200 Kbp. You need to prepare so that you pool equimolar amounts of each amplified DNA library. § Use the nanodrop instrument to measure the DNA concentration (as described above). § Calculate the right amount by dividing the DNA concentration (ng/µL) with 400. E.g. if you have a DNA concentration of 25 ng/µL you should use 400/25=16µL of your DNA library. § Take the calculated amount and pool into the same tube for e.g. eight (see above) DNA libraries. I.e. if you have worked with 48 unique barcodes you pool eight of these in the same tube and will end up with 46/8=6 tubes for sequence capture. § Dry your pooled DNA libraries with the Speed Vacuum instrument (as described above). § Note from Lovisa: I think that at least a subset of the samples should also be checked on TapeStation before Sequence Capture. This to confirm DNA concentration and fragment length. • Sequence capture – Now it is time for the actual sequence capture procedure. This procedure follows the MYBaits target enrichment system (with some modifications as described below). Read the whole document before starting! § First, elute your dried DNA libraries with 8µL milliQH2O, and once again measure the DNA concentration using the nanodrop instrument. § Divide the DNA concentration (ng/µL) with 500. E.g. if you have a DNA concentration of 200 ng/µL you should use 500/200=2.5µL of your pooled DNA libraries (sequencing libraries) in the sequence capture procedure. 8 MYcroarray Table of Contents MYbaits I. Sequence Enrichment for Targeted Sequencing INTRODUCTION 1 What does the bait library contain? 1 How does it work? 1 When to perform the capture during sequencing library preparation? 2 MATERIALS 3 Reagents provided in MYbaits kits and storage conditions 3 Reagents to be provided by user 4 Required equipment and supplies 4 III. HYBRIDIZATION 5 IV. RECOVERY OF CAPTURED TARGETS 7 V. ELUTION OF ENRICHED LIBRARY 8 VI. ENRICHED LIBRARY CLEANUP 9 VII. POST CAPTURE AMPLIFICATION 10 VIII. APPENDIX 11 II. A. Post capture PCR Amplification Primers 11 B. Elution Buffer 11 C. Thermocyclers 11 D. MSDS 11 Get the latest version at http://www.mycroarray.com/pdf/MYbaits-manual.pdf For research use ONLY. Not intended for diagnostic use. User Manual Version 1.3.8 - 06/14/2013 MYcroarray [email protected] (734) 998-0751 I. When to perform the capture during sequencing library preparation? Introduction MYbaits is a fully customizable liquid-phase DNA capture system for targeted sequencing or any other applications requiring sequence enrichment. Each kit is custom made to target your sequences of interest. We strongly recommend performing the capture on fully prepared and validated sequencing library. Your genomic DNA should have been fragmented, size purified and the sequencing adaptor ligated. This kit has been tested with 100 – 500 ng of genomic library. Working with lower or larger amounts of starting material may require some optimization. What does the bait library contain? Each MYbaits kit contains a custom library of biotinylated single stranded RNA baits designed per your recommendation. Each library can contain up to 100,000 different bait sequences. We first synthesize a library of DNA oligonucleotides using our proprietary parallel DNA synthesis technology. Then the DNA library is converted into biotinylated RNA baits by in vitro transcription. Each sequence from the bait library is present in the pool at an average concentration of 50 pM. Depending on the number of baits in your library, a capture experiment will use from 0.25 to 0.5 fmole of each bait. This represents 1.5 to 3 x 10⁸ molecules per baits. As a comparison, 1 microgram of human genomic DNA library contains 3 x 10⁵ copies of the genome. How does it work? Our approach is based on the work of Gnirke et al. (Solution Hybrid Selection with Ultra-long Oligonucleotides for Massively Parallel Targeted Sequences. 2009. Nature Biotechnology 27(2):182-189). The genomic DNA library is heat-denatured and hybridized to the RNA baits in stringent conditions for 36 hours. This gives enough time for a bait to hybridize to a complementary target sequence. After hybridization, the biotinylated baits hybridized to captured material are pulled out of the solution with streptavidin-coated magnetic beads. Any DNA molecule that may have bound non-specifically to the magnetic beads are washed away and the captured genomic DNA is released by chemical degradation of the RNA baits. Depending on the total length of the targeted sequences, it may be necessary to perform a limited PCR amplification post-capture to have enough material for sequencing. For example, when targeting 3 Mb of human sequence (1/1000th of human genome) and starting from 5 micrograms of genomic library, the theoretical amount of recoverable material is 5 nanograms. But in practice, the recovered amount will be lower due to inevitable loss of material at various steps. 1 MYcroarray [email protected] (734) 998-0751 2 MYcroarray [email protected] (734) 998-0751 II. Materials Reagents to be provided by user Reagents provided in MYbaits kits and storage conditions Box #1: Store at 4°C Stored in the fridge in room 4109. * Amount Components 1.5 ml 20X SSPE 60 l 500 mM EDTA 750 l 1% Sodium Dodecyl Sulfate Binding Buffer 45 ml 1 M NaCl; 10 mM Tris HCl, pH 7.5; 1 mM EDTA Wash Buffer 1 30 ml 1X SSC, 0.1% SDS Wash Buffer 2 80 ml 0.1X SSC, 0.1% SDS Neutralization Buffer 3.75 ml 1 M Tris HCl, pH 7 While the tube label may read “Room Temperature”, we now recommend storage at 4oC. * Amounts shown here are based on a 50 reactions kit size. ¥ Formerly distributed with a PINK cap color. Product HYB #1 HYB #2 HYB #4 Box #2: Store at -20°C in a non-frost-free freezer * Product HYB #3 BLOCK #1 BLOCK #2 BLOCK #3 Amount 700 l 125 l 125 l 30 l Cap Color Orange Red ¥ Teal RNase Block 70 l SUPERase In (20 U/ l) * Amounts shown here are based on a 50 reactions kit size. ¥ Formerly distributed with a BROWN cap color ¥ Gold Purple 3) room 4236A Stored in the freezer room (1207). First freezer to the right. Product + Capture Probe Library Amount variable Cap Color White + The Capture Probe Library is sensitive to freeze-thaw cycles. If performing a small number of captures at a time, it is recommended to aliquot the library to decrease its susceptibility to degradation. 3 MYcroarray [email protected] 2) room 4109 - drawer under desk opposite to fume hood 1) room 3310 Cap Color Yellow Green Blue Box #3: Store at -80oC Components Biotinylated RNA Baits (probes) Required equipment and supplies 1) BioRad C1000 Thermocycler or compatible thermocycler (see Appendix C) Non-stick, sterile, nuclease-free tubes compatible with the thermocycler PCR-strip 2) Magnetic particle stand (Life Technologies™, #123-210, DynaMag™-2) Vortex mixer 3) Water bath set at 65 °C 4) Lab rotator (Thermo Scientific, #400110Q) Stored in the freezer in room 4109. Components 50 X Denhardt’s Solution 1 g/ l Human Cot 1 DNA 1 g/ l Salmon Sperm DNA Proprietary Blocking Agent Same primers as in the library construction. PCR primers compatible with the sequencing platform to be used (see Appendix A) Elution Buffer (see Appendix B) Nuclease-free Water Room 4236A Dynabeads® MyOne™ Streptavidin C1 (Invitrogen, # 650-01) * Herculase II Fusion DNA Polymerase (Stratagene, #600677) * QIAquick PCR purification Kit (Qiagen, #28704)*(Same procedure as described above) * Order seperately - talk to Vivian! (734) 998-0751 4) room 4109 - on desk opposite to fume hood 4 MYcroarray [email protected] (734) 998-0751 PCR-strip III. Hybridization 4. Prepare Capture Baits Master Mix in a nuclease-free tube and mix by pipetting. Set aside until step 7. Note: When the hybridization step is finnished you need to proceed with step IV at once - i.e. you should start the hybridization in the evening to have the procedure ready in the morning 36 h later. This step involves denaturing and hybridizing the sequencing library to a pool of custom complementary RNA baits. MYbaits kit has been tested with 100 – 500 ng of input genomic library. Smaller or larger amounts may require optimization. This is the mix to which the other master mixes will be transfered to. Before starting, equilibrate HYB #4 tube at room temperature to fully dissolve SDS that may have precipitated during storage at 4°C. 1. Set the following program on a thermocycler. (See Appendix C for recommended thermocyclers and validation procedure). Room 3310. The program is called "Filipe". Step 1 2 3 4 Temperature 95oC 65oC 65oC 65oC Time 5 3 2 Note: You need to book the PCR machine beforehand. Write your name on the calender on the notice-board. (36h) PCR-strip 2. Prepare Library Master Mix in a nuclease-free tube and mix by vortexing. Set aside until step 5. Note: It may be necessary to concentrate the genomic library by reducing the volume using a SpeedVac in order to have 100 – 500 ng of library DNA in 3.4 µl before preparing the Library Master Mix. Make a master mix and distribute in Bring all mixes to the PCR machine room. press cancel and 6. Once the thermocycler program reaches step 2 temperature (65 oC), transfer the tube and start again containing the Hybridization Master Mix to the thermocycler. Leave the Library Master Mix in the thermocycler. This will pre-warm the Hybridization Master Mix for 3 minutes at 65oC. press cancel and 7. Once the thermocycler program reaches step 3 temperature (65 oC), transfer the tube and start again containing the Capture Baits Master Mix to the thermocycler. Leave all other tubes in the thermocycler. This will pre-warm the Capture Baits Master Mix for 2 minutes at 65oC. i.e. leave all samples in the PCR machine while performing this step 8. While keeping tubes at 65oC, transfer 7 l of Library Master Mix and 13 Hybridization Master Mix to Capture Baits Master Mix and mix via pipetting. PCR-strip Briefly centrifuge your sample before next step. 10. When finnished, proceed with step IV at once. Library Master Mix Amount (36.8 l) 20 10 0.8 0.4 8 4 8 4 Make a master mix and distribute in a new PCR strip. Capture Baits Master Mix 6 µl 65 oC – 3 minutes to your sample. 65 oC – 2 minutes the master mix (it is more than enough for the next step). Component Hyb #1 Hyb #2 Hyb #3 Hyb #4 Hybridization Master Mix 95 oC – 5 minutes 3. Prepare Hybridization Master Mix in a nuclease-free tube and mix by vortexing. Set aside until step 6. Use only half of the amounts per sample when you prepare This is the master mix including the hybridization buffers l of 9. Hybridize solution at 65oC for 36 hours. Depending the application, hybridization time may need some optimization between 24 and 48 hours. a PCR strip. Then, add the calculated This is the master mix including your sequencing library and blocking agents. Do not make a master mix. Rather distribute directly in a new PCR-strip. Amount (6 l) 5 1 5. Transfer the tube containing the Library Master Mix to the thermocycler and start the program set in step 1. This will denature the DNA library for 5 minutes at 95oC. Amount (9 l) amount of each sequencing library + milliQH2O so that the total volume 2.5 equals 3.4µL. See example 2.5 Example: Calculated amount of 0.6 sequencing library = 2.5µL. 3.4 3.4-2.5=0.9 i.e. add 0.9µL milliQH2O Component Block #1 Block #2 Block #3 Sequencing library (100 – 500 ng) Component Capture Probe (baits) RNase Block 7 µl 13 µl Capture Solution Sketch summarizing the hybridization procedure. 65 oC – 36 hours 5 MYcroarray [email protected] (734) 998-0751 6 MYcroarray [email protected] (734) 998-0751 IV. Recovery of Captured Targets V. This step consists of recovering the captured targets from the hybridization solution. Targeted DNA sequences are hybridized to biotinylated RNA baits. RNA baits, either hybridized to a complementary DNA molecule or free, are pulled out of the hybridization solution by the means of streptavidin-coated magnetic beads. Beads are then washed to remove any non-specific carry over of DNA molecules. Before starting, equilibrate Wash Buffer 1 bottle at room temperature to fully dissolve SDS that may have precipitated during storage at 4°C and preheat Wash Buffer 2 at 65oC in a water bath for at least 1 hour. 0.5 Set water bath (room 4236A) at 65°C. Add 1.5mL Wash Buffer 2 /sample in a new tube ! (wrap parafilm on the lid to prevent evaporation) and preheat in water bath. 1. Transfer 50 l of MyOne Streptavidin C1 magnetic beads to a new 1.5 ml tube. 2. Pellet beads using a magnetic particle stand and discard the supernatant. 3. Add 200 l Binding Buffer to beads to wash. Vortex tube for 5-10 seconds, place on magnetic particle stand for two minutes to pellet the beads and remove and discard supernatant. Put your Elution of Enriched Library This step consists of releasing the captured DNA target molecules from the RNA baits. This is achieved by specifically degrading the RNA molecules by an alkaline treatment that will leave DNA molecules unaffected. All of the steps in this section are performed at room temperature. The Elution Buffer is not provided with this kit. Fresh Elution Buffer should be prepared according to Appendix B. 1. Add 50 l freshly prepared Elution Buffer to beads from step 9 of Section IV. 2. Vortex for 5-10 seconds to mix. 3. Incubate 10 minutes at room temperature. 4. Pellet the beads and transfer supernatant to a tube containing 70 l Neutralization Buffer. * sample in the 4. Repeat step 3 twice for a total of three washes. 5. Resuspend the beads in 200 l Binding Buffer. i.e. your product from the hybridization step. tube from the green box. Fix with parafilm and place on rotator ! (20r/min). 6. Transfer the hybridization solution to the Binding Buffer/Beads and incubate 30 minutes at room temperature on a rotator.* Pellet beads with magnetic particle stand for two minutes and remove supernatant. 7. Add 500 l Wash Buffer 1 to the beads and briefly vortex to resuspend. Incubate 15 minutes at room temperature. Pellet beads with magnetic particle stand for two minutes and remove supernatant. 8. Add 500 l 65oC Wash Buffer 2 to the beads and briefly vortex to mix. Incubate for 10 minutes at 65oC. Pellet beads with magnetic particle stand for two minutes and remove supernatant. Note: Continue to work in room 4109, i.e. move samples back and forth to the water bath in room 4236A. 9. Repeat step 8 twice for a total of three 65oC washes. After third wash make sure all additional buffer is removed. 7 MYcroarray [email protected] (734) 998-0751 8 MYcroarray [email protected] (734) 998-0751 VII. Post-Capture Amplification VI. Enriched Library Cleanup This step consists of removing extra salts added during the release of the captured DNA molecules. It also permits the captured DNA to be concentrated. 1. Concentrate and desalt the solution using a QIAquick PCR Purification column following manufacturer’s manual.*The binding buffer should contain the pH indicator and pH should be adjusted if necessary. Elute with 30 l buffer EB (or Molecular Biology grade water). 20 Expected amounts of recovered material are very small and cannot be detected by spectrophotometry. This step consists of amplifying the small amount of captured DNA recovered in the previous step in order to have enough material for sequencing. It is important to limit the number of cycles to get just enough material while minimizing PCR amplification bias. We recommend using the Herculase II Fusion DNA Polymerase, which compare favorably to other DNA polymerases (Dabney and Meyer, BioTechniques 52:87-94 (February 2012)). 0,5) To get a high concentration of your captured DNA, run 3 PCR's on each sample; You have 20µL ! from the previous step, you use 5µL in each PCR, so in total you use 15µL of each sample. 1. Prepare PCR Master Mix on ice in a nuclease-free tube and mix by pipetting. PCR-strip Component Nuclease-free water 5x Herculase II Buffer dNTP mix (25mM each) PCR primers mix (10 M each) Herculase II Fusion DNA Polymerase Captured Library o Note: The sample can be stored at -20 C after this step if necessary. the QIAquick PCR Purification as described for the previous PCR purfication. The * Perform only modification is that you elute in 20µL EB instead of 30µL. Amount (50 l) 32.5 10 0.5 1 1 5 Make a master mix and distribute in a new PCR strip. ! Add Captured Library and mix by pipetting. 2. Place the tubes in a thermocycler and run the following program: Step 1 2 3 4 5 6 7 Temperature Time 98oC 30 seconds 98oC 20 seconds See Appendix A (60°C)30 seconds 72oC See * (1min) Repeat step 2 through 4 for 14 times 72oC 5 minutes 4 oC Use the PCR machine in room 4218 (Applied Biosystems).! The program is called "FILIPE pcr MYBaits postcapture"! But note! * Extension time (Step 4) will depend on the genomic library average fragment size. Use 30 seconds for fragments shorter than 500 bp, 45 seconds for fragments with size between 500 and 700 bp and 1 minute for fragment sizes ranging from 700 bp to 1 Kb. 3. Purify the PCR product using QIAquick PCR purification kit following the manufacturer’s instructions. Use 30 µl of buffer EB (or Molecular Biology grade water) for the final elution step. Perform the QIAquick PCR Purification as described for the previous PCR purfication. Pool all 3 PCR products. 4. Measure the DNA concentration with a spectrophotometer. (nanodrop) 9 MYcroarray [email protected] (734) 998-0751 10 MYcroarray [email protected] (734) 998-0751 VIII. Appendix A. Post-capture PCR Amplification Primers Same primers as in the library construction. PCR primers to use for the post-capture amplification depend on sequencing platform to be used. The sequence of the PCR primers should be obtained from your sequencer’s representative. The annealing temperature during the PCR amplification should be set 5°C below the lowest Tm of the primers. B. Elution Buffer NaOH pellet is in the extraction lab (room 4230). The recommended Elution Buffer is a solution of sodium hydroxide (100 mM). Due to the limited shelf life of diluted NaOH solutions, we do not include it in our kit. We recommend preparing fresh Elution Buffer just prior to usage. 1) Prepare a 10M NaOH stock solution in RNAse/DNAse free water using NaOH pellets (high purity or molecular biology grade). This solution should be discarded after 1 week. Example: Take 10g NaOH pellet + 25mL milliQH2O 2) Prepare the Elution Buffer (100 mM NaOH) from the stock solution using RNAse/DNAse free water. This solution should be discarded after 1 day. Example: Take 1mL of the stock solution (step 1) + 99mL milliQH2O C. Thermocyclers A thermocycler with a heated lid to prevent condensation on the tube cap MUST be used for capture hybridization. We have successfully tested and recommend the BioRad C1000 and S1000 thermocyclers with dual 48 blocks. They show minimal evaporation over a period of 72 hours compared to competitors. Before performing the first hybridization please validate that the combination of thermocycler and tubes you are using will not allow more than 15% evaporation over the planned duration of the hybridization. D. MSDS MYcroarray To obtain an MSDS for a particular box, click on the relevant link below: 5692 Plymouth Road, Ann Arbor, MI 48105, USA Phone (734) 998-0751 Fax (734) 998-0750 [email protected] 11 MYcroarray [email protected] (734) 998-0751 Last updated 20/11/2014 • After sequence capture. You can pool as many samples as the number of barcodes you have used in the library construction, i.e. if you have used 48 unique barcodes you pool all 48 samples in one tube. From the previous example it means that you pool the 6 samples from the sequence capture procedure. You need to prepare so that you pool equimolar amounts of each sample. § Calculate the right amount by dividing the DNA concentration (ng/µL) with 500. E.g. if you have a DNA concentration of 250 ng/µL you should use 500/250=2µL of your sample. § Take the calculated amount and pool into the same tube. § Measure DNA concentration using the nanodrop instrument. § Store sample in freezer with parafilm on the lid until sending for sequencing. § Also, make one dilution for use in the TapeStation - 2µL of NGS sample and 4µL of milliQH2O. • TapeStation. Use the Agilent 2200 TapeStation instrument to validate your sample’s fragment size. NOTE: D1K has been replaced by D1000!! Online protocol here (follow this protocol!!) o Sample preparation – room 3122 “Pre pcr-room”. All reagents are in the fridge. Equilibrate all reagents 30 min before use. Use the special TapeStation tubes – you find them in the locker next to the fume hood. § Take 3µL of D1K Ladder in the first tube. § Mix 1 µL of your diluted NGS sample with 3µL D1K Sample Buffer. Mix by vortexing and spin down. § You need to run an even number of samples, so if necessary add a negative sample or a sample with only water. o Prepare TapeStation – room 3304 B § Bring your samples to the TapeStation and also bring the ScreenTape from the fridge in room 3122. § Turn on the computer – user: admin, password: 2200. § Turn on the Agilent 2200 TapeStation. Last updated 20/11/2014 § Load the ScreenTape and the special loading tips - they are in the shelf above the machine. Even if you do not have a full run always load a full rack of tips. The once that are not used you just place back again. Make sure there are no bubbles in the separation channels by “flicking” the ScreenTape prior to loading. § Start the TapeStation software (TapeStation Controller) – it is located on the Desktop on the computer. o Sample Analysis § Load your samples in the machine and remove the lids/caps. !!!THE MACHINE WILL BREAK IF YOU DO NOT REMOVE THE LIDS!!! § Select your samples on the TapeStation Controller software. § Click START and specify a file to which the results will be saved. § It takes about 1 min for each sample to run. o Checking results § • As the analysis is finished you can open your result file in the TapeStation Analysis software. Here you can see the gel image, sample information and chromatograms. NGS sequencing. Samples have previously been sent to The Sahlgrenska Genomics Core Facility with a paired-end 2*150 bp run on the Illumina MiSeq platform. A large benefit of using this facility is the personal service. You have direct contact with the people who work there and can be part of the whole procedure. However, pricing is higher than at i.e. the SciLifeLab, and you have to pay for all labour hours (whereas at SciLifeLab this is covered by public research funding). § If you deliver sample to Sahlgrenska you can just talk to Ellen Hanson and deliver the sample directly to them (on ice). They want the following information: • Mark the tube with: Project name (G14-XX), name on the NGS pool, date and concentration. • Provide a file with adaptor / sample information (i.e. what sample name correspond to the specific adaptor). • Send the result from the final TapeStation run.