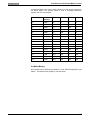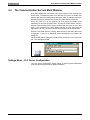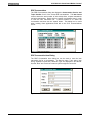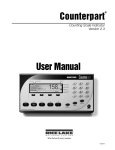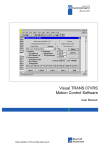
1
engineering mannesmann Rexroth CLC Multi-Axis Coordinated Motion Control End User Manual DOK-VISMOT-VM*-05VRS**-WAR1-AE -P 278099 Indramat CLC Multi-Axis Coordinated Motion Control Title CLC Multi-Axis Coordinated Motion Control Kind of documentation Document typecode Internal file reference Purpose of this document User Manual DOK-VISMOT-VM*-05VRS**-WAR1-AE-P • usergps5.doc This document supports trained operating and maintenance personnel • in the rapid identification of faults • outlining steps for the elimination of faults • to effectively contact either the manufacturer of the machine or INDRAMAT customer service. This document should be placed in the control cabinet where it can be easily accessed by operating or maintenance personnel. Record of revisions Copyright Revision Date Remarks Initial release 1/98 GPS - 05 INDRAMAT , 1998 Copying this document, and giving it to others and the use or communication of the contents thereof without express authority, are forbidden. Offenders are liable for the payment of damages. All rights are reserved in the event of the grant of a patent or the registration of a utility model or design (DIN 34-1). Validity Published by All rights are reserved with respect to the content of this documentation and the availability of the product. INDRAMAT • 5150 Prairie Stone Parkway • Hoffman Estates, IL 60192 Telephone 847-645-3600 • Fax 847-645-6201 About this documentation End User Manual CLC Multi-Axis Coordinated Motion Control Contents 1 Introduction and Overview 1-1 1.1 Purpose of Manual .....................................................................................................................................1-1 1.2 Manual Overview........................................................................................................................................1-2 1.3 CLC Overview ............................................................................................................................................1-2 CLC-D Overview..................................................................................................................................1-3 CLC-P Overview ..................................................................................................................................1-6 CLC-V Overview ..................................................................................................................................1-8 2 Monitoring and Diagnostics 2-1 2.1 System Diagnostics - Codes and Messages..............................................................................................2-1 2.2 Status Messages (001-199) .......................................................................................................................2-2 2.3 Warning Messages (201-399)....................................................................................................................2-3 2.4 Shutdown Messages (400 - 599) ...............................................................................................................2-4 2.5 Fatal System Errors..................................................................................................................................2-18 2.6 Communication Error Codes and Messages ...........................................................................................2-19 3 CLC DDE Server 3-1 3.1 Dynamic Data Exchange............................................................................................................................3-1 The Dynamic Data Exchange Server ..................................................................................................3-1 Dynamic Data Exchange Interface ......................................................................................................3-2 3.2 The Communication Servers Main Window ...............................................................................................3-3 Settings Menu - CLC Server Configuration .........................................................................................3-3 Settings Menu - Serial Communications .............................................................................................3-6 Settings Menu - VME Communications...............................................................................................3-7 Settings Menu - PC Bus Communications .......................................................................................... 3-8 3.3 AT Modem Configuration Dialog ..............................................................................................................3-11 3.4 SERVER Topic Name ..............................................................................................................................3-12 4 Teach Pendant 4-1 4.1 Overview.....................................................................................................................................................4-1 Menu Map............................................................................................................................................4-2 4.2 Teach Pendant Setup.................................................................................................................................4-4 4.3 Keyboard Operation ...................................................................................................................................4-6 Keyboard Map .....................................................................................................................................4-7 Cursor Control and Editing ..................................................................................................................4-8 End User Manual Contents I CLC Multi-Axis Coordinated Motion Control Jogging Control ...................................................................................................................................4-8 Task Control ........................................................................................................................................4-8 Teach Control ......................................................................................................................................4-8 4.4 Program Menu............................................................................................................................................4-9 Sequencer Editing (F4)......................................................................................................................4-10 4.5 Table Edit Menu .......................................................................................................................................4-14 Absolute Point Table Edit ..................................................................................................................4-14 Relative Point Table Edit ...................................................................................................................4-16 Event Table Edit ................................................................................................................................4-17 Integer Variable Table Edit ................................................................................................................4-18 Floating Point Variable Table Edit .....................................................................................................4-19 Global Integer Variable Table Edit.....................................................................................................4-20 Floating Point Variable Table Edit .....................................................................................................4-21 4.6 Jog Menu..................................................................................................................................................4-22 Jog Systems ......................................................................................................................................4-23 Jog Method........................................................................................................................................4-24 Teaching Points................................................................................................................................4-24 Jog Fine Adjustments ........................................................................................................................4-24 4.7 Control Menu ............................................................................................................................................4-25 Control Menu: Auto Run/Hold Mode..................................................................................................4-26 Control Menu: Auto Step Mode .........................................................................................................4-27 Control Menu: Manual Mode .............................................................................................................4-28 4.8 Register I/O Menu ....................................................................................................................................4-29 4.9 Parameter Menu.......................................................................................................................................4-31 Card Parameter Screen.....................................................................................................................4-31 Axis Parameter Screen......................................................................................................................4-32 Task Parameter Screen ....................................................................................................................4-32 Drive Parameter Screen ....................................................................................................................4-33 4.10 Security Menu.........................................................................................................................................4-34 4.11 Diagnostics Menu...................................................................................................................................4-35 4.12 Help Menu ..............................................................................................................................................4-35 4.13 Error Screen ...........................................................................................................................................4-36 4.14 System Parameters (Teach Pendant Related) ......................................................................................4-36 4.15 Teach Pendant Reserved Register Table ..............................................................................................4-40 5 Index II Contents 5-1 End User Manual CLC Multi-Axis Coordinated Motion Control Table of Figures Figure 1-1: CLC-D Hardware Comparison ...........................................................................................................1-3 Figure 1-2: CLC-D Jumper Configuration.............................................................................................................1-4 Figure 1-3: 7 segment display on the CLC-D .......................................................................................................1-5 Figure 1-4: CLC-P jumper locations .....................................................................................................................1-6 Figure 1-5: CLC-V Hardware Comparison ...........................................................................................................1-8 Figure 1-6: CLC-V Configuration Switches...........................................................................................................1-9 Figure 3.1: CLC DDE Server ................................................................................................................................3-3 Figure 3-2: CLC Server Configuration ..................................................................................................................3-4 Figure 3-3: Serial Communications ......................................................................................................................3-6 Figure 3.4: VME Communications........................................................................................................................3-7 Figure 3-5: PC Bus Communications ...................................................................................................................3-8 Figure 3.6: DDE Conversations............................................................................................................................3-9 Figure 3.7: DDE Conversation Item .....................................................................................................................3-9 Figure 3.8: DDE Communication Monitor...........................................................................................................3-10 Figure 4-9: Menu Map (F1-F4) .............................................................................................................................4-2 Figure 4-10: Menu Map (F5-F8) ...........................................................................................................................4-3 End User Manual Contents III CLC Multi-Axis Coordinated Motion Control 1 Introduction and Overview 1.1 Purpose of Manual This document is a user manual for the CLC motion control card. For information pertaining to other system components, refer to the following documentation: DIAX03 Drive with Electronic Transmission Function DOK-DIAX03-ELS-04VRS**-50M1-EN-P, Part No. 273438 DDS 2.1 W/ Analog Interface Application Manual (Pub No. 209-0069-4315-03, Part No. 257182) DDS 2.1/3.1 W/ SERCOS Interface Application Manual (Pub No. 209-0069-4321-04, Part No. 262156) DKS Intelligent Digital Servo Drive Project Planning Manual (Pub No. 209-0069-4355-00, Part No. 259310) DKS and MDD Intelligent Digital AC Servo Drives Application Manual (Pub No. 209-0069-4351-01, Part No. 261809) This document is meant to be a user manual for operators who are running or troubleshooting systems that use the CLC card. The information contained in this manual is intended for trained operating and maintenance personal. It is assumed that the controller and drives are installed properly and that all the hard wiring has already been done. For more information refer to the following CLC Manuals: •CLC Start Up Guide, IAE 68010 Rev. B, 02/97 (Part No. 274661) •CLC Reference Manual, •CLC Product Information Guide, End User Manual Introduction and Overview 1-1 CLC Multi-Axis Coordinated Motion Control 1.2 Manual Overview Chapter 1 - Introduction Describes the CLC’s general theory of operation and its motion capabilities. Chapter 2 - CLC Monitoring and Diagnostics Provides a description of Status, Warning and Shutdown messages and how to troubleshoot errors and faults. Chapter 3 - CLC DDE Server Describes the usage and functionality of the DDE Server: a program that allows communication to take place between the CLC card and other applications. Chapter 4 - Teach Pendant Describes the usage and functionality of the CLC Teach Pendant. 1.3 CLC Overview The CLC card is part of an extensive motion control system which also includes digital servo drives and SERCOS, a fiber-optic communication system. The CLC can provide multi-axis coordinated and non-coordinated motion control with tightly integrated I/O logic control functions. The flexibility of the CLC allows it to be used for a wide variety of applications, from general motion control to sophisticated multi-axis electronic line shafting (ELS) to robotics. Three versions of the CLC card are currently available: CLC-V for VME bus architecture. CLC-P for IBM PC-AT bus architecture. CLC-D which plugs into Indramat digital drives, providing an exceptional costeffective motion control solution. The CLC motion control card combines an integrated multi-tasking environment with a unique graphical Windows based programming interface TM Visual Motion (VM). VM provides simplified point-and-click programming, operation and management. With this software, system builders have a flexible and comprehensive environment, including easy DDE integration with applications such as Wonderware, InTouch or Visual Basic programs. A CLC card can simultaneously control up to four independent user tasks (A, B, C & D). Each task can control a coordinated group of two or three axes and any number of independent motion axes. Depending on the application, a single CLC may control up to 40 axes. 1-2 Introduction and Overview End User Manual CLC Multi-Axis Coordinated Motion Control CLC-D Overview CLC-D 1.1 CLC-D 2.1A/2.2A CLC-D 2.1M/2.2M Figure 1-1: CLC-D Hardware Comparison CLC-D Serial Communication Port A (X27) is configured to respond to the CLC ASCII Host Protocol. Port B (X28) can be configured to respond to Host Protocol, Teach Pendant or another interface. Both ports always operate with: • 8 bits per character • 1 stop bit • no parity. The configurable communication settings are shown in the following table. Serial Com Options Baud Rate Checksum Port Mode Protocol Port A (X27) default Port A (X27) valid settings Port B (X28) default Port B (X28) valid settings 9600 300, 1200, 2400, 4800, 9600, 19200, 38400 enabled enabled or disabled RS-232 RS-232,422,485 Host Protocol Host Protocol 9600 300, 1200, 2400, 4800, 9600 enabled enabled or disabled RS-232 RS-232,422,485 Host Protocol Off, Host Protocol, Teach Pendant End User Manual Introduction and Overview 1-3 CLC Multi-Axis Coordinated Motion Control CLC-D Jumper Configuration Jumpers S1 and S2 set the default configuration for serial ports X27 and X28 respectively. If the jumper is installed, the port is configured for the default settings of RS-232 and 9600 baud. S1 S2 Figure 1-2: CLC-D Jumper Configuration CLC-D SERCOS The SERCOS port is used for loop-through, daisy-chained installation into a SERCOS fiber-optic ring. The output port, Tx, is connected to the SERCOS input port of the next SERCOS device in the ring. Each SERCOS device is interconnected, output to input, with the output of the last device returned to the SERCOS input, Rx, of the CLC-D. On-Board Battery Non-volatile memory backup is provided by a 3 volt, CR2477N (MnO2/Li) type battery. The battery has a capacity of 0.9 Amp-hours. The battery is field replaceable, see Section 8.6 for ordering and installation information. 1-4 Introduction and Overview End User Manual CLC Multi-Axis Coordinated Motion Control CLC-D 2.1/2.2 Front Panel Diagnostic Display Normal operations The CLC-D 2.1/2.2 has a one digit 7-segment LED display. In normal operating conditions, a static display shows the mode that the CLC is currently in. H4 CLC-D front plate Figure 1-3: 7 segment display on the CLC-D Display Status 0 Initial display 1-4 Initialization Mode, SERCOS phases 1-4 P Parameter mode H No user tasks are running (Halt) A Task A is running b Task B is running C Task C is running d Task D is running Error codes When an error exists, the CLC displays the three digit diagnostic code from Parameter C1.123 and Register 6. “E” , indicating error, is displayed for one second, and each digit of the code is displayed for one-half second. The display continues to scroll in this manner until the error is cleared. Code Error Type E200 - E399 Warning E400 - E999 Shutdown Error For individual error code descriptions see Chapter 2. Monitoring and Diagnostics. CLC Watchdog The decimal point on the display is connected to a hardware watchdog circuit that is refreshed by the CLC every 100ms. If the microprocessor fails or if the CLC drops into the pROBE monitor, the display is blanked and the decimal point turns on. While the CLC is running, the decimal point is off. End User Manual Introduction and Overview 1-5 CLC Multi-Axis Coordinated Motion Control CLC-P Overview CLC-P SERCOS and Serial Communication The CLC-P card has the same serial communication and SERCOS settings as the CLC-D card. See CLC-D Serial Communication. CLC-P Jumper Configuration Jumpers S1 and S2 set the default configuration for serial ports X27 and X28 respectively. If the jumper is installed, the port is configured for the default settings of RS-232 and 9600 baud. S2 S1 S6 S7 S5 S11 S10 The switch order on earlier cards was: S9 S10 S9 S11 S8 S8 Figure 1-4: CLC-P jumper locations Jumpers S5 through S7 set the PC interrupt. Only IRQ2 (default) can be used. 1-6 Introduction and Overview PC Interrupt S5 S6 S7 IRQ2 (IRQ9) In Out Out IRQ3 Out In Out IRQ5 Out Out In End User Manual CLC Multi-Axis Coordinated Motion Control Jumpers S8 through S11 set the base address of a 16K memory segment in the Host’s RAM. This memory space is used to exchange information between the CLC and the Host. Card Number Base Address S11 S10 S9 S8 0 C000 In In In In 1 C400 In In In Out 2 C800 In In Out In 3 CC00 In In Out Out 4 D000 In Out In In 5 D400 In Out In Out 6 D800 In Out Out In 7 DC00 In Out Out Out 8 E000 Out In In In 9 E400 Out In In Out 10 E800 Out In Out In 11 EC00 Out In Out Out 12 F000 Out Out In In 13 F400 Out Out In Out 14 F800 Out Out Out In 15 FC00 Out Out Out Out On-Board Battery Non-volatile memory backup is provided by a 3 volt, CR2477N (MnO2/Li) type battery. The battery has a capacity of 0.9 Amp-hours. End User Manual Introduction and Overview 1-7 CLC Multi-Axis Coordinated Motion Control CLC-V Overview CLC-V 2.1 CLC-V 2.3 Figure 1-5: CLC-V Hardware Comparison CLC-V Serial Communication Port A is configured to respond to the CLC ASCII Host Protocol. Port B can be configured to respond to Host Protocol, Teach Pendant or another interface. The serial interface is compatible with EIA RS-232C and supports signals for both AT and XT type Host PCs. The CLC’s default parameters are: 9600 baud 8 bits per character 1 stop bit no parity The configurable communication settings are shown in the following table. 1-8 Introduction and Overview Serial Com Options Baud Rate Checksum Port A (X27) default 9600 enabled Port A (X27) valid settings 300, 1200, 2400, 4800, 9600, 19200, 38400 enabled or disabled Port B (X28) default 9600 enabled Port B (X28) valid settings 300, 1200, 2400, 4800, 9600 enabled or disabled End User Manual CLC Multi-Axis Coordinated Motion Control CLC-V SERCOS The SERCOS port is used for loop-through, daisy-chained installation into a SERCOS fiber-optic ring. The output port, Tx, is connected to the SERCOS input port of the next SERCOS device in the ring. Each SERCOS device is interconnected, output to input, with the output of the last device returned to the SERCOS input, Rx, of the CLC-V. CLC-V Configuration Switches Slide Switch SW5 (Default) OFF SW5 + Math Coprocessor / Flash Mezzanine B EPROM A ON 1 2 3 4 5 6 7 8 J1 Opto Isolated I/ O Drivers SERCOS MODULE SERCOS ASIC Slide Switch SW6 (Default) + J2 SW6 OFF ON 1 2 Figure 1-6: CLC-V Configuration Switches Configuration Switch - SW5 SW5 Position Default 1 ON Function ON - Programming of the local Flash EPROM enabled OFF - Local Flash EPROM write protected 2 OFF ON - CLC-V Drives VME SYSRESET OFF - SYSRESET not driven 3 OFF ON - CLC-V Accepts SYSRESET from VME OFF - SYSRESET not received 4 ON ON - Power-fail reset voltage set to 4.8V OFF - Power-fail reset voltage set to 4.2V 5 ON ON - Programming of Flash EPROM enabled OFF - Flash EPROM write protected 6 & 7 Select the CLC's VME Bus request level: BR0 BR1 BR2 BR3 6 ON OFF OFF ON ON 7 ON OFF ON OFF ON 8 ON ON - VME Slot 1 functions enabled OFF - VME Slot 1 functions disabled Configuration Switch - SW6 End User Manual Introduction and Overview 1-9 CLC Multi-Axis Coordinated Motion Control Both switches SW6-1 and SW6-2 are functionally used as one switch. Both must have the same setting, ON or OFF. SW6 Position Setting Function 1 OFF (default) 2 OFF (default) Disables the CLC-V's on-board secondary battery. Backup battery is provided through the VME bus STDBY line. 1 ON 2 ON Enables the CLC-V's on-board secondary battery and disconnects the CLC-V from the VME bus STDBY line. Both positions of SW6 must be ON to enable the on-board secondary battery and disconnect the CLC-V from the VME bus STDBY line. CAUTION: Leave both switch positions OFF, as set by the factory. The VME card cage is the required source of battery back-up. Damage to the CLC-V's on-board secondary battery may occur if a VME card cage supplies battery backup and either position of SW6 is set ON. On-Board Primary Battery SRAM parameters and real-time clock (RTC) backup is provided by a 3 volt, CR2032 lithium button-style battery. The battery has a capacity of 0.18 Amphours. 1-10 Introduction and Overview End User Manual CLC Multi-Axis Coordinated Motion Control 2 Monitoring and Diagnostics 2.1 System Diagnostics - Codes and Messages The CLC provides three types of diagnostic messages: Status Messages, Warnings, and Shutdowns. Diagnostic messages are preceded by an identifying code number. Indramat assigns these code numbers using the following groups: Status Messages (001-199) Warning Messages (201-399) Shutdown Messages (400 - 599) A second error code is often included within the primary error message. "X" indicates a hexadecimal error code "D" indicates a decimal error code The Host can request the currently active diagnostic message for the CLC system and for each user task. In addition, any parameters pertaining to Drive Diagnostics can be accessed through drive service channel (Dx.x) parameters. Refer to the Drive manual for descriptions of drive diagnostics. See the Parameters section for more detailed descriptions of the CLC System and Task parameters. For example: Parameter C-0-0122: Diagnostic Message Parameter C-0-0123: Diagnostic Code. Parameter C-0-0124: Extended Diagnostics. Parameter T-0-0122: Task Diagnostic Message (where s= A, B, C or D for Task A - D) Parameter S-x-0095: Drive Diagnostic Message (where x= 1 - 8 for Drive 1 - 8) End User Manual Monitoring and Diagnostics 2-1 CLC Multi-Axis Coordinated Motion Control 2.2 Status Messages (001-199) A Status Message indicates the normal operating status of an axis, task, or the system when there are no errors. A change in status that generates a new status message overwrites the previous message. No user acknowledgment is required for a change in a status message. 001 Initializing System The CLC is initializing the executive firmware, the SERCOS ring, and other devices at power-up or exit from parameter mode. 002 Parameter Mode The CLC is in parameter mode, and the drives are in Phase 2. 003 Initializing Drives SERCOS has been reconfigured and the ring is being initialized. 004 System is Ready The system has been initialized and is ready for operation. 005 Manual Mode All four user program tasks are in manual mode. 006 Automatic Mode: ABCD The user program tasks indicated at the end of the message are in automatic mode, and the rest are in manual mode. For example, "Automatic Mode: B" indicates that only Task B is in automatic mode. 007 Program Running: ABCD The user program tasks indicated at the end of the message are running, and the rest are not running or are single-stepping. 008 Single-Stepping: ABCD The user program tasks indicated at the end of the message are in singlestep mode. The other tasks are not running. 009 Select Parameter Mode to Continue An error during system initialization occurred and was cleared, but the error condition was not corrected. Switch into Parameter Mode to continue. 010 Breakpoint Reached: ABCD The user tasks indicated at the end of the message have reached a user program breakpoint, and the rest of the tasks are not running. 2-2 Monitoring and Diagnostics End User Manual CLC Multi-Axis Coordinated Motion Control 2.3 Warning Messages (201-399) Warning messages are issued when an improper system condition exists. The condition is important enough to be brought to an operator's immediate attention, but not critical enough to shut down the system. However, a warning may be a notification of an impending shutdown condition. Warnings typically allow normal system operation to continue. A warning sets the error bit associated with the affected task or the system and displays the warning message. Once issued, the error condition must be corrected and acknowledged to the system. The user acknowledges and clears a warning with a low-to-high transition of the Clear All Errors bit of the CLC's System Control Register. After a warning condition has been corrected and acknowledged, the user program can be resumed at the point where the error occurred. In SERCOS, warnings are Class 2 Diagnostics. Warning messages can be cleared by correcting the warning condition, or by setting the CLC's clear error input. 201 Invalid jog type or axis selected This message is issued before a coordinated I/O jog when an invalid type or axis is selected. 202 Drive D is not ready This message is issued before a coordinated I/O jog when a drive is not enabled. 203 Power lost during program This function is not currently implemented. 204 SERCOS Ring was disconnected The SERCOS ring was disconnected before a shutdown error was cleared. The ring is now initialized. To continue, activate the clear input. This message allows detection of an intermittent break in the fiber optic ring. 205 Parameter transfer warning in Task A There is an error in the parameter transfer instruction. This indicates a warning condition that does not shut down the task. The parameter format, parameter number, or stored value may be invalid. A communication error message is displayed in the diagnostic message for the task (A-D) in which the error occurred (T-0-0122). Information on the actual parameter number that caused the error is provided in extended diagnostics (C-0-0124). 206 Battery is low: replace it soon A low voltage on the RAM backup battery has been detected at power-up or initialization from parameter mode. Replace the battery to prevent any loss of data. 207 Axis D position limit reached The negative or positive travel limit of axis D was reached, preventing a jog from occurring. End User Manual Monitoring and Diagnostics 2-3 CLC Multi-Axis Coordinated Motion Control 2.4 Shutdown Messages (400 - 599) A Shutdown is issued in an emergency situation or when the system or drives cannot operate correctly. During a shutdown, the CLC switches the user program tasks into manual mode, decelerates all motion to zero velocity, and sets the error bit in the status register. If the shutdown condition results from an E-stop or DDS-2 drive shutdown condition, the CLC also disables the drives, disabling motor torque and engaging the brake. A low to high transition on the Clear All Errors bit in the System Control Register will clear a shutdown. The CLC automatically sends a 'Reset Class 1 Diagnostics' command to each drive that has an error. 400 Emergency Stop The Emergency Stop input is active (low). The E-Stop circuit has been opened due to activation of the E-Stop push button or external logic. All drives on the ring are disabled. Release the E-Stop button or correct the error condition. 401 SERCOS Controller Error: DD The SERCOS communications controller has indicated an error on the SERCOS ring. Check the fiber optic connections, the addresses set on the drives, and the drive configuration. 402 SERCOS Config. Error: see ext. diag. or 402 SERCOS Interface Error: XXXX (versions before 01.20) An error in the SERCOS service channel has occurred when the CLC was initializing the timing and scaling parameters. The extended diagnostics (C1.124) gives a description of the error. If the extended diagnostic indicates a timing error or data limit error, check the amount of data or drives on the ring and the minimum cycle time parameter. Otherwise, check the fiber optic connections, the addresses set on the drives, and drive firmware versions. 403 System Error This error is not issued in current CLC versions and is reserved for future use. 2-4 Monitoring and Diagnostics End User Manual CLC Multi-Axis Coordinated Motion Control 404 Invalid Switch into Phase D The SERCOS communications controller did not allow a phase switch. Check if power is applied to the drives and if the fiber optic connections and the drive addresses are correct. If drive parameters were just downloaded, switch back into parameter mode to reinitialize the interface. If the above conditions are O.K., the SERCOS interface board may be faulty. NOTE: This error is issued only in versions that do not use the SERCOS ASIC (firmware versions less than 01.20). 405 Phase D: Drive did not respond A time-out in the SERCOS ring has occurred when the CLC was initializing timing and scaling parameters. Check the fiber optic connections, the addresses set on the drives, and the drive firmware versions. This distinguishes a communication error from an actual phase switch error. 406 System Error This error is not issued in current CLC versions and is reserved for future use. 407 Drive D Phase 3 Switch Error The SERCOS phase 3 switch command failed for the drive indicated. This usually indicates that configuration parameters for the drive are invalid or have not been saved. Check the Drive Status message (parameter Dx.95) for drive ‘D’ for a description of the error. If the Drive Status indicates that parameters are invalid or lost, display the Phase 2 error parameter list for Drive ‘D’. Switch into parameter mode and change the invalid parameters or download a valid parameter file to the drive. If the drive is not communicating, check the connections and the addresses. If drive parameters were just downloaded, switch back into parameter mode to reinitialize the interface. 408 SERCOS Controller is in test mode The Indramat DAS2 SERCOS Controller is in test mode. Set the mode switch on the front of the board to a position where this error does not occur. Note: This error is not issued in versions that use the SERCOS ASIC. 409 SERCOS Disconnect Error The SERCOS fiber optic ring was disconnected or the drives were powered down while in Phase 3 or 4. A more descriptive message will be displayed in the extended diagnostics (C1.124 - Indicates the first drive in which the drive data failed). End User Manual Monitoring and Diagnostics 2-5 CLC Multi-Axis Coordinated Motion Control 410 System Error This error is not issued in current CLC versions and is reserved for future use. 411 Drive D Phase 4 Switch Error The SERCOS phase 4 switch command failed for the drive indicated. This usually indicates that configuration parameters for the drive are invalid or have not been saved. Check the Drive Status message (parameter Dx.95) for drive ‘D’ for a description of the error. If the Drive Status indicates that parameters are invalid or lost, display the Phase 3 error parameter list for Drive ‘D’. Switch into parameter mode and change the invalid parameters or download a valid parameter file to the drive. If the Drive Status indicates that there is a feedback error, voltage error, or other hardware error; correct the problem and switch into and out of parameter mode to reinitialize the interface. 412 No drives were found on ring No drives were found when the CLC initialized the SERCOS ring to Phase 1. Check the addresses set on the drives, in the CLC program, and in the CLC parameters. Also, check that power is applied to the drives and the fiber optic connections are correct. 413 I-O board was not found The selected I-O board was not found on the VME bus. The correct I-O device must be enabled and the address selected on the device must match the CLC parameter. A VME arbiter must be present in the rack (on CLC/V, switch SW5-8 must be on). See the I-O device descriptions for more information. 414 Parameters were lost CLC System, Task, and Axis parameters were lost, and defaults have been loaded. The RAM backup battery has failed or was not connected, or an internal system error or new software version has corrupted the memory. 415 Drive D was not found A drive (D) that is used in a program or selected in the system parameters was not found on the SERCOS ring. Check the fiber optic connections, the address switches on the drives, and the user program and parameters. 416 Invalid Instruction at XXXX An invalid user program instruction was found by the CLC during compilation. Recompile the program from the PC and download it again. If the error still occurs, check the source program for an instruction that may not be supported in this firmware version. 2-6 Monitoring and Diagnostics End User Manual CLC Multi-Axis Coordinated Motion Control 417 SYSTEM ERROR: pSOS #XXXX An internal CLC operating system error has occurred. Call Indramat Service for assistance. 418 No program is active No active user program was found on the CLC during initialization. Download and activate a program from the user interface, then clear the error. 419 Invalid Program File A checksum or file format error was found in the active program file. Recompile the program from the PC and download it again. If the error still occurs, call Indramat Service for assistance. 420 Drive D Shutdown Error The drive has issued a shutdown error, which disables motion. Check the SERCOS Drive Status message (parameter Dx.95) for a description of this error. Refer to the drive manual for more information. 421 User Program Stack Overflow The subroutine call stack for a user program task has overflowed. Check the program for the following conditions: -there is not a return for every subroutine call -a subroutine is calling itself -program flow has caused multiple returns -more than 256 subroutines are nested. See the diagnostic message (Error! Reference source not found.) or task error bit for each task to find out which task has this error. 422 Parameter transfer error in Task A There is an error in the parameter transfer instruction. The parameter format, parameter number, or stored value may be invalid. A communication error message is displayed in the diagnostic message for the task (A-D) in which the error occurred (T-0-0122). Information on the actual parameter number that caused the error is provided in extended diagnostics (C-0-0124). 423 Unimplemented Instruction The instruction is not implemented in this version. Recompile the program without this instruction indicated by the current instruction pointer or update the CLC firmware or PC software. 424 System Error This error is not issued in current CLC versions and is reserved for future use. End User Manual Monitoring and Diagnostics 2-7 CLC Multi-Axis Coordinated Motion Control 425 Instruction Error: see Task A diag. An error has occurred in a user program instruction. A more specific message is displayed in the diagnostic message for the task (A-D) in which the error occurred (T-0-0122). This error usually applies to coordinated motion instructions. 426 Drive D is not ready Drives must be enabled before motion commands are issued to them in a user program. Check the Axis Disable bit in Axis D's Control Register, Axis D's status bits, the fiber-optic ring, and the power circuit. 427 Calc: invalid table index D In a user program calculation expression, the index to a point or event table is invalid. See the diagnostic message for each task to find out which task has this error, then check the variable that is used to index the table. 428 Calc: division by zero In a user program calculation instruction, an attempt was made to divide a number by zero. See the diagnostic message for each task to find the task and the instruction, then check the variables used in the expression. 429 Calc: too many operands In a user program calculation instruction, more than 1000 operands and operators were in the string. See the diagnostic message for each task to find the task and the instruction. 430 Calc instruction: invalid operator An invalid arithmetic operator was found in a user program calculation instruction. Check the compiler and firmware version numbers, and call Indramat service for assistance. 431 Calc error: see Task A diag. An error has occurred in a user program calculation instruction. See the task diagnostic message for a communication error message. 432 Calc: too many nested expressions In a user program calculation instruction, more than 16 operations were pending. See the diagnostic message for each task to find the task and the instruction. Then check the number of operands in the expression, looking for unbalanced parentheses. 433 Setup instruction outside of a task The following commands must be placed in a task's main program: TASK/AXES, KINEMATIC, and DATA/SIZE. This error is issued if any of 2-8 Monitoring and Diagnostics End User Manual CLC Multi-Axis Coordinated Motion Control these commands are found in a subroutine. Move the instructions to Task A, B, C, or D, following the TASK/START instruction or Axis Setup icon. 434 Axis D configured more than once Axis D was selected more than once in a TASK/AXES command (axis setup icon). Modify the program so that the axis is selected once. 435 Axis D not associated with a task Axis D was not associated with a task using the TASK/AXES command but was used in another command. Modify the program so that the axis is selected. 436 General Compiler Error: XXXX An error was found in a compile-time instruction (TASK/AXES, KINEMATIC) after program activation. See the task diagnostic message for a description. If there is no task diagnostic message, call Indramat for assistance. 437 Axis D not controlled by this task Single-axis motion was started from a task not associated with an axis. Motion can only be started from a task with axes selected in the TASK/AXES command. 438 Invalid Axis Selected: D Axis D was not found on the SERCOS ring or is an invalid axis number. This error is issued during single-axis or ELS motion commands. Check the constant or variable that contains the axis number. 439 Invalid Motion Type: D The axis type does not match the type of motion used by the instruction. This error is issued when a single-axis command is given to a coordinated motion axis, for example. 440 I-O Transfer Error: see task diag. An error occurred while reading or writing an I-O register. diagnostic message for a description. See the task 441 DMA error while reading from local RAM 442 DMA error while reading from VME address 443 DMA error while writing to local RAM End User Manual Monitoring and Diagnostics 2-9 CLC Multi-Axis Coordinated Motion Control 444 DMA error while writing to VME address 445 DMA Access Time-out Error 446 DMA Time-out Error 447 VME SYSFAIL Detected 448 VME Communication Handshake Error (D) 449 VME Bus Error A VME bus error occurred while communicating to another card in passthrough mode through the serial port or during a VME transfer instruction. Check the extended diagnostics for the type of error and the address at which it occurred. If VME transfers were not being performed or if the address does not match that in the program, an internal CLC system error has occurred. Notify Indramat Service of this system error. 450 Event D: invalid event type The event type selected in the event table is not valid or does not match the type of motion or event. This error is also issued if an event/trigger (event arm) is executed for a motion-based event. 451 Invalid event number D The event number is not within the bounds selected with the data/size command for this task. 452 More than D event timers armed Only 'D' repeating timer events can be armed at one time. Check the program flow to make sure that triggered events are being disabled. 453 Homing param. transfer error: D A SERCOS communication error occurred during a drive-controlled homing command. 'D' indicates the communication error code returned by the drive. Try to home the axis again. If this error still occurs, call Indramat for assistance. 454 Axis D homing not complete The drive did not successfully complete the homing sequence. See the drive diagnostics for a status or error message. 2-10 Monitoring and Diagnostics End User Manual CLC Multi-Axis Coordinated Motion Control 455 Invalid VME Data Transfer Class During a VME/READ or VME/WRITE instruction, the transfer class (e.g. I16, F32, etc.) is invalid. 456 Invalid VME Address During a VME/READ or VME/WRITE instruction, the VME address does not lie within the valid VME address range. 457 Table Bounds Error During VME Read The variable or point table index exceeds the size of the table configured in the DATA/SIZE instructions. 458 Table Bounds Error During VME Write The variable or point table index exceeds the size of the table configured in the DATA/SIZE instructions. 459 Axis D target position out of bounds The programmed position in an axis/move command exceeds the drive's travel limits. Adjust the travel limits or check the variable or constant containing the position. 460 Invalid program D from binary inputs The program selected from the Binary Program Select bits does not exist on the card or is greater than the maximum number of programs. 461 System Error This error is not issued in current CLC versions and is reserved for future use. 462 System Error This error is not issued in current CLC versions and is reserved for future use. 463 Ratio command: invalid ratio In the RATIO command, one of the factors is too large or the master factor is zero. 464 Can't activate while program running A new program cannot selected through the Binary Program Select inputs unless the program is stopped. End User Manual Monitoring and Diagnostics 2-11 CLC Multi-Axis Coordinated Motion Control 465 Drive D config. error, see ext. diag, or 465 Drive D: telegram type not supported (versions before 01.20) Drive D does not support a product-specific option or a drive configuration calculation has failed. Product-specific options include ELS, single-axis motion, or I-O cards. The extended diagnostic message (C1.124, or in Status-System menu) describes the error in more detail. It often shows the parameter that failed along with a short message describing the error. If it indicates that a parameter is invalid or a configuration is not supported, check the axis configuration with the drive hardware or software. If the extended diagnostic indicates an error such as ‘Handshake time-out’ or ‘Drive is not responding’, the SERCOS ring may have been disconnected during initialization. Check the fiber optic connections and the addresses of the drives on the ring. 466 Drive D: scaling type not supported Drive D does not support an option such as ELS or single-axis motion, which are product-specific. Check the axis configuration with the drive hardware or software. Note: This error is issued only in versions that do not use the SERCOS ASIC (firmware versions less than 01.20). 467 Invalid ELS Master Option An option in the ELS/INIT command is invalid, not supported, or inconsistent with the other options. 468 ELS adjustment out of bounds The phase offset or fine ratio adjustment exceeded the bounds allowed by the drive. The fine adjust must be between -100 and 300%. 469 Axis D accel <= 0 or > maximum The acceleration or deceleration programmed for axis D is negative, zero, or exceeds the maximum acceleration or deceleration parameter (Ax.21 or Ax.22). 470 Axis D velocity > maximum The velocity programmed for axis D is exceeds the maximum velocity parameter (Ax.20). 471 Invalid VME Base Address Page: 0xXXXX The base address page selected in the VME parameter is invalid. See the VME descriptions. 2-12 Monitoring and Diagnostics End User Manual CLC Multi-Axis Coordinated Motion Control 472 VME Event Trigger Rejected A CLC did not respond to the VME broadcast event message. event description. See the VME 473 VME Event Trigger For Unit D Failed Unit D did not respond to the VME mailbox event message. event description. See the VME 474 Drive D cyclic data size too large Too much data is configured in the SERCOS cyclic telegram. The drives currently support up to 16 bytes of configurable data. Remove I-O or registration options from the parameter or program configuration. 475 Axis D capture already configured An axis has been configured for the feedback capture function in a previous user program command. Only one capture/setup command is allowed for each axis. 476 Axis D: Real Time Bit Setup Error A SERCOS error occurred while the CLC was configuring the drive’s real time bits for the feedback capture function. Clear the error, enter parameter mode to reinitialize SERCOS, and then exit parameter mode. 477 Axis D: probe edge not configured This error, issued in the capture/enable instruction, indicates that the selected probe edge for the event has not been configured with the capture/setup instruction. 478 Calc: operand out of range The operand of a calculation function is out of the range of valid arguments, as when a square root or a logarithmic of a negative number is attempted. 479 Drive D: too many cyclic data elements The DDS 2.1 currently allows 4 cyclic data elements for the AT and MDT. Remove options such as I-O cards and probing. Refer to the SERCOS Cyclic Telegram Configuration 480 SERCOS Error: MDT is too large The DDS 2.1 currently allows 104 bytes in the MDT. Remove options such as I-O cards and probing, or reduce the number of drives on the ring. Refer to the SERCOS Cyclic Telegram Configuration End User Manual Monitoring and Diagnostics 2-13 CLC Multi-Axis Coordinated Motion Control 481 Event D is already armed An event that is currently armed has been armed again using event/trigger (event arm) or the VME event instructions. 482 Checksum Error in Program The currently active program’s checksum doesn’t match the checksum that is stored in memory. This indicates that a system error has caused the CLC to overwrite memory. Call Indramat service for assistance. 483 Parameter Init. Error: see Task A diag There is an error in the parameter initialization or bit initialization instruction; which is executed when exiting parameter mode. The parameter format, parameter number, or stored value may be invalid. A communication error message is displayed in the diagnostic message for the task (A-D) in which the error occurred (T-0-0122). Information on the actual parameter number that caused the error is provided in extended diagnostics (C-0-0124). In many cases, this error is issued when a drive is not on the ring or the drive parameter is not found for a type of drive. 484 CLC SYSTEM ERROR This error indicates a problem in the CLC executive firmware. See the extended diagnostics parameter (C-0-0124) for more information, and call the Indramat service department for assistance. 485 SERCOS I-O: too many registers configured More than 50 SERCOS I-O registers were configured in the CLC, which exceeds the system limit. This includes both drive-resident I-O and SERCOS I-O slaves. 486 SERCOS Device D is not a drive The SERCOS device with address D was enabled in the user program or parameters as an axis, but an I-O slave or other type of slave was detected. 487 Cam D is invalid or not stored In the cam/activate command, the selected cam (‘D’) is not stored on the card or does not contain valid data. Check the variable or constant that selects the cam. Check that there is a valid cam with index ‘D’ stored on the CLC. 488 Cam Error: See Task A diag. An error was issued during a cam command in task (A-D). See the task diagnostic message (T-0-0122) for a description. 2-14 Monitoring and Diagnostics End User Manual CLC Multi-Axis Coordinated Motion Control 489 More than D cam axes selected The CLC limits the number of axes configured as CLC Cam Axes to ‘D’. 490 System Memory Allocation Error The dynamic memory space on the CLC has been exhausted. Call Indramat Service for assistance. 491 PC Communication Handshake Error The CLC/P did not respond to an ASCII message. Check the address configuration on both the PC (config.sys and system.ini) and the CLC/P (address jumper switches). 492 Programs were lost User programs and data were lost. The RAM backup battery has failed or was not connected, or an internal system error has corrupted the memory. For the CLC/V, the card may have been removed from the VME rack. 493 Data was restored from Flash User programs and parameters have been restored from Flash EPROM. If the card has just been installed in the VME rack and a valid program is active, clear this error and proceed. If the card has not just been installed, this indicates that the VME standby battery has failed and the previous program and data has been replaced with that stored in Flash. 494 Sequencer init. error: see task T diag An error has occurred in a sequencer/initialize instruction in task ‘T’. The task diagnostic (T-0-0122) and the extended diagnostic (C-0-0124) give a more detailed description of the error. 495 Sequencer error: see task T diag. An error has occurred in a sequencer/execute instruction in task ‘T’. The task diagnostic (T-0-0122) and the extended diagnostic (C-0-0124) give a more detailed description of the error. 496 Can't Execute this Instruction from an Event This user program instruction cannot be executed from within an event. See the task error descriptions and the current program instruction. Some operations, such as sequencer initialization, cannot take place during an event. Move the instruction into a main user task or subroutine 497 Limit switch config. error, see ext. diag This error is issued at activation of a program when one of the PLS parameters defined in the program is invalid. It is also issued when the ELS setup is incorrect for PLS operation. Parameter C-0-0124 provides a detailed description of the error as an extended diagnostic message. End User Manual Monitoring and Diagnostics 2-15 CLC Multi-Axis Coordinated Motion Control 498 Drive D Shutdown Warning This error is issued when any drive has a Class 2 shutdown warning. The tasks that stop for errors switch into manual mode and perform a controlled stop of all axes. A drive warning indicates a condition that will later cause a shutdown, but is serious enough to require immediate attention. Since the warning may have already been cleared on the drive, the extended diagnostic (C-0-0124) latches the class 2 diagnostic bits (drive parameter S-0-0012) from the drive so that this condition can be corrected. Note: Class 2 warnings may not be detected by the CLC if drive parameter S0-0012 is being continuously read by the user interface or user program, since the diagnostic change bit is reset whenever this parameter is read. 499 Axis number D not supported in this version This version of CLC software is limited to less than D axes. The axis number is limited to the number of axes allowed. Currently, the standard version of CLC allows 4 axes, and the enhanced version 40 axes. 500 Axis D is not referenced Axis D has not been homed, the reference position has not been set, or the reference position has been lost. The reference position bit in drive parameter S-0-0403 is zero. To enable or disable this error, use parameter A-0-0006. 501 Drive D communications error An error in drive communications has occurred while the CLC was reading or writing a service channel parameter for an internal operation. Parameter C1.124, extended diagnostics, has a detailed description of the error. 502 ELS and cams not supported in this version The ELS and cam features are not supported in this version of the CLC. GPS and GPE are the only firmware versions that include these features. 503 Executing empty block #D This error is reserved for use by the TRANS01-D control. documentation for this version. See the 504 Communication Timeout During a timed serial port transmission, the serial port has not responded within the time set in parameter C-0-0016. Timed transmissions used for jogging through Visual Motion. If this error occurs, increase the timeout value in C-0-0016. 2-16 Monitoring and Diagnostics End User Manual CLC Multi-Axis Coordinated Motion Control 505 Axis D is not configured A user program command was issued to Axis D, but axis D is not configured in the program. Modify the user program so that the correct axis is addressed, or exclude the axis from the system using parameter A-0-0007. 506 I-O Mapper initialization error The I-O mapper was invalid at initialization, due to loss of memory or an incompatibility in the mapper version. 507 Option Card Power Supply Error There is an external power supply or output driver error on a DEA-08.1C, DEA-09.1C, or DEA-10.1C expansion cards connected to the CLC-D. This error is issued only in Run Mode (phase 4). All inputs are read as 0, and all outputs are turned off. End User Manual Monitoring and Diagnostics 2-17 CLC Multi-Axis Coordinated Motion Control Power Supply Error on DEA/C: The +24V signal voltage on each CLC/D must fall in the following range: External Supply Voltage Min. Typical Max. +18V +24V +32V Output Driver Error on DEA/C: An output driver error turns the 'ERR' LED on the DEA/C card on. This indicates that the current drawn by the outputs has caused the output drivers to shut down. There is a protection circuit that prevents damage to the card in this condition. This error is issued if the current is greater than 300mA for more than 1 microsecond. Troubleshooting When a 507 error occurs, check parameter C-0-0031 to find the cards that have the error condition. Check the ERR LED on the DEA/C. If it is on, check the current draw of the devices connected to the outputs. If the ERR LED is off, check the +24V external power supply signal to see if it is connected and if it falls in the range above. 2.5 Fatal System Errors When a microprocessor exception or an unrecoverable system error occurs, the CLC may stop communicating with Visual Motion and teach pendant interfaces. If possible, control is passed to a CLC-resident monitor routine that can provide debugging information to an ASCII terminal connected to the Host serial port. If a fatal error repeatedly occurs and cannot be recovered, call Indramat Service for assistance in debugging. 2-18 Monitoring and Diagnostics End User Manual CLC Multi-Axis Coordinated Motion Control 2.6 Communication Error Codes and Messages Error Code Description !01 SERCOS Error Code#xxxx (xxxx=Error code) This is the code set in the data status word of the DDS-2 drive if SERCOS communication is invalid. Call Indramat Service if this error occurs. !02 Invalid Parameter Number The requested or sent parameter does not exist on the CLC / TRANS 01-D or the drive, or the format of the parameter is incorrect. !03 Data is Read Only The data in this parameter may not be modified. !04 Write Protected in this mode/phase The data in this parameter can not be written in this mode or communication phase. Switch into parameter mode (phase 2) to enter the parameter. !05 Greater than maximum value The parameter exceeds the maximum allowed value. !06 Less than minimum value The parameter is less than the minimum allowed value. !07 Data is Invalid Parameter data is invalid, or the format of the parameter is invalid. See the DDS or CLC / TRANS 01-D Parameter Descriptions. !08 Drive was not found The requested drive was not found on the SERCOS ring. !09 Drive not ready for communication The requested drive or the SERCOS ring has not been initialized. !10 Drive is not responding The drive did not respond to a service channel request. Check system diagnostics for the state of the SERCOS ring. !11 Service channel is not open. When switching between initialization phases, data from the drive is momentarily invalid, and this message is sent instead of the requested data. !12 Invalid Command Class A serial port command is invalid or not supported at this time. !13 Checksum Error: xx (xx= checksum that CLC / TRANS 01-D calculated) The CLC / TRANS 01-D detected an invalid or missing checksum in data that was sent to it. As a debugging aid, the checksum that the CLC / TRANS 01-D calculated on the incoming data is also sent with this message. !14 Invalid Command Subclass A serial port command option is invalid or not supported. !15 Invalid Parameter Set The parameter set number (task or axis) is invalid. !16 List already in progress An attempt has been made to start a parameter or program list that is already in progress. !17 Invalid Sequence Number The sequence number of a parameter or program list is invalid or has been sent out of order. !18 List has not started A parameter or program list has not been initiated (i.e. sequence number was sent before list was started). !19 List is finished This is an acknowledgment that a parameter or program list is complete. It does not indicate an error. !20 Parameter is a List This parameter is a variable-length list, and its data cannot be displayed as a normal parameter. !21 Parameter is not a List Only Variable-Length List parameters can use the Parameter List sequence. !22 Invalid Variable Number The variable mnemonic was not 'I' or 'F', or the variable number is greater than the maximum number of variables allocated. !23 Insufficient program space This message is sent after the CLC / TRANS 01-D receives a "P W" program header if not enough contiguous memory is left on the CLC / TRANS 01-D to store the program. Other programs may need to be deleted or their order rearranged. Check system parameters C1.91, C1.92 and C1.93 for CLC / TRANS 01-D memory status. !24 Maximum number of files exceeded The CLC / TRANS 01-D allows up to 10 programs resident in the CLC / TRANS 01-D. This error message is sent when the CLC / TRANS 01-D receives a "PW" program header and there are already 10 programs stored on the CLC / TRANS 01-D. One of the CLC / TRANS 01-D resident program files must be deleted to make room to download the program. End User Manual Monitoring and Diagnostics 2-19 CLC Multi-Axis Coordinated Motion Control Error Code Description !25 Invalid program header The format of the program header sent to the CLC / TRANS 01-D is invalid, or this command is not available for reading or writing. !26 Checksum Error in Program This message is sent at the end of a download if the checksum of the data does not match the checksums sent in the program or program header. !27 Invalid Program Handle The format of the handle is incorrect, or this command is not available for reading or writing. !28 Function not Implemented The function is not implemented in this version of the CLC / TRANS 01-D. !29 Program not found on CLC A program corresponding to the requested program handle was not found (e.g., the program is not resident in the CLC / TRANS 01-D). !30 Invalid I/O Register or Bit Number The I/O register mnemonic is invalid or a register number greater than the maximum number of registers was sent. !31 Invalid Table Index The ABS, REL, or EVT table name was incorrect, or the index number was greater than the maximum number of points or events. !32 Communication Port Error The serial port receive buffer has overflowed. Make sure communications is set to half-duplex. !33 Invalid Data Format The format of the data received by the CLC / TRANS 01-D is invalid (e.g., nondigits are sent in a decimal number). !34 Active program can't be deleted The active program cannot be deleted at any time. !35 Parameter mode is required The action requested can only be performed in Parameter Mode. !36 Invalid Event Number The event number selected in the ABS or REL point table is out of the range of the total number of events. !37 Invalid Event Function The function name selected in the event table does not exist on the CLC / TRANS 01-D card or is not defined as an event function. !38 Program file version mismatch The version of the file system on the card does not match that of the downloaded file. Upgrade to the latest versions of the Visual Motion compiler and CLC / TRANS 01-D executive. !39 Can't activate while program running A new program cannot be activated unless all user tasks are stopped. !40 No programs are active No programs are active on the CLC / TRANS 01-D card. Download a program to the card. !41 System Error: pSOS #XXXX This is an internal CLC / TRANS 01-D system error. Call Indramat Service for assistance. !42 Mapper: invalid operator An invalid Boolean operator was found in I/O Mapper when it was sent to the CLC / TRANS 01-D. !43 Mapper: too many operations The maximum number of Boolean operations allowed by the CLC / TRANS 01-D I/O mapper has been exceeded. !44 Mapper: invalid register A register exceeds the maximum number of registers or is 0. !45 Mapper: invalid bit or mask The bit number or mask sent exceeds 16 bits. !46 Mapper: register is read-only An assignment to a read-only register or bit was made (e.g., attempting to write to a CLC / TRANS 01-D status register). !47 Invalid Unit Number The unit number (second character in string) is not a number between '1' and 'F' or an ASCII space character. !48 VME Bus Error A VME bus error occurred while communicating to another card in pass-through mode through the serial port. !49 VME Communication Handshake Error (D) The card addressed by the unit number in pass-through mode does not exist or its parameters are not configured properly. Change the unit number to correspond to a card in the rack or set it to a space. (No longer issued on CLC / TRANS 01-D-D.) !50 Invalid Download Block The block sent during a program download is incorrect in length or is not in hexadecimal format. 2-20 Monitoring and Diagnostics End User Manual CLC Multi-Axis Coordinated Motion Control Error Code Description !51 Unit D: Invalid VME Base Address Page The VME base address page parameter is set to an invalid address for the indicated VME unit number. !52 Invalid Axis The parameter set for the requested axis does not exist. Either this axis is disabled or the CLC / TRANS 01-D does not support this number of axes. !53 Waiting for service channel When switching between drive initialization phases, data from the drive is momentarily invalid. This message is sent instead of the requested data. This message will also be issued whenever a service channel transaction cannot be completed. Continue to retry the message until a valid response is returned. !54 List or String is too short The text string or parameter list is smaller than the minimum length allowed by the CLC / TRANS 01-D or the drive, or the size of a value does not match the attributes sent from the drive. !55 List or String is too long The text string or parameter list exceeds the maximum length allowed by the CLC / TRANS 01-D or the drive, or the size of a value does not match the attributes sent from the drive. !56 PC Communication Handshake Error The CLC / TRANS 01-D/P is not responding to an ASCII message. Check the address configuration on both the PC (config.sys and system.ini) and the CLC / TRANS 01-D/P (address jumper switches). !57 I/O Mapper: Max file size on CLC Exceeded The CLC / TRANS 01-D’s memory that was allocated for I-O mapper strings (8KBytes) has been exhausted. Optimize the mapping program so that it fits into memory. !58 Cannot store cam: already active for axis D Cam data cannot be changed unless no axes are currently using it. Deactivate the cam for axis ‘D’, then send the cam again. !59 SERCOS handshake/busy timeout This is an internal error generated by the SERCOS ASIC. Change modes or reset the card. If it happens again, call Indramat Service. !60 Executable program is too large (ddK) The executable portion of the user program downloaded to the CLC / TRANS 01-D exceeds the maximum limit, which is indicated in the message (‘dd’) in kilobytes. Optimize the program and download it again, or update the firmware to a version that has a larger program limit. !61 System Memory Allocation Error The dynamic memory space on the CLC / TRANS 01-D has been exhausted. Call Indramat Service for assistance. !62 Cam X data is < 0 or greater than 360 All values in the x-column (right hand column) of the cam file sent to the CLC / TRANS 01-D must be between zero and the modulo value of the master. !63 X-Column does not start at 0 or end at 360 In the cam file sent to the CLC / TRANS 01-D, the first point must be zero and the last point must be the modulo value of the master. Check the beginning and end of the cam file. !64 Not supported in user prog file version 1.1 The requested feature is not present in the file version of the user program from which the data was requested or sent. To use this feature, a compiler upgrade is necessary. !65 Sequencer: invalid sequence (D) The sequence number (D) is zero or is greater than the allocated maximum number of sequencers for this program. !66 Sequencer: invalid step (D) The sequencer step number (D) is zero or is greater than the allocated maximum number of steps for this program. !67 Invalid function number (D) The function number (D) selected for a sequencer step is invalid or refers to a function that does not exist on the card. !68 Function D not accessible in a step The function referred to with the number (D) cannot be entered in a sequencer step. It needs to be declared accessible by the sequencer in the user program. !69 Too many functions are used (D) The total number of functions used by all steps exceeds the number (D) allocated for the program in the data sizing instruction, or the number of functions used in a step exceeds the number of functions remaining. Reduce the number of functions used or allocate more function slots in the data sizing instruction. !70 Maximum steps per sequence exceeded (D) The number of steps in a sequence exceeds the number (D) allocated for the program in the data sizing instruction. End User Manual Monitoring and Diagnostics 2-21 CLC Multi-Axis Coordinated Motion Control Error Code Description !71 Maximum functions per step exceeded (D) Up to (D) functions can be used in one sequencer step. This is a CLC / TRANS 01-D system limit, which in version GPS-02.00 is 100. !72 Program does not include a PLS PLS data was requested from a program that does not support the Programmable Limit Switch function or does not have any PLS’s configured. !73 Invalid ABS or REL point index (D) Point D is zero or is greater than the allocated maximum number of points for the selected point table !74 Error in command execution A procedure command set in the CLC / TRANS 01-D or drive parameter has not been successfully completed. !75 Comm. port buffer overflow The serial port receive buffer has overflowed. In current versions of the CLC / TRANS 01-D, this buffer is 512 bytes. To avoid this error, the host must communicate in half duplex or use XON-XOFF handshaking correctly. !76 Invalid Block This message is reserved for the TRANS01-D version of the CLC / TRANS 01D. See the documentation for this version. !77 Can't save sequencer while it is running Sequencer data can only be save while the program is not running, or while no user tasks are running a sequencer. !78 Service channel in use The SERCOS service channel is being used by a user program task or by a CLC / TRANS 01-D internal process, and has suspended the transmission of a list or text string. See the description of parameter C-0-0010, bit 12. !79 PID block number does not exist This error is issued when the selected PID block is not initialized in the user program. 2-22 Monitoring and Diagnostics End User Manual CLC Multi-Axis Coordinated Motion Control 3 CLC DDE Server 3.1 Dynamic Data Exchange The Microsoft Windows operating system specifies a method for transferring data between applications which is called dynamic data exchange (DDE). DDE is a message protocol that developers can use for exchanging data between Windows-based applications. The CLC communication server uses the dynamic data exchange management library (DDEML) which is built on top of the DDE protocol. The DDEML provides services that the messagebased DDE protocol does not support. Under the DDEML a client application requests information from a server application, or it sends unsolicited data to the server. The client does this by passing predefined ASCII strings to the server through the DDEML. Before a client and server can exchange data, they must first agree upon what they are going talk about. This is done by establishing a conversation. Conversations are defined by a service name and a topic name. The CLC server application uses this information to specify how and who to communicate with. After having established a conversation, the client application can now pass data. This is done by specifying an item name. The item name identifies the specific data to be passed. There are three basic types of data transactions which can be initiated by the client application. A request transaction is used to obtain data from the server. The server application knows how to obtain the requested information. The second type of transaction is an advise link. After a client application establishes an advise link with a server, it is up to the server to poll the data for changes. If the server finds that the data has changed it will notify the client application. The third type of transaction is a poke. A poke transaction is used to send data for a specific item to the server. The Dynamic Data Exchange Server CLC_DDE is a Windows based Dynamic Data Exchange (DDE) Server application which is used to communicate with Indramat’s CLC motion control cards. It has been implemented using windows dynamic data exchange management library (DDEML). Key Features End User Manual • Serial connection to a CLC card with support for an RS485 auto switching adapter. • Support for a modem connection to a CLC card (AT protocol). • VME back plane communications from a XYCOM PC (Requires XVME984.DLL). • VME back plane communications from a GE FANUC Plug & Play PC (Requires VPCMTK.DLL). • Direct PC AT bus communication to a CLC-P card (Requires CLC_P.DLL). • Connection for editing a CLC compiled program file off line (Requires CLC_FILE.DLL). • Demonstration connection for testing client applications off line (Requires DEMO.INI). • Access to server parameters and status through DDE. • Supports Request, Advise and Poke transactions. CLC DDE Server 3-1 CLC Multi-Axis Coordinated Motion Control Dynamic Data Exchange Interface A windows application, known as a client, can pass information between other applications known as servers using Dynamic Data Exchange (DDE). A client establishes a conversation with a server specifying a Service and a Topic. Once a conversation has been started, a client may request or send information by specifying an item. Service Name The CLC communication server supports two DDE service names. The standard service name is CLC_DDE. This should be used for all connections except when connecting to a CLC compiled program file. For this case use CLC_FILE. Topic Name When the standard service name is used to exchange CLC data, the topic name identifies the method of connection to the CLC card and the card unit number. Valid strings consist of a communication device name and a unit number. Valid device names are SERIAL_, AT_MODEM_, XYCOM_, GE_P&P_, DEMO_ or ISA_ and valid card unit numbers are '0' to 'F'. Connections which use the CLC_FILE service should specify the CLC program file as the topic name. If the file is not located in the same directory as clc_dde.exe then the complete path should be included. To exchange server data the service name should be CLC_DDE and the topic name should be SERVER. This is the only topic which will not support an advise link. See section SERVER Topic Name. Example: "SERIAL_0" Serial connection to a CLC card designated as unit '0'. "XYCOM_B" Xycom PC in VME rack talking to a CLC_V card designated as unit 'B'. "ISA_1" PC talking over the ISA bus to a CLC_P card designated as unit 1. "SERVER" Exchange CLC_DDE server information. Item Name The item name identifies the specific data to exchange. When exchanging CLC data the item name consists of a string which contains the class, subclass and data identifiers of the information for the CLC card. The strings follow the ASCII serial protocol. Refer to Appendix B. Direct ASCII Communications for an explanation of these codes. When exchanging server data the item name should consist of the section and entry name from the INI file (clc_dde.ini). The two names must be divided by a pipe (‘|’) character. Not all server data has read/write capabilities. Example: "RX 0.10" Specifies register 10 in hexadecimal format. "TP 2.20" Specifies task B parameter 20. "CP 1.122" Specifies card parameter 122. "SERIAL|Baudrate" Specifies the baud rate to use for serial connections. Note: 3-2 CLC DDE Server Serial connections directed at different units will be passed through the VME backplane to the proper unit (CLC-V only). This allows communications with any CLC_V card in the VME rack with only one serial connection. End User Manual CLC Multi-Axis Coordinated Motion Control 3.2 The Communication Servers Main Window CLC_DDE displays the unit number and current status for the selected CLC control card. To display the status for a different CLC card or to disable this feature, open the server configuration dialog box under the settings menu item. Select the desired connection/unit from the CLC status display combo box. When CLC_DDE is in an icon state the tip of the arrow will change colors depending on the communication state. A green tip means that the server is actively communicating, and a red tip indicates that the server is in an error state. If the monitored CLC card’s status indicates an error state while the application is an icon, the server window will be restored to the normal state. When the CLC DDE Server is running, either the icon or the dialog box below is displayed. If the icon is displayed, double-clicking the icon restores the dialog box. The CLC DDE Server dialog box contains three selections on the main menu bar: File, Settings and DDE. Figure 3.1: CLC DDE Server Settings Menu - CLC Server Configuration The CLC Server Configuration allows setting of various system parameters as well as providing performance status information. End User Manual CLC DDE Server 3-3 CLC Multi-Axis Coordinated Motion Control Figure 3-2: CLC Server Configuration Communications 3-4 CLC DDE Server CLC Status Display Selects the CLC device/unit (i.e. serial_0) combination to be displayed in the status window of the server . The request will be inserted into the standard client advise loop queue. This feature can be turned off by selecting “Disable Status”. CLC Response Time-out The amount of time in seconds that the server will wait for a completed response from the CLC control card before diagnosing a disconnect. The valid range of values is 1-900 seconds. CLC Back Plane Relay Time-out CLC-V control cards have the ability to redirect incoming serial messages over the VME back plane to other CLCV cards in the same rack. This allows a host to address multiple control cards with one serial connection. These transmissions may require more time than a direct serial link. The relay time-out value is used for these transactions. The valid range of values is 1-900 seconds. Communication Retry Attempts The number of times the server will re-send a message before it issues an error. The valid range of values is 0255. End User Manual CLC Multi-Axis Coordinated Motion Control Error Handling Intercept CLC Errors And Display Checking this box will cause the server to intercept CLC error responses and displayed them in a message box. Request and poke transactions will return failure to the client application. Advise links will remain active, however they will return nothing until the error is resolved. The error response will be written to the error log file if that feature is enabled. If this box is not checked the error string will be returned to the client. Make Error Messages System Modal Checking this box will cause all server generated message boxes to have system modal attributes. This means that all applications will be suspended until the user responds to the message box. The window can not be forced to the background. Log Errors To File Checking this box will cause the server to log all server errors to a file. The current system date and time will be associated with each log entry. As a default this feature is not enabled. View Log File Pressing this button will cause the current error log file to be displayed in notepad. DDE End User Manual Maximum Conversations This is a static display of the maximum number of allowed DDE conversations as specified in the INI file. The server will refuse any DDE connection requests in excess of this value. Maximum Advise Items This is a static display of the maximum number of allowed DDE advise links as specified in the INI file. The server will refuse any requests for advise links in excess of this value. Self Terminate If No Active Conversations Checking this box will cause the server to close itself when the last DDE conversation with it has terminated. This is the default state. CLC DDE Server 3-5 CLC Multi-Axis Coordinated Motion Control Settings Menu - Serial Communications The Serial Communications dialog box allows the user to select the serial communication parameters the server will use. When this dialog box is open all communications are suspended. If changes are made to the configuration they will take affect when the “Save” button is pressed. Figure 3-3: Serial Communications 3-6 CLC DDE Server Baud Rate Check the proper baud rate to use when communicating serially with a CLC card. Serial Port Select the serial communications port to use on the PC. Use Serial Event Checking this box causes Windows to notify the server when a completed message is in the receive queue. This will increase the number of serial messages sent over polling for a response. Slower computers may not be able to utilize this feature. RS485 Converter (not available with TRANS 01-D) This option should be used when an RS232 to RS485 converter is present. A delay will be inserted between messages which is equal to at least one character transmission at the selected baud rate. This is necessary to ensure that the CLC card has had sufficient time in which to turn the RS485 transmitter off and enable the receiver. Please note that the converter must toggle the transmitter and receiver automatically, and also that echo back must be disabled. End User Manual CLC Multi-Axis Coordinated Motion Control Settings Menu - VME Communications The VME Communications dialog box allows the user to edit parameters which the server uses when talking over the VME bus using a XYCOM embedded PC. When this dialog box is open all communications are suspended. If changes are made to the configuration they will take affect when the “Save” button is pressed. The dynamic link library “XVME984.DLL” must be in the CLC directory or the windows path. Figure 3.4: VME Communications CLC Parameters CLC Unit Number The CLC unit number for the currently displayed data. Short Address Page The address page in short VME memory space where the selected CLC card resides. Base Address Page The address page in Standard or Extended memory space where the CLC's shared RAM is located. Note: The default server settings correspond to the default CLC control card settings and should not need to be altered. XYCOM Options End User Manual VME Handshaking Interrupt Select the VME interrupt which all CLC-V control cards should use to terminate a communication response. If this option is not used, the server will poll for a communication response every 55 milliseconds. Refer to your XYCOM owners manual to configure the computers BIOS to acknowledge the selected VME interrupt. Allow Extended VME Addressing (A32) Check this box if the XYCOM PC can support A32 addressing. Release Bus Every Cycle Check this box if the PC should release the VME bus after every cycle. This will increase communication overhead due to the additional bus arbitration cycles CLC DDE Server 3-7 CLC Multi-Axis Coordinated Motion Control Settings Menu - PC Bus Communications The PC Communications dialog box allows the user to view CLC status indicators and set communication parameters. When this dialog box is open all communications are suspended. If changes are made to the configuration they will take affect when the “Save” button is pressed. The dynamic link library “CLC_P.DLL” must be in the CLC directory or the windows path. Figure 3-5: PC Bus Communications CLC Status Indicators CLC Heart Beat This indicator will blink indicating that the selected CLC control card is running. CLC Executing pROBE+Monitor This indicator will be marked if the selected CLC control card has faulted and is running the pROBE+ monitor. CLC Is In Parameter Mode This indicator will be marked when the selected CLC control card is in parameter mode. CLC Is In An Error State This indicator will be marked when the selected CLC control card is in an error state. Card parameter 122 will contain the specific error message. CLC Unit Number Use this pull down list to select the unit number to display the status indicators for. Use PC Handshaking Interrupt (IRQ 9) When selected, this option will force all CLC-P control cards to terminate communication responses with a PC interrupt (IRQ 9). Hardware jumper S5 must be inserted on the CLC-P card for this option to work properly. If this option is not used, the server will poll for a communication response every 55 milliseconds. Note: When using the interrupt option on the CLC-P control card, no other hardware devices may use IRQ 9.DDE Menu. 3-8 CLC DDE Server End User Manual CLC Multi-Axis Coordinated Motion Control DDE Conversations The DDE Conversations dialog box displays the Conversation, Service and Topic Handles for all of the current DDE conversations. The Item Count column shows the total number of active advise links, request transactions and poke transactions. Double click on a specific conversation entry in order to view the item transaction list. A second method is to select the conversation and then use the “expand” button. This dialog box is useful when creating client applications which talk to the CLC communications server. Figure 3.6: DDE Conversations DDE Conversation Item Dialog The DDE Conversation Item dialog box can be used to view the item transaction list for a conversation. The Service name, Topic string, Item string, clipboard Format and Transaction Type are displayed in text format. Use the “Next” and “Previous” buttons to cycle through the current list. Figure 3.7: DDE Conversation Item End User Manual CLC DDE Server 3-9 CLC Multi-Axis Coordinated Motion Control Communication Monitor The DDE Communication Monitor displays all of the current DDE conversations. The monitor can display DDE requests and/ or responses depending the selection made under the Settings menu. The active window builds a communications log of all DDE conversations that occur while the monitor is running. Selecting Clear will empty the log. Selecting Stop will stop the conversation monitoring and allow users to scroll through the log. The Monitor window can be resized to enlarge the active viewing area. Figure 3.8: DDE Communication Monitor 3-10 CLC DDE Server End User Manual CLC Multi-Axis Coordinated Motion Control 3.3 AT Modem Configuration Dialog CLC_DDE supports communications with a telephone modem which uses the AT protocol. The server will initiate the modem link and instruct it to dial the desired number by sending standard AT commands. The AT Modem Configuration dialog box is automatically displayed when a DDE conversation which specifies the “AT_MODEM_x” topic is started. The box will again appear when the conversation is terminated. The dialog contains setup data and connection status. To initiate the modem connection first enter the baud rate, serial port and phone number. The next step is to select the “Connect” button and watch the status box. After the sending and receiving modems have connected press the “Cancel” button to close the dialog box. The modems used for communication must respond to the AT protocol. CLC_DDE will initialize the sending modem and establish a connection with the receiving modem. The receiving modem should be configured in auto answer mode. The CLC card must be configured to the same baud rate as the receiving modem. End User Manual Baud Rate Select the baud rate to use to talk to the sending modem. Serial Port Select the serial port to use to talk to the sending modem. Telephone Enter the complete phone number to dial including any numbers required to get an outside line. Placing a comma in the number will insert a delay. Attempt To Connect On Start Up Check this box if you wish CLC_DDE to automatically attempt a connection when a conversation is started. The telephone number is saved in the INI file. If this box is not check the user will need to select the “Connect” button. CLC DDE Server 3-11 CLC Multi-Axis Coordinated Motion Control 3.4 SERVER Topic Name The “SERVER” topic name allows a DDE client application access to CLC_DDE’s parameter set and status. The server will accept request and poke transactions. When accessing a parameter the client application should specify the section and entry names from the INI file. The two names must be separated by a pipe character (‘|’). When requesting status information the client should use “STATUS” as the section name ( i.e. “STATUS|ErrorState” ). RW = Read/Write RO = Read Only Section: GENERAL Section: SERIAL Section: VME 3-12 CLC DDE Server Response_Timeout RW 1-900 Seconds Message response time out. Relay_Timeout RW 1-900 Seconds Message time out when using VME pass-through. Communication_Retry RW 0-255 Number of times to re-send a message. Suspend_Polling RO 0 or 1 If 1 CLC_DDE status polling will be disabled. Display_CLC_Errors RW 0 or 1 If 1 CLC_DDE will intercept & display CLC Errors. Log_Errors RW 0 or 1 If 1 all server errors will be logged to the error file. Modal_Errors RW 0 or 1 Displayed errors with the system modal attribute. Self_Terminate RW 0 or 1 Close CLC_DDE when last conversation terminates. Monitor_List_Size RW 1-500 # of entries in communication monitor window. Editor RW 256 Characters Name & path of text editor to use to display error log. Baudrate RO 38400..300 Baud rate for serial connection to CLC card. Port RO 1-4 COM port number to use for serial connection. Serial_Event RW 0 or 1 Use serial event option to increase performance. RS485_Converter RW 0 or 1 Activate RS485 adapter code. Sustain_Bus RW 0 or 1 Release every cycle option for XYCOM PC. A32_Addressing RW 0 or 1 Use A32 addressing for XYCOM PC. VME_IRQ RO 0-7 Number of VME IRQ to use ( 0 = disabled ). End User Manual CLC Multi-Axis Coordinated Motion Control Section: AT_MODEM Section: PC Section: DDE Section: STATUS End User Manual Baudrate RO 9600..300 Baud rate to use to communicate with the modem. Port RO 1-4 COM port number the modem is on. Auto_Connect RW 0 or 1 Initialize & connect on conversation connection. Phone RW 50 Characters Phone number to dial. Initialize_Script RW 100 Characters Script to initialize modem. Disconnect_Script RW 100 Characters Script to disconnect modem. Dial_Prefix RW 50 Characters Script to send to modem before phone number. Escape_Sequence RW 50 Characters Script to send modem to return to command mode. PC_IRQ RO 0 or 1 if 1 use PC interrupt for communications. Status RO 200 Characters CLC_DDE’s status request item. Max_Conversations RO 1-3274 Maximum allowed conversations. Max_Advise_Items RO 1-3500 Maximum allowed advise items. ErrorState RO 0 or 1 If 1 CLC_DDE is issuing an error. ErrorText RO 256 Characters Error text message CLC_DDE is displaying. RequestState RO 0 or 1 If 1 CLC_DDE is actively communicating. CLC DDE Server 3-13 CLC Multi-Axis Coordinated Motion Control 4 Teach Pendant 4.1 Overview This chapter explains how to use the GT/2000 - CLC Teach Pendant. The Teach Pendant is a hand-held instrument with 16 x 42 character display and a 40-key sealed membrane keypad. The pendant provides a convenient operation and position programming interface for Indramat CLC Motion Control. The Teach Pendant gives users a hand held operating interface which allows them to: • • • • Select operating modes and axis jogging. Access multi-level menus for functions. Teach and edit motion control points, events and variables; edit parameters. Select and activate CLC resident programs. Each category of functions has its own set of menus. The following function categories are available through the pendant TPT 2.0 Main Menu: Note: While in the Main Menu the B+ and B- keys can be used to respectively turn on and off the display backlighting. This line can be set by parameter C-0810 to display Task Status Messages. CLC MAIN MENU TASK: A CLC*DP-GPS-05T24 F1 F2 F3 F4 F5 F6 F7 F8 PROGRAM MENU TABLE EDIT MENU JOG MENU CONTROL MENU REGISTER I/O MENU PARAMETER MENU SECURITY MENU DIAGNOSTIC MENU Note: The first screen that is displayed on the Teach Pendant is the Control Menu. See section 4.3 Task Control. End User Manual Teach Pendant 4-1 CLC Multi-Axis Coordinated Motion Control Menu Map The following chart maps the submenus and menu links that are found within the main menu. Some menus have direct links to diagnostics, parameters and I/O registers. Note: Pressing the ESC key will backtrack the Teach Pendant and display the previously viewed screen until it reaches the main menu. MAIN MENU F1 F2 F3 F4 PROGRAM TABLE EDIT JOG CONTROL MENU MENU MENU MENU ⇑ ⇓ Program Selection F1 - Absolute Table F1 - Jog Systems F1 -Auto/Manual Modes F1 - Activate Program F2 - Relative Table F2 - Method F2 - Go/Jog F4 - Edit Sequencer F3 - Event Table F3 - Increment Point F3 - Stop F7 - Main Menu F4 - Integer Table F4 - Decrement Point F4 - I/O Menu F8 - Diagnostic Menu F5 - Float F5 - Axis F5 - Step Mode Type F6 - Global Integer F6 - Edit Jog Parameters F7 - Main F7 - Global Float F7 - Main Menu F8 - Diagnostic Menu F8 - Diagnostic Menu F8 - Diagnostic Menu Table Figure 4-9: Menu Map (F1-F4) 4-2 Teach Pendant End User Manual CLC Multi-Axis Coordinated Motion Control MAIN MENU F5 F8 F7 F6 REGISTER I/O PARAMETER SECURITY DIAGNOSTIC MENU MENU MENU MENU ⇑ - Bits 01 - 08 ⇓ - Bits 09 - 16 F1 - Card F2 - Axis ⇑⇓ Menu Selection ⇑⇓ Card Task Axis Drive F3 - Task F1 - Number Up F4 - Drive F2 - Number Down F7 - Main Menu F3 - Clear Errors F8 - Diagnostic Menu F7 - Main Menu Figure 4-10: Menu Map (F5-F8) End User Manual Teach Pendant 4-3 CLC Multi-Axis Coordinated Motion Control 4.2 Teach Pendant Setup Note: To use the pendant function keys, as well as the pendant edit features, the System Control Register 1, bit 14 (Pendant Enable) must be set to 1. When the Teach Pendant is enabled, the following registers and bits shall be forced at all times by the TPT. The CLC provides a register forcing capability that allows a Host system to directly change the state of individual I/O register bits overriding both the physical I/O and the CLC I/O Mapper. Task A Control Register 2: bit 1 Mode Select bit 4 Single Step bit 6 Cycle Start bit 7 !Task Stop bit 12 Step Sequence Step bit 13 Step Sequence Function Task B-D Control Registers 3-5: same as above. Registers 98 and 99 define blocking bits for task A, B, C and D. The bits in the register can disable Teach Pendant control of the selected function for the corresponding tasks A - B, C-D. The following functions can be blocked: Manual Mode Auto Mode Step Mode Jogging Teaching Points Task Selection If a block bit is set, its corresponding function is blocked. If a user selects the function an error message is issued by the TPT. See section 4.15 Teach Pendant Reserved Register Table for bit descriptions 4-4 Teach Pendant End User Manual CLC Multi-Axis Coordinated Motion Control The pendant parameters are automatically preset to the following specifications: Menu Item Default Setting Comm: Baud Rate Parity Data and Stop Bits Display Serial Errors Audible Serial Errors Support for XON/OFF 9600 (Fixed) None 8, 1 Yes Yes Yes Dsp: Display CTL Characters Display ESC Characters Cursor Visible Auto Line Wrap New Line on CR Display Self-Test Backlight Level Backlight On No No Yes No Yes No 7 Yes Kbd: Local Echo Key Repeat Audible Keys Simplified KB No Off No Yes Note: When the Teach Pendant is initializing, it automatically sets the baud rate to 9600. End User Manual Teach Pendant 4-5 CLC Multi-Axis Coordinated Motion Control 4.3 Keyboard Operation The following defines the keys for the Teach Pendant: Key Action F1 Soft key defined by active menu F2 Soft key defined by active menu F3 Soft key defined by active menu F4 Soft key defined by active menu F5 Soft key defined by active menu F6 Soft key defined by active menu F7 Soft key defined by active menu F8 Soft key defined by active menu HELP First press function key help, then press item help ESC Terminate current operation or return to previous menu EDIT Clear field of current item and allow editing END Move cursor to last item on current line ENTER Carriage Return 0 numeric key 1 numeric key 2 numeric key or UP ARROW 3 numeric key 4 numeric key or LEFT ARROW 5 numeric key 6 numeric key or RIGHT ARROW 7 numeric key 8 numeric key or DOWN ARROW 9 numeric key . decimal point +/- plus/minus sign TEACH Teach current position to absolute point table TASK Select a user task AXIS+ Jog axis positive (used in single axis mode) AXIS− Jog axis negative (used in single axis mode) A+/A- Jog A coordinate plus/minus B+/B- Jog B coordinate plus/minus Main Menu: respectively turns backlighting on and off 4-6 Teach Pendant C+/C- Jog C coordinate plus/minus X+/X- Jog X coordinate plus/minus Y+/Y- Jog Y coordinate plus/minus Z+/Z- Jog Z coordinate plus/minus End User Manual CLC Multi-Axis Coordinated Motion Control Keyboard Map Register 95 Register 96 Register 97 F1 F2 F3 F4 F5 F6 F7 F8 Help 7 8 9 Teach Task Axis + Axis - ESC 4 5 6 A+ A- X+ X- Edit 1 2 3 B+ B- Y+ Y- Enter . 0 +/- C+ C- Z+ Z- 1 2 3 4 5 6 7 8 9 10 11 12 13 14 15 16 1 2 3 4 5 6 7 8 9 10 11 12 13 14 15 16 1 2 3 4 5 6 7 8 Bit Numbers The TPT keyboard is mapped to register 95, 96 and 97. The first row of keys from the top is placed in the low bytes of register 95. The second row of keys is placed in the high byte of register 95, etc. When a key is pressed its corresponding bit turns on and remains on for as long as the key is pressed. End User Manual Teach Pendant 4-7 CLC Multi-Axis Coordinated Motion Control Cursor Control and Editing The cursor may be moved up or down, left or right by pressing the corresponding arrow key. The arrow keys double as numeric entry keys and generate numeric values when an item on the screen is edited. To edit an item, position the cursor over it and press the EDIT key. Doing so clears the field used by the item allowing a new value to be entered. Pressing ENTER terminates the editor and enters the new value into the system. Sometimes the cursor can be positioned on an item but the EDIT key does nothing when pressed. In this case the item cannot be edited. The cursor may be positioned there for another reason, such as item selection or viewing. Jogging Control Press the coordinated jog keys (-X, +X, -Y, +Y, -Z, +Z) to jog in world coordinates. The jog keys are active only while in the Jog Menu. If other coordinated axes are defined in other tasks, then that task must be activated in order to jog from the Teach Pendant. Press the single axis jog keys (-AXIS, +AXIS) to jog in axis coordinates. Task Control Press the TASK key to display the task menu. Use the arrow keys to position the cursor in the desired task, then press ESC to return to the previous menu. Teach Control The Teach key allows the user to store the current position (during a coordinated jog) into the Absolute Point Table. The table point number will flash indicating that point has been recorded in the table. F1 F2 F3 F4 F5 F6 F7 Help 7 8 9 Teach Task Axis + Axis - ESC 4 5 6 A+ A- X+ X- Edit 1 2 3 B+ B- Y+ Y- . 0 +/- C+ C- Z+ Z- Enter 4-8 Teach Pendant F8 End User Manual CLC Multi-Axis Coordinated Motion Control 4.4 Program Menu The Program menu allows pendant selection and activation of any of the programs that have been downloaded to the CLC card. Each program consists of one to four user tasks (A, B, C, and D), and the associated Absolute and Relative Point Tables, Event Table, and Variable Tables. Activating a new program replaces the current four motion tasks and tables with the tasks and tables for the new program selection. Table Includes: Program number (CLC card ID, 1-10) Program name Program size (in decimal bytes) CLC PROGRAM MENU 01 02 03 04 05 00 00 00 00 00 F1 Activate SEQ SEQ1 AB1 AB2 PLS1 12/20/96 01/03/97 01/03/97 11/20/96 01/03/97 F4 Edit 15:39:27 10:20:15 16:20:00 16:20:00 07:15:00 1572 3452 1152 3344 2888 F7 Main F8 Diag The up and down arrow keys move the cursor to select a program. Pressing F5 activates the selected program. Note: The currently active program must not be running when activating another program End User Manual Teach Pendant 4-9 CLC Multi-Axis Coordinated Motion Control Sequencer Editing (F4) The F4 key (Edit) only applies to programs which contain Sequencers. Pressing F4 allows the user to edit the Sequencer list, steps and functions of the selected program. See the CLC Reference Manual, IAE 74792 Rev. F, 10/96 for more Sequencer information. Sequence List Menu The first screen that appears after pressing F4 in the CLC Program Menu is the Sequence List Menu. Use the arrow keys to navigate with the cursor to select the desired Sequence List. Press F4 again to edit the contents of the selected list name within the Sequence Edit Menu. SEQUENCE LIST MENU PROGRAM: SEQ1 01 02 03 INITIALIZE_SYSTEM PRODUCT_1 PRODUCT_2 F1 PgUp F2 PgDn F4 Edit F7 Main F8 Diag The name of each list can also be edited. Position the cursor at the end of the list name and press the Edit key. This activates a special editing mode which allows you to type letters according to the keyboard map illustrated below. Use the F1 key to delete characters to the left of the cursor. Use the F2 key to Select Shift On and Off. This allows you to toggle the keyboard map between numbers and letters. Note: These letters do not appear on the keypad, however their location (as illustrated) represents the key functions while typing within this editing mode. F1 F2 F3 F4 F5 F6 F7 F8 Help A B C D E F G ESC H I J K L M N Edit O P Q R S T U Enter V W X Y Z Z+ Z- This editing mode is functional within all of the following Sequencer menus. 4-10 Teach Pendant End User Manual CLC Multi-Axis Coordinated Motion Control The Sequence Edit Menu The Sequence Edit Menu displays all the steps within the selected Sequence. Use the arrow keys to navigate with the cursor to select the desired Sequence Step. Press F4 again to edit the contents of that Step within the Step Table Edit Menu. Press F3 to cut the selected Sequence Step. Press F6 to paste a Sequence Step in the current cursor position SEQUENCE EDIT MENU PROGRAM: SEQUENCE: SEQ1 INITIALIZE_SEQUENCER 01 02 03 04 HOME_ALL_AXES SET_MAX_VALUES PICK_POSITION END OF LIST F1 PgUp F2 PgDn F3 Cut F4 Edit F5 Ins F6 Paste F7 Main F8 Diag Table List Menu Pressing F5 (Ins) from the Sequence Edit Menu will open the Table List Menu. This menu contains a list of all the step tables available within the selected Sequence. Use the arrow keys to navigate with the cursor to select the desired Step Table. Press ENTER to insert that function into the previous Sequence. TABLE LIST Press ENTER to insert End User Manual 01 02 03 04 05 06 07 08 09 PICK_POSITION SET_MAX_VALUES HOME_ALL_AXES Z_DROP_PART1 CYCLE_EJECTORS Y-DROP_PART1 PART_MADE STEP_08 STEP_09 F1 PgUp F2 PgDn Teach Pendant 4-11 CLC Multi-Axis Coordinated Motion Control The Step Table Edit Menu The Step Table Edit Menu displays all the functions within the selected Sequence Step. Use the arrow keys to navigate with the cursor to select the desired Sequence Function. Press F4 again to edit the contents of that function within the Function Edit Menu. Press F3 to cut the selected function. Press F6 to paste a function in the current cursor position STEP TABLE EDIT MENU PROGRAM: SEQUENCE: STEP: EMPTY SLOTS: SEQ1 INITIALIZE_SEQUENCER HOME_ALL_AXES 00011 01 02 03 04 05 DISABLE_CLAMP_MOTION CHK_MOLD_OPEN PERMIT_EJECT_BACK CHK_EJECTORS_BACK HOME_AXIS F1 PgUp F2 PgDn F3 Cut F4 Edit F5 Ins F6 Paste F7 Main F8 Diag Function List Menu Pressing F5 (Ins) from the Step Table Edit Menu will open the Function List Menu. This menu contains a list of all the functions available within the selected Sequence. Use the arrow keys to navigate with the cursor to select the desired Function. Press ENTER to insert that function into the previous Step Table. FUNCTION LIST Press ENTER to insert 01 02 03 04 05 06 07 F1 PgUp 4-12 Teach Pendant HOME_AXIS INIT_POS_VELOCITY CHK_EJECTORS_RETRACT CLEAR_SYSTEM_TIMERS DWELL PERMIT_EJECT_BACK DISABLE_CLAMP_MOTION F2 PgDn End User Manual CLC Multi-Axis Coordinated Motion Control Function Edit Menu The Function Edit Menu contains a list of all the arguments and their corresponding values. Use the arrow keys to navigate with the cursor and select a Function. Press F4 again to edit the values assigned to the arguments of that function. FUNCTION EDIT MENU PROGRAM: SEQUENCE: STEP: FUNCTION: 01 02 03 F1 Save End User Manual SEQ1 INITIALIZE_SEQUENCER HOME_ALL_AXES HOME_AXIS AXIS_NUMBER HOME_OFFSET_POSITION SET_HOME_POSITION F4 List-Edit 2 0.0000 0.0000 F7 Main F8 Diag Teach Pendant 4-13 CLC Multi-Axis Coordinated Motion Control 4.5 Table Edit Menu The Table Edit menu allows pendant editing of the Absolute and Relative Point Tables, the Event Table, and the Integer and Float variable Tables. CLC TABLE EDIT MENU F1 F2 F3 F4 F5 F6 F7 Absolute Table Menu Relative Table Menu Event Table Menu Integer Table Menu Float Table Menu Global Integer Table Global Float Table Esc Main F8 Diag Absolute Point Table Edit The Absolute Point Table Edit menus permit editing taught or programmed points. ABSOLUTE TABLE MENU NUM 001 002 003 .. NAME Part_Pickup Regrip Leave_Part .. F1 PgUp F2 PgDn F3 Home F4 End F5 Edit F6 Jog F7 Main F8 Diag Select a point by moving the cursor up and down with the arrow keys. Pressing edit will bring up the following menu: 4-14 Teach Pendant End User Manual CLC Multi-Axis Coordinated Motion Control ABSOLUTE POINT MENU ABS[0002] 30.000 20.000 00.000 00.000 Regrip X Y Z BLEND 0 0 0 0 F1 IncPnt F2 DecPnt 0.000 Roll 0.000 Pitch 0.000 Yaw Speed Accel Decel Jerk F3 Home F4 End 00 Elbow 001 002 003 0 Event 1 Event 2 Event 3 Event 4 F6 Jog F7 Main X Y Z Roll Pitch Yaw Elbow Blend X coordinate of the point Y coordinate of the point Z coordinate of the point Roll angle Pitch angle Yaw angle Elbow state Blend Radius Speed Accel Decel Jerk Speed Percentage (of task maximum) Acceleration Percentage (of task maximum) Deceleration Percentage (of task maximum) Jerk Limiting Percentage (0 trapezoid, 100 s-shape, 50 between) Event 1 Event 2 Event 3 Event 4 First event for the point Second event for the point Third event for the point Fourth event for the point (This value represents an event number from the event table F8 Diag See Event Table Edit.) End User Manual Teach Pendant 4-15 CLC Multi-Axis Coordinated Motion Control Relative Point Table Edit The Relative Point Table Edit menus permit editing taught or programmed points. RELATIVE TABLE NUM 001 002 003 .. .. F1 PgUp NAME REL[1] REL[2] REL[3] F2 PgDn F3 Home F4 End F5 Edit F6 Jog F7 Main F8 Diag Select a point by moving the cursor up and down with the arrow keys. Pressing edit will bring up the following menu: RELATIVE TABLE REL[0002] REL[2] 30.000 20.000 00.000 00.000 X Y Z BLEND 0.000 0.000 0.000 0 Speed 0 Accel 0 Decel 0 Jerk F1 IncPnt F2 DecPnt F3 Home F4 End X Y Z Blend X coordinate of the point Y coordinate of the point Z coordinate of the point Blend Radius Roll Pitch Yaw Elbow Roll angle Pitch angle Yaw angle Elbow state Speed Speed Percentage (of task maximum) Acceleration Percentage (of task maximum) Deceleration Percentage (of task maximum) Jerk Limiting Percentage (0 trapezoid, 100 s-shape, 50 between) Accel Decel Jerk Event 1 Event 2 Event 3 Event 4 Roll Pitch Yaw 00 001 002 003 0 Event 1 Event 2 Event 3 Event 4 F6 Jog F7 Main Elbow F8 Diag First event for the point Second event for the point Third event for the point Fourth event for the point (This value represents an event number from the event table See Event Table Edit.) 4-16 Teach Pendant End User Manual CLC Multi-Axis Coordinated Motion Control Event Table Edit The Event Table Edit menu allows pendant editing of the events associated with each task in the Event Table. The currently selected task determines the portion of the event table allowed to be viewed through the Teach Pendant. EVENT TABLE NUM 001 002 003 004 000 000 000 000 000 000 ST 01 01 01 01 00 00 00 00 00 00 F1 PgUp F2 PgDn RF 00 00 00 00 00 00 00 00 00 00 ARG 20.0 40.0 60.0 80.0 00.0 FUNCTION Pressure_Switch Change_Speed evt_fn_1 evt_fn_2 F5 Replace F7 Main F8 Diag St The Event's status: 0 = inactive 1 = pending 2 = queued 3 = executing 4 = done Ty Event type: 0 = event inactive 1 = repeating timer 2 = time on coordinated motion path 3 = dist. on coordinated motion path 4 = single axis distance 5 = repeating axis position 6 = task external interrupt input Ty Event type: (continued) 7 = VME broadcast interrupt 8 = VME short address (mailbox) interrupt 9 = axis feedback capture Rf Event Reference: 0 = start of segment 1 = end of segment Arg Argument for the event (milliseconds if time based, or percent of path and axis distance) Function End User Manual TY 06 06 03 03 00 00 00 00 00 00 Task ID and Event number Teach Pendant 4-17 CLC Multi-Axis Coordinated Motion Control Integer Variable Table Edit This menu allows for viewing and editing integers. Variables can be changed by any task at any time. It is possible, therefore, for editing to be in conflict with a motion task. In this instance, unexpected results may occur. It is at the discretion of the operator to determine the usefulness of such an operation. INTEGER TABLE MENU 00001 00002 00003 00004 00005 00006 00007 .. Pointer_1 Pointer_2 Timer_1 Timer_2 Operation Type I[6] I[7] F1 PgUp F2 PgDn F1 Page Up 20.0 40.0 60.0 80.0 00.0 0 0 F3 Fmt F7 Main F2 Page Down F8 Diag F3 Display Format Display Format Pressing F3 toggles the display between integer and scientific notation. 4-18 Teach Pendant End User Manual CLC Multi-Axis Coordinated Motion Control Floating Point Variable Table Edit This menu allows for viewing and editing floating point variables. Variables can be changed by any task at any time. It is possible, therefore, for editing to be in conflict with a motion task. In this instance, unexpected results may occur. It is at the discretion of the operator to determine the usefulness of such an operation. FLOATING TABLE MENU 00001 00002 00003 00004 00005 00006 F1 PgUp slave_turns master_turns z_position q_position q_axis_home_offset current_q_position F2 PgDn F1 Page Up F3 Fmt 0.2500 1.0000 19.9990 1.0001 1.0000 2.0000 F7 Main F2 Page Down F8 Diag F3 Display Format Display Format Pressing F3 toggles the display between floating point fixed (100.000) and scientific (1.000E2) notation. End User Manual Teach Pendant 4-19 CLC Multi-Axis Coordinated Motion Control Global Integer Variable Table Edit This menu allows for viewing and editing global integer variables. Variables can be changed by any task at any time. It is possible, therefore, for editing to be in conflict with a motion task. In this instance, unexpected results may occur. It is at the discretion of the operator to determine the usefulness of such an operation. GLOBAL INTEGER TABLE 00001 F1 PgUp GI[I] F2 PgDn F1 Page Up F3 Fmt F2 Page Down 25 F7 Main F8 Diag F3 Display Format Display Format Pressing F3 toggles the display between floating point fixed (100.000) and scientific (1.000E2) notation. 4-20 Teach Pendant End User Manual CLC Multi-Axis Coordinated Motion Control Floating Point Variable Table Edit This menu allows for viewing and editing global floating point variables. Variables can be changed by any task at any time. It is possible, therefore, for editing to be in conflict with a motion task. In this instance, unexpected results may occur. It is at the discretion of the operator to determine the usefulness of such an operation. GLOBAL FLOATING TABLE 00001 F1 PgUp GF[I] F2 PgDn F1 Page Up 0.2500 F3 Fmt F7 Main F2 Page Down F8 Diag F3 Display Format Display Format Pressing F3 toggles the display between floating point fixed (100.000) and scientific (1.000E2) notation. End User Manual Teach Pendant 4-21 CLC Multi-Axis Coordinated Motion Control 4.6 Jog Menu The Jog menu allows you to jog a stopped system. The following I/O register bits must be on before jogging an axis: Register 1 - System Control Register 2, 3, 4, or 5 -Task Control Bit 6 Bit 1 Pendant Live Man Mode:! Manual ROBOT JOG MENU Task: A System: Axis Method: Continuous/Slow 0001: ABS[1] 01 02 03 04 X Y Z A AXIS 12.643 95.215 63.609 0.960 WORLD 47.5 18.3 5.5 36.8 00 AXS 857.628 180 F1 System F2 Method F3 IncPnt F4 DecPnt F5 Axis TAUGHT 20.3 54.2 16.0 10.0 F6 Para F7 Main F8 Diag F1 = System F2 = Method F3 = Increase Point F4 = Decrease Point F5 = Axis F6 = Parameters F8 = Diagnostics Press F1 to select either the Axis, Joint, World or Tool jog system. F2 selects the jog method which can be continuos or incremental. F3 and F4 increases and decreases the current point in the point table which can be taught. See Teaching Points below. F5 selects a single axis to jog. F6 opens the Edit Jog Parameters screen which allows the user to adjust the percent distance and speed parameters, as well as, view the values set for each Task and Axis. 4-22 Teach Pendant End User Manual CLC Multi-Axis Coordinated Motion Control Jog Systems Axis Jog Menu The Single Axis Jog menu allows jogging a single, non-coordinated axis. Only the selected axis is affected. The pendant display is continuously updated with the current position of the axis. Press AXIS− to jog in the negative direction. Press AXIS+ to jog in the positive direction. (The pendant beeps at the beginning and end of motion.) Coordinated Jogging Press -X to jog in the negative X direction. Press +X to jog in the positive X direction. Press -Y to jog in the negative Y direction. Press +Y to jog in the positive Y direction. Press -Z to jog in the negative Z direction. Press +Z to jog in the positive Z direction. Joint Jog Menu The Joint Jog menu allows jogging of individual axes with a joint number. Robot World Jog Menu The Robot World Jog menu allows jogging a coordinated or single axis for a task in World Cartesian Space. When jogging in world coordinates, motion will be generated parallel to the selected X, Y, or Z coordinate. The pendant beeps at the beginning and end of motion. The display is continuously updated to display the current position (X, Y, Z) on each of the axes. Tool Jog Menu The Tool Jog menu allows jogging of the position of the end of a robotic arm. End User Manual Teach Pendant 4-23 CLC Multi-Axis Coordinated Motion Control Jog Method The following Jog Methods are available with the Teach Pendant: Continuous Slow Continues to jog slowly until the button is released Continuous Fast Continues to jog quickly until the button is released Incremental Small Jogs a predetermined small increment and then stops Incremental Large Jogs a predetermined large increment and then stops Teaching Points To teach the current position (during a coordinated jog) into the Absolute Point Table press TEACH. (Confirm each point by pressing the enter key.) The table point number will flash indicating that point has been recorded in the table. The point number will automatically advance to the next point. F3 and F4 can also be used to increase or decrease the point number. Jog Fine Adjustments The jog speed and distance increment are set as a percentage of the Maximum Jog Increment and Maximum Jog Velocity parameters (T-0-0025 and T-0-0026). Separate percents are used for FAST/SLOW and LARGE/SMALL jog settings in coordinated jog. While in the Axis Jog or World Jog Menus, pressing the PAR key displays a screen that permits editing the FAST/SLOW and LARGE/SMALL jog percents. 4-24 Teach Pendant End User Manual CLC Multi-Axis Coordinated Motion Control 4.7 Control Menu The Control menu allows the pendant to control the execution of a task. When the Teach Pendant powers up, the Control Menu is the first menu displayed. The Control Menu will provide the following information: Title Control Menu Title Task Status Current task operating status Program Name Name of the currently active program Sequence Name of the current sequence executing Step Name of the current step executing Function Name of the current function executing N/A Position Title Axis Position Title (Joint, World, & Target) Axis 1 Label (X) Axis defined as axis 1 Axis 2 Label (Y) Axis defined as axis 2 Axis 3 Label (Z) Axis defined as axis 3 Axis 4 Label (A) Axis defined as axis 4 Target Name Point # and label for the current point executing N/A Function Keys Function keys control machine operation Operation Labels Specify the machine operations The control menu can run in one of three different modes. The following pages describe the operation of each mode and illustrate the different menu layouts. End User Manual Teach Pendant 4-25 CLC Multi-Axis Coordinated Motion Control Control Menu: Auto Run/Hold Mode TASK: NAME: SEQN: STEP: FUNC: CONTROL MENU A: Auto: Run Two_Liter_Bottles Ejectors_Back Ejectors_fwd Move_In_Mold_Position JOINT 1200.00 500.00 90.00 X: Y: Z: A: TARGET F1 Auto F2 Go SPEED% 100 WORLD 1200.00 500.00 90.00 TARGET 2000.00 500.00 180.00 0001 Move_In_Mold_Position F3 STOP F4 I/O F5 F7 Main F8 Diag F1 - Mode Of Operation If the Teach Pendant Enabled Bit (Register 1 bit 14) is high, pressing the F1 key will change the mode of operation in the order shown below: Manual: Jog ⇒ Auto: Step ⇒ Auto: Run/Hold ⇒ Auto: Step ⇒ F1 = Auto F2 = Go, Jog F5=Instruct, Seq/Step, Seq/Func F3 = Stop F4 = I/O F8 = Diagnostics Note: F2,F3 and F5 are dependent on the selected mode of operation. When Automatic Mode is selected by pressing the F1 key, F2 will display Go and F3 will display Stop. By pressing the F2 key, the program will start executing instructions. By pressing the F3 key, program execution will stop. If the F2 key is pressed again, the program will continue. To restart at the beginning of the program, the mode of operation must be changed to manual or step and then changed back to auto. In Auto: Step mode F5 is used to select the step method which can be one instruction, one Sequence Step, or one Sequence Function at a time. 4-26 Teach Pendant End User Manual CLC Multi-Axis Coordinated Motion Control Control Menu: Auto Step Mode TASK: NAME: SEQN: STEP: FUNC: CONTROL MENU A: Auto: STEP Two_Liter_Bottles Ejectors_Back Ejectors_Fwd Move_In_Mold_Position JOINT 1200.00 500.00 90.00 WORLD 1200.00 500.00 90.00 X: Y: Z: A: TARGET 0001 Move_In_Mold_Position F1 STEP F3 STOP F2 GO SPEED% 100 F4 I/O F1 = Step F2 = Go F5 = Instruction/Sequence TARGET 2000.00 500.00 180.00 F5 INST F8 DIAG F3 = Stop F4 = I/O F8 = Diagnostics When the Automatic Step Mode is selected by pressing the F1 key, F2 will display GO and F3 will display STOP. Every time the F2-GO key is pressed, the program will be sequentially executed one step at a time. The steps can be program instructions, Sequencer steps or Sequencer functions. Pressing the F5 key selects the step mode that the program will follow: Instruction - INST Sequence/Steps - SEQ/STEP Sequence/Function - SEQ/FUNC When INST is selected the program will execute only one instruction every time the F2-GO key is pressed. When SEQ/STEP is selected the program will execute all the functions within one Sequencer step, one at a time. When SEQ/FUNC is selected the program will execute each Sequencer function, one at a time. The F3-STOP key can be used to immediately halt the execution of the program within a step. If the F2-GO key is pressed again the step will continue to run. End User Manual Teach Pendant 4-27 CLC Multi-Axis Coordinated Motion Control Control Menu: Manual Mode When manual mode is selected by pressing the F1 key, F2 will display Jog. TASK: NAME: SEQN: STEP: FUNC: CONTROL MENU A: Manual: Jog Two_Liter_Bottles Ejectors_Back Ejectors_Fwd Move_In_Mold_Position JOINT 1200.00 500.00 90.00 WORLD 1200.00 500.00 90.00 X: Y: Z: A: TARGET 0001 Move_In_Mold_Position F1 Manu F3 I/O F2 Jog F1 = Manual F2 = Jog F4 F5 F4 = I/O SPEED% 100 TARGET 2000.00 500.00 180.00 F8 DIAG F8 = Diagnostics By pressing the F2 key, the Jog Menu will be displayed, allowing the operator to jog and teach each axis. 4-28 Teach Pendant End User Manual CLC Multi-Axis Coordinated Motion Control 4.8 Register I/O Menu The F4 I/O key is provided on every operator interface control screen. The operator will have the ability to view and edit the register bits that the machine builder selects. When the F4 key is pressed, the register menu will be displayed. The first register displayed is set in CLC card parameter C-0-0805 Start of User Accessible Registers on Pendant. Parameter C-0806 defines the End of User Accessible Registers on Pendant. The operator can only edit registers within the range of these two parameters. For example, parameter C-0805 = register 100, which is labeled End_Of_Arm_Tool_1. When the F4 key is pressed, the first screen displayed is register 100, along with the register label. Bits 1 through 8 are displayed, along with the bit labels and current state (ON/OFF). This screen is only updated when any of the bits change states. REGISTER MENU REGISTER: 0100 End_Of_Arm_Tool_1 BITS: OAT_Forward EOAT_Reverse C_Axis_Vertical C_Axis_Horizontal A_Axis_Forward A_Axis_Retracted Bit_07 Bit_08 F1 01 F2 02 01 02 03 04 05 06 07 08 Press Down Arrow For Bits 09 - 16 F3 F4 F5 F6 03 04 05 06 OFF OFF ON OFF OFF OFF OFF OFF F7 07 F8 08 The first page of the register menu will display bits 1 through 8. By pressing the down arrow key, bits 9 through 16 will be displayed. Pressing the up arrow key will return to bits 1 through 8. End User Manual Teach Pendant 4-29 CLC Multi-Axis Coordinated Motion Control REGISTER MENU REGISTER: 0100 BITS: F1 09 End_Of_Arm_Tool_1 Bit_09 Bit_10 Bit_11 Bit_12 Bit_13 Bit_14 Bit_15 Bit_16 F2 10 09 10 11 12 13 14 15 16 Press Down Arrow For Bits 01 - 08 F3 F4 F5 F6 11 12 13 14 OFF OFF ON OFF OFF OFF OFF OFF F7 15 F8 16 The function keys F1 through F8 will allow the operator to toggle the state (ON/OFF) of bits 1 through 8 (first page displayed) or bits 9 through 16 (second page displayed). NOTE: If an operator needs to change a bit in a register outside the range set by parameters C-0-0805 and C-0-0806, a password will have to be entered or the pendant level protection bits will have to be adjusted. See the Security Menu description. 4-30 Teach Pendant End User Manual CLC Multi-Axis Coordinated Motion Control 4.9 Parameter Menu The Parameter menu allows selection of screens for editing the system, task, axis, and drive parameters. PARAMETER F1 F2 F3 F4 MENU CARD AXIS TASK DRIVE F7 Main F8 Diag Selecting F1-F4 will open one of the following Parameter screens. Position the cursor over the parameter number or the parameter value and press the edit key to select a different parameter or change the value of the current one displayed. Card Parameter Screen CARD PARAMETER Ccc.pppppp C01.00001 F1 Home F2 End Ccc.pppppp F3 PgUp nnnnn Language Selection 1 F4 PgDn F7 Main nnnnn vvvv F8 Diag vvvv vvv…Value of the parameter nnn… Name of the parameter ppppp cc C End User Manual Parameter Number Card Number System Parameter Indicator Teach Pendant 4-31 CLC Multi-Axis Coordinated Motion Control Axis Parameter Screen AXIS PARAMETER Aaa.pppppp A01.00001 F1 Home F2 End nnnnn Task Assignment F3 PgUp Aaa.pppppp vvvv 0 F4 PgDn nnnnn F7 Main F8 Diag vvvv vvv…Value of the parameter nnn… Name of the parameter ppppp aa A Parameter Number Axis Number Axis Parameter Indicator Task Parameter Screen TASK PARAMETER Ttt.pppppp T01.00001 F1 Home F2 End Ttt.pppppp nnnnn Task Motion Type F3 PgUp vvvv 0 F4 PgDn nnnnn F7 Main F8 Diag vvvv vvv…Value of the parameter nnn… Name of the parameter ppppp tt T 4-32 Teach Pendant Parameter Number Task Number Task Parameter Indicator End User Manual CLC Multi-Axis Coordinated Motion Control Drive Parameter Screen DRIVE PARAMETER Ddd.pppppp D01.00001 F1 Home F2 End nnnnn NC Cycle Time F3 PgUp Ddd.pppppp F4 PgDn nnnnn vvvv 2000 (TNcyc) F7 Main F8 Diag vvvv vvv…Value of the parameter nnn… Name of the parameter ppppp Parameter Number dd Drive Number D End User Manual Drive Parameter Indicator Teach Pendant 4-33 CLC Multi-Axis Coordinated Motion Control 4.10 Security Menu The Security Menu allows the Teach Pendant manager to assign a protection level code between 0 and 2 for each menu. Different access codes can then be set for various users to provide customized security for system data. SECURITY MENU NAME Program Menu Table Edit Menu Jog Robot Menu Control Menu I/O Menu Security Level Menu System Parameter Menu Axis Parameter Menu Task Parameter Menu Drive Parameter Menu Main Menu 000 001 002 003 004 005 006 007 008 009 010 LEVEL 1 1 1 0 2 -1 1 1 1 1 0 F8 Diag To alter a menu protection level, place the cursor over the protection level field and press the EDIT button. Key-in the appropriate code (0, 1 or 2) and press ENTER. The Security Level Menu has a default of -1 to allow initial access to all users. The user access status for each menu depends on the menu protection level outlined above and the users access code, which is determined by the System Control Register 1, Bits 15 and 16. The access code has to be greater than the menu protection level to allow the user to view and edit a menu. If the levels are the same the user can only view the menu. A menu with a protection level that is higher than the security level cannot be accessed by a user. The following table lists the level combinations which determine user access privileges. 4-34 Teach Pendant Bit 15 Status Bit 16 Status Access Code (Bit Resultant) Protection Level (Preset) Net Access Status 0 0 0 0 View Only 1,2 No Access 1 0 1 0 View/Edit 1 View Only 2 No Access 0 1 2 0,1 View/Edit 2 View Only 1 1 3 0-2 View/Edit End User Manual CLC Multi-Axis Coordinated Motion Control 4.11 Diagnostics Menu When the F8 key is pressed from any of the Operator Interface Control Menus, the Diagnostics Menu is displayed. The diagnostics menu displays the current Card, Tasks, Axis, and Drive status. The diagnostics screen updates continuously. When first entering this menu, by default, Axs=1, Drv=1 and the cursor is positioned on the CLC card number. DIAGNOSTICS MENU Crd: 03 007 Program Running: AB Extended Diagnostic Message Tsk: AA Tsk: BB Tsk: CC Tsk: DD TASK RUNNING TASK RUNNING MANUAL MODE MANUAL MODE Axs: 01 No Axis Message Drv: 01 303 Position Mode Encoder 1 / lag F1 NumUp F2 NumDn F3 ClrErrors F7 Main Positioning The Cursor The up/down arrow keys will position the cursor on the menu item the user may wish to edit. NOTE: The Teach Pendant cannot edit the card number or task. Cursor Positioned Axis and Drive Number By pressing the (F1 NumUp) or (F2 NumDn), the Axis number will increment up or down, respectively. By pressing the Edit key, the operator can enter the desired Axis number and press the Enter key to accept. 4.12 Help Menu Reserved for future use. End User Manual Teach Pendant 4-35 CLC Multi-Axis Coordinated Motion Control 4.13 Error Screen If and error is detected during operation, the pendant automatically enters the Error screen and displays a message about the error condition. If the TPT enable bit (Register 1, bit 14) is on and an error occurs, the TPT will force all tasks into manual mode. Pressing escape after an error occurs will display the Diagnostic Menu. DIAGNOSTICS MENU Crd: 03 420 Drive 6 Shutdown Error Tsk: AA Tsk: BB Tsk: CC Tsk: DD MANUAL MODE MANUAL MODE MANUAL MODE MANUAL MODE Axs: 01 No Axis Message Drv: 04 028 Excessive Deviation F1 NumUp F2 NmDn F3 CrErrors F3 - Clear Errors A basic “Shutdown” error can be cleared by pressing F3. If the error is a configuration or hardware error, the source of that error must first be corrected before it can be cleared by the pendant. 4.14 System Parameters (Teach Pendant Related) C-0-0801 Pendant Protection Level 1 Password Default: Limits: Attributes: 4-36 Teach Pendant 0 0-9999 Integer, Read/write at any time End User Manual CLC Multi-Axis Coordinated Motion Control This parameter defines a four-digit numeric password that prevents entry into protected menus unless it is entered. If it is 0, the password is disabled. C-0-0802 Used) Pendant Protection Level 2 Password (Not Currently Reserved for future use. C-0-0803 Pendant User Accessible Floats Section Default: Selections: Attributes: -1 -1 all are accessible 0 none are accessible 1 number of program floats defines range Integer, Read/write at any time This parameter defines the maximum allowable range for program floats to be user accessible from the Teach Pendant. The operator can view all the program floats, but the operator can only access the program floats, up to number set in this parameter. If the operator needs to change a program float greater than the number in this parameter then the operator can either enter a password or set the pendant level protection bits (System Control Register 1, bits 15 & 16). Example: User Accessible Program Float Section = 10 When the operator selects Table Edit Menu/Float Table Menu, the operator can only access the first ten floats. The programmer is responsible for structuring the program floats properly. End User Manual Teach Pendant 4-37 CLC Multi-Axis Coordinated Motion Control C-0-0804 Pendant User Accessible Integers Section Default: Selections: Attributes: -1 -1 = all are accessible 0 = none are accessible 1 = number of program integers defines range Integer, Read/write at any time This parameter defines the maximum allowable range for program integers to be user accessible from the Teach Pendant. The operator can view all the program integers, but the operator can only access the program integers, up to number set in this parameter. If the operator needs to change a program integer greater than the number in this parameter then the operator can either enter a password or set the pendant level protection bits (System Control Register 1, bits 15 & 16). Example: User Accessible Program Integer Section = 10 When the operator selects Table Edit Menu/Integer Table Menu without a password or the required security level, the operator can only access the first ten integers. The programmer is responsible for structuring the program integers properly. C-0-0805 Start of User Accessible Registers on Pendant Default: Limits: Attributes: C-0-0806 1 1 - maximum I-O register number (512 on CLC-D/P, 2048 on CLC-V) Integer, Read/write at any time End of User Accessible Registers on Pendant Default: Limits: Attributes: maximum I-O register number (512 on CLC-D/P, 2048 on CLC-V) 1 - maximum I-O register number Integer, Read/write at any time These parameters define a range of registers accessible to the operator. The operator can view all the registers, but the operator can only access the registers within this window. If the operator needs to change a bit in a register outside the window of this parameter, the operator can either enter a password or set the pendant level protection bits (System Control Register 1, bits 15 & 16). When the Register I/O Menu is selected on the Teach Pendant, the first register to be displayed is the number stored in the Start of User Accessible Registers parameter. 4-38 Teach Pendant End User Manual CLC Multi-Axis Coordinated Motion Control C-0-0807 Pendant Password Time-out Units: Default: Limits: Attributes: seconds 30 seconds 0 (disabled) to 3600 (one hour) Integer, Read/write at any time This parameter sets a time-out on the Teach Pendant password. After the password is entered (parameter C-0-0801), the user can enter any screen requiring the password for the time set in this parameter. When a key is pressed, the timer is reset. After the timer expires, the password is again required. If the time-out is set to 0, the password is always required. C-0-0810 Task ID Number Default: Limits: Attributes: 0 0-4 Integer, Read/write at any time Gets Task Status (Parameter T-0-0123) and allows for the message to be displayed on the first line of the TPT. 0 1 2 3 4 Disabled Task A status message to line 1 of TPT Task B status message to line 1 of TPT Task C status message to line 1 of TPT Task D status message to line 1 of TPT This allows the user program to place customized messages on the top line of the CLC TPT. Every time the message changes, the TPT beeps and flashes the new message three times. End User Manual Teach Pendant 4-39 CLC Multi-Axis Coordinated Motion Control 4.15 Teach Pendant Reserved Register Table Register 01 Register Label Name System_Control 21 System_Status 95 Teach Pendant Status 96 4-40 Teach Pendant Teach Pendant Status Bit 6 14 15 16 13 14 1 2 3 4 5 6 7 8 9 10 11 12 13 14 15 16 1 2 3 4 5 6 7 8 9 10 11 12 13 14 15 16 Bit Label Name Pendant_Live_Man (switch) Pendant_Enable Pendant_Level_LSB Pendant_Level_MSB TP_Password_Active Teach_Pendant F1 Key F2 Key F3 Key F4 Key F5 Key F6 Key F7 Key F8 Key Help Key 7 Key 8 Key 9 Key Teach Key Task Key Axis Plus Key Axis Minus Key Esc Key 4 Key 5 Key 6 Key A Plus Key A Minus Key X Plus Key X Minus Key Edit Key 1 Key 2 Key 3 Key B Plus Key B Minus Key Y Plus Key Y Minus Key Output Bits End User Manual CLC Multi-Axis Coordinated Motion Control Register 97 Register Label Name Teach Pendant Status 98 Teach Pendant Control 99 End User Manual Teach Pendant Control Bit 1 2 3 4 5 6 7 8 1 2 3 4 5 6 7 8 9 10 11 12 13 14 15 16 1 2 3 4 5 6 7 8 9 10 11 12 13 14 15 16 Bit Label Name Enter Key Decimal Key Zero Key Plus Minus Key C Plus Key C Minus Key Z Plus Key Z Minus Key Block Task A Manual Block Task A Auto Block Task A Step Block Task A Jog Block Task A Entry Block Task A Teach Bit 7 Bit 8 Block Task B Manual Block Task B Auto Block Task B Step Block Task B Jog Block Task B Entry Block Task B Teach Bit 15 Bit 16 Block Task C Manual Block Task C Auto Block Task C Step Block Task C Jog Block Task C Entry Block Task C Teach Bit 7 Bit 8 Block Task D Manual Block Task D Auto Block Task D Step Block Task D Jog Block Task D Entry Block Task D Teach Bit 15 Bit 16 Input Bits Teach Pendant 4-41 CLC Multi-Axis Coordinated Motion Control 5 Index ! !01 SERCOS Error Code#xxxx (xxxx=Error code) 2-19 !02 Invalid Parameter Number2-19 !03 Data is Read Only 2-19 !04 Write Protected in this mode/phase 2-19 !05 Greater than maximum value 2-19 !06 Less than minimum value 2-19 !07 Data is Invalid 2-19 !08 Drive was not found 2-19 !09 Drive not ready for communication 2-19 !10 Drive is not responding 2-19 !11 Service channel is not open. !12 Invalid Command Class 2-19 2-19 !13 Checksum Error\: xx (xx= checksum that CLC calculated) !14 Invalid Command Subclass !15 Invalid Parameter Set 2-19 !16 List already in progress 2-19 2-19 2-19 !17 Invalid Sequence Number 2-19 !18 List has not started 2-19 !19 List is finished 2-19 !20 Parameter is a List 2-19 !21 Parameter is not a List 2-19 !22 Invalid Variable Number 2-19 !23 Insufficient program space 2-19 !24 Maximum number of files exceeded 2-20 !25 Invalid program header 2-20 !26 Checksum Error in Program !27 Invalid Program Handle 2-20 2-20 !28 Function not Implemented 2-20 !29 File not Found 2-20 !30 Invalid I/O Register 2-20 !31 Invalid Table Index 2-20 !32 Communication Error 32 2-20 !33 Invalid Data Format 2-20 !34 Active program can't be deleted 2-20 !35 Parameter mode is required 2-20 !36 Invalid Event Number 2-20 !37 Invalid Event Function 2-20 !38 Program file version mismatch 2-20 !39 Can't activate while program running2-20 !40 No programs are active 2-20 !41 System Error\: pSOS #XXXX 2-20 !42 Mapper String DD\: invalid operator 2-20 !43 Mapper String DD\: too many operations 2-20 !44 Mapper String DD\: invalid register 2-20 End User Manual !45 Mapper String DD\: invalid bit or mask 2-20 !46 Mapper String DD\: register is read-only 2-20 Index 5-1 Error! Reference source not found. !47 Invalid Unit Number 2-20 !48 VME Bus Error 2-20 !49 VME Communication Handshake Error (D) !50 Invalid Download Block 2-21 !51 Unit D\: Invalid VME Base Address Page !52 Axis Disabled 2-21 2-21 2-21 !53 Waiting for service channel 2-21 !54 List or String is too short 2-21 !55 List or String is too long 2-21 !56 PC Communication Handshake Error 2-21 !57 Mapper String D string space is full 2-21 !58 Cannot store cam already active for axis D 2-21 !59 SERCOS handshake/busy timeout 2-21 !60 Executable program is too large (ddK) !61 System Memory Allocation Error 2-21 2-21 !62 Cam X data is < 0 or greater than 360 2-21 !63 X-Column does not start at 0 or end at 360 2-21 !64 Not supported in user prog file version 1.1 2-21 !65 Sequencer invalid sequence (D) 2-21 !66 Sequencer invalid step (D) 2-21 !67 Invalid function number (D) 2-21 !68 Function D not accessible in a step 2-22 !69 Too many functions are used (D) 2-22 !70 Maximum steps per sequence exceeded (D) 2-22 !71 Maximum functions per step exceeded (D) 2-22 !72 Program does not include a PLS 2-22 !73 Invalid ABS or REL point index (D) 2-22 !74 Error in command execution 2-22 !75 Comm. port buffer overflow 2-22 !76 Invalid Block 2-22 !77 Can't save sequencer while it is running !78 Service channel in use 2-22 2-22 !79 PID block number does not exist 2-22 0 001 Initializing System 2-2 002 Parameter Mode 2-2 003 Looking for drives 2-2 004 System is Ready 2-2 005 Manual Mode 2-2 006 Automatic Mode\: ABCD 2-2 007 Program Running\: ABCD2-2 008 Single-Stepping\: ABCD 2-2 009 Select Parameter Mode to Continue2-2 010 Breakpoint Reached: ABCD 5-2 Index 2-2 End User Manual CLC Multi-Axis Coordinated Motion Control 2 201 Invalid jog type or axis selected 2-3 201 Warning Messages Invalid jog type or axis selected 2-3 202 Drive D is not ready 2-3 203 Power Lost During Program 2-3 204 SERCOS Ring was disconnected 2-3 205 Parameter transfer warning in Task A 206 Battery is low: replace it soon 2-3 207 Axis D position limit reached 2-3 2-3 4 400 Emergency Stop 2-4 401 SERCOS Controller Error\: DD 403 System Error 2-4 2-4 404 Invalid Switch into Phase D 2-5 405 Phase D\: Drive did not respond 2-5 406 System Error 2-5 407 Drive D Phase 3 Switch Error 2-5 408 SERCOS Controller is in test mode 2-5 409 SERCOS Disconnect Error 410 System Error 2-5 2-6 411 Drive D Phase 4 Switch Error 2-6 412 No drives were found on ring 2-6 413 I-O board was not found 2-6 414 Parameters were lost 2-6 415 Drive D was not found 2-6 416 Invalid Instruction at XXXX 2-7 417 SYSTEM ERROR\: pSOS #XXXX 2-7 418 No program is active 2-7 419 Invalid Program File 2-7 420 Drive D Shutdown Error 2-7 421 User Program Stack Overflow 2-7 422 Parameter transfer error in Task A 2-7 423 Unimplemented Instruction 424 System Error 2-8 2-8 425 Instruction Error\: see Task A diag. 2-8 426 Drive D is not ready 2-8 427 Calc\: invalid table index D 428 Calc\: division by zero 2-8 2-8 429 Calc\: too many operands2-8 430 Calc instruction\: invalid operator 2-8 431 Calc error\: see Task A diag. 2-8 432 Calc\: too many nested expressions 2-9 433 Setup instruction outside of a task 2-9 434 Axis D configured more than once 2-9 435 Axis D not associated with a task 2-9 436 General Compiler Error\: XXXX 2-9 437 Axis D not controlled by this task 2-9 438 Invalid Axis Selected\: D 2-9 End User Manual Index 5-3 Error! Reference source not found. 439 Invalid Motion Type\: D 2-9 440 I-O Transfer Error\: see task diag. 2-10 441 DMA error while reading from local RAM 2-10 442 DMA error while reading from VME address 2-10 443 DMA error while writing to local RAM 2-10 444 DMA error while writing to VME address 2-10 445 DMA Access Timeout Error 446 DMA Timeout Error 2-10 2-10 447 VME SYSFAIL Detected 2-10 448 VME Communication Handshake Error (D) 2-10 449 VME Bus Error 2-10 450 Event D\: invalid event type 451 Invalid event number D 2-10 2-10 452 More than D event timers armed 2-11 453 Homing param. transfer error\: D 2-11 454 Axis D homing not complete 2-11 455 Invalid VME Data Transfer Class 2-11 456 Invalid VME Address 2-11 457 Table Bounds Error During VME Read 2-11 458 Table Bounds Error During VME Write 2-11 459 Axis D target position out of bounds 2-11 460 Invalid program D from binary inputs 461 System Error 2-12 462 System Error 2-12 463 Ratio command\: invalid ratio 2-11 2-12 464 Can't activate while program running 2-12 466 Drive D\: scaling type not supported 2-12 467 Invalid ELS Master Option 2-12 468 ELS adjustment out of bounds 2-13 469 Axis D accel <= 0 or > maximum 2-13 470 Axis D velocity > maximum 2-13 471 Invalid VME Base Address Page\: 0xXXXX 472 VME Event Trigger Rejected 473 VME Event Trigger For Unit D Failed 474 Drive D cyclic data size too large 2-13 2-13 2-13 2-13 475 Axis D capture already configured 2-13 476 Axis D\: Real Time Bit Setup Error 2-13 477 Axis D\: probe edge not configured 2-14 478 Calc\: operand out of range 2-14 479 Drive D\: too many cyclic data elements 480 SERCOS Error\: MDT is too large 2-14 2-14 481 Event D is already armed 2-14 482 Checksum Error in Program 2-14 483 Parameter Init. Error\: see Task A diag 484 CLC SYSTEM ERROR 2-14 2-15 485 SERCOS I-O\: too many registers configured 2-15 5-4 Index 486 SERCOS Device D is not a drive 2-15 487 Cam D is invalid or not stored 2-15 488 Cam Error\: See Task A diag. 2-15 489 More than D cam axes selected 2-15 490 System Memory Allocation Error 2-15 End User Manual CLC Multi-Axis Coordinated Motion Control 491 PC Communication Handshake Error 492 Programs were lost 2-15 2-15 493 Data was restored from Flash 2-16 494 Sequencer init. error: see task T diag 495 Sequencer error: see task T diag 2-16 2-16 496 Can't Execute this Instruction from an Event 2-16 497 Limit switch config. error, see ext. diag 498 Drive D Shutdown Warning 2-16 2-16 499 Axis number D not supported in this version 2-16 5 500 Axis D is not referenced 2-17 501 Drive D communications error 2-17 502 ELS and cams not supported in this version 503 Executing empty block #D 2-17 2-17 504 Communication Timeout 2-17 505 Axis D is not configured 2-17 506 I-O Mapper initialization error 2-17 507 Option Card Power Supply Error 2-17 A AT Modem 3-11 B Battery CLC-D 1-4 CLC-P 1-7 CLC-V 1-10 Baud Rate 3-6 C CLC Back Plane Relay Time-out 3-4 Response Time-out 3-4 Server Configuration 3-3 Status and Diagnostics Status Display 2-1 3-4 CLC DDE Server 3-3 CLC Overview 1-2 CLC-D Configuration Jumpers SERCOS 1-4 1-4 Serial Communication 1-3 CLC-D 2.1/2.2 Diagnostic Display CLC-D Overview 1-5 1-3 CLC-P Jumper Configuration SERCOS Serial Communication End User Manual 1-6 1-6 1-6 Index 5-5 Error! Reference source not found. CLC-P Overview 1-6 CLC-V Configuration Switches SERCOS Serial Communication CLC-V Overview 1-9 1-9 1-8 1-8 Communication Error Codes and Messages !01 SERCOS Error Code#xxxx (xxxx=Error code) !02 Invalid Parameter Number 2-19 !03 Data is Read Only 2-19 !04 Write Protected in this mode/phase 2-19 !05 Greater than maximum value 2-19 !06 Less than minimum value !07 Data is Invalid 2-19 2-19 2-19 2-19 !08 Drive was not found 2-19 !09 Drive not ready for communication !10 Drive is not responding 2-19 2-19 !11 Service channel is not open. 2-19 !12 Invalid Command Class 2-19 !13 Checksum Error\: xx (xx= checksum that CLC calculated) 2-19 !14 Invalid Command Subclass 2-19 !15 Invalid Parameter Set 2-19 !16 List already in progress 2-19 !17 Invalid Sequence Number 2-19 !18 List has not started 2-19 !19 List is finished 2-19 !20 Parameter is a List 2-19 !21 Parameter is not a List 2-19 !22 Invalid Variable Number 2-19 !23 Insufficient program space 2-19 !24 Maximum number of files exceeded !25 Invalid program header 2-20 2-20 !26 Checksum Error in Program 2-20 !27 Invalid Program Handle 2-20 !28 Function not Implemented 2-20 !29 File not Found 2-20 !30 Invalid I/O Register 2-20 !31 Invalid Table Index 2-20 !32 Communication Error 32 2-20 !33 Invalid Data Format 2-20 !34 Active program can't be deleted 2-20 !35 Parameter mode is required 2-20 !36 Invalid Event Number 2-20 !37 Invalid Event Function 2-20 !38 Program file version mismatch 2-20 !39 Can't activate while program running 2-20 !40 No programs are active 2-20 !41 System Error\: pSOS #XXXX2-20 !42 Mapper String DD\: invalid operator 2-20 !43 Mapper String DD\: too many operations 2-20 !44 Mapper String DD\: invalid register 2-20 !45 Mapper String DD\: invalid bit or mask 2-20 !46 Mapper String DD\: register is read-only 2-20 !47 Invalid Unit Number 2-20 !48 VME Bus Error 2-20 5-6 Index End User Manual CLC Multi-Axis Coordinated Motion Control !49 VME Communication Handshake Error (D) !50 Invalid Download Block !51 Unit D\: Invalid VME Base Address Page !52 Axis Disabled 2-21 2-21 2-21 2-21 !53 Waiting for service channel 2-21 !54 List or String is too short 2-21 !55 List or String is too long 2-21 !56 PC Communication Handshake Error 2-21 !57 Mapper String D string space is full 2-21 !58 Cannot store cam already active for axis D !59 SERCOS handshake/busy timeout 2-21 2-21 !60 Executable program is too large (ddK) 2-21 !61 System Memory Allocation Error 2-21 !62 Cam X data is < 0 or greater than 360 2-21 !63 X-Column does not start at 0 or end at 360 2-21 !64 Not supported in user prog file version 1.1 2-21 !65 Sequencer invalid sequence (D) 2-21 !66 Sequencer invalid step (D) 2-21 !67 Invalid function number (D) 2-21 !68 Function D not accessible in a step 2-22 !69 Too many functions are used (D) 2-22 !70 Maximum steps per sequence exceeded (D) 2-22 !71 Maximum functions per step exceeded (D) 2-22 !72 Program does not include a PLS 2-22 !73 Invalid ABS or REL point index (D) 2-22 Configuration Switches CLC-V 1-9 D DDE 3-2, 3-5 Conversations Dde Server 3-9 3-1 Diagnostic Display CLC-D 1-5 Diagnostics 2-1 Dynamic Data Exchange 3-1 E Error codes 1-5 Error Handling 3-5 F Fatal System Errors2-18 I Item Name End User Manual 3-2 Index 5-7 Error! Reference source not found. J Jumper Configuration CLC-D 1-4 CLC-P 1-6 M Manual Overview 1-2 P PC Bus 3-8 R RS485 Converter 3-6 S SERCOS 1-2 CLC-D 1-4 CLC-P 1-6 CLC-V 1-9 Serial Communication CLC-D 1-3 CLC-P 1-6 CLC-V 1-8 Serial Communications Serial Event 3-6 Serial Port 3-6 3-6 SERVER Topic Name 3-12 Service Name 3-2 Shutdown Messages 2-4 400 Emergency Stop2-4 401 SERCOS Controller Error\: DD 403 System Error 2-4 2-4 404 Invalid Switch into Phase D 2-5 405 Phase D\: Drive did not respond 406 System Error 2-5 2-5 407 Drive D Phase 3 Switch Error 2-5 408 SERCOS Controller is in test mode 2-5 409 SERCOS Disconnect Error 2-5 410 System Error 2-6 411 Drive D Phase 4 Switch Error 2-6 412 No drives were found on ring 2-6 413 I-O board was not found 2-6 414 Parameters were lost 2-6 415 Drive D was not found 2-6 416 Invalid Instruction at XXXX 2-7 417 SYSTEM ERROR\: pSOS #XXXX 418 No program is active 2-7 419 Invalid Program File 2-7 420 Drive D Shutdown Error 2-7 421 User Program Stack Overflow 5-8 Index 2-7 2-7 End User Manual CLC Multi-Axis Coordinated Motion Control 422 Parameter transfer error in Task A 2-7 423 Unimplemented Instruction 2-8 424 System Error 2-8 425 Instruction Error\: see Task A diag. 426 Drive D is not ready 2-8 2-8 427 Calc\: invalid table index D 2-8 428 Calc\: division by zero 2-8 429 Calc\: too many operands 2-8 430 Calc instruction\: invalid operator 2-8 431 Calc error\: see Task A diag. 2-8 432 Calc\: too many nested expressions 2-9 433 Setup instruction outside of a task 2-9 434 Axis D configured more than once 2-9 435 Axis D not associated with a task 2-9 436 General Compiler Error\: XXXX 2-9 437 Axis D not controlled by this task 2-9 438 Invalid Axis Selected\: D 2-9 439 Invalid Motion Type\: D 2-9 440 I-O Transfer Error\: see task diag. 2-10 441 DMA error while reading from local RAM 2-10 442 DMA error while reading from VME address 2-10 443 DMA error while writing to local RAM 2-10 444 DMA error while writing to VME address 2-10 445 DMA Access Timeout Error 2-10 446 DMA Timeout Error 2-10 447 VME SYSFAIL Detected 2-10 448 VME Communication Handshake Error (D) 2-10 449 VME Bus Error 2-10 450 Event D\: invalid event type 2-10 451 Invalid event number D 2-10 452 More than D event timers armed 2-11 453 Homing param. transfer error\: D 2-11 454 Axis D homing not complete 2-11 455 Invalid VME Data Transfer Class 456 Invalid VME Address 2-11 2-11 457 Table Bounds Error During VME Read 2-11 458 Table Bounds Error During VME Write 2-11 459 Axis D target position out of bounds 2-11 460 Invalid program D from binary inputs 2-11 461 System Error 2-12 462 System Error 2-12 463 Ratio command\: invalid ratio 2-12 464 Can't activate while program running 2-12 466 Drive D\: scaling type not supported 2-12 467 Invalid ELS Master Option 2-12 468 ELS adjustment out of bounds 2-13 469 Axis D accel <= 0 or > maximum 2-13 470 Axis D velocity > maximum 2-13 471 Invalid VME Base Address Page\: 0xXXXX 472 VME Event Trigger Rejected 2-13 473 VME Event Trigger For Unit D Failed 2-13 474 Drive D cyclic data size too large 2-13 475 Axis D capture already configured 2-13 476 Axis D\: Real Time Bit Setup Error 2-13 477 Axis D\: probe edge not configured 2-14 2-13 478 Calc\: operand out of range 2-14 End User Manual Index 5-9 Error! Reference source not found. 479 Drive D\: too many cyclic data elements 2-14 480 SERCOS Error\: MDT is too large 481 Event D is already armed 2-14 2-14 482 Checksum Error in Program 2-14 483 Parameter Init. Error\: see Task A diag 2-14 484 CLC SYSTEM ERROR 2-15 485 SERCOS I-O\: too many registers configured 486 SERCOS Device D is not a drive 487 Cam D is invalid or not stored 2-15 488 Cam Error\: See Task A diag. 2-15 489 More than D cam axes selected 2-15 490 System Memory Allocation Error 2-15 491 PC Communication Handshake Error 2-15 492 Programs were lost 2-15 2-15 2-15 493 Data was restored from Flash 2-16 494 Sequencer init. error: see task T diag 2-16 495 Sequencer error: see task T diag 2-16 496 Can't Execute this Instruction from an Event 2-16 497 Limit switch config. error, see ext. diag 2-16 498 Drive D Shutdown Warning 2-16 499 Axis number D not supported in this version 500 Axis D is not referenced 501 Drive D communications error 2-17 502 ELS and cams not supported in this version Status Messages 2-17 2-2 001 Initializing System 2-2 002 Parameter Mode 2-2 003 Looking for drives 2-2 004 System is Ready 2-2 005 Manual Mode 2-16 2-17 2-2 006 Automatic Mode\: ABCD 2-2 007 Program Running\: ABCD 2-2 008 Single-Stepping\: ABCD 2-2 009 Select Parameter Mode to Continue 202 Drive D is not ready 2-2 2-3 203 Power Lost During Program 2-3 204 SERCOS Ring was disconnected 2-3 205 Parameter transfer warning in Task A 2-3 SW5 1-9 SW6 1-10 T Teach Pendant 4-1 Diagnostics Menu 4-35 Error Screen 4-36 File Menu 4-9 Jog Menu 4-22 Fine Adjustments 4-24 Keyboard Operation 4-6 Parameter Menu 4-31 Axis 4-32 5-10 Index Drive 4-33 System 4-31 End User Manual CLC Multi-Axis Coordinated Motion Control Task 4-32 Program Menu 4-9 Register I/O Menu 4-29 Security Menu 4-34 Setup 4-4 Table Edit Menu 4-14 Absolute Point Table 4-14 Event Table 4-17 Floating Point Variable Table 4-19, 4-20, 4-21 Integer Variable Table 4-18 Relative Point Table 4-16 Teaching Points 4-24 Topic Name 3-2 V VisualMotion 1-2 VME Communications 3-7 W Warning Messages 2-3 Watchdog End User Manual 1-5 Index 5-11 CLC Multi-Axis Coordinated Motion Control Customer Service Americas (United States, Canada, and Latin America) USA USA INDRAMAT Service Hotlines Canada Rexroth Corporation INDRAMAT Division 5150 Prairie Stone Parkway Hoffman Estates, Illinois 60192 Rexroth Corporation INDRAMAT Division 2110 Austin Avenue Rochester Hills, Michigan 48309 USA: 1-800-860-1055 Phone: 847/645-36 00 Fax: 857/645-62 01 Phone: 810/853-82 90 Fax: 810/853-82 90 Basic Technologies Corporation Burlington Division 3426 Mainway Drive Burlington, Ontario Canada L7M 1A8 Canada: 1-847-645-3600 (request Service Department) Latin America: (US Phone No.) 847-645-3600 (request Service Department) Phone: Fax: 905/335-55 11 905/335-41 84 Mexico Argentina Argentina Brazil Motorización y Diseño de Controles, S.A. de C.V. Av. Dr. Gustavo Baz No. 288 Col. Parque Industrial la Ioma Apartado Postal No. 318 54060 Tlalnepantla Estado de Mexico Mexico Mannesmann Rexroth S.A.I.C. Division INDRAMAT Acassusso 48 41/7 1605 Munro (Buenos Aires) Argentina Nakase Asesoramiento Tecnico Diaz Velez 2929 1636 Olivos (Provincia de Buenos Aires) Argentina Mannesmann Rexroth Automação Ltda. Divisão INDRAMAT Rua Georg Rexroth, 609 Vila Padre Anchieta BR-09.951-250 Diadema-SP Caixa Postal 377 BR-09.901-970 Diadema-SP Phone: 01/756 01 40 01/756 02 40 Telex: 262 66 rexro ar Fax: 01/756 01 36 Phone: 01/790 52 30 Phone: 011/745 90 65 011/745 90 70 Fax: 011/745 90 50 Phone: 5/397 86 44 Fax: 5/398 98 88 Customer Service in the Americas Asia, Australia, and Far East Australia China China China Australian Industrial Machinery Services Pty. Ltd. Unit 3/45 Horne ST Campbellfield VIC 2061 Australia Rexroth (China) Ltd. Shanghai Office Room 206 Shanghai Intern. Trade Centre 2200 Yanan Xi Lu Shanghai 200335 P.R. China Rexroth (China) Ltd. Shanghai Parts & Service Centre 199 Wu Cao Road, Hua Cao Minhang District Shanghai 201 103 P.R. China Rexroth (China) Ltd. 1430 China World Trade Centre 1, Jianguomenwai Avenue Beijing 100004 P.R. China Phone: 021/627 55 333 Fax: 021/627 55 666 Phone: 021/622 00 058 Fax: 021/622 00 068 Phone: 03/93 59 0228 Fax: 03/93 59 02886 Phone: 010/50 50 380 Fax: 010/50 50 379 China Hong Kong India Japan Rexroth (China) Ltd. A-5F., 123 Lian Shan Street Sha He Kou District Dalian 116 023 P.R. China Rexroth (China) Ltd. 19 Cheung Shun Street 1st Floor, Cheung Sha Wan, Kowloon, Hong Kong Mannesmann Rexroth (India) Ltd. INDRAMAT Division Plot. 96, Phase III Peenya Industrial Area Bangalore - 560058 India Rexroth Co., Ltd. INDRAMAT Division I.R. Building Nakamachidai 4-26-44 Tsuzuki-ku, Yokohama 226 Japan Phone: 0411/46 78 930 Fax: 0411/46 78 932 Phone: 741 13 51/-54 and 741 14 30 Telex: 3346 17 GL REX HX Fax: 786 40 19 786 07 33 Korea Korea Rexroth-Seki Co Ltd. 1500-12 Da-Dae-Dong Saha-Gu, Pusan, 604-050 Korea Seo Chang Corporation Ltd. Room 903, Jeail Building 44-35 Yoido-Dong Youngdeungpo-Ku Seoul, Korea Phone: 051/264 90 01 Fax: 051/264 90 10 Phone: 80/839 21 01 80/839 73 74 Telex: 845 5028 RexB Fax: 80/839 43 45 Phone: 045/942-72 10 Fax: 045/942-03 41 Phone: 02/780-82 07 ~9 Fax: 02/784-54 08 Customer Service in Asia, Australia, and the Far East End User Manual Customer Service Locations Error! Reference source not found. Europe Austria Austria Belgium Denmark G.L.Rexroth Ges.m.b.H. Geschäftsbereich INDRAMAT Hägelingasse 3 A-1140 Wien G.L.Rexroth Ges.m.b.H. Geschäftsbereich INDRAMAT Randlstraße 14 A-4061 Pasching Mannesmann Rexroth N.V.-S.A. INDRAMAT Division Industrielaan 8 B-1740 Ternat BEC Elektronik AS Zinkvej 6 DK-8900 Randers Phone: 1/9852540-400 Fax: 1/9852540-93 Phone: 07229/4401-36 Fax: 07229/4401-80 Phone: 02/5823180 Fax: 02/5824310 Phone: 086/447866 Fax: 086/447160 England Finland France France Mannesmann Rexroth Ltd. INDRAMAT Division 4 Esland Place, Love Lane Cirencester, Glos GL7 1YG Rexroth Mecman OY Riihimiehentie 3 SF-01720 Vantaa Rexroth - Sigma S.A. Division INDRAMAT Parc des Barbanniers 4, Place du Village F-92632 Gennevilliers Cedex Rexroth - Sigma S.A. Division INDRAMAT 91, Bd 1 Joliot Curie F-69634 Venissieux - Cx Phone: 01285/658671 Fax: 01285/654991 Phone: 0/848511 Fax: 0/846387 Phone: 1/41475430 Fax: 1/47946941 Phone: 78785256 Fax: 78785231 France Italy Italy Netherlands Rexroth - Sigma S.A. Division INDRAMAT 270, Avenue de lardenne F-31100 Toulouse Rexroth S.p.A. Divisione INDRAMAT Via G. Di Vittoria, 1 I-20063 Cernusco S/N.MI Rexroth S.p.A. Divisione INDRAMAT Via Borgomanero, 11 I-10145 Torino Hydraudyne Hydrauliek B.V. Kruisbroeksestraat 1a P.O. Box 32 NL-5280 AA Boxtel Phone: 61499519 Fax: 61310041 Phone: 02/92365-270 Fax: 02/92108069 Phone: 011/7712230 Fax: 011/7710190 Phone: 04116/51951 Fax: 04116/51483 Spain Spain Sweden Switzerland Rexroth S.A. Centro Industrial Santiago Obradors s/n E-08130 Santa Perpetua de Mogoda (Barcelona) Goimendi S.A. División Indramat Jolastokieta (Herrera) Apartado 11 37 E-San Sebastion, 20017 AB Rexroth Mecman INDRAMAT Division Varuvägen 7 S-125 81 Stockholm Rexroth SA Département INDRAMAT Chemin de l`Ecole 6 CH-1036 Sullens Phone: 03/718 68 51 Telex: 591 81 Fax: 03/718 98 62 Phone: 043/40 01 63 Telex: 361 72 Fax: 043/39 93 95 Phone: 08/727 92 00 Fax: 08/64 73 277 Phone: 021/731 43 77 Fax: 021/731 46 78 Switzerland Russia Rexroth AG Geeschäftsbereich INDRAMAT Gewerbestraße 3 CH-8500 Frauenfeld Tschudnenko E.B. Arsenia 22 153000 Ivanovo Russia Phone: 052/720 21 00 Fax: 052/720 21 11 Phone: 093/22 39 633 Customer Service in Europe Germany Central Sales Region Eastern Sales Region Western Sales Region Northern Sales Region INDRAMAT GmbH Bgm.-Dr.-Nebel-Str. 2 D-97816 Lohr am Main INDRAMAT GmbH Beckerstraße 31 D-09120 Chemnitz INDRAMAT GmbH Hansastraße 25 D-40849 Ratingen INDRAMAT GmbH Fährhausstraße 11 D-22085 Hamburg Phone: 09352/40-0 Fax: 09352/40-4885 Phone: 0371/3555-0 Fax: 0371/3555-230 Phone: 02102/4318-0 Fax: 02102/41315 Phone: 040/227126-16 Fax: 040/227126-15 Southern Sales Region Southwestern Sales Region INDRAMAT Service Hotline INDRAMAT GmbH Ridlerstraße 75 D-80339 München INDRAMAT GmbH Böblinger Straße 25 D-71229 Leonberg INDRAMAT GmbH Phone: 0172/660 040 6 Phone: 089/540138-30 Fax: 089/540138-10 Phone: 07152/972-6 Fax: 07152/972-727 -orPhone: 0171/333 882 6 Customer Service in Germany Customer Service Locations End User Manual CLC Multi-Axis Coordinated Motion Control Notes End User Manual Customer Service Locations Indramat