1
CommView
Network Monitor and Analyzer for MS Windows
User Manual
Copyright © 1999-2002 TamoSoft, Inc.
Introduction
About CommView
CommView is a program for monitoring Internet and Local Area Network (LAN) activity capable of capturing and analyzing network
packets. It gathers information about data passing through your dial-up connection or Ethernet card and decodes the analyzed
data.
With CommView you can see the list of network connections and vital IP statistics and examine individual packets. Packets are
decoded down to the lowest layer with full analysis of the most widespread protocols. Full access to raw data is also provided.
Captured packets can be saved to log files for future analysis. A flexible system of filters makes it possible to drop packets you don't
need or capture only those packets that you wish to capture.
CommView is a helpful tool for LAN administrators, security professionals, network programmers, or anyone who wants to have a
full picture of the traffic going through one's PC or LAN segment. This application is designed for Internet users and small and
medium-sized networks and can run on any Windows 95/98/Me/NT/2000/XP system. It requires an Ethernet or Wireless Ethernet
network card supporting the NDIS 3.0 driver standard, or a standard dial-up adapter.
CommView features full decoding of the following protocols: ARP, BCAST, BGP, BMP, CDP, DHCP, DIAG, DNS, EIGRP, FTP, GRE,
HTTP, ICMP, ICQ, IGMP, IGRP, IPsec, IPv4, IPv6, IPX, HSRP, NCP, NDS, NetBIOS, NFS, NLSP, OSPF, POP3, PPP, PPPoE, RARP,
RADIUS, RDP, RIP, RIPX, RPC, RSVP, RTSP, SAP, SER, SMB, SMTP, SNA, SNMP, SOCKS, SPX, TCP, TELNET, TFTP, UDP, VTP, WAP,
WDOG, 802.1Q, 802.1X. More protocols coming soon!
Additionally, our new remote monitoring technology allows CommView users to capture network traffic on any computer where
Remote Agent is running, regardless of the computer's physical location. To take advantage of this unique feature, you need to
deploy CommView Remote Agent, an affordable add-on for CommView.
What's New
Version 3.4
•
•
•
•
•
•
•
•
•
New protocol decoding modules have been added: BGP, CDP, EIGRP, IGRP, IPsec, HSRP, NFS, OSPF, RADIUS, RIP, RPC,
SNA, VTP, WAP, 802.1Q, 802.1X.
New log file management tools that allow you to split/concatenate CCF files have been added.
TCP Session Reconstruction windows now allow you to jump the next session between the two hosts.
New features in the Statistics window: switching between bits and bytes per second, a bandwidth usage indicator, IP
protocol and sub-protocol charts by number of bytes or by number of packets.
Optional non-promiscuous mode.
Import of capture files in MS NetMon and NAI Sniffer for Windows formats.
Syntax highlighting in the advanced formula window.
Improved Windows XP themes support.
An important bug fix in the advanced rules hex function; this function didn't work correctly for the byte patterns that
included 0x00.
Version 3.3
•
•
•
•
•
•
•
•
•
•
•
Advanced rules that allow you to create complex filters using Boolean logic and simple, easy to understand syntax.
New protocol decoding modules have been added: FTP, TFTP, SOCKS (v. 4,5)
Yet another performance improvement.
New features in Packet Generator: drag-and-drop support for many packet formats, high-speed packet generation (up to
5,000 packets/sec), and ability to send many different packets with a single click.
Log files can be optionally concatenated into a single file when the program stops capturing.
New export formats: comma-delimited files with and without hex data.
You can now save packets in different formats (CCF, ENC, etc.) directly, without first loading log files into Log Viewer.
LAN Hosts tables can now handle up to 1,000 MAC and IP addresses.
Optional "Size" column is available in the packet list.
You can define network addresses and subnet masks for the IP addresses that you want the program to treat as local
ones.
Many minor improvements and bug fixes.
Version 3.2
•
•
•
•
•
•
New protocol decoding modules have been added: SNMP (v. 1,2,3), IPv6, ICQ, GRE, RDP.
A major performance improvement when opening/importing capture files: files are loaded up to 25 times faster.
Lower CPU usage.
Extended NIC statistics, such as collisions and CRC errors, are available.
You can apply rules to pre-captured data in Log Viewer.
Improved Find Packet dialog.
Version 3.1
•
•
•
•
•
•
New protocol decoding modules have been added: DHCP, DNS, HTTP, POP3, RTSP, SMTP.
A new, unique remote monitoring technology.
You can add up to 4 custom protocols to the IP Sub-protocols chart.
You can import capture files in Tcpdump (libcap) format.
More configuration options have been added.
Many minor improvements and bug fixes.
Version 3.0
•
•
•
•
•
•
•
•
•
•
•
•
•
A new protocol decoder; now supports ARP, BCAST, BMP, DIAG, ICMP, IGMP, IPv4, IPX, NCP, NDS, NetBIOS, NLSP, PPP,
PPPoE, RARP, RIPX, RSVP, SAP, SER, SMB, SPX, TCP, UDP, WDOG. More protocols coming soon.
Supports Wireless Ethernet (802.11b) adapters.
The program is ready for Windows XP (tested with RC1).
The Packet Generator can now send packets via the Windows 2000/XP dial-up adapter.
A protocol decoder and checksum corrector were added to the Packet Generator.
You can optionally run multiple instances of CommView to monitor several adapters simultaneously.
IP Statistics can be included in the Statistics Report.
A new LAN Hosts by IP Address table has been added to the Statistics window.
The TCP Reconstruction window allows you to exclude/include data based on the packet direction.
You can now filter packets based on TCP flags.
The program can run in invisible mode.
You can now share CommView data with your own application using a simple TCP/IP interface.
The Packets tab allows you to select multiple packets.
Version 2.6
•
Aliases can be assigned to IP addresses.
•
•
•
•
Current rules can be applied to the Statistics window and reports.
PPPoE decoding
TCP Session Reconstruction windows now non-modal, allowing you to have several open windows with different sessions.
Minor interface improvements and bug fixes
Version 2.5
•
•
•
•
Full drag-and-drop support: you can now drag IP Statistics, individual packets, and graphs and drop them to the desktop
or any folder. You can drag capture files (CCF, ENC, or BFR) and drop them to the application.
Packet Size Distribution chart and LAN Hosts Table have been added to the Statistics window.
Automatic or manual report generation: all statistics data can be saved as HTML or semicolon-delimited reports. (See the
"Report" tab in the Statistics window.)
The TCP Session Reconstruction window now allows you to view data as HTML and EBCDIC in addition to ASCII and HEX.
Version 2.4
•
•
•
•
•
•
•
•
•
•
•
•
TCP session reconstruction
Aliases can be assigned to MAC addresses.
NIC Vendor Identifier
More columns are available on the "IP Statistics" and "Packets" tabs.
Columns on the "Packets" and "IP Statistics" tabs can be hidden.
ARP/RARP packets are decoded.
Wildcards can be used in IP Address rules.
The "Both" option in capturing rules is available in addition to the "From" and "To" options.
Tabs with active rules are now displayed in bold font.
Packet output can be suspended/resumed.
Several alternative IP Statistics layouts are available.
Other minor improvements
Version 2.3
•
Dial-up support under Windows 2000
Version 2.2
•
•
•
•
•
•
•
MAC, IP, and TCP/UDP/ICMP headers are colorized.
The contents of the IP Statistics tab can be saved as an HTML file.
Added Packet Generator allows you to send packets.
Your rules configurations can be saved/loaded.
Text rules can now be made case sensitive.
Improved Find Packet Contents dialog
Bug fix: problems with starting the driver on localized Windows 2000 systems have been solved.
Version 2.1
•
•
•
•
•
•
Log Viewer: You can now load and explore capture files just as you do with real-time captured data.
You can import and export capture files from/to the NI Observer or the NAI Sniffer file formats.
Port numbers can be displayed as service names.
A new "Jump To" feature allows you to quickly find packets going to/coming from a given IP address.
A few interface improvements
Bug fix: The previous versions showed an incorrect UDP checksum.
Version 2.01
•
Windows 2000 support
Version 2.0 Final
•
•
Improved performance on Windows NT systems
A few bugs found in 2.0 Beta were fixed.
Version 2.0 Beta
•
•
Windows NT support
More statistical information
Version 1.0 Final
•
•
•
•
New functions: Find Packet and Go to Packet Number
New filters: Capture/ignore packets based on MAC addresses and packet direction
Statistics: Packets per second and Bytes per second histograms, IP protocols and sub-protocols distribution graphs
Bug fix: The text filter in v.1.0 Beta could sometimes capture packets that did not contain specified text; this problem has
been resolved.
License Agreement
Please read the following terms and conditions carefully before using this software. Your use of this software indicates your
acceptance of this license agreement. If you do not agree with the terms of this license, you must remove this software from your
storage devices and cease to use the product.
Copyright
This software is copyrighted 1999-2002 by TamoSoft, Inc. CommView is a trademark of TamoSoft, Inc. The use and copyright of
this software is governed by international copyright treaties. TamoSoft, Inc. retains full title and rights to this software and
documentation, and in no way does the license granted diminish the intellectual property rights of TamoSoft, Inc. You must not
redistribute the registration codes provided--on paper, electronically, or in any other form.
Evaluation Version
This is not free software. You are hereby licensed to use this software for evaluation purposes without charge for a period of 30
days. Using this software after the evaluation period violates copyright laws and may result in severe civil and criminal penalties.
Registered (Licensed) Version
One registered copy of this software may be used by a single person who uses the software personally on one or more computers,
or it may be installed on a single workstation used non-simultaneously by more than one person, but not both. This software may
be installed on a network server, provided that a separate, appropriate license to use this software has been granted by TamoSoft,
Inc. for each computer terminal having access to this software.
Disclaimer
THIS SOFTWARE IS PROVIDED "AS IS" WITHOUT WARRANTY OF ANY KIND, EITHER EXPRESSED OR IMPLIED, INCLUDING, BUT
NOT LIMITED TO, WARRANTIES OF MERCHANTABILITY OR FITNESS FOR A PARTICULAR PURPOSE. IN NO EVENT WILL
TAMOSOFT, INC. BE LIABLE TO YOU FOR ANY DAMAGES, INCLUDING INCIDENTAL OR CONSEQUENTIAL DAMAGES, ARISING OUT
OF THE USE OF THIS SOFTWARE, EVEN IF ADVISED OF THE POSSIBILITY OF SUCH DAMAGES. YOU ACKNOWLEDGE THAT YOU
HAVE READ THIS LICENSE, UNDERSTAND IT, AND AGREE TO BE BOUND BY ITS TERMS.
Governing Law
This Agreement will be governed by the laws of the Republic of Cyprus.
Distribution
This software may be distributed freely in its original unmodified and unregistered form. The distribution has to include all files of its
original distribution. Distributors may not charge any money for it. Anyone distributing this software for any kind of remuneration
must first contact us for authorization.
Other Restrictions
You may not modify, reverse engineer, decompile or disassemble this software in any way, including changing or removing any
messages or windows.
Windows is a registered trademark of Microsoft Corporation. All other trademarks and service marks are the property of their respective owners.
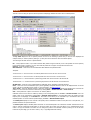
Using the Program
Overview
The program interface consists of four tabs that allow you to view data and perform various actions with captured packets. To start
capturing packets, select a network adapter from the drop-down list on the toolbar, and click on the Start Capture button or
select File = > Start Capture from the menu. If network traffic passes through the selected adapter, CommView will start
displaying information.
Main Menu
File
Start/Stop Capture – starts/stops capturing packets.
Suspend/Resume Packet Output – stops/resumes the real-time packet output on the 2nd tab.
Remote Monitoring Mode – shows/hide the remote monitoring toolbar.
Save IP Statistics As – allows you to save the contents of the IP Statistics tab as a HTML report.
Save Packet Log As – allows you to save the contents of the Packets tab in different formats. Use the Logging tab for advanced
saving options.
Log Viewer – opens a new Log Viewer window.
Clear IP Statistics – clears the IP Statistics table (1st tab).
Clear Packet Buffer – clears the contents of the program's buffer and the packet list (2nd tab).
Performance Data – displays the program's performance statistics: the number of packets captured and dropped by the device
driver. This command is not available under Windows 95/98/Me.
Exit – closes the program.
Search
Find Packet – shows a dialog that allows you to find packets matching a specific text.
Go to Packet Number - shows a dialog that allows you to jump to a packet with the specified number.
View
Statistics – shows a window with data transfer and protocol distribution statistics.
Port Reference – shows a window with port reference information.
Log Directory – opens the directory to which logs are saved by default.
IP Statistics Columns – shows/hides the IP Statistics tab columns.
Packets Columns – shows/hides the Packets tab columns.
Tools
Packet Generator – opens the Packet Generator window.
Reconstruct TCP Session – allows you to reconstruct a TCP session starting from the selected packet; it opens a window that
displays the entire conversation between two hosts.
NIC Vendor Identifier – opens a window where you can identify a network adapter vendor by MAC address.
Settings
Fonts – shows the submenu for setting fonts of the interface elements.
MAC Aliases – brings up a window where you can assign easy-to-remember aliases to MAC addresses.
IP Aliases – brings up a window where you can assign easy-to-remember aliases to IP addresses.
Options – brings up the Options window where additional advanced program options can be set.
Rules
Save Current Rules As – allows you to save current rules configuration to a file.
Load Rules From – allows you to load a previously saved rules configuration from a file.
Reset All – clears all existing rules (if any).
Help
Contents – launches CommView help.
Search For Help On … – shows CommView help index.
About – shows information about the program.
Almost every element of the interface has a context-sensitive menu that can be invoked by clicking on the right mouse button, and
many commands are available only through these menus.
The first tab is used for displaying detailed information about your computer's network connections (IP protocol only). For more
information see IP Statistics.
The second tab is used for viewing captured network packets and displaying detailed information about a selected packet. For more
information see Packets.
The third tab allows you to save captured packets to files. For more information see Logging.
The fourth tab is for configuring rules that allow you to capture/ignore packets based on various criteria, such as IP address or port
number. For more information see Rules.
You can change some of the settings, such as fonts, colors, and buffer size by selecting Settings from the menu. For more
information see Setting Options.
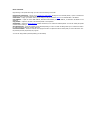
IP Statistics
This tab is used for displaying detailed information about your computer's network connections (IP protocol only). To start capturing
packets, select File = > Start Capture in the menu, or click on the corresponding button on the toolbar.
The meaning of the table columns is explained below:
Local IP – shows the local IP address. For inbound packets, it is the destination IP address; for outbound and pass-through
packets, it is the source IP address.
Remote IP – shows the remote IP address. For inbound packets, it is the source IP address; for outbound and pass-through
packets, it is the destination IP address.
In – shows the number of packets received.
Out – shows the number of packets sent.
Direction – shows the session direction. The direction is determined based on the direction of the first packet received from or
sent to the remote IP address.
Sessions – shows the number of established TCP/IP sessions. If no TCP connections were established (connections failed, or the
protocol is UDP/IP or ICMP/IP), this value is zero.
Ports – lists the remote computer's ports used during the TCP/IP connection or connection attempt. This list can be empty if the
protocol is not TCP/IP. Ports can be displayed either as numeric values or as the corresponding service names. For more
information see Setting Options.
Hostname – shows the remote computer's hostname. If the hostname cannot be resolved, this column is empty.
Bytes – shows the number of bytes transmitted during the session.
Last packet – shows the time of the last packet sent/received during the session.
You can show or hide individual columns by clicking on the corresponding items in the View =>IP Statistics Columns menu.
Menu Commands
Right-clicking on the IP Statistics list brings up a menu with the following commands:
Copy – copies the local IP address, remote IP address, or hostname to the clipboard.
Show All Ports – displays a window with the complete list of ports used in communicating between the selected pair of IP
addresses. This is useful when many ports were used, and they don't fit into the corresponding column.
Data Transfer – displays a window with information on the data transfer volume between the selected pair of IP addresses and
the time of the last packet.
Jump To – allows you to quickly jump to the first/last packet with the selected source/destination IP address; the program will
display the Packets tab and set the mouse cursor to the packet that matches the criterion.
SmartWhois – sends the selected remote IP address to SmartWhois, if it is installed on your system. SmartWhois is a stand-alone
application developed by our company capable of obtaining information about any IP address or hostname in the world. It
automatically provides information associated with an IP address, such as domain, network name, country, state or province, city.
The program can be downloaded from our site.
Create Alias -- brings up a window where you can assign an easy-to-remember aliases to the selected IP address.
Save IP Statistics As – allows you to save the contents of the IP Statistics tab as a HTML report.
Clear IP Statistics – clears the table.
More Statistics -- shows a window with data transfer and protocol distribution statistics.
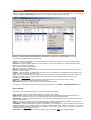
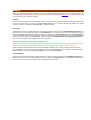
Packets
This tab is used for listing all captured network packets and displaying detailed information about a selected packet.
The top table displays the list of captured packets. Use this list for selecting a packet that you want to have displayed and
analyzed. When you select a packet by clicking on it, other panes show information about the selected packet.
The meaning of the table columns is explained below:
No – a unique packet number. If you make CommView filter packets using the Rules tab, some of the packets will not be captured,
but will still be logged. Therefore, you may notice that the packets do not appear in sequential numerical order.
Protocol – shows the packet's protocol.
MAC Addresses – shows the source and destination MAC addresses and packet direction.
Examples:
22:22:22:22:22 => 33:33:33:33:33 is an outbound packet from 22:22:22:22:22 to 33:33:33:33:33.
22:22:22:22:22 <= 33:33:33:33:33 is an inbound packet from 33:33:33:33:33 to 22:22:22:22:22.
44:44:44:44:44 <=> 55:55:55:55:55 is a pass-through packet from 44:44:44:44:44 to 55:55:55:55:55.
55:55:55:55:55 <=> 44:44:44:44:44 is a pass-through packet from 55:55:55:55:55 to 44:44:44:44:44.
IP Addresses – shows the source and destination IP addresses (where applicable) and packet direction.
Ports – shows the source and destination ports (where applicable) and packet direction. Ports can be displayed either as numeric
values or as the corresponding service names. For more information, see Setting Options.
Time / Delta – shows the packet's absolute or delta time. Delta time is the difference between the absolute times of the last two
packets. You can switch from absolute to delta time by clicking View =>Packets Columns =>Show Time As.
Size – shows packet size in bytes. This column is not visible by default.
Individual columns can be shown or hidden by clicking on the corresponding items in the View =>Packets Columns menu. The
packet output can be suspended by clicking File =>Suspend Packet Output. In the Suspended mode, the packets are being
captured, but not displayed, on the Packets tab. This mode is useful when you are interested only in the statistics rather than
individual packets. To resume real-time packets display, click File =>Resume Packet Output.
The middle pane displays the raw contents of the packet, both in hexadecimal notation and as plain text. In the plain text, nonprintable characters are replaced with dots.
The bottom pane displays decoded packet information for the selected packet. This information includes vital data that can be
used by network professionals. Right-clicking on the pane invokes the context menu that allows you to collapse/expand all the
nodes or to copy the selected or all nodes. You can change the position of the decoder window by clicking on one of the three
buttons at the pane edge (you can have a bottom-, left-, or right-aligned decoder window).
Menu Commands
Right-clicking on the packet list brings up a menu with the following commands:
Reconstruct TCP Session – allows you to reconstruct a TCP session starting from the selected packet; it opens a window that
displays the entire conversation between two hosts.
Create Alias -- brings up a window where you can assign an easy-to-remember aliases to the selected MAC or IP address.
Copy Address – copies the source MAC address, destination MAC address, source IP address, or destination IP address to the
clipboard.
Copy Packet – copies the raw data of the selected packet to the clipboard.
Send Packet – shows the Packet Generator window that allows you to resend the selected packet. You can also modify the packet
contents before sending it.
Save Packet(s) As – saves the contents of the selected packet(s) to a file. The Save As dialog allows you to select the format to
be used when saving data from the drop-down list.
Clear Packet Buffer – clears the contents of the program's buffer. The packet list will be cleared, and you will not be able to view
the packets previously captured by the program.
You can also drag-and-drop selected packet(s) to the desktop.
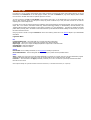
Logging
This tab is used for saving captured packets to a file on the disk. CommView saves packets in its own format with the .CCF
(CommView Capture Files) extension. You can open and view these files at any time using Log Viewer, or you can just double-click
on any CCF file to have it loaded and decoded.
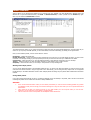
Save Log
Use this frame to manually save captured packets to a file. You can either save all packets currently stored in the buffer or save
only a part of them within a given range. The To and From fields allow you to set the necessary range based on the packet
numbers as shown on the Packets tab. Click Save As … to select a file name.
Auto-saving
Check this box to have the program automatically save captured packets as they arrive. Use the Maximum directory size field to
limit the total size of the capture files stored in the Log Directory. If the total size of the capture files exceeds the limit, the
program automatically deletes the oldest files in the directory. To change the default Log Directory, click on the Save files to box
and select a different folder. Packets are logged in chunks, 500 packets in each file. If you prefer to have all files generated during
to the current capturing session concatenated into a single file, check the Concatenate files when capturing is stopped box.
This will make the program create a single file when you stop capturing.
A log file with 500 packets is approximately 500 kilobytes in size.
IMPORTANT: If you want to have an important capture file stored for a long time, don't keep it in the default Log Directory: there is
a chance it will be automatically deleted as new files are being saved. Move the file to a different folder to preserve it.
Please note that the program doesn't save each packet individually immediately upon arrival. Packets are saved in groups, 500
each. It means that if you view the log file in real time, it may not contain the last 500 packets. To make the program immediately
dump the buffer to the log file, either click Stop Capture or uncheck the Auto-saving box.
Log Management
Use this frame to manually concatenate multiple CCF files into a single, larger file by clicking on the Concatenate Logs button, or
split CCF files that are too large in size into smaller chunks by clicking on the Split Logs button. The program will then guide you
through the process, and you will be able to enter the desired size of the output files.
Viewing Logs
Log Viewer is a tool for viewing and exploring capture files created by CommView and several other packet analyzers. It has the
functionality of the Packets tab of the main program window, but unlike the Packets tab, Log Viewer displays packets loaded
from the files on the disk rather than the packets captured in real time.
To open Log Viewer, click File => Log Viewer in the program's main menu, or just double-click on any CommView capture file
that you have previously saved. You can open as many Log Viewer windows as you wish, and each of them can be used for
exploring one or several capture files.
Log Viewer can be used for exploring capture files created by other packet analyzers and personal firewalls. The current version can
import files in the Network Instruments Observer®, Network Associates Sniffer® for DOS/Windows, Microsoft NetMon, and
Tcpdump (libcap) formats. These formats are also used by a number of 3rd-party applications. Log Viewer is capable of exporting
packet data by creating files in the Network Instruments Observer® and Network Associates Sniffer® for DOS formats, as well as
the native CommView format.
Using Log Viewer is similar to using the Packets tab of the main window; please refer to the Packets chapter if you need detailed
information.
Log Viewer Menu
File
Load CommView Logs – opens and loads one or several CommView capture files.
Import Logs – allows you to import capture files created by other packet analyzers.
Export Logs – allows you to export the displayed packets to capture files in several formats.
Clear Window – clears the packet list.
Close Window – closes the window.
Search
Find Packet – shows a dialog that allows you to find packets matching a specific text.
Go to Packet Number - shows a dialog that allows you to jump to a packet with the specified number.
Rules
Apply – applies your current rule set to the packets displayed in Log Viewer. As a result, when you use this command the program
will delete the packets that don't match the current rule set. Note that this won't modify the file on the disk.
From File … - does the same as the Apply command, but allows you to use a rule set from a previously saved .RLS file rather
than the current rule set.
Observer® and Sniffer® are registered trademarks of Network Instruments, LLC and Network Associates, Inc. respectively.
Rules
This tab allows you to set rules for capturing packets. If one or more rules are set, the program filters packets based on these rules
and displays only the packets that comply with the rules. Note that CommView is not a firewall, and when you set rules, packets are
still processed by the operating system; they are not just displayed and logged by CommView. If a rule is set, the name of the
corresponding tab is displayed in bold font.
You can save your rules configuration(s) to a file and load them by using the Rules command of the program's menu.
Since LAN traffic can often generate a high number of packets, it is recommended that you use rules to filter out unnecessary
packets. This can considerably reduce the amount of system resources consumed by the program. If you want to enable/disable a
rule, select the appropriate tab on the left side of the window (e.g. IP Addresses or Ports), and check or uncheck the box
describing the rule (Enable IP Address rules or Enable port rules). There are seven types of rules that can be used:
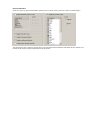
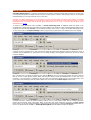
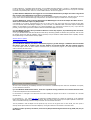
Protocols & Direction
Allows you to ignore or capture packets based on Ethernet (Layer 2) and IP (Layer 3) protocols, as well as on packet direction.
This example shows how to make the program capture only inbound and outbound ICMP and UDP packets. All other packets in the
IP family will be ignored; all pass-through packets will be ignored also.
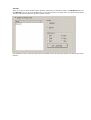
MAC Addresses
Allows you to ignore or capture packets based on MAC (hardware) addresses. Enter a MAC address in the Add Record frame,
select the direction (From, To, or Both), and click Add MAC Address. The new rule will be displayed. Now you can select the
action to be taken when a new packet is processed: the packet can be either captured or ignored. You can also click on the MAC
Aliases button to get the list of aliases; double-click on the alias you would like to add, and the corresponding MAC address will
appear in the input box.
This example shows how to make the program ignore packets that come from 0A:DE:34:0F:23:3E. All packets that come from other
MAC addresses will be captured.
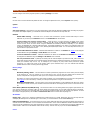
IP Addresses
Allows you to ignore or capture packets based on IP addresses. Enter an IP address in the Add Record frame, select the direction
(From, To, or Both), and click Add IP Address. You can use wildcards to specify blocks of IP addresses. The new rule will be
displayed. Now you can select the action to be taken when a new packet is processed: the packet can be either captured or
ignored. You can also click on the IP Aliases button to get the list of aliases; double-click on the alias you would like to add, and the
corresponding IP address will appear in the input box.
This example shows how to make the program capture the packets that go to 63.34.55.66, go to and come from 207.25.16.11 and
come from all addresses between 194.154.0.0 and 194.154.255.255. All packets that come from other addresses or go to other
addresses will be ignored. Since IP addresses are used in the IP protocol, such configuration will automatically make the program
ignore all non-IP packets.
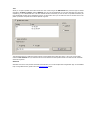
Ports
Allows you to ignore or capture packets based on ports. Enter a port number in the Add Record frame, select the direction (From,
To, or Both), and click Add Port. The new rule will be displayed. Now you can select the action to be taken when a new packet is
processed: the packet can be either captured or ignored. You can also press the Port Reference button to get a list of all known
ports; double-click on the port you would like to add and its number will appear in the input box. You can also click on the Port
Reference button to get a list of all known ports; double-click on the port you would like to add and its number will appear in the
input box. Ports can also be entered as text; for example, you can type in http or pop3, and the program will convert the port name
to the numeric value.
This example shows how to make the program ignore packets that come from port 80 and go to and come from port 137. This rule
will prevent CommView from displaying inbound HTTP traffic, as well as inbound and outbound NetBIOS Name Service traffic. All
packets coming to and from other ports will be captured.
TCP Flags
Allows you to ignore or capture packets based on TCP flags. Check a flag or a combination of flags in the Add Record frame, and
click Add Flags. The new rule will be displayed. Now you can select the action to be taken when a new packet with the entered
TCP flags is processed: the packet can be either captured or ignored.
This example shows how to make the program ignore TCP packets with the PSH ACK flag. All packets with other TCP flags will be
captured.
Text
Allows you to capture packets that contain certain text. Enter a text string in the Add Record frame, select the type of entered
information (As String or As Hex), and click Add Text. The new rule will be displayed. You can enter text either as a string (selfexplanatory), or as a hexadecimal value. The latter method should be used when you want to enter non-printable characters: just
type hexadecimal character values separated by spaces, as shown below. Now you can select the action to be taken when a new
packet is processed: the packet can be either captured or ignored.
This example shows how to make the program capture only the packets that contain either "GET" or the 01 02 03 04 hex data.
Check the Case sensitive box if you want the rules to be case sensitive. All other packets that do not contain the text mentioned
above will be ignored.
Advanced
Advanced rules are the most powerful and flexible rules that allow you to create complex filters using Boolean logic. For the detailed
help on using advanced rules, please refer to the Advanced Rules chapter.
Advanced Rules
Advanced rules are the most powerful and flexible rules that allow you to create complex filters using Boolean logic. Using advanced
rules requires a basic understanding of mathematics and logic, but the rules syntax is rather easy to understand.
Overview
To add a new rule, you should enter an arbitrary name in the Name field, select the action (Capture/Ignore), enter a Formula
using the syntax described below, and click Add/Edit. Your new rule will be added to the list and become active immediately. You
can add as many rules as you wish, but only those rules that have a checked box next to the rule name are currently active. You
can activate/deactivate rules by checking/unchecking the corresponding boxes or completely delete selected rules using the Delete
button. If more than one rule is active, you can evaluate the resulting combined rule by clicking Evaluate. Please note that multiple
active rules are combined using the logical OR operator, e.g. if you have three active rules, RULE1, RULE2, and RULE3, the resulting
rule is RULE1 OR RULE2 OR RULE3.
You can use advanced rules in conjunction with the basic rules described in the previous chapter, however if you feel comfortable
with Boolean logic, it's a good idea to use advanced rules only, as they offer much more flexibility. Basic rules are combined with
advanced rules using the logical AND operator.
Syntax Description
dir – Packet direction. Possible values are in (inbound), out (outbound), and pass (pass-through).
etherproto – Ethernet protocol, the 13th and 14th bytes of the packet. Acceptable values are numbers (e.g. etherproto=0x0800 for
IP) or common aliases (e.g. etherproto=ARP, which is equivalent to 0x0806).
ipproto – IP protocol. Acceptable values are numbers (e.g. ipproto!=0x06 for TCP) or commonly used aliases (e.g. ipproto=UDP,
which is equivalent to 0x11).
smac – Source MAC address. Acceptable values are MAC addresses in hex notation (e.g. smac=00:00:21:0A:13:0F) or user-defined
aliases.
dmac – Destination MAC address.
sip – Source IP address. Acceptable values are IP addresses in dotted notation (e.g. sip=192.168.0.1), IP addresses with wildcards
(e.g. sip!=*.*.*.255), network addresses with subnet masks (e.g. sip=192.168.0.4/255.255.255.240 or sip=192.168.0.5/28), IP
ranges (e.g. sip from 192.168.0.15 to 192.168.0.18 or sip in 192.168.0.15 .. 192.168.0.18 ), or user-defined aliases.
dip - Destination IP address.
sport – Source port for TCP and UDP packets. Acceptable values are numbers (e.g. sport=80 for HTTP), ranges (e.g. sport from 20
to 50 or sport in 20..50 for any port number between 20 and 50) or the aliases defined by your operating system (e.g. sport=ftp,
which is equivalent to 21). For the list of aliases supported by your OS click View => Port Reference.
dport – Destination port for TCP and UDP packets.
flag – TCP flag. Acceptable values are numbers (e.g. 0x18 for PSH ACK) or one or several of the following characters: F (FIN), S
(SYN), R (RST), P (PSH), A (ACK), and U (URG), or the has keyword, which means that the flag contains a certain value. Usage
examples: flag=0x18, flag=SA, flag has F.
size – Packet size. Acceptable values are numbers (e.g. size=1514) or ranges (e.g. size from 64 to 84 or size in 64..84 for any size
between 64 and 84).
str – Packet contents. Use this function to indicate that the packet must contain a certain string. This function has three
arguments: string, position, and case sensitivity. The first argument is a string, e.g. 'GET'. The second argument is a number that
indicates the string position (offset) in the packet. The offset is zero-based, i.e. if you're looking for the first byte in the packet, the
offset value must be 0. If the offset is not important, use –1. The third argument indicates the case-sensitivity and can be either
false (case-insensitive) or true (case-sensitive). The second and third arguments are optional; if omitted, the offset defaults to –1
and the case-sensitivity defaults to false. Usage examples: str('GET',-1,false), str('GET',-1), str ('GET').
hex - Packet contents. Use this function to indicate that the packet must contain a certain hexadecimal byte pattern. This function
has two arguments: hex pattern and position. The first argument is a hex value, e.g. 0x4500. The second argument is a number
that indicates the pattern position (offset) in the packet. The offset is zero-based, i.e. if you're looking for the first byte in the
packet, the offset value must be 0. If the offset is not important, use –1. The second argument is optional; if omitted, the offset
defaults to –1. Usage examples: hex(0x04500, 14) , hex(0x4500, 0x0E), hex (0x010101).
The keywords described above can be used with the following operators:
and - Boolean conjunction.
or - Boolean disjunction.
not - Boolean negation.
= - Arithmetic equality.
!= - Arithmetic inequality.
<> - Same as above.
> - Arithmetic greater-than.
< - Arithmetic less-than.
( ) – parenthesis, control operator precedence rules.
All numbers can be in decimal or hexadecimal notation. If you want to use the hexadecimal notation, the number must be preceded
by 0x, i.e. you can use either 15 or 0x0F.
Examples
Below you will find a number of examples illustrating the rules syntax. Each rule is followed by our comments about what the rule
does. The rules are shown in red. The comments are separated from the actual rule by two slashes.
•
dir!=pass // Captures only inbound and outbound packets. Pass-through packets being sent between other workstations
on the LAN are ignored.
•
(smac=00:00:21:0A:13:0E or smac=00:00:21:0A:13:0F) and etherproto=arp // Captures ARP packets sent by two
computers, 00:00:21:0A:13:0E and 00:00:21:0A:13:0F.
•
ipproto=udp and dport=137 // Captures UDP/IP packets sent to the port number 137.
•
dport=25 and str('RCPT TO:', -1, true) // Captures TCP/IP or UDP/IP packets that contain "'RCPT TO:" and where the
destination port is 25.
•
not (sport>110) // Captures everything except the packets where the source port is greater than 110
•
(sip=192.168.0.3 and dip=192.168.0.15) or (sip=192.168.0.15 and dip=192.168.0.3) // Captures only the IP packets
being sent between two machines, 192.168.0.3 and 192.168.0.15. All other packets are discarded.
•
((sip from 192.168.0.3 to 192.168.0.7) and (dip = 192.168.1.0/28)) and (flag=PA) and (size in 200..600) // Captures TCP
packets the size of which is between 200 and 600 bytes coming form the IP addresses in the 192.168.0.3 - 192.168.0.7
range, where destination IP address is in the 192.168.1.0/255.255.255.240 segment, and where the TCP flag is PSH ACK.
Hex(0x0203, 89) and (dir<>in) // Captures the packers that contain 0x0203 at the offset 89, where the packet direction is not
inbound.
Reconstructing TCP Sessions
This tool allows you to view the TCP conversation between two hosts. To reconstruct a TCP session, you should first select a TCP
packet on the Packets tab. If you want to reconstruct the entire session, it is recommended that you select the first packet in the
session; otherwise, the reconstruction may start in the middle of the "conversation". After you locate and select the packet, rightclick on it and select Reconstruct TCP Session from the pop-up menu as shown below:
Reconstructing sessions works best for text-based protocols, such as POP3, Telnet, or HTTP. Of course, you can also reconstruct a
download of a large zipped file, but it can take CommView a long time to reconstruct several megabytes of data, and the obtained
information would be useless in most of the cases. A sample HTTP session shown in ASCII and HTML modes is shown below:
You can filter out the data that came from one of the directions by unchecking one of the check boxes on the bottom pane.
Incoming and outgoing data is marked by different colors for your convenience. If you want to change one of the colors, click
Settings =>Colors and pick a different color. You can enable or disable word wrapping using the Word Wrap item in the
Settings menu.
The Display type drop-down list allows you to view data in the ASCII (plain-text data), HEX (hexadecimal data), HTML (web
pages), and EBCDIC (IBM mainframes' data encoding) formats. Please note that viewing data as HTML does not necessarily
produce exactly the same result as the one you can see in the web browser (e.g. you won't be able to see inline graphics);
however, it should give you a good idea of what the original page looked like.
The Navigation buttons allow you to search the buffer for the next or previous TCP session between the two hosts. If you have
multiple TCP sessions between the two hosts in the buffer and you'd like to see them all one by one, it is recommended to start the
reconstruction from the first session, as the back button (<<) cannot navigate beyond the TCP session that was reconstructed first.
The obtained data can be saved as binary data, text, or rich text file by clicking File =>Save As… .
Statistics and Reports
This window (View => Statistics) displays vital network statistics of your PC or LAN segment, such as packets per second rate,
bytes per second rate, and IP protocols and sub-protocols distribution graphs. You can copy any of the graphs to the clipboard by
double-clicking on the graph. IP protocols and sub-protocols "pie" graphs can be rotated using the small buttons in the lower right
corner for better visibility of the slices.
The data displayed on each tab can be saved as a bitmap or semicolon-delimited text file using the context menu or drag-and-drop.
The Report tab allows you to have CommView automatically generate customizable reports in HTML or semicolon-delimited text
formats.
Network statistics can be collected either by using all the data that passes through your network adapter or by using the rules that
are currently set. If you want the statistics counters to process only the data (packets) that match the current rule set and ignore all
other data, you should check the Apply current rules box.
General
Displays Packets per second and Bytes per second histograms, a bandwidth utilization chart (traffic per second divided by the NIC
or modem link speed), as well as the overall packet and byte counters.
IP Protocols
Displays the distribution of the main IP protocols: TCP, UDP, and ICMP. Use the Chart by drop-down list to select one of the two
available calculation methods: by number of packets or by number of bytes.
IP Sub-protocols
Displays the distribution of the main IP application-level sub-protocols: HTTP, FTP, POP3, SMTP, Telnet, NNTP, NetBIOS, HTTPS,
and DNS. To add more protocols, click on the Customize button. This dialog allows you to define up to 4 custom protocols. You
should enter a protocol name, select the IP protocol type (TCP/UDP), and port number. Use the Chart by drop-down list to select
one of the two available calculation methods: by number of packets or by number of bytes.
Sizes
Displays the packet size distribution chart.
LAN Hosts (MAC)
Lists active LAN hosts by MAC address and displays data transfer statistics. You can assign aliases to MAC addresses.
LAN Hosts (IP)
Lists active LAN hosts by IP address and displays data transfer statistics. Since IP packets captured by the program can be
originated from an unlimited number of IP addresses (both internal to your LAN and external), by default this tab doesn't display
any statistics. To have the statistics displayed, you should first set the range of IP addresses to be monitored by clicking Add/Set
Ranges. Normally, these ranges should belong to your LAN, and configuring the program to monitor a certain range of IP
addresses allows you to have the usage statistics. You can enter any number of ranges, but the total number of IP addresses being
monitored cannot exceed 1,000. To delete a range, right-click on the list of ranges and select the appropriate menu command. You
can assign aliases to IP addresses.
Errors
Displays the information on the Ethernet errors obtained directly from the adapter. Below are
Rx CRS Errors
The number of frames received with circular redundancy check (CRC) or frame check sequence (FCS) error.
Rx Alignment Errors
The number of frames received with alignment errors.
Rx Overrun
The number of frames not received due to overrun errors on the NIC.
Tx One Collision
The number of frames successfully transmitted after exactly one collision.
Tx More Collisions
The number of frames successfully transmitted after more than one collision.
Tx Deferred
The number of frames successfully transmitted after the NIC defers transmission at least once.
Tx Max Collisions
The number of frames not transmitted due to excessive collisions.
Tx Underrun
The number of frames not transmitted due to underrun errors on the NIC.
Tx Heartbeat Failure
The number of frames successfully transmitted without detection of the collision-detect heartbeat.
Tx Times CRS Lost
The number of times the CRS signal has been lost during packet transmission.
Tx Late Collisions
The number of collisions detected after the normal window.
Rx Frames w/Errors
The number of frames that a NIC receives but does not indicate to the protocols due to errors.
Rx Frames w/o Errors
The number of frames that the NIC receives without errors and indicates to bound protocols.
Tx Frames w/Errors
The number of frames that a NIC fails to transmit.
Tx Frames w/o Errors
The number of frames that are transmitted without errors.
Please note that:
•
Dial-up adapters are not supported, only hardware Ethernet cards.
•
Your adapter may not support all the listed fields. Some vendors make NICs that provide all the required information,
others don't.
•
Unlike other data in the Statistics window, the data on the Errors tab cannot be reset when you click the Reset button.
The counter is initialized when your computer boots up.
•
This tab is not supported under Windows 95.
Report
This tab allows you to have CommView automatically generate customizable reports in HTML or semicolon-delimited text formats.
Using Aliases
Aliases are easy-to-remember human-readable names that CommView will substitute for a MAC or IP address when showing the
packets on the Packets and Statistics tabs. This can make packets easier to recognize and analyze. For example,
00:00:19:2D:0D:35 becomes GATEWAY2, and ns1.earthlink.com becomes MyDNS.
To add a MAC alias right-click on a packet and select Create Alias Using Source MAC or Using Destination MAC from the popup menu. A window will pop up where the MAC address field is already filled out, and you will only need to type in an alias.
Alternatively, you can click Tools =>Aliases and fill out the MAC address and Alias fields manually. To delete an alias or clear the
entire aliases list, right-click on the Aliases window and select Delete Record or Clear All. The same applies to creating IP aliases.
When a new IP alias is created by right-clicking on a packet, the alias field is pre-filled with the corresponding hostname (if
available) and can be then edited by the user.
Packet Generator
This tool allows you to edit and send packets via your network card. It is available only under Windows NT, Windows 2000, and
Windows XP. To open the Packet Generator, click View => Packet Generator, or select a packet from the Packets tab, rightclick on it, and select the Send Packet command.
The Packet Generator allows you to change the packet contents and have the packet decode displayed in the left window as you
edit it. For IP, TCP, UDP, and ICMP packets, you can automatically correct the checksum(s) by clicking on the sigma button.
Once you have edited a packet, use the controls below to send it:
Packet Size – modifies the packet size.
Packets Per Second – controls the speed at which packets will be sent. Be sure not to send packets too fast if you have a slow
connection. For example, sending a 1,000 byte packet 5,000 times per second is more than your 10Mbit NIC can handle.
Continuously – select this option if you want the Packet Generator to send packets continuously until you click Stop.
Time(s) – select this option if you want the Packet Generator to send packet a given number of times.
Send/Stop – click this button when you are ready to send packets or to stop sending them.
Working with multiple packets
You can use the Packet Generator to send multiple packets at once. To do that, just select the packets you want to send in the list
and invoke the Packet Generator using the right-click menu. Alternatively, you can drag and drop capture files in all supported
formats directly to the Packet Generator window. When multiple packets are being sent, the packer editor and decoder tree become
invisible.
Saving edited packets
If you edit a packet and would like to save it, just drag the decoder tree to the desktop or any folder, and a new file in CCF format
containing the packet will be created. The file name is always PACKET.CCF.
WARNING:
1.
2.
3.
Don't use the Packet Generator unless you know exactly what effect you want to achieve. Sending packets may produce
unpredictable results, and we strongly recommend refraining from using this tool unless you are an experienced network
administrator.
There should be at least one working computer on your LAN besides your own computer when you use this tool.
Otherwise, you will experience severe delays in sending packets.
This tool cannot be used to send packets via RAS adapters under Windows NT.
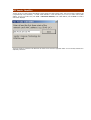
NIC Vendor Identifier
The first 24 bits of a network card's MAC address uniquely identify the network card's vendor. This 24-bit number is called the OUI
("Organizationally Unique Identifier"). The NIC Vendor Identifier is a tool that allows you to look up a vendor name by MAC
address. To look up a vendor name, click Tools =>NIC Vendor Identifier, enter a MAC address, and click Find. The vendor's
name will be displayed.
The list of vendors is contained in the MACS.TXT file located in the CommView application folder. You can manually edit this list to
add/modify information.
Using Remote Agent
CommView Remote Agent is a companion product that can be used for monitoring network traffic remotely. All you have to do
is to install Remote Agent on the target computer, and then use CommView to connect to Remote Agent. Once you are connected
and authenticated, you can start monitoring as if you were there.
Important: the chapter describes how to use CommView to connect to Remote Agent and capture traffic remotely. For detailed
information on Remote Agent installation and configuration, please refer to the help file that comes with Remote Agent. It is highly
recommended that you carefully read the Remote Agent documentation prior to using it. CommView Remote Agent can be
downloaded from our site.
To switch to remote monitoring mode, click File => Remote Monitoring Mode. An additional toolbar will appear in the
CommView main window below the main toolbar. Enter the IP address of the computer running CommView Remote Agent into the
IP address input area and click Connect. If you are behind a firewall or proxy server, or using a non-standard Remote Agent port,
you may need to click on the Network Settings button to change the port number and/or enter SOCKS5 proxy server settings.
A window will pop up prompting you to enter the password. Enter the Remote Agent password, and if the password is correct, a
connection will be established. You will then see the Link Ready message, and the adapter selection box will list the remote
computer's adapters.
Now is the best time to configure the capturing rules using the Rules tab. It's very important to configure the rules correctly so
that the volume of traffic between Remote Agent and CommView doesn't exceed the bandwidth limit on either side of the
connection, or you'll experience a noticeable lag. Be sure to filter out unnecessary packets (see more on this topic below). Once
you're ready to start monitoring, select the network adapter from the list and click the Start Capture toolbar button.
CommView will start to capture the remote computer's traffic as if it's your local network traffic; there is virtually no difference
between using CommView locally and remotely. When you are done with remote monitoring, just click on the Stop Capture
toolbar button. You can then change the adapter or disconnect from Remote Agent by clicking the Disconnect toolbar button. To
return to the standard mode, click File => Remote Monitoring Mode, and the additional toolbar will disappear.
Setting Options
You can configure some of the program's options by selecting Settings in the menu.
Fonts
Use this menu to set the interface and packet text font. To change the packet text colors, use the Options menu (below).
Options
General
Auto-start capturing – check this box if you want CommView to start capturing packets immediately after launching the program.
For systems with multiple adapters, you should also select the adapter to be used from the drop-down list.
Network
Disable DNS resolving – check this box if you don't want CommView to perform reverse DNS lookups of the IP
addresses. If you check it, the Hostname column on the IP Statistics tab will be blank.
Convert numeric port values to service names – check this box if you want CommView to display service names
rather than numbers. For example, if this box is checked, port 21 is shown as ftp, and port 23 as telnet. The program
converts numeric values to service names using the SERVICES file installed by Windows. Depending on your Windows
version, the SERVICES file is located in different folders: in Windows 95/98/Me you can find it in the \Windows folder, and
in Windows NT/2000/XP, you can find it in the \Winnt\system32\drivers\etc folder. You can manually edit this file if you
want to add more ports/service names.
Convert MAC addresses to aliases – substitute MAC addresses for aliases on the Packets tab. Aliases can be assigned
to MAC addresses using the Settings =>MAC Aliases menu command.
Convert IP addresses to aliases – substitute IP addresses for aliases on the Packets and Statistics tabs. Aliases can
be assigned to IP addresses using the Settings =>IP Aliases menu command.
Use non-promiscuous mode – by default, CommView puts the network adapter in promiscuous mode, which means that
the program captures all traffic in the local LAN segment. Checking this box switches CommView to non-promiscuous mode,
which you sometimes may want to use, for example if your company's IT policy doesn't allow promiscuous packet
monitoring, or to reduce CPU usage in the situation where you're interested only in your own inbound and outbound
packets and have to filter out many pass-through packets.
Memory Usage
Display
Maximum packets in buffer – sets the maximum number of packets the program stores in the memory and can display
in the packet list (2nd tab). For example, if you set this value to 3000, only the last 3000 packets will be stored in the
memory and packet list. The higher this value is, the more computer resources the program consumes.
Note that if you want to have access to a high number of packets, it is recommended that you use the auto-saving features
(see Logging for more information): it allows you to dump all the packets to a log file on the hard drive.
Maximum IP statistics lines - sets the number of lines the program displays on the IP Statistics tab. When the number
of connections exceeds the limit, the connections that have been idle for the longest period of time are removed from the
list.
Driver Buffer (Windows NT/2000/XP only) - sets the driver buffer size. This setting affects the program's performance: the
more memory allocated for the driver buffer, the fewer packets the program drops. For low traffic LANs and dial-up connections,
the buffer size is not critical. For high traffic LANs, you may want to increase the buffer size if the program drops packets. To check
the number of dropped packets, use the File => Performance Data menu command while capturing is on.
IP Statistics
Display Logic – allows you to select the IP Statistics layout that best suits your needs. Selecting an item from the drop-down list
will display the description of the selected logic. In most cases, it is recommended to use the default Smart logic.
Define Local IP Addresses – you should use this tool if you monitor LAN traffic with many pass-through packets and a mixture of
external and internal IP addresses. In such a situation CommView doesn't "know" which IP addresses should be treated as local and
might reverse the IP addresses in the Local and Remote IP columns. This tool allows you to define the local network addresses and
subnet masks to make sure the IP Statistics window works correctly. This will work only if you use the default Smart logic.
Colors
Packet color – sets the color for displaying packets on the Packets tab based on the packet direction (in, out, pass-through). To
change a color, select the packet direction from the drop-down list and click on the colored rectangular.
Colorize Packet Headers – check this box if you want CommView to colorize packet contents. If this box is checked, the program
displays the first four packet layers using different colors. To change a color, select the type of header for which you want to
change the color and click on the colored rectangular.
Formula syntax highlighting – sets the colors for highlighting keywords in formulas in the Advanced Rules window.
Decoding
Always fully expand all nodes in the decoder window – check this box if you would like to have all nodes in the decoder
windows automatically expanded when you select a new packet in the packet list.
Decode up to the first level only in ASCII export – this option affects the decoding format used when you export a packet log
or individual packet as ASCII file with decode. If this box is checked, only the top-level nodes will be saved. For example, if you
save a TCP/IP packet when this option is disabled, all Type of service sub-nodes are saved. When this option is enabled, these subnodes are not saved. Checking this box makes the output ASCII file less detailed and more compact.
Ignore incorrect checksums when reconstructing TCP sessions – this option affects the way CommView treats malformed
TCP/IP packets when reconstructing TCP sessions. By default, this option is on, and packets with incorrect checksums are not
discarded in the process of reconstruction. If you turn off this option, packet with incorrect checksums will be discarded and not
displayed in the TCP reconstruction window. Attention Gigabit card users: all your outbound packets will have incorrect checksums
if the "checksum offload" feature is present. If you turn off this option, it's likely that you will see only half of the reconstructed TCP
stream.
Miscellaneous
Hide from the taskbar on minimization - check this box if you don't want to see the program's button on the Windows taskbar
when you minimize the program. If this box is checked, use the program's system tray icon to restore it after minimization.
Allow multiple application instances – check this box if you would like have multiple CommView instances running
simultaneously to be able to capture traffic going through different adapters. This option is not available under Windows 95.
Prompt for confirmation when exiting the application – check this box if you would like the program to ask you for a
confirmation when you close it.
Auto-scroll packet data window - if this box is checked, the program scrolls the text of the packet data window automatically
when you select a new packet from the packets list (but only if the text does not fit into the window). This is useful when you want
to see the contents of a long packet without manually scrolling the window.
Auto-sort new records in IP statistics - if this box is checked, the program auto-sorts new records on the IP Statistics tab
based on the user-defined sorting criterion (e.g. ascending order of remote IP addresses).
Smart CPU utilization control – if this box is checked, the program tries to decrease CPU utilization when capturing high-volume
traffic by decreasing the quality and frequency of the screen updates.
Run on Windows startup - if this box is checked, the program is automatically launched every time you start Windows.
Run minimized - if this box is checked, the program is launched minimized and the main window is not displayed until you click
on the tray icon or taskbar button.
Find Packet
This dialog (Search => Find Packet) allows you to find packets matching a specific text. Enter a search string, select the type of
entered information (String or Hex), and click Find Next. The program will search for packets that match the search criterion
and display them on the Packets tab.
You can enter text as a string, hexadecimal value, or IP address. A hex string should be used when you want to enter non-printable
characters: just type hexadecimal character values separated by spaces, e.g. AD 0A 02 78 04.
Check Match Case for case sensitive search. Check At offset to search for a string that begins at a certain offset. Note that the
offset indicator is hexadecimal and zero-based (i.e. if you're looking for the first byte in the packet, the offset value is 0).
Port Reference
This window displays a table of port numbers and corresponding service names. This reference is obtained from the SERVICES file
installed by Windows. Depending on your Windows version, the SERVICES file is located in different folders: In Windows 95/98/Me,
you can find it in the \Windows folder, and in Windows NT/2000/XP, you can find it in the \Winnt\system32\drivers\etc
folder. You can manually edit this file if you want to add more ports/service names. CommView reads this file on start up, so your
changes to the file will be displayed only after you restart the program.
Tips & Troubleshooting
Frequently Asked Questions
In this chapter you can find answers to some of the most frequently asked questions. The latest FAQ is always available at
http://www.tamos.com/products/commview/faq.php
Q. Can CommView be used for capturing dial-up (RAS) adapter traffic?
A. Yes, Windows 95/98/Me/NT/2000/XP.
Q. What exactly does CommView "see" when installed on a PC connected to a LAN?
A. CommView enables the network card's promiscuous mode and can capture network traffic on the local segment of the LAN. In
other words, normally it captures and analyzes packets addressed to all of the computers on the segment, not only to the one
where the program is running. There are certain limitations for Wireless Ethernet adapters (you can monitor only inbound/outbound
traffic) and switched networks (see the next question about switches in this FAQ).
Q. I am connected to the LAN through a switch, and when I launch CommView, it captures only the packets sent to
and from my machine. I can't see the traffic of other machines. Why is this so?
A. Unlike hubs, switches prevent promiscuous sniffing. In a switched network environment, CommView (or any other packet
analyzer) is limited to capturing broadcast and multicast packets and the traffic sent or received by the PC on which CommView is
running. However, most modern switches support "port mirroring", which is a feature that allows you to configure the switch to
redirect the traffic that occurs on some or all ports to a designated monitoring port on the switch. By using this feature, you will
able to monitor the entire LAN segment. Please refer to the documentation that comes with your switch for information on
availability of this feature and configuration instructions. Various networking hardware manufacturers name this feature differently.
Below is a short reference list of hardware by three major manufacturers – Cisco, 3COM, and Intel that support port mirroring.
Manufacturer
Name used for the
port mirroring feature
Models of switches with
port mirroring support
Cisco
Port spanning
Cisco Catalyst 1900 Series Switches
Cisco Catalyst 6000 Family Switches
3COM
Roving analysis port (RAP)
3Com SuperStack 3 Switch 4400
Intel
Port mirroring
Intel Express 460T
Intel Express 480T
Q. Can CommView capture data from a network adapter that doesn't have an IP address?
A. Yes. In fact, the network adapter does not need to be bound to TCP/IP or any other protocol. In a situation where you are
troubleshooting a network it might be necessary to be able to plug in the computer running CommView into an available port on a
hub. In such cases you do not need to guess the IP address available in the LAN segment, all you need to do is unbind the network
adapter from TCP/IP and start capturing. In Windows 2000/XP open Control Panel => Network Connections, right-click on the
connection icon, select Properties, and uncheck the boxes corresponding to the protocols you don't want to be bound to the NIC. In
Windows 9x Control Panel => Network, select the TCP/IP => Your NIC item, click Remove, and then reboot.
Q. I launched the program and clicked "Start Capture", but no packets are displayed. Why?
A. There are two possible reasons: You either selected an unused network adapter, or you made a mistake when configuring the
capturing rules. Turn off the rules and see what happens. In any case, even when the capturing rules are on, the program's status
bar should display the total number of packets, so have a look at it before panicking.
Q. I noticed that IP/TCP/UDP checksums in the outgoing packets are incorrect. Why is it so?
A. New Gigabit network adapters have a feature called TCP/UDP/IP "checksum offload", which allows the network adapter to
calculate packet checksums, thus increasing the system performance and decreasing CPU utilization. Since CommView intercepts
packets before they reach the network adapter, the checksum appears to be incorrect. This is normal and the only thing that it
might affect is the reconstruction of TCP sessions and only if you changed the default "Ignore incorrect checksums" option (see
Setting Options for more information).
Q. Does CommView support non-Ethernet network adapters, such as TokenRing?
A. Currently no. Sorry.
Q. Does CommView run on multi-processor computers?
A. Yes, it does.
Q. My network connection is via a cable/xDSL modem. Will CommView be able to monitor traffic on it?
A. If your modem has a dual USB/Ethernet interface and you can connect it to an Ethernet card, CommView will certainly capture
traffic on it. If it has only a USB interface, the best thing to do is to try.
Q. My firewall software warns me that CommView is "attempting to access the Internet." I am aware that some
sites are able to track users by collecting the information sent by their programs via Internet. Why does CommView
"attempt to access the Internet"?
A. What alerts your firewall is the attempt to resolve IP addresses to hostnames. Since CommView has to contact your DNS servers
to make a DNS query, it inevitably triggers the alarm. You can disable this feature (Settings => Options => Disable DNS resolving),
but in this case, the IP Statistics tab will not be able to show you the hostnames. DNS queries are the only type of connection
CommView can potentially make. There are no other hidden activities. We don't sell spyware.
Q. Under Windows 2000/XP I'm often logged on as a user without administrative privileges. Do I have to log off and
then re-logon as the administrator to be able to run CommView?
A. No, you can open CommView folder, right-click on the CV.exe file while holding down the Shift key, and select "Run As" from the
pop-up menu. Enter the administrative login and password in the window that pops up and click OK to run the program.
Q. I have Windows NT, and I see several "Remote Access WAN Wrapper" entries in the adapter list. Which one do I
select to have CommView capture my RAS packets?
A. It depends on your system. The easiest thing to do is to try them one by one, and in most cases, any of them will work. With
one of the Remote Access WAN Wrapper adapters, you may encounter an undesirable effect: CommView captures and displays
packets, but the packets are not delivered to your network applications (e.g. connections are timed out, etc.). If you have this
problem, just stop capturing and select a different Remote Access WAN Wrapper from the list.
Q. I have Windows 95 and a dial-up connection. Whenever I click "Stop Capture", my modem drops the connection.
Can I do anything about it?
A. Yes, you should download and install the Winsock and dial-up networking updates for Windows 95 by Microsoft. This will solve
the problem. Please note that the installation order is important, and you should first install Windows Socket 2 Update, and then
Dial Up Networking 1.4 Performance & Security Update.
Windows Socket 2 Update
Dial Up Networking 1.4 Performance & Security Update
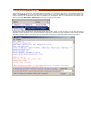
Q. I have Windows 2000/XP, and when I uninstall the program, I get this message: "CommView will now uninstall
the drivers. Click "OK" to continue. This can take between 10 and 60 seconds." But then nothing happens!
A. This can happen if there are active network connections while you uninstall the program. You should temporarily disable all
active connections as shown below:
As soon as the connection(s) are disabled, CommView will resume the uninstallation process. Once the uninstallation is complete,
you can enable the connections.
Q. I have Windows 2000 Terminal Server, and I have a problem running CommView via a Terminal Services client.
A. The solution depends on the CommView version:
For CommView 3.0 and higher: Just reboot the server after installing the program to be able to run CommView via a Terminal
Services client.
For CommView 2.4 – 2.6: Please click here to download an updated CV2K.DLL file, replace the original DLL in the application
folder, start and stop capture as a local user, and reboot. After you reboot, make sure that you can capture packets as a local user.
Then you shouldn't have any problems running CommView via a Terminal Services Client.
The only limitation is that an adapter can be opened by only one user at any given time. In other words, two users (local or
remote) cannot capture traffic from the same adapter by running two instances of CommView on the same server.
Q. When I monitor my dial-up connection, I don't see any PPP packets during the session set up (CHAP, LCP, etc). Is
this normal?
A. Sorry, PPP packets can only be captured under Windows 95/98/NT/ME, CommView doesn't capture such packets under Windows
2000/XP.
Q. Can I change PC cards on my notebook while CommView is running?
A. No, it's safer to close CommView, then change or plug/unplug your card, and restart the program. The adapter list will be
automatically updated.
Q. I'm on the LAN with high traffic volume, and I noticed that CommView increases the CPU load and/or becomes
less responsive. What can I do about it?
A. The best way to optimize the program's performance is to use rules to filter out the packets you don't need to monitor. For
example, sending a 50 Meg file between two machines on your LAN can generate approximately 40,000 NetBIOS packets with the
data transfer rate of 1Mbytes per second, which can be a heavy load for the application. But normally you don't to need to view
every NetBIOS packet being sent, so you can configure CommView to capture IP packets only. CommView has a flexible system of
filters, and you can fine-tune the application to display only the packets that you really need. If you are interested in the statistics
information only (those green histograms, pie charts, and hosts tables), you can use the "Suspend packet output" menu command,
which allows you to have statistical data without real-time packet display. Also, see the Capturing High Volume Traffic chapter for
more information.
Q. Are there any known conflicts with other software?
Currently we know about conflicts with the following programs:
•
•
•
•
•
ConSeal Private Desktop: CommView users may experience problems opening the dial-up adapter if CPD is running.
McAfee Internet Guard Dog: There is a low-level device driver conflict resulting in the Blue Screen of Death.
Norton Anti-Virus: If the "Auto-Protect" feature is enabled, CommView may not list all the available network cards under
Windows 98. This problem is not confirmed.
SoftIce by Numega: Possible system crashes.
PGPNet 7.0 by NAI: There is a low-level device driver conflict resulting in the Blue Screen of Death under Windows 2000 if
PGPNet is bound to the dial-up adapter.
If you think that you have discovered a conflict with an application not listed above, we'd be grateful if you would let us know.
Q. Do I have to be a pro to use this program?
A. No. We hope that even inexperienced users will find it useful. You don't have to use all of its features. For example, even novices
might be interested in having a full picture of Internet and Local Area Network connections to and from their PCs, or finding out
that a program installed yesterday is in fact a Trojan that sends your dial-up passwords to a certain e-mail address.
Q. Where can I find a good FAQ on packet capturing and protocol analysis?
A. Check out these sites:
Sniffing (network wiretap, sniffer) FAQ
Protocols.com
Q. Will there be a French (Spanish, Italian, Dutch, etc.) version of CommView?
A. Currently we don't plan to release any versions with localized interface, but we do plan to provide users with manuals in foreign
languages. Want to help? Translate the manual (the help file) that comes with the program into one of these languages and get a
license for free -- but contact us first, please.
Capturing High Volume Traffic
When capturing data from a large and busy network segment, you should keep in mind that processing thousands of packets per
second may considerably increase the CPU usage and make the application less responsive. The best way to optimize the program's
performance is to use rules to filter out the packets you don't need to monitor. For example, sending a 50 Meg file between two
machines on your LAN can generate approximately 40,000 NetBIOS packets with the data transfer rate of 1Mbytes per second,
which can be a heavy load for the application. But normally you don't to need to view every NetBIOS packet being sent, so you can
configure CommView to capture IP packets only. CommView has a flexible system of filters, and you can fine-tune the application to
display only the packets that you really need. Also, if you are interested in the statistics information only (those green histograms,
pie charts, and hosts tables), you can use the "Suspend packet output" menu command, which allows you to have statistical data
without real-time packet display.
The factors that improve the program's performance:
•
A fast CPU (Pentium III recommended)
•
RAM size (128 and higher recommended)
•
An OS built on NT technology (Windows 2000/XP recommended)
•
Using rules to filter out unnecessary traffic
•
Using the "Suspend packet output" mode
The factors that degrade the program's performance:
•
A slow CPU or insufficient RAM size
•
Using MAC and IP aliases, especially if the you use many aliases
•
Using port number => port name conversion
Working with Multiple Instances
CommView can capture packets from several network adapters simultaneously (not available under Windows 95). This feature is
turned on by checking the Allow Multiple Application Instances checkbox in Settings => Options => Miscellaneous.
Please note that you cannot open the same adapter in two different instances of the program. The same limitation applies to the
Terminal Server: two users (local or remote) cannot capture traffic from the same adapter by running two instances of CommView
on the same server.
Running CommView in Invisible Mode
There are two ways to run CommView as a hidden process:
1.
Launch CommView with the "hidden" switch, i.e.:
CV.EXE hidden
2.
If CommView is already running, you can hide/unhide it by using the "hot key". To hide the application, press
ALT+SHIFT+h. To unhide the application, press ALT+SHIFT+u.
Remember that you cannot completely hide any Windows application. When running in invisible mode, CommView is not listed in
the task list (the one that is invoked by pressing ALT+CTRL+DEL) under Windows 95/98/ME, but one can still see it by using any
utility that lists running processes. Under Windows NT/2000/XP this utility is a part of the Task Manager.
Exchanging Data with Your Application
Starting from version 3.0, CommView provides a simple TCP/IP interface that allows you to process packets captured by CommView
using your own application in real time.
How It Works
You should launch CommView with a special command-line switch, telling the program to "mirror" captured packets to an IP
address and TCP port of your choice.
Examples:
CV.EXE mirror:127.0.0.1:5555 // mirrors packets to the loopback address, TCP port 5555
CV.EXE mirror:192.169.0.2:10200 // mirrors packets to 192.169.0.2, TCP port 10200
When CommView is launched with a switch like this, it tries to establish a TCP session by connecting to the specified IP address and
port number. It means that you should already have your application running and listening on the specified port. If CommView fails
to establish a connection, it will keep on trying to connect every 15 seconds. The same happens if the connection is broken:
CommView will try to re-establish it every 15 seconds. If the connection is successfully established, CommView sends the packets it
captures to the specified IP address as they arrive, in real time.
Data Format
Since packets are being sent as a stream, and you must be able to identify individual packets, CommView uses simple headers that
allow you to "chop" the stream into individual packets. Each packet is preceded by a 3-byte header. The first two bytes are the
packet length, excluding this header. These bytes are in the standard little-endian byte order, i.e. 0x0200 equals 2, and 0x0002
equals 512. The third byte is the packet direction:
0x00 - pass-through
0x01 - inbound
0x02 – outbound
Examples:
0xE80000 - a pass-through packet, 232 bytes long
0xB10102 - an outbound packet, 433 bytes long
Based on this description, you can easily create a packet parser that would extract packets from the stream.
Sample Projects
Two simple demo applications that listen for inbound connections, extract packets from the stream, and display raw data are
available.
•
http://www.tamos.com/products/commview/samp_mirr_c.zip. This is a Visual Studio project with C++ source code.
•
http://www.tamos.com/products/commview/samp_mirr_d.zip. This is a Delphi project with Pascal source code. If you
want to compile the project, you'll need the popular ICS components suite by François Piette available at
http://overbyte.alexid.fr/
Bandwidth
When mirroring data to a remote computer, make sure that the link between CommView and the computer to which the data is
being mirrored is fast enough to transfer all the data being captured. If CommView captures 500 Kbytes/sec, and your link can
handle only 50 Kbytes/sec, you'd inevitably have "traffic jams", which might result in various problems (e.g., Winsock may just stop
sending data under some Windows versions). If you are looking for a more flexible solution that would feature smart buffering and
remote control, consider using CommView Remote Agent.
Information
How to Purchase CommView
This program is a 30-day evaluation version. Below is the pricing for the fully functional, unrestricted version of the program:
License Type
Price, US$
CommView Home License 1 user
(for private, noncommercial usage)
99.00
CommView Enterprise License 1 user
(for professional, commercial usage)
249.00
•
The less expensive Home License grants you the right to use the program at home for noncommercial purposes. If you
use CommView to monitor your home network, the maximum number of hosts in your LAN this license allows you to
monitor cannot exceed five.
•
The more expensive Enterprise License grants you the right to use the program anywhere for any commercial or
noncommercial purpose.
One licensed copy of CommView may be used by a single person who uses the software personally on one or more computers, or it
may be installed on a single workstation used non-simultaneously by more than one person, but not both. Check our web site for
pricing on multiuser licenses if you need to purchase this product for more than one user.
As a registered user, you will receive:
•
•
•
•
Fully functional, unrestricted copy of the software
Free updates that will be released within 1 year from the date of purchase
Information on updates and new products
Free technical support
We accept credit card orders, orders by phone and fax, checks, purchase orders, and wire transfers. Prices, terms, and conditions
are subject to change without notice: please check our web site for the latest product offerings and prices.
http://www.tamos.com/order/
Contacting Us
Web
http://www.tamos.com
E-mail
[email protected] (Sales-related questions)
[email protected] (All other questions)
Mail and Fax
Mailing address:
PO Box 1385
Christchurch 8015
New Zealand
Fax: +64 3 359 0392 (New Zealand)
Fax: +1 503 213-7764 (USA)
Other Products by TamoSoft
SmartWhois
SmartWhois is a handy utility for obtaining information about any IP address, hostname, or domain in the world. Unlike standard
whois utilities, it automatically delivers information associated with an IP address or domain no matter where it is registered
geographically. In just a few seconds, you get all you want to know about a user: domain, network name, country, state or
province, and city. Even if the IP address cannot be resolved to a hostname, SmartWhois won't fail!
More information
Essential NetTools
Essential NetTools is a set of network tools useful in diagnosing networks and monitoring your computer's network connections. It's
a Swiss Army knife for everyone interested in a set of powerful network tools for everyday use. The program includes a NetStat
utility that shows your computer's network connections and open ports and maps them to the owning application. It also features a
fast NetBIOS scanner, a NetBIOS Auditing Tool for checking LAN security, and a monitor of external connections to your computer's
shared resources, as well as a process monitor that displays information about all the programs and services running on your
computer. Other useful tools are included, such as Ping, TraceRoute, and NSLookup. Additional features include report generation
in HTML, text, and comma delimited formats and a customizable interface. The program is an easy-to-use and powerful
replacement for such Windows utilities as nbtstat, netstat, and NetWatcher. It incorporates many advanced features that standard
Windows tools can't offer.
More information
DigiSecret
DigiSecret is an easy-to-use, secure, and powerful application for file encryption and sharing. It utilizes strong and time-proven
encryption algorithms for creating encrypted archives, self-extracting EXE files, and sharing files with your associates and friends.
DigiSecret also includes powerful and intelligent file compression; you no longer need .zip files when you can have encrypted and
compressed DigiSecret files. The program is integrated with the Windows shell, and you can perform operations on files by rightclicking on them. It also fully supports drag-and-drop operations.
More information