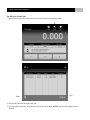
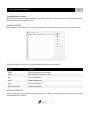
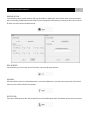
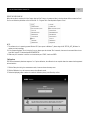
1
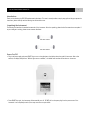
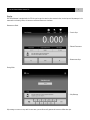
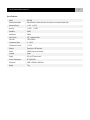
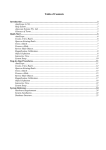
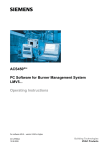
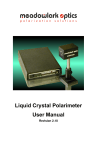
POL-200 Semiautomatic Polarimeter Instruction Manual BANTE INSTRUMENTS LIMITED Technology to create the future... POL-200 SEMIAUTOMATIC POLARIMETER 1 Introduction Thank you for selecting the POL-200 semiautomatic polarimeter. This user’s manual provides a step-by-step guide to help you operate the instrument, please carefully read the following instructions before use. Unpacking the Instrument The following list describes the standard accessories of the instrument. After the unpacking, please check all accessories are complete. If any are damaged or missing, please contact nearest distributor. Test tube 100mm Test tube 200mm Power On/Off ■ Plug in the power supply and press ON/OFF key to turn on the polarimeter, the display shows the model of instrument. After a few seconds, the display briefly shows “Wait for light source to stabilize”, the default user interface will be shown on the screen. ■ Press ON/OFF key again, the instrument will automatically turn off. DO NOT pull out the power plug from the power source if the instrument is not completely turned off, that may cause the zero-point offset. POL-200 SEMIAUTOMATIC POLARIMETER 2 Display POL-200 polarimeter is equipped with the 5.6 inch touch screen that used to show measured value, function keys and help message. In the measurement and setting modes, the instrument will show different user interfaces. Measurement Mode: …………..Function Keys ………….. Selected Parameters …………..Measurement Keys Setting Mode: ………….. Help Message Help message on screen are very useful in most cases, you are able to easily operate the instrument follow these tips. POL-200 SEMIAUTOMATIC POLARIMETER 3 Setup Menu POL-200 semiautomatic polarimeter contains an integrated setup menu that allows you to customize each displayed option to meet measurement requirements. Settable parameters include the following options. PARAMETER OPTION ■ Measurement Mode ■ ■ ■ ■ Tube length ■ ■ Temperature Compensation ■ ■ Concentration --- Specific Rotation --- DESCRIPTION Optical Rotation Specific Rotation Concentration International Sugar Scale Select your desired measurement mode. 100mm 200mm Custom During the Custom mode, the instrument acceptable setting ranges from 0.0 to 220.0mm. Enable (Default) Disable Temperature compensation allows the instrument to run at ambient temperature but produces readings as if the system was running at 20ºC. During the Specific Rotation, Concentration and Sugar Degrees modes, the instrument will automatically enable the this feature. Sets the concentration of sample for measurement of specific rotation Sets the specific rotation of sample for measurement of concentration o Temperature Setting Range: 0.0 to 100.0 C Calibrate the current temperature value Calibration 1 to 3 points Using the standard tubes to calibrate the polarimeter Date and Time --- Sets the date and time of instrument POL-200 SEMIAUTOMATIC POLARIMETER 4 SETTING THE PARAMETER: 1. During the measurement mode, click the Setup icon to enter the setup menu. 2. Select the parameter you need to set. 3. Press key to select an option or press the numeric keys to input the setting value. 4. Press Enter key to confirm. Setting is completed. Prior to Use Rotate the focus knob on front panel until visual field became legible. Focus Knob………………. Measurement POL-200 polarimeter can use for measuring the 4 parameters, including the optical rotation, specific rotation, concentration and International Sugar Scale. Click the Setup icon to enter the setup menu, press Measurement Mode icon to select desired measurement mode. When the setting is completed, the instrument will automatically return to selected measurement mode. 1. ZERO CORRECTION: 1.1 Take a clean empty tube and place in the sample chamber. Note, the bubble trap is upward. 1.2 If the visual field appears the differences in apparent brightness, press Zero key to enter the zero-point correction mode. POL-200 SEMIAUTOMATIC POLARIMETER 5 1.3 Press or key to adjust the instrument until visual field appear the uniform brightness. 1.4 Press Enter key to confirm, the instrument returns to measurement mode. Zero correction is completed. 2. MEASUREMENT: 2.1 Take out the tube from the sample chamber. Unscrew the cap, remove the sealing ring and glass disc. 2.2 Pour sample solution into the tube, screw on the tube cap. Wipe away the drops of water on glass disc. 2.3 Place tube into the sample chamber. Press or key until visual field appears uniform brightness. Record the measured value. 2.4 Press Return key, the instrument returns to the zero-point automatically. Measurement is completed. Press and hold or key for 8 seconds, the instrument will enter auto-run mode. Press or key again, the instrument stops run. POL-200 SEMIAUTOMATIC POLARIMETER 6 Storing the Measuring Value 1. During the measurement, click the Save icon, the screen shows a dialog box and wait for entering the sample name. 2. The instrument default sample name is “SAMPLE”. If you need to modify current name, press key, then press the letter keys to enter new name. Press Enter key to confirm, the measured value will be saved into the memory. POL-200 SEMIAUTOMATIC POLARIMETER 7 Recalling the Stored Data 1. Click the Data icon during the measurement mode, the screen shows the stored measured values. Delete………. …….…Page 2. Press Page key, the screen will toggle to next page. 3. If you need to delete stored data, press Delete key, all of the data will be deleted. WARNING: Once the data is deleted, cannot be recovered. POL-200 SEMIAUTOMATIC POLARIMETER 8 Communication Software Bante Instruments provides a free DAS data acquisition system that can be used to transfer stored data. You can download this software from our official website (www.bante-china.com). RUNNING THE SOFTWARE: Click the Data Acquisition System icon on the start bar, the DAS splash screen appears for few seconds and then the application starts. DAS system includes 6 function buttons, the following table describes the function of each button. BUTTON FUNCTION Receive Receive the stored data from polarimeter Search Search the data by sample name or time Print Print the uploaded data Recall Display all uploaded data Delete Delete the selected data Import data into Excel Create the Excel data file RECEIVING THE STORED DATA: Connect the USB cable to polarimeter and computer (Communication port: COM1). Click the Receive button, the stored data in instrument will automatically send to computer. POL-200 SEMIAUTOMATIC POLARIMETER 9 SEARCHING THE DATA: If you would like to search a specific measured value from the database or uploaded data, click the Search button, the screen will show a search criteria dialog. Available search criteria include the time and sample name. After selecting or entering the search criteria, click the OK button, the screen will show all qualified records. PRINT THE REPORT: If you would like to print current data, click the Print button, the printer will output data sheet. DATA RECALL: DAS data acquisition system has a large database used to store the all uploaded data. If you need to view previous data, click the Recall button, the screen will show all data in the database. DELETE THE DATA: If you need to delete the certain data, click the data field, then click the Delete button. Note: Once deleted, the data cannot be recovered. POL-200 SEMIAUTOMATIC POLARIMETER 10 CREATE THE EXCEL DATA FILE: When the transfer is complete, click the “Import data into Excel” button, the measured value in the data sheet will be converted to Excel file. You can follow the path below to find the Excel file: C:>Program Files>Data Acquisition System>Excel NOTE: 1. The software is run in operating system Windows XP. If your system is Windows 7, please using the file "CP210x_VCP_Windows" to update your device manager. 2. If the computer displayed "Error" during the first run, please open the windows "Run" command, then enter the command below in text input field. regsvr32 "c:\windows\system32\DAO350.DLL" 3. Make sure your instrument is connect to communication port "COM1", baud rate: 9800. Calibration POL-200 semiautomatic polarimeter supports 1 to 3 points calibration, but calibration is not required unless the measured value appeared serious deviation. 1. Click the Setup icon during the measurement mode, the screen shows the setup menu. 2. Click the Calibration icon, the instrument enters the calibration mode. 3. Follow the displayed guides to select the number of calibration points, press Enter key confirm. POL-200 SEMIAUTOMATIC POLARIMETER 11 4. Make sure that remove the tube from the sample chamber. 5. Press or key until visual field appears uniform brightness, press Enter key to confirm. Zero-point calibration is completed. 6. Place the standard tube into the sample chamber, press number keys to enter calibration value, press Enter key to confirm. 7. Press or key until visual field appear uniform brightness, press Enter key to confirm. The instrument returns to zero-point automatically. 8. If you selected three points calibration, please repeat above steps until screen shows “Calibration is completed”. The instrument will return to measurement mode automatically. Calibration is completed. POL-200 SEMIAUTOMATIC POLARIMETER 12 Restore Factory Settings If the instrument goes wrong during the use, you are able to follow the steps below to restore factory settings. Reset function will restore the polarimeter back to factory default parameters, all calibration values and selected parameter will be lost or reset. 1. Click the Setup icon to enter the setup menu. 2. Click on the Reset icon, and press or key to select the “Enable” option. 3. Press Enter key, then press Yes key. Reset is completed. POL-200 SEMIAUTOMATIC POLARIMETER Specifications Model POL-200 Measurement Modes Optical Rotation, Specific Rotation, Concentration, International Sugar Scale Measuring Range ±90°, ±130°Z Accuracy ±0.02°, ±0.05°Z Resolution 0.005° Wavelength 589nm Light Source LED, Interference filter Test Tube 100 or 200mm Temperature Range 0~100°C Temperature Accuracy ±0.5°C Memory Stores up to 100 data sets Output USB Communication Interface Language English Display 5.6 inch TFT touch screen Power Requirements AC 220V/50Hz Dimensions 550(L)× 300(W)× 220(H)mm Weight 7.5g 13 Hazardous Substance Statement Bante Instruments is committed to the reduction and eventual elimination of all hazardous substances in both the manufacturing process and finished products we supply. We have an active manufacturing and procurement program to minimize and eliminate the use of harmful heavy metals such as cadmium, lead, mercury and the like. New technologies and design parameters are also promoting these efforts and we expect to have little or no such materials in our product in the coming years. We welcome our customer suggestions on how to speed up these efforts. Warranty The warranty period for instrument is 2 year from the date of shipment. Above warranty does not cover light source. For more information, please contact nearest authorized distributor. BANTE INSTRUMENTS LIMITED E-mail: [email protected] Phone: +8621-6404-1598 Website: www.bante-china.com The information in this document is subject to change without notice. Copyright © Bante Instruments Limited, 2015. All rights reserved.