1
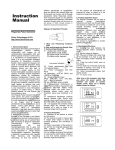
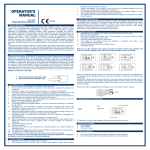
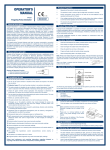
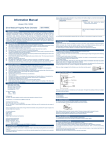
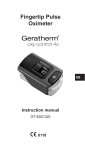
Instruction
Manual
information acquired through which will
be shown on two groups of LEDs through
process
in
electronic
microprocessor.
circuits
and
Diagram of Operation Principle
Fingertip Pulse Oximeter
1. General Description
Haemoglobin Saturation is percentage of
Oxyhemoglobin
(HbO2)
capacity,
compounded with oxygen, by all
combinativable haemoglobin (Hb) obin
(HbO2) capacity in blood. In other words,
it is consistence of Oxyhemoglobin in
blood. It is a very important ecological
parameter for Respiratory circulation
System. Many respiratory diseases can
result in haemoglobin Saturation being
lowered in human blood. Moreover, the
following factors can also lead to
problems in oxygen supply, so that
human haemoglobin saturation might be
reduced: Automatic Organic Regulation
Malfunction caused by Anesthesia,
Intensive Postoperative Trauma, hurts
resulted in by some medical examination
and etc. In the situation, illnesses, such
as light head, asthenia, vomitory and etc,
might happen to patients and even
endanger the patient’s life. Therefore, it
is very important to know Hemoglobin
saturation of patient timely in clinical
medical aspects. So that doctors can
find problems in time.
The Fingertip Pulse Oximeter features in
small volume, low power consumption,
convenient operation and being portable.
It is only necessary for patient to put one
of his fingers into a fingertip
photoelectric sensor for diagnosis, and a
display screen will directly show
measured
value
of
hemoglobin
Saturation. It has been proved in clinical
experiments that it features in rather high
precise and repeatability.
2. Measurement principle
Principle of the Oximeter is as follows:
An experience formula of data process is
established taking use of Lambert Beer
Law according to Spectrum Absorption
Characteristics
of
Reductive
hemoglobin(R Hb) and Oxyhemoglobin
(O2 Hb) in glow and near-infrared zones.
Operation principle of the instrument is
Photoelectric Oxyhemoglobin Inspection
Technology is adopted in accordance
with Capacity Pulse Scanning and
Recording Technology, so that two
beams of different wavelength of lights
(660nm glow and 940nm near infrared
light) can be focused onto human nail tip
through perspective clamp finger-type
sensor. Then measured signal can be
obtained by a photosensitive element,
1. Glow and Infrared-ray Emission
Tube
2. Glow and Infrared-ray Receipt Tube
3. Technical Specifications
3.1 Display type: OLED display
SPO2 display range: 0-99%
PR display range: 30-254 BPM
PR display mode: bargraph
Low power indication
:
3.2 Power requirements: Two AAA 1.5V
Alkaline Battery
3.3 Power consumption: less than 40mA
3.4 Resolution: ±1% for SPO2 and
±1BPM for Pulse rate
3.5 Measurement Accuracy:
SPO2: 80%--99%, ±2%; 70%--80%,
±3%; ≤70% no definition.
PR: 30—235 BPM, ±2% or 2 BPM
3.6 Measurement Performance in Weak
Filling Condition: required the test
equipment (BIO-TEK INDEX Pulse
Oximeter tester) the pulse wave is
available without failure when the
simulation pulse wave amplitude is at
6%.
3.7 Interference Resistance Capacity
against Ambient Light: Device work
normally when mixed noise produced by
BIO-TEK INDEX Pulse Oximeter tester
3.8 It is equipped with a function switch,
through which the Oximeter can be
powered off in case no finger is the
Oximeter longer than 8 seconds.
4. Product Properties
4.1 Operation of the product is simple
and convenient
4.2 The product is small in volume, light
in weight (total weight is about 50g
including batteries) and convenient in
carrying
4.3 Power consumption of the product is
low and the two originally-equipped two
AAA batteries can be operated
continuously for 30 hours.
4.4 Low voltage warning will be indicated
in visual window when battery voltage is
so low that normal operation of the
Oximeter might be influenced.
4.5 The product will automatically be
powered off when no signal is in the
product for longer than 8 seconds.
5. Product Operation Scope
The fingertip Oximeter can be used to
measure
human
Haemoglobin
Saturation and heart rate through finger.
The product is suitable for use in family,
hospital (including clinical use in
internist/surgery,
Anaesthesia,
paediatrics, intensive care and etc.)
Oxygen
Club,
social
medical
organizations, physical care in sports (It
can be used before or after sports.
Operation in sport procedure is not
recommended) and etc.
The product is not suitable to monitor
patient continuously.
6. Operation Instructions
6.1 Installing two AAA batteries into
battery cassette before covering its
cover.
6.2 Nip the clamp as diagram
6.3 Plug one of fingers into rubber hole
of the Oximeter (it is best to plug the
finger thoroughly) before releasing the
clamp
6.4 Press the switch button once on front
panel.
6.5 Your finger do not tremble during the
Oximeter is working. Your body is not
recommended in moving status
6.6 Read correspondent datum from
display screen.
6.7 Six display modes
After turn on the oximeter, each time
you press the power switch, the
oximeter will switch to another
display mode, there are 6 display
modes shown as follows:
1.
2.
3.
4.
5.
6.
When you press the power switch for a
long time (more than one second), the
brightness of the oximeter will be
changed by degrees, there are 10 levels
on brightness; the default level is level
four.
Declaration: Please use the medical
alcohol to clean the rubber touching the
finger inside of Oximeter, and clean the
test finger using alcohol before and after
each test. (The rubber inside of the
Oximeter belongs medical rubber, which
has no toxin, and no harmful to the skin
of human being).
When your finger is plugged into the
Oximeter, your nail surface must be
upward.
7. Brief Description of Front Panel
SPO2
PR Bargraph
PR
Power
Switch
Please remove the battery if the
Oximeter will not be used for long time
10. Hang Lace Installations
10.1 Thread thinner end of the hang lace
through the hanging hole
10.2 thread thicker and of the lace
through the threaded end before pulling
it tightly
11. Maintenance and Storage
11.1 Replace the batteries timely when
low voltage lamp is lighted
11.2 Clean surface of the fingertip
Oximeter before it is used in diagnosis
for patients
11.3 Remove the batteries inside the
battery cassette if the Oximeter will not be
operated for a long time
11.4 It is best to preserve the product in
a place where ambient temperatures
–10-40 ℃ (14-104 ℉ ) and humidity is
10%-80%
It is recommended that the product
should be kept in a dry environment
anytime. A wet ambient might affect its
lifetime and even might damage the
product.
Please follow the law of the local
government to deal with used battery
12.Possible Problems and resolutions
Problems
Oxyhemoglobi
nor heart rate
can not be
shown
normally
Possible
reason
1. Finger is not
plugged
correctly
2. Patient’s
Oxyhemoglobi
n value is too
low to be
measured
Low power indicator
Oxyhemoglobi
nor heart rate
is shown
unstably
1. Finger might
not be plugged
deep enough
The Oximeter
can not be
powered on
1. Power of
batteries might
be inadequate
or not be there
at all
SPO2 waveform
It is apparent the heart rate bargraph
display corresponds with pulse rate.
8.Product Accessories
8.1 One hang lace
8.2 Two batteries
8.3 One User manual
9.Battery Installations
9.1 Put the two AAA batteries into
battery cassette in correct polarities.
9.2 Push the battery cover horizontally
along the arrow shown as below:
2. Finger is
trembling or
patient’s body
is in
movement
status
2. Batteries
might be
installed
incorrectly
Solution
1.Retry by
plugging the
finger
2. Try some
more times, If
you can make
sure about no
problem
existing in the
product. Please
go to a hospital
timely for exact
diagnosis
1. Retry by
plugging the
finger
2. Try not to
move
1. Please
replace
batteries
2. Please
reinstall the
batteries
3. Please
contact with
local customer
service centre
3. The
Oximeter
might be
damaged
Indication
lamps are
suddenly off
1. The product
is
automatically
powered off
when no signal
is detected
longer than 8
seconds
“Error3” or
“Error4”
Displayed on
screen
1 .Low power
2. Receiving
tube being
shielded or
damaged
together with
broken
connector.
3. Mechanical
contact with
local
customer
service
center
4 Please
contact with
local
customer
service
center
1. Low power
2. Emission
tube damaged.
3. Current
control circuit
malfunction.
1 Please
change battery
2
Please
contact with
local
customer
service
center
3
Please
contact with
local
customer
service
center
13. Detailed descriptions of product
functions:
13.1Display mode: OLED
13.2 SPO2:
Measurement range::70-99%
Accuracy : ±2% on the stage of
80%-99%;±2% on the stage of
70%-80%;
13.3 Pulse:
Measure range:30-235 BPM
Accuracy:±2 BPM or ±2%(larger)
13.4 Pulse Intensity
Bargraph Indication
13.5 Power Requirements:
Two AAA alkaline Batteries
13.6 Battery life
Two AAA 1.5V, 600mAh alkaline
batteries could be continuously operated
as long as 30 hours.
13.7 Outline dimension:
Length: 58mm
Width: 32mm
Height: 34mm
Weight: 50g (including two AAA
batteries)
13.8 Environment requirements:
Operation Temperature: 5-40℃
Storage Temperature: -10-40℃
Ambient Temperature: 15%-80% in
operation
10%-80%
in
storage
Declaration: EMC of this product comply
with IEC60601-1-1-2 standard.
14 .Symbol Definitions
Symbol
Definition
The equipment type is BF
1. Normal
2. Replace the
batteries
Refer to user manual
before application
Hemoglobin saturation
2. Power
quantity of the
batteries is
started being
inadequate
Notes: Battery polarities must be
correctly installed. Otherwise, damage
might be caused to device.
Please put or remove batteries in right
order, or is likely to damage the device
bracket.
“Error7”
displayed on
screen
Misplace for
receive-emissi
on tube
4. Amp circuit
malfunction.
Heart rate (BPM)
1. Change
new battery
2. Please
contact with
local
customer
service
center
3. Please
Low power indication
Serial No