1
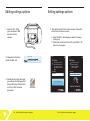
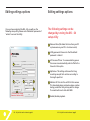
RS1 - SX
With you on the front line
Quick Start
and User Manual
REVEALMEDIA.COM
Quick start
Quick start
1
Charge
Charge the camera for
three hours or until the
charging light turns
green.
Introduction
Welcome to our most
straightforward body camera.
For your convenience, the
camera is set up and ready to
go in three easy steps.
2 Mount
Choose how to mount
your camera; you can
use either the Klickfast
attachments, clips or a
lanyard.
3 Record
Slide the red switch
down to start
recording. To stop
recording, slide the red
switch up.
RS1 - SX Quick Start and User Manual - page 2
RS1 - SX Quick Start and User Manual - page 3
Quick start
1 Charge
Open the cover on the
side of the camera
Quick start
2 Mount
Take your chosen clip system and slot
into place ensuring the 2 plates on the
clip are between the 3 plates on the back
of the camera and align the holes. Place
the screw through the top hole in the
clip and tighten at the desired angle.
Insert the micro USB into
the port and connect to a
computer or plug to
charge.
NOTE: This is the same
cable that will upload
video to a computer.
RS1 - SX Quick Start and User Manual - page 4
RS1 - SX Quick Start and User Manual - page 5
Quick start
Operation
3 Record
Camera articulation
Simply pull down the red
sliding switch to record.
The camera will beep
three times to let you
know it is recording.
In addition, the LED light
will be flashing red, and
the red recording light
will be flashing on the
display.
To stop recording, slide
the red switch back up.
The camera will beep
twice and both the LED
and display lights will
stop flashing.
RS1 - SX Quick Start and User Manual - page 6
CAUTION: DO NOT OVER ROTATE!
The camera head rotates
110 degrees vertically.
Camera
rotation
To set the RS1 - SX to sit
correctly against the
body simply select the
mounting attachment
required and fasten at
the desired angle by
tightening the screw at
the top of the camera.
RS1 - SX Quick Start and User Manual - page 7
Operation
Operation
Charging via USB (off when charged)
Recording (flashing)
On when connected to PC (via USB)
Flashing
record
indicator
Date
YY-MM-DD
Time
HH:MM:SS
•REC
3050 MB
2014-09-11
14:33:22
RS1 - SX Quick Start and User Manual - page 8
Micro SD
Card space
remaining
MicroSD Card
(up to 32Gb)
* Recordings will
stop automatically when full
RS1 - SX Quick Start and User Manual - page 9
Editing settings options
4. This will launch the first of two screens. Follow the
instructions on these screens.
1. Connect RS1 - SX to
your computer’s USB
and turn on the
camera.
2. Navigate to the drive
inside the RS1 - SX
Editing settings options
1. Select the RS1 - SX camera you want to change
settings on
2. While still connected to the PC, turn off RS1 - SX
then turn it on again
RS1 - SX (J:)
0.97 GB free of 3.62 GB
RS1 Utility
i
3. Double click on the drive and
you will see the following RS1
Setup utility icon. Double click
on this to start the setup
procedure.
RS1 Utility
RS1 Setup
RS1 Setup
Once you have clicked
the button below you
will need to turn off
your RS1 then turn it on
again
i
Please turn your RS1
off then on again
while still connected
to this computer
Select RS1
Select RS1
RS1B1234
RS1B1234
Click to edit RS1 settings
RS1Utility.exe
RS1 - SX Quick Start and User Manual - page 10
WAITING TO FIND RS1
RS1 - SX Quick Start and User Manual - page 11
Editing settings options
Editing settings options
Once you have rebooted the RS1 - SX, you will see the
following setup utility. Please enter the default password of
“admin” to access the utility.
The following settings can be
changed by running the RS1 - SX
setup utility
1
Date and time (this takes the time from your PC
so please ensure your PC’s clock is accurate)
2
Utility password. Please note that the default
password is “admin”
3
LCD screen off time. To conserve battery power
the screen can automatically switch off after the
time set in this option.
4
Split video. This setting will ensure that long
recordings are split into sections according to
the length specified.
5
Machine ID. This sets the unit ID for this camera.
This has already been assigned a unique number
during production that you may wish to change.
The machine ID must start with RS1B
6
Enable/disable playback.
RS1 Utility
RS1 setup
Sync Date/Time
1
Sync Date/Time
2
Change Password
Syncronise RS1 to your PC’s Date & Time
Password
New Password
Confirm Password
Parameters
6
Playback
Disable
3
Enable
Show Portrait
Change Parameters
***You must click “Change
Parameters” before exiting
Screen Off
Split Video
30 min
1 min
4
Machine ID ( 9 Alphanumerics )
5
RS1B1234
Exit
RS1 - SX Quick Start and User Manual - page 12
RS1 - SX Quick Start and User Manual - page 13
Mounting and usage options
Chest Mount
Attach with Klickfast or
clip onto chest for the
most popular mounting
option.
Mounting and usage options
Harness
For use with loose
fitting clothes or
uniforms.
(optional extra)
Lanyard
Table top
For use in a non-confrontational environment.
For use in interviews
and other static
situations.
RS1 - SX Quick Start and User Manual - page 14
RS1 - SX Quick Start and User Manual - page 15