1
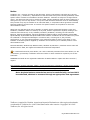
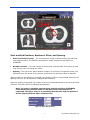
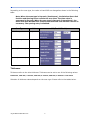
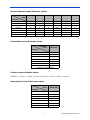
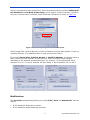
Aquarius iNtuition Client 4.4 R.O.D.
US |
Symbols used in the label:
Symbol
Meaning
Consult Instructions for Use.
The CE 0197 mark applies to iNtuition and AquariusAPS Software. The CE
mark is affixed on the software and computer containing the aforementioned software.
Manufacturer
The name and address of the manufacturer are listed next to this symbol.
Date of Manufacture
The year of manufacture is listed next to this symbol.
Authorized Representative in the European Community
The name and address of TeraRecon’s authorized representative in the
European Community are listed next to this symbol.
GOST-R Mark
Mark of conformity certifying that Russian Federation safety requirements
have been met.
AQ-IN-ROD-USER-EN-4.4A
Notice
TeraRecon, Inc., reserves all rights in this document, which is copyrighted, Copyright 2011-2015 by
TeraRecon, Inc., (“TeraRecon”). Reproduction of this document in any form is strictly prohibited, unless
specific written consent from TeraRecon has been obtained. Contents are subject to change without
notice. This document may only be used if the reader releases TeraRecon from all claims relating to or
arising from any errors it may contain. Use by the reader herewith constitutes such an understanding.
This provision may only be modified on an individual basis, in a separate written agreement executed
between TeraRecon and the owner or licensee of a specific instance of the product to which this
documentation relates.
Apart from any warranty that may be stated in a specific written agreement between a party and
TeraRecon, TeraRecon makes no warranty of any kind, whether expressed or implied, relating to the
contents of this document, or any software provided by TeraRecon, including, but not limited to
iNtuition, Aquarius Workstation, Aquarius Workstation iNtuition Edition, AquariusGATE, AquariusNET,
AquariusBLUE, AquariusAPS and AquariusNET Client software. TeraRecon will not be liable in any event
for incidental or consequential damages in connection with, or arising out of, the provision,
performance, or use of this documentation or any software product to which it may relate, or any
software or hardware product supplied by TeraRecon for use with any such software product or this
documentation itself.
Microsoft Windows, Windows NT, Windows 2000, Windows XP, Windows 7, Windows Server 2003 and
Windows Server 2008, are registered trademarks of Microsoft Corporation.
is a trademark owned by Citrix Online, LLC. and is used with permission from Citrix Online, LLC. No
endorsement, sponsorship or affiliation with Citrix Online is either intended or implied by use of this
trademark.
SCENARIA and Intelli IP are registered trademarks of Hitachi Medico in Japan and other countries /
regions.
This document contains important, helpful, use and precautionary information. Please review carefully
all precautionary statements and advisories, whether onscreen or contained herein, as these are
essential to the effective and authorized use of the products and applications discussed.
Note: Any beta features extended are not to be used clinically, and can ONLY
be authorized, obtained or accessed through an appropriate beta agreement.
TeraRecon, AquariusNet, iNtuition, Aquarius and Aquarius Workstation are either registered trademarks
or trademarks of TeraRecon, Inc. in the United States and/or other countries. Copyright© 2011-2015
TeraRecon, Inc. All rights reserved.
i
AQ-IN-ROD-USER-EN-4.4A
General Description
iNtuition (also referred to as Aquarius iNtuition) is a medical device comprised of two stand-alone
software components: a server software backend (iNtuition Server) which performs complex image
post processing, and client viewer software (iNtuition Client Viewers) that provides a user interface,
enabling the user to view medical image data and associated derived metadata.
The Aquarius iNtuition Client (“AQi”) is one of the iNtuition client viewers with 2D/3D/4D (3D with
dimension of time) image processing and advanced visualization capabilities to assist physician review
of medical images. The base functionality of AQi includes, but is not limited to, various tools for
visualization and analysis, customizable workflow templates to deliver structured workflow, and support
for the physician to write and store the report.
A fully-configured iNtuition system is capable of a comprehensive suite of image processing and
visualization functions, including full-color Volume Rendering, Calcium Scoring, Time-Dependent
Analysis (TDA), Time Volume Analysis (TVA), Segmentation Analysis and Tracking (SAT), Vessel
Analysis, Flythrough, Multi-phase review, CT/CTA Subtraction, Lobular Decomposition (LD), iGENTLE,
Maxillo-Facial, Volumetric Histogram, Findings Workflow, Fusion CT/MR/PET/SPECT, MultiKV,
Reconstruction On Demand (R.O.D.). Results from the AquarisAPS Server module may be displayed in
the viewer. Each of these features may vary by client viewer and offered as an independent upgrade
option to the basic configuration.
Indications For Use
iNtuition Indications For Use
To receive, store, transmit, post-process, display and allow manipulation of reports and medical images
from acquisition devices, including optical or other non-DICOM format images, DICOM images with
modality type XA, US, CR, DR, SPECT, NM and MG, and images from volumetric medical scanning
devices such as EBT, CT, PET or MRI. To provide access to images derived data and derived images via
client-server software, web browser and mobile technology.
Visualization in 2D, 3D and 4D are supported for single or multiple datasets, or combinations thereof.
Tools are provided to define and edit paths through structures such as centerlines, which may be used
to analyze cross-sections of structures, or to provide flythrough visualizations rendered along such a
centerline. Segmentation of regions of interest and quantitative analysis tools are provided, for images
of vasculature, pathology and morphology, including distance, angle, volume, histogram, ratios thereof,
and tracking of quantities over time. A database is provided to track and compare results using
published comparison techniques such as RECIST and WHO. Calcium scoring for quantification of
atherosclerotic plaque is supported.
Support is provided for digital image processing to derive metadata or new images from input image
sets, for internal use or for forwarding to other devices using the DICOM protocol. Image processing
tools are provided to extract metadata to derive parametric images from combinations of multiple input
images, such as temporal phases, or images co-located in space but acquired with different imaging
parameters, such as different MR pulse sequences, or different CT image parameters (e.g. dual
energy).
iNtuition is designed for use by healthcare professionals and is intended to assist the physician in
diagnosis, who is responsible for making all final patient management decisions.
Interpretation of mammographic images or digitized film screen images is supported only
when the software is used without compression and with an FDA-approved monitor that
offers at least 5Mpixel resolution and meets other technical specifications reviewed and
accepted by the FDA.
iNtuitionMOBILE provides wireless and portable access to medical images. This device is not
intended to replace full workstations and should be used only when there is no access to a
workstation. Not intended for diagnostic use when used via a web browser or mobile device.
AQ-IN-ROD-USER-EN-4.4A
ii
iNtuition TDA, TVA and Parametric Map Indications For Use
iNtuition-TDA, TVA, and Parametric Mapping are software modules which supports assessment of timedependent behavior of image intensity, density, dimensions or volume of regions of interest over time,
for volumetric or planar dynamic image types such as CT or MR. Parametric mapping tools encode in
color various parameters derived from the temporal or spatial characteristics of the planar or volumetric
data.
Support is provided for digital image processing to derive metadata or new images from input image
sets, for internal use or for forwarding to other devices using the DICOM protocol. Image processing
tools are provided to extract metadata to derive parametric images from combinations of multiple input
images.
iNtuition-TDA, TVA and Parametric Mapping are iNtution based software features with dedicated
workflows and basic tools and thus support post-processing, displaying and manipulation of reports and
medical images from acquisition devices and visualization in 2D, 3D and 4D for single or multiple
datasets, or combinations thereof.
iNtuition-TDA, TVA, Parametric Mapping are designed for use by healthcare professionals and are
intended to assist the physician in diagnosis, who is responsible for making all final patient
management decisions.
Safety Concerns
Aquarius iNtuition Client is part of iNtuition, a Class II medical device regulated by the Food and Drug
Administration.
CAUTION: U.S. Federal Law restricts use of this device to trained physicians,
or other suitably qualified and trained personnel on the order of a physician.
This Aquarius iNtuition Client is part of a sophisticated medical device, and as such MUST ONLY BE
USED BY QUALIFIED AND TRAINED PERSONNEL. If you require training, please contact TeraRecon
or a suitably qualified trainer. Please keep this documentation readily available near Aquarius iNtuition
Client at all times, and please keep it updated with all corrections/addenda that may be released by
TeraRecon from time to time.
Please also be aware that patient information is restricted, private, and extremely confidential, and
subject to stringent legal regulations - you should control access to the Aquarius iNtuition Client or
patient data contained therein accordingly.
Devices attached to this product must comply with their own applicable safety standards.
Precautions Relating to General Use
The Aquarius iNtuition Client software may allow images to be generated in which parts of the original
scan data are obscured, removed (including but not limited to, through use of lossy compression),
hidden, or modified. Similarly, output images and reports can be produced, saved, and annotated, with
elements of the original acquisition omitted, obscured, modified, or hidden. Hence, careful and
responsible use of the equipment and its output images requires that the user be aware of, and
effectively communicate these important facts to, untrained or uninformed observers or recipients of
the processed information. Please ensure that all processing has completed (including completion of
any final stage subsequent to an intermediate stage of processing) before formulating a final
interpretative decision.
In certain situations, processing takes a brief time, but please ensure that all processing of whatever
type has completed (including, for example, completion of any final stage subsequent to an
intermediate stage of processing) before seeking to validate, or validating, a final interpretative
decision.
iii
AQ-IN-ROD-USER-EN-4.4A
Precautions Relating To Display Hardware
Please be aware that Aquarius iNtuition Client display is limited in acuity and color or grayscale depth to
that of the display device used. Display hardware characteristics can vary widely.
The judgment of the medical imaging professional is essential to reaching the appropriate conclusion
from the results presented by the Aquarius iNtuition Client.
Precautions Relating To Interpretation
Please be aware that calculations relating to distances, volumes, centerline creations and other physical
properties performed by Aquarius iNtuition Client are dependent in accuracy upon the correct
information being supplied in the input DICOM images. It is the responsibility of the operator to ensure
that inputted DICOM images are correctly formatted and to heed any warnings that the software may
display during operation relating to potential problems with the information supplied in those DICOM
images.
Note further that, in certain instances, even though there may be problems or inconsistencies in the
DICOM information, the Aquarius iNtuition Client will be unable to detect this, and erroneous image
display will be unavoidable unless the user properly ensures the correctness of all input data in
advance. Potential problems relating to errors in the DICOM information include incorrect dimensional
readouts, incorrect orientation markings, and incorrect pixel value calibration. Three-dimensional
imaging inherently offers a wide variety of different imaging views of any given dataset; it is an
important responsibility of the operator to ensure that a proper visualization is achieved, and that a
complete review of the data has been performed before reaching any diagnostic or interpretive
conclusion relating to the dataset in question. Limitations present in the original input data (such as
those relating to spatial and/or temporal resolution, pixel size, and slice thickness) remain valid even
when Aquarius iNtuition Client processes the data, and these provisos should be considered when using
the equipment for image review.
The image processing and display techniques offered by Aquarius iNtuition Client are only intended as
an adjunct to, and not a substitute for, conventional diagnostic review of medical imaging data. All
results should be validated by qualified physicians trained in the subject matter.
The Aquarius products provide tools and protocols to quantify metrics and distances relating to
structures in the CT, MR scans or images which are based upon the dimensions of the anatomy scanned
or imaged at the time the images were originally acquired from the patient, and based on the
measurement calibrations provided by the acquiring device. The suitability for any particular purpose,
especially monitoring the progression of disease, or the sizing or planning of a device to be implanted in
a patient, is dependent upon many factors, including, but not limited to, the accuracy of the original
acquisition, the extent to which the images acquired still represent the patient's anatomy, and the way
in which the actual device deployment may modify the anatomy into which it is introduced. TeraRecon
does not represent that the Aquarius products are suitable for such purposes - all such activities should
always be cross-correlated with other techniques to ensure a complete understanding of the patient
and contemplated procedure is obtained by the validating physician(s) in charge.
Precautions Relating To Magnetic Resonance Imaging Machines
Components of Aquarius iNtuition Client, including this document and its packaging or binding, may
contain metallic or Ferro-magnetic components. Please ensure that no such component is introduced
into the influence of magnetic fields from devices such as Magnetic Resonance Imaging Scanners, since
injury or damage to equipment or property could occur.
Precautions Relating To Risk Of Loss Of Data
Aquarius iNtuition Client is not intended to be used as a primary archive for medical imaging data. This
means that a secure copy of any data should be maintained in a location separate from the software,
for example, in the scanner, in a PACS archive, or on archive media. Please do not rely on Aquarius
iNtuition Client as your primary archive.
AQ-IN-ROD-USER-EN-4.4A
iv
In addition, do not rely on Aquarius iNtuition Client to convey data from its acquisition point to your
primary archive, because in this configuration, a failure in Aquarius iNtuition Client could compromise
your primary archive. Your primary archive should be maintained in a manner independent of, and not
relying on, Aquarius iNtuition Client.
Precautions Relating to Computer Software and Hardware:
NOTE THAT THE INSTALLATION AND USE OF ANY ADDITIONAL SOFTWARE OR HARDWARE
COMPONENT WITHOUT THE SPECIFIC DIRECTION AND APPROVAL OF TERARECON MAY IMPAIR THE
SAFETY AND EFFECTIVENESS OF THE PRODUCT. HENCE, NO ADDITIONAL SOFTWARE OR HARDWARE
COMPONENT SHOULD BE ADDED TO Aquarius iNtuition Client, NOR SHOULD THE CONFIGURATION BE
CHANGED IN ANY WAY, EXCEPT UNDER THE EXPRESS DIRECTION OF TERARECON PERSONNEL. DO
NOT USE THE SOFTWARE IF IT IS DAMAGED, COMPROMISED, OR IF YOU IN ANY WAY SUSPECT THAT
ITS SAFETY MAY HAVE BEEN COMPROMISED. IN THIS EVENT, CONTACT YOUR CUSTOMER SERVICE
REPRESENTATIVE IMMEDIATELY.
You can return the HASP key provided for software licensing back to TeraRecon, Inc. for electronic
waste disposal per applicable local laws.
Patents
The product described in this document is protected by the following patents:
http://www.terarecon.com/patents
v
AQ-IN-ROD-USER-EN-4.4A
Welcome
Welcome to the Aquarius iNtuition Client Manual. This guide is intended for users performing and
analyzing different studies using the Aquarius iNtuition Client application. Please read the chapters
sequentially to gain a complete understanding of the Aquarius iNtuition Client application. You can use
the table of contents to navigate to your topics of interest.
Please pay attention to all Notices, whether onscreen, or contained herein, including all precautionary
statements and advisories, as these are essential to the effective and authorized use of the products
and applications discussed herein.
Conventions
This guide uses the following conventions:
•
The text that appears on buttons, menu items, dialog boxes and other elements of the AQi user
interface are printed in a bold font. For example, “Click the Save button.”
•
Screen names are capitalized. For example, Patient List, 3D Viewer.
•
The chapters are arranged based on the functions in the Aquarius iNtuition Client application.
•
A NOTE contains supplementary information about a topic.
AQ-IN-ROD-USER-EN-4.4A
vi
Contents
Introduction
- - - - - - - - - - - - - - - - - - - - - - - 1
Feature Limitations .........................................................................1
Unsupported Data Types ................................................................1
Starting the Aquarius iNtuition Client (AQi) - - - - - - - 2
Logging In ......................................................................................2
The Patient List - - - - - - - - - - - - - - - - - - - - - - 2
Loading a Study ..............................................................................3
The 3D Viewer - - - - - - - - - - - - - - - - - - - - - - 3
The R.O.D. Button ..........................................................................4
The R.O.D. Panel - - - - - - - - - - - - - - - - - - - - - 5
FOV (Field of View) ......................................................................6
Start and End Positions, Number of Slices, and Spacing ...............7
Thickness ........................................................................................8
Filters ..............................................................................................10
Modifications ..................................................................................11
Reconstruction Phase ......................................................................12
Series Comment ..............................................................................14
Preset and Reset Buttons ................................................................15
Start Reconstruction .......................................................................16
Error and Information Messages - - - - - - - - - - - - - 19
vii
AQ-IN-ROD-USER-EN-4.4A
AQ-IN-ROD-USER-EN-4.4A
viii
Introduction
The Reconstruction On Demand (R.O.D.) system allows you to set image reconstruction
parameters on the Aquarius iNtuition Client (AQi) Viewer and send reconstruction requests to
the SCENARIA X-ray CT System (manufactured by Hitachi Medical Corporation). The
reconstructed image from SCENARIA is then communicated back to the AquariusNET Server
for the AQi Viewer to display. Using the R.O.D. system, you can obtain reconstructed images
without operating SCENARIA itself.
The R.O.D. system consists of the SCENARIA X-ray CT system, the AquariusNET Server and
the AQi Viewer. All components must be connected via a secure network.
R.O.D. supports a total of up to three AQi Viewers running at the same time.
Please refer to Aquarius iNtuition Client User Manual, version 4.4, for complete information
about the Aquarius iNtuition Client.
Feature Limitations
The following features are not supported by Reconstruction on Demand:
•
•
•
Fine Recon function
Display or editing for ECG information
Recon queue operations such as pause, restart or reorder
Unsupported Data Types
The following data types are not supported in R.O.D.:
•
•
•
•
•
•
•
•
Image series
Corporation)
Image series
Image series
Image series
Image series
Image series
Image series
Image series
that are NOT from the SCENARIA X-Ray CT System (Hitachi Medical
for which RawData is not available in SCENARIA
that have been scanned by Predict Scan
that have been scanned by Guide Shot Scan
from a Normal Scan that has been scanned by Skip Scan
from a Normal or Dynamic Scan with gantry tilt
that are combined in series when scanned or post reconstruction
that have already been analyzed in 3D or MPR rendering format
Note: If you use the Aquarius iNtuition Client continuously for long periods
of time, memory usage may build up. This could eventually cause the
application to crash. Therefore, it is recommended that you restart the
Aquarius iNtuition Client once a day.
1
AQ-IN-ROD-USER-EN-4.4A
Starting the Aquarius iNtuition Client (AQi)
To start AQi, double-click the AQi icon on your desktop. The login dialog is
displayed (see Figure 1).
Figure 1: Login dialog
Logging In
1. Enter your user name, password, and server name in the login dialog.
2. Click the Login button to connect to the AquariusNET Server.
The Patient List
When you are successfully logged in, AQi displays the Patient List:
AQ-IN-ROD-USER-EN-4.4A
2
Loading a Study
To load studies in the Viewer, simply double-click on the studies in the Patient List, or rightclick the study and select a Workflow from the menu. You can also select a study, click the
Load button and then select a Workflow.
The R.O.D. system supports the following scan types from SCENARIA:
Scan Type
Description
Normal
Scans are done intermittently by repeatedly scanning and moving the table. This
type of scan is mainly used to scan the head region.
Volume
Scans are done spirally by repeatedly scanning and moving the table. This type of
scan is mainly used to scan the chest and abdominal regions.
Dynamic
The same region is scanned while the table position is fixed. This type of scan is
mainly used for perfusion scanning.
Retrospective
An ECG recording is taken while acquiring images in a volume scan. The associated ECG data is then used to create scans from a particular phase of the cardiac
cycle.
Prospective
ECG data is monitored. When a specified time has passed after detecting an Rwave; a normal scan is performed.
The 3D Viewer
When the image is loaded into the 3D Viewer, the Viewer tab is displayed, as shown in
Figure 2.
3
AQ-IN-ROD-USER-EN-4.4A
Figure 2: The AQi Viewer
The R.O.D. Button
Click the R.O.D. button under the Tool tab to
open the R.O.D. panel.
If an error occurs, the error message will have an Error Code in the title bar. Please see
“Error and Information Messages” on page 19 for a list of error message descriptions.
Figure 3: R.O.D. error message
AQ-IN-ROD-USER-EN-4.4A
4
The R.O.D. Panel
When AQi successfully connects to SCENARIA, the
R.O.D. panel is displayed as shown below. The
R.O.D. panel displays different parameter entries,
depending on the scan type.
If, for example, the scan type is Retrospective or
Prospective, the R.O.D. panel in Figure 4 is
displayed. You can set phase parameters such as
Recon Phase using this panel.
Figure 4: R.O.D. Panel for Retrospective/
Prospective Scan
The controls in the R.O.D. panel are grouped into five sections:
#
1
Group
Volume Info
R.O.D. Parameter
FOV
Start~End Position
Number of Slice
Spacing
Thickness
2
Filter and Correction
Filter
Correction
3
Reconstruction Phase
Recon Phase
4
Series Comment
Add phase information
Series comment
5
Preset and Reset buttons
Preset
Reset all parameters.
Click the OK button in the lower right corner to start reconstruction.
5
AQ-IN-ROD-USER-EN-4.4A
FOV (Field of View)
The Field of View is the region of the image that will be reconstructed, in 512x512 resolution.
There are two settings: FOV size and FOV position.
You can set the FOV size by entering the numeric value in the FOV edit box. The FOV range is
from 20 mm to 500 mm.
To set the FOV position, click the down arrow button next to the FOV edit box. A small dialog
pops up so that you can enter the FOV-X and FOV-Y positions. To close the dialog, click the
down arrow button again. The range of FOV-X and FOV-Y is between -250 to +250 mm. The
table shift is added to FOV-X, if there is any.
Figure 5: Left: FOV size; Right: FOV Position
Another way to set the FOV size and position is to adjust the FOV crop rectangle on one of
the three basic views. For example, on the Axial view there is a crop rectangle with blue
(vertical) and green (horizontal) lines.
•
To change the FOV Size:
Move the mouse cursor over the crop rectangle. The cursor changes from an arrow to a
horizontal double arrow (see Figure 6). Click and drag the crop rectangle to change the
FOV size.
•
To change the FOV Position:
Move the mouse cursor to the center of the crop rectangle. The cursor changes from an
arrow to a cross double arrow (see Figure 6). Click and drag the crop rectangle to change
the FOV position.
AQ-IN-ROD-USER-EN-4.4A
6
Figure 6: FOV Crop Rectangle
Start and End Positions, Number of Slices, and Spacing
•
Start~End Position (mm) - The reconstruction range is determined by the start and
end image positions. The default reconstruction range is based on raw data from
SCENARIA.
•
Number of slices - The total number of slices to be reconstructed. This setting is readonly and you can not change the value.
•
Spacing - The size of the space between images. For Normal or Prospective scans, the
thickness value will be set to the spacing value when the thickness value is changed.
When the start or end position is changed, the number of slices is recalculated, based on the
spacing size. Also the end position is adjusted automatically.
When the spacing is changed, the number of slices is recalculated based on the start and end
positions. The end position is adjusted automatically.
Note: In order to calculate accurate start and end positions, SCENARIA
recalculates the positions based on raw data when reconstruction is
requested. Therefore, there is a possibility that the start and end positions
will be slightly different after reconstruction.
Figure 7: Start~End positions
7
AQ-IN-ROD-USER-EN-4.4A
Depending on the scan type, the value unit and GUI are changed as shown in the following
table:
Note: When the scan type is Dynamic (Continuous), the Relative Start~End
Position and Spacing boxes contain the scan time. The time value is
expressed in seconds. When the scan type is Dynamic (Intermittent), the
Start~End Slice Number box contains the Raw Data slice number. No unit is
necessary. The spacing entry is disabled.
Scan Type
Unit
Normal Prospective
(mm)
Volume Retrospective
(mm)
Dynamic (Continuous)
(s)
Dynamic (Intermittent)
(None)
GUI (Enable/Disable)
Thickness
Thickness refers to the slice thickness. Thickness can be set to one of the following values:
0.625 mm, 1.00 mm, 1.25 mm, 2.50 mm, 3.75 mm, 5.00 mm, 7.50 mm and 10.0 mm
Selection of thickness values depends on the scan type. Please refer to the tables below.
AQ-IN-ROD-USER-EN-4.4A
8
Normal Dynamic scans thickness values
Collimation 1.25mm(2)
(Row)
Thickness
0.625mm
1.25mm
2.5mm
3.75mm
5.0mm
7.5mm
10.0mm
o (2i)
o (1i)
×
×
×
×
×
5.00mm(8)
10mm (16) 15mm (24)
o (8i)
o (4i)
o (2i)
×
o (1i)
×
×
o (16i)
o (8i)
o (4i)
×
o (2i)
×
o (1i)
×
×
×
o (4i)
×
o (2i)
×
20mm (32)
40mm (64)
o (32i)
o (16i)
o (8i)
×
o (4i)
×
o (2i)
o (64i)
o (32i)
o (16i)
×
o (8i)
×
o (4i)
o: Selectable, x: Not Selectable.
Prospective scans thickness values
Collimation
(Row)
40mm (64)
Thickness
0.625mm
o (56i)
1.25mm
o (28i)
2.5mm
o (14i)
3.75mm
×
5.0mm
×
7.5mm
×
10.0mm
×
o: Selectable, x: Not Selectable.
Volume scans thickness values
0.625mm / 1.0mm / 1.25mm / 2.5mm / 3.75mm / 5.0mm / 7.5mm / 10.0mm
Retrospective scans thickness values
Collimation
(Row)
40mm (64)
Thickness
0.625mm
o (56i)
1.25mm
o (28i)
2.5mm
o (14i)
3.75mm
×
5.0mm
×
7.5mm
×
10.0mm
×
o: Selectable, x: Not Selectable.
9
AQ-IN-ROD-USER-EN-4.4A
The value in parentheses represents Image
Mode and is displayed next to the thickness
combo box.
Filters
SCENARIA provides three filters: Reconstruction filter, Image filter, and Intelli IP.
The reconstruction filter belongs to SCENARIA and is used while the images are being
reconstructed. Filters are provided based on body parts. Each body part has different levels
of image sharpness and smoothness.
The image filter is used after reconstruction. It is an image processing tool that provides the
levels of sharpness and smoothness.
Intelli IP (Iterative Processing) is a technique for reducing noise by using iterative
reconstruction. Intelli IP has two methods: Normal and Advanced.
By default, current filter information is displayed in the Filter text box. The text box contains
the reconstruction filter number and name, followed by the image filter / Intelli IP level in
parentheses. If the selected reconstruction filter includes Hi-Res, the letter ‘H’ will be added
after the reconstruction filter number.
[Filter Number + H (if Hi-Res)] [Filter Name] [Image Filter / Intelli IP/OFF (If “None” is selected)]
Figure 8: Filter information – Hi-Res and Not Hi-Res
To change the filter options, click the “…” button next to the Filter text box. This will open the
Filter Setting dialog (see Figure 9).
Figure 9: Filter Setting dialog
AQ-IN-ROD-USER-EN-4.4A
10
Select a reconstruction filter from the list. Some reconstruction filters, such as #20 Body HiRes Standard and #21 Body Hi-Res Sharp, do not support “Intelli IP Normal”; therefore,
when one of these filters is selected, Intelli IP Normal is disabled, as shown in Figure 10.
Figure 10: Filter Setting dialog – Disable Intelli IP Normal
Select Image Filter, Intelli IP Normal, or Intelli IP Advance from the radio buttons. These are
mutually exclusive. If no additional filter is used, simply select “None”.
If you select Image Filter, Intelli IP Normal, or Intelli IP Advance, you need to select a
filter level as well. The selection of filter levels for Intelli IP Normal will be changed,
depending on the selected reconstruction filter. For example, “64 Lung Standard” has a
selection of A, B, C, D, and E, whereas “95 Bone Sharp 1” has a selection of A, B, and C.
Figure 11: Image Filter / Intelli IP
Modifications
The Correction setting dialog allows you to select B.G.C, B.H.C and Extended CT value as
options.
•
•
B.G.C stands for Bowel gas correction.
B.H.C stands for Beam hardening correction.
11
AQ-IN-ROD-USER-EN-4.4A
Extended CT value is an option to use 16-bit pixels when reconstructing new images. Check
the Extended CT value box if you would like to use 16-bit; otherwise, 13-bit will be used by
default. If the images are already 16-bit, 13-bit can not be used and the feature is disabled.
The box will be shown as checked to indicate that the images will be reconstructed using 16bit.
To set the correction options, click the “…” button next to the Correction text box. The
Correction Setting dialog will be displayed.
Figure 12: Correction Setting dialog
•
If the scan type is Volume, B.G.C is selected by default and can not be changed.
•
If the scan type is Retrospective or Prospective, B.G.C is disabled by default and can not
be selected.
Reconstruction Phase
Reconstruction phase is used for Retrospective and Prospective scans. To set the
Reconstruction phase option, click the “…” button next to the Recon Phase text box.
If the scan type is Retrospective, the Recon Phase Setting dialog will open with the
following settings.
Figure 13: Recon Phase Setting dialog - Retrospective
When the phase range is changed, click OK. The new phase information will be displayed in
the Recon Phase text box.
AQ-IN-ROD-USER-EN-4.4A
12
Figure 14: Recon Phase Setting dialog – Retrospective Phase Changed
Reconstruction Type has two options: Half and Segment.
Note: Prospective scan supports Half only.
Heart Phase Mode has three modes: Relative, Absolute, and Auto. See the following
table for a full description of each.
Mode
Relative
Setting
Set phase range (%) and interval (%).
Phase range: 0 ~ 99%
Interval: Increment is every 1% to 50%.
Example:
If the phase range is 75 ~ 85 and the interval is 5, then three phases (75%, 80%, and
85%) will be created.
If the mode is changed to Absolute, the phase range and interval are automatically
calculated using this formula: Absolute = (600 x Relative) / Heart Rate (bpm)
Absolute
Set phase range (ms) and interval (ms).
Phase range: -2000 ~ +2000
Interval: Increment is every 10ms from 10ms to 1000ms.
Example:
If phase range is -100 ~ +100 and interval is 50, then 5 phase (-100, -50, 0, 50, 100)
will be created.
If the mode is changed to Relative, the phase range and interval are automatically calculated using this formula: Relative =(Absolute x Heart Rate (bpm)) / 600
Auto
Diastole / Systole
Auto mode is an ECG option. It is enabled only when SCENARIA has the CardioHarmony option.
13
AQ-IN-ROD-USER-EN-4.4A
If the scan type is Prospective, the Recon Phase Setting dialog will open with the following
settings:
Figure 15: Recon Phase Setting dialog - Prospective
Figure 16: Recon Phase Setting dialog – Prospective Phase Changed
Mode
None
Setting
Shift Time (ms) and interval (ms).
Range: -40 ~ +40ms
Interval: Increment is every 10ms from 10ms ~ 40ms
Example:
If shift time is -20 ~ +10 and interval is 10, then four phases (-20ms, -10ms, 0ms, and
10ms) will be created.
Series Comment
A comment can be added for each series. If the scan type is Retrospective or Prospective, the
Add phase information check box will be shown. This option allows you to add phase
information to the beginning of the series comment. The phase information displays next to
the Add phase information check box.
AQ-IN-ROD-USER-EN-4.4A
14
For example, if you check the Add phase
information check box, the series comment
will appear as shown below:
[Seg.:
75%] This is a test.
Maximum length for the series comment is 52 characters, using the English alphabet and
numbers (ASCII). If the Add phase information checkbox is checked, the maximum length
allowed is 37 characters, because 15 characters are reserved for the phase information.
Preset and Reset Buttons
A preset is a set of predefined values that you can
define yourself. AQi provides five presets. Each
preset can define different R.O.D. parameters.
To apply a preset, click the preset button you would like to use. If you would like to save the
current R.O.D. parameters as a preset, right-click on a preset button. This will open a preset
dialog as shown in Figure 17:
A
B
Figure 17: Preset dialog
The current preset parameters are displayed on the left side of the Preset dialog (bounded in
a red square and labeled “A” in Figure 17). The text box displays the preset name. You can
change this name by entering a new name and clicking Save.
The center of the dialog (bounded in a green square and labeled “B”) contains a list of
checkboxes, each of which corresponds to the parameter in section A on the same row.
Check these boxes to enable and set the corresponding parameter for that preset.
For example, if you were to open the preset dialog for Preset 1, check the first check box
(FOV), and then click the Save button, the FOV parameter value that is currently shown on
the R.O.D. panel is saved in Preset 1.
15
AQ-IN-ROD-USER-EN-4.4A
Since necessary R.O.D. parameters or units are different depending on the scan type, AQi
provides three types of presets as shown in the table below. The appropriate presets are set
based on the scan type when images are loaded.
Preset Name
FOV (X, Y)
Num of Slice
Spacing
Thickness
Filter
Correction
Reconstruction
Phase
Add Phase Info
Se Comment
Preset Type 1
Normal
Volume
O
O
O
O
O
O
X
O (mm)
O
O
O
O
O
O
X
X
X
O
Preset Type 2
Dynamic C Dynamic I
O
O
O
O
X
X
X
X
O
O
O
O
O
O
X
X
X
O
X
O
X
O
Preset Type 2
Retrospective Prospective
O
O
O
O
O
O
O (mm)
X
O
O
O
O
O
O
O
O
O
O
O
O
O: Show, X: Hide. (When applicable, units are shown in parentheses.)
Reset
Click the Reset button to reset all R.O.D.
parameters to the original settings for the
current series.
Start Reconstruction
To request reconstruction, click the OK button in the R.O.D. tool panel (see Figure 4 on page
5). Once the OK button is clicked, AQi starts communication with SCENARIA. The OK button
is temporarily disabled while it waits for a response from SCENARIA. Once the OK button is
enabled again, you can request the next reconstruction.
While reconstruction is in progress, the status is shown in the tool bar as an icon. Move the
mouse cursor over the icon to show a tooltip for the current status.
Figure 18: Reconstruction status icon
AQ-IN-ROD-USER-EN-4.4A
16
Icon
Status
Reconstruction status is idle. There is no request for reconstruction.
AQi is not connected with SCENARIA.
R.O.D. does not support the currently loaded data.
AQi is sending a reconstruction request to SCENARIA.
SCENARIA is reconstructing data.
AQi is receiving reconstructed data.
AQi is ready to show reconstructed data.
There is an error while requesting reconstruction.
There is an error while communicating with SCENARIA.
When reconstruction is successfully completed and the reconstructed image is ready to be
displayed in AQi, the following message will pop up:
Figure 19: Notification Message
Click the Yes button to close the message and display the R.O.D. series list, as shown in
Figure 20. You can select a series to load from this list.
Click the No button to close the message. When you would like to load the series, simply
click the status icon (
below).
) in the top bar. This will show the R.O.D. series list (see image
17
AQ-IN-ROD-USER-EN-4.4A
Figure 20: R.O.D. Series List
The R.O.D. series list does not support image display if the original data is a Dynamic scan.
In order to load the image, you need to go back to the Patient List and load the image into
the AQi Viewer. In this case, the following message will pop up:
Figure 21: Notification Message for Dynamic Scan
AQ-IN-ROD-USER-EN-4.4A
18
Error and Information Messages
Code
Message
1
Loaded data is not supported by R.O.D. R.O.D. only supports the data from a local drive.
Please select the local drive in the Patient List.
2
Loaded data is not supported by R.O.D. R.O.D. only supports the data scanned by SCENARIA.
3
Unable to recognize the connection with SCENARIA. Please check if SCENARIA is already
turned ON.
4
Unable to recognize a connection with RRServer2. Please contact Customer Service for assistance.
5
Loaded data is not supported by R.O.D. R.O.D. does not support Tilt data.
6
Loaded data is not supported by R.O.D. R.O.D. does not support the data that has non-uniformly spaced.
7
R.O.D. does not support loading series from Viewer and switch the window. Please go back to
Patient List and load the series.
200
Unable to get SCENARIA system information. Please contact Customer Service for assistance.
201
There is no reconstruction filter information in the system information from SCENARIA. Please
contact Customer Service for assistance.
202
There is no Intelli IP information in the system information from SCENARIA. Please contact
Customer Service for assistance.
300
Unable to get SCENARIA image information from the loaded data. Please try again.
301
Loaded data is not supported by R.O.D. R.O.D. does not support data that is combined in
series by SCENARIA.
302
Loaded data is not supported by R.O.D. R.O.D. supports only the following scan types: Normal,
Volume, Dynamic, Retrospective and Prospective scan.
303
Loaded data is not supported by R.O.D. R.O.D. does not support the data after image processing.
304
Loaded data is not supported by R.O.D. R.O.D. does not support the data after post Reconstruction and image processing.
305
Loaded data is not supported by R.O.D. R.O.D. does not support any post-reconstruction data.
R.O.D. supports only the Normal, Volume, Dynamic, Retrospective and Prospective scan types.
306
Loaded data is not supported by R.O.D. If the ECG scan option is not installed on SCENARIA,
R.O.D. does not support the data which was scanned by ECG. Please check whether the ECG
scan option is installed on SCENARIA.
400
Failed to check RawData for loaded data. There is not enough memory in client PC. Please
restart AQi and the AquariusNET Server.
401
Failed to check RawData for loaded data. An unexpected error occurred during communication.
Please restart AQi and the AquariusNET Server.
402
Failed to check RawData for loaded data. A time-out occurred during communication. Please
try again.
403
There is no RawData in SCENARIA corresponding to the loaded data.
404
There is insufficient RawData corresponding to the loaded data. R.O.D. does not support insufficient RawData.
19
AQ-IN-ROD-USER-EN-4.4A
Code
Message
405
Loaded data is not supported by R.O.D. R.O.D. does not support data that is combined in
series at SCENARIA.
406
Loaded data is not supported by R.O.D. R.O.D. does not support data that was scanned by skip
scan.
407
Failed to check RawData for loaded data. An unknown error occurred during communication.
Please restart the AquariusNET Server.
407
Failed to check RawData for loaded data. Network has been disconnected during communication. Please check network connection and configuration to SCENARIA.
407
Failed to check RawData for loaded data. A time-out occurred during communication. Please
retry again.
407
Failed to check RawData for loaded data. Data received from SCENARIA is invalid. Please
restart AquariusNET Server and SCENARIA.
407
Failed to check RawData for loaded data. Failed to read the file on R.O.D. Please restart the
AquariusNET Server and SCENARIA.
407
Failed to check RawData for loaded data. Failed to write to the file on R.O.D. Please restart the
AquariusNET Server and SCENARIA.
407
Failed to check RawData for loaded data. Failed to delete the file on R.O.D. Please restart the
AquariusNET Server and SCENARIA.
407
Failed to check RawData for loaded data. Network authorization failed. Please contact Customer Service for assistance.
407
Failed to check RawData for loaded data. An unexpected error occurred during communication.
Please restart the AquariusNET Server and SCENARIA.
500
Failed to register Reconstruction queue. There is not enough memory in client PC. Please
restart AQi and the AquariusNET Server.
501
Failed to register Reconstruction queue. An unexpected error occurred during communication.
Please restart AQi and the AquariusNET Server.
502
Failed to register Reconstruction queue. A time-out occurred during communication. Please try
again.
503
Failed to register Reconstruction queue. An unexpected error occurred during communication.
Please restart SCENARIA.
504
Failed to register Reconstruction queue. Reconstruction parameter error occurred. Please contact Customer Service for assistance.
505
Failed to register Reconstruction queue. Reconstruction queue registration error occurred.
Please restart SCENARIA.
506
Failed to register Reconstruction queue. There is not enough space on SCENARIA HDD.
Please back up or delete some data to free disk space in SCENARIA.
507
Reconstruction queue has successfully registered; however, an unknown error occurred while
sending DICOM data to the AquariusNET Server. The DICOM send destination is not configured correctly in SCENARIA. Please contact Customer Service for assistance.
508
Failed to register Reconstruction queue. The number of Reconstruction queues that can be registered at a time has been exceeded. Please wait and try again.
509
Failed to register Reconstruction queue. An unknown error occurred during communication.
Please restart the AquariusNET Server and SCENARIA.
AQ-IN-ROD-USER-EN-4.4A
20
Code
Message
509
Failed to register Reconstruction queue. Network has been disconnected during communication. Please check network connection and configuration to SCENARIA.
509
Failed to register Reconstruction queue. A time-out occurred during communication. Please
retry again.
509
Failed to register Reconstruction queue. Data received from SCENARIA is invalid. Please
restart the AquariusNET Server and SCENARIA.
509
Failed to register Reconstruction queue. Failed to read the file on R.O.D. Please restart the
AquariusNET Server and SCENARIA.
509
Failed to register Reconstruction queue. Failed to write to the file on R.O.D. Please restart the
AquariusNET Server and SCENARIA.
509
Failed to register Reconstruction queue. Failed to delete the file on R.O.D. Please restart the
AquariusNET Server and SCENARIA.
509
Failed to register Reconstruction queue. Network authorization failed. Please contact Customer
Service for assistance.
509
Failed to register Reconstruction queue. An unexpected error occurred during communication.
Please restart the AquariusNET Server and SCENARIA.
510
A time-out occurred while receiving DICOM data from SCENARIA. Would you like to continue
to wait for DICOM data? Yes: Continue to wait. No: Cancel.
511
An unexpected error occurred in the AquariusNET Server. (Error:-25) Please contact Customer
Service for assistance.
512
The AquariusNET Server failed to reserve memory for Reconstruction image; however; the
image will be received without any problem. (-1001) Please wait.
513
The AquariusNET Server failed to reserve memory for Reconstruction image; however; the
image will be received without any problem. (-1004) Please wait.
514
Failed to register Reconstruction queue. Number of slices should be 3000 or less. Please check
the Reconstruction parameters.
600
Failed to receive the first Reconstruction image from SCENARIA. Please restart the AquariusNET Server. (Error: XX)
601
Failed to load Reconstruction image. Please contact Customer Service for assistance.
602
Reconstruction is successfully completed. Reconstruction image is available in the Patient List.
Please go back to Patient List and reload the image. ( -24)
603
Failed to detect Sub Series. Please contact Customer Service for assistance. (Error: -5)
604
AQi Client has successfully received the Reconstruction image. Please go back to Patient List
and load the image. ( -1001)
605
AQi Client has successfully received the Reconstruction image. Please go back to Patient List
and load the image. ( -1004)
606
Failed to load Reconstruction images. Please contact Customer Service for assistance.
607
Failed to show Reconstruction images. Please restart AQi Client.
700
Unable to recognize the connection with RRServer2. Please contact Customer Service for
assistance.
701
Network connection to SCENARIA has been disconnected. Please check network connection
and configuration to SCENARIA.
701
Network has been disconnected during communication. Please check network connection and
configuration to SCENARIA.
21
AQ-IN-ROD-USER-EN-4.4A
Code
Message
701
A time-out occurred during communication. Please try again.
701
Data received from SCENARIA is invalid. Please restart the AquariusNET Server and SCENARIA.
701
Failed to read the file on R.O.D. Please restart the AquariusNET Server and SCENARIA.
701
Failed to write to the file on R.O.D. Please restart the AquariusNET Server and SCENARIA.
701
Failed to delete the file on R.O.D. Please restart the AquariusNET Server and SCENARIA.
701
Network authorization failed. Please contact Customer Service for assistance.
701
An unexpected error occurred during communication. Please restart the AquariusNET Server
and SCENARIA.
AQ-IN-ROD-USER-EN-4.4A
22