1
Munis
Munis
1
2
3
New User Information
1.1
Accessing Munis on Your Computer
6
1.2
Your Munis v10.5 user profile and settings
7
1.3
Munis Menus
11
1.4
My Workflow
12
1.5
Dashboard Overview
14
Munis v10.5 Dashboard
2.1
Dashboard v10.5 & Tyler Menu
16
2.2
Dashboard v10.5 - Apply a Template
18
2.3
Dashboard v10.5 - Web Parts
24
2.4
Your Munis v10.5 user profile and settings
26
User Guides
3.1
4
5
User Guides
31
Club Accounts
4.1
Club Detail History
33
4.2
Club Account Balances
36
4.3
Club Expense Inquiry
40
4.4
Club Funding Source Inquiry
43
Employee Self Service
5.1
ESS Overview
47
5.2
ESS - Reset Password
56
5.3
Trouble Logging into ESS?
60
6
7
8
Financials
6.1
Admin Secretary Club Account Numbers (Project Strings)
63
6.2
"Bottom Line" YTD Budget Report
66
6.3
Scheduling a Recurring Report
70
6.4
Departmental Budget Information Overview
75
6.5
YTD Budget Report - Detail
77
Human Resources
7.1
Personnel Actions Entry
82
7.2
Employee Actions Inquiry
91
7.3
Accessing Employee Accruals
93
7.4
Originator's Approved Actions Digest
96
7.5
Originator's Pending Actions Digest
98
Payroll
8.1
9
10
Payroll Time Sheet Approvals in Munis
100
Purchasing
9.1
Purchasing - Some Definitions & Tips
107
9.2
Rejected Purchase Requisitions
110
Tips & Tricks
10.1 Enable right click on a Mac
113
10.2 iDevice: Configuring Access to the Virtual Private Network
116
10.3 iDevice: Remote Desktop App -- Configuring PocketCloud
118
10.4 iDevice: Using PocketCloud to Access Munis
120
10.5 The Munis Application Launcher
122
10.6 Quick Launch
124
10.7 Saving Scanned PDF's
125
11
10.8 Scanning Documents for Use in Munis
127
10.9 Using AnyConnect to Access Munis Outside the District (PC)
130
10.10 Using AnyConnect to Access Munis Outside the District (Mac)
134
Web Favorites
11.1 My Programs
139
11.2 Club Accounts
143
11.3 Employee Lookup Favorite
146
11.4 Webmail Favorite
148
11.5 Workflow Action Daily Digest
150
New User Information
Munis - 5
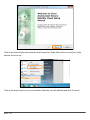
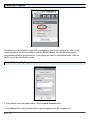
Accessing Munis on Your Computer
Before you begin using Munis, follow these steps to place a shortcut on your desktop for future
access.
Getting to this tutorial
1.
2.
3.
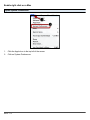
Log in www.k12northstar.org using your f-number and password.
Click on the Munis link (lower left, under Useful Links).
Click on the New User tutorial called Accessing Munis on Your Computer.
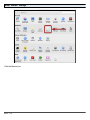
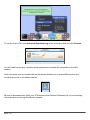
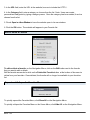
Download the appropriate file for your computer operating system
Download for Macs
Download for Windows
Save the file
PC users: If the file does not save automatically to your desktop, find it in your downloads and
drag it to your desktop.
Mac users: If the file does not save automatically to your desktop, open your downloads folder or
the downloads manager and drag the Remote Desktop file to your computer desktop.
Munis - 6
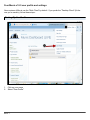
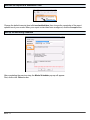
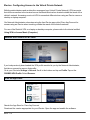
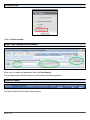
Your Munis v10.5 user profile and settings
New versions of Munis use the "Web Client" by default. If you prefer the "Desktop Client" (it's the
one you're used to), follow these steps...
Finding My User Profile
1.
2.
Click on your name
Select "User Profile"
Munis - 7
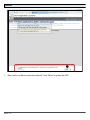
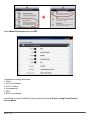
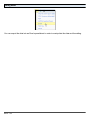
GDC or GWC
1.
2.
Make your selection, either GDC or GWC
Click "OK"
Munis - 8
Allow Pop-ups
1.
To allow pop-ups, select "Options for this site" and click "Always allow"
Munis - 9
ActiveX
1.
New versions of Munis means new ActiveX! Click "Allow" to update the GDC.
Munis - 10
Munis Menus
Menus are divided by Munis products, and then by applications within those products. For
example, Financials is a product, and Accounts Payable is an application within that product.
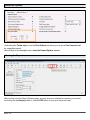
Tyler Menu - Search for programs
1. Tyler Menu
There are two options to find menus. Drill down into the menus or
2. Select search
3. Type the menu you are looking for
4. Open up the search results
You can right click to add it to your favorites or just open the menu
Munis - 11
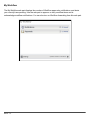
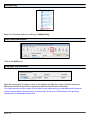
My Workflow
The My Workflow web part displays the number of Workflow approvals, notifications, and alerts
you currently have pending. Use the web part to approve or deny workflow items and to
acknowledge workflow notifications. You can also turn on Workflow forwarding from this web part.
Munis - 12
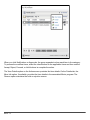
When you click Notifications or Approvals, the group expands to show each item in the category.
To process the workflow items, select the check boxes for the applicable items and then use the
Accept, Reject, Forward, or Hold buttons to complete the action.
The View Details option on the Actions menu provides the item details. On the Details tab, the
More Info option, if available, provides the item details in the associated Munis program. The
Reason option maintains the hold or rejection reason.
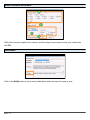
Munis - 13
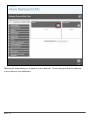
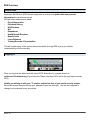
Dashboard Overview
This is an example of the Tyler Dashboard with Web parts already added.
Munis - 14
Munis v10.5 Dashboard
Munis - 15
Dashboard v10.5 & Tyler Menu
10.5 Dashboard
Munis - 16
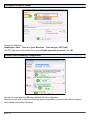
Tyler Menu - Search for programs
1. Tyler Menu
There are two options to find menus. Drill down into the menus or
2. Select search
3. Type the menu you are looking for
4. Open up the search results
You can right click to add it to your favorites or just open the menu
Munis - 17
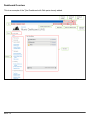
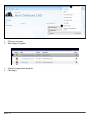
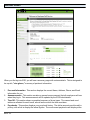
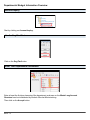
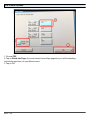
Dashboard v10.5 - Apply a Template
The first time you log into Munis your screen should look similar to the snapshot below. Your
favorite programs do not come over with the new upgrade. We have created templates to add
back the basic menus. Please follow the instructions below.
Munis - 18
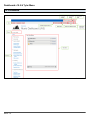
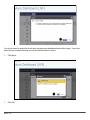
1.
2.
Click on your name.
Select Apply Template
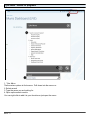
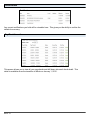
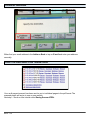
1.
2.
Check the appropriate template.
Click Apply
Munis - 19
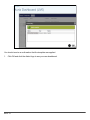
You do not need to select the check box, because your dashboard should be empty. If you had
items that you wanted cleared, you could check the box to clear it.
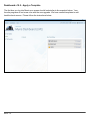
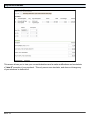
1.
Click Save
1.
Click OK
Munis - 20
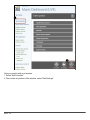
You should receive a confirmation that the template was applied.
1.
Click OK and click the district logo to see your new dashboard.
Munis - 21
Now you need to edit your favorites.
1. Select "Edit Favorites"
2. Then at the very bottom of the window, select "Edit Settings"
Munis - 22
Click No for all the items in the red box and then save settings.
Click the district Logo and it will refresh your home page.
Munis - 23
Dashboard v10.5 - Web Parts
You have the ability to customize your dashboard web parts. You can have certain web parts
open or closed and you can drag and drop them to orient them on your dashboard.
1.
Select Web Parts
Munis - 24
Selecting the folder allows you to open or close a web part. You can drag and drop the web parts
to move them on your dashboard.
Munis - 25
Your Munis v10.5 user profile and settings
New versions of Munis use the "Web Client" by default. If you prefer the "Desktop Client" (it's the
one you're used to), follow these steps...
Finding My User Profile
1.
2.
Click on your name
Select "User Profile"
Munis - 26
GDC or GWC
1.
2.
Make your selection, either GDC or GWC
Click "OK"
Munis - 27
Allow Pop-ups
1.
To allow pop-ups, select "Options for this site" and click "Always allow"
Munis - 28
ActiveX
1.
New versions of Munis means new ActiveX! Click "Allow" to update the GDC.
Munis - 29
User Guides
Munis - 30
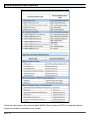
User Guides
These Munis User Guides were distributed during the initial Munis training.
Munis User Manual
General Ledger Manual Overview
Purchasing Manual
•
Updated 3-8-2-12
Invoice Approval Manual
•
Updated 3-22-2012
Personnel Actions Procedures for Schools and Departments
•
Updated 4-17-2013
Payroll Time and Attendance Manual
User Guide Addenda
These items were contributed by individual departments as supplementary instructions.
Project String Inquiry
•
Contributed by Nichole Wood, Chief Accountant (3-22-2012)
Time Entry Corrections & Substitutes
•
Contributed by Valerie Stilipec, Payroll Department
Specific Requisition Instructions
Travel, Blanket PO, Central Stores, etc.
•
Contributed by Bart Grahek, Purchasing Department (3-08-2012)
Munis - 31
Club Accounts
Munis - 32
Club Detail History
Run a report that will show what has been charged and received in a particular club.
Open Club Detail History
Click on Club Detail History on the My Programs sidebar.
Define the report
Click on the Define button.
1. Template Selection
You can change the report title if you wish. This template is a shared template, though. Keep in
mind that if you change the report title, the next user (MUNIS-wide) who runs this report will see
your report title.
Munis - 33
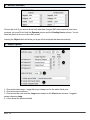
2. Account Selection
Choose the club. If you want to know both what was charged AND what deposits have been
received, you must fill out both the Expense column and the Funding Source column. You do
have the option to do one or the other as well.
Leaving the Object blank will allow you to get ALL the objects that have had activity.
3. Report Options
1. Choose the date range. I suggest that you always run for the whole fiscal year.
2. Choose the sort sequence.
3. Choose whether you want the Long account name or the Short account name. I suggest
always choosing Long.
4. Leave these two boxes checked.
Munis - 34
Accept
Click on the Green Check Mark to accept, or hit Enter.
Choose your output
Choose how you want to ouput the report. I suggest using the PDF report.
Munis - 35
Club Account Balances
How to run the Club Account Balances report to get current available balances for your clubs.
Click on the Club Account Balances link on the My Programs sidebar. A new window will open in
Internet Explorer.
Log In
Use your f# and password just like when you log into Munis. Hit Enter.
Choose a Location and Fiscal Year
It should default to your location. If it doesn't, you can use the drop down to choose the correct
location. Then, choose the fiscal year you would like to see balances for. It will default to the
current fiscal year.
Munis - 36
The report is really meant to be viewed on screen. If you try to print it, be prepared to get out some
tape. My suggestion, if you want a printed copy, is to export it to Excel and manipulate it so that you
can print it to one page wide.
Export to Excel
Click on the down arrow, and choose Excel.
You will probably get a dialoge box open to ask if you want to open or save the file. Choose either.
Munis - 37
Format the Excel document
When you go to print the report, change the scaling option from No Scaling to Fit All Columns on
One Page.
Munis - 38
Change the margins to Narrow.
Change the orientation from Portrait Orientation to Landscape Orientation.
Now you are ready to print the report. If you want to see detail of what has been paid or received in
any of these accounts, see the chapters on inquiry, or go on to the next chapter to print a detail
report.
Munis - 39
Club Expense Inquiry
Use the online inquiry in Munis to see what has been charged to a particular club.
Open Expense Inquiry
Click on "Club Expense Inquiry" on the "My Programs"
Munis - 40
Explore the Expense Inquiry screen
Find the Account
Click on the magnifying glass to find.
Define the account string to look up. You can fill in any combination of the segments.
Munis - 41
Look at the detail
Notice that there are no budgets. Club accounts don't have budgets. The Actual (Memo) line is
what has been spent so far in the current year. If there were open purchase orders, there would be
an amount in the Encumbrance line. You can see open requisitions on the Requisition line. To
view the detail, click on the file folder icon.
You can see the detail of what was spent from here.
You can also print from this screen, or export to Excel. Use the "Print", "Display", "PDF", "Save",
"Excel", or "Word" buttons to output a report from the detail screen.
Highlighting a line in the detail listing, and then clicking on the Detail button will take you to the
backup (invoice, purchase order) inquiry program.
Munis - 42
Club Funding Source Inquiry
Use the online inquiry in Munis to see what deposits have been credited to a club account.
Open Funding Source Inquiry
Click on Funding Source Inquriy on the My Programs sidebar.
Munis - 43
Explore the Funding Source Inquiry screen
Find the Account
Define the account string to look up. You can fill in any combination of the segments.
Munis - 44
Look at the detail
Notice that there are no budgets. Club accounts don't have budgets. The Actual (Memo) line is
what has been received so far in the current year. To view the detail, click on the file folder icon.
You can see the detail of what was deposited here.
You can output this information by using the "Print", "Display", "PDF", "Save", "Excel", or "Word"
buttons.
Highlighting a line in the detail listing, and then clicking on the Detail button will take you to the
receipt inquiry program.
Munis - 45
Employee Self Service
Munis - 46
ESS Overview
Introduction
Employee Self Service (ESS) allows employees to access and update their own personal
information though Internet access.
ESS will allow employees to view:
•
Payroll Information
•
Paycheck History
•
W-4 Elections
•
W-2
•
Dependents
•
Health Benefit Elections
•
Benefit Costs
•
Leave Balances
•
Training Records & Opportunities
This will review many of the options that are available through ESS to give you a better
understanding of its functionality.
Logging In
Once you log into the district website, select ESS. Alternatively, navigate directly to
selfserve.k12northstar.org (If you leave the District, the direct URL will be the only way to access
ESS)
Initially you will sign in with your "f" number and the last four of your social security number.
Munis will require that you change your password upon the first login. You are also required to
change your password every six months.
Munis - 47
Start Page
There are three links at the top right of the screen:
•
Home
•
My Account (gives you login and password information)
•
Log Out (use this each time you are done with your session)
Left side bar:
•
Employee Self Service (Access for all the menus)
Munis - 48
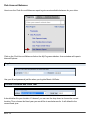
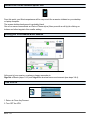
Welcome Screen
When you first log into ESS, you will see a summary page with various details. This is designed to
be a quick, "at-a-glance," summary of pertinent information.
1.
2.
3.
4.
Personal Information - This section displays the current Name, Address, Phone, and Email
information for you.
Announcements - This section contains a general announcement that all employees will see
when they log in. This announcement will be updated by the ESS Administrator.
Time Off - This section shows a graphical summary of leave types. The earned and used
totals are reflected for each leave, as well as the month the time was taken.
Paychecks - This section displays your paycheck history. The dollar amounts are blurred for
privacy, with a link to display the actual figures. The most recent paychecks will display at the
Munis - 49
5.
top.
Resources - This section displays important documentation and links.
Supervisors (e.g. building principals) are able to view leave for their staff in the section "Time Off."
ESS Side Menu
There are numerous options available from the left side menu.
Benefits
This section displays your current benefit elections. During the November Open Enrollment, you
will be given the opportunity to change your elections with links to the pertinent documents to
download and submit to Human Resources, as needed.
Munis - 50
Certifications
Any current certifications you hold will be viewable here. This gives you the ability to confirm the
details for accuracy.
Pay/Tax Information
This screen allows you to view all your paychecks and drill down into each check detail. This
detail is available since the transition to Munis on January 1, 2012.
Munis - 51
W-2
This screen allow you to view your W-2 elections.
1. The current year is displayed by default; previous years can be viewed with the drop down.
2. Click here to view an image of your actual W-2.
W-4
This screen allows you to view your current federal withholding elections.
Munis - 52
Paycheck Simulator
This screen allows you to view your current deductions and to make modifications and recalculate
a "what if" example of your paycheck. This only serves as a simulator, and does not change any
of your elections or deductions.
Munis - 53
Personal Information
This screen allows you to view and make changes to the personal information on file in Munis.
The items in green are selectable to edit your information. You can also see your dependents and
gives you the ability to confirm details for accuracy.
Employee Profile
This screen gives you an overview of all your personal information for accuracy. If any
discrepencies are discovered, please contact the Human Resources Department
Munis - 54
Time Off
This screen gives you leave totals for earned, taken and available.
Supervisors have the ability to view your staff accruals in the employee drop down.
Training Opportunities
This screen lists available training opportunities.
Munis - 55
ESS - Reset Password
This lesson gives a step by step demonstration of the password reset process in Munis ESS.
Logging In
After navigating to Munis ESS @ https://selfserve.k12northstar.org
Click the "Log In" text in the upper right hand corner of the browser.
Log in problems
1.
If you can't log in to ESS, first try resetting your password using the "Forgot your password?"
link.
Munis - 56
Hint Retrieval
1.
2.
Your username is your "F" number. For example f12345
Click "Retrieve hint"
Hint retrieval success
1.
The system will send password reset information to your email address.
Munis - 57
Hint retrieval email notification
1.
2.
If you set a "Hint" when you updated your password the last time, it will be displayed here.
If the 'Hint" doesn't help, click this link to get a new temporary password.
New password generation
Clicking "Submit" will send another email to you with a temporary password.
Munis - 58
Temporary password email
1.
Now you can log in to ESS with your new temporary password.
Incorrect Email Address?
Most current employees will have their district email address in ESS. Subs, temps, retirees and
some other users will likely have a personal email address in ESS.
If your email address in ESS is invalid or hasn't been entered, HR can enter or modify your email
address so that you can take advantage of the password retrieval function.
Munis - 59
Trouble Logging into ESS?
Important notes about ESS
•
Your user name is always your "f" number.
•
You have to reset your password every six months.
•
Your ESS password is seperate from your password used to do school district business.
•
The password requirement must be at least 6 characters long, contain at least 1 numeric
character and contain at least one uppercase character and one lowercase character
•
If you get a message that your account has been locked you must have it reset. Do this
by calling Natalie 452-2000 ext 11219.
•
You can access ESS directly by going to https://selfserve.k12northstar.org
If your are having trouble remembering your password click the "Forgot your password" link.
Type in your "f" number, and click "Retrieve Hint."
Munis - 60
You will receieve an email with the hint your created. If your hint does not help you to log in, you
can click the link to generate a temporary password.
You must click "Submit" on this screen to email yourself a temporary password. Follow the
directions on the screen once it says an email was sent.
You will receive an email with a temporary password.
Go to the log in page again and use your temporary password.
You will be prompted to change your password. PLEASE put in a good password hint!
**If you get an error message saying that it did not like your current (old) password, try logging in
with the new password you just tried creating**
Munis - 61
Financials
Munis - 62
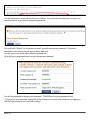
Admin Secretary Club Account Numbers (Project Strings)
Using the Club Accounts "favorite" to help identify the correct account number for related
expenditures.
Open Your Club Accounts Favorite
If you haven't already made a "favorite" for the Club Accounts Report, find the tutorial on the Munis
Training Materials page at the district Website.
Additional Information On the Club Accounts Report
Some account information has been added to the report to assist you in finding the correct project
string to use with your club accounts.
You will want to refer to this chart when looking for the entire project string.
Munis - 63
Tyler Menu
On your Munis home page, locate and open Expense Inquiry for expenditures.
To inquire on revenues, click on Funding Source Inquiry.
Right-click on either or both of these selections to add them to your list of favorite programs, if
desired.
Find the Project String
1. Click the Find button.
2, 3, 4. Enter the ReptUnit, Category, and Activity for the account you seek as shown on the Club
Accounts Report page.
5. To view all of the expenditures for a club, leave the Object blank. Put in all or part of the Object
to narrow the results. "Supplies" are 24500. The asterisk is viewed by the search as a wild card.
6. Click the Accept button.
Munis - 64
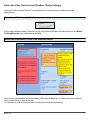
Verify the Project String
You can navigate through the different expenditure accounts by using the navigation buttons at the
bottom of the page (orange rectangle).
Browse a list of records by clicking on the button outlined in red. From this list, it's easy to see the
complete Project String.
Double-click on a line to view the balance information.
Munis - 65
"Bottom Line" YTD Budget Report
The example acount segments in this tutorial will yield results for regular instruction supplies. Your
results may vary depending on the account segments you enter in Step 3.
Step 1.
From the Departmental Functions menu, click on YTD Budget Report.
Step 2.
Click on Seg Find.
Step 3.
Click on the Query button.
Munis - 66
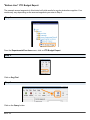
Step 4.
Click on the Load* tab to find predefined reports.
Click on Bottom Line to highlight that report.
Click the Execute button to run the report.
Step 5.
Once you have clicked on the Execute button, you will be returned to the YTD Budget Report
pane.
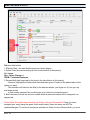
Click on Report Options to define the display parameters for the report.
Munis - 67
Step 6.
This picture shows the set-up for the Bottom Line report.
Year/period = 2012/99 will include the memo balances.
Step 7.
Click on the Additional Options tab.
Configure the Additional Options tab including the items in orange as shown above.
Munis - 68
Step 8.
Accept your report options configuration, then close that pane (X out).
Step 9.
Back on the YTD Budget Report pane, click on the PDF button to render the report according to
your report options.
Munis - 69
Scheduling a Recurring Report
Follow these instructions to schedule a report to run at a chosen interval and receive email
notification of its completion.
The YTD Budget Report will be used in this example, but the same principles apply to any Munis
report.
Open the Report
Click on the name of the report you'd like to configure to run automatically.
Seg Find
Add as many elements to your Seg Find as you need to get the information you will want on this
recurring report, then click the Accept button.
Access the Report Options
Click on Report Options.
Munis - 70
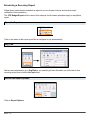
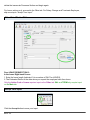
Execute the Report at a Scheduled Time
Change the default execute time to At a scheduled time, then choose the remainder of the report
options to suit your needs. When your report content has been configured, click the Accept button.
Set Up the Recurring Schedule
After completing the previous step, the Munis Scheduler pop-up will appear.
First, click on the Recur button.
Munis - 71
Munis Scheduler Recurrence
Define the recurrence pattern, the run time, and the range of recurrence to meet your needs, then
click OK.
Notification
Click on the Notify button to set up email notifications when the report is ready to view.
Munis - 72
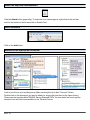
Munis Scheduler Notifications
Unless you want to be notified at any other point in the process, start with the Clear All button.
Then, in the top Event drop down, select the option When job completes, include document
link(s) for ease of locating the report in Munis. Input your f-number for notification delivery to your
email Inbox. Click the OK button at the bottom right of the pane (not pictured).
Output Config
Click on the Output button to finish the scheduler settings.
Munis - 73
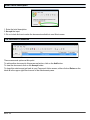
Configure the Report Output
Change the following:
Output type = Save Save in = TylerCM archive Save as type = PDF (.pdf)
The PDF type choice will check the box next to Enable hyperlinks if present. Click OK.
Submit Your Scheduling Configuration
Review your input and click OK when satisfied with the configuration.
Should you ever wish to delete a scheduled report configuration you must notify a Munis Systems
Administrator (Information Systems).
Munis - 74
Departmental Budget Information Overview
Account Inquiry
Start by clicking on Account Inquiry.
Use the Seg Find Feature
Click on the Seg Find button.
Enter Your Departmental Information
Enter at least the first two elements of the department as shown on the Munis Long Account
Structure hand-out distributed by Nichole Wood at Munis training.
Then click on the Accept button.
Munis - 75
View or browse the records
Use the arrow keys to page through the account pages one at a time, or click on the browse button
to view the records as a list.
Export the Records
You can export the records into Excel to view them all on a spreadsheet.
Munis - 76
YTD Budget Report - Detail
This tutorial is meant to be used in conjunction with the Financials segment of the Munis training
documentation.
YTD Budget Report
Locate and click on the YTD Budget Report option under Departmental Functions.
Use the Seg Find
Click on the Seg Find button.
Complete Seg Find Screen
The above search would yield all of the General Fund Accounts for Lathrop High School.
Once you have entered account segments, click on the Accept button.
Munis - 77
Report Options
Notice that the Seg Find returned a number of records, in this case 23.
Click on the Report Options to define the parameters for your report output.
Munis - 78
Report Sequence & Print Options
Refer to the Financials portion of the training manual for descriptions of all the fields (starting on
page 36).
In order to configure a report with detail, you must uncheck Totals only.
Note: The "period" referred to in the Year/period field refers to the month of the fiscal calendar that
the report should cover. For example, 1 = July, 5 = November. The period = 12 will yield the entire
year.
Munis - 79
Additional Options
Unchecking the Totals only box on the Print Options tab allows you to opt to Print Journal detail
for a specified period.
After clicking on the Accept button, close the Report Options screen.
Viewing the Report
After closing out of the Report Options page, you may choose to display the report to your screen
by clicking on the Display button or click the PDF button to view your report as a pdf.
Munis - 80
Human Resources
Munis - 81
Personnel Actions Entry
When an admin secretary is contacted by an employee requesting a change or addition to the
individual’s record that affects status, pay, or position, the secretary requests that the employee
complete and sign the proper form and coordinate it through the employee’s supervisor. Once
completed and signed, the admin secretary scans and saves a digitized copy of the form, letter or
email. The copy will be used as part of the PA when it is initiated.
Please Note: Personnel Actions should only be utilized for the "Action Codes & Areas
Covered" noted below. Creating a Personnel Action Entry does not create a pay record.
Personnel Action Entries will not be entered for ordinary Sick Leave, Personal Leave, or Annual
Leave. However, these three leave types should be noted for payroll purposes in your Munis Time
Entry for the appropriate time frame.
Munis - 82
Personnel Actions Entry Guidelines
Follow the instructions in the tutorial entitled "MUNIS::Saving Scanned PDFs" to make the required
document available in the Munis environment.
Munis - 83
Actions Entry
Begin the Personnel Action by clicking on Actions Entry.
Add a New Data Record
Click on the Add button.
Employee Identitification
Enter the employee's f-number, or click on the ellipses and filter the results to find the employee.
Tab to the next field to auto-fill the remaining employee identification information.
You might get errors at the bottom of the screen or pop-ups warning you that additional Personnel
Actions are pending for this employee. In most cases, there is no conflict between the pending
actions and it is acceptable to proceed.
Munis - 84
Main Tab: What to Fill In
Tab from field to field.
1. Effective Date = the date that the personnel action begins.
2. Action Code (choose according to chart in Introduction to this lesson):
LV - Leave;
SAL - Salary Change; or,
TERM - Terminate Employee.
3. Reason/Auth (as/if required by the chart in the introduction to this lesson).
- Shortcut: Highlight the Reason/Auth field and then type in 2 letters of the abbreviation of the
option you want.
The selection will load into the field (in the above example, you'd type in LA). Use your up
and down arrows
to find nearby reasons if the one that pops in is close but not exactly correct.
4. Brief comment. Include the account number that this personnel action will be charged to, as
appropriate.
Please Note: Be careful when choosing the Action Code and Reason/Auth! Once you have
accepted your entry (using the green check mark button), those two items can NOT be
updated/changed. To correct an erroneous selection for Action Code or Reason/Auth, you must
Munis - 85
delete the inaccurate Personnel Action and begin again.
For Leave actions only, proceed to the Other tab. For Salary Change and Terminate Employee,
skip one step to "Accept Your Input."
Other Tab: What to Fill In
For a LEAVE REQUEST ONLY:
In the Lower Right-hand Corner:
1. Enter the leave length (indicate if it is a number of DAYS or HOURS).
2. The Estimated Return is the date when you expect the employee back from leave.
Only the Action Code of Leave requires input on the Other tab. SAL and TERM only require input
on the Main tab.
Accept Your Input
Click the Accept button to save your input.
Munis - 86
Attach the Required Documentation
Click the Attach button (paperclip). To make the icon names appear, right-click on the tool bar,
scroll to the bottom of the list and click on Enable Text.
Add a Document
Click on the Add button.
Browse for the Appropriate Document
Look in your file on your building server (Mac users might look in their "Docume" folder).
Double-click on the document you want to attach (or single click and then hit the Open button).
Please see the tutorial entitled "MUNIS::Saving Scanned PDFs" for more detail on how to get the
document into a file that is accessible on the Terminal Server.
Munis - 87
Enter a Brief Description
1. Enter the brief description.
2. Accept the input.
3. Do not check the box to make the document available to non-Munis users.
The Document is Attached
There are several options at this point.
To add another document to this personnel action, click on the Add button.
To view the document, click on the Accept button.
To close this window and get back to your Personnel Action screen, either click on Return or the
black X in the upper right-hand corner of the Attachments pane.
Munis - 88
Review and Release
Review the Action Entry for completeness and accuracy.
If you need to check to make sure that you've attached the required documentation, click on the
Attach button again to view the pdf(s).
When you are satisfied that the Personnel Action Entry is accurate and complete, click on the
Release button.
Where Will It Go?
Click on the Approvers tab if you wish to see the path that this Personnel Action Entry will take.
Munis - 89
Finding a Saved (Accepted) Personnel Action Entry
If you need to review a Personnel Action Entry, open that screen in Munis, then click on the Find
button (magnifying glass).
Find Personnel Action Entries for an Employee
Enter the employee f-number.
Click on the Accept button.
Multiple Personnel Action Entries
Once you've accepted the employee number, all personnel action records associated with this
employee will display. Multiple records, if any, are indicated by a number of pages that can be
scrolled through at the bottom of the pane.
Check the approval status of the record by clicking on the Approvers button.
Munis - 90
Employee Actions Inquiry
Personnel Actions Inquiry is no longer a menu option in the most recent version of Munis, you now
access this information through employee detail. Please see instructions below.
1.
2.
3.
Select the Menu tab
Departmental Functions
Employee Inquiry
1.
2.
Select the finder tool to search by "f" number or name.
Once you have the employee, select Detail.
Munis - 91
1. Select Personnel Actions.
2. Then the green check mark for accept.
The employee and their various Personnel Actions will be displayed.
Munis - 92
Accessing Employee Accruals
This document describes how to find an employees leave balances.
Departmental Functions > Employee Inquiry
1. Begin by clicking on the Find button.
2. Enter the emplyee's f-number (without the f).
3. Click on the Accept button. The employee information will fill in.
View the Detail
Click on the Detail button.
Munis - 93
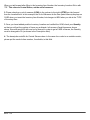
Select Employee Accruals
1. Select the Employee Accruals option.
2. Click on the Accept button.
View in place or select the leave type from the list.
In this example, the Balance column was dragged next to the Accrual Description column for
ease of viewing.
Alternatively, click on the type of leave and then the Accept button.
Munis - 94
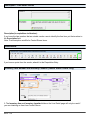
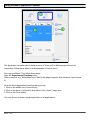
The Full Detail View
This example shows that the employee has just over 145 hours of annual leave and that 142.5
hours have been encumbered through the FNSBSD Munis employee self serve feature for future
time off.
1. Available hours.
2. Pending hours (encumbered through the FNSBSD Munis employee self serve).
3. Page forward or back to view the other type of leave, in this case, because we are viewing the
vacation time, we can change pages to view the detail for sick leave.
Munis - 95
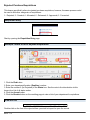
Originator's Approved Actions Digest
Browse a list of all the actions you have entered that have been approved and output-posted to
Munis Live.
Go to Actions Inquiry
Start by clicking on Actions Inquiry.
Find the records
1. Click on the Find button.
2. Enter your f-number in the "User" field (lower case f).
Narrow the results by entering an Entry Date (indicate "before" with < or "after" with the > symbol;
see example).
When you have finished putting in the criteria for your find, click on the Accept button.
View the records
In this example, there are 17 personnel actions entered by this user that have been fully approved
and output-posted.
Click on the Browse button to view the list, or page through the entries to view each record
Munis - 96
individually.
Munis - 97
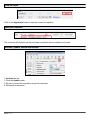
Originator's Pending Actions Digest
Browse a list of all the actions you have entered that are pending approval or pending
output-posting.
Go to Actions Entry
Start by clicking on Actions Entry.
Find the records
1. Click on the Find button.
2. Enter your f-number in the "User" field (lower case f).
You may enter additional information to narrow down the list, such as: Entry Date (narrow your
results, if you wish, by using the > symbol to pull records entered after a specific date, or the <
symbol for all records entered before a specific date); Status; or Action Category.
3. When you have finished putting in the criteria for your "Find," click on the Accept button.
View the records
This user has entered five personnel actions that have not been fully completed.
Click on the Browse button to view the list, or page through the 5 entries to view each record
individually.
Click on the Approvers button for each record to see where the action is in the approval process.
Munis - 98
Payroll
Munis - 99
Payroll Time Sheet Approvals in Munis
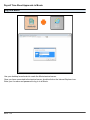
Log in to Munis
Use your desktop icon shortcut to reach the Munis terminal server.
Once you have connected to the terminal server, double-click on the Internet Explorer icon.
Enter your f-number and password to log in in to Munis.
Munis - 100
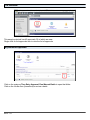
The Workflow
This sample principal has 43 approvals, 35 of which are new.
Single click on the approvals icon to view the list of approvals.
My Workflow Approvals
Click on the category Time Entry Approval: Run Warrant Batch to open that folder.
Click on the Viewer icon (binoculars) to review a batch.
Munis - 101
Verify the Pay Period Dates
If the pay period dates are correct, click Yes.
If incorrect, contact the Payroll Department.
Munis - 102
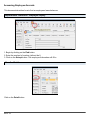
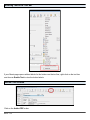
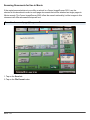
Enabling Text in the Tool Bar
If your Munis page opens without labels for the buttons on the tool bar, right-click on the tool bar
and choose Enable Text to view the button labels.
Review Time Entered
Click on the Adobe PDF button.
Munis - 103
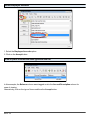
Run the Review Report
The default report style is Standard. Change this option to Review using the drop-down menu.
Click on the green Accept button.
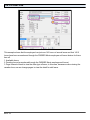
Review the PDF Report
Munis - 104
Batch Approval
After reviewing the submitted time, you can choose to approve, reject, hold, or forward the payroll
time entry batch.
Initiate the action from one of two places, either from the Workflow section of the Time Entry pop-up
screen (A) or by clicking the Update link on your workflow approvals page (B).
There will be an opportunity to leave a brief comment, as applicable.
Munis - 105
Purchasing
Munis - 106
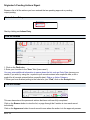
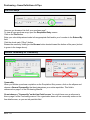
Purchasing - Some Definitions & Tips
List Your Req.s
How can you browse a list of all your purchase reqs?
To view all your purchase reqs, open the Requisition Entry screen.
Click on the Find button.
Enter your school/department code in the appropriate field and/or your f-number in the Entered By
field.
Click the check mark ("Okay") button.
Browse the results by clicking on the Browse button located toward the bottom of the pane (circled
in green in the image above).
General Commodity vs. Commodity
Commodity
When you initiate a purchase requisition on the Requisition Entry screen, click on the ellipses and
choose a General Commodity that best categorizes your entire requisition. This field is
referenced on page 3 of the Purchasing Manual.
Do not choose a "Commodity" on the Line Detail screen. You might have seen a reference to
this on page 8 of the Purchasing manual. Our organization does not use commodity codes on the
line detail screen, so you can tab past this field.
Munis - 107
Description - Line Detail Screen
Description (in requisitions to Vendors):
If you have the item number that an outside vendor uses to identify the line item, put that number in
the Description field.
Note: The description autofills for Central Stores items.
Attachments
If you have a quote from the vendor, attach it to the Requisition Entry.
Inventory Item Number and Inventory Location (Central Stores Orders Only)
1. The Inventory Item and Inventory Location fields on the Line Detail page will only be used if
you are obtaining an item from Central Stores.
Munis - 108
When you tab forward after filling in the Inventory Item Number, the Inventory Location fills in with
"CS." This refers to Central Stores, not the unit of measure.
2. Please check your unit of measure (UOM), in the column to the right AFTER you tab forward
from the Location field. In this example, the Unit of Measure for the item (facial tissues) displays as
CASE when you insert the Inventory Item Number, but changes to BOX when you tab to the TYPE
of Inventory Item.
3. Once you have tabbed past the Inventory Location and verified the UOM, check your Quantity
so that you will get the number of items you anticipate. In the case of facial tissues as shown
above, this order would fill with one box of tissues. In order to get a CASE of tissues, the Quantity
must be changed to 30 (as shown in the Description field).
4. The description autofills for Central Stores orders. In the case of an order to an outside vendor,
please put the vendor's item number, if available, in this field.
Munis - 109
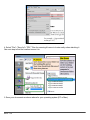
Rejected Purchase Requisitions
This lesson specifically refers to rejected purchase requistions, however, the same process could
be used to find other categories of requisitions:
1 - Rejected; 2 - Created; 4 - Allocated; 6 - Released; 8 - Approved; 0 - Converted.
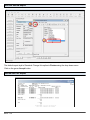
Requisition Entry
Start by opening the Requisition Entry page.
Example: Obtain a List of Rejected Requisitions
1. Click the Find button.
2. Enter your department/location (Dept/Loc) number.
3. Enter the number 1 (for Rejected) in the Status box. See the note in the introduction to this
lesson for a list of all status codes.
4. Click the Accept button.
5. Click the Browse button on the resulting page to view a list of your department's requisitions.
View the List
Double-click on the line of the rejected item you wish to inspect to open the record.
Munis - 110
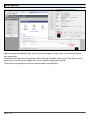
Find the issue
Click on the Approvers button to view the reason for rejection.
Read the Comment
The comment will explain how the purchase requisition was incomplete or incorrect.
Activate, Update, Revise and Release
1. Activate the req.
2. Click the Update button.
3. Revise or correct the requisition as per the comment.
4. Release the requisition.
Munis - 111
Tips & Tricks
Munis - 112
Enable right click on a Mac
Open System Preferences
1.
2.
Click the Apple Icon in the top left of the screen
Clcik on System Preferences
Munis - 113
Enter "Mouse" settings
Click the Mouse icon
Munis - 114
Changing the Mouse Settings
1.
2.
3.
Select the dropdown menu on the right
Click "Secondary Button"
Close the window
Munis - 115
iDevice: Configuring Access to the Virtual Private Network
Building administrators and certain other managers have Virtual Private Network (VPN) accounts
that allow connection to the terminal server that hosts Munis when located outside the reach of the
district's network. Accessing munis via VPN is somewhat different when using an iDevice versus a
desktop or laptop computer.
Our Network Administrator advocates using the free iDevice app called Cisco AnyConnect for
access using an iDevice when traveling outside the reach of the district's network.
For use of the District's VPN on a laptop or desktop computer, please refer to the tutorial entitled
Using VPN to Access Munis (Computer).
Remove the Previous VPN Profile
If you had previously downloaded the VPN profile emailed to you by the Network Administrator,
first take a moment to remove that profile.
Go to your iDevice's Settings > General. Scroll to the bottom and tap on Profile. Tap on the
FNSBSD VPN Profile. Select Remove.
Visit the App Store
Search the App Store for Cisco AnyConnect.
Download the version appropriate for your iDevice. Open the app and enable the software.
Munis - 116
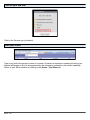
Add VPN Connection
1. Tap on Add VPN Connection.
2. Give the connection a Description (name).
3. Enter this Server Address: webvpn.k12northstar.org
4. Leave the default values for the rest of the pop-up; tap Save.
Make the VPN Connection
Slide the AnyConnect VPN to ON. Enter your f-number and password, then tap on Connect.
Authorized Use Banner
Once you have accepted the pop-up, you're ready to open PocketCloud and access Munis.
If you haven't already configured Pocket Cloud, view the tutorial entitled iDevice: Using
PocketCloud to Access Munis.
Munis - 117
iDevice: Remote Desktop App -- Configuring PocketCloud
Downloading PocketCloud Remote Desktop App gives you the ability to access Munis from an
iPhone or iPad.
Building and district administrators may also access the district's Virtual Private Network (VPN)
when outside the FNSBSD network. See the tutorial entitled iDevice: Configuring Access to the
Virtual Private Network for instructions on how to get access.
Only building and district administrators will be given VPN access to the district's network.
Visit the App Store
In your search bar type PocketCloud. Select the FREE version and download.
Open the app and select Advanced users.
If prompted to send anonymous usage statistics, select NO.
Depending on what operating system you are using, you might get directly to the "connection type"
(see below) or might need to take these steps
1. Tap on My Computers
2. Tap on the plus symbol +
Munis - 118
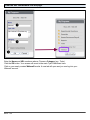
Select Manual Connection and then RDP.
Complete the settings as follows:
1. Munis
2. erp-ts1.fsd.domain
3. your "f" number
4. your password
5. FSD
6. SAVE your settings
Instructions for using PocketCloud are located in the tutorial iDevice: Using PocketCloud to
Access Munis.
Munis - 119
iDevice: Using PocketCloud to Access Munis
If you have not already followed the instructions in the tutorial entitled iDevice: Remote Desktop
App -- Configuring PocketCloud, please do so prior to utilizing this tutorial. All tutorials can be
found on the district Website.
Real Network or Virtual Network?
This step is not necessary for users who are within range of the district's network.
Administrators who are physically outside the reach of the district's network must first access the
network using a Virtual Private Network (VPN) app. If you haven't already downloaded and
configured Cicso AnyConnect on your iDevice, please refer to the tutorial entitled iDevice:
Configuring Access to the Virtual Private Network. Only building and district administrators
have VPN accounts.
Once configured, locate and open your Cisco AnyConnect app, turn the VPN ON, and initiate
access to the VPN using your f-number and password.
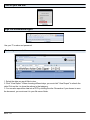
PocketCloud
Click on the Home button on your iDevice to return to the normal view. Find your PocketCloud
app and open it.
Connect to the Terminal Server
Click on the Connect button to enter the terminal server environment.
Munis - 120
Double-Click On the Internet Explorer Icon
From this point, your Munis experience will be very much like a session initiated on your desktop
or laptop computer.
The screen desktop background is probably black.
One of our users recommends an iPad or iPhone stylus (like a pen with a soft tip) for clicking on
buttons and other targets in this smaller setting.
Ending your VPN-Enabled Munis Session
At the end of your session, as always, please remember to
Sign Out of Munis (steps 1 & 2) and Log off the terminal server environment (see steps 3 & 4).
Turn VPN Off
1. Return to Cisco AnyConnect.
2. Turn OFF the VPN.
Munis - 121
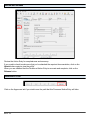
The Munis Application Launcher
After logging in to Munis, the first time you click on an application link (for example, "Actions Entry")
another tab opens in your browser and you will be moved from the Munis home page to this new
tab, known as the Munis Application Launcher.
This tutorial describes two aspects of the Munis Application Launcher:
1. How to configure the Munis Application Launcher page to automatically move to the
background of your browser session; and,
2. How the Munis Application Launcher can help when you encounter an error in a Munis
application.
Configuration Options
Here's how to make the Munis Application Launcher appear as a pop-up and automatically move
to the background of your browser session (you will only have to do this reconfiguration once).
First, sign into Munis. Then follow these steps:
Open the Departmental Functions folder;
Click on any link, e.g., Account Inquiry.
Your Internet Explorer page will change from the Tyler Home page to the Munis Application
Launcher. On the Munis Application Launcher page:
1. Click on the Options link.
2. Check the first box to open as a pop-up window.
3. Save this change.
Next time you start a Munis session and click on an application link, the Munis Application
Launcher will pop up and move to the background. Your browser session will remain on the Munis
Home page.
Munis - 122
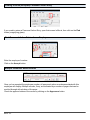
Using the Munis Application Launcher
The Application Launcher can be used as a sort of "force quit" for Munis pages that are not
responding. Follow these steps for a demonstration of how to use it:
First, sign into Munis. Then follow these steps:
Open the Departmental Functions folder;
Click on any link, e.g., Requisition Entry. Wait for the page to appear, then minimize it (don't close
it).
Go to the Munis Application Launcher tab or pop-up:
1. Click on the middle icon (Connections);
2. Click on the block of information that relates to the "frozen" page; then,
3. Click on the Close button.
You may choose to close a single application or all applications.
Munis - 123
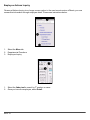
Quick Launch
Here's a shortcut for finding an application without going through the menu tree.
Quick Launch
Click on the binoculars to initiate the Quick Launch pop-up.
Type In the Search Field
Click your cursor in the search field, then begin typing the name of the application.
A list of menu items containing the characters you've entered will display.
Note that if you hover over the name of an application, you can see where the page is located on
the menu tree (Source Location).
Click once on the name of the desired menu item to launch it.
Close the Dashboard Quick Launch by clicking on the X at the far right of the search field.
Munis - 124
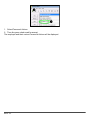
Saving Scanned PDF's
1. While in Munis, click on your Webmail favorite to open your email. If you do not have this Web
favorite, please obtain the tutorial from the Munis Training Material page at the district website.
Alternatively, open your webmail in a new tab with the url http://webmail.k12northstar.org in order
to access your email.
2. Click on "download" for the PDF you would like to access.
3. Select "Open" to view your document.
Munis - 125
4. Select "File"> "Save As"> "PDF." Give it a meaningful name to locate easily when attaching it.
See next step to find the location to save it to.
5. Save your documents as shown above for your operating system (PC or Mac).
Munis - 126
Scanning Documents for Use in Munis
If the copier/scanner/printer at your office or school is a Canon ImageRunner 3235, use the
shortcut in this document to scan in multi-page documents that will be attached as single pages to
Munis records. The Canon ImageRunner 6065 offers the same functionality, but the images in this
document will differ whereas the steps will not.
Scan the document page(s) to yourself.
1. Tap on the Send tab.
2. Tap on the File Format button.
Munis - 127
File Format Options
1. Choose PDF.
2. Tap on Divide into Pages if your document has multiple pages but you will be attaching
individual pages from it to your Munis record.
3. Tap on OK.
Munis - 128
Choose the Destination
Either find your email address in the Address Book or tap on E-mail and enter your address
manually.
Check Your Email While in the Terminal Server
Your multi-page document has been sent to you in individual pages in the pdf format. The
scanned pages will arrive in one or more emails.
Next step -- check out the tutorial called Saving Scanned PDFs
Munis - 129
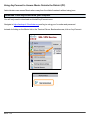
Using AnyConnect to Access Munis Outside the District (PC)
Administrators can access Munis when away from the district's network without using java.
Download Cisco AnyConnect onto your computer
You will only need to download and install AnyConnect once.
Navigate to https://webvpn.k12northstar.org and log in using your f-number and password.
Instead of clicking on the Munis link in the Terminal Server Bookmarks area, click on AnyConnect:
Munis - 130
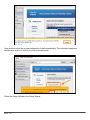
Have patience while the program attempts to install automatically. The automatic installation
almost never works, so click on the link as shown below:
Follow the steps outlined in the Setup Wizard:
Munis - 131
Click on the Home button and locate the AnyConnect icon. Right-click on the icon and pin it to the
task bar for future use.
Click on the AnyConnect icon on your task bar. Enter the vpn web address and click "Connect":
Munis - 132
You will need to enter your f-number and/or password to complete the connection to your VPN
account.
Once the VPN link is established, use IE to navigate to munis.fsd.domain.
Be sure to disconnect from (Quit) your VPN session when finished. Otherwise, all of your browsing
will continue to run through the district's network.
Munis - 133
Using AnyConnect to Access Munis Outside the District (Mac)
Administrators can access Munis when away from the district's network without using java.
Download Cisco AnyConnect onto your computer
You will only need to download and install AnyConnect once.
Navigate to https://webvpn.k12northstar.org and log in using your f-number and password.
Instead of clicking on the Munis link in the Terminal Server Bookmarks area, click on AnyConnect:
Munis - 134
Have patience while the program attempts to install automatically. The automatic installation
almost never works, so click on the link as shown below:
Munis - 135
Double-click on the VPN package:
You can use the spotlight ("magnifying glass" icon in upper right corner of your computer desktop)
to search dor the AnyConnect application. Click on it to open.
Munis - 136
To use the Cisco VPN, enter webvpn.k12northstar.org in the connection field and click Connect.
You will need to enter your f-number and/or password to complete the connection to the VPN
session.
Once connected, you can double-click on the remote desktop icon to access Munis just as you
would when you're on the district network.
Be sure to disconnect from (Quit) your VPN session when finished. Otherwise, all of your browsing
will continue to run through the district's network.
Munis - 137
Web Favorites
Munis - 138
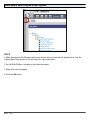
My Programs
My Programs allows you to add and remove Favorites. Favorites provide quick access to the
MUNIS Menu and user entered websites. You can also hide the My Programs to see more of the
Main Screen.
Hiding My Programs
To hide the Navigation Menu, click on the Left Arrow at the top of the Navigation Menu.
Displaying My Programs
To display the Navigation Menu, click the Right Arrow on the left of the screen.
Munis - 139
Add a MUNIS Menu Program to My Programs
STEPS:
1. Make sure that the My Favorites web part is closed; else, the favorite will appear there. See the
Closing Web Parts section in this document for more information.
2. On the MUNIS Menu, navigate to the desired program.
3. Right-click on the program.
4. Click the OK button.
Munis - 140
Viewing My Programs
The Module and the selected program will now appear in you’re my Programs list. Note: If the
added program is the first to be added under the MUNIS Module, then the Module name is
automatically added to the favorites list. All programs are listed in alphabetical order under the
Module, not in the MUNIS Menu order.
Add a Website to My Programs
1. At the bottom of the Navigation Menu, click the Add A Favorite button.
2. In the Name field, enter the name that you want to appear in the My Programs list.
Munis - 141
3. In the URL field, enter the URL to the website, be sure to include the HTTP:// .
4. In the Category field, enter a category or choose from the list. Note: Users can create
personalized categories by typing a category name. Once the category has been added, it can be
chosen from the list.
5. Check Open in a New Window to have the website open in its own window.
6. Click the OK button. The website will appear in your Favorite list.
Edit or Delete a Favorite
To edit or delete a favorite, on the Navigation Menu, click on the Edit button next to the favorite
that you want to edit or delete.
Edit the favorite as needed or click on the Delete this Favorite button at the bottom of the menu to
delete from your favorites. Once deleted, the favorite will no longer be available in your favorites
list.
Expand and Collapse the Favorites Menu
To quickly expand the Favorites Menu, click Show All on the Navigation Menu.
To quickly collapse the Favorites Menu or the Views Menu, click Hide All on the Navigation Menu.
Munis - 142
Club Accounts
This tutorial guides you through the process of adding a "favorite" to render a report showing your
club account balances.
Add a Favorite
Click on the Add a Favorite button to add the link to the club accounts report to your list of favorite
programs.
Define the Favorite
1. Give the link a name (e.g., Club Accounts).
2. Enter the url as follows -- http://goto.fsd.domain/clubaccounts
3. Create a category to hold this report, if you wish (e.g., Reports).
4. Click the OK button.
Munis - 143
Go to the Link
Click on Club Accounts.
Enter Your f-number and Password
Enter your f-number and password, then click View Report.
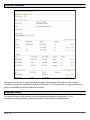
The resulting report will show all your club accounts and their respective
View the Report
The report offers the information shown above.
Munis - 144
Using Excel
You can export the data into an Excel spreadsheet in order to manipulate the data and formatting.
Munis - 145
Employee Lookup Favorite
Here is a simple tool for finding an employee using several letters of their name or a few numbers
of their f-number.
Add a Favorite
Define the Favorite
1. Enter a name for the favorite.
2. Enter the url as follows -- http://user-lookup.fsd.domain
3. Choose a category underwhich to file this favorite, or create a new one.
4. Click OK.
Munis - 146
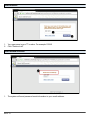
Test out your new tool.
Click on the Favorite you just added.
Start your search.
Type in any part of the person's name or f-number. All names or numbers containing the string you
entered will appear in the list, accompanied by the information indicated in the column headings.
Return to your Munis session by clicking on the Home - Tyler Menu tab.
Munis - 147
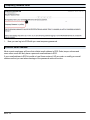
Webmail Favorite
Add this "Favorite" for easy access to your district Webmail while in the Munis terminal server
environment.
Log into Munis.
From the Tyler Dashboard, click on the Add a Favorite button at the bottom of the My Programs
block.
Your list under the My Programs headings might look different depending on which favorites
you've added or how you've organized them.
Munis - 148
Clear the URL that defaults into the page.
Enter the Name and URL as shown above. Choose a Category (e.g., Tools).
Click the OK button. Your screen will revert to the main Tyler Dashboard view.
Click on your newly created Webmail favorite. A new tab will open and you can log into your
Webmail account.
Munis - 149
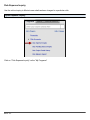
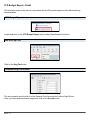
Workflow Action Daily Digest
This tool will generate a list of your actions done on a daily basis and can be printed or exported.
Add a Favorite
Define a Favorite
1. Enter a name for the favorite.
2. Enter the url as follows--http://goto.fsd.domain/workflow
3. Choose a category underwhich to file this favorite, or create a new one.
4. Click "OK" to save.
Munis - 150
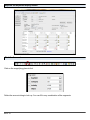
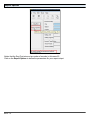
Test out your new tool.
Sign into the Workflow Digest.
Use your "f" number and password.
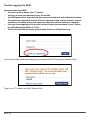
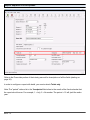
Test out your new tool.
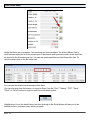
1. Select the date you would like to view.
2. Click "View Report." When choosing different days, you must click "View Report" to refresh the
data. Click on the + to show the actions in that category.
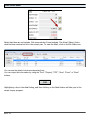
3. You can also export this data into a PDF by clicking the disc. Remember if you choose to save
the document, you must save it in your file server folder.
Munis - 151