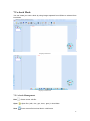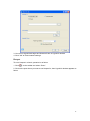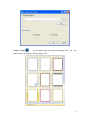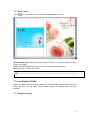
1
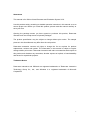
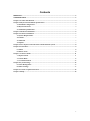
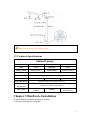
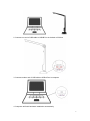
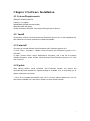
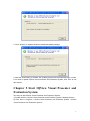
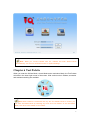
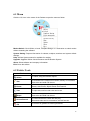
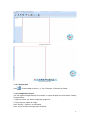
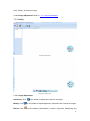
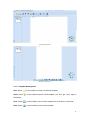
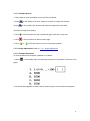
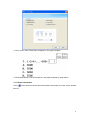
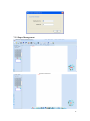
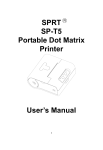
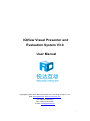
IQView Visual Presenter and
Evaluation System V3.0
User Manual
Copyright(C) 2003-2013 Returnstar Interactive Technology Group Co., Ltd.
Web: www.iqboard.net; www.recoverystar.com;
Tel: 0086-591-87274373
Fax: 0086-591-87274383
E-mail: [email protected]
1
Statements
This manual is for IQView Visual Presenter and Evaluation System V3.0.
Use this product strictly according to detailed operation instruction in this manual so as to
ensure proper use. Before you install this product, please read this manual carefully to
save your time.
Opening the package means you have agreed to purchase this product, Returnstar
Interactive will not accept returns of opened packages.
The product specification may be subject to change without prior notice. The sample
pictures in this User Manual may differ from the real product.
Returnstar Interactive reserves all rights to charge the fee at anytime for product
replacement, revision and update. The information in this manual is subject to regular
change without prior notice. Returnstar Interactive will make no warranties with respect to
this product and disclaims any warranties, whether express or implied, of merchantability
and fitness for a particular purpose.
Trademark Notice
Returnstar Interactive and IQBoard are registered trademarks of Returnstar Interactive
Technology Group Co., Ltd., and Windows is a registered trademark of Microsoft
Corporation.
2
Contents
Statements ............................................................................................................................................. 2
Trademark Notice................................................................................................................................. 2
Chapter 1 Product Introduction ............................................................................................................ 4
Chapter 2 Physical and Technical Specifications ................................................................................. 4
2.1 Standard Configuration........................................................................................................... 4
2.2 Physical Structure .................................................................................................................... 4
2.3 Technical Specifications ........................................................................................................... 5
Chapter 3 Hardware Installation .......................................................................................................... 5
Chapter 4 Software Installation ............................................................................................................ 7
4.1 System Requirements ............................................................................................................... 7
4.2. Install ........................................................................................................................................ 7
4.3 Uninstall .................................................................................................................................... 7
4.4 Update ....................................................................................................................................... 7
Chapter 5 Start IQView Visual Presenter and Evaluation System ..................................................... 8
Chapter 6 Tool Palette ............................................................................................................................ 9
6.1 Menu........................................................................................................................................ 10
6.2 Palette Tools............................................................................................................................ 10
Chapter 7 Software Modes .................................................................................................................. 11
7.1 IQView Mode.......................................................................................................................... 11
7.2 e-book Mode ........................................................................................................................... 16
7.3 e-evaluation Mode .................................................................................................................. 22
Chapter 8 System Settings ................................................................................................................... 32
8.1 Class Management ................................................................................................................. 32
8.2 Other Settings ......................................................................................................................... 35
Chapter 9 Version & Update Statement ............................................................................................. 36
Chapter 10 FAQ .................................................................................................................................... 36
3
Chapter 1 Product Introduction
IQView Visual Presenter and Evaluation System V3.0 is an integration of professional
Visualiser Capture, e-book Making and e-evaluation. Through IQView Visual Presenter
and Evaluation System V3.0, various interactive teaching and demonstrating functions
can be achieved, which are to adjust captured images, annotate, erase, move, zoom,
reveal screen, spotlight, capture and save screen, screen record, text input and switch
main/sub camera. In Comparison mode, interactive teaching and demonstration can be
more specific and clear by spliting the screen into 2, 4, 6 parts to compare images from
IQView, Gallery or local disks.
e-book Mode in IQView System V3.0 can help you create your own e-books by designing
various images from IQView, Gallery or local disks. Adding hyperlinks for Hotspot and
Hotzone will bring your e-books with more interaction!
e-evaluation Mode in IQView System V3.0 saves teachers’ time from correcting mountain
of student papers. Design a template with Single/Multiple Answers, T or F, Blank Filling,
Sort in Order and Subjective Answer available, and match this template with student
papers captured from IQView, then IQView System will correct and score papers
automatically. Teachers can query saved papers anytime they need.
IQView System V3.0, a friendly software with embedded image-text menu designed,
brings new human-computer interaction experience to its users. It’s so easy for use that
everyone can master it within 10 minutes.
This manual is for IQView Visual Presenter and Evaluation System V3.0, which can be
adapted to all models of IQView products by Returnstar Interactive. For the usage and
operation of IQView, please refer to the corresponding user manuals.
Chapter 2 Physical and Technical Specifications
2.1 Standard Configuration
1 IQView
1 USB Cable
1 Installation CD (including IQView Visual Presenter and Evaluation System and User
Manual)
2.2 Physical Structure
4
Note: Sub Camera is only for specific model.
2.3 Technical Specifications
IQView E Series
Structure
Fold Upright
Lens
CMOS sensor
Zoom
Digital
MIC Input
Support
Image Formats
bmp/jpg/png/wmf…
Video Formats
avi/flv/wmv/swf/exe
CMOS Pixels
3 megapixels(2048×1536); 5 megapixels (2592×1944)
Sub Camera
Only for specific model
USB Port
USB2.0
Brightness, Exposure, Sharpen, Color, Cut
Image Adjustment
Working
Voltage: 5V; Current: 270mA-500mA
Environment
Light Control
USB
Power Supply
touch panel with 4-level
available
Lighting
super-bright LED
illumination lamp
Chapter 3 Hardware Installation
To install hardware of IQView, operation is as follow:
1. Set and unfold IQView on a flat table.
5
2. Connect one end of USB cable to USB-B Port in the back of IQView.
3. Connect another end of USB cable to USB-A Port in computer.
4. Computer will finish hardware installation automatically.
6
Chapter 4 Software Installation
4.1 System Requirements
Windows XP/2003/Vista/7/8
Celeron 2.1 or higher
256MB RAM (512MB recommended)
500M free hard disk space
Screen resolution: 800×600, 1024×768 (16bit high color or above)
4.2. Install
Double-click “IQView Visual Presenter and Evaluation System V3.0” in the installation CD,
then follow the on-screen instruction to install the software.
4.3 Uninstall
Two ways to uninstall IQView Visual Presenter and Evaluation System V3.0:
1) Click “Start > Programs > IQView Visual Presenter and Evaluation System V3.0 >
Uninstall”;
2) Open “Control Panel”, select “Add/Remove Programs”, and in the list of Currently
Installed Programs, select “IQView Visual Presenter and Evaluation System V3.0”, then
click “Remove”.
4.4 Update
After starting IQView Visual Presenter and Evaluation System, the system will
automatically check whether the update package is available. If so, it will prompt you to
update. Operation is as follow:
1. Click “Yes” to update the software, click “No” if you don’t want to update now. You can
also click the taskbar icon, and select “Update” to enter Update window.
7
2. Click “Update” on Update window to download update package.
3. After the downloading is finished, the updating process will automatically begin. If there
is no need to update IQView Visual Presenter and Evaluation System, click “Exit” to exit
this window.
Chapter 5 Start IQView Visual Presenter and
Evaluation System
Two ways to start IQView Visual Presenter and Evaluation System:
1) Double-click the “IQView Visual Presenter and Evaluation System” desktop shortcut;
2) Click “Start > Programs > IQView Visual Presenter and Evaluation System > IQView
Visual Presenter and Evaluation System”.
8
Note: When you connect IQView with PC, software will enter IQView Mode
automatically. You can turn on/off this function in System Settings.
Chapter 6 Tool Palette
When you enter the IQView Mode, e-book Mode and e-evaluation Mode, the Tool Palette
will show in the lower right corner of the screen. With various tools in Palette, annotation
and assistant teaching are available.
Note: When software is minimized and only the Tool Palette shown in screen, you
can enter Annotation Mode by selecting any tools from Tool Palette. To exit Annotation
Mode, click “Exit” in the middle of Tool Palette.
9
6.1 Menu
Click the “IQ” icon in the center of the Palette to open the menu as follow:
Modes Switch: Click IQView, e-book, Template Design or e-evaluation to switch modes
without restarting the software.
System Setting: Prepare information for classes, subjects, teachers and system default
settings.
Help: IQView System manual is available for reading.
Upgrade: Upgrade IQView Visual Presenter and Evaluation System.
About: Show software and company information.
Exit: Close the softare.
6.2 Palette Tools
Tool
Function
Select
To select, drag and edit the objects.
Pen
To annotate in the images from IQView, Gallery or local disks;
Pens color and width can be set.
Eraser
10 erasers are provided, including Normal Erasers, Circle
Eraser, Area Eraser, Object Eraser and Erase All.
Text
To input text; text font and color can be set.
Shape
To draw rectangulars, circles or lines;
Pens color and width can be set.
Screen Record
To record screen as a video file and play;
Recorded video can be converted to several formats.
Fill
To fill color or gradient to closed geometries.
10
Spotlight, Reveal Screens and Highlight.
Screen Tools
Chapter 7 Software Modes
7.1 IQView Mode
Display in Windows
Display in Full Screen
7.1.1 Functions
Video Device: Click
on the toolbar, and select the camera(s) you need. You can turn
on/off the “Dual Cameras” function here.
11
Dual Cameras: When “Dual Cameras” function is turned on, you can operate as below:
1. Hold and drag the mini window for Sub Camera to any position you need.
2. Click the button at the upper right corner of the mini window for Sub Camera to switch
images of Main Camera and Sub Camera.
3. Click “Dual Page Display” at the lower right corner of the mini window, to show Main
Camera and Sub Camera in two split screens.
Capture: Three capture ways you can select as follow.
1) Full Screen Capture: Click
on the toolbar to capture and save a full screen image
to the gallery;
2) Area Capture: Click
on the toolbar, then hold and drag a square to capture and
save an image to the gallery.
3) Continuous Capture: Click
on the toolbar, then set Burst Number and Interval time
in the window appears. Click “Start” to capture and save images to the gallery according
to your settings.
Save: Click
on the tool bar to save the captured images into Gallery or clipboard. By
default, it will be saved into Gallery.
Note: If you choose to save captured images to clipboard, you can press “Ctrl+V” to
paste the captured pictures into any document you need.
Image Adjustment: Refer to 7.1.3.1 Imange Adjustment.
7.1.2 Comparison Mode
12
Display in Windows
Display in Full Screen
7.1.2.1 Screen Split
Click
on the toolbar to select 1, 2, 4 or 6 Screens, 2 Screens by default.
7.1.2.2 Comparison Source
You can capture images directly from IQView, or import images from local disk or Gallery
as steps follow:
1. Select a screen you want to import the image into;
2. Three ways to import an image:
Click “IQView > Capture” on the toolbar;
Click “Local” to select an image from local disk;
13
Click “Gallery” to select an image.
7.1.2.3 Image Adjustment: Refer to 7.1.3.1 Image Adjustment.
7.1.3 Gallery
Display in Windows
Display in Full Screen
7.1.3.1 Image Adjustment
Resolution: Click
on the toolbar to adjust the resolution of images.
Modify: Click
on the toolbar to adjust Brightness, Saturation and Contrast of images.
Effects: Click
on the toolbar for Binarization, Invertion, Grayscale, Sharpening and
14
Embossment settings of images.
Rotation: Select
Zoom: Click
on the toolbar to rotate images to any direction you need.
on the toolbar to zoom in/out images or display it by 100% size.
Full Screen: Click
Cut: Click
on the toolbar to enter full screen mode.
on the toolbar, then hold and drag a square to cut images.
Restore Page: Click
on the toolbar to return a moved or zoomed image to its original
position.
7.1.3.2 Image Edit
Undo: Click
on the toolbar to cancel last edition. You can cancel 30 steps of edition
at most.
Redo: Click
on the toolbar to recover the deition you set undo. You can recover 30
steps of undo edition at most.
Reset: Click
on the toolbar to remove all your editions to current images.
Apply: Click
on the toolbar to save current edited images into Gallery.
7.1.3.3 Right-click Menu
Copy, Cut, Paste: To copy, cut or paste current image.
Delete: To delete current image.
Clear Annotation: To clean all annotations in current image.
Save As: Save current image to a selected folder in local disks.
Gallery: Open file path of current selected image.
Print: Select one or more images in Gallery, then click “Print” from right-click menu to
print.
Send Email: Select one or more images in Gallery, then click “Send Email” to send
selected images as attachment by email.
15
7.2 e-book Mode
You can create your own e-book by using images captured from IQView or selected from
local disks.
Display in Windows
Display in Full Screen
7.2.1 e-book Management
New
: Create a new .cdb file.
Open
: Open files (.cdb, .doc, .ppt, .docx, .pptx ) in local disks.
Save
: Save current file into local disk in .cdb format.
16
7.2.2 e-book Source
Three ways to insert an image into e-book:
1) Select Click “IQView > Capture” on the toolbar;
2) Click “Local” to select an image from local disk;
3) Click “Gallery” to select an image.
Click
in Page Panel to add a blank page below the current one.
Click
in Page Panel to delete current page.
Click
or
in Page Panel to move current page up or down.
7.2.3 Image Adjustment: Refer to 7.1.3.1 Image Adjustment.
7.2.4 Insert Resource
Click
on the toolbar and select video, flash or image files from the window appears to
insert resources into current e-book page.
Hotzone
To set a Hotzone in e-book, operation is as follow:
1. Click
on the toolbar to select hotzone shape you need.
2. Hold and drag an area in the e-book page to set your Hotzone, then Hyperlink window
appears as follow:
17
3. You can set hyperlinked target and Hotzone frame in Hyperlink window.
4. Click “OK” to finish Hotzone settings.
Hotspot
To set a Hotspot in e-book, operation is as follow:
1. Click
on the toolbar and select “Draw”.
2. Click on the spot where you want to set Hotspot for, then Hyperlink window appears as
follow:
18
3. You can set hyperlinked target and icon in Hyperlink window.
4. Click “OK” to finish Hotspot settings.
7.2.5 Hyperlink
You can hyperlink any object on the software page to a web page, or a file on your
computer.
To add hyperlink to an object:
1. Select the object.
2. Right-click the selected object, then select “Hyperlink”. Hyperlink window appears as
follow:
19
3. Select hyperlink to a web page, a file on local disk, a software page, or a prompt. You
can also browse and select an audio file to add sound effect.
4. If you want to open the link by clicking the corner icon, select “Corner Icon”. If you want
to open the link by clicking anywhere in the object, select “Object”.
5. Click “OK” to finish Hyperlink settings.
Now when you click the Corner Icon or the object itself, it will hyperlink to the content you
set.
Note: When edit your e-book, you are able to undo or redo your editions at most 30 steps by
Ctrl+Z or Ctrl+Y.
7.2.6 e-book Settings
Settings
: You can set background music for your e-book and show your e-book by
single/dual pages.
20
e-book Frame
:
You can add a frame for current e-book page. And you can
add frames to all pages by clicking "Apply to all".
21
7.2.7 Read e-book
Click
in the toolbar and e-book preview window appears as follow:
Previous/Next Page: Hold and drag the margin of e-book or “Previous Page” and “Next
Page” to turn page.
Zoom: Hold and drag the lower right corner of e-book to zoom the e-book.
Exit: Click “ESC” to close the e-book.
Note: You can double-click an e-book in .cdb format saved in local disks to open and read.
7.3 e-evaluation Mode
Before you start correcting student papers, you should design a template for this exam
firstly. And then you can easily correct student papers by matching them with this
template.
7.3.1 Template Design
22
Display in Windows
Display in Full Screen
7.3.1.1 Template Management
New: Select
Open: Select
on the toolbar to create a new blank template.
on the toolbar to open a saved template (.cdt, .doc, .ppt, .docx, .pptx) in
local disks.
Save: Select
on the toolbar to save current template into local disk in .cdt format.
Print: Select
on the toolbar to print current template.
23
7.3.1.2 Template Source
1. Three ways to insert a template source into Preview Panel:
1) Select
2) Click
on the toolbar, then click “Capture” to catch an image from IQView.
on the toolbar, then browse and select an image from local disks.
3) Select an image from Gallery.
2. Click
in Preview Panel to add a new blank page under the current one.
3. Click
in Preview Panel to delete current page.
4. Click
or
in Preview Panel to move current page up/down.
7.3.1.3 Image Adjustment: Refer to 7.1.3.1 Image Adjustment.
7.3.1.4 Template Questions
To insert questions into template, operation is as follow:
1. Select
on the toolbar, then hold and drag a square on the position of answer in the
paper.
2. An Answer Box appears as follow. Select question types, correct answers and points.
24
3. Click “Insert”, then Answer Box will appear in the paper template.
4. Set Answer Boxes or all the questions in the paper template by steps above.
7.3.1.5Paper Information
Click
on the toolbar to check the total questions and points you have set the Answer
Box for.
25
7.3.2 Paper Management
Display in Windows
26
Display in Full Screen
7.3.2.1 Management
New: Select
on the toolbar to creat a new paper database.
Open: Select
on the toolbar to select a saved .cde file to open.
Save: Select
on the toolbar to save current paper into local disks in .cde format.
7.3.2.2 Paper Source
To insert a paper into paper database, operation is as follow:
1. Select a student ID from Students List.
2. Two ways to insert a paper image for this student:
1) Select
2) Click
on the toolbar, then click “Capture” to catch the paper image.
on the toolbar, then browse and select a paper image file to open.
3. Now this student paper is shown in Preview Panel.
27
4. Insert papers for every student by the steps above.
7.3.2.3 Image Adjustment: Refer to 7.1.3.1 Image Adjustment.
7.3.3 Correct Paper
To correct papers, you should Import a Template > Select a Student ID > Correct the
Paper > Score the Paper > Check Paper Information. Operation is as follow:
1. Import a Template: Click
on the toolbar to import a saved template in .cdt format
from local disks.
2. Select a Student ID: Click a student ID to show his/her paper. Template will match with
this paper automatically.
3. Correct the Paper: Check student’s answers, then click “Correct” or “Wrong” from
Answer Box. Points and ”√” / “X” will be shown automatically in the paper.
4. Score the Paper: Click
on the toolbar to score current paper or all papers
automatically by software. The score will be shown in the upper left corner in the first
28
paper page.
5. Show/Hide Answer Box of Template: Click
on the toolbar to show or hide the
Answer Box of Template
6. Paper Information: Click
on the toolbar to check current student’s score, total
questions, responsed/unresponsed questions number, correct/incorrect responses
number, total scores, and current scores.
7.3.4 Query
Click “Query” on the toolbar to check the class activity information. You can query by class,
student or activity.
7.3.4.1 Query Types
By Class
By Student
29
By Activity
30
7.3.4.2 View Reports
The reports generated by each query type are different. All reports could be printed,
exported and emailed.
Export: Save current report into local disks in .html, .txt, .xls formats.
Send e-mail: Send current report by e-mail.
Print: Print current report.
Paper Database: You can open paper database to check every student’s paper image.
31
Chapter 8 System Settings
Click “IQ” in the middle of Tool Palette to enter System Settings.
8.1 Class Management
Class management includes the setting of class, subject and teacher.
8.1.1 Class Settings
In Class Settings, you can add, delete, edit, import or export class database, and add,
delete, edit or group student information.
32
8.1.2 Subject Settings
In Subject Settings, you can add, delete, edit, import or export subject database.
33
8.1.3 Teacher Settings
In Teacher Settings, you can add, delete, edit, import, or export teacher datebase.
Furthermore, teacher can also be related to class and subject he/she takes charge of.
34
Note: Only administrator can enter Class Management.
8.2 Other Settings
By clicking “Other settings” on System Settings window, you can change the languages or
do some other settings.
35
Password Setting: You can reset your login password.
Language Setting: You can modify the interface language of the software. English,
Simplified Chinese and Troditional Chinese are available.
Image Format: You can choose a saved formate for captured images in dropdown box.
Auto-run: Tick to run IQView Visual Presenter and Evaluation System automatically when
launching Windows.
Connect Setting: Tick to run IQView Visual Presenter and Evaluation System
automatically when connecting IQView to computer.
Chapter 9 Version & Update Statement
IQView Visual Presenter and Evaluation System is a set of software that will be constantly
updated. In addition to the update of software, we will continually increase its functions
and make some improvement. So we strongly recommend the clients to update the
software regularly.
Chapter 10 FAQ
1. When I enter IQView mode, it shows a blackscreen. What can I do?
1) If the resolution you set for IQView is high, it will cost about 15s to response. Please
patiently wait, or set the resolution lower to acquire faster response.
36
2) The IQView is not well connected with computer. Please check and re-connect the
USB cable, or restart IQView Visual Presenter and Evaluation System.
2. Everytime when I start computer or connect IQView, the software will
automatically run and enter IQView mode. How can I do?
This function is designed for quick start when using IQView or correcting papers. You
can turn off this function from “System Settings > Other Settings”.
3. After using the function of Screen Record, I cannot see some windows in the
saved recorded video, such as Tool Palette, the annotating window in Windows
Mode. How can I do?
It is because the system only records the operating area by default in order to control
the size of video files. If you want to record all windows and the Tool Palette, then
before recording please click
Screen Record, and then click
Options on the
secondary toolbar of Screen Record, select “Record all areas”.
4. While using the “Spotlight” tool, the concentrated area cannot be highlighted,
what’s up?
The reason is the color quality in system is not enough to support this software
function, please right click windows desktop blank, get the “ Properties” menu, select
“Settings” and then change “Color quality” to “Highest (32bit)”.
5. How to efficiently use e-evalutation mode to correct papers?
You can correct papers in this efficient way: Design a paper template > Import all the
student papers into system > Import designed paper template > Correct papers >
Score papers automatically by system > Save results into paper database > Query or
view report.
For example, Class 1 Grade 2 has finished its 2012 final exam. Teacher is going to
correct these papers. He/she can do as follow:
1) Import a blank paper from IQView or local disks in Template Design.
2) Set template questions for this paper.
3) Import student papers from IQView or local disks in Paper Source.
4) Import the paper template designed in previous step.
5) Answer Boxes are now shown in every student paper. Teacher only needs to click
“Correct” or “Wrong” to finish paper correction.
6) After correcting all papers, teacher can click “Score” to show the scores
automatically in papers. All these results will be saved into paper database for
later query.
Other questions, please consult our service center or local dealer.
37