1
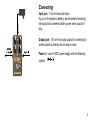
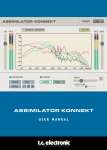
USER’S MANUAL
Important Safety Instructions
1 Read these instructions.
2 Keep these instructions.
3 Heed all warnings.
4 Follow all instructions.
5 Do not use this apparatus near water.
6 Clean only with dry cloth.
7 Do not block any ventilation openings. Install in accordance with the manufacturer’s instructions.
8 Do not install near heat sources such as radiators, heat
registers, stoves, or other apparatus (including amplifiers)
that produce heat.
9 Only use attachments/accessories specified by the manufacturer.
10Refer all servicing to qualified service personnel.
Servicing is required when the apparatus has been damaged in any way, such as power-supply cord or plug is
damaged, liquid has been spilled or objects have fallen
into the apparatus, the apparatus has been exposed to rain or moisture, does not operate normally, or
has been dropped.
Warning!
• To reduce the risk of fire or electrical shock, do not
expose this equipment to dripping or splashing and ensure
that no objects filled with liquids, such as vases, are
placed on the equipment.
• Do not install in a confined space.
Service
• All service must be performed by qualified personnel.
Caution:
You are cautioned that any change or modifications
not expressly approved in this manual could void your
authority to operate this equipment.
When replacing the battery follow the instructions on
battery handling in this manual carefully.
EMC/EMI
This equipment has been tested and found to comply with
the limits for a Class B Digital device, pursuant to part 15
of the FCC rules.
2
These limits are designed to provide reasonable protection
against harmful interference in residential installations.
This equipment generates, uses and can radiate radio
frequency energy and – if not installed and used in
accordance with the instructions – may cause harmful
interference to radio communications. However, there is
no guarantee that interference will not occur in a particular
installation. If this equipment does cause harmful
interference to radio or television reception – which can
be determined by turning the equipment off and on –, the
user is encouraged to try correcting the interference by
one or more of the following measures:
•
•
•
•
Reorient or relocate the receiving antenna.
Increase the separation between the equipment and
the receiver.
Connect the equipment to an outlet on a circuit
different from the one to which the receiver is
connected.
Consult the dealer or an experienced radio/TV
technician for help.
For the customers in Canada:
This Class B digital apparatus complies with Canadian
ICES-003. Cet appareil numérique de la classe B est
conforme à la norme NMB-003 du Canada.
3
(EN) Introduction
Congratulations! You have just bought an Overdrive pedal that will breathe life, magic and that
certain something into your sound and make your playing stand out.
Guitarists everywhere are always looking for that little extra push over the cliff, a touch of magic to their
tone that gives just that bit more bite, body and tone. It’s hard to describe, but you always know when
you have achieved it by the hairs on your neck standing out. MOJO MOJO is the pedal that will deliver
that flash of perfection every time you engage it, providing a crisp and clear overdrive with a rock-solid
bottom end. A sweet blues lead, an extra chunky rhythm tone or a soaring lead, it’s all there – and then
some. MOJO MOJO is equipped with a straightforward yet deep set of controls, and a voice toggle
allows you to quickly dial in a sound that oozes thick and juicy undiluted tone, sparkling with musicality
and MOJO!
www.tcelectronic.com - www.youtube.com/tcelectronic
4
1 - Effect on/off (true bypass)
2 - 1/4 inch mono jack input
3 - 1/4 inch mono jack output
4 - Bass control
5 - Treble control
6 - Drive control
7 - Level control
8 - Voice selector
9 - Power in (9 VDC)
5
Connecting
Input jack - 1/4 inch mono jack input
If you run the pedal on battery, we recommend removing
the input jack to preserve battery power when you don’t
play.
Output jack - 1/4 inch mono jack output for connecting to
another pedal or directly into an amp or mixer.
Power in - use a 9 VDC power supply with the following
symbol:
6
The controls
BASS & TREBLE
Bass/treble controls. Add bass for more punch or roll off a bit for a tighter sound on big cabinets. Add
treble to cut through a dense mix or reduce to aim for a softer tone.
DRIVE
Controls the amount of overdrive. At lower settings, Drive acts as boost and fattens up your tone.
At the other end of the scale you will get a smooth singing characteristics.
LEVEL
Sets the overall level.
Voice Type selector
Two Voice types are available. With the switch in “up” position, the frequency response is true to the
input signal.
With the switch in “down” position, the low-end frequencies are naturally boosted. This is excellent
where the guitar is allowed to take up a great portion of the sonic spectrum. E.g. for rhythm guitar in a
trio.
7
Changing battery – Unscrew the thumb-screw on the back of the pedal and detach the back-plate.
Unmount the old battery and attach the new battery to the battery clip making sure the polarity is
correct. Then remount the back-plate. To save battery life, remove the input jack when you don’t play.
Batteries must never be heated, taken apart or thrown into fire or water. Only rechargeable
batteries can be recharged. Remove the battery when the pedal is not being used for a longer
period of time. Dispose batteries according to local laws and regulations.
8
Unique overdrive circuit with classic tube-amp characteristics: high headroom, low compression
and huge bottom-end. Touch sensitive – control tone and overdrive level by pick attack and your
guitars volume knob. Works equally great as a standalone drive, stacked with other pedals or an
overdriven amp. Two-band active EQ with separate bass and treble controls. Voice switch for
bass response control
Size & Weight
72 mm x 122 mm x 50 mm - 300 g (excl. battery)
Battery
16mA current draw
Non-stop playing Carbon: 6.5 hours, Alkaline: 25 hours.
These figures will vary depending on the actual conditions of use.
Design
Custom ‘hammerhead’ rugged, die-cast aluminum casing built for a life on the road
Gloss powder coating
Unique one-screw battery access for lightning fast battery changes
All metal design – this pedal was meant to be stepped on!
Connectors &
Inputs/Outputs
Metal Jack Connectors - road ready
Knobs etc.
Overdrive, Level, Bass and Treble knobs with high-quality, metal-shaft potentiometers
Heavy duty tactile footswitch with true bypass for zero tone coloration
In the box
Owner’s Manual, TC Electronic Guitar Pamphlet, TC Electronic Sticker.
These specifications are subject to change without notice
(EN) Technical Specifications
Sounds
9
TC Electronic, Sindalsvej 34, DK-8240 Risskov
[email protected]