1
P3 -
Private Psychiatric Practice
2005
Independent Psychiatric Services
Seattle, Washington
(206) 328-5135
Developed by
Richard T. Adamson, M.D.
P 3 2005 is a database application created with the Microsoft Visual FoxPro design system and
provides the practicing mental health clinician with a reliable, efficient mechanism for record
keeping and billing. Program enhancements allow the user to select from a variety of data input,
viewing, and reporting styles so as to match personal tastes and preferences. Backed by
accessible support and training, a substantial group of clinicians, including psychiatrists,
psychologists, counselors, and nurse practitioners, use P3 on a daily basis to run their practices
and have reported stability and data integrity for over a decade.
KEY FEATURES
•
Centralized Patient Chart - Patient contact can be fully managed without a paper file
•
Quick Entry - Create a Progress Note Template and Charge in a Single Action
•
Rapid Entry of Insurance Vouchers
•
Automated Patient Registration - Assigns the critically important Patient ID #.
•
Customizable Fee Schedule
•
Track Prescriptions, Medication History, and Currently Used Medications
•
Print HCFA 1500 statements as well as patient statements with automatic posting of
Balances forward to the next billing interval
INSTALLATION
The Installation CD-ROM has been configured for Autorun Activation in Windows XP
1) Insert CD into Drive
2) Wait for Autorun Start
3) If CD fails to start, Select START MENU : RUN and type x:\setup.exe in the box
where x = drive letter for your CD Drive
4) Follow on screen instructions to install program
When program installation is completed you will see the P3 2005 Fox icon on your desktop.
Double click the Fox to start the program.
P3 2005
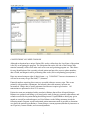
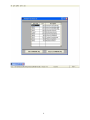
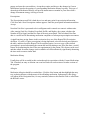
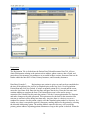
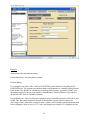
The following image shows the Patient Chart centered on the System Screen. Access to program
features is through the Menu at the top of the System Screen and through tabbed headings in the
Patient Chart. By clicking each tab the user can move to specific work areas such as Registration,
Medications, Finances, and Chart Notes. Tabbing deeper reveals nested tabs that grant access to
other associated work areas.
2
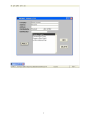
CONVENTIONS YOU NEED TO KNOW
Although each patient has a unique Patient ID # used to collate data, the Last Name of the patient
is the key to navigating the program. The Navigation Bar on the left side of the Patient Chart
remains constantly visible while other work areas come and go during program use. This allows
for easy identification of the currently selected patient and provides access to phone numbers,
date of birth, and diagnosis while performing other work (such as telephoning prescriptions).
Dates are entered using an eight (8) digit format - e.g. "04/06/2003". In most circumstances it
will not be necessary to type the slash ("/") character.
Financial numbers requiring direct entry are recorded without a currency sign. This occurs
primarily with payments, adjustments, and refunds where odd monetary amounts are
encountered. Charge data is usually automated and does not require typed entries. All
transactions are presumed to be in U.S. currency.
Patient Accounts are maintained with a cumulative Balance that reflects all unpaid charges.
Balances are updated each billing cycle based on the total of charges, payments, adjustments, and
refunds recorded for the patient during that billing interval. Unpaid Balances during any given
month are carried forward and appear as a Prior Balance on the billing statement issued the
following month. Program screens and printed patient statements make it possible to determine
at a glance the patient's prior Balance, current charges, current payments(whether by insurance or
out of pocket), current refunds, and current adjustments.
3
The four types of transactions tracked by the program are Charges, Payments, Adjustments, and
Refunds. Charges and payments are intuitive, reflecting the most common actions taken against
the Balance. However, the use of Adjustments and Refunds requires some advance planning. In
this program all transactions are typically entered as positive numbers and effect the Balance in
predictable ways.
A Charge results in an Increase in the patient Balance.
A Payment results in a Decrease in the patient Balance.
An Adjustment (when positive) results in a Decrease in the patient Balance. This transaction is
most often used to document a contractual deduction in the standard fee.
A Refund (when positive) results in an Increase in the patient Balance. This transaction is most
often used to document the repayment of a patient when a negative Balance has accumulated due
to overpayment by two sources, such as the patient and his insurance company.
Patient ID # When a new patient is registered, the program assigns a seven (7) digit Patient ID number as the
unique identifier for that patient. All data is tracked by association to that number. The assigned
number consists of the year of registration followed by a sequence number ranging from 001 to
999. The first patient registered in a new year (e.g. 2008) would be assigned the number
2008001. In rare circumstances the user may wish to override the assigned number although
safety features have been designed to prevent accidental reassignment.
GETTING STARTED
The first step in preparing to use P3 2005 involves customizing the program to certain
preferences designated by the clinician user. These customizations involve:
1)
Enter clinician name and address. Select File : Clinician Setup : from the System
Menu and overwrite the data with your information.
2)
Set up a standard fee schedule. This fee data should represent your regular and normal
charges for specific CPT codes. Later it will be possible to create patient specific
customized fees but at this point it speeds data entry to have a standard set. Select File
: Standard Fee Setup : from the System Menu. If the CPT codes, descriptions, and
fees shown are not useful, feel free to delete or overwrite these and replace them with
your preferred data. It will be useful to organize these codes from top to bottom in the
order of most frequently used codes. Later program operation automates data entry
using the order of these codes that are set up today.
3)
Set up the Insurance Companies with whom you conduct billing operations. Select
File : Insurance Company Setup : and add or delete companies according to your
preferences. You will need the Insurance Company name and mailing address for this
set up. This table will make it easy to update patient records should an insurance
company change its mailing address in the future. In that event the address data only
needs to be changed once rather than for every patient with this particular insurance.
4)
Enter Existing Patients into the system GO TO Patient Chart : Registration
4
a)
b)
c)
patient
handled
Gather existing records with name, address, insurance information, and
last Balance for the patient
Click New Patient button and enter data into the blank record
When all existing patients have been entered
GO TO Menu : File : Lists : For All Patients : Listed, by Last
Balance and enter the last prior Balance for each
seen in the scrolling list (this is a one time task. For
previously unbilled patients, this task is
automatically)
5
6
7
Other Menu Items
GO TO Menu : File : Select Patient CTRL+P
Creates keyboard shortcut (CTRL+P) Has the same function as clicking on the
SELECT PATIENT button. Highlights the Record Locator box to receive last name of desired
patient
GO TO Menu : File : Quit CTRL+Q
To Quit P3 2005
GO TO Menu : Edit : Undo - Sometimes reverses the last action taken, depending on context
Cut, Copy, Paste - for moving text
Find - only operates within a Browse List
GO TO Menu : Utilities : Reindex - useful in the event of a corrupted index
Print Return Labels - Clinician Return Address Labels
WORK AREAS - NESTED TABS
8
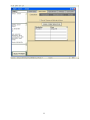
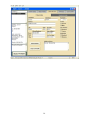
Chart Notes
The Chart Notes Tab is divided into nested Tabs for Progress Notes and the Initial Evaluation.
Notes may be both entered and reviewed in this location. Although there is only one Initial
Evaluation allotted to a patient, a patient may have an unlimited number of Progress Notes.
To review existing Progress Notes, place the cursor in the table to the right and move forward
and backward in time by using the arrow keys. With each change in the row of dates, the selected
Progress Note changes on screen. To go to a particular note, click its date once with the mouse
and that record is selected and displayed.
To enter a new Progress Note, click the New button. This action will result in the posting of a
blank Progress Note with the current date inserted. Adjust this date and tab key to the CPT Code
field and enter the code (90806, 90801, etc) needed to describe the clinical event. Sometimes the
event being described is not a typical clinical encounter and is best described with alternatives
such as "Other", "Phone", or "m.appt". The system recognizes events coded in this way as
unusual and while it will submit these events for billing to the patient, they are suppressed in
HCFA billing to insurance companies. In other words, only sessions coded with numeric
characters may be printed to a HCFA insurance form. Tab key again and begin entering the body
of the Progress Note.
To enter an Initial Evaluation, go to that work area and click the New button. A blank form with
the current date is created and may be edited freely to complete the Initial Evaluation.
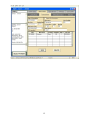
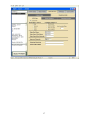
Medications
The Medications Tab is divided into 4 nested Tabs for Current Medications, Prescriptions,
Medication History, and Allergies. Considerable time saving features have been included in these
sections and will greatly enhance work productivity for those clinicians who regularly prescribe
medications.
Current Medications
The Current Medications Tab is a primary work area for daily use. By default, this nested Tab
works in conjunction with Medication History to provide a temporal log of medication actions.
Whenever Current Medications is updated for a patient, a log entry is posted in Medication
History reflecting the date and action taken.
Data Entry Example 1:
A patient with no prior medication entry is determined to require
use of an antidepressant. Click on the Change Current Medication button. An Update window
will appear. Adjust the date if necessary and select START from the popup. Type in the
medication name, the starting dose, and then ACCEPT. A Current Medication entry is recorded
and in the same action a corresponding Medication History entry is created.
Data Entry Example 2:
Two weeks later the same patient needs a dose increase. Click the
Change Current Medication button and the same Update window appears. Adjust the date if
necessary, select Increase from the popup, select the previously entered medication from the
9
popup, and enter the corrected dose. Accept these entries and observe the changes in Current
Medications but also the posting of a corresponding Medication History log entry. This type of
chronological Medication History will provide instant answers months or years later when a
change in treatment strategy is being reviewed.
Prescriptions
The Prescriptions nested Tab is both the review and entry point for prescription information.
Click New and a New Prescription window appears. Enter the prescription information and then
Accept.
Note that Unit Size is presumed to be in milligrams and is entered as a numeric without units.
After entering Unit Size, Number Prescribed, Refills, and Mg/day, the system calculates the
Number of Days Supply and the Due Date of the next prescription. This calculated Next Due
date is a useful tool in determining medication compliance at subsequent prescription encounters.
A significant time saving feature in this section involves use of the Repeat This Prescription
checkbox. If a refill of a prior prescription is being duplicated, select the desired prescription in
the table, and then check the Repeat This Prescription option. An exact copy of the selected
prescription is posted substituting the current date and calculating a new Next Due date, a useful
feature for determining the date of the next appointment for the patient. This feature can be used
and then edited for minor changes (such as number of refills authorized), significantly shortening
the time need to reenter similar data.
Medication History
Usually data will be recorded in this section through its association with the Current Medications
Tab. If needed, an entry or deletion can occur here and will not be mirrored in other sections of
the program.
Allergies
Medication allergies should be recorded here. Click the New button and then highlight the entry
text, replacing that text with the name of the offending medication. Subsequently, this allergy
will appear in the Navigation Bar ( for easy reminder) whenever this Patient Chart is called from
the Record Locator.
10
11
12
13
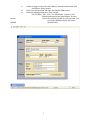
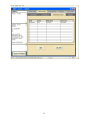
Registration
The Registration Tab is divided into the Patient Data Tab and Insurance Data Tab. All non
clinical information relating to the patient such as address, phone contacts, date of birth, and
particulars of the insurance circumstances are recorded in these sections. Insurance Data can be
further subdivided into HCFA Data, Primary Insurance, and Secondary Insurance.
Data Entry Example 3:
Registering a new patient is quite easy and can be accomplished at
the time of the patient's first visit (or by telephone prior to the first visit). Go to Registration :
Patient Data and click New Patient. A unique sequential patient ID # is created and the cursor
enters the Last Name field. Enter the last name and press the tab key. Enter the first name and
continue tabbing to complete the form. The Patient Data screen is also used to set up a
customized fee schedule for this particular patient. Click the Custom option under Fee Structure
and make changes to the table presented. This option must be checked for the customized fee
structure to remain in effect during later data entry. Any time there is a desire to revert to a
standard fee structure for this patient, simply select the Standard option under Fee Structure. In a
similar way, there is an option to provide a temporary mailing address for the patient by selecting
the Alternate Addressing option. The mailing address entered in this way will override the
primary patient address in printing patient statements as long as this option is checked. When the
14
patient returns to the primary address simply uncheck Alternate and resume the Standard
Addressing option. The text area labeled Additional Notes is a useful entry point for important
reminders or information with no other logical location. When the patient is later selected
through the Record Locator box, the Additional Notes information will appear with the
Navigation Bar for ready refernce.
Data Entry Example 4:
A new patient is registered into the program and wants to make
use of an insurance company with whom there is an existing billing relationship. This insurance
company has been entered into the system during customization of Insurance Company Setup. To
enter insurance information for this patient go to Registration : Insurance Data : HCFA Data :
and complete this form. With the patient's insurance card in hand, go to Registration : Insurance
Data : Primary Insurance : and complete this form. This insurance data entry takes less than one
minute and is usually completed at the first patient visit. A similar process allows for the use of a
Secondary Insurance if there is a desire to bill two companies for each visit.
Data Entry Example 5:
The process differs only slightly if there is a desire to use an
insurance company that has not previously been registered within the program. If such a situation
arises, and a decision is made to add this new company to the list of billable insurers, first go to
File : Insurance Company Setup : and add the new insurance company usually obtaining the
mailing address from the patient's insurance card. It is then necessary to close the Patient Chart
by clicking the close box in the upper right corner of the window, and then go to Forms : Recall
Patient Chart from the system menu. This allows the changes made in the Insurance Company
Setup to be reflected in the Registration options under Primary and Secondary Insurance. In order
to avoid a program error, it is necessary to always choose an insurance company from the popup
of previously entered companies rather than attempting to type in the name of the new insurer in
the box within Registration : Insurance Data : Primary Insurance.
15
16
17
Finances
Transactions -this information coming
Patient Statements - this information coming
Perform Billing
P3 is designed to be used with a CASH ACCOUNTING system which is of the BALANCE
FORWARD type. The program accumulates charges and payments for a monthly billing interval.
Each month a new Balance is calculated as a running total of charges, payments, refunds, and
adjustments applied to the previous month's ending Balance. This new Balance is presented to
the patient in the form of a monthly statement.
Patient Statements - These are the paper statements given or mailed to patients at the end of each
month. They have been designed to include all information a private insurer requires for
processing a claim. Such items as clinician name, address, tax ID number and patient information
such as diagnosis, dates of service, CPT codes, and charges are included. Two templates for the
18
patient statement are available within the program. Additional customized forms are available by
request.
HCFA 1500 Statements - These are the standardized claim forms used universally by all
insurance companies and must be purchased.
Batch Printing - Patient Statements
1)
2)
3)
4)
5)
6)
7)
Complete and verify accuracy of entered financial transactions
Select Perform Billing within the Finances Section
Select Patient Statements
Select Batch Printing
Select Form Type
Enter Billing Interval Dates
Preview or Print Batch Statements
Internal calculations are performed during the printing process. A Posting Screen will appear but
do not Post Balances until you have examined the paper statements for accuracy. When satisfied
that the statements reflect the expected data, click Post Balances and all Prior Balances will be
updated for the next billing cycle.
Single Printing - Patient Statements
To ensure internal accounting accuracy, Single Patient Statements are available only as a
reprinting from a prior Batch Printed Interval. It is not possible to print a single statement
covering dates of service that are not part of a prior Batch.
1)
2)
3)
4)
5)
6)
7)
Select Perform Billing within the Finances Section
Select Patient Statements
Ensure the correct patient has been located in the Chart
Select Single Patient Statement
Select Form Type
Select the Closing Date for the previous Interval from the popup
Preview or Print the single archival statement
Batch Printing - HCFA-1500 Claims
1)
2)
3)
4)
5)
Select Perform Billing within the Finances Section
Select Insurance Claims
Select Batch Insurance Processing
Enter Billing Interval Dates
Preview or Print Batch HCFA Claims
19
HCFA 1500 claims, which do not depend on a prior Balance, may be printed in batch (or singly)
at any time for any billing interval.
Single Printing - HCFA Insurance Claims
1)
2)
3)
4)
5)
6)
Select Perform Billing within the Finances Section
Select Insurance Claims
Ensure the correct patient has been located in the Chart
Select Single Insurance Claim
Enter Billing Interval Dates
Preview or Print Single HCFA
Quick Entry
this information coming
20