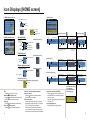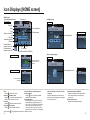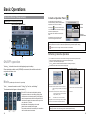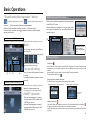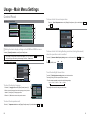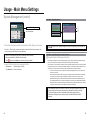
1
Air-conditioner Control System
ADVANCED TOUCH CONTROLLER
MODEL
AT-50A
INSTRUCTION BOOK
Safety Precautions............................................................... 2
Function List......................................................................... 4
Names and Functions of Controller Components................ 6
Screen Configuration [HOME screen].................................. 8
Buttons [HOME screen]...................................................... 10
Icon Displays [HOME screen]............................................ 12
Basic Operations................................................................ 16
Screen selection.......................................................................... 16
Group selection........................................................................... 17
Operating the Air conditioning unit group.................................... 18
ON/OFF operation......................................................................... 18
Mode.............................................................................................. 18
Temperature setting....................................................................... 20
Interlocked ventilation units(LOSSNAY)/Fan speed/Air direction/Louver settings........ 21
"Disable scheduled operation" button............................................ 22
Operating the LOSSNAY group................................................... 22
Mode.............................................................................................. 22
Fan speed setting.......................................................................... 22
Operating the General equipment group..................................... 22
ON/OFF operation......................................................................... 22
Before using the controller, read this
Instruction Book carefully to ensure
proper operation.
Retain this Instruction Book for future
reference.
Make sure that this manual as well as the
Installation Manual are passed on to any
future air condition system users.
To ensure safety and proper operation of
the unit, the unit should only be installed
by qualified personnel.
Multiple group selection screen................................................... 23
Disabling functions...................................................................... 23
Menu Screen...................................................................... 24
Usage - Main Menu Settings.............................................. 26
Operation Setting........................................................................ 26
Restriction Settings..................................................................... 42
Control Panel............................................................................... 50
System Management.................................................................. 57
Maintenance....................................................................... 61
Touch Panel Cleaning screen...................................................... 61
Troubleshooting.................................................................. 62
Safety Precautions
●Thoroughly read the following safety precautions prior to installation.
●Observe the following precautions to ensure safety.
WARNING
CAUTION
Precautions for moving or repairing the controller
WARNING
The controller should be repaired or moved only by
qualified personnel. Do not disassemble or modify the
controller.
Improper installation or repair may cause injury,
electric shock, or fire.
Indicates a risk of death or serious injury.
Indicates a risk of serious injury or structural damage.
●Nomenclature
(Prohibited actions)
(Do not touch)
(No water)
(No wet hands)
(Electric shock hazards) (Injury hazards)
(Important actions)
reading this manual, pass it on to the end user to retain for future reference.
●After
●Keep this manual for future reference and refer to it as necessary. This manual should be made available to those who repair or relocate
the controller. Make sure that the manual is passed on to any future AT-50A users.
All electric work must be performed by qualified personnel.
General precautions
WARNING
Do not install the unit in a place where large amounts
of oil, steam, organic solvents, or corrosive gases,
such as sulfuric gas, are present or where acidic/
alkaline solutions or sprays are used frequently.
These substances can compromise the performance
of the unit or cause certain components of the
unit to corrode, which can result in electric shock,
malfunctions, smoke, or fire.
To reduce the risk of shorting, current leakage,
electric shock, malfunctions, smoke, or fire, do not
wash the controller with water or any other liquid.
CAUTION
To reduce the risk of shorting, electric shock, fire,
or malfunction, do not touch the circuit board with
tools or with your hands, and do not allow dust to
accumulate on the circuit board.
To reduce the risk of injury or electric shock, before
spraying a chemical around the controller, stop the
operation and cover the controller.
To reduce the risk of injury or electric shock, stop
the operation and switch off the power supply before
cleaning, maintaining, or inspecting the controller.
Additional precautions
To avoid damage to the controller, use appropriate tools to
install, inspect, or repair the controller.
To avoid damage to the controller, do not overtighten the
screws.
AT-50A is designed for exclusive use with the Building
Management System by Mitsubishi Electric. The use of this
controller for with other systems or for other purposes may
cause malfunctions.
To avoid discoloration, do not use benzene, thinner, or
chemical rag to clean the controller. To clean the controller,
wipe with a soft cloth soaked in water with mild detergent,
wipe off the detergent with a wet cloth, and wipe off water
with a dry cloth.
To avoid damage to the controller, provide protection against
static electricity.
Properly install all required covers to keep moisture
and dust out of the controller. Dust accumulation and
water can cause electric shock, smoke, or fire.
To reduce the risk of electric shock, malfunctions,
smoke or fire, do not operate the switches/buttons or
touch other electrical parts with wet hands.
CAUTION
To reduce the risk of fire or explosion, do not place
flammable materials or use flammable sprays around
the controller.
To reduce the risk of damage to the controller, do not
directly spray insecticide or other flammable sprays
on the controller.
To reduce the risk of injury and electric shock, avoid
contact with sharp edges of certain parts.
To avoid injury from broken glass, do not apply
excessive force on the glass parts.
To reduce the risk of injury, wear protective gear
when working on the controller.
To reduce the risk of electric shock or malfunctions,
do not touch the touch panel, switches, or buttons
with a pointy or sharp object.
Precautions during installation
WARNING
Do not install the controller where there is a risk of
leaking flammable gas.
If flammable gas accumulates around the controller, it
may ignite and cause a fire or explosion.
Properly dispose of the packing materials. Plastic
bags pose suffocation hazard to children.
Function List
Function
The table below summarizes the functions that are available on the AT-50A.
Refer to the pages listed for details.
Lock Buttons
Function
Description
Switches the ON/OFF operation of the units such as air conditioning
units. The LED on the Collective ON/OFF button will light up when one
ON/OFF Operation
or more units are in operation and off when all units are stopped.
Switches the mode “Cooling/Dry/Fan/Auto/Heating” for each group or all
*1 groups. (Switches the mode “Bypass/Heat recovery/ Auto” for LOSSNAY
Mode
groups.)
*1 Sets the set temperature for each group or all groups.
Set Temperature
Unit Operation
Fan Speed
Air Direction
Louver
*1 Adjusts the fan speed for each group or all groups.
*1 Adjusts the air direction for each group or all groups.
*1 Enables/disables the louver for each group or all groups.
Page
18
Set Temperature
Range Limit
Restriction
Settings
18
Operation Mode
Selection Limit
20
21
21
21
The ON/OFF operation of the interlocked ventilation unit is interlocked
ON/OFF Operation
with the ON/OFF operation of the air conditioning unit. The interlocked
ventilation units can be independently operated for ON (High/Low)/ OFF
for Interlocked
*1 for each group or all groups. (When the ventilation unit is interlocked
Ventilation
Display Format
21
Function Key Setting
with the air conditioning unit, the ventilation mode cannot be used.)
Time and
Collective Operation
The following functions can be collectively executed on multiple groups:
Setback, Schedule, Mode, Temperature Correction, RC Prohibition.
19
38
Date and Time
Sets the date, time, and display formats. The current time will appear at
the top right corner of the HOME screen.
27
Weekly/1-day
schedule
• Allows the user to set the Weekly schedule for each group.
• Maximum of 16 events can be scheduled for each day.
• The types of actions that can be scheduled are as follows: ON/OFF,
Mode, Set Temperature, Fan Speed, Air Direction, and Remote
Controller Operation Prohibition.
• Maximum of 12 patterns can be configured for the Weekly schedule,
and 5 for 1-day schedule.
• Two types of weekly schedule (Summer/Winter) can be set.
• 1-day schedule overrides the Weekly schedule.
27
Setback Control
This function helps keep the indoor temperature in the
temperature range while the units are stopped and during the
time this function is effective.
35
Disabling scheduled
operation
Scheduled operation can be temporarily disabled.
This setting must be set to OFF to run scheduled operation.
22
System-Changeover
Automatically switches the entire system (all indoor units that are
connected to the same outdoor units) to Cooling or Heating by
periodically monitoring the room temperature and the preset temperature
of each group and determining the best operation mode.
• The System-Changeover function is not available for the following
types of products: Simultaneous Cooling/Heating units (with automatic
mode change function), Mr. SLIM®, LOSSNAY, and DIDO controller.
Schedule
System
Management
Maintenance
59
Locks the following buttons: Collective ON/OFF, F1, F2, and Main
Menu.
Locks the following functions: ON/OFF, Mode, Set Temp, Fan
Speed, and Schedule ON/OFF.
Limits the available temperature range for the local remote
controllers (each group or all groups).
Locks the following buttons on the local remote controllers: ON/
OFF, Mode, Set Temperature, and Filter Reset buttons (collectively
or by group)
When set as the main controller, operation of the following modes
with the local remote controllers can be prohibited.
When cooling is prohibited: Cooling, dry, automatic cannot be
chosen.
When heating is prohibited: Heating, automatic cannot be chosen.
When cooling/heating is prohibited: Cooling, dry, heating, automatic
cannot be chosen.
Selects the display formats for the following items: Display
language, temperature unit, room temperature, display or nondisplay of Cooling/Heating mode icons (during Auto mode),
backlight timer, and group names.
The F1 button and the F2 button can be set as a run button of the
following collective operation: Setback, Schedule, Operation Mode,
Temperature Correction, Remote Controller Prohibition.
Page
11
23
42
44
46
48
50
54
HOME screen
Operation Mode
Setting
When the Group icon is touched, the action differs depending on
the operation mode. Default is set to the operation mode 2.
Operation mode 1: Turns ON/OFF the units in the group whose
Group icon is touched.
Operation mode 2: Displays the check mark when Group icon is
touched. Touch the Group icons of the groups
to be operated, and then touch the “OPERATE”
button to move to the Group screen. Multiple
groups can be selected. Use this mode when
operating the multiple groups collectively.
Operation mode 3: Directly moves to the Group screen of the
group whose Group icon is touched.
41
Volume Control
Sets the sound volume and screen brightness.
55
Error
If an error occurs on the AT-50A controller or the units and
controllers it controls, the LED on the Collective ON/OFF button
will blink. If an error occurs on the indoor or LOSSNAY units,
will
appear on the corresponding group icon on the HOME screen. The
error code can be verified and reset on the Status List screen.
57
Filter sign
Filter Icon will appear on the HOME screen when the filter is due
for cleaning. The icon can be removed from the Status List screen.
57
Touch Panel
Cleaning Mode
Disables the touch panel to allow the user to clean the panel.
61
Touch Panel
Calibration Mode
Calibrates the touch panel if the touch panel does not respond
correctly when touched.
56
External input
Receives input signals from external devices and start/stop all
groups of units or permit/prohibit operations from the local remote
controllers. Requires cable connections.
External output
Outputs the operation status of the units (ON/OFF) or error signals
to external devices collectively, using contact signals. Requires
cable connections.
Basic Settings
*1: Available functions vary depending on the unit type. Only the functions that are supported by the connected units can
be controlled from the AT-50A.
Prohibit Remote
Controller
Description
Miscellaneous
Names and Functions of Controller Components
Product features
Touch panel / Buttons
The AT-50A described in this manual is a centralized controller with color LCD touch panel for air
conditioning units, LOSSNAY, and General equipment using the Mitsubishi Electric DIDO controller (PACYG66DCA).
AT-50A can control up to 50 units/50 groups. (*1)
AT-50A controls and monitors the air conditioning units of each group. AT-50A also can control detailed
scheduling and prohibits the local remote controller operation in each room (group), which may lead to
energy savings.
Basic operations are accessed through the AT-50A touch panel. ON/OFF, F1, and F2 operations that
control air conditioning units collectively are accessed by using buttons next to the touch panel.
AT-50A display screen consists of three types, corresponding to the usage.
HOME screen
: Monitoring screen to monitor the operation status of the units
(described in this Instruction Book)
Main Menu screen
: Setting screen to set the functions such as schedule settings
(described in this Instruction Book)
Maintenance screen : Initial setting screen to set the basic systems such as group settings
(described in the Installation Manual)
* 1 Group: minimum unit to be controlled by AT-50A
A group consists of units (16 units maximum).
1
2
1 Display/Touch panel
AT-50A features a 5" color LCD touch panel. Touch panel displays the operation status of the
units. Function settings such as week schedule settings are accessed through the touch panel.
The backlight lights up when the panel is touched, and lights off after certain period of time. The
backlight will remain lit as long as an error exists.
2 Collective ON/OFF Button *1
The Collective ON/OFF button enables the collective ON/OFF function that allows the user to
turn on/off the air conditioning units, LOSSNAY, and DIDO controllers in all groups collectively.
The indicator corresponds to the operation status of controlled units.
Unlit: Indicates that all units are stopped.
Lit : Indicates that one or more units are in operation.
Blink: Indicates that an error is occurring.
3 Function 1 Button (F1), 4 Function 2 Button (F2) *1 *2
Desired functions from the following list can be assigned to the F1 and F2 buttons.
(Setback/Schedule/Operation Mode/Temperture Correction/Remote Controller Prohibition)
The functions to assign to these buttons can be selected from the Function Key Setting on the
Control Panel.
The indicator on the buttons indicates the enabled/disabled status of the function.
Unlit: The assigned function is disabled.
Lit : The assigned function is enabled.
The indicators on the F1 and F2 buttons will be lit or unlit when the functions that are assigned to
the F1 and F2 buttons are enabled or disabled from the Collective Operation panel.
3
5 Power indicator
The power indicator lights up when the power to AT-50A is turned on.
Unlit: Power OFF
Lit : Power ON
4
*1 When the button is pressed while the operation is prohibited, the LED will blink twice.
*2 Buttons 2, 3, and 4 are available only on the HOME screen.
5
Buttons 2, 3, and 4 have indicators on the top.
Screen Configuration [HOME screen]
HOME screen
1. How to switch the HOME screen
Touch tubs to change the display format.
GRID screen
GROUP screen
Zoom-out screen
: Displays the GRID screen.
To the GROUP screen
: Displays the GRID (zoom-out) screen.
: Displays the GRID (zoom-in) screen.
To the GRID screen
: Displays the LIST screen.
: Displays the GROUP screen.
2. How to move to the Main Menu screen
: Displays the Main Menu screen.
3. How to move to the Maintenance screen
To the LIST
screen
Refer to the Installation Manual.
To the GRID
(zoom-in) screen
To the GROUP
screen
LIST screen
To the GRID
(zoom-out) screen
To the LIST screen
Zoom-in screen
To the GRID screen
[Main Menu screen]
To the Main Menu screen
To the HOME screen
Buttons [HOME screen]
HOME screen
GRID (zoom-out) screen
GRID (zoom-in) screen
Displays the operation status of all groups.
The button layout 6 varies with the number of the
registered groups.
Displays the detailed operation status of each
group. (10 groups on 5 pages maximum)
① ② ③ ④
⑤
⑥
1GRID screen button
0Move-to-the-selected-group button
Displays the GRID screen.
Displays the LIST screen.
Moves to the GROUP screen of the selected group.
Moves to the Multiple group selection screen when
multiple groups are selected. Refer to P23 "Multiple
group selection screen" for details.
3GROUP screen button
aPage button
Displays the GROUP screen.
Flips through pages.
2LIST screen button
4MAIN MENU screen button
bDisplay selection button
Displays the MAIN MENU screen.
Shows/Hides the display for the information below.
• Set temperature
• Scheduled operation is enabled.
5Operation lock button
Locks or unlocks the buttons on the AT-50A.
Press and hold the button for two seconds to lock or
unlock the buttons.
The locked/unlocked status icon will appear on the
buttons.
⑥
Locked
⑦⑧
⑧
⑨ ⑩
A password may be required to unlock certain buttons.
Select the buttons to be locked from the Lock Buttons
(Refer to P42.) on the Main menu.
If no items have been selected, the operation lock
button will not appear on the screen.
⑪
6Group icon (operation status display) button
LIST screen
GROUP screen
Displays the detailed operation status of each
group with group name. (5 groups on 10 pages
maximum)
Displays the detailed operation status of each
group. Sets group operations.
(When the air conditioning units are controlled)
⑥
⑬
⑮
⑭
⑪
⑫
⑯
⑰
Note: Display ⑨ and ⑩ vary depending on the operation
mode. Refer to P17 "Operation mode" for details.
Sample displays above are for default setting: Operation
mode 2.
Operation mode 2
Switches the Group icon between Selected
(checked) and Deselected (unchecked).
(Default) Displays the check mark when Group
icon is touched.
Operation mode 3
Directly moves to the Group screen of the group
whose Group icon is touched.
7 “Access the Collective Operation
panel” button
Press this button to bring up the collective operation
panel.
(Refer to P19 for information about the collective
operation panel.)
Switches the group to be displayed.
dMode button
Switches the operation mode of the air conditioning
units and LOSSNAY.
eSet temperature button
Adjusts the set temperature by using the + and –
buttons. Set temperature appears above the button.
f“Disable scheduled operation” button
Use this button to temporarily disable the scheduled
operation on the display.
The indicator on the button will remain lit when the
function is enabled.
The scheduled operation will not be run when the icon
is displayed.
gInterlocked ventilation (LOSSNAY)/
Air direction/Fan speed/Louver
setting button
Displays the popup window of Interlocked
ventilation (LOSSNAY)/Air direction/Fan speed/
Louver setting screen.
* Refer to P21 "Interlocked ventilation units
(LOSSNAY)/Fan speed/Air direction/Louver
settings" for the popup window.
⑱ON/OFF button
Changes the operation to ON/OFF.
⑲Fan speed selection button
Switches LOSSNAY fan speed between Lo and High.
: Displays the zoom-out screen.
: Displays the zoom-in screen.
9Select All button
LOSSNAY
Operation mode 2
10
⑱
Operation differs depending on the operation mode.
Operation mode 1
Turns ON/OFF the units in the group whose Group
icon is touched.
8GRID (zoom-out/zoom-in) screen button
Operation mode 1
Operation mode 3
Unlocked
cGroup button
Selects/Deselects groups collectively. Adds check
marks to all selected icons.
⑲
1Current time
Displays the current time.
2Current page/Total pages
Displays the Current page/Total page number.
Note : Depending on the units to be controlled and AT-50A settings, available button operations and displays vary.
: While the
icon is displayed on the button, the operation is locked.
11
Icon Displays [HOME screen]
(3) LIST screen
(1) GRID (zoom-out) screen
[ON (BG Color: blue)]
Group No.
•Filter sign
•Check mark
[OFF (BG Color: black)]
[Error (BG Color: yellow)]
Error display
Communication error
at startup
(2) GRID (zoom-in) screen
Group No.
[ON (BG Color: blue)]
Room (Group) name
Schedule (enable/disable)
[ON (BG Color: blue)]
[OFF (BG Color: black)]
Interlocked ventilation (LOSSNAY) operation**
•Check mark
•Mode
•Filter sign:
Room temperature
Interlocked ventilation
(LOSSNAY) operation
•Mode
•Filter sign:
Schedule (enable/disable)
[OFF (BG Color: black)]
Schedule (enable/disable)
Group No.
[OFF (BG Color: black)]
[ON (BG Color: blue)]
[Air conditioning ]
•Check mark
•ON/OFF operation
prohibition
Display selection button
Display selection button
Room
Set
temperature temperature*
* When the temperature offset function is
enabled, the temperature will appear in
the green outline font.
Room
Interlocked
temperature ventilation**
ON: blue
OFF: black
•Mode
•Filter sign:
Room
temperature
** Interlocked LOSSNAY
does not appear
during operation.
[LOSSNAY group]
[ON (BG Color: blue)]
[OFF (BG Color: black)]
Schedule (enable/disable)
[LOSSNAY group]
Filter sign:
LOSSNAY icon
Group No.
Room (Group) name
[ON (BG Color: blue)]
Schedule (enable/disable)
[OFF (BG Color: black)]
Schedule (enable/disable)
[ON (BG Color: blue)]
[OFF (BG Color: black)]
[General equipment group]
•Check mark
[OFF (BG Color: black)]
[ON (BG Color: blue)]
•LOSSNAY icon
•Filter sign:
•LOSSNAY icon
•Filter sign:
•LOSSNAY icon
Schedule (enable/disable)
[General equipment group]
General equipment icon
[ON (BG Color: blue)]
Group No.
Room (Group) name
Schedule (enable/disable)
[OFF (BG Color: black)]
Schedule (enable/disable)
[ON (BG Color: blue)]
[OFF (BG Color: black)]
[Error (BG Color: yellow)]
[Air conditioning unit/LOSSNAY/General equipment group]
Error display
Error:
when an error occurs.
Displays
Startup (communication) error:
Displays as well as the error display when a
startup (communication) error occurs.
Filter sign:
Displays
when filter needs maintenance.
During scheduled operation:
during scheduled operation.
Displays
12
When the "Disable scheduled operation"
button is enabled:
Displays
when the "Disable scheduled
operation" button is enabled.
Room temperature:
Display ranges 8-39ºC (46-102ºF). When the
temperature is beyond the range, 8ºC (46ºF) or
39ºC (102ºF) will blink on the display.
When multiple air conditioning units (indoor
units) are registered to a group, current indoor
temperature on the main indoor unit is displayed.
•Check mark
•General equipment icon
Interlocked ventilation (LOSSNAY):
Displays
when there are ventilation units
interlocked with the air conditioning (indoor)
units in the group.
Icon color indicates the operation status (Blue:
ON, Black: OFF).
General equipment icon:
Displays the General equipment type.
•General equipment icon
•General equipment icon
【Error (BG Color: yellow)】
【Air conditioning
unit/LOSSNAY/General
equipment group】
Error display
13
Icon Displays [HOME screen]
GROUP screen
[Air conditioning unit group]
Group name
[LOSSNAY group]
During operation
During operation
Group No.
Mode
Room temperature
Error
Startup (communication)
error
Filter sign
Scheduled operation
/Disabled
Disable scheduled operation function: ON
Disable scheduled operation function: OFF
Set temperature
While the unit is stopped
Fan speed display
Fan speed
Louver
Air direction
Interlocked ventilation (LOSSNAY)
[General equipment group]
Temperature Correction
During operation
When the Temperature
Correction function is
enabled
While the unit is stopped
While the unit is stopped
General equipment icon
Interlocked ventilation
(LOSSNAY)
When the "Disable scheduled operation"
button is enabled:
Displays
when the "Disable scheduled
operation" button is enabled.
Room temperature:
Display ranges 8-39ºC (46-102ºF). When the
room temperature is beyond the range, 8ºC
(46ºF) or 39ºC (102ºF) will blink on the display.
When multiple air conditioning units (indoor
units) are registered to a group, current indoor
temperature on the main indoor unit is displayed.
icon is displayed on the button, the operation is locked.
Error:
Displays
when an error occurs.
Startup (communication) error:
Displays
as well as the error display when a
startup (communication) error occurs.
Filter sign:
Displays
when filter needs maintenance.
During scheduled operation:
Displays
during scheduled operation.
Note : While the
14
When the Temperature Correction function
is enabled:
When the Temperature Correction function is
enabled, the corrected temperature will appear
in the green outline font.
Interlocked ventilation (LOSSNAY):
Displays the operation status of the ventilation
that is interlocked with the air conditioning
(indoor) units.
General equipment icon:
Displays the General equipment type.
15
Basic Operations
Screen selection
Group selection
GRID (zoom-out) screen appears at the initial startup.
Select the desired screen.
• Operation mode 1, 2, 3
When the Group icon 1 is touched, the action differs depending on the operation mode.
Operation mode consists of three modes (shown below), and default is set to the
operation mode 2. Refer to P41 for changing the mode.
GRID (zoom-out) screen
• Operation mode 2:
appears in the area marked 2.
Allows the user to select groups to be operated. Moves to the
Group screen.
1
2
3
LIST screen
GRID (zoom-in) screen
1
1
Touch the Group icon 1 to select the group to be operated. Groups can be selected on
the GRID or the LIST screens.
Touch the Group icon 1 to switch between displaying check marks (selected) and hiding
check marks (deselected). Touch 3 to select all groups.
Touch the Group icons of the groups to be operated, and then touch
2 to move to
the Group screen.
The number of selected groups = 1 : The selected group appears on the Group screen.
Refer to P18 "Group screen" for details.
The number of selected groups > 1 : The Multiple group selection screen appears.
(The selected groups can be operated collectively.)
Refer to P23 "Multiple group selection screen" for details.
• Operation mode 1:
appears in the area marked 2.
Stops or starts the operation of the air conditioning units through Group icon 1.
* ON/OFF operation lock
When AT-50A restricts its own ON/OFF operation, the icon above will appear. The ON/OFF
operation will be disabled.
* During receiving the external input signal
2
2
3
3
The ON/OFF function cannot operate when the following displays appear.
■Displays the emergency stop level-signal input*
■Displays ON/OFF level-signal input
The button cannot
be operated.
When the group icon button is set to the operation mode 1
• Operation mode 3: Nothing appears in the area marked 2.
Moves to the Group screen by touching the Group icon 1.
16
17
Basic Operations
Operation Screen (Group screen)
Collective Operation Panel
Operating the Air conditioning unit group
This panel has the functions that can be
executed collectively. (Setback, Schedule, Mode,
Temperature Correction, RC Prohibition)
Basic operations (GROUP screen)
Indicator
Function
icon at the left bottom of the
Touching the
icon on the GRID or the LIST screen will bring up
the Collective Operation panel.
Each button has an indicator and the function
name.
Collective
Operation button
The indicators on the buttons show which
functions are assigned to which buttons.
1
▪Before using the Collective Operation buttons, the groups to execute collective settings on must be selected,
and the parameters must be set from Main Menu>Operation Setting>Collective Operation Setting.
▪If
2
5
3
4
ON/OFF operation
Touching 3 allows the indoor units in the displayed group to start/stop.
When interlocked ventilation units (LOSSNAY) are connected, the ventilation units work in
conjunction with indoor units.
ON:
[Green]
OFF:
Performing Collective Operation
1 On the GRID or the LIST screen, touch the button that brings up the Collective Operation Panel.
2 Select the Collective Operation button on the Collective Operation panel.
3 Press OK on the Collective Operation panel.
(Go to 4 if Setback or Mode was selected. Otherwise, the setting is complete.)
4 If Setback or Mode was selected, take the following steps.
When Setback is selected
When Mode is selected
[Black]
Mode (useable only while the unit is in operation)
Touch 2 to access the modes in order of "Cooling, Dry, Fan, Auto, and Heating."
The selected mode will appear in the area labeled 1.
Auto heating
display
18
appears on an icon of a given function, the function is not available.
Auto cooling
display
*Refer to P51 for Auto mode cooling/heating settings.
*To operate an indoor unit in the heating (cooling) mode
while the indoor unit is already operating in the opposite
mode, the operation mode cannot be changed until all of
the indoor units operate in the same mode or stop. In this
case, the mode 1 will blink.
*Available mode varies depending on the model.
Modes that are unavailable do not appear.
*The operation mode which is restricted by this controller or
other controllers cannot be selected.
Select the desired item, and touch OK.
▪Touch OK on the popup window.
▪Scheduled: Scheduled operation is enabled. The units will
operate according to the Setback Control settings.
(P35)
▪Select a mode on the window that will appear.
▪Unscheduled: Scheduled operation is disabled. The units will
operate according to the Collective Operation
settings (Setback). (P39)
▪OFF
▪Press OK.
:The Setback function will not be executed.
*Regardless of how the above settings are made, the Setback
function will not be executed if the operation switch is on.
*A blinking indicator on a button indicates that the function that corresponds to the button cannot be
collectively executed. Check the settings for the “Collective Operation Setting.”
19
Basic Operations
Checking the status of the collective operation functions
1On the GRID or the LIST screen, touch the button that brings up the Collective Operation panel.
2Check the color of the indicator on the collective operation button.
Interlocked ventilation units (LOSSNAY)/
Fan speed/Air direction/Louver settings
(Yellow) : The function is enabled.
(Gray) : The function is disabled.
Checking the Function button settings
1 On the GRID or the LIST screen, touch the button that brings up the Collective Operation Panel.
2 Check what it says on the indicator on the collective operation buttons.
Touch 4 to show the Interlocked ventilation
units (LOSSNAY)/Fan speed/Air direction/
Louver settings screen.
:The function is assigned to the F1 button.
:The function is assigned to the F2 button.
:The function is not assigned to the F1 or F2 button.
4
Temperature setting
Touch
A
(useable only while the unit is in operation)
C
to adjust the temperature setting.
(* When fan mode is selected, the temperature setting cannot be made.)
*Available set temperature range varies depending on the mode or model.
The temperature can be set within the following range.
Cool/Dry : 19°C - 30°C / 67°F - 87°F
Heat
: 17°C - 28°C / 63°F - 83°F
Auto
: 19°C - 28°C / 67°F - 83°F
B
D
A : Interlocked ventilation units (LOSSNAY)
* When interlocked ventilation units are not connected, [A] does not appear.
Stop
Low
High
B : Fan speed (useable only while the unit is in operation)
* [B] does not appear when the model does not have this function.
* Available fan speed varies depending on the model.
Quiet
Low
Medium
High
Auto
C : Air direction (useable only while the unit is in operation)
* [C] does not appear when the model does not have this function.
* Available air direction varies depending on the model.
Setting 1
Setting 2
Setting 3
Setting 4
Setting 5
Swing
Auto
D : Louver (useable only while the unit is in operation)
* [D] does not appear when the model does not have this function.
ON
OFF
After setting A through D , touch the OK button.
20
21
Basic Operations
“Disable scheduled operation” button
The “Disable scheduled operation” function is ON.
The “Disable scheduled operation” function is OFF.
Use button 5 (P18) to temporarily disable the scheduled operation.
When the function is enabled, the indicator on button 5 will light up in yellow.
When this function is enabled, the icon
will appear on the screen, and the scheduled
operation will not be run.
Operating the LOSSNAY group
Multiple group selection screen * To operate the Air conditioning unit group
Allows the user to collectively operate all groups that are selected
on the GRID or LIST screen.
When selected groups include two or more unit types, select
the unit type to be operated. Then, the target group will be the
selected unit group.
(1)
Displays that are not marked by numbers on the screen are the same as those on the Air conditioning unit group screen.
Mode
Check the selected groups.
Touch (1) to show the
selected group confirmation
screen.
Touch (1) to access the modes in the order "Bypass,
Heat recovery, Auto."
The selected mode will appear in the area marked (2).
Disabling functions
*Available mode varies depending on the model.
Modes that are unavailable do not appear.
Fan speed setting
(2)
(1)
(3)
(4)
Touch (3) to access the fan speeds in the order
"Low, High."
The selected fan speed will appear in the area
marked (4).
Lock Buttons
When AT-50A locks its own functions for ON/OFF, Mode, Temperature, Fan speed, “Disable scheduled
operation” button, the icon above will appear on the corresponding buttons, and the functions will be
disabled.
When the ON/OFF function is locked, the Collective ON/OFF button will be enabled.
Example) ON/OFF operation lock
During receiving the external input signal
The ON/OFF function cannot operate when the following displays appear.
Operating the General equipment group
Displays that are not marked by numbers on the screen are the same as those on the Air conditioning unit group screen.
■Displays the emergency stop level-signal input*
■Displays ON/OFF level-signal input
Displays the General equipment type.
*When changing icons, refer to the Installation Manual.
ON/OFF operation
•When the General equipment is turned on,
the output contact of DIDO controller (PACYG66DCA) also turns on.
•When the General equipment is turned off,
the output contact of DIDO controller (PACYG66DCA) also turns off.
22
The button cannot
be operated.
Operation restrictions
If the ON/OFF, Mode, and Temperature buttons on the AT-50A are disabled from other controllers,
will appear on the buttons, and these buttons will not be available for selection.
If the AT-50A denies other controllers access to itself, other controllers cannot disable the functions on
the AT-50A.
23
Menu Screen
1 Operation Setting
The Main Menu screen allows the user to configure the basic settings.
To access the [Main Menu] screen, touch the
[Menu] screen.
icon at the right top corner of the [HOME] or the
Main Menu screen
(Top screen)
(1) Time and Schedule
Sets the date, time, schedules, and Setback control.
P26
(2) Collective Operation Setting
Sets the collective operation settings.
P38
(3) Group Icon Setting
Changes the behavior of the group icon on the HOME screen.
* Three setting options are available.
P41
Locks the buttons and the functions on the AT-50A.
P42
2 Restriction Settings
1
(1) Lock Buttons
(2) Set Temperature Range Limit Sets the temperature range for the local remote controllers.
P44
(3) Prohibit Remote Controller
Locks the buttons* on the local remote controllers.
*ON/OFF, Mode, Set Temperature, and Filter Reset buttons
P46
(4) Operation Mode Selection
Limit
Limits the operation mode selection.
P48
2
3
3 Control Panel
(1) Display Format
Selects the display formats* on the Home and Menu screens.
*Display language, temperature unit, display or non-display
of room temperature and Cooling/Heating mode icons
(during Auto mode), and backlight timer, and group names.
P50
(2) Function Key Setting
Assigns the functions to the F1 and F2 buttons.
* Setback, Schedule, Mode, Temperature Correction, and RC
Prohibition can be assigned.
P54
(3) Volume Control
Sets the sound volume and screen brightness.
P55
(4) Touch Panel Calibration
Calibrates the touch panel.
P56
(1) Status List
Displays errors and filter signs.
P57
(2) System-Changeover
Selects the System-Changeover* setting.
*Automatically switches the entire system to Cooling or
Heating based on the room temperature and the preset
temperature of each group.
* This function cannot be used when the Operation Mode
Selection Limit function is used.
P59
1
4
3
4
2
1 [HOME] button
Accesses the [HOME] screen.
2 Back button
4 System Management
Returns the screen to the previous screen.
(When touched on the Main Menu screen, returns the screen to the HOME screen.)
3 Touch Panel Cleaning button
P61
Touch this button to access the screen that will not respond when touched (except when the numbers
in the four corners are touched in a specified order), allowing the user to clean the touch panel without
accidentally changing the settings.
4 Service Menu button
Accesses the maintenance menu for service personnel. Normally, general users do no need to change
any settings in the maintenance menu.
24
25
Usage - Main Menu Settings
Operation Setting
Main Menu > Operation Setting > Time and Schedule > Date and Time
Main Menu > Operation Setting
A Setting the date, time, and display format
1
1
2
2
4
3
3
5
Date tab
Time tab
1. Touch the A Date and Time button on the [Time and Schedule] screen.
Main Menu > Operation Setting > Time and Schedule
2. On the [Date and Time] screen, touch the 1 [Date] tab to set the date, or 2 [Time] tab to set the time.
1 Time and Schedule
3. Using the 3
buttons, set the following items: [Month/Date/Year] and [Hour/Minute/AM・PM].
4. On each tab, select one of the three display formats by checking the 4 checkbox next to the desired
format.
A
B
C
D
5. Touch the 5 Save button.
・The initial date/time setting is 1/1/2011 12:00AM.
・If the clock is set forward, the operations that were scheduled to have taken place before the new
time will be cancelled.
Main Menu > Operation Setting > Time and Schedule > Set Schedules
B Setting the operation schedule
Types of schedules
Number of operation patterns
Weekly
Use to assign an operation pattern for each day of the week to be
executed every week.
Maximum 12 patterns
One Day
Use to assign unique operation patterns for specific dates (up to seven
days in advance, including the current date).
Maximum 5 patterns
[Note] If a specific pattern is assigned to multiple groups or days and the configuration of the pattern is changed, the
change will be reflected on all the groups and days.
Use a different pattern number to save a given configuration of events if you do not want the changes to be
reflected on the groups and days to which the pattern is assigned.
26
27
Usage - Main Menu Settings
Operation Setting (cont'd)
Schedule setting flowchart
Schedule Setting Procedures
Set Schedule screens
1. Touch the [Set Schedules] button on the [Time and Schedule] screen to access the Select Group and
Days/Dates screen.
Step 1 Select the Weekly or One Day tab.
Weekly
Step 2 Validity period.
Current tab
name
[Weekly] tab
One day
[One Day] tab
On the [One day] tab, a 7-day schedule including today will be displayed.
Day (Date) grid
Step 3 Select a group.
Step 4
Select days or dates.
• [Weekly] screen
Displays the pattern numbers that are assigned to groups and days.
Select Group and Days/Dates screen
) will appear on the top left corner of the cell to which One(
day schedule is assigned.
One-day pattern will override the Weekly pattern.
The “Seasonal Settings” button will appear.
On the button, the effective period that was selected on the
Weekly Tab will appear.
The effective period can be changed on the “Seasonal Settings”
"Seasonal Settings" btutton
screen that will appear when the button is pressed.
• [One day] screen
Displays the One-day schedule patterns that are assigned to
specific dates.
Seasonal settings screen
Step 5 Assign a pattern to the selected days or dates.
Select Pattern screen
Step 6
Configure the pattern.
2. Touch the Weekly or One Day tab.
When the Weekly tab was selected, the “Seasonal settings” must be made as follows.
(1) Touch the [Seasonal settings] button on the Select Group and Days/Date screen.
(The “Seasonal settings” button appears only on the [Weekly] screen.)
Edit Pattern screen
(2) Touch the button 1, and select the use or non-use of Weekly2.
: Use Weekly2
: Do not use Weekly2
(3) Use the 2
buttons to select the use or non-use
of Weekly1 and the effective period for Weekly2.
If Weekly2 is set to “Do not use Weekly2,” the effective
period cannot be set.
(4) Pressing the 3 OK button will take the screen back
to the Select Group and Days/Date screen, and the
effective period on the “Seasonal Settings” button will be
updated.If the effective periods for Weekly1 and Weekly2
2
1
3
overlap, the setting cannot be completed.
28
29
Usage - Main Menu Settings
Operation Setting (cont'd)
3. Select the cell where a specific group and a day (date) intersect to assign a pattern.
* Patterns can be copied, pasted, or deleted on the Select Group and Days/Dates screen.
e.g., The weekly schedule of a specific group can be copied and pasted to another group,
or the schedule pattern of a specific day can be copied and pasted to another day.
Refer to P32 for details.
② To copy an existing pattern and paste it to selected days or dates
Touch a pattern number to select it, then touch the [OK] button to return to the Select Group and Day/
Date screen. To set the schedule for other groups or days/date ⇒ See Step 2.
When setting is complete ⇒ See Step 10.
③ To edit an existing pattern
Touch an existing pattern number, then touch the
4. On the Select Pattern screen, select [--] (deselected) or one of the 12 or 5 patterns (between [P01] and
[P12] on the Weekly tab OR between [P01] and [P05] on the One Day tab). Each pattern can be newly
configured, copied and pasted, or edited. See 1, 2, and 3 below for details.
Touch a schedule pattern to select it.
Black pattern numbers indicate that the patterns have already been configured, and the white ones
indicate blank patterns.
button to access the Edit Pattern screen.
⇒ See Step 5.
If the selected pattern number is assigned to other groups or days, the message "This pattern
is used for another schedule. To use different pattern number, select the number, and touch
the OK button." will appear. To change the schedule of the day or date that was selected in
Step 3 above alone, select a new blank pattern number and then touch the [OK] button. To
change the setting of all groups and days to which the pattern is assigned, just touch the [OK]
button.
5. On the Edit Pattern screen, touch an event number to edit its contents.
Event No.
Scheduled actions
Event No.
Scheduled actions
Operation pattern numbers
Schedules events for the selected pattern
• Appears only if the selected pattern has been configured.
• The functions not supported by the selected group will appear
underlined in red, and they will not be executed.
* Touch the < > buttons to check the actions for each scheduled
event.
* Refer to P34 for icon definitions.
Scroll button
ON/OFF, Mode, Set Temperature, and Fan Speed
Air Flow Direction, Prohibit Remote Controller Operation
*1 The scheduled actions for each event will be displayed over two pages.
Use the scroll buttons to switch between the pages.
*2 On the Edit Pattern screen, the events of a specific pattern can be copied and pasted to another
pattern.
① To configure a new pattern using a blank pattern
Touch a blank pattern number, then touch the
⇒ See Step 5.
Refer to P32 for details
button to access the Edit Pattern screen.
If one or more patterns have been configured and saved, the message "When copying other
setting patterns to edit, select the pattern to be copied, and touch the OK button." will appear.
Touch the [OK] button to create a new pattern using a blank pattern. To use an existing
pattern as a template, select a desired pattern and then touch the [OK] button.
30
31
Usage - Main Menu Settings
Operation Setting (cont'd)
6. Set the time and the actions for the selected event number.
Copying and pasting the existing settings
1. Touch the item to be copied.
* Items that can be copied include the weekly schedule for a group, the pattern assigned to a specific
Change values with the
day, or the event that is scheduled to take place at a certain time.
buttons.
Touch the icons repeatedly to select
the desired one.
* A red checkmark will appear on the selected item(s).
(Example) To copy the weekly schedule for a group
* Functions that can be included in each event are as follows: Execution Time, ON/OFF, Mode, Fan
Speed, Air Direction, Set Temperature, and Local Remote Controller Operation Prohibition settings.
* Refer to P34 for icon definitions.
* The Set Temperature must be set to a temperature within the range that was specified in the Initial
Settings 1/Basic Settings under the Service Menu.
Refer to the Installation Manual to change the temperature setting range.
7. When finished making the settings, touch the OK button to return to the Edit Pattern screen.
8. Repeat Steps 5 through 7 above to set as many events and the execution time for the events as
necessary.
9. When finished, touch the Return button
to return to the Select Group and Days/Date screen.
To set the schedule for other groups or days/date ⇒ See Step 2.
When setting is complete ⇒ See Step 10.
10. To exit the screen and return to the “Time and Schedule” screen, press
Days/Date” screen.
on the “Select Group and
(Example) To copy an event (a set of actions executed at a scheduled time)
2. Touch the
3. Touch the copy destination.
* Multiple copy destinations can be selected.
* A red checkmark will appear on the selected item(s).
4. Touch the
Delete, and
Insert buttons.
button to activate the
Paste button.
5. Touch the OK button on the window that pops up.
Copying, pasting, deleting, and inserting settings
Click on the checkbox next to the
Copy button. The selected item will be highlighted in blue.
Copy,
Paste,
Deleting selected settings
1. Touch the items to be deleted.
* Items that can be deleted at once include the weekly schedule for a group, the pattern assigned to a
specific day, or the event that is scheduled to take place at a certain time.
* Multiple items can be deleted at once.
2. Touch the
Delete button.
3. Touch the OK button on the window that pops up.
32
33
Usage - Main Menu Settings
Operation Setting (cont'd)
Main Menu > Operation Setting > Time and Schedule > Setback Control
C Setting the Night setback function
Inserting an event
Night setback function is a function that prevents indoor dew or extreme temperature rise by heating/
cooling automatically when the room temperature goes outside of the specific range during the set time
period.
1. Touch a row to insert an event above it.
* A red checkmark will appear on the selected row.
Insert button. A blank row will appear above the selected row.
2. Touch the
・When the air conditioning group with night setback function is off and when the temperature
exceeds the preset temperature, heating/cooling operation starts.
・If the room temperature is measured by the air-conditioner’s suction temperature sensor, the
temperature may not be correct when the air-conditioner is inactive and the air is not fresh. When
the air-conditioner is inactive, using a remote sensor or a remote control sensor is recommended
to measure room temperature correctly.
・If the temperature setting or ON/OFF operation is prohibited for this unit, Setback operation
cannot be used.
・If the operation mode change is prohibited or the operation mode selection is limited for this unit,
Setback function may not function properly.
When the night setback control is set, air conditioning group operates as shown below.
* If the maximum number of events have been set, no more rows can be inserted.
Icon Definitions
Functions
ON/OFF
Mode
Fan Speed
Air Flow Direction
Local remote controller
operation prohibition (ON/OFF)
Local remote controller
operation prohibition (Mode)
Local remote controller
operation prohibition (Set Temperature)
Local remote controller
operation prohibition (Filter Sign Reset)
Deselected *1
Setting Options
On [green] Off [black]
Cooling
Dry
Bypass
Heat Recovery
Quiet
Setting 1
Permit
Low
Fan
Mid
Heating
Auto
Auto Damper
High
Setting 2 Setting 3 Setting 4
Auto
Setting 5
Swing
Auto
Prohibit
Permit
Prohibit
Permit
Prohibit
Permit
Prohibit
*1 The icons corresponding to the functions that are not scheduled will not be displayed except in the Edit Pattern popup
screen.
21ºC/69ºF
Lower limit
temperature
12ºC/53ºF
Heating
On
21ºC/69ºF
Room
temperature
Setback
operation
starts.
Setback operation stops
(when the temperature rise
3ºC/5.4ºF or the control
time period is over)
Upper limit
temperature
28ºC/83ºF
3ºC/5.4ºF
Room
temperature
Setback
operation
starts.
24ºC/75ºF
Heating
Off
Heating
On
12ºC/53ºF
Heating
Off
21ºC/69ºF
Cooling
On
24ºC/75ºF
Setback control time period
When the temperature drops below the lower limit temperature
(heating control)
Cooling
Off
Cooling
On
28ºC/83ºF
Cooling
Off
24ºC/75ºF
Setback control time period
When the temperature rises above the upper limit temperature
(cooling control)
If “Unscheduled” is selected, the Setback function that were set on the Setback Control screen will not be
executed with the pressing of the Collective Operation button.
In this case, the settings that were made on the “Collective Operation Setback” screen will override the
settings made on the “Setback Control” screen, and the scheduled operation will not run.
1. Touch the C Setback Control button on the [Time
and Schedule] screen.
2. R ead the pop-up message, and touch the OK
button to confirm.
4
1
5
6
7
34
35
Usage - Main Menu Settings
Operation Setting (cont'd)
3. P ress button 1 to bring up the “Control Time
Period” and “lower/upper limit temperature” settings
screen, and make necessary settings.
Setting of night setback control time period
buttons to set the control time.
Touch the 2
Main Menu > Operation Setting > Time and Schedule > Check Current Settings
D Checking the Weekly/One Day Schedule Settings
1. Touch the [Check Current Settings] button on the [Time and Schedule] screen.
2
[Weekly] tab
• [Weekly] screen
Displays the pattern numbers that are assigned to groups and
days.
3
) will appear on the top left corner of the cell to which One(
day schedule is assigned.
One-day pattern will override the Weekly pattern.
• [One day] screen
Displays the One-day schedule patterns that are assigned to
specific dates.
Setting of lower/upper limit temperature
buttons to set the upper and lower limits.
Touch the 3
When [--] is set, setback control will not be operated.
Click OK to close the popup window and return to the “Setback Control” screen. The new settings will
appear on the display section 4 on the screen.
Pressing “Cancel” will close the popup window, but the new setting will not be reflected on the display
section 4 on the screen.
[One Day] tab
Day (Date) grid Displays scheduled patterns
Seasonal Settings (Weekly only)
2. Touch the Weekly or One Day tab.
3. Touch the row that corresponds to the group whose schedules you want to check.
Touch the pattern number under a specific day to check the day's schedule that appears under the
pattern numbers.
4. P
ress the button labeled 5 to set different lower/upper limit temperature for different groups.
The groups whose temperature setting is different from the one for the collective setting will appear
.
underlined
5. Select the groups to include from the Group buttons labeled 6. By default, all groups are selected.
6. Touch the 7 Save button.
• The minimum difference between the upper and lower limits is 4ºC (8ºF).
• The temperature range that can be set depends on the connected units.
• The temperature can be set within the following range.
[Upper limit] 19°C - 30°C [19°C - 30°C] / 67°F - 87°F [67°F - 87°F]
[Lower limit] 12°C - 28°C [17°C - 28°C] / 53°F - 83°F [63°F - 83°F]
* [ ] in case of using Mr.SLIM® units.
• The groups that do not support the Setback function cannot be selected.
• The changes that are made while the Setback function is turned on will not be reflected. To have
the settings reflected, turn off the Setback function and then turn it back on. Refer to P19 for how
to turn on/off the Setback function.
• The Setback status can be verified by accessing the “Check Current Settings” screen from the
“Time and Schedule” screen.
36
Effective time for the Night Setback function
Operation pattern numbers
Schedules events for the selected pattern
• Appears only if the selected pattern has been configured.
• The functions not supported by the selected group will appear
underlined in red, and they will not be executed.
* Refer to P34 for icon definitions.
• The effective time for the Night Setback function will appear as a
yellow line on the timeline.
4. Touch the < > buttons to check the actions for each scheduled event.
Touch the [Close] button to return to the previous screen.
5. To change the schedule settings, touch the Return
button to return to the Time and Schedule
screen, and access the Set Schedules screen.
37
Usage - Main Menu Settings
Operation Setting (cont'd)
To select the groups on which to execute the Collective Operation
(Enable or disable the Setback function)
Main Menu > Operation Setting
1. Touch the 2 Setback button on the [Collective
1
Operation Setting] screen.
2
2. Read the pop-up message, and touch the OK button
to confirm.
3
3. Touch the C
buttons to set the upper and
C
D
A
lower limits. Press the button labeled D to set
different ranges for different groups. The groups
whose temperature setting is different from the one for
Main Menu > Operation Setting > Collective Operation Setting
the collective setting will appear underlined
2Setting the Collective Operation Settings
.
4.Select the groups to include from the Group buttons
Select All button
Selects all groups.
B
labeled A. By default, all groups are selected.
・When
1
2
3
4
5
6
5. Touch the B Save button.
・The minimum difference between the upper and lower limits is 4ºC (8ºF).
・The temperature range that can be set depends on the connected units.
・The groups that do not support the Setback function cannot be selected.
・The changes that are made while the Setback function is turned on will not be reflected. To
have the settings reflected, turn off the Setback function and then turn it back on. Refer to P19
for how to turn on/off the Setback function.
appears on the “RC Prohibition” button, this function will not be available.
To select the groups on which to execute the Collective ON/OFF function
1. Touch the 1 ON/OFF button on the [Collective
Operation Setting] screen.
2. Read the pop-up message, and touch the OK button
1. Touch the 3 Schedule button on the [Collective
Show Group Name List button
Shows a list of group names in a pop-up window.
Operation Setting] screen.
Show Group Name List button
Shows a list of group names in a pop-up window.
2. Read the pop-up message, and touch the OK button
to confirm.
to confirm.
3. S
elect the groups to include from the Group buttons
3. Select the groups to include from the Group buttons
labeled A. By default, all groups are selected.
4. Touch the B Save button.
To select the groups on which to execute the Collective Operation
(Enable or disable Scheduled operation)
labeled A. By default, all groups are selected.
A
Select All button
Selects all groups.
4. Touch the B Save button.
B
A
Select All button
Selects all groups.
B
・The DIDO controller groups that do not support the Collective ON/OFF function cannot be selected.
38
39
Usage - Main Menu Settings
Operation Setting (cont'd)
To select the groups on which to execute the Collective Operation
(Operation Mode)
Show Group Name List button
Shows a list of group names in a pop-up window.
1. Touch the 4 Mode button on the [Collective
Operation Setting] screen.
1. Touch the 6 RC Prohibition button on the
Show Group Name List button
Shows a list of group names in a pop-up window.
[Collective Operation Setting] screen.
2. Read the pop-up message, and touch the OK button
2. Read the pop-up message, and touch the OK button
to confirm.
to confirm.
3. Select the groups to include from the Group buttons
3. S
elect the groups to include from the Group buttons
labeled A. By default, all groups are selected.
A
labeled A. By default, all groups are selected.
To select the groups on which to execute the Collective Operation
(Locking or unlocking access to the ON/OFF, Mode, Set Temperature,
and Filter Sign Reset settings from the local and other system
controllers).
A
4. Touch the B Save button.
4. Touch the B Save button.
・The settings that can be locked or unlocked depend on the type of group.
Select All button
Selects all groups.
B
・The DIDO controller groups and the LOSSNAY groups that do not support this function cannot be
selected.
1 ON/OFF
2 Mode
3 Set temperature
4 Filter Sign reset
Indoor unit groups
LOSSNAY groups
○
○
○
×
○
×
○
○
Select All button
Selects all groups.
Main Menu > Operation Setting
To select the groups on which to execute the Collective Operation
(Temperature Correction)
1. Touch the 5 Temperture Correction button on the
[Collective Operation Setting] screen.
B
1
2
3
Show Group Name List button
Shows a list of group names in a pop-up window.
2. Read the pop-up message, and touch the OK button
to confirm.
3. Select a value to be used as the temperature offset
value from the buttons labeled C.
4. Select the groups to include from the Group buttons
C
Main Menu > Operation Setting > Group Icon Setting
3To assign an operation mode to the Group icon on the [HOME] screen
A
Touch the 3 Group Icon Setting button on the [Operation Setting] screen.
labeled A. By default, all groups are selected.
5. Touch the B Save button.
Select All button
Selects all groups.
1
40
Operation mode 2 (default)
B
・The Temperature Correction function is used to temporarily raise or lower the preset temperature
setting by a certain preselected amount.
・Positive offset is used for units that are operated in the Cooling and Dry modes, and negative offset is
used for units that are operated in the Heating mode.
・The DIDO controller groups and the LOSSNAY groups that do not support this function cannot be
selected.
Operation mode 1
Stops or starts the operation of the specific group of
units when the Group icon is touched.
Allows the user to select multiple groups before jumping
to the Group screen. Touch the operate button after
selecting groups to jump to the Group screen.
2
Operation mode 3
Jumps to the Group screen when a Group icon is
touched.
1. Select among Operation mode 1, Operation mode 2, and Operation mode 3 by touching the
corresponding button labeled 1 .
2. Touch the 2 Save button.
41
Usage - Main Menu Settings
Restriction Settings
Setting the Unlock password
Main Menu > Restriction Settings
1
2
3
4
2
Main Menu > Restriction Settings > Lock Buttons
1Selecting the functions to be locked and setting the password to
unlock the locked functions
Selecting the functions to be locked
1
3
Save button
Saves the settings.
1. Touch the 1 Lock Buttons button on the [Restriction
Setting] screen.
2. Enter the password on the [Login] screen, and touch
the Login button. Refer to below for the details on
log in. If the correct password is entered, the [Lock
Buttons] screen will appear.
3. P
ress 1
. The screen that looks like the figure at
left will appear.
4. To allow unlocking the buttons without entering the
password, touch 2 “No password” to activate the
button. To require a password to unlock the buttons,
touch 2 “Password” to activate the button.
5. Touch the 3 Save button.
Use the same password as the login password
to unlock buttons.
Category button
1
2
3
Enable/Disable Lock button
Use these buttons to select the
items to be locked when the
operation lock button is enabled.
Table A. List of items and functions in each category
Item
ON/OFF
F1
F2
Screen
Main Menu
Category
button
Function
Collective ON/OFF button *1
Function button 1 *1
Function button 2 *1
Touch Panel Screen *2
Main Menu Button
Item
ON/OFF
Mode
Set Temp.
Fan Speed
Schedule ON/OFF
panel. Touch 2
1
3
or
will not be available for selection.
*3 The buttons that can be locked are the ones that appear on the HOME screen.
*4 On the HOME screen, the
42
icon will appear on the buttons that are locked.
4
If the password matches, the Lock Buttons screen will be
2
displayed.
・The initial login password is "0000". Change the password if
necessary.
・If you forget the password, refer to the Installation Manual.
To change the password
1. Enter the current password on the login screen, and then
Function
ON/OFF button *3 *4
Mode button *3 *4
Set temperature button *3 *4
Fan speed button *3 *4
Shcedule ON/OFF button *3 *4
to delete a character.
2. Touch the 3 Login button.
touch 4
. The screen at left will appear.
2. Enter the new password in the 5 [New Password] field.
5
* Password should be between four and eight characters.
6
8
Touch 8
to delete a character.
3. Touch the 6 [Retype Password] field, and enter the new
*1 If the function is locked, the LED on the button will blink twice when touched.
*2 When the Touch Panel Screen is locked, the category
1. Enter the login password from the 1 keyboard on the touch
Save button
Saves the settings.
1. Touch the 1 Lock Buttons button on the [Restriction Setting] screen.
2. Enter the password on the [Login] screen, and touch the Login button. Refer to below for the details on
log in. If the correct password is entered, the [Lock Buttons] screen will appear.
3. Press the Category button 1 that includes the function to be locked. The screen that looks like the
figure above will appear. (The items in each category and the type of functions that can be locked are
summarized in Table A.)
4. Touch the button 2 that corresponds to the function to be locked so that
will appear. (The items
whose corresponding icon is
cannot be locked.)
5. Touch the 3 Save button.
Category
button
To log in
7
password again.
4. Touch the 7 OK button to reflect the change and return to
the previous screen.
43
Usage - Main Menu Settings
Restriction Settings (cont'd)
5. Use the 4
Main Menu > Restriction Settings
buttons shown in the pop-up window at right
4
to set the range for each operation mode (Cooling, Heating, and
AUTO).
1
2
3
4
To clear the lower limit, keep hitting the
button until
appears. To clear the upper limit, keep hitting the
button until
appears.
Not all functions are supported by all local remote controllers. The
buttons for the unsupported functions will be grayed out.
5
6. Touch the 5 OK button to save the settings.
Main Menu > Restriction Settings > Set Temperature Range Limit
2Setting the temperature ranges within which the operating
temperatures can be set from the local remote controllers
1 Show Group Name List button
Displays a list of group
names in a pop-up window.
2 Group buttons
Displays group numbers.
Touch the button for a specific
group to edit the settings.
3 Edit button
Edits the temperature range
for the selected group.
• The temperature setting range and the operation mode that can be set depend on the indoor unit
and remote controller models.
• Operation from the local remote controllers that are connected to Mr. SLIM® cannot be prohibited
from the AT-50A. Use the button lock function on the controllers instead.
• If the temperature limits are set too high or low, the System-Changeover function may not work
properly and the units may not operate in the expected mode (Cooling or Heating).
When using the System-Changeover function, it is recommended not to use the temperature
range limit function.
buttons
Use to flip through the pages.
(Each page lists four groups.)
Select All button
Selects all groups.
1. Touch the 2 Set Temperature Range Limit button on the [Restriction Settings] screen.
2. Read the pop-up message, and touch the OK button to confirm.
3. Click on the 2 Group button on the [Set Temperature Range Limit] screen to select the groups to
change their settings.
4. Touch the 3 Edit button.
44
45
Usage - Main Menu Settings
Restriction Settings (cont'd)
1. Touch the 3 Prohibit Remote Controller button on the [Restriction Settings].
Main Menu > Restriction Settings
2. Read the pop-up message, and touch the OK button to confirm.
3. Click on the 2 Group button on the [Prohibit Remote Controller]
1
2
3
4
screen to select the groups and change their settings.
4. Touch the 3 Edit button.
5. Use the buttons labeled 4 in the pop-up window at right to lock or
unlock access to each item.
6. Touch the 5 OK button to save the settings.
5
4
・When
appears on the “Prohibit Remote Controller” button, this function will not be available.
Main Menu > Restriction Settings> Prohibit Remote Controller
3Locking or unlocking access to the ON/OFF, Mode, Set Temperature,
and Filter Sign Reset settings from the local and other system
controllers
1 Show Group Name List button
・The screen shown left will always display the latest prohibit/permit
status. If an event takes place that changes the prohibit/permit
status of a specific item, the screen display will be updated. (The
mark will appear or disappear.)
・When this function is in use, the buttons on AT-50A cannot be
disabled from the system controller.
The display will change
as follows every time the
button is touched.
Locked → Unlocked
3 Edit button
Displays a list of group
names in a pop-up window.
Edits the temperature range
for the selected group.
2 Group buttons
buttons
Use to flip through the pages.
(Each page lists four groups.)
Displays group numbers.
Touch the button for a specific
group to edit its settings.
Select All button
Selects all groups.
・When access to specific settings are locked,
will appear over the corresponding icons.
・The settings that can be locked or unlocked depend on the type of group.
46
Indoor unit groups
LOSSNAY groups
1 ON/OFF
○
○
2 Mode
○
×
3 Set temperature
○
×
4 Filter Sign reset
○
○
47
Usage - Main Menu Settings
Restriction Settings (cont'd)
Main Menu > Restriction Settings
1Button
Explanation
No Limitation
The limits will be cancelled.
No Cooling Operation
The cooling, dry and automatic modes cannot be selected with the Mode button.
No Heating Operation
The heating and automatic modes cannot be selected with the Mode button.
No Heating/Cooling
The cooling, dry, heating and automatic modes cannot be selected with the
Mode button.
1
2
3
4
・When
appears on the “Operation Mode Selection Limit” button, this function will not be available.
Press the button labeled 2 to set different limitation type for different groups.
The groups whose limitation setting is different from the one for the collective setting will appear
underlined
.
3. Select the groups to include from the Group buttons labeled 3 .
4. Touch the 4 Save button.
Main Menu > Restriction Settings> Operation Mode Selection Limit
4Operation mode selection limit (season changing)
Selection to specific operation modes with this controller or the local remote controller for all groups can be
limited.
For example, the mode selection can be limited according to the season.
Cooling mode limit (winter), heating mode limit (summer), cooling + heating mode limit (between seasons)
1
・When this function is used, the System-Changeover function cannot be used.
・Note that this function cannot be used with some indoor units. In this case, changeover of the
operation mode cannot be limited with the local remote controller.
2
3
4
1. Touch the 4 Operation Mode Selection Limit button on the [Restriction Settings] screen.
2. Touch the 1 button to set the operation mode limit.
* Touch the 1 button repeatedly to select from following settings.
48
49
Usage - Main Menu Settings
Control Panel
To show or hide the room temperature
Main Menu > Control Panel
Touch the 3 Room Temperature button on the [Display Format] screen (1/3) to switch between Show
and Hide .
Display Format screen:2/3
1
2
3
8
4
9
5
Main Menu > Control Panel > Display Format
1Setting the basic display settings on the HOME and MENU screens
Touch the 1 Display Format button on the [Control Panel] screen.
・The [Display Format] screen consists of three pages (1/3 - 3/3). Use the 4
through the pages. After setting all the settings, touch the 5 Save button.
buttons to flip
Display Format screen:1/3
Touch the 8 Automatic Mode Display Setting button to switch between Show (
(
).
Example) [HOME] screen
show
To set the backlight timeout time
5
* Touch the button repeatedly to select from the following settings.
6
The backlight will remain lit as long as an error exists.
To select the display language
) and Hide
hide
1
2
3
4
1. Touch the 1 Language button on the [Display Format] screen (1/3).
To show or hide the Cooling/Heating mode icon (during Auto mode)
when the operation mode is enabled
Touch the 9 Backlight timeout setting button to set the timeout time.
The back light will go off after a specified time of non-use.
1 min. → 3 min. → 5 min. → 7 min. → 10 min.
2. Select a desired language from the language options (buttons
labeled 6 in the figure) on the pop-up screen.
3. Press the 7 OK button to return to the previous screen.
7
To select the temperature unit
Touch the 2 Temperature unit button on the [Display Format] screen (1/3) to switch between ºC and ºF .
50
51
Usage - Main Menu Settings
Control Panel (cont'd)
Character input screen
Main Menu > Control Panel
1
1
2
4
5
3
3
4
2
Main Menu > Control Panel > Display Format
6
Display Format screen:3/3
To enter character strings such as group names (maximum 16 characters), perform the following
procedure.
b
0
a
c
5
Group Name Setting screen
To enter a character string
1. Touch 1
,
,
,
, or
numerical and other symbols.
to select upper case alphabets, lower case alphabets, or
2. Enter characters from the 2 keyboard.
* Scroll the screen up and down with the 3
buttons to see all characters.
* To correct a character, move the cursor over the character with the 4
To change the group name
1. Touch the 0 Jump to the group name setting screen button on the [Display Format] screen (3/3).
button, and then either
delete it with the 5 DELETE button or overwrite it with a new character.
3. When complete, touch the 6 OK button to return to the previous screen.
2. Select a desired group name button labeled a on the [Group Name Setting] screen to change its
group name.
3. Enter the group name on the pop-up window. (Refer to the next page for details.) Group names can be
copied and pasted by using the b Copy and c Paste buttons.
4. Touch the 5 Save button.
52
53
Usage - Main Menu Settings
Control Panel (cont'd)
Main Menu > Control Panel
Main Menu > Control Panel
1
1
2
2
3
3
4
4
Main Menu > Control Panel > Volume Control
Main Menu > Control Panel > Function Key Setting
2Assigning Collective Operation functions to the Function Button 1
(F1) and Function Button 2 (F2)
3Adjusting the volume and brightness
Touch the 3 Volume Control button on the [Control Panel] screen.
Touch the 2 Function Key Setting button on the [Control Panel] screen.
1
2
3
3
1. Touch the check mark [
will appear as [
To adjust the volume
] that corresponds to the function to assign to F1 or F2 so that the checkmark
].
Every time the 1 Sound button is touched, the sound level changes as follows: [Level 0] → [Level 1]
(Check the check mark in the F1 column to assign a function to F1, and check the check mark in the F2
column to assign a function to F2. Touch the button again so that the button will appear as [
] to cancel
the selection.)
2. Touch the 3 Save button.
・As a default, no functions are assigned to either F1 or F2.
・The F1 and the F2 will be effective only on the HOME screen.
・To use the F1 or F2 button to execute a function, certain settings for Collective Operation must be
set. (Refer to P38 for information about the Collective Operation settings.)
・If “ ” appears on the checkbox, the function that corresponds to the checkbox is not available and
the function cannot be assigned to the F1 or F2 button.
54
1. Touch the 1 Sound button on the [Volume Control] screen.
→ [Level 2] → [Level 3].
2. Touch the 3 Save button.
To adjust the brightness
1.Touch the 2 Brightness button on the [Volume Control] screen.
Every time the 2 Brightness button is touched, the brightness level changes as follows: [70%] →
[80%] → [90%] → [100%].
2. Touch the 3 Save button.
・The volume and brightness settings will be changed immediately, but will not be saved until the
3 Save button is touched.
55
Usage - Main Menu Settings
Control Panel (cont'd)
Main Menu > Control Panel > Touch Panel Calibration
4Calibrating the touch panel
System Management
Main Menu > System Management
4
1
2
1. Touch the 4 Touch Panel Calibration button on the [Control Panel] screen.
Main Menu > System Management > Status List
Touch the OK button on the confirmation screen.
1Checking or resetting the Error or Filter Sign
2. Touch the white squares ( 4 ) in the order they appear, starting from the top left corner.
Touch the 1 Status List button on the [System management] screen.
3. After all nine squares are touched, the screen will return to the [Control Panel] screen.
・If each square is not touched within one minute after the last square is touched, calibration will be
cancelled and the screen will return to the [Control Panel] screen.
・To calibrate the screen properly, use a pointy, but not sharp, object to touch the squares.
* Sharp objects may scratch the touch panel.
Error source address
1
Displays the M-NET address
of the units whose Error/Filter
Signs are turned on.
Number of errors
Displays the number of errors.
Error code
Group names
Displays the code for the error
that were detected.
Displays the name of the group
that includes the unit whose
Error/Filter Signs are turned on.
2
To check the error
1. Touch the 1 [Malfunction] tab to check the number of errors, the names of the group in which the
errors occurred, the addresses of the error-source units, and the error codes.
・If an error occurs, note the error code and consult your dealer or a maintenance provider.
To reset the error
1. Touch the 1 [Malfunction] tab.
2. Touch the 2 All Reset button.
3. Touch the OK button on the pop-up window.
・Those groups whose errors have been reset will have an icon indicating that they are stopped.
56
57
Usage - Main Menu Settings
System Management (cont'd)
3
4
Main Menu > System Management
Number of Filter Signs detected
Displays the number of Filter Signs that
have been detected.
1
2
5
To check the information about the units whose Filter Signs are turned on
1. Touch the 3 [Filter Sign] tab, and check the number of units whose Filter Signs are turned on, the
・When
appears on the “System-Changeover” button, this function will not be available for
selection.
names of the groups they belong to, and their addresses.
・When a Filter Sign appears, clean, wash, or replace the filter as necessary.
Refer to air conditioner or LOSSNAY manual for details.
・When
appears on the Reset button, the button will not be available.
To reset the Filter Sign after cleaning the filter
4 Reset button
:Clears the specific Filter Sign.
5 All Reset button:Clears all Filter Signs.
Main Menu > System Management > System-Changeover
2Using the System-Changeover function
Use the System-Changeover mode to automatically change a group of indoor units that are connected to the same
outdoor unit over between the Cooling and Heating modes according to temperature changes.
Use this function to control the indoor units that do not have an automatic changeover mode. They can be operated in
the Heating mode in the morning, and then automatically changed over to the Cooling or Heating mode all at once in
the afternoon, for example, without the need to manually change the mode via each remote controller.
* This function should not be used in conjunction with the System-Changeover function on the outdoor unit or
other system controllers.
* When the System-Changeover mode is set to [Auto], the operation mode is selected based on the demands
of the majority of the group, taking into consideration the capacity of each indoor unit. When it is set to
[Representative Group], the operation mode is selected based on the demand of the representative group
through updating its status every 15 minutes and changing over to the cooling or heating mode as necessary.
Because the operation mode is selected based on the demands of the representative group or of the majority
of the groups, not all areas may be air conditioned to the optimum temperature.
・If the temperature limits are set too high or low (see P44), the System-Changeover function may
not work properly and the units may not operate in the expected mode (Cooling or Heating).
・The System-Changeover function is not available for the following types of products:
Simultaneous Cooling/Heating units (with Auto mode), Mr. SLIM®, LOSSNAY, and DIDO
controller.
58
59
Usage - Main Menu Settings
Maintenance
System Management (cont'd)
Touch Panel Cleaning screen
Operation mode
Display Block Information button
Displays the current
operation mode.
Cooling:
Heating:
1
2
Block No.
Displays the block number. All
units in each group are operated
in the same operation mode. The
AT-50A automatically creates
blocks based on the refrigerant
pipe connection information and
the group setting information on
each unit.
Displays the addresses of
the outdoor units and the
names of the groups in a
specific block.
3
Group list
Displays the number assigned to the indoor unit groups that are connected to
the outdoor units in a specific block. Select a representative group from this list
when the [Representative Group] is selected for the System-Changeover mode.
1. Touch the 2 System-Changeover button on the [System management] screen.
2. Touch the 1 Change mode button to select between [None], [Auto], and [Representative Group].
System-Changeover Setting
mode
None (default)
Select this option so as not to use the System-Changeover function.
The operation modes (cooling/heating) will be changed-over based on the following:
Temperature differences between the preset temperature and the room temperature of
all indoor unit groups that are connected to a specific outdoor unit, AND the capacity of
Auto
each indoor unit in each group.
* The operation mode of the groups of units that are not operating, or the ones that are operating in
the Fan or Auto mode, will remain the same.
Representative
Group
To clean the touch panel
This screen allows the user to wipe the touch screen without accidentally changing the settings.
1. Touch the
icon on the [Main menu] screen to bring up the screen shown above.
2. When done cleaning the touch panel, touch the four numbers in the corners 1, 2, 3, and 4 in that order
to return to the [Main Menu] screen.
・The four numbers must be touched in the correct order. If you touch the numbers in the wrong order,
start over from 1.
・Wipe with a soft dry cloth, a cloth soaked in water with mild detergent, or a cloth dampened with
ethanol. Do not use acidic, alkaline, or organic solvents.
The operation modes (Cooling/Heating) will be changed-over based on the temperature
difference between the preset temperature of the representative group and the room
temperature.
* When the air conditioning units in the Representative Group are not operating, or they are operating
in the Fan or Auto mode, the System-Changeover function will work in the same way as when the
System-Changeover mode is set to Auto.
When [Representative Group] is selected, the group that is
currently designated as the Representative Group will be
displayed.
* To designate a different group as the Representative Group, select
a new group on the screen that appears (shown right) when the 2
Representative Group button is pressed, and then touch the OK
button.
・The initial setting for the Representative Group is the group in a specific block with the smallest
group number.
3. Touch the 3 Save button on the [System-Changeover] screen.
60
61
Troubleshooting
Specifications
Problem
The indicator on the Collective ON/OFF button is
blinking.
Solution
Touch Main Menu > System Management > Status List.
ON the Malfunction tab, check the error code and the error
source address on the screen, and consult your dealer.
Refer to P57.
30VDC *1
(for connection to M-NET only)
Power source
Operating conditions
Temperature
Humidity
Weight
External dimensions (W x H x D)
Operating temperature range
Storage temperature range
30%~90%RH (Non-condensing)
0.5 kg [1-1/8 lbs]
Receives power from the power supply unit for transmission line or
from outdoor units via the M-NET transmission cable. The power
consumption coefficient*2 of AT-50A is "4."
0 - 40˚C [32˚F - 104˚F]
-20 - +70˚C [-4˚F - +158˚F]
180 x 120 x 30 mm 7-3/32 x 4-23/32 x 1-3/16 in
*1 Not for use with a generic DC power supply device. Use the power supply unit for transmission line (PAC-SC51KUA etc.) by Mitsubishi.
*2 "Power consumption Coefficient" is a coefficient to calculate the relative power consumption of the devices that receive power through the
M-NET transmission line.
Refer to the note at the end of Chapter 1-5 "System diagram" in the Installation Manual.
Problem
is displayed on the screen.
Solution
Touch Main Menu > System Management > Status List.
ON the Malfunction tab, check the error code and the error
source address on the screen, and consult your dealer.
Refer to P57.
Problem
A Filter Sign is displayed on the screen.
Solution
Touch Main Menu > System Management > Status List.
ON the Filter Sign tab, check the address on the screen.
Clean the filter on the unit whose Filter Sign is on according
to the instructions in the manual for the applicable unit.
Refer to P57.
Problem
[Emergency Stop (Level-signal)] is displayed on the screen, and the controller does not respond to the ON/OFF button.
If the external input interface receives an emergency stop
signal, all indoor units and the LOSSNAY that are controlled
by the AT-50A will stop. The AT-50A controller, low-level
system controllers, or local remote controllers will not
respond until the emergency stop signal input is removed.
When the emergency stop signal is removed, the operation
status before the signal was received will be restored.
62
63
This product is designed and intended for use in the residential, commercial and light-industrial
environment.
This product at hand is based on the following EU regulations:
• Low Voltage Directive 2006/95/EC
• Electromagnetic Compatibility Directive 2004/108/EC
HEAD OFFICE: TOKYO BLDG., 2-7-3, MARUNOUCHI, CHIYODA-KU, TOKYO 100-8310, JAPAN
Authorized representative in EU: MITSUBISHI ELECTRIC EUROPE B.V.
HARMAN HOUSE, 1 GEORGE STREET, UXBRIDGE, MIDDLESEX UB8 1QQ, U.K.
WT06092X01