1
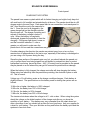
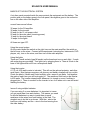
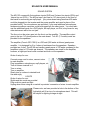
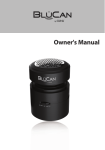
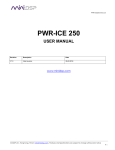
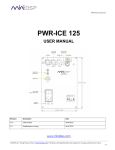
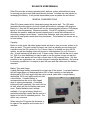
SOLAR PA USER MANUAL
Solar PAs provides a battery operated public address system with additional power
for running a projector and other small electric devices. Included are solar panels for
recharging the battery. It will provide dependable power anywhere the sun shines.
GENERAL CONSIDERATIONS
Solar PA’s have created a fully integrated system that works well. The 120 watts
generated by solar panels in a sunny climate will be able to recharge a 60 amp hour
battery in 1 day; the 400 watt inverter will run the recommended projector, DVD player,
laptop or other accessories. Wherever possible, 12-volt DC equipment is used to
eliminate the need for additional inverter capacity and to avoid the inefficiencies of
converting voltages up and down. Inverter size, batteries, and solar panels can be
adjusted to meet power needs when they are known. The standard unit comes set up
for one battery.
Capacity
Books on solar power talk about power needs and how to size your solar system to do
what you want. This unit is sized for heavy use (such as showing movies using both
a projector and the PA system) for 2 to 3 hours a day or for limited use (just the PA
system, as well as charging some cell phones or other batteries) for up to 8 hours a
day. A small laptop may be able to run 12 hours a day if that is all that the unit is used
for. With 2 or more batteries you may be able to use the system longer one day but
the 120 watt solar panels will need two or three days to fully recharge them. It is also
possible to use a generator, car, or other charger to recharge the batteries. No hookup
is currently provided but it is simple to open the case and clip cables onto the battery
terminals.
Battery Type and Usage
A deep discharge battery is essential for normal use of the system. Lead acid batteries
will last longer when not discharged below 50% of their capacity so two batteries
discharged to 50% each night could last up to several years while a single battery
discharged 100% each night would only last
a few months. A sealed battery is
recommended as the unit is often tipped
when it is being transported. A standard
battery will leak, especially if the unit is left on
its side, which will ruin the battery and much
more. Sealed batteries aren’t always
available, if you get a battery which isn’t
sealed be especially careful that the unit isn’t
tipped on its side for extended periods. The
acid is very corrosive.
When using the PA system the lid needs to
be open so the amplifier and inverter don’t
overheat.
SOLAR PA USER MANUAL
Control panel
CHARGING THE SYSTEM
The panels have newer crystals which will do limited charging on bright cloudy days but
will work best in full sunlight and aimed directly at the sun. The panels should be at a 90
degree angle to the sun’s rays. Each panel has its own connection, hook each panel to
the Y then hook the cord to the case and to
the Y. Once the cord is all plugged in, the
green charge light on the charge controller
should come on. The charge controller won’t
activate if the battery voltage is below 11
volts. When the battery is completely
discharged, bypass the controller to start the
charging. If the green light doesn’t come on
and the controller indicates 11 volts or
greater you will need to make sure the
panels are in full sun and the connections are good.
Consider changing the direction the panels are pointed every hour or two so they
remain close to perpendicular to the sun’s rays, especially if the battery is discharged or
you are using a lot of power during the day.
Since the glass surface of the panels gets very hot, you should elevate the panels not
only to protect them from being stepped on and broken by animals but also to protect
bystanders from being burned by them. A 40’ (10 metre) cord is provided so the panels
may be placed on a roof where they can get full sun and be protected from damage.
When the battery is fully charged, the charge controller will stop charging the battery.
When using less electricity than the panels are providing, the controller cycles on and
off. This is normal.
Voltage on a 12 volt battery varies as the charge condition changes. Each battery is
slightly different. The specifications on the battery used for testing the system are as
follows:
12.84 volts or higher, the battery is 100% charged
12.60 volts, the battery has 75% of full charge
12.18 volts, the battery is 50% charged
11.88 volts, the battery has 25% of a full charge
The inverter shuts down when the voltage is at 11 volts or less. When using the system
check the voltage on the digital readout of the charge controller so you know the
condition of your battery. Your battery may vary somewhat from the chart above but
after a few days of use you should get an idea for how it performs. Ask your supplier for
a chart for your battery. Plan your activities so they end before the battery quits and the
systems in use shut down.
SOLAR PA USER MANUAL
BASICS OF THE ELECTRICAL SYSTEM
A six-fuse panel mounted inside the case protects the equipment and the battery. The
positive pole on the battery goes to the fuse panel, the negative goes to the connector
bar on the other side of the amplifier.
current fuses are as follows.
30 amps for the PA amplifier
30 amps for the inverter
20 amp for the 12 volt power outlet
20 amp for the solar panel (incoming power)
15 amp for the mixer board
15 amps for the lights
All fuses are type ATC.
Using the sound system:
On the control board the switch on the right turns on the main amplifier, the switch on
the left turns on the mixer. Connect all the equipment (microphones, instruments, DVD
players, etc), turn on the mixer, and then turn on the main amplifier.
Using the lights:
There are 2 small sockets (type M female) on the board and one on each light. 2 cords
with male plugs are provided. Turn lights on by plugging them in. There is a hole in the
base of the lights which will fit on a microphone stand
Using the inverter:
A 115 volt, 400 watt inverter is included. This will run the optional projector, and other
small items. Most laptop computers, cell phones, and battery chargers will run on this.
Check the labels, if watts aren’t listed multiply volts x amps to get watts. Add together
the watts of each item you will be plugging in. The maximum total load on the inverter
is 400 watts. The inverter draws power whenever it is turned on, even if nothing is
plugged into it. There is a switch on the inverter to turn it off when not in use and avoid
draining the battery.
Issues if using multiple batteries:
If you are using 2 or more batteries, it is important to insure
you get equal draw from each battery. This means you need
to wire the batteries in a way to insure there is equal
resistance in the wires from each battery to the load. The
simplest way to do this is as shown. With the + wire to the
load from one battery and the – wire to the load coming from
the other battery.
SOLAR PA USER MANUAL
SOUND SYSTEM
The MX 153 comes with 2 microphone inputs (SLR) and 3 stereo line inputs (RCA) and
1stereo line out (RCA.) The #3 line input also has an 1/8” stereo jack on the front of
the board for connecting an mp3 player. [Any mixer board using less than 400 watts
could be plugged into the inverter and the power amplifier and used in place of the
provided mixer.] Two microphones are provided, if you need additional microphones,
wireless microphone receivers could be plugged into the other inputs. You could also
use the additional inputs for a DVD player, an mp3 player, an iPod, a key board or any
other instrument with a line out jack.
The line out on the mixer goes into the line in on the amplifier. The amplifier output
goes to the two 1/4” phone jacks on the main board. Two 25’ (7.5 metre) cords are
provided for the speakers.
The amplifier (Crunch GPV 700.2) is a 700 watt (350 watts at 4ohms) peak power
amplifier. It is designed for 2 to 4 ohms of resistance from the speakers. Speakers
provided are 4 ohm. The KS 69 can handle a peak power of 270 watts compared to the
amplifiers output of 175 watts per channel. The speakers are sized for the amplifier;
however, a high input level could overload and burn out the speakers.
Order of setup for use:
Connect power cord to mixer, connect mixer
to main amplifier
Plug in speakers, microphones, mp3 players, etc.
Turn all volume controls to 0
Turn on mixer
Turn on amplifier
Slowly turn up volume to desired level
Use and enjoy
LIGHTS
Order of setup for use:
2lights and two cords are provided
Plug cord into panel and light
Unplug when done using as no switch is provided connection of mixer to main amplifier
Please note, we have provided a hole in the bottom of the
light which will fit on top of a microphone stand. This will
be helpful for lighting a stage at night.