1
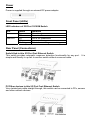
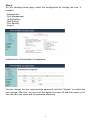
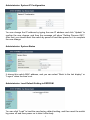
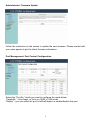
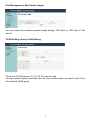
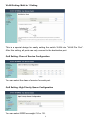
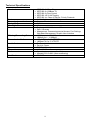
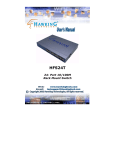
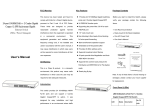
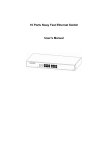
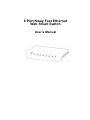
8 Port Nway Fast Ethernet
Web Smart Switch
User’s Manual
FCC Warning
U
This device has been tested and found to comply with limits for a Class B digital device, pursuant to
Part 2 and 15 of FCC Rules. These limits are designed to provide reasonable protection against
harmful interference when the equipment is operated in a commercial environment. This equipment
generates and radiates radio frequency energy and, if not installed and used in accordance with the
user’s manual, it may cause interference in which case users will be required to correct interference at
their own expenses.
CE Warning
U
This is a Class B product. In a domestic environment, this product may cause radio interference in
which case the user may be required to take adequate measures.
Introduction
U
This switch provides 5/8 10/100M ports. It was designed for easy installation and high
performance in an environment where traffic is on the network and the number of
users increases continuously.
The small palm size with transparent plastic case was specifically designed for small
to medium workgroups. It can be installed where space is limited; moreover, it
provides smooth network migration and easy upgrade to network capacity.
Package Contents
U
Before you start to install this switch, please verify your package that contains the
following items:
z One Fast Ethernet Switch
z One Power Adapter
z One User’s Manual
Note: If any of these items is found missing or damaged, please contact your local
supplier for replacement.
Key Features
U
z
z
z
z
z
z
z
z
z
Supports real time status(link,speed, duplex) of each port.
Supports port setting for enable or disable operation (the 1’st port can’t be
disabled).
Supports port setting for N-Way or force mode operation.
Supports Broadcast Storm Protection.
Supports Maximum Packet Length 1536 or 1552.
Supports Port-bases VLAN.
Supports two priority queues for QoS.
Supports weighted round robin scheduling for queues.
Supports Port-bases / 802.1p / Diff serv. priority three types of CoS.
1
Power
U
U
Power is supplied through an external DC power adapter.
Front Panel (LEDs)
U
LED Indicators of 5/8 Port 10/100M Switch
LED
Power
LINK/ACT
Status
On
Off
On
Off
Flashing
Operation
Power is on.
Power is off.
Port is for connection
No connection.
Data is transmitting or receiving.
Rear Panel (Connections)
U
Switch/Hub to this 5/8 Port Fast Ethernet Switch
This switch provides automatic crossover detection functionality for any port.
simple and friendly to up-link to another switch without crossover cable.
It is
PC/Other devices to this 5/8 Port Fast Ethernet Switch
Via a twisted pair cable straight through, this switch can be connected to PCs, servers
and other network devices.
U
2
Configure
Please follow the steps to configure this Web Smart switch.
Step 1:
Use a twisted pair cable to connect this switch to your PC.
Step 2:
Set your PC’s IP to 192.168.2.xx.
Step 3:
Open the web browser (like IE…), and go to 192.168.2.1 site, and then you will see
the login screen.
Key in the user ID and the password to pass the authentication,
IP: 192.168.2.1
ID: admin
Password: admin
After the authentication procedure, the home page shows up.
3
Step 4:
On the following home page, select the configuration by clicking the icon. It
includes,
- Administrator
- Port Management
- VLAN Setting
- QoS Setting
- Port Security
- Logout
Administrator: Authentication Configuration
You can change the user name and the password, and click “Update” to confirm the
new change. After that, you can reset this switch by power off and then power on to
take the new user name and the password effectively.
4
Administrator: System IP Configuration
You can change the IP address by typing the new IP address and click “Update” to
confirm the new change, and then the message will show “Setting Process OK!!”,
After that, you should reset this switch by power off and then power on it to complete
the new change.
Administrator: System Status
It shows this switch MAC address, and you can select “Back to the last display” or
“Logout” when the time’s out.
Administrator: Load Default Setting to EEPROM
You can click “Load” to load the new factory default setting, and then reset the switch
by power off and then power on to take it effectively.
5
Administrator: Firmware Update
Follow the instruction on the screen to update the new firmware. Please contact with
your sales agents to get the latest firmware information.
Port Management: Port Control Configuration
Select the “Port No.” which you want to configure the mode below,
“Capability” - Auto-Nego. or force on 100M or 10M mode
“Duplex” - you can select the port is full/half-duplex or enable/disable this port.
6
Port Management: Bandwidth Control
Select the “Port No.” which you want to configure the mode below,
“TX Rate” is meant you can set the maximum transmission rate of this selected port
and choose the full speed or in 128K/256K/512K/1M/2M/4M/8M speed.
“RX Rate” is meant you can set the maximum receiving rate of this selected port and
choose full speed or in 128K/256K/512K/1M/2M/4M/8M speed.
Port Management: Broadcast Storm Control
You can enable or disable the broadcast storm protection feature by clicking “Update”.
7
Port Management: Max Packet Length
You can select the maximum packet length setting, 1536 byte or 1552 byte of this
switch.
VLAN Setting: Group VLAN Setting
There are 4 VLAN groups, 01, 02, 03, 04, can be used.
You can select a group, and then click the port number which you want to put it into
the selected VLAN group.
8
VLAN Setting: Multi to 1 Setting
This is a special design for easily setting the switch VLAN into “VLAN Per Port“.
After this setting, all ports can only connect to the destination port.
QoS Setting: Class of Service Configuration
You can select the class of service for each port.
QoS Setting: High Priority Queue Configuration
You can select WRR low weight 1/4 or 1/8.
9
QoS Setting: Customization Diffserv
Please follow the instruction on the screen to update the setting.
Port Security
When this function is enabled, the port will record the first receiving source MAC
address as the security MAC address and only allow the packet which has this MAC
address to activate on the port.
Logout: You can click “Logout” to logout.
U
10
Technical Specifications
Standards
z
z
z
z
z
Ports
Transmission method
Packet Buffer
Mac Table Size
Smart Features
z
z
z
z
z
z
z
Filtering/Forwarding Rates
z
z
Transmission Media
z
z
Led Indicators
z
z
Power
Dimension
Environment
z
z
z
z
Certification
z
IEEE 802.3 10BaseT
IEEE 802.3u 100Base TX
IEEE 802.3x Flow Control
IEEE 802.1Q VLAN Tagging
IEEE 802.1p, Class of Service, Priority Protocols
8 * RJ45 ports, with 10/100Mbps
Store-and-forward
512K bits
1K
Port-based VLAN: Maximum 5/8
QoS: 2 Queues
Management: Password-protected Access, Port Settings,
Web-base Management, Graphic User Interface
100Mbps port – 148,800pps
10Mbps port – 14,880pps
10BaseT Cat. 3,4,5 UTP/STP
100BaseTX Cat. 5 UTP/STP
Per Port: Link/Act
Per Unit: Power
DC7.5V 0.8A adapter
140* 105* 25 mm
Operating temperature : 0 to 40℃
Humidity:10% to 90% (Non-condensing)
CE, FCC
11