1
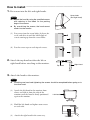
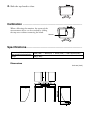
Thank you very much for choosing an EIZO product.
Please read this User’s Manual carefully to familiarize yourself with safe and effective usage
procedures.
Please retain this manual for future reference.
PRECAUTIONS
To ensure personal safety and proper maintenance, please read this section.
CAUTION
Do not carry the monitor with attaching the hood.
Doing so may cause the hood to drop or slip off, which may result in injury or equipment
damage.
Do not put any object on the hood.
Doing so may cause the hood to drop or monitor to fall, which may result in injury or
equipment damage.
Do not use other screws than the specified ones.
Doing so may cause the hood to drop, which may result in injury or equipment damage.
Attach only to specified EIZO LCD monitors.
Attach only to specified EIZO LCD monitors. Attaching to other monitors may cause the hood
to drop, which may result in injury or equipment damage. For the specified monitors, please
visit our website at http://www.eizo.com.
Package Contents ________________________________
Please contact your local dealer for assistance if any of the listed items are missing or damaged.
Left Hood
Right Hood
Top Hood
User’s Manual
Screws M3×8 4pcs
Screws M3×16 4pcs
Screw Caps 6 pcs (2 pcs for spare)
How to install ____________________________________
1. Put screws into the left and right hoods.
Screw holes
(Ex. Right Hood)
NOTE
Attach the hood by using the specified screws
with referring to the labels on the packing
bags of the screws.
By over-driving the screws, the hood cannot
attach into the monitor.
(1) Put screws into the screw holes (2 places for
each) and drive it until the half-length of
screws coming up from the screw holes.
(2) Put the screw caps on each tips of screws.
2. Attach the top hood to either the left or
right hood before attaching to the monitor.
Top Hood
Right Hood
3. Attach the hood to the monitor.
NOTE
Attaching one hood and tightening the screws should be completed before going on to
the other hood.
(1)
Attach the left hood to the monitor from
above and slide it from the side of the
monitor until the hood is firmly positioned
against the monitor.
(2)
Hold the left hood and tighten two screws
on each side.
(3)
Attach the right hood in the same way.
Left Hood
4. Slide the top hood to close.
Calibration ______________________________________
When calibrating the monitor, the sensor of the
measurement device can be attached by sliding
the top cover without removing the hood.
Sensor
Specifications____________________________________
Dimensions(W) × (H) × (D)
(Not including projected part)
425.8 (16.8) ~ 483.8 (19) × 344.5 (13.6) × 202.4 (8) mm (inch)
Weight
860g (1.9lbs)
Dimensions
Unit: mm (inch)
NOTE