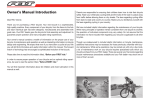
1
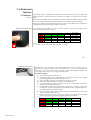
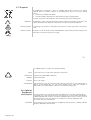
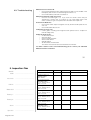
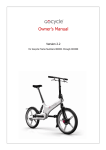
E-BIKEBOARD EVO I USER
MANUAL
Rev. 14 - February 2015
Ap pli ca bl e f or f oll o w ing E -B ik eb oar d M o d els :
Whenever you ride the E-Bikeboard, you risk death or serious injury from loss of control, collisions,
and falls. To reduce these risks, you must read, understand and follow all instructions and
warnings in this E-Bikeboard User Manual.
Welcome to the
World of Bikeboard!
The E-Bikeboard - an environmentally friendly 3-wheeled electric personal
transporter - is a completely new kind of transportation which can be enjoyed in
many ways.
Although keeping your balance on three wheels is easy, the risk of injury from loss
of control, collisions and falls will always be present. The manufacturer wants you to
enjoy riding your new E-Bikeboard and be safe at the same time!
This User Manual is designed to help you learn and understand how to properly use
and enjoy your E-Bikeboard while minimizing risks.
Page 2 of 44
Always Follow National,
State and Local Laws!
The E-Bikeboard does not comply with any international regulation for safety of
motorized vehicles on public roads. Exception is the european street
homologation. Anyhow, apply this license there are also difference in each
country.
Therefore, always follow the applicable local legislation concerning the use of the
E-Bikeboard on public roads and public places. In some countries it is forbidden to
use the E-Bikeboard in public areas.
If you are uncertain regarding the local legislation, contact your local authorities
for information or contact your local E-Bikeboard dealer (find contacts on
www.bikeboard.com).
The E-Bikeboard is typeapproved
of a type of vehicle with regard to Directive 2002/24/EC, as last amended by
Regulation (EC) No 1137/2008
3
Table of Contents
1. Safe Riding.........................................................................................................................6
1.1. Basics ..........................................................................................................................6
1.2. Where to Ride ...........................................................................................................8
1.3 Protective Gear .........................................................................................................9
1.4 Protective Measures................................................................................................10
1.5 Pre-Ride Inspection .................................................................................................12
1.6 How to Ride ..............................................................................................................12
2. Preparation .....................................................................................................................15
2.1. Unfold Platform .......................................................................................................15
2.2. Unfold Handlebar ...................................................................................................17
2.3. Fold Handlebar .......................................................................................................19
2.4. Insert Batteries .........................................................................................................20
2.5. Remove Batteries....................................................................................................22
3. E-Bikeboard Features.....................................................................................................23
3.1 Batteries.....................................................................................................................23
3.2 Handlebar Control Features ..................................................................................26
3.3 Display .......................................................................................................................28
3.4
Reverse ................................................................................................................29
3.5
Cruise Control.....................................................................................................29
3.6
Switch off the light .............................................................................................29
3.7
Engage the Alarm .............................................................................................29
3.8
Setup Control
(Software Version 18-22*).....................................................30
4. Consumer Information...................................................................................................32
4.1. Maintenance ..........................................................................................................32
Page 4 of 44
4.2. Repairs......................................................................................................................32
4.3. Warranty and Limited Liability ..............................................................................33
4.4. Right of Return.........................................................................................................35
4.5. Transport...................................................................................................................35
4.6. Storage and Care Instructions..............................................................................36
4.7. Disposal ....................................................................................................................37
4.8. Optional Equipment/ Accessories .......................................................................38
4.9. Troubleshooting.......................................................................................................39
5. Inspection-Plan ...............................................................................................................40
5.1 Service Plan .............................................................................................................41
5
1. Safe Riding
1.1. Basics
Driver's License /
Restrictions
If required by law, you must carry a valid driver’s license that is locally accepted for
riding the E-Bikeboard.
If you can not safely operate the E-Bikeboard in the traffic caused by phyisic or
mental disablities, you are only allowed to ride if you take all n
Who can not safely operate the E-Bikeboard in the traffic due to physical or mental
defects is only allowed to ride if he himself has made provision that he does not
endanger others. In case of doubt on the ability to drive the e-Bikeboard, then
order at the driver's license office a professional medical opinion, a medicalpsychological examination or an technical expertise
.
Before first ride
Maximum Total Weight
Permissible maximum total weight: 180kg/400lbs.
No Stunts or Horseplay
The E-bikeboard is not developed for any type of tricks, stunts, jumping, wheelies or
racing.
Be Kind
Page 6 of 44
The owner must ensure that any operator of the E-Bikeboard fully read, understood
and follows all instructions in this manual. A demonstration to ensure that the rider
understands the operation of the E-Bikeboard is strongly advised.
Regardless of where you use the E-Bikeboard, operators should always show
courtesy to others and ride in a safe and suitable manner.
Insurance
Modifications
Make sure you are covered with insurance for both you and your E-Bikeboard.
Do not remove, modify or alter any components of the E-Bikeboard. Any
modification can cause malfunctions and the loss of road approval or warranty
claims. Modifications can be dangerous and lead to serious injuries. Do not open,
disassemble or service the battery.
7
1.2. Where to Ride
Legislation
Always pay attention to the locally applicable legislation about the use of the EBikeboard on public roads and in public places. If you are uncertain regarding
your local legislation, contact your local authorities or your E-Bikeboard dealer (find
dealer contacts on our homepage) for information.
Private property
To ride the E-Bikeboard on private property, always obtain permission from the
owner to do so.
Roads
Typically bicycle lanes and side roads with low traffic (if allowed) are suitable for
riding the E-Bikeboard.
Models with Street Tires
The Models with Street Tires (Semislick) are only to be used on paved roads and
places with an even surface, such as asphalt, concrete, sports field pavement, etc.
Modes with Allseason or
Offroad Tires
Unsafe Conditions
The Modesl with Allseason or Offroad Tires can be used (if allowed) on streets and
on dirt roads which are in good condition for driving, on lawns, or beaches with
compact sand.
•
•
•
•
•
Page 8 of 44
Do not ride when road and weather conditions do not allow safe use.
Never ride on snow, ice or greasy surfaces (i.e. oil), in heavy rainfall or with
poor visibility (i.e. fog). Wet and icy weather impairs traction, braking, and
visibility.
Do not use the E-Bikeboard in water or drive through standing water under
any circumstances.
Do not ride on stairs, escalators or through revolving doors.
Do not ride off curbs
1.3 Protective Gear
NOTE
Bikeboard Recommends
Always inform yourself about local regulations regarding the use and wearing of
protective gear on public roads and areas where you are riding. In some
countries/states, it is mandatory to wear a helmet at all times.
•
Helmets with chin protection, (DOT or SNELL certified)
•
Good, sturdy footwear - No heels, open-backed shoes, or flip-flop type shoes
•
Arm, elbow, knee and shin guards, as well as chest protection
9
1.4 Protective
Measures
For maximum safety when riding the E-Bikeboard, it is extremely important to take
certain protective measures:
Throttle
Never use the throttle unless you are standing with both feet on the E-Bikeboard
platform and are fully ready to ride.
Turning Components
Turning wheels are a high risk for injury. Hands, feet, body parts and clothes should
under no circumstances be close to turning wheels. To prevent injury, never touch
any moving or turning parts.
Collapsible Frame
Special precaution must be used with the collapsible frame, especially when
folding up the folding stem into the riding position, as well as when folding out the
platform for the riding position. You risk injuring fingers, hands or other parts of your
body.
Beware of Hot Brake Discs
Do not touch brake discs during or immediately after use, as they can get very hot
when used.
Be Prepared to Stop
At any point in time during the use of the E-Bikeboard, the rider must be alert and
prepared to stop. Special care must be taken as soon as other people or vehicles
are close by.
Normal Operational
Environment
Page 10 of 44
•
•
Temperature: -15ºC/5ºF to +45ºC/113ºF
Humidity: 5% to 85%
Lithium Batteries
Lithium batteries pose a risk of injury when handled improperly. Therefore:
•
Do not use or leave battery near a heat source such as fire or heater
•
Use only Bikeboard’s authorized chargers
•
Do not connect battery to an electrical outlet directly
•
Refer to chapter 3.1. Batteries and chapter 4.6. Storage and Care Instructions
for more detailed information
Be Aware
Adjust your riding style to your ability as well as road, traffic and weather
conditions. The E-Bikeboard is to be operated in a safe and suitable manner.
Avoid Distractions
The rider should not use a cell phone, listen to headphones, or engage in any other
activity that might distract or interfere with the ability to monitor the surroundings
while driving. The attention of the rider must be directed toward operating the EBikeboard.
Both Hands and Feet
While driving the E-Bikeboard, both hands should be kept on the handlebar, and
both feet should be kept on the platform.
Luggage
Do not carry objects in your hands or on the platform while driving. Use the EBikeboard’s carrier equipment, such as a top case, to transport objects/luggage.
Parking
Lock the E-Bikeboard and remove battery keys and main key (located at the
throttle) when parking it. Secure with an adequate lock.
11
1.5 Pre-Ride
Inspection
•
Check the functionality of the E-Bikeboard prior to each use.
•
Make sure all fastening elements are tight (bolts, quick release clamps, folding
mechanism for stem and platform, etc.). Do not use the E-Bikeboard if any
parts are loose or damaged
•
Ensure that brakes work properly
•
Both batteries must be firmly locked onto frame and both keys must be taken
off the battery before riding the E-Bikeboard.
1.6 How to Ride
1.
Turn on the battery (or both if equipped with two batteries)
1.6.1 Turn on
2.
Turn the keyswitch on (located at the throttle)
3.
Push 2 seconds on the mode button *
* for more details refere to chapter 3
1.6.2 Practice
Page 12 of 44
•
New riders must practice using the E-Bikeboard first. Training rides should be
performed in a safe place on an even and non-slippery surface, away from
traffic or pedestrians.
•
Always be alert and ready to use the brakes.
1.6.3 Riding Tips
3 - Speed *
Beginners should use speed 1 (slow). Use speed 2 (medium) and 3 (max speed)
only if you are an experienced E-Bikeboard user.
Braking *
Use primarily the left brake lever to slow down, which is for the rear wheels.
Reverse *
This feature should only be used by experienced E-Bikeboard users.
Acceleration
Never accelerate in an uncontrolled fashion.
Terrain/Surface changes
Be aware that every terrain/surface change (i.e. from pavement to grass, a
threshold or speed bump) is a potential hazard and may require a change in
driving style. Do not pull up the E-Bikeboard handlebar when riding over obstacles.
Steep Slopes
When going downhill never exceed a speed of 35km/h (22mph). Instead, use the
brakes to slow down or push the E-Bikeboard. If driving across a slope the driver
must balance the inclination by leaning his/her body uphill.
Added Height
Because of the added height of the E-Bikeboard platform (and the driver’s helmet)
special care must be taken when driving indoors, as well as through doorways,
archways, under tree branches, signs, or other overhead obstacles.
*
Visibility
Note: See chapter "3.2 Handlebar Control Features" for more detailed information
To ride safely, the rider must be able to see clearly and must be visible to others.
Always switch on the light when riding the E-Bikeboard at night time or in
conditions of low visibility. Follow local legislation regarding regulations for using the
E-Bikeboard at night.
13
Turns/Curves
Always turn slowly and with caution - do not turn abruptly!
Lean into the turn to maintain balance. The body must be brought into an inclined
position as on a bicycle or motorbike. (see diagram)
Exception 1: When driving alongside a steep hill, lean towards the hill
Exception 2: When driving a Models with fixed leaning system, make sure to turn
only with a slow speed so all 3 wheels are always touching the ground.
Page 14 of 44
2. Preparation
2.1. Unfold
Platform
CAUTION
Beware of Pinchpoint!
•
Fold out the platform and close the quick releases on both sides of the platform as
shown below.
•
To fold out the platform, always hold the E-Bikeboard as shown on the photos below;
One hand holds the fork or light bracket (1), the other holds the diagonal tube (2).
1
2
15
CAUTION
Keep your fingers, hands or other parts of your body away from the pivot (4) when folding out
the platform; you could get seriously injured.
•
Fold out the rear part of the platform (3) by 180°, so that the two parts form an entire
platform and the E-Bikeboard stands firmly on all three wheels on the ground.
4
3
Bring the quick release handle (5) into a horizontal position and turn it around until it stops in
position (6); You must feel some pressure when doing this in order to be sure the lock will stay
firmly closed. Should this not be the case, tighten the counter nut (7) until you can feel the
correct pressure when closing it.
6
5
Page 16 of 44
7
2.2. Unfold
Handlebar
CAUTION Beware of
Pinchpoint
Folding Stem Variant 1 (not heigth adjustable)
•
Fold up stem with attached handle bar (1) so that the center guide (A) and the stem
align parallel to the cylinder(B) below.
•
Push in safety lock button (2) fully and push down the stem at the same time until the
safety lock button pops out again (3).
•
Pull the stem up again to check if the stem sits firmly on the cylinder; the stem should not
move up or down and the safety lock button should sit correctly in its proper position (3).
A
1
B
2
3
Adjust counter nut (4) of the quick release until you feel a strong pressure when closing
the quick release (5) and you are able to firmly push it down onto its arrester (6).
17
4
5
6
Folding Stem Variant 2 (height adjustable, Picutres on next page)
Page 18 of 44
1.
Unfold the handelbar (1), and keep the hook up, so it can be placed over the
connection piece.
2.
Place the hook in the connection piece. Make sure, there is enough pressure when
closing, otherrwise tighten the adjusting screw (use an allan key size 5)
3.
Close the lever, make sure the small lever lock the big lever.
1
2
3
Achtung:
Schnellspanner der
Höhenverstellung
immer fest anziehen!
2.3. Fold Handlebar
•
Follow steps 6 - 1 from previous chapter
o
Make sure that the safety lock button (2) is pushed in all the way before
pulling up the stem.
•
Note: Be careful not to bend the center guide (A). (Variant 1)
19
2.4. Insert Batteries
CAUTION
Beware of Pinchpoint! Keep hands off battery bracket while inserting or
removing the battery
1.
2.
3.
4.
5.
Page 20 of 44
Make sure the lock is unlocked (open)
Make sure the battery is turned off (green switch located at the battery bottom
must be on 0)
If there is already one battery installed on the other side, also turn off this battery.
Align the battery bottom from the side with the bracket and push it in from the side
Lock and make sure, the battery is secured and fixed correct.
Close Battery Strap.
1.
2.
3.
Place strap in the bracket
Pull firm
Close the velcro and push it firm on the battery
1
2
3
21
2.5. Remove
Batteries
•
•
•
Page 22 of 44
Turn off both batteries.
Hold the battery, so it will not drop out
Insert the key, unlock and use the other hand to remove the battery sideways.
3. E-Bikeboard
Features
3.1 Batteries
Basics
The batteries used on the E-Bikeboard are based on Lithium technology. These batteries are
designed using the latest technology for high power density, low weight and a long life
span.
Before using the E-Bikeboard for the first time, please charge both Batteries until the green
LED on the charger unit lights up (approximately 4.5 hours with the standard charger).
Always turn off the batteries with the Switch when you store the E-Bikeboard for longer than
1 day! Otherwise the battery will be empty in a few days.
Battery LED Read Out
Use the button in the middle (1) to turn on the LED interface. There are 5 LED lights, which
show the remaining battery capacity:
80% - 100%
60% - 80%
40% - 60%
20% - 40%
5% - 20%
0% - 5%
Blinking
Note:
•
The LED’s turn on automatically in use (drive or charge)
1
23
Charging of Batteries
The batteries can be charged on or off the E-Bikeboard.
If you charge on the EBikeboard, then make sure both batteries are turned on, so both will be charged and
balanced. So you can use also only one charger to charge both batteries together. Also
two charger can be used, so the charge time will be half.
Procedure for Charge:
A) Turn off batteries at the main switch
B) Plug in the charger at the supply side (110 or 240VAC), make sure the charger
was unplugged before and LED1 and LED2 are off.
C) After this, plug in charger to the battery (see picture on the left).
D) Turn on the battery (or both if charged on the E-Bikeboard)
E) Now the LED2 turn on red, also the fan noise can be noticed and the LED start to
blinking according the table below.
F) Charge until the LED2 of the charger turn to green. This can take up to 4.5h, until
the batteries are fully charged (or 9h if both batteries are charged together on
the E-Bikeboard with a 2Amp charger)
G) After the charger LED2 turned to green, make sure the batterie also show full (all
4 green and the red LED are on)
H) Make sure that after charge close the charge socket again with the rubber
protection and the charger is unplugged from the power supply.
Blinking
Blinking
Blinking
Blinking
Blinking
Page 24 of 44
80% - 100%
60% - 80%
40% - 50%
20% - 40%
0% - 20%
LED1 red
LED2 green
•
•
Charger is
connected to
the power
and ready
If not plugged in
Charger
ready to charge
If connected to battery:
battery is fully charged
LED2 rot
Charging process ongoing
CAUTION
SAFETY
LED 2
Do not combine batteries with different charge levels on the same E-Bikeboard; i.e. one
fully charged battery with one partially discharged battery.
ALWAYS USE ONLY AN ORIGINAL E-BIKEBOARD CHARGER!
Follow all safety instructions regarding the handling of the batteries, including the
following:
•
Only use the approved, original E-Bikeboard battery charger to charge your
batteries.
•
Use only in temperatures ranging from -15°C (5F) to 60°C (140F).
•
Do not let children play with batteries.
•
Do not put batteries in a microwave.
•
Do not open the batteries.
•
Do not expose batteries to an open flame.
•
Do not use batteries in water.
Do not throw batteries into the garbage; for proper disposal of batteries see section
“Disposal”.
25
3.2 Handlebar Control
Features
Left Side of Handlebar
Horn : Push down to activate the horn.
Display Control
There are 3 buttons:
1. Arrow up ⇑
2. Mode
3. Arrow down ⇓
More details are in the next chapter “display control”
Brake Levers on Handlebar
Both handlebars are equipped with brake levers (left operates rear brakes;
right operates front brakes). Primarily use left brake levers! Only use right
brake lever in addition to the left brakes levers, if further brake force is
required.
Right Side of Handlbar
Key Switch
For turn on rote the key clockwise. After this you have to push the mode
button for 2s.
Throttle
Use throttle only if you are ready to ride and on the E-Bikeboard. Turn the
throttle very slowly and carefully, since an electric motor has the maximal
torque when starting.
Page 26 of 44
Right Side of Handlebar
- Parking Brake Parking
brake front
wheel
activated
To ensure that the E-Bikeboard does not inadvertently move, the parking
brake must be activated. Pull up the small black lever on the right
handlebar brake lever to activate the park brake (see photos).
Check functioning of the brake by pushing the E-Bikeboard forward while
brake is activated. For further theft protection you may use a motorbike
lock.
Pull up once the brake lever to release parking brake.
Parking
brake front
wheel
released
In public places be sure to park the E-Bikeboard only where
parking is officially allowed.
27
3.3 Display
Batterie-Stand:
Full (F) 5 Bars, Empty (E) 1 bar flashing
Trip and ODO:
ODO = total distance
TRIP = distance since turned on
Use the „Mode“ button to alternate.
Speed:
Actual Speed (km/h, or mph, use Setup to change)
Alternate (push 2s ⇑ ) to show average or max speed of the acutal trip
5-Speed and Power Setup (Change with ⇑ oder ⇓ )
1 = slow speed, continuous power level I
2 = medium speed, continuous power level I
3 = maxium speed, continuous power level I
4 = power level II
5= power level III
Range (DST. TO GO)
Is calculated according the driving style. If Set8 is in maintenace mode you can read out other
values here (for instance % if Set8=10)
Page 28 of 44
3.4 Reverse
Reverse (push ⇓ long and keep it) (only on the 20m/h model available)
Never activate the reverse button while riding. This feature is only to be used for convenience
when backing up the E-Bikeboard while the operator is standing firmly on the ground. Push the
⇓ button to go in reverse and release to go forward.
3.5 Cruise
Control
3.6 Switch off
the light
3.7 Engage the
Alarm
Cruise Control
You can setup the automatic cruise control (see 3.7 Setup) to engange after 3s, 4s or 5s. If you
keep then the speed for the choosen interval, the E-Bikeboard will continue at the selected
speed without activating the throttle. The cruise control is deactivated by pressing the button
again, activating a brake lever, or by using the throttle.
The light is always turned on because of homologation and security reasons. If you push the
mode button and ⇑ together for 2s, the E-Bikeboard will switch to maintenance mode and turn
off the light. If you push the mode button and ⇑ again together for 2s, you can switch on the
light again.
In the Setup Menu you can active (Set6=1) or deactivate (Set6=2) this function. If the alarm
function is activated, you can engage the alarm like this:
A)
After turn off the Bikeboard with the key,
B)
push the horn button. The light will blink 3 times to singal the alarm is engaged.
When the bikeboard is moved, or manipulated (horn button, throttle, the alarm will go off).
To turn off the alarm, turn on the E-Bikeboard again.
29
3.8 Setup Control
(Software
Version 18-22*)
Through the display, you can setup several parameter.
1.
2.
3.
Change to setup mode: you push ⇓ and ⇑ together.
Short push on Mode alternate between the different Set’s.
Long push on Mode stores the settings and exit the setup mode.
Explain the different Set’s (see set nr. on right top corner)
⇑
Mode
•
Set 1: Wheel Size Setup (for calibrate the speed)
Default = 16
•
Set 2: Set Speed Limit
Default = 45 (so the limit is not active and the max speed is according the motor)
•
Set 3: Display backlight 1-2-3
Default = 1
•
Set 4: Change km / miles
Default km
•
Set 5: Choose Battery-Type (for calculate the range and behavior with empty battery)
o
1 = 1 Battery with “Safe-Home Mode*”
o
2 = 2 Batteries, with *Safe-Home Mode*”
o
3 = 1 Battery, without “Safe-Home Mode*”
o
4 = 2 Batteries, without “Safe-Home Mode*”
Default 4 (or 3 if only one battery)
•
Set 6: Alarm function (1=activ, 2 = not active)
Default: 2 (use only 1 or 2!)
•
Set 7: Choose start mode (2 = Soft Start .... 10 fast Start)
Default 5 (make sure you don’t use 1)
•
Set 8: Setup Cruise Control, Safe Brake function + Maintenance Mode
o
1 = no cruise control, safe brake function activated
o
2 = no cruise control, safe brake function disabled
o
3 = auto cruise control after 3 seconds , safe brake function disabled
o
4 = auto cruise control after 4 seconds , safe brake function disabled
o
5 = auto cruise control after 5 seconds , safe brake function disabled
⇓
Display in Setup Mode,
Examplel Set5=4
Safe-Home Mode = Limits power
and speed towards end of battery
capacty
Page 30 of 44
o
o
o
o
6 = current (in *10Amp), e.g. 153 = 15.3A
7 = Voltage
8 = Voltage (in *10V) with 40V offset, e.g. 145 = 54.5V, 72= 47.2V
9 = Software Version (This setup is for Software 10)
10 = Percent of Battery capacity, in 5% steps, speed limit disabled
Make sure the value are correct, or the distance to is maybe wrong calculated. Also check that
the correct Software Version is installed (Version 18 – 22)
31
4. Consumer
Information
4.1. Maintenance
•
Service
The first inspection must be done after around 200km or max. 8 weeks
The normal inspection must be done regulary very 6 months or 3000km, latest after one
year.
•
Check all Screw Connections Regularly:
Please check all screw connections regularly, especially the ones for the steering, wheel
axles and suspension.
•
Adjustment of Brakes:
The mechanical front wheel brake can be adjusted at any time with its adjusting screws,
one at the brake lever and one directly at the brake caliper. The hydraulic rear brake
adjusts itself.
•
Tire and Tire Pressure:
Maintain tire air pressure as stated on the tire sidewall. If you exceed the tire air pressure
stated on the tire sidewall, you increase the risk of loss of control, collisions, and falls. Lower
pressure reduces range and can cause tire and wheel damage! Once the tired tread is
worn out, the tire needs to be replaced.
•
4.2. Repairs
•
•
Page 32 of 44
Tire/rim size
Recommended tire pressure
Maximal tire pressure
front
12” rim
2.5 bar / 36 psi
2.8 bar / 40 psi
rear
4“/6" rim
2.5 bar / 36 psi
3.5 bar / 50 psi
Replacing Wear-and-Tear Parts:
Please note that only original parts, supplied by Manufacturer or its authorized dealers are
permitted. Have service work completed only by trained personnel or by your authorized
Bikeboard dealer. Find your closest dealer on www.e-bikeboard.com.
Any repairs must be performed by your specialized Bikeboard dealer. You can find your
closest dealer on our homepage: www.e-bikeboard.com. Only original parts, supplied by
Bikeboard are permitted.
Do not modify the E-Bikeboard from the manufacturer's original design and configuration.
Any repairs and/or modifications should be performed by a licensed E-Bikeboard dealer or
trained technician.
4.3. Warranty and
Limited Liability
Scope of Warranty
•
•
•
Period of Warranty
•
•
•
The designer and manufacturer of the E-Bikeboard, offers a limited warranty for each
purchased original E-Bikeboard. This warranty covers the replacement of original parts that
fail prematurely due to material or fabrication defects.
The warranty is only activ, if the warranty form is registrated and all inspections are done
Tires, tubes and brake pads are not included in the warranty.
The warranty covers the statutory warranty period valid in the country of purchase, with a
minimum period defined by the distributor from the date of issue of the certificate of
warranty, and is restricted to the first purchaser of the E-Bikeboard.
The warranty covers the statutory warranty period valid in the country of purchase, with a
maximum period of 2 years for the E-Bikeboard and 2 years or 700 recharges (whichever
occurs first) for the battery. It is restricted to the first purchaser of the E-Bikeboard.
The period of warranty does not extend to parts that are replaced during the period of
warranty.
Warranty Terms and
Conditions
In order for a warranty claim to be valid, the following conditions must be satisfied:
•
The E-Bikeboard must be complete and correctly assembled.
•
The E-Bikeboard must have been used only under normal conditions and for its intended
purpose in line with the instructions of use.
•
The original proof of purchase with the VIN number.
•
If the terms and conditions of the warranty have been satisfied, the defective parts will be
replaced free of charge by an authorized dealer.
Warranty Claims
All claims that are covered by this warranty must be processed by an authorized E-Bikeboard
dealer. Any defective parts must be returned with the claim. To find your nearest authorized
dealer please visit our website at www.bikeboard.com.
Warranty Exceptions
The following conditions are not covered by warranty:
33
•
•
Damage or wear and tear caused by:
o
External mechanical, chemical or temperature factors
o
Accidents, misuse, sabotage, negligence or natural disasters
o
Improper assembly
o
Failure to observe the guidelines issued in this User Manual in regards to handling, use
or maintenance of the E-Bikeboard
o
Improper maintenance or repair work (see chapter 6 "Repairs and Maintenance")
o
Changes of any kind to the original E-Bikeboard
o
Illegal use of the equipment
o
Use of E-Bikeboard parts for other purposes
o
Use in races or competitions
The warranty also does not cover any paint damage or scratches, normal wear and tear to
parts, in particular tires, inner tubes, brake pads, handles and protective coatings, or any
other wear and tear caused by the normal use of the E-Bikeboard.
The liability of the Manufacturer and its authorized dealers is limited to the repair and
replacement of defective parts. It does not cover any direct or indirect liability for any alleged
damages and their consequences. The Manufacturer and its authorized dealers will not
reimburse any travel expenses incurred by people or by the transport of the product from the
purchaser to the authorized dealer and back.
Secondary Damage
Exclusion
Limited Liability
The Manufacturer will not accept liability for incidental or indirect losses or damages caused by
the use of the E-Bikeboard.
All E-Bikeboard products have been developed, manufactured and sold for their intended use
as detailed in the instructions for use. They should not be used with other engines or with any
other forms of propulsion or batteries other than those supplied.
The Manufacturer and its authorized dealers will not accept liability for any injuries or damages
of any kind caused by the improper use of the E-Bikeboard. This warranty only gives the user the
limited rights that are stated by law.
Page 34 of 44
4.4. Right of Return
The right of return only applies to unused equipment which is still in its original packaging. The
right of return and refund of the purchase price is only possible within 10 days of purchase
from the dealer where the E-Bikeboard was purchased and upon provision of the original
receipt with the VIN number.
4.5. Transport
You can easily transport the collapsible E-Bikeboard in almost any car with the handle bar
and platform folded. When transporting the E-Bikeboard, you must first remove the battery
set from the frame.
To transport the E-Bikebaord via airplane, please make sure you research safety regulations
in regards to the transport of Lithium batteries. There might be restrictions, depending on the
airline you are using.
35
4.6. Storage and
Care Instructions
Page 36 of 44
•
Storage:
o
Please store the E-Bikeboard in a dry place
o
Temperatures should not exceed 60°C (140°F) or fall below -15°C (-5°F) at any
time. Keep in mind that the batteries in particular are sensitive to higher
temperatures.
o
Please charge the batteries every 6 months.
•
Care instructions:
o
Keep the E-Bikeboard dry and clean.
o
Avoid moisture and water on electric or electronic parts. Water could cause a
short circuit and damage electric parts. Electricity is dangerous and could
cause injury in combination with water.
o
Always switch off the batteries after use. Keep the remote control key as well
as the battery keys in a safe place and out of reach of children at all times.
o
While cleaning, check for cracks, deterioration of cables, metal warping or
discoloration. In case of any concerns or doubts about the condition of the EBikeboard, please contact your Bikeboard dealer.
o
Do not get any oily products or oil on the brake pads or disks. Doing so may
cause the brakes to fail!
o
When cleaning the E-Bikeboard with water, first remove the battery packs.
Water could cause a short circuit, which could lead to injuries of people and
damage to the E-Bikeboard.
o
Clean the battery packs with a damp cloth only. Insert the battery packs only
when the battery contacts on the E-Bikeboard are completely dry.
o
4.7. Disposal
The E-Bikeboard is designed to allow for separate disposal and recycling of its various
materials. When you need to dispose of the E-Bikeboard, choose one of the following
options:
1. Return it to your Bikeboard dealer
2. Professional disposal through a local disposal/recycling company/facility.
The main components are listed below and show their proper waste classification:
Batteries
The batteries contain chemicals and heavy metals. Therefore they MUST be returned to any
E-Bikeboard dealer or be disposed of at special local collection points for batteries.
Packing Foam
The packing foam is made of polystyrene and can be recycled at special local collection
points.
Plastic Covers
The plastic covers are made of Acrylonitrile Butadiene Styrene (ABS) and can be disposed of
at special local collection points for recycling.
37
The E-Bikeboard also contains the following materials:
Steel
Aluminum
Engine housing and E-Bikeboard frame
Rubber
Tires and inner tube
Copper
Motor coils, cables
Cardboard
4.8. Optional
Equipment/
Accessories
CAUTION
Page 38 of 44
Screws, axles, motor components, spring fork components
Main packing box. This box should be kept during the life span of your E-Bikeboard. To
dispose of your E-Bikeboard, you can use this original box to return the complete EBikeboard to your nearest dealer or directly to the importer of Bikeboard.
We offer a variety of accessories and optional equipment, such as seat, charging station,
mud guards, top cases, rear view mirror, golf accessories etc. Some models (i.e. EU Models,
P1000 and G1000) offer certain accessories as standard features. Please contact your local
authorized dealer or visit our website for a complete list of optional equipment and
accessories, as well as current prices.
Before using any of the optional pieces of equipment and accessories, carefully read their
operation and safety instructions first.
4.9. Troubleshooting
•
Bikeboard does not work at all:
o
Check if the batteriy are fully charged (Push the button in the middle of the
LED Display and check if one red and 4 green LED are on.)
o
Check if the battery main switch is turned on.
•
Bikeboard is switched on but does not run:
o
Check if the brake light is on. If yes, then the electric switch may be
activated or is stuck in the "on" position on one of the brake levers. If the
switch continues to get stuck, please have the brake lever replaced.
•
Noise from the Brake Disc:
o
Check if the brake caliper is aligned correctly and the brake pads are not
worn out.
o
Check if the brake disc is bent.
•
Folding Stem does not work:
o
Center guide of folding stem might be bent (please refer to chapter 2.2
Unfold Folding Stem).
•
Display shows Error Code:
o
21 Abnormal current
o
22 Throttle fault
o
23 Motor phase problem
o
24 Motor Hall defect
o
25 Brake Failed
o
30 Abnormal Communication
Contact the Customer Service and tell the error number.
•
For further customer service and troubleshooting, please contact your authorized
Bikeboard dealer for assistance.
39
5. Inspection-Plan
Modell/
Color
max km/h
VIN-Nr:
Motor-S/N
Inspection
............................................
Handover acc.
Handover Protocol
............................................
First Inspection
after 200km,
latest after 8 Weeks
............................................
Main Inspection
every 2000km, latest
after one year
............................................
Battery 1:
............................................
Battery 2:
............................................
Stem:
............................................
Specials:
............................................
Page 40 of 44
Main Inspection
every 2000km, latest
after one year
Main Inspection
every 2000km, latest
after one year
Main Inspection
every 2000km, latest
after one year
Main Inspection
every 2000km, latest
after one year
Main Inspection
every 2000km, latest
after one year
Km
Date
Dealer Stamp
X
X
X
X
X
X
X
X
X
X
X
X
Main
Inspection
Frontbrake deactivates Motor, enough Braking force, Brake Pads ok
Parking brake (lock in on 2nd stop) blockes the E-Bikeboard
Rear brakes deactivates Motor, enough Braking force, Brake Pads ok
Batteries are stable locked in and the Battery strap is fixed stable
Throttle is easy to use and relase back without any resistance
Lightsystem including brake light is working and the front light horizon is set on 40cm
Horn is working
Grips and Switches are mounted and are fixed
All Quickreleases are tight (2xFrame, Folding Stem, Seat)
Tire Tread is still ok and the tire pressure is correct
Handlebar Steering works without resistance and don’t have play
Overall Condtion is ok
All Charger are working and every Battery can be charged >58V
The Batteries are working one by one and on both brakets separate
Charger Connector fits the battery / adapter is avialable if needed
All Cables are placed correctly
Display Setup is correct, actual Software Version is installed
All 5 PAS Levels incl. Reverse are working, Display shows Speed is correct
If both batteries are on same voltage: signifact difference when accelerate when compare one battery and two
batteries turned on.
Suspension is adjusted for the customer and works ok without play
Hydraulic-Brakes are not leaking
All screws on the Battery-Bracket including Lock are tight
First
Inspection
Before
riding
5.1 Service Plan
X
X
X
X
X
X
X
X
X
X
X
X
X
X
X
X
X
X
X
X
X
X
X
X
X
X
X
X
X
X
X
X
X
X
X
X
X
X
X
X
X
X
X
X
Page 42 of 44
Main
Inspection
All Screws of Brake Disc/Caliper/Brackets front/back are tight
Motor nut is tight with 65Nm, Rubber Protector are installed and glued.
Rear Wheel Screw is tight with 40Nm
Open Front Compartment, check all cable connections and install latest software
Open Rear Compartment and checkk all cable connections
Check all Tires carefully if there are any damages
Check for cracks at all Suspension and foling hinges
Check for cracks at the Stem
Check for cracks at all welding lines
First
Inspection
Before
riding
41
X
X
X
X
X
X
X
X
X
X
X
X
Text and photos:
e-Bikeboard AG
Printzstrasse 4
76139 Karlsruhe
[email protected]
www.e-bikeboard.com
Technical details with regards to information and figures in this user guide are subject to change.
43
Page 44 of 44