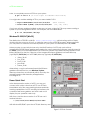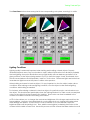
1
.
ACTS
ActivMEDIA Color Tracking Software
User Manual
Copyright © 2000, ActivMEDIA ROBOTICS, LLC.
All rights reserved.
Under international copyright laws, this document or any portion of it
may not be copied – or in any way duplicated – without the
expressed written consent of ActivMEDIA ROBOTICS.
ActivMEDIA ROBOTICS developers and users are authorized by revocable license to develop
and
operate custom software for personal research and educational use only.
Duplication, distribution, reverse-engineering, or commercial
application of ActivMEDIA ROBOTICS software or hardware
without the expressed written consent of
ActivMEDIA ROBOTICS is explicitly forbidden.
The various names and logos for products used in this manual are often
registered trademarks or trademarks of their respective companies.
Mention of any third-party hardware or software constitutes
neither an endorsement nor a recommendation.
ActivMEDIA ROBOTICS, LLC
44 Concord Street, Peterborough, NH 03458, USA •
http://www.ActivRobots.com
603-924-9100 • Fax 603-924-2184
ACTS User Manual version 2, August 2000.
ii
Contents
Page
WELCOME TO ACTS ....................................................................................................................................1
BASIC COMPONENTS ............................................................................................................................................... 1
USER SUPPLIED COMPONENTS .................................................................................................................................. 1
All distributions................................................................................................................................................... 1
Linux................................................................................................................................................................... 1
Windows 95/98/NT............................................................................................................................................. 1
OPTIONAL ACCESSORIES.......................................................................................................................................... 1
WHERE TO GET THE SOFTWARE ................................................................................................................................. 2
LINUX FRAME GRABBERS .......................................................................................................................................... 2
WINDOWS FRAME GRABBERS ................................................................................................................................... 2
SUPPORTING SOFTWARE ........................................................................................................................................... 2
ADDITIONAL RESOURCES .......................................................................................................................................... 3
ACTS Software................................................................................................................................................... 3
ACTS Newsgroup............................................................................................................................................... 3
Support .............................................................................................................................................................. 3
NEW TO VERSION 1.2 .............................................................................................................................................. 4
ACKNOWLEDGEMENTS ............................................................................................................................................. 4
INSTALLATION AND QUICK START ..............................................................................................................5
LINUX I NSTALLATION ................................................................................................................................................. 5
WINDOWS 95/98/NT (WIN32) ............................................................................................................................... 6
DEMO QUICK START ................................................................................................................................................ 6
LICENSED QUICK START ............................................................................................................................................ 7
Training Mode Live Video ................................................................................................................................. 7
Training Mode Static Image ............................................................................................................................. 7
Server-Only Mode ............................................................................................................................................. 7
Startup Options ................................................................................................................................................. 8
CONCEPTS AND TUTORIAL .........................................................................................................................9
HOW ACTS WORKS ................................................................................................................................................ 9
PERFORMANCE CONSIDERATIONS ............................................................................................................................ 9
TYPICAL OPERATION SEQUENCE ............................................................................................................................. 10
TUTORIAL ............................................................................................................................................................... 10
Step 1. Start Up ACTS for Training.....................................................................................................................10
Step 2. Load the Tutorial Picture......................................................................................................................11
Step 3. Select Channel and Number of Blobs Tracked ..................................................................................11
Step 4. Select Objects......................................................................................................................................11
Step 5. Remove Colors and Undo ...................................................................................................................12
Step 6. Change Training Views........................................................................................................................12
Step 7. View Blob Data ....................................................................................................................................13
Step 8. Save the Channel Data.......................................................................................................................13
Step 9. Create a Runtime Configuration.........................................................................................................13
Step 10. Quit EZ-Train and Restart in Server Mode ..........................................................................................14
TRAINING TOOLS AND TIPS ......................................................................................................................15
CHANNELS ............................................................................................................................................................ 15
ACTS TRAINING TOOLS ......................................................................................................................................... 15
MANUAL TRAINING MODE ..................................................................................................................................... 16
LIGHTING CONDITIONS........................................................................................................................................... 17
CHOOSING COLORS ............................................................................................................................................. 18
CAMERA EFFECTS .................................................................................................................................................. 18
iii
ACTS REFERENCE ......................................................................................................................................19
RUNTIME OPTIONS ................................................................................................................................................. 19
THE TRAINING WINDOW ......................................................................................................................................... 19
Training Window Modes...................................................................................................................................20
THE EZ-TRAIN CONSOLE ......................................................................................................................................... 20
Add...................................................................................................................................................................20
Remove ............................................................................................................................................................21
Draw .................................................................................................................................................................21
Erase .................................................................................................................................................................21
Pick ...................................................................................................................................................................21
CHANNEL SETTINGS ................................................................................................................................................ 21
Select Current Channel ...................................................................................................................................21
Number of Blobs Tracked ................................................................................................................................22
Channel Filename ...........................................................................................................................................22
TRAINING WINDOW COMMANDS ........................................................................................................................... 22
Continuous Frame Grab Mode .......................................................................................................................22
Single Frame Grab Mode ................................................................................................................................22
Image View Mode ...........................................................................................................................................22
Training Window Closed Mode .......................................................................................................................23
Undo.................................................................................................................................................................23
Magnification...................................................................................................................................................23
Brightness and Contrast ..................................................................................................................................23
Clear Training ...................................................................................................................................................23
FILE MENU ............................................................................................................................................................. 23
Load and Save Channel, and Save As...........................................................................................................24
Load Runtime Config.......................................................................................................................................24
Load Image......................................................................................................................................................24
Quit...................................................................................................................................................................24
SETTINGS MENU ..................................................................................................................................................... 24
View Mode.......................................................................................................................................................24
Brush Size ..........................................................................................................................................................24
Draw Color .......................................................................................................................................................24
Thresh Color......................................................................................................................................................24
I NFO MENU ........................................................................................................................................................... 25
Timing ...............................................................................................................................................................25
Blob Stats ..........................................................................................................................................................25
WINDOW MENU .................................................................................................................................................... 25
EZ-Train..............................................................................................................................................................25
RUNTIME CONFIG .................................................................................................................................................. 25
ACTS CLIENT-SERVER SOFTWARE..............................................................................................................27
CLIENT-SERVER COMMUNICATION.......................................................................................................................... 27
ACTS DATA PACKET ............................................................................................................................................. 27
Packet Header.................................................................................................................................................27
Blob Data .........................................................................................................................................................27
ACTS
WITH S APHIRA .............................................................................................................................................. 28
Robot Application............................................................................................................................................28
Saphira Plugin ..................................................................................................................................................28
INDEX........................................................................................................................................................31
WARRANTY & LIABILITIES ..........................................................................................................................32
iv
Welcome to ACTS
The ActivMEDIA Color Tracking System (ACTS) is software which, in combination with a color camera
and frame grabber hardware in a PC, lets your applications track up to 320 colored objects.
Developed by Paul Rybski, currently with the University of Minnesota, ACTS is very useful as a vision
sensor for robotics, and for object identification,
surveillance, and many other machine-vision
applications.
This manual describes how to install ACTS in your PC,
how to train and edit each of up to thirty-two discrete
color channels with the EZ-Train utility, how to use
ACTS with ActivMEDIA’s Mobile Robotics software as a
powerful vision sensor, and how to integrate ACTS with
your own applications.
Basic Components
ü ACTS User Manual
ü EZ-Train
ü ACTS blob-tracking servers
ü Supporting FLTK and OpenGL graphics and
GUI software libraries
ü Gnu and MSVC++ (version 6.x) sample C++
sources and makefiles
Figure 1. ACTS tracks up to 320
colored objects in up to 32
independent color
channels
User Supplied Components
All distributions
ü
ü
ü
ü
150 MHz Pentium or better PC system including mouse and min. 8-bit color display
32 MB RAM
8 MB free space on hard-disk drive
Color camera (NTSC or PAL)
Linux
ü Redhat Linux version 6.x
ü Matrox Meteor or Brooktree BT8xx frame grabber
ü Associated frame-grabber drivers
Windows 95-2000/NT
ü PXC200 frame grabber from Imagenation, Inc.
ü PXC200 driver software
Optional Accessories
ü
ü
ü
ü
C++ development tools
SRI International’s Saphira Robotics Application Development Environment
ActivMEDIA’s Ayllu Multiagent Robot Application Development Environment
Pan-Tilt-Zoom Robotic Color Camera
1
ACTS User Manual
Where to Get the Software
distributions, as well as free updates and upgrades, all are available from the
M
OBOTICS
http://robots.activmedia.com/ACTS
Versions and download instructions are detailed on the ACTS homepage. Contact
[email protected]
for full-distribution licensing details.
ACTS also lets you train its blob-tracking channels from static image files. That’s fine in some
situations; for demonstration purposes, for instance. But for most other situations, you’ll need a
frame grabber and supporting software to train and operate the ACTS servers.
Linux Frame Grabbers
For you RedHat Linux folks, there are several Brooktree BT848/868/878-based PCI-bus frame-grabber
cards available generally, as well as through ActivMEDIA ROBOTICS. For instance, the Intel Smart
Video III frame grabber works fine with ACTS for desktop PCs. The Imagenation PXC200 is the one
we recommend and support for use with the Pioneer Mobile Robot’s onboard PC.
Use the correct Linux driver and ACTS distribution.
There are special version of ACTS and Linux drivers for the
Imagenation PXC200 PC104+ card.
Linux drivers for the various BT8xx frame grabbers for Linux also are available from the ActivMEDIA
ROBOTICS support website. Installation and configuration instructions come with the software:
http://robots.activmedia.com/bt8xx
Windows Frame Grabbers
For Windows95/98/NT users, ACTS currently requires an Imagenation PXC200 or equivalent frame
grabber and the company’s supporting drivers. Purchase directly from the manufacturer
(http://www.imagenation.com) or through ActivMEDIA ROBOTICS. The required frame-grabber’s
support software for Windows come bundled with the hardware.
Supporting Software
For all versions, ACTS makes use of OpenGL (Mesa) version 3.0 graphics toolkit and the Fast Light
Tool Kit (FLTK version 1.0.9) from Easy Software for the graphical-user interface. The required libraries
come bundled with ACTS and are part of the installation process. Complete versions, including
sources and support utilities for these graphics/GUI toolkits, may be downloaded from their
manufacturer’s websites:
http://fltk.easysw.com/software.html
http://www.Mesa3d.org/download.html
You don’t need to download FLTK or MESA.
Their salient libraries are included with ACTS.
Additional Resources
Every new ACTS customer gets three additional and valuable resources:
ü A private account for downloading ACTS software, updates, and manuals
ü Access to the private vision-users newsgroups
ü Direct access to the ACTS technical support team
ACTS Software
We maintain a 24x7 Web server where customers can obtain ACTS software and supporting
materials:
http://robots.activmedia.com/ACTS
Access to complete distributions and upgrades of ACTS is restricted to licensed customers. To gain
access, enter the username and password that accompanied your original purchase of the
software. For Pioneer Mobile Robot customers, this may also be the same username and password
that you use to gain access to some, but not necessarily all, other areas of the website.
ACTS Newsgroup
We maintain an E-mail-based newsgroup through which ACTS and VisLib owners share ideas,
software, and questions about the software. To sign up, send an E-mail message to our automated
newsgroup server:
To: [email protected]
From: <your return e-mail address goes here>
Subject: <choose one command:>
help
(returns instructions)
lists
(returns list of newsgroups)
subscribe
unsubscribe
Our SmartList-based vision-users listserver will respond automatically. After you subscribe, send your
E-mail comments, suggestions, and questions intended for the worldwide community of Pioneer
users:
To: [email protected]
From: <your return e-mail address goes here>
Subject: <something of interest to all members>
Access to the vision-users newslist is limited to subscribers, so your address is safe from spam.
However, the list currently is unmoderated, so please confine your comments and inquiries to issues
concerning the operation and programming of ACTS and VisLib.
Support
Have a problem? Can’t find the answer in this or any of the accompanying manuals? Or, do you
know
a way that we might improve ACTS? Share your thoughts and questions directly with us:
[email protected]
3
ACTS User Manual
Your message goes directly to ActivMEDIA’s technical support team. There a staff member will help
you or point you to a place where you can find help.
Because this is a support option, not a general-interest newsgroup like vision-users, we reserve
the option to reply only to questions about problems with ACTS.
New to Version 1.2
ü Supports 32 channels. All clients must use the up-to-date TCP socket communications files
provided with the distribution. Clients compiled with the older files will not work with the
new version of ACTS.
ü A new Channel Save file format. Downward compatible with older versions (can still read
channel files that were saved by older versions).
ü New Visible EZ-Train window mode in which interesting pixels display in the colors that are
reported to ACTS while all other pixels are black.
ü On-the fly contrast and brightness controls for the frame grabber (currently Linux only).
ü Arbitrary image sizes.
ü Increased flexibility for manual training of channels with the addition of Fill Plane and Clear
Plane buttons.
Acknowledgements
Special thanks to Michael Trosen for his work on the Windows port and for managing the
distribution and support of the product.
4
Installation and Quick Start
Installation and Quick Start
ACTS currently works only with RedHat Linux- or Microsoft Win32-based PCs. Each version of ACTS
has its own peculiarities, which we detail in the following sections.
In common, you may train ACTS and perform a few simple tests without using a camera and frame
grabber. But for most work, you’ll need that hardware and its supporting driver software. Please,
install and test your frame grabber according to the instructions provided with the hardware and
the drivers. Most difficulties with ACTS derive from improperly installed or configured hardware.
Also in common, ACTS creates its own directory hierarchy (usr/local/ACTS/ or C:\ACTS\)
containing the acts(.exe) or acts-demo(.exe) program, accessory files, development resources
and source files, as well as a variety of support libraries and files. Read the enclosed REAME files for
more details. A file named Version contains additional version and update information.
ACTS looks best in 24-bit video mode. However, 8-bit and 16-bit video modes work fine. None of
the windows in ACTS are larger than 640x480 pixels, so even the most basic window configurations
(minimum 8-bits) should work.
Linux Installation
ACTS runs over RedHat Linux 6.x and requires the X-Window system while training (EZ-Train). The
training display may be exported across a network, so the machine running ACTS does not have to
be the display machine. Of course, the performance of ACTS across a network depends on the
speed of that network and will certainly be slower than when execution and display are on the
same machine.
READ CAREFULLY.
You do not need to install FLTK or Mesa.
ACTS comes with the required FLTK and Mesa OpenGL libraries compiled for RedHat 6.x. If you do
your own installation of these graphics and GUI software, please make sure to install the Mesa ones
before FLTK. And after unpacking the distribution, configure the makefile with:
% ./configure --enable-shared --prefix=[wherever Mesa was installed]
Otherwise follow the instructions for installation of these two library packages included with the
distributions. They should compile directly out of the box. Finally, don't forget to set the
environment variable LD_LIBRARY_PATH to include the directory of the Mesa and FLTK libraries.
Once ACTS can find all of the libraries, it will be able to run.
The demo and full-distribution versions of ACTS for Linux come as rpm archives, and they come in
two flavors: one for common BT8xx-based frame grabbers and one for the Imagenation PXC200
frame grabber. The default location for all their components is /usr/local and /usr/lib. If you locate
ACTS elsewhere, or place its supporting libraries at a different location, you’ll need to redirect
various symlinks and makefile pointers.
To install ACTS in the default location, you’ll need to be root. Copy or download the rpm file to
/tmp (assuming you have the proper permissions), and then:
# cd /tmp
# rpm -Uhv acts-1.2.i386.rpm (common BT8xx)
# rpm -Uhv acts-1.2pxc.i386.rpm (Imagenation PXC200 only)
5
ACTS User Manual
Later, to completely remove ACTS from your system:
# rpm -e acts-1.2 (or acts-1.2pxc for PXC200 installation)
You might also consider adding ACTS to your executables’ PATH:
% export PATH=$PATH:/usr/local/acts/bin
(bash version)
% setenv PATH ${PATH}:/usr/local/acts/bin
(sh, csh, tcsh)
If you have a frame grabber installed, make sure you have a /dev/fg0. This may mean creating a
symlink to your frame-grabber device. For example, with the BT848 drivers:
# ln –sf /dev/bt848 /dev/fg0
Windows95-2000/NT (Win32)
The distribution ACTS.EXE is a WinZip (http://www.winzip.com) self-extracting archive. Simply
double-click the mouse on its icon, or otherwise execute the ACTS.EXE program. When prompted,
you may select to install the software anywhere on your system. The default path is C:\ ACTS.
Unless you plan to use static pictures only, the Win32 version of ACTS only works with an
Imagenation PXC200 frame grabber and requires the card’s supporting software, typically stored in
C:\PXC2. Once you have expanded the ACTS archive, please copy these following dynamic-load
library (dll) files from the bin\ directory of the Imagenation frame-grabber’s software directory
(typically C:\PXC2\bin) into ACTS’ bin\ directory (typically C:\ACTS\bin):
ü
ü
ü
ü
ü
Video_32.dll
Pxc_95.dll
Pxc2_95.dll
pxcdd.dll
Frame_32.dll
Alternatively, copy the aforementioned Win32 framegrabber software files into your Windows\System
directory where they automatically will be found by the
operating system and shared by all applications,
including ACTS.
Demo Quick Start
In the demonstration version of ACTS, you may not
connect with a client other than ACTS’ own EZ-Train.
Nonetheless, all of the many training features and blobtracking capabilities of ACTS, including its interface with
a camera and frame grabber, are intact and on full
display for your operation and study.
With Linux, start the demo version of ACTS from an Xterminal window:
% /usr/local/acts-demo/bin/acts-demo
With Windows95/98/NT, open the ACTS\bin directory and
Figure 2. EZ-Train Console
6
Installation and Quick Start
double-click acts-demo(.exe) with the mouse or from the Start menu Run… item’s dialog, type
C:\ACTS-demo\bin\acts and click the OK button.
With all demonstration versions, ACTS opens two windows: The EZ-Train console and an associated
graphics window containing purchasing information. A third window containing DOS-like text also
appears with the Windows versions.
Pull-down the EZ-Train File menu and choose Load Image. From the resulting dialog, select your
own or the prepared bin/test.ppm image. Alternatively, click the Live Video button on the EZ-Train
console to activate your frame grabber.
Licensed Quick Start
The licensed versions of ACTS start up a bit differently than their demo cousins.
Training Mode Live Video
When executed without command line arguments—double-clicking the acts.exe icon, for
instance—ACTS starts in EZ-Train Live Video mode, wherein the EZ-Train console window appears
along with another window containing live video frame grabs from your camera. If the frame
grabber is not working, a promotional image will appear in the video window with an error
message to that effect.
Training Mode Static Image
If you don’t have the frame grabber
installed or camera attached, you may
also start ACTS so that a static picture of
your choice appears in the image
window associated with the EZ-Train
console. You then operate EZ-Train as
you would on a Live Video image.
With Linux, start ACTS from an X-windows
terminal and with a command
Figure 3. Starting Win32 ACTS with a static image
argument that identifies the image you
wish to load. For example, to start the
licensed version of ACTS with the test.ppm static image supplied with the distribution, from within
/usr/ACTS/bin:
% ./acts –f test.ppm
With Windows95/98/NT systems, run the licensed version of ACTS from the Start menu Run… item, as
shown in Figure 3.
Server-Only Mode
With Linux, you may start the licensed version of ACTS in server-only mode. This way, ACTS’s servers
operate most efficiently in the background for connection with your client applications.
Server-only mode requires that you already have prepared and saved your color lookup tables in
an ACTS configuration file. So, for example, to start the ACTS servers in the background using the
sample configuration we’ve prepared for you in the distribution:
% ./acts –t ../actsconfig
7
ACTS User Manual
Startup Options
ACTS comes with a variety of startup options to address various operating environments. Use the
command line arguments given in
Table 1 from an X-terminal with Linux, or from the Start menu’s Run… item under Win32.
Table 1. ACTS Start Up Options
8
Option
(none)
Argument
(none)
-h
-f
none
imagefile
-c
-t
configfile
configfile
-p
-d
-C
-B
-W
portnum
device
contrast
brightness
width
-H
height
Meaning
Native, EZ-Train client mode with no channels or configuration
defined. Training image window will contain live frame-grabber
video, if available, or tutorial static image.
Display a summary of the command-line arguments.
Load an image for EZ-Train instead of starting with live video
from a frame grabber. Pathname is the path and the filename;
bin\test.ppm, for example.
Load a color-blob lookup table configuration set and run ACTS.
Start up ACTS servers only and use the specified configuration
set.
Specify the client-connection TCP port. Default is 5001.
Specify the frame grabber’s device name. Default is /dev/fg0.
Set the contrast of the image captured by the frame grabber.
Set the brightness of the image captured by the frame grabber.
Set the minimum width of the image captured by the
framegrabber. The default width is 160.
Set the minimum height of the image captured by the
framegrabber. The default height is 120.
Concepts and Tutorial
Concepts and Tutorial
ACTS is state-of-the-art, client-server software. Its servers process frames of video information to
identify and track colored objects (blobs) and share that extracted information with clients. The
integrated ACTS EZ-Train client software lets you train ACTS to find the colored objects you want
the servers to track.
How ACTS Works
ACTS needs specialized hardware in your PC—a color camera and frame grabber—to take digital
snapshots (frames) for ACTS to process. Once that video data gets captured, ACTS servers take
over and perform an operation known as color segmentation by sorting the color-encoded digital
elements of the frame—pixels—into two groups, interesting and uninteresting. Interesting pixels
match the red, green, and blue (RGB) elemental color components of those stored in any one of
up to thirty two different color look-up tables that you create when you “train” the system with the
EZ-Train client. Disinteresting pixels, of course, don’t match any of the RGB colors in any of the
tables.
Once identified, interesting pixels are grouped into blobs—identically colored regions of adjacent
pixels at least ten pixels wide. (Blobs smaller than ten pixels are usually noise and thereby ignored.)
The ACTS servers characterize each blob according to its matching channel, position in the video
frame, size, and dimensions, and finally communicate that information to clients, such as EZ-Train or
the Saphira and Ayllu robotics-application clients we include with ACTS.
It’s up to the client to decide what it will do with the blob-tracking information, of course. A Saphira
or Ayllu client might also be controlling a mobile robot, for example, and thereby use the blob
information to guide the machine towards a moving colored target. Your own client application
might count and sort parts passing by on a conveyor belt according to their ACTS-extracted color
and size.
Performance Considerations
ACTS currently can simultaneously track up to 320 independent blobs at the frame grabber’s
maximum rate of 30 frames per second (ten blobs in each of thirty two independent color
channels). We’ve done this repeatedly with a variety of objects and environments.
ACT’s performance—its ability to find and track blobs, of course, depends on a variety of factors,
including computing resources (RAM, processor speed, quality frame grabber, and so forth),
environmental variables, such as variance in luminance (lighting and shading), subtle color
variations among similar objects, background colors, and many other real-world complications.
The one most important factor in ACTS’ performance, however, is how well you train the system for
the colored objects you wish to track. There is no magic training formula. To a great degree,
training ACTS is an art. Experience is invaluable. (Using odd colored things helps a lot, too.) Having
fast and easy-to-use training tools, as provided by EZ-Train, makes a big, big difference, too. We
give you a number of clues on how to optimize training in the forthcoming Tutorial.
9
ACTS User Manual
Typical Operation Sequence
1. Set up system and camera to view objects for tracking in the tracking environment
2. Start up ACTS in EZ-Train Live Video mode (simple invocation of the acts executable with no
command line arguments)
3. Select one of thirty-two channels to train in the EZ-Train console.
4. Load or create a new Look Up Table (.LUT) for that channel.
5. Use the EZ-Train toolset to select colored objects to track.
6. If possible, reposition objects within environment and add/remove colors from the training
channel.
7. Refine color selections with Manual Training mode.
8. Save the channel LUT.
9. Repeat steps 3 through 8 for each different type of object for tracking.
10. Prepare a runtime configuration file containing the saved LUT filenames.
11. Shut down EZ-Train and ACTS.
12. Restart ACTS in server mode (Linux only; see Table 2-1 for start up options) and connect blobtracking information with application clients, such as a mobile robot controlled with Saphira or
Ayllu.
Tutorial
This 10-step tutorial takes first-time users through a step-by-step training sequence we commonly
use to prepare ACTS for tracking colored objects. We presume that you have at least browsed the
preceding chapters of this manual and have installed the software in the default directories on
your Linux- or Windows95/98/NT-based PC. Since we’ve
used a common GUI, operation of the Linux and Win32
versions of ACTS is virtually identical. We’ll mention the
minor differences as we go along.
Having a frame grabber and camera connected is
good, although not required to perform most of this
tutorial. Demo users are forewarned that they won’t be
able connect with a client other than EZ-Train, but you
may use a camera and frame grabber throughout and
there is still a lot to see and learn besides.
Step 1. Start Up ACTS for Training
Start up ACTS in its native mode, which is connected to
the EZ-Train client, with Live Video (if available), and with
the default (none) configuration and LUT files. Simply
(see Chapter 2 for details):
Linux
% cd /usr/local/ACTS/bin
% ./acts
Win32
Double-click acts(.exe) icon in C:\ACTS\bin directory,
or use the Start menu Run… item’s dialog, type in
C:\ACTS\bin\acts and click the OK button.
Figure 4. The EZ-Train console
10
Concepts and Tutorial
Once ACTS starts up, it will open and display two or three windows: The EZ-Train console and
another EZ-Train window containing an image. A third window, one opened by Windows or the
original X-terminal with Linux, contains system messages that you may ignore. Minimize it.
Step 2. Load the Tutorial Picture
Rather than fuss with your frame grabber and the myriad of real
objects and environments that complicate color training, let’s
start with a nearly ideal collection of colored objects and a
clean environment found in the sample static image we provide
with the software.
For the purposes of this demo, please load the tutorial static
image by pulling down the File menu of the EZ-Train console to
the Load Image item, and select test.ppm from the dialog.
The demonstration version of ACTS opens with a promotional
Figure 5. Sample EZ-Train
message in the Training Window. Please contact
static image
[email protected] to order a licensed, full-featured
version of ACTS. Load the Tutorial training image from the EZ-Train Console.
The Training Window starts up at a resolution of 160 horizontal by 120 vertical pixels. Use the
Magnification section of the EZ-Train console to increase the image size by up to six times.
Step 3. Select Channel and Number of Blobs Tracked
In the image, there is a red book and a red teacup. Later in this tutorial, we describe how to track
these two objects. First, select to train Channel 1 by clicking its corresponding button on the EZTrain console. And, since there are only two objects that we plan to track, click the arrows on the
Number of Blobs Tracked on the EZ-Train Console until the number is 2.
Step 4. Select Objects
Click the Add button
on the EZ-Train console to start
adding colors to your tracking channel.
In the Training Window, click and hold the mouse button and
drag it to create a rectangle inside the red book. Change the
shape of this rectangle to select as many of the pixels inside of
the book as possible. Be careful not to select any pixels outside
of the book.
Figure 6. Add-tool rectangle
selects training colors
Release the mouse and the pixels under the red box automatically get added to the colors of the
current channel. The Training Window is in Overlay mode, so that the blobs found by EZ-Train get
highlighted in the image.
Resize the image to make it easier to select individual pixels.
11
ACTS User Manual
Step 5. Remove Colors and Undo
Similar to the Add tool, click and operate the Remove tool
to select areas of colors you do not
want included in the channel. As you remove colors, previously highlighted blobs also should
disappear. Resize the image to work more closely with the color.
Throughout, you may also click the Undo button on the EZ-Train
console to reverse the last training operation that modified the
channel’s data. Click the Clear Training button to completely
erase the channel data and start over training from scratch.
Step 6. Change Training Views
Overlay mode in the Training Window can be confusing. Click
the right mouse button inside the Training Window or press
the”2” key while the mouse pointer is inside the Training Window,
giving you an ACTS-eye view of blobs, called Thresh mode. The
program displays the interesting pixels—colors appearing in the
current channel—in white and all others in black. Blobs—
contiguous regions of interesting pixels—get highlighted by a
purple square. The center point of each blob is a single purple
pixel.
Figure 7. Extracted blobs overlay
the Training Window
Return to Overlay mode by right-clicking inside of the
Training Window three times or by pressing the “1” key while
the mouse is inside the Training Window.
Figure 8. ACTS-eye Thresh view
of interesting pixels
Figure 9. Refine the training to
track the entire object
Notice, by comparing the sample Thresh image with the original picture in this manual that we
have not captured all of the pixels that make up the book or the cup. Go in and Add more pixels
to better define the objects as blobs, as we have done to create Figure 9.
12
Concepts and Tutorial
Step 7. View Blob Data
Viewing the blobs in our sample Figure 8, notice that
ACTS is tracking only the book and the cup, even
though two other, smaller objects also contain
interesting pixels. This is due to two factors.
First, ACTS only tracks your selected number of blobs;
two in this tutorial, as you had set in Step 4—from the
largest to the smallest objects in the image (size
chosen by area in pixels).
Second, very small blobs of pixels (less than 10 pixels
across) will be completely ignored by ACTS as they
are usually indicative of noise.
Select the Blob Stats option from the Info menu of the
EZ-Train console. The output field at the bottom of the
console displays the statistics of the currently tracked
blobs, including area ‘a’, center of mass coordinates
‘x’ and ‘y’, and the row and columns of the bounding
box surrounding the blob.
Figure 10. Blob statistics appear in the
console output window.
Step 8. Save the Channel Data
Once you are satisfied with the training in a
particular channel, save its color lookup table (LUT)
to a disk-based file for later use. Notice the default
filename, channel1.lut, in the EZ-Train console.
Retyping that name does not save the data.
Rather, select the Save Channel item from the File
menu in the EZ-Console to actually save the LUT file.
Use Save Channel As… to select a different directory
or change the name and click the OK button to save
the channel.
Figure 11. Saving a runtime configuration
Step 9. Create a Runtime Configuration
Runtime configurations in ACTS are saved collections of channels and operating parameters.
Commonly used to define the operating environment for ACTS in the service of an application
client, such as in server mode, an ACTS runtime configuration also may be loaded for editing with
the EZ-Train client.
13
ACTS User Manual
In this tutorial, you’ve defined and edited one channel (channel1.lut) and set its blob-tracking
number. Now, save that set up as a runtime configuration file. Select Save Runtime Config from the
File menu in the EZ-Train console.
In the dialog, choose your destination directory and perhaps change the filename, then click the
OK button to save the configuration.
Note: Saving a runtime config file will not save the individual channel files. These need to be
saved separately in addition to the acts config file.
Step 10. Quit EZ-Train and Restart in Server Mode
Select Quit from the File menu or press the ESC
key to quit ACTS. Now restart ACTS with that
saved configuration (we named it actsconfig
and used the test.ppm static image for training).
From an X-terminal window in Linux,
% cd /usr/local/acts
% ./acts –f docs/test.ppm –c actsconfig
With Windows95/98/NT, start ACTS from the
Run… item in the Start menu.
Figure 12. Start up ACTS with a configuration file
and static image
In both cases, ACTS should start up and continue where you left off in Step 9. The image of the
book and the cup should be visible with the blue Thresh overlay. The tracked blobs should have
the same statistics, as well.
14
Training Tools and Tips
Training Tools and Tips
Training a color channel to accurately track objects over in a variety of environments is a skill that
takes a bit of practice to master. The tutorial does not do justice to the difficulties attributed to
tracking live video.
There are a number of factors which can greatly influence the tracking quality of a channel. ACTS
contains several tools, including a manual training mode as well as the EZ-Train client, that help you
define and refine the colors that ACTS will use to distinguish colored objects.
Channels
The digital elements—pixels—that make up a grabbed video typically are 24-bit values, three times
eight bits for each of the red, green, and blue components that make up each pixel. ACTS
classifies each pixel by comparing its RGB components against a lookup table stored inside of
each of the thirty two color channels. If a pixel’s components are found there, it is classified as
interesting by the channel and tracked. Pixels that are not indexed in the color channel are
ignored.
Storing all of the possible color combinations for a 160x120, 24-bit image would require nearly 17
million distinct index locations. That’s per channel; multiply by thirty two to account for all the
channels ACTS supports. Besides hogging memory, initializing and iterating through this much data
would overtax even the fastest processors.
Instead, we use a scheme which involves projecting the pixel’s data onto a set of three color
planes. Rather than have an RGB cube store the data, three color planes, a Red/Green (RG)
plane, a Blue/Green (BG) plane and a Red/Blue (RB) plane, are used instead To be classified as
interesting, pixels from the image must have their red and green components located in the RG
plane, their blue and green components located in the BG plane and their red and blue
components located in the RB plane.
ACTS Training Tools
Add
Remove
Draw
Erase
Pick
The most-common and quickest way to add colors to an ACTS channel is with the mouse-driven
Add tool. It’s the default active tool when you start up ACTS with EZ-Train.
As described in the tutorial, clicking and drag this tool in the Training Window to draw a
rectangular overlay in the image, inside which delimits the set of pixels that will be added to the
channel.
However, simply adding pixel values to the channel generally is not enough to robustly track a
colored object. In addition to the single pixel value, a set of additional pixel values which neighbor
that value are also added to the color channel. Thus, each of the three color planes receives a
square of color consisting of multiple pixels to be added to its table. This redundancy helps to
make a much more robust color training by making sure that the regions added to the color
channels are more or less contiguous. This helps compensate for variable lighting conditions and
other environmental noise.
15
ACTS User Manual
The Remove tool erases pixel values from the channel. Use it just like the Add tool, except its
selected color contents get removed from the channel. The pixels removed from the channel are
not only the selected pixel but also several neighboring pixel values. Thus, trying to remove a few
peripheral pixels from the channel (like those unintended pixels that were selected in the tutorial
example) may actually remove pixels from seemingly unrelated colors.
The Draw tool lets you point and click to select Training Window regions to add to the channel. By
default, Draw adds a single pixel to the channel each time you click the mouse. Change the size
of this tool with the Brush Size settings in the EZ-Train Settings menu from a single pixel up to a 27pixel square.
The Erase tool, like the Draw tool, selects discrete spots in the Training Window image, but it
removes the colors from the channel. Its size also is set by the Brush Size item in the EZ-Train Settings
menu.
Finally, use the Pick tool to click a single pixel in the Training Window and have its RGB values
printed in the Output text window at the bottom of the EZ-Train console. Pick is a valuable
diagnostic tool to see how a particular pixel’s value may change with changing environments,
such as through a moving shadow .
Manual Training Mode
You will find on occasion that the EZ-Train toolset just isn’t precise enough for stubborn objects. The
Manual Train control panel lets you more-finely tweak various settings for the currently selected
channel. Choose it from the Settings menu in the EZ-Train console. If you change to another
channel, the settings in the Manual Train console automatically change too.
Each color plane that comprise the ACTS color channel has four associated adjusters and three
buttons entitled Reset Limits, Fill Plane, and Clear Plane. Modify the various limits to trim a plane’s
included selection of values.
These parameters—two color levels and two brightness levels—define what color pixels are
allowed in the channel. Initially, no limits are set, meaning that all parameters are set to their
maximum (or minimum) values and all pixel colors are allowed.
The two color threshold adjusters for each plane change the amount of that particular color that is
allowed in that plane. For instance, changing the Red adjuster in the Red/Green plane will add or
reduce the amount of red pixels that are allowed into that plane. This reduction is shown by the
white pixels of the plane being replaced by black pixels.
Any colors that happen to be in this plane when these parameters are changed are turned to
black and are no longer tracked. To restore them, either change the appropriate adjuster to
reveal the color again or hit the Reset Limits button. The color limit adjusters will remove pixels
starting from a clockwise and counterclockwise direction (try it to see). The High Bright adjuster
changes how much of the “lighter” valued pixels (closer to white) are classified as interesting. This
limits and removes pixels from the upper right part of the plane. The Low Bright adjuster changes
how much of the “darker” valued pixels (closer to black) are classified as interesting. This limits and
removes pixels from the lower left of the plane.
The Fill Plane button turns every pixel in the corresponding color plane on. If each plane is filled in
this fashion, the ACTS has classified every pixel as interesting and the EZ-Train window should be
completely highlighted. ACTS could be trained by filling each color plane and then adjusting the
limits on the planes to subtract what is not wanted. This is a different approach from the additive
mechanism used in the EZ-Train window but may be more useful in some circumstances.
16
Training Tools and Tips
The Clear Plane button clears every pixel in the corresponding color plane, reverting it to white.
Lighting Conditions
Lighting quality is extremely important when training and tracking colored objects. Properly
illuminated objects are so very much easier to track! Indirect illumination from all sides is probably
the best lighting, since point illumination sources (light bulbs) will cast shadows and reflect off of
glossy surfaces on the objects being tracked. Try not to have the target “back” illuminated, since
this will cause shadows and will probably “wash out” their colors. Fluorescent lights are better than
incandescent lights because they have a whiter color spectrum.
When training a channel to track an object, it is very important to view the object under various
conditions. After training under one lighting condition, view the object under another lighting
conditions. Add training as needed.
For instance, after training a channel to track an object of a particular color, cast a shadow over
the object. This should reveal, particularly when the Training Window is in Thresh mode, several pixel
colors on the object that the channel is not tracking. Those colors can then be added to the
channel to make the overall color training more robust.
ACTS for Linux allows you to change the contrast and brightness of the images captured from the
frame grabber. However, the trained pixels in a color channel do not change their values when
these settings are altered. A useful trick is to train a channel on a color and then adjust the
brightness slider until the training is lost. Then, add the new brighter (or darker) pixel colors to the
channel with the Add or Draw tools. Iterate this process until the channel has been trained over all
17
ACTS User Manual
possible lighting conditions. This will help make your color training less affected by changes in
lighting and shadows around the object.
Choosing Colors
High-saturation colors, such as neon, are excellent for tracking, because they are distinct. And try
to choose colored objects that stand out from their background. For instance, track a bright
orange object on a forest-green carpet, but not a bright green object against a dark green
background.
If the lighting conditions change or if the object moves further away from the camera, the amount
of light seen by the camera reflecting off the object diminishes. The differences between a light
color and a darker version of the same color will become hard to see.
If at all possible, also try and choose objects that are matte instead of glossy. Glossy objects reflect
colors from the objects around them in the worst case and will nearly always reflect the light
sources. In the latter case, the object in question will appear to have large white spots on it,
making color tracking useless on those parts of the object.
Camera Effects
What may be good for home videos, may actually interfere with ACTS. For instance, some
cameras have an automatic white-balancing feature, in which the camera changes the color
values of the image pixels relative to its neighbors to produce a clearer picture.
But remember, we are tracking colors, not edges. Since different lighting conditions have different
colors in their spectra (the sun versus fluorescent lights), auto-white balancing will assuredly
produce very different pixel colors for the same object. This also means that if the object that the
camera is tracking gets very close to the lens (and thus appears to be very large in the image), the
colors of the other objects in the image will start to vary as the camera attempts to “balance” the
color values.
Turn off auto white-balancing, if you can.
18
ACTS Client-Server Interface
ACTS Reference
This section describes all of the controls and modes of ACTS and the EZ-Train client.
Runtime Options
ACTS comes with a variety of startup options to address various operating environments. Use the
command line arguments given in Table 2 from an X-terminal with Linux, or from the Start menu’s
Run… item under Win32.
Table 2. ACTS runtime options
Option
(none)
Argument
(none)
-h
-f
none
imagefile
-c
-t
-s
-d
configfile
configfile
portnum
device
-C
contrast
-B
brightness
-W
width
-H
height
Meaning
Native, EZ-Train client mode with no channels or configuration
defined. Training image window will contain live frame-grabber
video, if available, or tutorial static image.
Display a summary of the command-line arguments.
Load an image for EZ-Train instead of starting with live video from a
frame grabber. Pathname is the path and the filename;
C:\ACTS\bin\test.ppm, for example.
Load a color-blob lookup table configuration set and run ACTS.
Start up ACTS servers only and use the specified configuration set.
Specify the client-connection TCP port. Default is 5001.
Specify the frame grabber’s device name. Default is /dev/fg0. Linux
only. (Win32 systems automatically choose the first available frame
grabber.)
Set the image contrast from the frame grabber. Default is 100. Linux
only
Set the image brightness from the frame grabber. Default is 20. Linux
only.
Set the minimum width of the image captured by the framegrabber.
The default width is 160.
Set the minimum height of the image captured by the
framegrabber. The default height is 120.
All windows in ACTS may be closed by either pressing the ESC key while the mouse is positioned
over the window, or by selecting the close button from the window manager.
The Training Window
The Training Window contains either live video from a frame grabber
or a static image file, as well as ACTS-generated overlays and displays
of the selected channel colors and extracted blobs. Use it to watch
ACTS work and to train its color lookup tables from EZ-Train and
Manual Training mode.
The middle button when the mouse is in the Training Window acts like
the Grab Frame button in the EZ-Train console: When grabbing live
video, it changes the view from a still snapshot to continuous grab
Figure 14. ACTS Training
Window
19
ACTS User Manual
and back again.
Click the right mouse button in the Training Window or press an associated hot-key to cycle
between modes: Overlay, Thresh-, Raw , Visible. The active mode, if not already apparent in the
image, also appears in the window’s title.
Training Window Modes
In Overlay mode, the Training Window shows the raw pixel data as it appears to the framegrabber
or as it appears in the loaded image file. All pixels that ACTS finds interesting are colored either
blue, green, or red, depending on your Thresh Color selection from the EZ-Train Settings menu
(default overlay color is blue).
Hotkey = '1'
Thresh mode displays all interesting pixels as white and all uninteresting pixels as black. The logical
blob groupings appear as purple rectangles bound the interesting regions. The center of mass for
each blob is shown by a single purple pixel inside of each rectangle. Number of Blobs Tracked in
the EZ-Train console limits the number of rectangles displayed.
Hotkey = '2'
View the unencumbered image in Raw mode if overlays get distracting.
Hotkey = '3'
Visible mode is like Raw mode, but displays all interesting pixels as their natural colors instead of
white. No rectangle for the blobs is displayed.
Hotkey = ‘4’
The EZ-Train Console
The EZ-Train console is where you manage the color
training process.
The Training Tools section of the EZ-Train console lets
you choose a mouse-operated training function for
the Training Window, including adding and removing
individual or whole regions of pixels from the currently
active channel, and sampling RGB values.
Activate a particular tool by clicking its icon on the
EZ-Train console, or by pressing a hot-key while the
cursor is in the Training Window. The mouse pointer
changes to the tool’s icon when it is over the Training
Window.
Add
The Add tool lets you define a rectangular region of
pixels in the Training Window by clicking and
dragging the mouse. Pixels within the so-defined
rectangle get added to the channel.
Hotkey = 'a'
20
Figure 15. The EZ-Train Console
ACTS Client-Server Interface
Remove
Like Add, the Remove tool lets you define a rectangular region of pixels with the mouse in the
Training Window. Removed pixels within the rectangle get removed from the channel.
Hotkey = 'r'
Draw
The Draw tool lets you click Brush Size squares of pixels in the Training Window and thereby add
them to the channel. Holding the pointer in the window displays the full-sized brush.
Hotkey = ‘d’
Erase
The Erase tool works the same as Draw, except the tool removes brush-sized segments from the
channel.
Hotkey = ‘e’
Pick
When the Pick tool is selected from the EZ-Train console, clicking in the Training Window causes the
corresponding RGB color values for the selected pixel to be printed in the Output text window of
the EZ-Train console.
Hotkey = ‘p’
Channel Settings
Several tools and dialogs of the EZ-Train console enable you to set the number of parameters for
each of up to thirty two color-tracking channels of ACTS.
Select Current Channel
This radio-button section of the EZ-Train console is perhaps the most important since most other
features of the console refer to this setting to alter a channel’s data. Click on the buttons labeled
1-8, 9-16, 17-24, or 25-32 to select a different bank of eight channels. Clicking on the various
square buttons will set ACTS to that new channel.
When changed, ACTS automatically switches to the working parameters of the selected channel,
including Number of Blobs Tracked (next section), color information in the channel, and so on.
These may or may not be the same as for other channels, or even for the filename-stored version of
the channel if you have altered the channel information in the current session.
When you select a different channel, the raw image in the Training Window won’t change, but
because the color-tracking parameters may (probably) change, blobs indicated in the window’s
overlay and thresh modes will change.
21
ACTS User Manual
Number of Blobs Tracked
Use the Number of Blobs Tracked thumb-dial tool to set the number of colored objects you want to
track in a the current channel. Click the arrow to the left of the number to decrease the value
(minimum one); click the right arrow to increase the value to a maximum of ten. ACTS will report to
the client information about a maximum of that number of the largest blob it detects from the
current image frame. The default Number of Blobs Tracked is three.
Channel Filename
Enter a pathname into the Channel Filename textbox to give the channel data a saved-file
destination on disk. This will be the filename ACTS uses when you simply Save the channel from the
File menu.
Alternatively, enter a pathname and press the ENTER key to load a saved channel’s data into the
current channel—if the file exists. Click the ellipsis (“…”) button to activate a file-selection dialog,
which contents get loaded into the current channel.
Training Window Commands
The set of controls in the Training Window Commands section of the EZ-Train console manage
various parameters of the Training Window.
Continuous Frame Grab Mode
The licensed version of ACTS normally starts up in continuous frame-grab mode, unless you don’t
have a frame grabber running in which case a default image appears in the Training Window. In
continuous frame-grab mode, ACTS works as quickly as it can to have the frame grabber grab a
frame, then process and display that image from the Training Window. The quickest ACTS can grab
frames is 30 per second. When the Continuous radio button is selected, the Grab Frame button is
grayed out.
Single Frame Grab Mode
Click the Single Frame radio button to stop continuously grabbing frames and display the last
grabbed image. Click the Grab Frame button to take a new snapshot.
Hotkey = ‘g’ , besides switching to single frame mode, also grabs a new frame for the Training
Window.
Image View Mode
If you’ve loaded a static image from a file into the Training Window, switch to frame-grabbing
mode by clicking the Live Video button. Selecting this button will command ACTS to display
images from the framegrabber again.
22
ACTS Client-Server Interface
Training Window Closed Mode
Close the Training Window by clicking its close-window button in the upper corner of the window in
order to test the optimal timing and performance of ACTS’ color tracking while training. In the
absence of an image, the Training Window Commands frames-related button becomes Show EZTrain. Click it to re-open the Training Window.
Undo
Click the Undo button to cancel the last training operation done on a channel. Each channel has
its own separate undo buffer, so you may come back and reverse a change in one channel even
though you may have modified several settings in another channel.
Magnification
Shrink or grow the size of the Training Window by clicking the left (shrink) or right (grow) arrows in
the Magnification tool of the Training Window Command set in the EZ-Train console. The minimum
magnification is 1x and the maximum is 6x.
Hotkeys = '-' and '+'
Brightness and Contrast
The Brightness and Contrast sliders adjust the brightness and contrast of the images captured by
the frame grabber. These have no affect on a static image.
Clear Training
Remove all the color values from the current channel with a single, swift click on the Clear Training
button. A dialog will pop up making you willfully erase the channel because, frankly, there is no
salvation with Undo here.
File Menu
The File pull-down menu of the main
menubar along the top of the EZ-Train
console is where you load and save the
various files relevant to ACTS’ channels,
configuration sets, and the static images for
training. Operate the File menu, as well as all
other menus along the main menubar of the
EZ-Train console, as you do for most other
GUI applications: Click and hold the mouse
on the menu item name, then drag to the
pulldown item of choice that appears.
Figure 16. Common File menu file-selection
dialog
23
ACTS User Manual
Release the mouse button to select that highlighted item of choice, or move off the pulldown
menu and release the mouse button to cancel the operation.
The various items of the File menu share a common dialog (Figure 16) .
Load and Save Channel, and Save As
When selected, the Load and Save Channel, and Save As items of the File menu activate a
common file-selection dialog for loading or saving, respectively, the current channel’s data file on
disk. The filename, which you may change in the dialog’s textbox, initially is the one that you may
have entered in the Channel Filename textbox on the EZ-Train console.
Load Runtime Config
Use the file-selection dialog activated by this item to load a runtime configuration set of channels
into ACTS.
Load Image
Load Image lets you select a .ppm file to load into the Training Window. This is useful for
computers that do not have frame grabbers or if you simply want to demonstrate ACTS without the
headaches of hardware. ACTS can load .ppm files of any size, as long as they are saved in 24-bit
color, and will resize them to fit the current window size.
Quit
This is the graceful way to quite ACTS. You are prompted to verify the quit, giving you the chance,
without explicitly exhorting you, to save any unsaved channels, so be sure to save everything
before quitting! ACTS also may be quit by hitting the 'ESC' key or by closing the window through
the window manager .
Settings Menu
The Settings menu on the main menubar of the EZ-Train console consists of a series of hierarchical
menus and items that control various parameters of how ACTS operates on the Training Window.
View Mode
The View Mode items of this menu select the appearance of channel data in the Training Window,
including Overlay, Thresh, Raw, and Visible. See the discussions about the Training Window for
details.
Brush Size
Brush Size lets you select from one pixel to a 9x9 square of pixels for the Draw and Erase tools.
Draw Color
By default, all of the Training Tools use a red rectangle in the Training Window to delimit their areas
of influence. This can be bothersome when trying to train on red objects. Hence, with this Settings
menu, you may change the Draw Color to blue or green for better visibility, and back to red.
Thresh Color
In Overlay mode, the "interesting" pixels are covered by a Blue overlay. Use the Thresh Color
Settings menu to change the overlay color to red or green for better visibility, depending on the
background image.
24
ACTS Client-Server Interface
Info Menu
The items found in the Info menu on EZ-Train’s main menubar display their results in the Output
window at the bottom of the console’s window.
Timing
This gives you a sense of ACTS’ performance with your system. When selected, Timing displays how
many milliseconds it takes for ACTS to process a single frame of video. It also shows the number of
frames per second (fps) currently being achieved. Under most conditions, ACTS should operate
efficiently between the maximum rate for most frame grabbers (30 fps).
Blob Stats
Blob Stats displays all of the statistics for all of the blobs being tracked in the selected channel:
Blob #n a=aaa x=xxx y=yyy l=lll r=rrr t=ttt b=bbb
n = blob # (blob 1-10)
a = area of blob in pixels
x = x index of the blob center of mass
y = y index of the blob center of mass
l = left most column of the bounding box surrounding the blob
r = right most column of bounding box
t = top most column of bounding box
b = bottom most column of bounding box
Window Menu
Selecting items from the Window menu of the EZ-Train main menubar enables the various
accessory windows of the console. Close windows by pressing the “ESC” key when the mouse
cursor is inside the window, including the EZ-Train console, or by closing them via your windowsmanager menu.
EZ-Train
The EZ-Train item in the Window menu activates the Training Window which displays the image
data that ACTS will train its channels on.
Runtime Config
A runtime configuration is a disk file that contains the names of the channels that you want
loaded—en masse—to start a tracking session. This lets you train channels for different objects, and
then mix and match which objects to track by reconfiguring which channels you include in a
particular runtime configuration. Only eight channels can be viewed at a time, so switch between
the various banks by clicking on the buttons found along the top of the window.
Also, runtime configurations are vital for running ACTS in server-only mode since there is no other
way to tell ACTS what it should track.
Selecting the Runtime Config option enables the ACTS Configuration File Manager in which you
define and save a particular run-time configuration on disk. A configuration consists of the number
of channels that are processed for each frame of video as well as the saved parameters for each
channel.
25
ACTS User Manual
Channels can be made active or inactive, as well.
If they're active, ACTS computes statistics for each
blob, up to the Number of Blobs Tracked, in that
channel. All channels default to active, but we
recommended that you make the unused
channels inactive.
Note: Saving a runtime config file will not save
individual channel files. If you modify the channel
files, you need to save them separately from the
actsconfig file.
Figure 17. ACTS Configuration File Manager
26
ACTS Client-Server Interface
ACTS Client-Server Software
With the licensed distributions, we provide sample applications and supporting software, including
source code, for interfacing ACTS with ActivMEDIA’s Mobile Robotics software, including Saphira
and Ayllu. This chapter also describes the data structures and interface details that you need to
know to integrate ACTS with your own C++ language-based client applications.
Client-Server Communication
ACTS servers communicate with a client through a TCP socket, either on the same machine or over
a network. The default socket address is 5001. You may configure ACTS to respond on a different
port with the –p <port number> start-up option.
Include the (W)SocketClientComm.cxx, SaphiraACTSClient.cxx and related header file in your
application code to enable ACTS client-server communication. Visual C++ users also need to
include the system’s wsock32.lib library in their project.
On inspection of the SaphiraACTSClient.h file, you will find commands to open and close the ACTSserver socket, as well as query its status, send commands, and retrieve data.
ACTS Data Packet
Upon request (comm->requestPacket();, for example), ACTS sends a variable-length (maximum
5248 bytes) data packet over the client-server TCP socket that describes the blobs it has found in
the current frame on a channel-by-channel basis. Each ACTS packet consists of a 64-byte header,
which describes the number and index for the blobs in each channel, followed by a sequence of
16-byte blob data structures.
Packet Header
The ACTS packet header is 64 bytes long; four bytes for each of the thirty two color channels in
order one through thirty two. The four bytes actually correspond to two numbers. Each number is
encoded using 6-bits per byte. This lets us encode numbers larger than 255 without having to worry
about sending a NULL character (0) in the middle of the packet. The first of these numbers number
is the starting blob number and the second number (also encoded as two bytes) is the total
number of blobs described for that channel in the packet. For example, the header sequence: 0,
2, 2, 0, 2, 0, 2, 0, 2, 4, 6, 0, 6, 0, 6, 1, means that the packet contains blob information for channels 1,
5, and 7 only. Channel one has two blobs, beginning with the first blob (zero indexed as blob #0),
channel five has four blobs described in the packet, starting with the third out of ten total blobs,
and channel eight has one blob starting with the seventh.
Blob Data
Following the ACTS packet header come the blobs. Each blob is described in sixteen bytes (Table
3), including its area (number of pixels); x and y pixel coordinates of its center relative to the top,
left corner of the image; and the pixel coordinates of the corners of its rectangular bounding box,
also relative to the top, left corner of the image.
The blob data are specially encoded so that the data do not contain NULL (0) value bytes by
adding 1 to each of the 6-bit bytes. We recommend that you examine the example code we
provide in the distribution for details. They illustrate well how you might go about extracting an
ACTS packet in your own application.
27
ACTS User Manual
Table 3. Blob Data Structure
Byte(s)
0-3
5
7
9
11
13
15
Label
Area
X
Y
Left
Right
Top
Bottom
Description (each are encoded as 6-bits per byte; each byte +1)
Number of contiguous pixels that make up the blob
Pixel coordinates for the center of the blob
relative to the upper, left corner of the image
Bounding coordinates of rectangle that encompasses the blob,
relative to the upper, left corner of the image
to remove NULL bytes.
ACTS with Saphira
SRI International, Inc.’s Saphira is a full-featured development environment for controlling intelligent
mobile robots, including ActivMEDIA ROBOTICS’s Pioneer Mobile Robots, as well as related robotic
accessories. Saphira comes with a demonstration client that you may modify and add features,
including ACTS handlers. We’ve done just that to create a Saphira client that makes a robot chase
a colored object around the room. We also provide a Saphira extension (plugin) that you may use
with your Colbert programs. And we provide the source code for all of these, as well as for other
ACTS/Saphira supporting code, so that you can build your own Saphira clients.
Robot Application
We’ve created a Saphira client—acts_robot(.exe)—to provide you with an example application in
which the mobile robot follows a color, literally driving around to find and then follow a colored
card that you move around the room. You may run the acts_robot application on a real robot or
fake it with the simulator that comes with the Saphira distribution. In either case, the PC that runs
the application must contain an active frame grabber and host both ACTS and the Saphira client.
To run acts_robot, first start up ACTS, either in training mode or loaded with a pre-trained
configuration. In either case, we assume that you will train ACTS to follow some colored card,
preferably a 5x7 card of a wild color, such as fluorescent green or orange.
Once ACTS is ready, execute acts_robot(.exe). The Saphira client’s main control window appears,
containing an iconic representation of a robot at its center. From the Connect menu on the main
menubar, pull-down to connect with your robot, either Local for the simulator (pioneer(.exe)
already started) or one the serial ports.
Once the robot gets connected, the application also makes a connection with the ACTS servers
and will automatically begin following your colored card. Don’t forget to enable the MOTORS on
the real robot, or else you and it will get really frustrated.
Saphira Plugin
Saphira comes with an interactive robotics-control environment called Colbert. Colbert is an
interpreted language whose suite of features may be extended through plugins—dynamically
loadable and shared libraries that we provide to support intelligent robot accessories like ACTS,
and which you may also create to add features to the basic Saphira client.
The ACTS plugin for Saphira/Colbert is called sfActs. Its Win32 dynamically loadable library
(sfActs.dll) and Linux shared object (sfActs.so) come with the licensed distribution along with the
source code, accessory files, and makefiles (Visual C++ workspaces). For convenience, copy
these libraries into the Colbert directory of your Saphira distribution, typically
/usr/local/Saphira/ver62/colbert for Linux systems, or C:\Saphira\ver62\colbert for Win32.
28
ACTS Client-Server Interface
To use the plugin, simply load it from the Colbert interaction window at the bottom of the Saphira
client’s main window, from the Load file option in the File pulldown menu from the Saphira main
window’s menubar, or included as a load statement in a Colbert activity.
Once loaded (initialization part of the loading process), the ACTS plugin for Saphira continuously
attempts to connect with an ACTS server on the default TCP socket 5001. When connected, the
plugin automatically queries for blob data at a rate of once every 100 milliseconds—the standard
Saphira cycle time.
Examine the sfActs source code for supported functions and data structures.
29
ACTS User Manual
Appendix A. Hotkey and Mouse Shortcuts
The following hotkeys are active in the Training Window:
1 : Overlay mode
2 : Thresh mode
3 : Raw mode
4 : Visible mode
a : Add Tool
r : Remove Tool
d : Draw Tool
e : Erase Tool
p : Pick Tool
+ : Increase magnification of the Training Window
- : Decrease magnification of the Training Window
g : Grab a new frame (Single Frame Grab mode)
The following functions are invoked by the mouse while clicking in the Training Window:
Mouse Button 2 : Grab a new frame (g hotkey)
Mouse Button 3 : Cycle between the various Training Window modes:
Overlay à Thresh à Raw Visible à Visible
Double-clicking in any of the channel selectors in the Select Current Channel area will bring up a
Load Channel dialog.
30
ACTS Client-Server Interface
Index
ActivMedia, 1
Add tool, 16, 20, 30
Blob Stats, 13, 25
Brightness, 4, 8, 17, 19, 23
Brush Size, 16, 21, 24
Channel Filename, 22
Channel Settings, 21
Clear Plane, 4, 17
Clear Training, 12, 23
Configuration, 25
Continuous Frame Grab Mode,
22
Contrast, 4, 8, 17, 19, 23
Control Window, 20
Draw Color, 24
Draw tool, 16, 21, 24, 30
Email
pioneer-support, 3
pioneer-users, 3
saphira-users, 3
Erase tool, 16, 21, 24, 30
EZ-Train, 11, 25
File menu, 14, 23
Fill Plane, 4, 16
FLTK, 5
Grab Frame button, 19, 22
High Bright slider, 16
Image View Mode, 22
Info menu, 13, 25
Linux, 4
Live Video button, 22
Load Channel, 24, 30
Load Image, 24
Load Runtime Config, 24
Low Bright slider, 16
Magnification, 23
Manual Train, 16
Mesa, 5
Newsgroups
pioneer-users, 3
saphira-users, 3
Number of Blobs Tracked, 11,
22
OpenGL, 2
Output text window, 16, 21, 25
Overlay mode, 12, 20, 24, 30
Pick tool, 16, 21
pioneer-support, 3
Quit, 14, 24
Raw mode, 20, 24, 30
Remove tool, 16, 21, 30
Reset Limits button, 16
Resources, 3
Save Runtime Config, 14
Select Current Channel, 21, 30
Settings menu, 16, 20, 24
Single Frame Grab mode, 30
Single Frame Grab Mode, 22
Software
Download site, 3
Support
pioneer-support, 3
TCP, 4, 8, 19
Thresh Color, 20, 24
Thresh mode, 20, 24, 30
Timing, 25
Training Tools, 15, 20, 24
Training Window, 11, 12, 15, 19,
20, 23, 24, 25, 30
Training Window Closed Mode,
23
Training Window Commands,
22
Undo, 12, 23
View Mode, 24
Visible mode, 20, 30
Window menu, 25
X Window, 5
31
Warranty & Liabilities
The ACTS software is delivered as is with no implied warranties or promises of service.
Developers, marketers, and manufacturers of ACTS shall bear no liabilities for operation
and use of the software or any accompanying hardware.
The developers, marketers, or manufacturers shall not be held responsible for any injury to
persons or property involving ACTS in any way. They shall bear no responsibilities or
liabilities for any operation or application using ACTS, or for support of any of those
activities.
And under no circumstances will the developers, marketers, or manufacturers of ACTS
take responsibility for support of any special or custom modification to the software.
ACTS User Manual v2 August, 2000
44 Concord Street
Peterborough, NH 03458
(603) 924-9100
(603) 924-2184 fax
http://www.activrobots.com