1
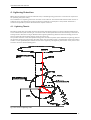
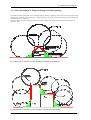
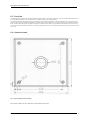
SICLOCK® GPS1000 Radio Clock
2XV9450-1AR82
User Manual
2.0
Revision: August 2012
Order No.: 2XV9450-1AR82-BA
User Manual SICLOCK GPS1000
Responsible Distributor:
Siemens AG, I&S EDM, Germany
Contact person:
local Siemens branch
Orders:
local Siemens branch
Published by:
Siemens AG
I IA CE SE
Würzburger Straße 121
D-90766 Fürth
SICLOCK-Hotline:
Phone: +49 (9131) 7-2 88 66
Fax: +49 (9131) 18-8 06 04
E-Mail: [email protected]
WWW: http://www.siemens.com/siclock
Technical subject to change without notice
© Siemens AG 2012
2
Version 2.0
Order number 2XV9450-1AR82-BA
User manual SICLOCK GPS1000
Contents:
1.
Safety instructions ........................................................................................................5
2.
Brief Overview...............................................................................................................7
2.1.
Function ....................................................................................................................................7
2.2.
Scope of Delivery......................................................................................................................7
2.3.
Installation Procedure ..............................................................................................................7
2.4.
Operation and Maintenance ....................................................................................................8
3.
Installation instructions................................................................................................9
3.1.
Connection to SICLOCK TM or PC.............................................................................................9
3.2.
Connection to SICLOCK TC400 / TC100 or TS.........................................................................11
4.
Lightning Protection ...................................................................................................13
4.1.
Lightning Theorie ...................................................................................................................13
4.2.
Parts of buildings in danger of being struck by lightning ...................................................14
4.3.
Inducting effect during lightning strikes..............................................................................15
4.4.
Choosing a safe location ........................................................................................................15
4.5.
Installation of the lightning protection module 2XV9450-1AR83 ......................................15
5.
Mounting the antenna................................................................................................16
5.1.
Procedure for selecting the installation location.................................................................16
5.2.
Mounting procedures.............................................................................................................16
6.
Appendix .....................................................................................................................18
6.1.
Technical data.........................................................................................................................18
6.2.
Ordering data..........................................................................................................................18
6.3.
Precision ..................................................................................................................................19
6.4.
Antenna stand.........................................................................................................................19
Index of Illustrations
Fig 1: Front view GPS1000 PS. ..................................................................................................................8
Fig 2: Installation diagram for SICLOCK TM and PC without lightning protection module.........................9
Fig 3: Installation diagram for SICLOCK TM and PC with lightning protection module. ...........................10
Fig 4: Installation diagram for SICLOCK TS without lightning protection module....................................11
Fig 5: Installation diagram for SICLOCK TS with lightning protection module. ........................................12
Fig 6: The course of a lightning stroke ....................................................................................................13
Fig 7: Determination of potential areas where lightning could strike (normal buildings)........................14
Fig 8: Determination of potential areas where lightning could strike (industrial building)......................14
Fig 9: Flat roof installation ......................................................................................................................16
Fig 10: Wall mounting.............................................................................................................................17
Fig 11: Dimensioning Antenna Stand......................................................................................................19
Order number 2XV9450-1AR82-BA
Version 1.0
3
User Manual SICLOCK GPS1000
4
Version 2.0
Order number 2XV9450-1AR82-BA
User manual SICLOCK GPS1000
1. Safety instructions
Caution
Please observe the safety instructions on the back of the cover sheet of this documentation. You
should not expand your device unless you have read the relevant safety instructions.
If you have questions about the validity of the installation in the planned environment, please
contact your service representative.
Smooth and safe operations demand proper transport, proper storage, installation and assembling as well as careful operations and maintenance.
Warning
Danger from line voltage
• Connection and disconnection may only be performed by a qualified electrician!
• Connect or disconnect power supply cables only when the power is turned off.
Warning
Life-threatening > 60 VDC/VAC dangerous contact voltage
Take the following safety precautions when supplying the device with a
> 60 VDC/VAC dangerous contact voltage:
• Ensure that the protective conductor (PE) in the power supply cable is
connected to the PE terminal
.
• There must be a means (main switch or circuit breaker) of
disconnecting the devices upstream in the supply system or the building installation.
Caution
Danger from lines carrying a > 60 VDC/VAC dangerous contact voltage
Ensure that connection cables carrying a > 60 VDC/VAC dangerous contact voltage are secured
against disconnection by being pulled out. Lay the cables in cable ducts or cable channels and, if
necessary, secure the cables with cable ties.
Repairs
Repairs to the device may only be performed by authorized specialists.
Warning
Unauthorized opening or improperly performed repairs can cause considerable damage to
property and/or danger to users.
Order number 2XV9450-1AR82-BA
Version 1.0
5
User Manual SICLOCK GPS1000
ESD guidelines
Modules containing electrostatic sensitive devices (ESDs) can be identified by the following label:
Strictly follow the guidelines mentioned below when handling modules containing ESDs:
• Before working with modules containing ESDs, you must discharge all your
personal static e.g. by touching a grounded object.
• All devices and tools must be free of static charge.
• Always pull out the power plug before connecting or disconnecting modules containing ESDs.
• Handle modules containing ESDs by their edges only.
• Do not touch any pins.
6
Version 2.0
Order number 2XV9450-1AR82-BA
User Manual SICLOCK GPS1000
2. Brief Overview
2.1. Function
SICLOCK GPS1000 is a modern GPS radio-controlled clock which can be used worldwide for the reception of time
signals from the 24 American GPS satellites. At the output of the GPS1000 antenna head a DCF77 time telegram
with Greenwich Meantime is available.
The advantage of the GPS1000 is that the antenna, GPS receiver and GPS decoder are integrated in the antenna head as one unit and there is therefore no need to lay coaxial cables, nor to separately install the decoder together with a power supply.
Both the power supply of the antenna head and also the transmission of the DCF77 time telegram is done via
loop current by means of a shielded twin-core control cable with a maximum length of approx. 1000 meters. The
power supply module GPS1000 PS is at the process end of the control cable. The module feeds the loop current
connection to the antenna head and extracts the DCF77 time telegram. For its own supply it has a long range
power supply of 24 to 230V V/DC or 48-230 V/AC.
SICLOCK GPS1000 does not require parameter settings.
2.2. Scope of Delivery
•
•
•
•
•
•
•
GPS1000 antenna head E10433-E9910-H100 with integrated electronics and 2,5 m connecting cable
with end splices
GPS1000 PS (power supply module) E10433-E0006-H100
(not included in the complete package SICLOCK TC400 with GPS1000, SICLOCK TC100 with GPS1000
and SICLOCK TS with GPS1000)
Antenna holding frame for universal mounting, comprising:
antenna stand with base plate and holding arm,
cube with 6 hexagon socket set screws,
sealing cover
Allan key for installation
Conduit box for connection of control cables
Connecting cable to PC COM interface (9-pole SUB D)
Operating manual German / English
2.3. Installation Procedure
1. First find a suitable location for the antenna.
When doing this, please take the following into account:
The antenna head should be able to “see” as much sky as possible and must be installed with the housing
cover upwards, parallel to the sky.
The antenna head should NOT be installed in places where there is lightning hazard! (see chap. 3)
Make sure that there is easy access for servicing! (Electromagnetic interference fields from the plant do not
need to be taken into account as the operating frequency of GPS1000 is above the industrial interference
level.)
2. Mark the drill holes for installing the antenna stand, drill and insert dowels.
3. Make the bore hole for the connecting cable (for wall mounting preferably in the middle underneath the base
plate).
4. Assemble the antenna according to figures 9 and 10 respectively.
5. Thread the cable into the bore hole and screw on the stand. For mounting on flat roofs, use additional IP67distribution box and additional control cable to extend if necessary.
6. Inside buildings, install the supplied conduit box near to the cable entry (alternatively, install the lightning
protection module 2XV9450-1AR83 and omit the conduit box).
7. Mount the GPS1000 PS near the system to be synchronized (computer, SICLOCK TM, SPC or similar.) (on DIN
rails, 19 inch frames or in table housing).
8. Control cable provided on site for GPS1000 PS (terminal X2/11,12) for installation of conduit box for the antenna and clamp with antenna connection cable (polarity is not important here).
9. Lay the shield of the control cable on the equipotential busbar in the control cabinet.
10. Set up the power supply connection to GPS1000 PS (terminal X1/13,14,15).
11. Setting up synchronization to the system:
Connection to PC: via cable supplied for X3 at SICLOCK GPS1000 PS to free COM interface.
(Driver software required: 2XV9450-1AR28).
Connection to SICLOCK TM: via shielded twin-core control cable from the terminal X2/1,2 at SICLOCK
GPS1000 PS to SICLOCK TM terminal X2/5,6.
Connection to SICLOCK TS: via shielded twin-core control cable directly from the antenna head (SICLOCK
GPS1000 PS is not necessary) to SICLOCK TS terminal X2/9,10.
Order numberr 2XV9450-1AR82-BA
Version 2.0
7
User Manual SICLOCK GPS1000
Connection to SIMATIC S7 Digital input: via shielded twin-core control cable from terminal X2/1,2 at
SICLOCK GPS1000 PS to the corresponding SIMATIC S7 digital input.
(necessary function module for step7 - software: 2XV9450-1AR30).
12. Switch on the mains power. When the green LED “Pwr” is illuminated, the initializing of the antenna head
now begins (yellow LED “Sig” permanently illuminated). After successful initialization, the initializing of the
time reception begins, which, according to the reception situation and the number of available satellites, can
last for up to 30 minutes or longer. During this phase, the antenna head sends out “heartbeats” in the form of
50 ms impulses at intervals of 2 seconds which is indicated by the yellow LED. The normal operation which
then begins with permanent radio reception can be recognized by the transition of “ heartbeat” impulses on
DCF77 telegrams with GMT. If the yellow LED does not light up at all, then there is a defect in the machine or
a break in the antenna cable.
13. Setting the parameters for PC driver software / SICLOCK TM/TS / S7 should be done in accordance with operating data for the system.
2.4. Operation and Maintenance
After installation, the mains voltage can be switched to SICLOCK GPS1000 PS. The green LED “Pwr.” lights up.
The built in receiver of the antenna head now looks for GPS satellites and initializes the time reception. According to the number of “visible” satellites, this procedure lasts between 5 and 10 minutes (if the angle to the sky
perceived by the antenna is under 90° it can last up to 30 minutes or more until satellites appear in this window
and the initializing procedure is accordingly longer). During the initializing process, the yellow LED “Sig.” flashes
continually at 2 second intervals (“heartbeat”).
Normal operation now begins whereby constantly simulated DCF77 telegrams with Greenwich Meantime are
transmitted from the antenna to SICLOCK GPS1000 PS whose second impulses are recognizable by short dark
phases of the “Sig.” LED. The DCF77 telegrams are constantly available in parallel at the outputs “TTY/20mA” and
“TTY inv.” at the terminal X2 as active TTY/20mA signals and at the SUBD jack X3 as a RS232 signal.
SICLOCK GPS1000 works in principle completely without maintenance.
Only when the antenna is exposed to direct sunlight, the white painted antenna head should be cleaned from
time to time with water, in order to prevent overheating.
When there is no alarm signal for recognizing a malfunction of radio synchronization in the connected system,
then checks should be made at regular intervals, that the yellow LED “Sig.” on GPS1000 PS is still flashing properly in second intervals.
Fig 1: Front view GPS1000 PS.
8
Version 1.0
Order number 2XV9450-1AR82-BA
User Manual SICLOCK GPS1000
3. Installation instructions
3.1. Connection to SICLOCK TM or PC
Fig 2 shows a schematic diagram of the connection of GPS1000 to SICLOCK TM or to a PC without lightning protection. The parts illustrated in photos and the grey cables are included in the scope of delivery of the complete
package SICLOCK GPS1000. The red cables must be provided on site.
Power supply
24-230 V/DC or 48-230 V/AC
Fig 2: Installation diagram for SICLOCK TM and PC without lightning protection module.
Order numberr 2XV9450-1AR82-BA
Version 2.0
9
User Manual SICLOCK GPS1000
Parameterization required for SICLOCK TM:
1. Set input E1 to DCF passive.
2. Set time zone according to the location in relation to GMT (see SICLOCK TM manual)
Fig. 3 shows in schematic diagram the connection of GPS1000 to SICLOCK TM or to a PC with the lightning protection module 2XV9450-1AR83. The parts illustrated in photos and the grey cables are included in the scope of
delivery for the complete package SICLOCK GPS1000 except of the lightning protection module.
The red and green cables must be made available on site.
The lightning protection module should be installed in the building as near as possible to where the antenna
cable enters the building. Please pay attention to “IN” and “OUT” !
Important:
It is absolutely essential that the earth cable shown in green and connected to the DIN rail (cross section 25 sq.
mm or more) is connected in the shortest possible way and as straight as possible to a foundation earth.
Power supply
24-230 V/DC or 48-230 V/AC
Fig 3: Installation diagram for SICLOCK TM and PC with lightning protection module.
10
Version 1.0
Order number 2XV9450-1AR82-BA
User Manual SICLOCK GPS1000
3.2. Connection to SICLOCK TC400 / TC100 or TS
Fig. 4 shows in schematic diagram the installation of SICLOCK TS without lightning protection . The parts illustrated in photo and the grey cable are included in the scope of delivery for the complete package SICLOCK
GPS1000. The red cable must be made available on site.
Siclock TC400
X2
7 8 9
Fig 4: Installation diagram for SICLOCK TS without lightning protection module.
Parameterization required for SICLOCK TC400/TC100 or TS:
1.
2.
3.
Set input E1 to “GPS1000” . (See also operating manual SICLOCK TS)
Set time zone according to the location in relation to GMT.
If the GPS1000 is connected to a SICLOCK TC400/TC100 no parameterization is necessary.
Order numberr 2XV9450-1AR82-BA
Version 2.0
11
User Manual SICLOCK GPS1000
Fig. 5 shows a diagram of the connection from GPS1000 to SICLOCK TS with lightning protection module
2XV9450-1AR83. The parts illustrated in photo and the grey cable are included in the scope of delivery for the
complete package SICLOCK GPS1000 except of the lightning protection module. The red and green cables must
be made available on site.
The lightning protection module should be installed in the building as near as possible to where the antenna cable enters the building.
Important:
It is absolutely essential that the earth cable shown in green and connected to the DIN rail (cross section 25 sq.
mm or more) is connected in the shortest possible way and as straight as possible to a foundation earth.
Siclock TC400
X2
7 8 9
Fig 5: Installation diagram for SICLOCK TS with lightning protection module.
12
Version 1.0
Order number 2XV9450-1AR82-BA
User Manual SICLOCK GPS1000
4. Lightning Protection
When exterior antennas are used in industrial areas, a reliable lightning protection is of the utmost importance
for operating the system safely.
The installation of a lightning protection unit alone is not sufficient. The antenna and antenna cable must be installed in such a way that a direct stroke of lightning or flashover in these parts is not possible. Otherwise it
would not be possible to prevent the destruction of parts of the unit.
4.1. Lightning Theorie
Recordings made with high speed cameras have shown that lightning does not cover the distance between the
storm cloud and the point of striking at a continuous and constant speed but travels intermittently at intervals on
average of 20 to 40 meter in length. Between these lightning advancing distances there are holding points of a
few microseconds, where further energy is built up (see Fig. 6).
The possible locations of the subsequent holding points lie within a sphere (here called ball of lightning) around
the previous holding point with 20 to 40 meter radius. The last holding point is reached when parts of the earth’s
surface or other grounded parts extend into the ball of lightning. The lightning then strikes in the point of this
structure closest to the last holding point
Fig 6: The course of a lightning stroke
Order numberr 2XV9450-1AR82-BA
Version 2.0
13
User Manual SICLOCK GPS1000
4.2. Parts of buildings in danger of being struck by lightning
The determination of potential areas in danger of being struck by lightning can be done in a very simple way by
conjuring up a mental picture of the ball of lightning rolling over all the surfaces and edges of the building to be
examined (see Fig 7 and Fig 8).
All areas, where the ball of lightning touches surfaces or edges, are in danger of being struck by lightning
(shown in red).
Fig 7: Determination of potential areas where lightning could strike (normal buildings)
Fig 8: Determination of potential areas where lightning could strike (industrial building)
14
Version 1.0
Order number 2XV9450-1AR82-BA
User Manual SICLOCK GPS1000
4.3. Inducting effect during lightning strikes
Another important parameter influencing the choice of antenna location is the induction effect which arises from
lightning conductors or building parts where lightning current flows through.
When the lightning hits into a lightning conductor, within a few hundred nanoseconds, voltages of several
megavolts are built up, which result in conducted currents up to several 10000 amps with correspondingly steep
surge pulse edges (depending on the inductive resistance of the lightning conductor). Leading to powerful electrical fields which at a 2 meter distance to the antenna or antenna cable produce induction voltages in the kilovolt range.
Furthermore, when the distance is too short, there is a danger of flashover from the lightning conductor to parts
of the antenna unit.
4.4. Choosing a safe location
Keeping in mind the the previous chapter and the safety against lightning strikes, the following facts should be
taken into account when choosing a antenna location.
1. Antenna and antenna cable should always be installed at least 2 meters away
from lightning conductors and areas in danger of being struck by lightning in
conformity with Fig 7 and Fig 8 and in the green area. Never in the red area!!!
2. Install the antenna cable the shortest possible way from the antenna to the
inside of the building.
3. Install the antenna cable orthogonal to lightning conductors nearby, because
the induction effect is then minimal.
4. The 2m distance from lightning conductors to antenna cables shall be enforced also inside the building, because an electrical breakthroug can occur
even through a wall.
5. Install the lightning protection module at the inside of the building as close as
possible to the entry point of the antenna cable.
4.5. Installation of the lightning protection module 2XV9450-1AR83
The lightning protection module 2XV9450-1AR83 (not included in the scope of delivery of SICLOCK GPS1000)
consists of a base part and a lightning conductor module which can be plugged into this basis. The basis part is
connected to the earth cable via the DIN rail supplied with the unit. Basically, it should be installed inside the
building, as close as possible to the entry point of the antenna cable. Ideally there should be a straight connection lead to the earth foundation electrode.
Several changes of direction, tight bends and coiling up the cable previous to the earth foundation electrode
are extremely adveresly to the conduction effect.
For details of installation, please see the manual enclosed with the lightning protection module.
Order numberr 2XV9450-1AR82-BA
Version 2.0
15
User Manual SICLOCK GPS1000
5. Mounting the antenna
5.1. Procedure for selecting the installation location
The best reception is achieved when the antenna is installed in the open air.
This however, means that there is a possible danger of lightning striking. Therefore the location selection criteria
in chapter 3.4 are of utmost importance!
Concerning the best performance for signal reception, the following points should be taken into account when
selecting a suitable location:
The antenna should “see” as much sky as possible, i.e. it should not be overshadowed by large buildings, or
stand underneath parts of buildings etc. A preferred location for the antenna for example, would be on a flat
roof.
Preferred locations inside a building are underneath (extensively) glazed facade or under glass domes.
5.2. Mounting procedures
The following illustrations show the assembly of the antenna for wall or flat roof mounting.
Due to weakening the roof sealing, wall mounting is prefered to flat roof mounting.
1
2
3
4
5
-
Antenna head
Cube with 6 hexagon socket set screws
Allan key for cube installation
Sealing cover
Antenna stand with base plate and holding arm
Fig 9: Flat roof installation
16
Version 1.0
Order number 2XV9450-1AR82-BA
User Manual SICLOCK GPS1000
1
2
3
4
5
-
Antenna head
Cube with 6 hexagon socket set screws
Allan key for cube installation
Sealing cover
Antenna stand with base plate and holding arm
Fig 10: Wall mounting
(a) Mark the position of the mounting holes at the planned place with the aid of the base plate (5), drill the holes and insert
dowels.
.
(b) In preparation of the antenna installation, it shall be taken into account whether the antenna is to be assembled for wall
mounting or flat roof installation.
•
When installing the antenna on a flat roof, (Fig 9), the connecting cable of the antenna head (1) is inserted in a
straight line through 2 opposite openings of the cube (2), the antenna head support is then pushed into the opening
of the cube as far as possible, and tightened gently on the left and on the right with the 2 hexagonal socket set
screws provided.
Now the connecting cable is inserted from above through the antenna stand (5), the cube (2) is slipped as far as it
will go on the holding arm and tightened gently on the left and on the right with the 2 hexagonal socket set screws
provided. After radial adjustment (which is not influencing the signal reception quality) of the antenna head (loosen
the hexagonal socket set screws again) the hexagonal socket set screws are retightened.
Finally the opening in the cube (2) is closed with the sealing cover (4) and the two hexagonal socket set screws on
the left and right are tightened gently.
•
For wall mounting (Fig. 10), the connecting cable of the antenna head (1) is inserted through the cube (2) at a right
angle, the antenna head support is pushed into the opening of the cube as far as it will go and the two hexagonal
socket set screws on the left and right gently screwed tight.
Now the connecting cable is inserted from above through the antenna stand (5), the cube (2) is slipped as far as it
goes on the holding arm and tightened gently left and right with the 2 hexagonal socket set screws provided. Set up
the stand, loosen the hexagon socket set screws again, align the cover surface of the antenna head parallel to one
edge of the base plate and tighten the hexagon socket set screws.
Finally the remaining opening in the cube (2) is closed with the sealing cover (4) and the two hexagon socket set
screws left and right are screwed tight.
.
c) The best position of the drill hole through the wall or through the roof is underneath and in the middle of the base plate.
The connecting cable is inserted through the drill hole and the complete antenna stand screwed on.
The connecting cable can also be passed through the slot in the base plate and then outside the base plate through the wall or
roof.
Order numberr 2XV9450-1AR82-BA
Version 2.0
17
User Manual SICLOCK GPS1000
6. Appendix
6.1. Technical data
SICLOCK GPS1000
Antenna head with mounting stand
Operating frequency:
Precision:
Time of day transmitted:
Parameterization:
Antenna cable (coaxial):
Connecting cable:
Connection extension:
Maximum cable length:
Time telegram transmitted:
Power supply:
Power consumption:
Dimensions (WxHxD)
Antenna stand:
Antenna head:
System of protection:
Operating temperature:
Mounting antenna stand:
1.574 GHz
max. 1 µ sec
GMT
not necessary
not necessary
2.5 m shielded twin-core control cable
via shielded twin-core control cable and conduit box supplied
1000 m
DCF77 simulation signal without summertime bits
Loop current 40 mA via connecting cable direct from SICLOCK TS or
GPS1000PS
1W
160 x 630 x 160 mm
160 x 85 x 80 mm
IP 65
-40°C to +60°C
can be mounted and directionally adjusted with 4 screws in all locations
SICLOCK GPS1000 PS
Power supply for operation with SICLOCK TM or PC
Supply voltage:
Current consumption:
Power supply GPS1000:
DCF77-outputs:
SICLOCK TM, PCON, EOPC:
PC (COM-Interface):
Dimensions (WxHxD):
System of protection:
Operating temperature:
Montage:
24-230 V/DC 48-230 V/AC
0,5A – 0,03A
48V/40mA
2
TTY/20mA
RS232_
100 x 75 x 125 mm
IP 40
0°C to +50°C
35mm top hat rail
6.2. Ordering data
Hardware:
SICLOCK GPS1000 package:
comprising: antenna stand,
antenna head, GPS1000Power Supply, surface
distribution box, PC connection cable,
operating manual
2XV9450-1AR82
Software:
DCF77-reception service for windows:
2XV9450-1AR28
DCF-S7 interface + reception service for SIMATIC S7: 2XV9450-1AR30
Accessories:
Lightning protection for antenna cable (koax):
Lightning protection for RS232 interface:
18
2XV9450-1AR83
2XV9450-1AR15
Version 1.0
Order number 2XV9450-1AR82-BA
User Manual SICLOCK GPS1000
6.3. Precision
The absolute time precision for the individual DCF output interfaces is maximum 60 µs for the TTY interfaces and maximum 10
µs for the RS232 interface. The relative precision is better than 3 µs for both interfaces.
The relative precision specifies the maximum deviation of two sequential impulses. The absolute precision is the offset to the
atomic clock supplying the whole GPS system. If signals from only four satellites or less are received, a time interval of 20ms to
50ms resulting from the signal propagation delay from satellites to the earth, must be added to the absolute times and in this
case cannot be corrected by the receiver. For receiving signals from four or more satellites the inaccuracy of the receiver is maximum 1µs.
6.4. Antenna stand
Fig 11: Dimensioning Antenna Stand
The stand is fixed by 4 5mm diameter countersunk head screws.
Order numberr 2XV9450-1AR82-BA
Version 2.0
19
User Manual SICLOCK GPS1000
Notes:
20
Version 1.0
Order number 2XV9450-1AR82-BA
User Manual SICLOCK GPS1000
The trademarks SICLOCK, GPS1000 from Siemens AG
are registered and protected by law.
The right to technical modifications to the product
reserved. This description is not deemed to be an
assurance of the properties. Technical data and
illustrations are not binding for delivery. The
forwarding or reproduction of this document, the
exploitation and notification of its content is not
permissible insofar as not expressly agreed.
Contraventions are subject to compensation of
damage.
All rights reserved, in particular in the case of the
granting of a patent or GM registration.
© Siemens AG, September 2012
Order numberr 2XV9450-1AR82-BA
Version 2.0
21