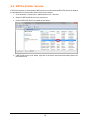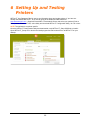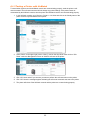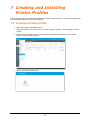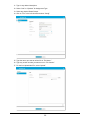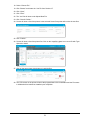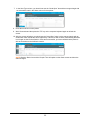
1
NETira™ Connect for AirWatch® User Guide Contents 1 Preface...................................................................................................................... 1 1.1 Purpose ......................................................................................................................... 1 1.2 Steps Covered in this User Guide .................................................................................. 1 1.3 Who Should Use this Guide ........................................................................................... 1 1.4 Legal Disclaimers........................................................................................................... 1 1.4.1 Permissions of Use ................................................................................................. 1 1.4.2 Liability Limitations .................................................................................................. 1 1.4.3 Warranty Disclaimer................................................................................................ 2 1.4.4 Trademarks ............................................................................................................ 2 2 Introduction.............................................................................................................. 3 2.1 System Overview ........................................................................................................... 3 2.1.1 NETira Connect for AirWatch & NETira Printer Service .......................................... 3 2.1.1.1 NETira-CA ........................................................................................................... 3 2.1.1.2 NETira-PS ........................................................................................................... 3 2.1.2 AirWatch ................................................................................................................. 3 2.1.3 NETira-Configuration Tool (NETira-CT) .................................................................. 3 2.2 Requirements for Installation and Configuration ............................................................. 3 2.3 Supported Printers ......................................................................................................... 5 3 Installation................................................................................................................ 6 3.1 3.2 4 Required AirWatch Information ...................................................................................... 6 Installing NETira-CA ...................................................................................................... 6 NETira-CA and AirWatch Configuration .............................................................. 10 4.1 4.2 4.3 4.4 NETira-CA Configuration, Part 1 .................................................................................. 10 AirWatch Console Configuration .................................................................................. 13 NETira-CA Configuration, Part 2 .................................................................................. 16 NETira-Printer Service ................................................................................................. 18 5 Installing .pfx Certificate File for NETira-CA ....................................................... 19 6 Setting Up and Testing Printers ........................................................................... 20 6.1 Enrolling and Testing a Printer ..................................................................................... 21 6.1.1 Enrolling a Printer with AirWatch ........................................................................... 21 6.1.2 Testing a Printer with AirWatch ............................................................................. 23 7 Creating and Installing Printer Profiles ............................................................... 24 7.1 7.2 Creating a Printer Profile .............................................................................................. 24 Managing Printer Profiles with “Optional” Assignment Type ......................................... 27 8 Sending Install File Commands to a Printer ........................................................ 28 9 Receiving and Testing Alerts from a Printer ....................................................... 32 10 10.1 10.2 Managing Datamax-O’Neil Printers from AirWatch ....................................... 34 Query All ...................................................................................................................... 34 Soft Reset .................................................................................................................... 35 10.3 Factory Reset .............................................................................................................. 36 Appendix A: Definitions and Alerts ............................................................................ 37 A-1 A-2 Definitions .................................................................................................................... 37 Alerts ........................................................................................................................... 38 Appendix B: Troubleshooting ..................................................................................... 40 B-1 B-2 NETira-CA Troubleshooting Messages and Solutions .................................................. 40 HTTP Status Codes ..................................................................................................... 42 1 Preface 1.1 Purpose The purpose of the NETira™ Connect for AirWatch® User Guide is to provide step-by-step instructions to complete basic tasks to set up and use NETira Connect for AirWatch. 1.2 Steps Covered in this User Guide This User Guide covers the following steps: Installing NETira-CA software Configuring AirWatch Server Adding and setting up system printers using NETira-CT Testing system printers Managing system printers 1.3 Who Should Use this Guide IT staff System administrators System integrators AirWatch Ecosystem users Note: It is important that users have some familiarity with AirWatch ecosystems and know how to manage and navigate AirWatch consoles because this User Guide does not cover operation of the AirWatch Console. For information, guidance and training on AirWatch systems and products, including the AirWatch Console, contact AirWatch. 1.4 Legal Disclaimers 1.4.1 Permissions of Use This document may not, in whole or in part, be copied, photocopied, reproduced, translated, or reduced to any electronic medium or machine-readable form without prior written consent from Datamax-O’Neil Corporation (“Datamax-O’Neil”). The information in this documentation is subject to change without notice. 1.4.2 Liability Limitations In no event shall Datamax-O’Neil, or anyone else associated with the creation, content and delivery of this guide, be held liable for any error or for any incidental, indirect, special or consequential damages (including but not limited to any lost revenues, profits, business opportunity, data or use) in connection with the furnishing, performance, or use of this manual and/or the use of the software/hardware associated with Datamax-O’Neil or the examples herein. 1 1.4.3 Warranty Disclaimer Although every effort has been made to ensure the accuracy of the content of this manual, Datamax-O’Neil makes no warranties with respect to the content or accuracy of this documentation. Datamax-O’Neil warrants that the NETira™ software will perform in substantial compliance with published specifications, and will be free from defects in materials and workmanship, under normal use, for the corresponding warranty period specified on Datamax-O’Neil's website. This limited warranty is in lieu of all other warranties, express or implied, including warranties of merchantability or fitness for a particular purpose. The rights and remedies provided herein are exclusive and in lieu of any and all other rights or remedies. 1.4.4 Trademarks NETira™ is a registered trademark of Datamax-O’Neil, in the United States and certain international markets. Datamax-O’Neil is licensed to use other trademarks in the United States and internationally, all of which are the property of their respective owners. Microsoft Corporation, Windows®, Windows® NT, Windows Server®, and Active Directory are either registered trademarks or trademarks of Microsoft Corporation in the United States and/or other countries. Other product names mentioned in this manual may be trademarks or registered trademarks of their respective companies and are the sole property of their respective owners. ©2015, Datamax-O’Neil Corporation. All rights reserved. 2 2 Introduction 2.1 System Overview The overall system is composed of three programs/systems: NETira Connection for AirWatch (NETira-CA) or NETira Printer Service (NETira-PS), AirWatch and NETira Configuration Tool (NETira-CT). NETira-CA / NETira-PS and AirWatch are the primary programs utilized on a day-to-day basis and work together to control and monitor the printers. NETira-CT is used to setup/configure the system and printers. 2.1.1 NETira Connect for AirWatch & NETira Printer Service 2.1.1.1 NETira-CA NETira Connect for AirWatch (NETira-CA) is software from Datamax-O’Neil that resides on your server, works over the Internet with a remotely installed system called AirWatch and interfaces with the DatamaxO’Neil printers on your printer network. NETira-CA serves as the intermediary control between the remote AirWatch system and your network printers through its AirWatch Console interface that is accessed on your computers. The AirWatch Console functions also provide extensive information regarding printer usage and diagnostics. Some of the available managed tasks are: Alerts/status/enrollment requests sent from the printers to the AirWatch Console Files and settings sent from the AirWatch Console to the printers 2.1.1.2 NETira-PS NETira-CA software will run as a Windows Application, hence It can be launched only after a user logs into the server. Instead, NETira-PS software can be used if the application has to be run as a windows service. NETira-PS provides all functionalities similar to NETira-CA application. NETira-PS will be launch automatically after the server is powered on. Installation and configuration of NETira-PS can be done in the same way as that of NETira-CA. 2.1.2 AirWatch AirWatch is a proprietary printer control system hosted and maintained by AirWatch, a division of VMware® that resides on a remote site and communicates/works with your NETira-CA system via the Internet. 2.1.3 NETira-Configuration Tool (NETira-CT) NETira-Configuration Tool (NETira-CT) is software from Datamax-O’Neil used to set up and configure the NETira-CA system and printers. 2.2 Requirements for Installation and Configuration PC-based computer running Windows 7 or newer Windows Server 2008 R2 or newer All printers equipped with the latest firmware: 8.05.0066 or 18.05.0066 or newer NETira-CT version 1.0.0.65 or newer. Available on the Datamax-O’Neil website at www.datmaxoneil.com > Supports & Downloads > Downloads & Drivers and select your product (RL4e or RL3e). Under Software & Tools, select Utility and download NETira-CT Configuration Utility, v.65 or later. Datamax-O’Neil Package Builder v1.0.0.12 (available on the Datamax-O’Neil website at www.datamax-oneil.com > Support & Downloads > Downloads & Drivers > RL4e > Utility > D-O Package Builder) AirWatch Console version 8.x or newer already installed Subscription to AirWatch services and AirWatch customer number Printer manuals may be required to create the printer profiles Signed Certificate 3 Private Key File for Certificate FQDN name associated with Signed Certificate Public-facing IP address of WiFi network of server hosting NETira-CA 4 2.3 Supported Printers Datamax-O’Neil RL3 (Firmware version 8.05_0066 or newer) Datamax-O’Neil RL4 (Firmware version 8.05_0066 or newer) Datamax-O’Neil RL3e (Firmware version 18.05_0066 or newer) Datamax-O’Neil RL4e (Firmware version 18.05_0066 or newer) It is highly recommended that you utilize the current firmware version on your printers. 5 3 Installation 3.1 Required AirWatch Information NOTE: You must already have an AirWatch account and AirWatch Console Version 8 or newer installed. 1. To set up the AirWatch Console software for NETira CA, you must have available or create and write down the following information that will be required for later steps: a. User Name. This is the user name you use to long onto the AirWatch Console. b. Password. This is the password you use to log onto the AirWatch Console. c. Login Screen URL Address. This is another name for the ‘Environment URL’ or the unique company URL to access your company’s AirWatch admin console. This should have been provided to you by your AirWatch Account Manager or other AirWatch representative at time of installation of the AirWatch system, along with the login credentials. The Login Screen URL Address is the site where you will set up the connection between your NETira-CA system and AirWatch. This will be used later in Section 4.2, Step 1. d. Printer Server Registration URL. You will need to create your Printer Server Registration URL using the following example as a guide: https://<Environment URL>/deviceservices/peripheralservice/v1/register The Environment URL is the unique company URL to access your company’s AirWatch console you wrote down in the previous step. This should have been provided to you by your AirWatch Account Manager or other AirWatch representative at the time of installation of the AirWatch system, along with the login credentials. The remainder of the URL is static and must be entered exactly as shown. The Printer Server Registration URL is required for the NETira-CA software to register the print server with AirWatch during the setup process. This will be entered later in Section 4.1, Step 6. e. If you have any questions or need assistance regarding the steps above, please contact your AirWatch account representative or AirWatch support. 3.2 Installing NETira-CA 1. Go to the Datamax-O’Neil website at www.datamax-oneil.com > Support & Downloads and download NETira-CA_Setup.msi. NOTE: a) The NETira-PS software also can be downloaded from the same location. b) NETira-CA and NETira-PS is not printer specific. 2. Once it has downloaded, unzip the file NETira_CA_Setup_XXXX.zip (XXXX represents the version number and will change as the software is updated). Once the file has unzipped, run NETira-CA_Setup.msi 6 a. This will take you to the Welcome to the NETira Connect for Airwatch Setup Wizard screen which starts the installation program. Click “Next >.” b. Next, select the “I Agree” radio button on the End User License Agreement to continue and then click “Next >.” 7 c. On the Shortcut screen, check Create Desktop Shortcut if you want to create a convenient NETira-Connect for Airwatch (NETira-CA) shortcut icon on the Desktop to quickly access NETiraCA when needed. Check “Launch on Windows Startup” if you want NETira-CA to start up automatically when the user first logs into the computer. Click “Next.>.” d. On the Select Installation Folder screen you can choose the location where the NETira-CA software will be installed. To change the suggested default location, click “Browse” and select the desired location. When you have selected where it will be installed, click “Next >.” 8 e. On the Confirm Installation screen, click “Next >” to start installation of NETira-CA. f. When you receive the screen message telling you that installation is complete, click “Close” to exit the installation program. 9 4 NETira-CA and AirWatch Configuration 4.1 NETira-CA Configuration, Part 1 1. After installing NETira-CA.exe, a shortcut icon to NETira-CA that looks like this the desktop. will appear on 2. Double-click on the shortcut icon to create a shortcut in the sistray at the bottom right of the screen. 3. Double-click on the NETira-CA icon in the sistray. 4. Enter admin for the User Name and admin for Password. Click “Login.” NOTE: The User Name is not case sensitive; the Password is case sensitive. 5. From the NETira Connect for AirWatch (Configuration) screen that appears with pre-populated data, write down the data in the Print Server UID section. The data in the Print Server UID section will be used later in the AirWatch Add Print Server dialog box in Section 4.2, Step 6. Example of PrintServer UID: 9ab41b5c-D70a-4ad8-9a1c-05efea6c3d7e 10 6. Enter the Printer Server Registration URL information from Section 3.1, Step 1d in the AirWatch Registration URL box. Example of Print Server Registration URL: http://do_airwatch.airwatch.com/deviceservices/periperalservice/v1/register 7. Enter the Fully Qualified Domain Name (FQDN) name associated with a signed certificate in the AirWatch Notify Point line. Follow the FQDN name with a colon and the appropriate port number followed by /aw-notify. You can find the non-secure port number listed next to Normal Port, and the secure port number listed next to Secure Port. You can use either port number. a. FQDN name examples: b. https://airwatchNETira-CA.com:10000/aw-notify (Secure site URL) http://airwatchNETira-CA.com:9090/aw-notify (Non-secure site URL) 11 8. Enter the AirWatch Organization Group ID into the NETira Connect for AirWatch Configuration screen. See the AirWatch User Manual for instructions to create an organization group. The AirWatch Console Organizations Group Details screen is shown below for reference. 9. Click “Save Data” to update changes into the NETira-CA database. 12 4.2 AirWatch Console Configuration 1. Go to the Login Screen URL Address that you wrote down in Section 3.1 Step 1c. When you get to the AirWatch Console login screen, enter the user name and password you wrote down in Section 3.1, Steps 1a and 1b to log in. 2. On the first screen that appears after you have successfully logged in, click on the Devices icon on the left and then select Printers > Printer Settings > Print Server from the drop-down menu that appears. This starts the process of adding NETira-CA services to the AirWatch Console. 3. Select Add Print Server to add a new print server. Here, you will be adding NETira-CA as the print server. NOTE: If you currently have print servers already installed on your AirWatch Console, they will be listed. If no printers are installed, none will be shown. 13 You will be able to enroll printers later in Section 6. 4. Write down the HMAC Token that is automatically provided in the HMAC Token section of the page. You will need it while completing configuration of NETira-CA in Section 4.3, Step 2. 5. Select the User Name you wrote down in Section 3.1,Step 1a in the User ID* box in the User section of the page. 6. Enter the Print Server UID of NETira-CA that you obtained in Section 4.1, Step 5 in the Service UID* box in the UID section of the page. 14 7. Click “Save” and the NETira-CA print server will be shown as Pending Registration. 15 4.3 NETira-CA Configuration, Part 2 1. Go back to the NETira Connect for AirWatch (Configuration) screen. 2. Enter the HMAC Token from Section 4.2, Step 4 in the box next to HMAC Key and click “Save Data.” 3. Click “Register Server” to register NETira-CA to AirWatch and you will see a message box with “Registration request success.” 16 4. Upon successful registration of NETira-CA, the AirWatch Server will automatically update the following fields on the NETira-CA configuration form: Registration URL, Enrollment URL, Command URL, Alert URL, and AirWatch Server Version. Write down the number in the box next to Secure Port. It will be needed to enroll printers in Section 6.1.1, Step 3c. NOTES: The Stop/Start Server button can be used to start and stop the NETira-CA. If Normal/Secure port value is changed the user must stop and restart the NETira-CA. The Change Password button can be used to change the password of the currently logged-in user. Only Admin can use the Manage Users to add/delete users and/or to reset the password of a user. Manage Printers allows admin user to manage currently enrolled printers. Check the box next to Enable Logging to log all activities. The Open Logs Folder button will show you the logged activity file. Check the box next to Enable Data Logging to log all data transmitted through the networks among NETira-CA printers and the AirWatch Console. 17 4.4 NETira-Printer Service If NETira-PS software is used instead of NETira-CA, then make sure that NETira-PS Service is added in the Windows services list and also confirm that service is started. 1. Go to Windows > Control Panel > Administrative Tools > Services. 2. Search for NETira-PS Service in the services list. 3. Confirm NETira-PS Service is started as seen below. 4. If NETira-PS Service is not started, right click on the service name and choose start option from the context menu. 18 5 Installing .pfx Certificate File for NETira-CA This step requires that you already have the following: Signed Certificate file Private Key file for Certificate To create a .pfx file, combine the Signed Certificate file and the Private Key file. Assign this .pfx file to the Certificate file from the Configuration screen of NETira Connect for AirWatch. To create the .pfx file: 1. Create a new folder. The name of the folder is not important. 2. Place the Private Key file and the Signed Certificate file into the new folder. 3. Create the .pfx file by using openssl.exe or a similar tool. You can obtain openssl.exe from https://www.openssl.org. Here is an example of a command line to use with openssl to create the .pfx file: >openssl pkcs12 –export –out NETira-CA.pfx –inkey private.key –in cert.crt Explanation of the example above: NETira-CA.pfx is the name of the .pfx file we are creating to use as the certificate file for NETira-CA private.key is the name of the private key of the signed certificate cert.crt is the name of the signed certificate file 4. After you have created the .pfx file, go to the currently open Configuration screen of NETira-CA. 5. Click on the button next to the Certificate file line to browse for the .pfx file. 6. Select the .pfx file and click the “Open” button. 7. The .pfx file will now be listed in the box next to Certificate file. 19 6 Setting Up and Testing Printers NETira-CT from Datamax-O’Neil is used to get information about and update printers. If you have not already downloaded NETira-CT, do so now by going to the Datamax-O’Neil website at www.datamaxoneil.com > Support & Downloads > Downloads & Drivers and select your product (RL4e or RL3e). Under Software & Tools, select Utility and download NETira CT Configuration Utility, Ver .65 or later. NOTE: The software is not printer specific. Once the NETira CT Configuration Utility has downloaded, unzip NETira-CT_Setup-XXXX.zip to install it. Open NETira-CT_Setup.exe to launch the install program and add a shortcut icon to NETira-CT on your desktop. 20 6.1 Enrolling and Testing a Printer This section will show you how to enroll a printer and test it to be sure it is communicating properly with the AirWatch Console. To complete this section, you will need the following: The public facing IP address of the WiFi network of the server hosting NETira-CA. The normal and secure port number you recorded in Section 4.3, Step 4. A printer connected to the network of the host computer running NETira-CT. 6.1.1 Enrolling a Printer with AirWatch 1. Click on the NETira-CT shortcut icon on the desktop. 2. Click on “Auto Update” in the list under Printer Component on the left. 3. On the Auto Update window, perform the following tasks: a. On the Print Server Connection Mode line, select HTTP for normal or HTTPS for secured connection in the New Value column. b. On the Print Server IP Address line, type the address of the server hosting NETira-CA in the New Value column. c. On the Port line, enter the normal or secure port number recorded in Section 4.3, Step 4. d. On the Type line, select “AirWatch” from the drop-down menu in the New Value column. e. When done, Click “Send.” 21 4. Click on the “AirWatch” button in the Printer Component menu at left. 5. Type in the friendly name for the connected printer in the New Value column. When done, click “Send.” 6. Remove and reinstall the battery in the printer you are enrolling and restart it. (On printer start up, a printer enrollment request will be sent to AirWatch). 7. Click on the AirWatch console. 8. Under the Devices icon on the left, select Printers > List View to see the currently enrolled printers. If the friendly name of the printer is on this list, the printer is enrolled. 22 6.1.2 Testing a Printer with AirWatch To test whether a printer and the AirWatch console are communicating properly, send the printer a soft reset command. The soft reset command will not change any printer settings. If the printer resets as commanded by the AirWatch console, then the printer and AirWatch console are communicating properly. 1. In the AirWatch console, go to Devices > Printers > List View and click on the friendly name of the printer to see the specific details of this printer. 2. Select “More” on the upper right (next to “Query”), and on the drop-down menu click on “Soft Reset” under the Management column to initiate a soft reset of the printer. 3. Click “OK” when asked if you are sure you want to perform the soft reset action on the printer. 4. Click “OK” when the message appears indicating the soft reset command was sent to the printer. 5. The printer will reboot if the AirWatch console and the printer are communicating properly. 23 7 Creating and Installing Printer Profiles This section explains how to create and install printer profiles. A printer profile is a set of printer settings that can be applied to other printers to save setup time. 7.1 Creating a Printer Profile 1. Open and log into the AirWatch console. 2. Select the “Devices” icon on the menu on the left, then go to Printers > Printer Settings > Printer Profiles. 3. From the Printer Profiles screen, click “Add Profile” located directly under the Printer Profiles header to add a new printer profile. 4. Click on the Datamax-O’Neil logo. 24 5. You will now be on the General screen. On the first two lines, fill in the Name* and Description of the profile. 6. For Assignment Type, select one of the two choices from the dropdown list: Auto: The profile will be sent automatically to the printers within the Assigned Smart Groups [For information and instructions on using Smart Groups, contact AirWatch]. Optional: The profile will be assigned to select Smart Groups, but it must be manually sent to the printers belonging to the selected Smart Groups. 7. The Device menu on the left will list a number of profile categories. Any of the items in the profile categories can be reconfigured as necessary. To configure a profile category, select the desired profile category and click “Configure.” 25 8. The profile for that profile category will appear with some of the data already populated. Change any settings as necessary. You may need to consult the printer manual to complete some of the fields. Below is the Media Label category as an example. Here is an example of the typical data that could be used for the Media Label profile: Units of Measure = I (Imperial) Present Distance = 0 Allow Present Backup = E (Enabled) Label Length = 200 Maximum Label Length = 1000 Sensor Type = C (Continuous) Gap Alternate Mode = D (Disabled) Back After Print = N (No) Label Width = 412 Paper Out Distance = 25 TOF Precedence = N (No) Clean Head Counter = 0 Stop Location = A (Auto) 9. When you have completed entering the desired fields in the profile category, click “Save & Publish.” NOTE: AirWatch will immediately send (“push”) the printer profiles to the printers belonging to the selected smart groups with an Assignment Type of “Auto” set in Section 7.1, Step 6. 26 7.2 Managing Printer Profiles with “Optional” Assignment Type The following describes how printer profiles should be sent to printers with their Assignment Type set to “Optional”. 1. From the AirWatch console, navigate to Devices > Printers > Printer Settings > Printer Profiles. 2. Click on the magnifying glass icon on the right of the printer profile that you want to install. It must be “Optional” under “Type”. 3. A list of printers for the selected Smart Group will appear. Click on the arrow down circle icon on the line of the selected printer in order to send the printer profiles to that printer. Status column will display “Pending Install” and Updated column will display current day/date. 27 8 Sending Install File Commands to a Printer This section provides guidelines for using the AirWatch console to create a group of files that contain items such as firmware, fonts, graphics, etc. to be sent to printers. 1. Download and install the Datamax-O’Neil Package Builder from the Datamax-O’Neil website. Go to www.datamax-oneil.com, select Support & Downloads > Downloads & Drivers. In the dropdown menu to the right of “Select Your Product”, select Remote Management and download the file Datamax-O’Neil Package Builder. It must be version 1.0.0.12 or later. 2. Double-click on the downloaded .zip file called PackageBuilder to install the Package Builder and put a shortcut icon on your desktop. Click on the “Package Builder” icon to launch the application. 3. Click on the “New Package” button. 4. “Enter a New Package File Name” screen will appear. Select a folder to save the new update package. Enter the name of the update package on the “File Name” line and click “Open.” 28 5. The Manage Update Package screen will appear. Locate and select the desired files and firmware you wish to upload to the printer(s) to create one package for a specific printer and click “Save.” 6. Find the folder with the update package files and compress it into a *.zip file. 7. Manually change the file extension from “.zip” to “.dat”. AirWatch will not allow “.zip” extensions for files. Make a note of where this file is located because you will need it in Section 8, Step 19. 8. In the AirWatch console on the menu on the left, go to Devices > Printers > Printer Settings > Printer Files. Then, click on “+ Add New File” at the top of the Printer Files screen. 9. Select Datamax-O’Neil. 10. On the next screen, name the file. For example, “Update Packet 1.” 29 11. Type in any desired description. 12. Select “Auto” or “Optional” for Assignment Type. 13. Select any desired Smart Groups. 14. Click on “File” in the left column and select “Config.” 15. Type the name you want to call the file in “File Name.” 16. Type any version number you want to use in “File Version.” 17. For the line Upload New File, select “Upload.” 30 18. Select “Choose File.” 19. Click “Browse” and locate the “.dat” file from Section 8.7. 20. Click “Open.” 21. Click “Save.” 22. The “.dat” file will show under Upload New File. 23. Click “Save & Publish.” 24. Screen will show a list of the printers in the selected Smart Groups that will receive the new files. 25. Click “Publish.” 26. Screen will show a list of the printer files. Click on the magnifying glass icon next to file with Type: Optional to install. 27. Click on the arrow down circle button to install the files. 28. The LCD screen on the printer will show the progress/status of the installation and the File status in AirWatch will be labeled as Installed upon completion. 31 9 Receiving and Testing Alerts from a Printer In this section, you will conduct a test to confirm that the AirWatch console receives alerts from the printer. 1. In the AirWatch console, using the menu on the left, go to Devices > Printers > List View. 2. Select the printer you want to test from the list. 3. Click on the lower “More” tab and select “Alerts” from the drop-down menu. 4. A list of possible alert types will be displayed with the current status of each for that printer. 5. Physically open the media door on the printer and leave it open. Be sure the printer is powered ON. 6. Wait 10 seconds and then press the “F5” key on the computer keyboard to refresh the screen. 32 7. In the Alert Type column, you should now see the “Head Open” alert with an orange triangle with an exclamation mark in the Status column for that printer. 8. Close the media door on the printer. 9. Wait 10 seconds and then press the “F5” key on the computer keyboard again to refresh the screen. 10. After the screen refreshes, you should see the “Head Open” alert, but the orange triangle with an exclamation mark should have been replaced by a blue circle with a check mark showing that there is no longer an alert for that function. If this test is successful, you have verified that the printer is able to send alerts to the AirWatch console. NOTE: Both the Status icon and the Sample Time will update on the Alerts screen each time the status changes. 33 10 Managing Datamax-O’Neil Printers from AirWatch This section coves the management of Datamax-O’Neil printers from AirWatch console by sending Query All, Soft Reset and Factory Reset Commands. 10.1 Query All Displays printer attributes and settings on a detail page on AirWatch console. 1. Go to Devices > Printers > List View and a list of printers will appear. Select the desired printer by clicking its friendly name. 2. Click on the upper “More” tab to the right of the printer friendly name and select “Query All.” 3. After 10-15 seconds, hit the F5 key to refresh the screen and a list of updated printer attributes and settings will appear. 34 10.2 Soft Reset Sends command to reboot the printer but not change any settings. 1. Go to Devices > Printers > List View and a list of printers will appear. Select the desired printer by clicking its friendly name. 2. Select “Soft Reset” from upper “More” button drop-down menu under “Management.” 3. Printer will reboot. 35 10.3 Factory Reset Restores factory setting for printer attributes. 1. Go to Devices > Printers > List View and a list of printers will appear. Select the desired printer by clicking its friendly name. 2. Select “Factory Reset” from the upper “More” button drop-down menu under “Management.” 3. All currently installed attributes and settings will be replaced by factory attributes and settings. 36 Appendix A: Definitions and Alerts A-1 Definitions AirWatch Notify Point: Address (or URL) at which NETira-CA receives all the requests (or Notifications) from AirWatch. Connection Mode: Type of connection between NETira-CA and Printers, secure (HTTPS) or normal (HTTP). Factory Reset: Command to restore the factory setting for a printer. Factory Reset will not alter the Networking Settings (e.g., Wi-Fi setting of the printer is remained the same). FQDN: Fully Qualified Domain Name. Group ID: The ID associated with an Organization Group of AirWatch. HMAC Key: Hash-based Message Authentication Code – AirWatch generates this key automatically for each Print Server. NETira-CA: NETira Connect for AirWatch – Middleware software solution that allows AirWatch to manage Datamax-O’Neil printer. NETira-CT: NETira Configuration Tool – Software program for configuration of the Datamax-O’Neil printer. PFX File: Personal Information Exchange File – In NETira-CA context, this file contains the Certificate and Private Key information. Print Server UID: A unique ID to represent an instance of NETira-CA (or Datamax-O’Neil Print Server) on AirWatch. Signed Certificate Files: Certificate signed by a known Certificate Authority. Private Key File: Information used to decrypt the cipher data. Registration URL: Address (or URL) that NETira-CA uses to register itself to AirWatch. Soft Reset: Command to reboot the printer. System Files: Files on printer including LUA Script file, JSON Menu File, Configure File, and Database File. Trusted Certificate Authority: Known organization that issues Certificates. 37 A-2 Alerts SL No Alert Description Alert 1 Print-head is not locked-on position HEAD OPEN 2 Print-head temperature reached above max. HEAD TOO HOT 3 Top-of-form not found TOF FAULT 4 Out of paper PAPER OUT 8 Verifier fault VERIFIER FAULT 10 A/D conversion error ADC ERROR 11 Dma faults DMA FAULTS 12 Software faults SW FAULT 13 PIP position fault POSITION FAULT 14 Head needs cleaning CLEAN PRINTHEAD 15 Dots out after dot check BAD DOTS 16 Stop signal asserted STOP SIGNAL 17 RFID fault RFID FAULT 19 Soft headup fault CLOSE HEAD LATCH 20 Motor temperature reached above max MOTOR HOT 21 Invalid data INVALID DATA 22 Battery voltage too low to move paper BATTERY VOLT TOO LOW 23 Battery missing BATTERY MISSING 24 Print-head temperature is above the ambient temperature HEAD WARM 26 Low voltage warning LOW VOLTAGE 27 TPH 24v high TPH HIGH 28 Power down POWER DOWN 29 Head needs cleaning HEAD NEED CLEANING 30 Ribbon is below the fixed threshold REWINDER FULL 31 Head mismatch HEAD MISMATCH 32 Motor temperature is above the ambient temperature MOTOR WARM 33 Media low sensor MEDIA LOW 34 Battery charge low BATTERY LOW 38 39 Appendix B: Troubleshooting B-1 NETira-CA Troubleshooting Messages and Solutions NETira-CA Registration Error Message Cause/Solution “Registration failed: (500)InternalServerError” Occurs when incorrect data sent to AirWatch from NETira-CA. Enter correct values (Print server UID, Group ID, Registration URL) and try registering Print server. Occurs when incorrect data sent to AirWatch from NETira-CA. “Registration failed: (400)Bad Request” Enter correct values (Registration URL) and try registering Print server. Occurs when authentication provided, but user does not have access requested. AirWatch provided HMAC key for particular print server has to be used in NETira-CA configuration window. “Registration request failed: (403)Forbidden” Occurs when Print server UID provided in the NETira-CA does not match with UID of Print server added in AirWatch. Provide correct Print server UID which is added in AirWatch console. Occurs when Group ID provided in NETira-CA does not match with Group ID set in AirWatch under Organizational group details (Groups & settings-> Groups->Organizational groups). Provide correct Group ID which is provided in AirWatch console. Printer Enrollment Error Message on Printer UI "Enrollment request Failed" Cause/Solution Occurs when "Print Server IP Address", "Port Number" and "Print Server Connection Mode" configuration on printer are incorrect. Reconfigure printer with correct values and try to enroll printer. Occurs when NETira-CA is not registered with AirWatch. Register NETira-CA with AirWatch and enroll printer. 40 NETira-CA Logs Error Message on UI Cause/Solution Occurs when Print Server Connection Mode is set to secure connection (HTTPS) and Certificate files are not installed. Printer will enroll but will not be able to receive and respond to commands from NETira-CA. Install Printer Certificate files in the correct Printer Module path and Restart the printer. Occurs when printer has lost Network IP. Printer : Command error: (Printer is not Check the Wi-Fi configuration on the printer. Check if the network that is being used is active. connected or not alive.) Occurs when Print server IP, Port Number, Print Server Connection Mode and AutoUpdate type is modified on the printer. Re-configure the printer with correct settings and reboot. Occurs when CLC terminal is open for printer by other interfaces. Close CLC terminal used by other interfaces. Printer : Command error: (Connection to printer is failed in between!...) for device Occurs when printer has lost Network connection during package/profile download or Printer Query. Restore the Network Connection of the printer. Error : A connection attempt failed because the connected party did not Occurs after firmware upgrade using AirWatch autoupdate. properly respond after a period of time, NETira CA will acquire connection with printer after upgrade and or established connection failed reboot. because connected host has failed to respond “MDM, Wrong command payload received.” Occurs when AirWatch sends command request other than Reset, ResetDefaults, Delete, PrinterQuery, InstallProfile, InstallFile. NETira-CA application version is outdated. Install the new version of NETira-CA. “MDM, Alert request< AlertType> <alert.Item> failed, from device <DeviceId>” Occurs when printer is deleted from AirWatch console and Printer Delete Notification is missed at NETira-CA. Re-enroll the Printer if it is to be added to AirWatch Reconfigure the printer [Set Auto-update type to a value other than AirWatch (5)]. “Printer, Wrong enrollment request received.” Occurs when Printer has sent incorrect payload values in enrollment request. Firmware is outdated. Update printer firmware. MDM, Enrollment request failed, from device <PrinterUID> Occurs when enrollment URL is incorrectly set on NETira CA. Register NETira-CA application again with AirWatch. “Printer, Wrong status alert received from DeviceID:<PrinterUID>” Occurs when printer has sent incorrect payload values in the Alert request. Firmware is outdated. Update the printer firmware. 41 "NETira CA, Failed to copy <filename> Occurs when Install File command from AirWatch fails. to Device:<filename>” Printer is not accessible to NETira-CA. Reboot printer. B-2 HTTP Status Codes Status Code Cause 200 Ok Indicates HTTP GET or HTTP POST was successful. 401 Unauthorized Indicates that printer either needs to authenticate with the server or failed to authenticate with the remote server. 403 Forbidden Indicates that the authentication was provided and valid; however, the user does not have access to the requested resource. 404 Not Found Indicates that the remote URL provided points to an invalid location on the server. 500 Internal Server Error Indicates that the server encountered an unexpected condition that prevented it from fulfilling the request. 42 43