1
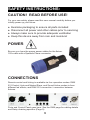
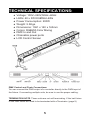
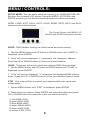
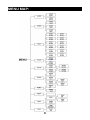
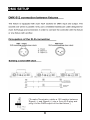
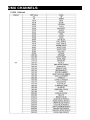
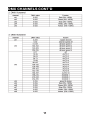
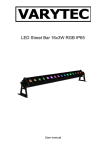
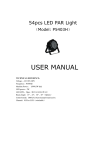
1
2
SAFETY INSTRUCTIONS:
CAUTION! READ BEFORE USE!
For your own safety, please read this user manual carefully before you
initially power up your fixture.
●
●
●
●
Examine packaging to ensure all parts included
Disconnect all power and other cables prior to servicing
Always make sure to provide adequate ventilation
Keep this device away from rain and moisture!
POWER
Be sure you have the proper power cables for the fixture.
120v cable with a Speakon Power connector.
CONNECTIONS
Remote control and linking is available via four operation modes: DMX
512 Control, Auto and Master/Slave, and Sound Active modes to form
different led effects, and DMX-512 connection / connection between
fixtures.
Ports and Control Panel seen here. See the DMX page for cabling details
and Daisy-chaining specifics (Page 9).
3
FEATURES:
● RGBWA Color Mixing
● Color Strobe Effect
● Color Mix Effect
● LED Chases (Adjustable Speeds)
● Electronic Dimming 0-100%
● Operating Modes: Sound Active, Master /
Slave, or DMX Control
● DMX-512 Protocol Compatible (1, 5 & 9
DMX Channels)
● Digital Display for Address and Function
Settings
Please Note: Specifications and improvements in
the design of this unit and this manual are subject
to change without any prior written notice.
4
TECHNICAL SPECIFICATIONS:
●
●
●
●
●
●
●
●
●
Voltage: 100V~240V,50Hz~60Hz
LEDs: 60 x 3W RGBWA LEDs
Power Consumption: 200W
Weight: 5.3Kgs.
Dimensions: 1061 x 140 x 163mm
Colors: RGBWA Color Mixing
DMX In and Out
Chainable power ports
LCD Control Screen
DMX Control and Chain Connections:
You can connect the DMX-output of a controller directly to the DMX-input of
the fixture. If connecting mulitple units, be sure to use the proper cabling.
TERMINATION NOTE: These units are not self terminating. If the last fixture
in the DMX chain will need to be terminated with a Terminator. (page 9)
5
MENU / CONTROLS:
SETUP MENU: You can easily setup and control your DAZZLER RGB LED
Bar from the on-board LCD screen. Using the MENU, UP, DOWN, and
ENTER buttons, you will find the following options to select and modify:
ADDR, CHND, STAT, COLO, AUTO, SOUD, REMO, REST, INFO, and SLAV
selections are outlined below.
The Control Screen with MENU, UP,
DOWN, and ENTER Navigation buttons.
ADDR - DMX Address Setting via control board and motor setting
1. Tap the MENU button and UP button or DOWN button until “ADDR” is
displayed, press ENTER.
2. “Axxx” will now be displayed, “x” represents the displayed address.
Press the UP or DOWN buttons to find your desired address.
CHND - This menu will let you select your desired DMX Channel mode.
1. Tap the MENU button and UP button or DOWN button until “CHND” is
displayed, press ENTER.
2. “X Ch” will now be displayed, “X” represents the displayed DMX channel
mode. Press the UP or DOWN buttons to find your desired Channel mode.
STAT - This menu will let you select your desired static color mode and
strobe mode.
1. Tap the MENU button until “STAT” is displayed, press ENTER.
2. There will be six options. Press ENTER can select the option and press
UP or DOWN button can select the value you desire as below.
1) red~R000~R255
2) gree~G000~G255
3) blue~B000~B255
4) white~W000~W255
5) anbe~A000~A255
6) strobe~ST00~ST20
6
MENU OPTIONS CONT’D:
COLO - Build-in color mix
1. Tap the MENU button and UP button or DOWN button until “COLO” is
displayed, press ENTER.
2. “CoX” will now be displayed,, “X” representing a number between 1-51
will be displayed. Press the UP or DOWN buttons to select either a static
color mode.
AUTO - This menu will let you select your desired auto mode
1. Tap the MENU button and UP button or DOWN button until “AUTO” is
displayed, press ENTER.
2. “Autx” will now be displayed, You can confirm three modes by UP or
DOWN for auto mode.
SOUD - This menu will let you select your desired sound mode
1. Tap the MENU button until “SOUD” is displayed, press ENTER.
2. “SOUD No.x” or “SOUD SENS” will now be displayed, You can confirm
three modes by UP or DOWN for sound mode. “SOUD SENS” will display
the Sensitivity of sound
REMO - This menu will let you select your desired remo mode
1. Tap the MENU button until “REMO” is displayed, press ENTER.
2. “on” or “off” will now be displayed, you can select to close or open the
infrared.
REST - This will display the System all value Reset
1. Press the UP or DOWN button until “REST” is dispalyed, press ENTER.
2. The software version will be displayed.
INFO -This menu will display the light information
1. Tap the MENU button and UP button or DOWN button until”INFO” is displayed ,press ENTER.
1) DISP this will display the time of display panel,if you select “ON” means
after 20 seconds the display panel will destroy,if you select “OFF” means the
display panel will always display.
2) TEMP this will display the temperature at work
3) TIME this will display the light operating time
SLAV - This menu will let you select your desired Master/slave mode
1.Tap the MENU button until “SLAV” is displayed, press ENTER.
2. “Sla” will now be displayed,Slave mode is confirmed.It will be slaved by
auto mode sound mode and chase mode
7
MENU MAP:
8
DMX SETUP
[To make Terminator; solder a 120 resistor between
Signal (–) and Signal (+) into a 3-pin XLR-plug and
plug it in the DMX-output of the last fixture.]
9
DMX CHANNELS:
10
DMX CHANNELS CONT’D
11
(NO DIRECT SALES, DEALERS AND DISTRIBUTORS ONLY)
Please Register your product warranty on ProXDirect.com,
submit your testimonials and setup photos to our website,
& Tag us on your social media websites.
#proxdirect
12