1
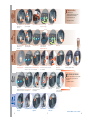
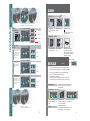
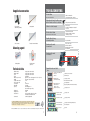
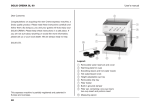
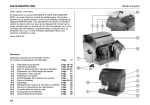
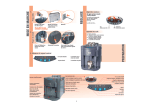
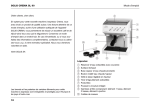
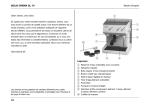
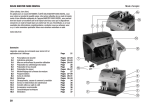
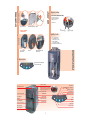
ADJUST
Preparation
1
2
3
Fill in coffee beans
Fill tank with fresh water Plug in
Degree of grinding
Adjust only when grinding unit is running
The machine is pre-set to a
mean value. Recommended
settings are 8 (+4 / -2)
Coffee flows too …
fast:
finer grinding
Do not use caramelized
or flavored coffee!
slow:
coarser grinding
Quantity of coffee
2.
Ventilate
1) Place cup under nozzle
2) Press and hold desired
button (espresso or coffee)
3) Release button when
correct amount is reached
4) Quantity remains stored in memory
2.
1.
1
2
3
Place receptacle
under nozzle
Switch on
Draw off hot water until
it flows evenly
PREPARATION
STARTING
1.
3. Observe display
flashing: machine is warming up
steady: machine ready
Coffee bean container
Funnel for coffee powder
Adjusting lever for degree of grinding
Adjusting lever for quantity of coffee
Turning knob steam/hot water
Service door / brewing unit
Coffee outlet unit
(adjustable)
Coffee dregs drawer
(access: open service door)
Operating panel
Refill with beans
Ventilate machine /
Refill with
water Heating up / Standby
Dregs drawer full
Request for descaling
Fresh water tank
Mains switch (On / Off)
Cappuccino nozzle
Steam
Espresso
Coffee
Powder coffee
Drip tray / drip grid
Clean (see page 6)
Display: drip tray full
1
BEAN COFFEE
To improve frothing
strong
coffee
- Use fresh roasted coffee beans
weak
coffee
1
2
Place cup(s) under nozzle Adjust coffee flow
3
4
Coffee
or Espresso
- Change degree of grinding
5
Coffee flow adjustable
Select quantity of powder Press 1 x for 1 cup
Press 2 x for 2 cups
Remove cup(s)
Different cup sizes
are possible
1
2
3
4
5
Select powder coffee
Fill up with powder
Press 1 x
Remove cup
5
6
7
8
End preparation and
remove glass
Frothed milk
Choose coffee
Place cup under nozzle
Adjust coffee flow
Different cup sizes
are possible
Coffee flow adjustable
Coffee
or Espresso
6
Max. 1 level measure
NEVER use instant coffee!
CAPPUCCINO
POWDER COFFEE
- Use another coffee mix
(insure that it is the appropriate sort of coffee
for fully automatic espresso machines)
1
2
3
4
Fill 1/3 glass with milk
Select steam
Start steam preparation
Place glass under nozzle Froth up milk
Use only heatproof glass!
LED Temp. flashes: warming up Let leftover water run off
LED Temp. is lit: temp. correct Close turning knob
Immerse nozzle 3-4 cm deep Move glass...
Open turning knob
Coffee flow is adjustable to the back
Clean nozzle with damp cloth
STEAM
After STEAM / CAPPUCCINO
Push button «Steam» and draw off 1 cup of hot water:
Water temperature is reset to normal coffee
temperature.
See STARTING , 2. Ventilate
1
Select steam
2
3
4
Start steam preparation Place can under nozzle
5
6
End preparation and
remove can
Clean nozzle with
damp cloth
Open turning knob
so that the residuals can
not dry up on the nozzle
HOT WATER
LED Temp. flashes: warming up Let leftover water run off
LED Temp. is lit: temp. correct Close turning knob
Rotate beverage
Immerse nozzle 3-4 cm deep while frothing
2
1
2
3
Adjust nozzle if
necessary
Place glass under nozzle Start hot water
preparation
4
5
Draw off hot water
End preparation and
remove glass
3
TSM SUCCESS MANUAL® - © 200602 - by SEV/ASE
4
PROGRAMMING
Start here
CLEAN
1 Machine
and
1
2
Switch off
To start programming mode, press both buttons
hold them down, and switch on machine again
Duration: approx. 6 min.
3
Measure
water hardness
Hardness 1
1
2
3
Fill water tank,
place receptacle under
outlet
Throw in cleaning
tablet
Press Clean for 5 sec.
When button «Clean» goes out:
Cleaning is finished
Hardness 2
1 sec.
2 Cappuccino nozzle
Hardness 3*
Read after 1 min.
Press button
Hardness 4
Until appropriate setting...
*Basic setting
Machine wash
function
As soon as the machine
has been switched on,
the remaining water is
rinsed out. Therefore,
the very first cup of
coffee is made with
fresh water.
1
2
3
Loosen the knurling
screw, remove nozzle
Clean with damp
cloth
Disassemble nozzle. Place
nozzle parts under running
water and remove milk residue.
Dry separate parts, reassemble,
and mount on machine.
activated
not activated
Press button
Every 3-4 months or
Prebrewing function
The coffee is first
moistened and then
brewed after a short
pause!
if lamp
DESCALE
activated
(automatic)
- To descale, make sure that the mains cable is plugged in and the
machine switched on. During this process the heating is deactivated.
not activated
- Use a non-poisonous, harmless, commercial decalcifying agent.
Press button
- NEVER use VINEGAR (possible damage to device!)
- Note manufacturer’s instructions!
- If the machine is turned off during the descaling procedure, it will
continue again where it left off when the machine is turned on again.
Pregrinding function
During preparation,
the next portion of coffee
will already be ground
(ideal if several coffees
need to be prepared at
same time)
activated
1 Preparation
not activated
Press button
1. Place large receptacle under Cappuccino nozzle
2. Solipol rated 1:1 (0,5 l Solipol / 0,5 l Wasser)
in the water tank.
End here
2 Descale Duration: approx. 45 min.
1
2
Switch off...
and switch on again to
activate the programmed functions
1
2
Press buttons: Buttons «Clean»,
«Powder» and LED «Descale»
light
Open turning knob:
As soon as buttons / LED flash:
LED «Descale» flashes / close turning knob
«Clean», «Powder» light
3 Rinse
5
3
1. Rinse water tank and fill
2. Open turning knob and draw off tank contents
3. Close turning knob, descaling is complete
6
TROUBLESHOOTING
Supplied accessories
No indication
Key for strainer
dismantling / assembly
Coffee measure
Cleaning brush
Test strip for water hardness
No power to the machine
- Switch on main switch
- Check plug and power connection
Only water instead of coffee comes
when «Powder coffee» is selected
- Fill up a measure of powder coffee
Coffee is not hot enough
- Pre-heat cups
- Possibly clean brewing unit, descale if
necessary
No hot water / steam
Hot water / steam nozzle blocked
- Clean nozzle with needle
(when the machine is switched
off and tap is closed)
Heating time too long,
not enough water
- Descale machine
1. Close service door
2. Switch on machine
3. Brewing unit is unlocked
4. Continue with
Brewing unit cannot
be removed
Cleaning agent
Brewing unit cannot
be inserted
1
2
Restore brewing unit to
original position
Cleaning tablets
Descaling agent
(optional)
Technical data
-
Nominal voltage
Nominal output
Power
Frame
Dimensions (L x W x D)
Weight
Length of mains cable
Place for extra cable
Control panel
Water tank
Capacity
- Heating unit
- Pump pressure
- Safety devices
- Steam outlet
Preparation does not start
Display:
see type plate on the machine
see type plate on the machine
see type plate on the machine
metal-plastic
approx. 27,5 x 35 x 42 cm /approx. 11 x 14,4 x 16,9 Inch
net approx. 11 kg / net 24.25 lb
1.2 m
yes
on the front
removable
wate tank approx. 2 l
bean container approx. 250 g
aluminum
15 bar
pressure-sensitive safety release valve
for heating and safety thermostat
continuously adjustable
This TSM SUCCESS MANUAL® has been examined by SEV for conformity with the safety-relevant
standards, and has been analysed by an application-oriented risk analysis for the completeness
and correctness of the indications for a safe use of the appliance. Thereby we assume a use
with which can be reckoned based on common-sense.
TSM SUCCESS MANUAL® - safe to use- easy to understand due to TSM® - Total Security Management and ergonomic communication®
7
= The motor of the grinding unit
is blocked
= No beans
Contact the Service technician
Refill with beans
= Ventilate machine
= Fresh water tank empty
See page 1, ventilate
Fill water tank with fresh water
= Dregs drawer missing
= Dregs drawer full
(after 14 coffees)
= Request for descaling
Insert dregs drawer
Empty dregs drawer (with machine switched on)
See page 6, descale
= Request for cleaning
after 250 coffees
See page 6, clean
= Temperature too high
See page 1, Ventilate
= Brewing unit blocked
= Brewing unit missing
See page 8, Troubleshooting (Brewing unit)
Insert brewing unit
= Door open
Close door
8
CLEANING
Use a mild non abrasive cleaning agent!
- The machine must not be connected to main switch for cleaning.
- Do not use conventional and / or microwave ovens for drying the coffee machine components.
Casing
Wipe with a soft, damp cloth
Container for coffee grounds and
drip tray
Rinse under running water
Water tank
Rinse under running water
Remove the filter that is in the water tank and
rinse thoroughly. Replace by turning and pressing
lightly into place.
Coffee outlet
1. Place receptacle under coffee outlet
Clean weekly
2. Press button «Coffee powder»
(do not fill in coffee powder)
3. Let flow pure water through the system
to avoid residuals in the pipes etc.
Brewing unit
Clean weekly.
Never clean the brewing unit
in the dishwasher!
1. Open service door.
Remove drip tray / grounds container
2.1 Loosen sieve with key...
2. Press PUSH-position and remove
brewing unit. If necessary, unscrew the
uppermost sieve in the brewing unit
Clean everything under running warm water
and let it dry. Clean service area
2.2 ...and remove
3. Reassemble brewing unit and
slide in, do NOT press the PUSHposition!
Operating Instruction
The documentation for your new coffee machine consists of these instructions and the
separately enclosed safety advice. This documentation should be read before the installation
of the device. Keep the documentation handy at any time and pass it on to any other
user.
4. Insert drip tray and grounds container,
then close service door
9