1
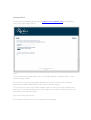
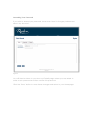
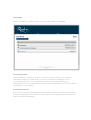
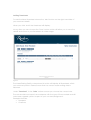
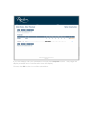
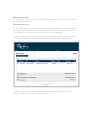
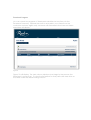
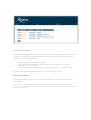
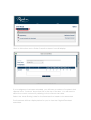
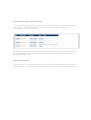
Temporary Worker Timesheet User Manual
Contents
About Omni .............................................................................................................1
Point of Contact .....................................................................................................1
Getting Started .......................................................................................................2
Amending Your Password .....................................................................................3
Homepage ..............................................................................................................4
Adding Timesheets .................................................................................................5
Returned timesheets ..............................................................................................9
Timesheet Progress .............................................................................................. 10
Timesheet Corrections ........................................................................................ 11
About Omni
Omni is a Recruitment Process Outsourcer (RPO) established in 1997 and winners
of the Recruiter Award for Best Managed Service Provider 2008 and Outstanding
Outsourced Recruitment Organisation 2010.
We are entirely independent of any agency and do not have a database of our
own. We are managing the recruitment on behalf of Rydon and work with your
agency and many others to provide candidates to Rydon.
In order to process the timesheets for your temporary assignments at Rydon, you
need to log in to our recruitment system, Appellia. This manual will help you to
use this system to ensure your timesheets receive the correct approval and you
can be paid for the work you complete.
Point of Contact
If you have any problems or questions, please call Omni’s Rydon Recruitment
Hotline 0845 0940718 and ask for Sarah Stewart.
Getting Started
To access the Appellia system, go to https://rydon.appellia.com. This will take
you to the login page below:
Figure 1
You should have already been set up with login details, so please refer to your
email for login details.
If you have not yet received login details you should contact Omni’s Rydon
Recruitment Hotline 0845 0940718 and ask for Sarah Stewart.
You will need to enter your email address (the one that your login details were
sent to) in the Email Address field on the page, and enter the password that you
received in the Password field.
Then click the Login button.
This will then take you to your own personal homepage.
Amending Your Password
If you wish to amend your password, hover over ‘Users’ in the grey toolbar and
select ‘My Account’.
Figure 2
You will then be taken to your Account Details page where you are asked to
enter a new password and then confirm this password.
Click the ‘Save’ button to save these changes and return to your Homepage.
Homepage
When you login, you will be taken to your personalised homepage.
Figure 3
Outstanding Tasks
The homepage is designed to give you easy access to all of your personal
recruitment tasks. Any tasks that you have outstanding will display in the
Outstanding Task list. For the timesheet process, these tasks will be any
timesheets that you have started to enter but not completed, or that have been
returned to you to amend.
Timesheet Summary
A list of your contracts/assignments are detailed under the Timesheets Summary.
If there is more than one contract, only contracts with timesheets that have not
been submitted will display.
Adding Timesheets
To add the latest timesheet choose the ‘Add’ button on the right hand side of
your contract details.
When you click ‘Add’ the timesheet will display.
At any time you can choose the ‘Save’ button which will allow you to save the
details and return to your timesheet at a later stage.
Figure 4
The Week Ending field is a dropdown-list which will display all timesheets within
your contract period. Please ensure that the correct week ending date is
selected.
Under ‘Timesheet’, in the ‘Rate’ column ensure you choose the correct rate.
The rate should be chosen in accordance with the type of time worked and will
have been agreed upfront as part of your contract/assignment.
Examples include:
• Standard
• Overtime
•
•
Annual Leave
Sickness Absence
The Period field displays when a timesheet is added. The type of period is
predefined and displays different periods according to the Rate selected.
The different types include:
• Hour
• Day
• Week
Please level the Project and Detail fields blank.
For standard, overtime rates, annual leave and sickness absence, a box will
display under each day for you to enter the total number of days/hours under
each project number at each pay rate.
You must click ‘Add’ in order for each entry to be captured.
If you want to delete a timesheet for a week where no time was worked, choose
the button ‘Delete Timesheet’. If you then wish to input a timesheet for a week
you have cancelled, you will need to contact your Omni Account Manager.
Mid-week contract renewals
If your contract has expired and been renewed mid-week, you will have two
contract records for that week which means that you will need to submit two
timesheets for the same week – one timesheet will cover the days up to your last
contract end date, and the other will cover the days from your new contract
start date.
Expenses
If Expenses can be claimed as part of the assignment, the Expenses section will
display and allows you to enter in any expenses incurred. To do this:
1.
2.
3.
4.
Choose a date from the date picker
Enter the amount in the Amount column
Provide a description of the expense
Choose the Add button
You can also upload a receipt should you want to. Simply:
1.
2.
3.
4.
5.
Choose the Upload button
Choose the Browse button
Locate the file
Choose Open with the file selected
Choose Upload
If you are happy with your timesheet choose the Complete button. The page will
display shaded and a confirmation box will display.
Choose the OK button to confirm submission.
Figure 5
If more than one timesheet approver has been set up, a pop-up box will display
containing a list of Timesheet Approvers.
Please select the name of the manager who will be available to approve your
timesheet within the next few days, then choose OK.
Choosing Cancel will return you back to the timesheet input page.
Figure 6
What Happens Next
The timesheet will then be sent to the Timesheet Approver you selected and they
will be notified by email.
Returned timesheets
If a timesheet is returned to you to amend following submission, you will be able
to click the link in the email to go straight back into the timesheet, or alternatively
you can go to the Outstanding Tasks section of the homepage.
Click on ‘Amend Timesheet’ and you will be presented with the option to make
further amendments to the timesheet, and see the Approvers comments.
Figure 7
Timesheet Approver comments display at the bottom of the page with the
option to make amendments to the timesheet.
Timesheet Progress
You can check the progress of timesheets submitted at any time via the
Timesheet Summary. Expand the section and select your name from the
contractor column. Again only contracts with timesheets that have not been
submitted will display.
Figure 8
Figure 10 will display. The task column displays what stage in the process the
timesheet is currently at. To view the timesheet for that particular date click on
the date under the Week Ending column.
Figure 9
Timesheet Corrections
If an original timesheet has been incorrectly input, the Appellia system allows you
to raise a correction for any timesheets that have already been processed in
order to amend the following:
-
The number of hours/days worked
The type of rate selected against these hours/days (e.g. Overtime,
Standard, Annual Leave)
The expenses claimed (if these can be claimed for your assignment)
For any other queries, please contact your recruitment agency.
Raising a Correction
A ‘Raise Timesheet Correction…’ button will display under your name on the
homepage.
NB. Please note that this button will be disabled if these timesheets have not yet been fully
processed, in which case, please contact your agency if you feel that an amendment needs to be
made to the timesheet.
Click on this button and a ‘Raise Correction Memo’ box will display:
If your assignment has been extended, you will have a number of contracts that
appear in the ‘Contract’ drop-down list at the top of the box. You will need to
select the correct contract by referring to the contract start date.
Select the ‘Week Ending’ date for the timesheet that needs to be amended.
The timesheet will then display below for you to view the Original Timesheet
submitted.
Comments Box
In order to submit your correction, please enter comments in to the Comments
box, to clarify what needs correcting in the original timesheet. You need to
provide clear detail of what is required.
Once complete, please click ‘OK’ to submit.
Expenses Receipts
If you are adding additional expenses, you will need to email your receipts to
[email protected], quoting your Name, Contract Reference (as displayed
in the Contract drop-down list) and the week ending date for the expenses.
Corrections already raised
You may see a red message at the top of the box when you are selecting the
relevant week ending date:
This message indicates that a correction is already being processed for this
week. Until this has been completed, you cannot raise another correction for this
week.
You will need to contact your agency to ensure that amendments are made to
the correction already raised before it is finalised.
Tracking the Progress of a Correction
Once you have submitted your correction, you can track its progress in the same
way that you track timesheets. The Correction will be distinguished as a
‘Correction’ in the Type column.
By clicking on the week ending date for the correction, or the original timesheet,
you will be able to view both timesheet and correction together in one screen
for the specified week.
Rejected Correction
If for any reason a Correction is declined by the Omni Recruitment Team or the
Line Manager, you will receive an email from the system confirming the rejection.