1
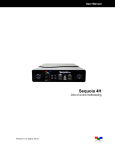
User’s Manual Seneca E.264 Revision 1.0.0 (May, 2012) WARNING Do not attempt to disassemble your Seneca device. Doing so may void your warranty. There are no serviceable parts inside. Please refer all servicing to qualified personnel. TRADEMARKS All brand and product names are trademarks or registered trademarks of their respective companies. COPYRIGHT The information in this manual is subject to change without prior notice. No part of this document may be reproduced or transmitted in any form or by any means, electronic or mechanical for any purpose, without the express written permission of Avitech International Corporation. Avitech International Corporation may have patents, patent applications, trademarks, copyrights or other intellectual property rights covering the subject matter in this document. Except as expressly written by Avitech International Corporation, the furnishing of this document does not give you any license to patents, trademarks, copyrights or other intellectual property of Avitech International Corporation or any of its affiliates. TECHNICAL SUPPORT If you have any questions regarding the information provided in this guide, call our technical support help line at 425-885-3863, or our toll free help line at 1-877-AVI-TECH. You can also email us at [email protected] Table of Contents Warranty .............................................................................................. ii Extended Warranty Options ....................................................................... iv Services and Repairs Outside the Warranty Period .................................. iv Regulatory Information ...................................................................... iv Federal Communications Commission (FCC) Statement ........................... v European Union CE Marking and Compliance Notices ............................. vi Statements of Compliance.................................................................. vi Australia and New Zealand C-Tick Marking and Compliance Notice ....... vii Statement of Compliance .................................................................. vii Preface ............................................................................................... vii Welcome .................................................................................................. viii About this Manual .................................................................................... viii 1 Getting Started .............................................................................. 1 1.1 Product Features ................................................................................. 1 Specifications ....................................................................................... 2 1.2 Identifying the Front Switch ................................................................. 3 1.3 Identifying the Front Indicators ............................................................ 4 1.4 Identifying the Rear Components ........................................................ 5 1.5 Application Diagram ............................................................................. 6 1.6 Getting Your Seneca Ready for Use ................................................... 7 2 Managing Your Seneca ................................................................ 8 2.1 Control Tab .......................................................................................... 8 Control Port Configuration Tab ............................................................ 9 Control Port Statistics Tab .................................................................11 SNMP Configuration Tab ...................................................................12 SNMP Statistics Tab ..........................................................................13 2.2 Web Pages Served by the Seneca ....................................................13 i ii Warranty Avitech International Corporation (herein after referred to as “Avitech”) warrants to the original purchaser of the products manufactured in its facility (the “Product”), that these products will be free from defects in material and workmanship for a period of one (1) year or fifteen (15) months from the date of shipment of the Product to the purchaser. There is a three (3) month grace period between shipping and installation. If the Product proves to be defective during the one (1) year warranty period, the purchaser’s exclusive remedy and Avitech’s sole obligation under this warranty is expressly limited, at Avitech’s sole option, to: (a) repairing the defective Product without charge for parts and labor; or (b) providing a replacement in exchange for the defective Product; or (c) if after a reasonable time is unable to correct the defect or provide a replacement Product in good working order, then the purchaser shall be entitled to recover damages subject to the limitation of liability set forth below. LIMITATION OF LIABILITY: AVITECH’S LIABILITY UNDER THIS WARRANTY SHALL NOT EXCEED THE PURCHASE PRICE PAID FOR THE DEFECTIVE PRODUCT. IN NO EVENT SHALL AVITECH BE LIABLE FOR ANY INCIDENTAL, SPECIAL, OR CONSEQUENTIAL DAMAGES, INCLUDING WITHOUT LIMITATION, LOSS OF PROFITS FOR ANY BREACH OF THIS WARRANTY. If Avitech replaces the defective Product with a replacement Product as provided under the terms of this Warranty, in no event will the term of the warranty on the replacement Product exceed the number of months remaining on the warranty covering the defective Product. Equipment manufactured by other suppliers and supplied by Avitech carries the respective manufacturer’s warranty. Avitech assumes no warranty responsibility either expressed or implied for equipment manufactured by others and supplied by Avitech. iii THIS WARRANTY IS IN LIEU OF ALL OTHER WARRANTIES EXPRESSED OR IMPLIED, INCLUDING WITHOUT LIMITATION, ANY IMPLIED WARRANTY OF MERCHANTABILITY OR FITNESS FOR A PARTICULAR PURPOSE, ALL OF WHICH ARE EXPRESSLY DISCLAIMED. This Hardware Warranty shall not apply to any defect, failure, or damage: (a) caused by improper use of the Product or inadequate maintenance and care of the Product; (b) resulting from attempts by other than Avitech representatives to install, repair, or service the Product; (c) caused by installation of the Product in a hostile operating environment or connection of the Product to incompatible equipment; or (d) caused by the modification of the Product or integration with other products when the effect of such modification or integration increases the time or difficulties of servicing the Product. Any Product which fails under conditions other than those specifically covered by the Hardware Warranty, will be repaired at the price of parts and labor in effect at the time of repair. Such repairs are warranted for a period of ninety (90) days from date of reshipment to customer. Extended Warranty Options Avitech offers OPTIONAL Extended Warranty plans that provide continuous coverage for the Product after the expiration of the Warranty Period. Contact an Avitech sales representative for details on the options that are available for your Avitech equipment. Services and Repairs Outside the Warranty Period Avitech make its best offer to repair a product that is outside the warranty period, provided the product has not reached its end of life (EOL). The minimum charge for such repair excluding shipping and handling is $200 (US dollars). AVITECH INTERNATIONAL CORPORATION ● 8655 154th Ave NE ● Redmond, WA ● 98052 ● TOLL FREE 1 877 AVITECH PHONE 1 425 885 3863 ● FAX 1 425 885 4726 ● [email protected] ● www.avitechvideo.com iv Regulatory Information NOTE: Marking labels located on the exterior of your device indicate the regulations that your model complies with. Please check the marking labels on your device and refer to the corresponding statements in this chapter. Some notices apply to specific models only. Federal Communications Commission (FCC) Statement This equipment has been tested and found to comply with the limits for a Class A digital device, pursuant to Part 15 of the FCC Rules. These limits are designed to provide reasonable protection against harmful interference when the equipment is operated in a commercial environment. This equipment generates, uses, and can radiate radio frequency energy and, if not installed and used in accordance with the instruction manual, may cause harmful interference to radio communications. Operation of this equipment in a residential area is likely to cause harmful interference, in which case the user will be required to correct the interference at his own expense. Properly shielded and grounded cables and connectors must be used in order to meet FCC emission limits. Avitech is not responsible for any radio or television interference caused by using other than recommended cables and connectors or by unauthorized changes or modifications to this equipment. Unauthorized changes or modifications could void the user's authority to operate the equipment. Operation is subject to the following two conditions: (1) this device may not cause harmful interference, and (2) this device must accept any interference received, including interference that may cause undesired operation. v European Union CE Marking and Compliance Notices Statements of Compliance English This product follows the provisions of the European Directive 1999/5/EC. Danish Dette produkt er i overensstemmelse med det europæiske direktiv 1999/5/EC. Dutch Dit product is in navolging van de bepalingen van Europees Directief 1999/5/EC. Finnish Tämä tuote noudattaa EU-direktiivin 1999/5/EC määräyksiä. French Ce produit est conforme aux exigences de la Directive Européenne 1999/5/EC. German Dieses Produkt entspricht den Bestimmungen der Europäischen Richtlinie 1999/5/EC. Greek To προϊόν αυτό πληροί τις προβλέψεις της Ευρωπαϊκής Οδηγίας 1999/5/EC. Icelandic Þessi vara stenst reglugerð Evrópska Efnahags Bandalagsins númer 1999/5/EC. Italian Questo prodotto è conforme alla Direttiva Europea 1999/5/EC. Norwegian Dette produktet er i henhold til bestemmelsene i det europeiske direktivet 1999/5/EC. Portuguese Este produto cumpre com as normas da Diretiva Européia 1999/5/EC. Spanish Este producto cumple con las normas del Directivo Europeo 1999/5/EC. Swedish Denna produkt har tillverkats i enlighet med EG-direktiv 1999/5/EC. vi Australia and New Zealand C-Tick Marking and Compliance Notice Statement of Compliance This product complies with Australia and New Zealand's standards for radio interference. vii Preface Welcome Congratulations on purchasing this Avitech Seneca E.264. The Seneca E.264 is a high-performance, real-time MPEG-4 SD and HD video encoder that delivers unrivalled HD and SD video quality, providing operators with the most powerful and cost-effective architecture for delivering quality broadcast and streaming video services. The Seneca supports up to two H.264 SD / HD encoders. The encoded transport stream can be routed and replicated to Ethernet and ASI outputs. Both SPTS and MPTS outputs are supported. About this Manual This manual contains comprehensive information about your Avitech Seneca E.264 to help you operate the device. Throughout the manual, the following conventions are used to distinguish elements of text. NOTE: provides additional hints or information that requires special attention. CAUTION: identifies important information which, if not followed, may result in loss of data or damage to your device. Any name of menu, command, icon or button that you can see on the screen is shown in a bold typeset. For example: On the Start menu, select Settings. viii 1 Getting Started This chapter introduces you to the features and specifications, as well as the external components of your Avitech Seneca E.264. It also guides you through the process of setting up your Seneca for use. The Seneca can be used as a desktop encoder. Or placed in a 19” rack-mount tray that holds up to three units. NOTE: Depending on the model you purchased, the cabinet color and the look of the accessories may be different from the ones shown in this manual. 1.1 Product Features MPEG-4 AVC SD encoder. Capable of encoding one video and one MPEG-1 Layer II audio pair in SD format. Output over ASI and IP interfaces individually or simultaneously. Each unit can encode and simultaneously stream up to two HD / SD video services. 1 Reliable transmissions through forward error correction and direct processing ensure high broadcast quality of content. Specifications Parts Inputs Specifications HD video 3G-SDI (SMPTE 424M) at 75 Ohm SD video HD-SDI (SMPTE 292M) at 75 Ohm SD-SDI (SMPTE 259M) at 75 Ohm with EDH CV (PAL / NTSC) at 75 Ohm SD-SDI 625 and 525 line standards Audio Embedded SDI × 2 Unbalanced analog × 2 Dolby Digital AC3 pass through Video resolution HD 1080p × 1920 at 50 / 60 Hz 1080 × 1920 / 1440i at 25 / 29.97 / 30 Hz 720 × 1280 / 960 at 50 / 59.94 Hz 960 × 540 at 25 / 29.97 Hz SD 480 × 720 / 704 / 640 / 528 at 29.97 Hz 576 × 720 / 704 / 640 / 528 at 25 Hz Video encoding Lower resolution 480 × 270, 320 × 240, 320 × 180 Dual channel HD MPEG-4 AVC high profile at level 4.2 MPEG-4 AVC high profile at level 4.0 CBR and VBR 2 Mbps up to 30Mbps (profile dependent) Dual channel SD MPEG-4 AVC main profile at level 3.0 CBR and VBR 1.5 Mbps up to 10 Mbps (profile dependent) Supported IP protocols UDP/IP, RTP/IP SMPTE 2022 FEC (one session per Ethernet port) HTTP Live Streaming (support for FTP / SFTP to a web server) Direct HTTP encoding 2 Parts Audio encoding Specifications MPEG-1 layer II up to 2 stereo pairs Dolby® Digital AC pass-through MPEG-4 AAC-LC up to 2 pairs Lip sync adjustment Management and control RJ-45 × 2 Power supply 100 – 250 V, 47 to 63 Hz (external) 15 watts consumption (maximum) Dimension Environment 163×400×44 mm (6.4×15.8×1.7 inch) Temperature Humidity Safety regulations Operating: 0 C (32 F) to 40 C (104 F) 5 % to 95 % relative, non-condensing CE, UL, US FCC (part 15), EMC 1.2 Identifying the Front Switch The front panel has a recessed switch that can be used to restore the unit to its default setting. Use a pen or a small screwdriver to press this switch. If the switch is pressed during normal operation, the control port IP address, subnet mask, and gateway are restored to the following factory default settings: IP address: 192.168.1.30 Subnet mask: 255.255.255.0 Gateway: 192.168.1.1 The STAT indicator will change colors for about three seconds to acknowledge the change. Note that this operation DOES NOT disturb the encoding function or the streaming Ethernet ports (i.e., it does not affect the current service). If you press and hold this switch when the unit is powered off, and then power up the unit while holding the switch, the following actions will be performed: The controlling IP address, subnet mask, and gateway are reset to the factory default setting as described above. The Seneca configuration is cleared. The Seneca reverts to the factory-installed firmware. 3 Just like before, the STAT indicator will temporarily change color to acknowledge the command. When it changes color, you can release the switch. You can use this feature in the unlikely event of a corrupted firmware upgrade or a corrupted configuration. 1.3 Identifying the Front Indicators PWR CH1 CH2 STAT VID ASI ENC LED Indicator STAT CTL ETH Description Indicates the overall status of the Seneca. Green No active alarm. Red At least one critical alarm is present. Upon powering up the Seneca, this LED will be red until the Seneca starts operation. At that point, it will turn green if there is no active alarm or stay red if there is at least one alarm. PWR Indicates the power status of the Seneca. Green Power is available. Off No power is available or insufficient voltage. CH1 / 2 VID Off No video signal detected, or input is not configured. Flashing Video input is locked to the video signal as indicated by the following behavior: Flash once per second – SD-SDI input signal. Flash twice per second – HD-SDI input signal. Flash four times per second – 3G-SDI (1080p 60 Hz) input signal. CH1 / 2 ASI Off ASI output port is disabled. Flashing ASI output port is configured and enabled. 4 LED Indicator Description CH1 / 2 ETH Off No connection. On Connected but in idle state. CTL Off No activity detected. Flashing Port is currently transmitting and / or receiving data packets. 1.4 Identifying the Rear Components The Seneca’s rear panel includes two software-configurable Composite/SDI video inputs on standard BNC connectors, two ASI output ports on standard BNC connectors, four unbalanced analog audio inputs on standard RCA connectors, two streaming 100/1000 Mb/s Ethernet ports on standard RJ-45 connectors, and two control 10/100/1000 Mb/s Ethernet ports on standard RJ-45 connectors. L AUD1 R ASI1 VID1 ASI2 VID2 I 0 CTRL1 ETH1 L AUD2 R CTRL2 Control Ethernets Streaming Ethernets 5 ETH2 LED Indicator Description VID 1 / 2 (green) Off No video signal detected, or input is not configured. Flashing Video input is locked to the video signal as indicated by the following behavior: Flash once per second – SD-SDI input signal. Flash twice per second – HD-SDI input signal. Flash four times per second – 3G-SDI (1080p 60 Hz) input signal. ASI 1 / 2 (green) Off ASI output port is disabled. Flashing ASI output port is configured and enabled. ETH 1 / 2 (green) Indicates the status of the Ethernet connection. Off No connection. On Connected but in idle state. (yellow) Off No activity detected. Flashing Port is currently transmitting and / or receiving data packets. 1.5 Application Diagram The following figure shows a sample application diagram of your Seneca E.264. 6 1.6 Getting Your Seneca Ready for Use Perform the following steps to get your Seneca set up and running: 1. Configure the encoder. 2. Configure the output signal (ASI or IP). 3. Connect the input and output signals. The connection between input and output signals can be made as part of the input or output configuration steps. The Seneca supports many-to-many connections. The application diagram is shown next. Outputs Inputs ASI 1 Composite/SDI A/V 1 Unbalanced Audio A/V 2 Mux ETH1 Composite/SDI ASI 2 Switch Unbalanced Audio Encoder 1 ETH2 Up to 4 Encoder 2 Switch Up to 4 Test Generator Test Generator For the remainder of this user manual, we will use the term “port” to pertain to the physical input / output port (such as ASI or Ethernet), and “stream” for a transport stream present in the port. ASI ports support only one stream, while Ethernet ports support multiple streams. 7 2 Managing Your Seneca The Seneca is configured using the free software application, which is available for Windows, Apple OS X, and Linux. The user interface is divided into a statistics panel on the left, and a configuration panel on the right. Each panel has multiple tabs, corresponding to the various functions in the Seneca. The Seneca’s NTP server IP address can be entered in the Control tab. 2.1 Control Tab The Control tab is used to configure the management Ethernet ports in the Seneca. This includes both the IP information, as well as the SNMP parameters. The Seneca has two physical management (control) Ethernet ports. However, from a logical standpoint, each is a single port with a single IP address; the two connections are provided for control redundancy. If one port loses its link, the unit can still be controlled from the other. If you do not need control redundancy, you can leave one of the ports disconnected. The unit will automatically and dynamically select the control port as follows: If only one port has link, that port will be used for control. If both ports have link, but at different speeds, the port with the highest speed will be used for control. If both ports have link at the same speed, Port 1 will be used for control. Both ports support operation at 10, 100, and 1000 Mb/s, both half-duplex and full-duplex, with auto-negotiation and auto-crossover detection. 8 The Control tab has two bottom tabs: Control Port is used to configure the IP parameters of the control port. SNMP is used to configure the SNMP parameters for the unit. Control Port Configuration Tab The control configuration window is shown below: The configuration parameters are described next. Device Name This field controls the top-level name of the device in the hierarchy. It defaults to the “Standalone Encoder.” Changes to this field take effect immediately. IP Configuration This field selects the control port IP configuration mode. – Static IP This option selects a static IP address, specified by the IP Address, Subnet Mask, and Default Gateway fields. – DHCP This option selects the control port IP address configuration via DHCP. If this option is selected, the IP Address, Subnet Mask, and Default Gateway fields are not displayed. 9 IP Address This field is only shown if the IP Configuration is set to Static IP. Enter the desired control port’s IP address. Subnet Mask This field is only shown if the IP Configuration is set to Static IP. Enter the desired control port’s subnet mask. Default Gateway This field is only shown if the IP Configuration is set to Static IP. Enter the desired control port’s default gateway. NTP Server If you want the unit to be NTP-synchronized (for logging purposes), enter the IP address of an accessible NTP server in this field. If you do not need NTP, you can leave this field at 0.0.0.0. If your Seneca has access to the Internet through the control port, you can point it to one of the public NTP servers for your region. For more details, click on this link – http://psp2.ntp.org/bin/view/Servers/WebHome Apply / Cancel Use these buttons to apply or cancel the changes to the control port’s IP configuration. Note that if you change the IP address, the program utility may lose contact with your Seneca. The IP Address, Subnet Mask, and Default Gateway entries will be checked for consistency and will be rejected if invalid. 10 Control Port Statistics Tab The Control Port Statistics screen is shown below. It contains the current settings for the control port. If you have configured the unit for DHCP, it will include the current IP Address, Subnet Mask, and Default Gateway obtained from the DHCP server. It also includes the link state for the individual control Ethernet ports. 11 SNMP Configuration Tab The Seneca includes a built-in SNMP agent with support for SNMP V1 and V2C. For security reasons, it will respond to SNMP transactions only on the control port. This tab includes the parameters for the SNMP configuration. Changes to these parameters take effect immediately. The SNMP parameters are described next. Read Community This is the SNMP “read-only” community string. Write Community This is the SNMP “read-write” community string. System Contact This configures the value for the system’s variable System Contact. Whatever value entered here is returned for SNMP queries to that variable. System Location This configures the value for the system’s variable System Location. Whatever value entered here is returned for SNMP queries to that variable. Trap Destinations The Seneca supports up to five trap destinations. Enter the desired IP addresses here. Note that the Seneca will only generate SNMP V2C traps. 12 SNMP Statistics Tab The SNMP Statistics tab displays the current SNMP configuration as shown below. 2.2 Web Pages Served by the Seneca Direct HTTP Streaming pages are available from the control port. 13