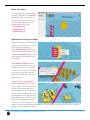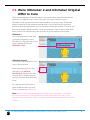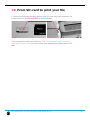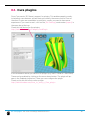
1
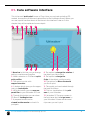
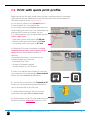
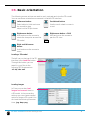
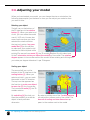
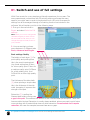
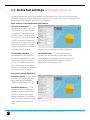
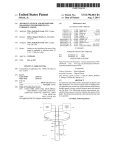
Cura 13.11.2
Ultimaker’s software for making 3D prints
User manual
English Version 1.0
FIRST TIME
STARTING UP
CURA
13
C1.Cura software interface
This is the main ’quick print’ screen of Cura. Here you can load and adjust 3D
models, choose print profiles and upload files to the YouMagine library. Below you
can see a quick overview about all the items in the interface. Later on in this
chapter they will be explained in more depth
1
2
3
4
5
6
8
9
10
1. Menu bar In this bar you can change
settings, machines and profiles.
2. Make a selection in 3 different quick
print profiles.
3. The option to print with
support structure.
4. A button which gives you the opportunity to load objects.
5. With this button you can save prepared files to your Ultimaker SD-card.
6. Through this button you can share
3D files on YouMagine.com.
7. A prepared model can be
viewed in other modes to check it’s
printpath.
7
11
12
13
8. The option to change the rotation of
the object you like to print.
9. The option to change the
Scale of the object you like to print.
10. The options to Mirror the model
you like to print.
11. The model you have loaded through
the load file button.
12. This is a visualisation of the print
area of your Ultimaker.
13. (ultimaker 2) The grey squares in
the build area are the no go zones. In
your Ultimaker 2 these are the metal
clips were you can’t print.
C1. Cura software interace First time starting up Cura
14
C2. Print with quick print profile
Before going into this step, make sure you have a working printer, if not please
calibrate your printer. Need help? check the user manual of the Ultimaker 2 or
Ultimaker Original on our support page.
1. Let’s start by clicking on the Load button in
Cura and search for a compatible file.
2. You might notice the progress bar, when you
have loaded a file into Cura, cura is automatically
making the 3D model print ready for you.
3. In the meantime you can adjust settings and
select a print type.
- High quality prints with layers of 0.06 mm
- Normal quality prints with layers of 0.1 mm
- Low quality prints with layers of 0.2 mm
4. When the 3D model is prepared, the Save
toolpath button shows up and gives you the
option to save the prepared model in a
directory.
Underneath the button Cura gives you an
indication about your print on
- Estimated Print Time
- Amount of material required
- And the weight of your 3D print
5. After you inserted the included SD-card into
your computer, Cura changes the Save toolpath
Button into the Toolpath to SD Button.
SD
6. Just after you choose for the Toolpath to SD
button you will see the same progress bar but
now it saves the file on the SD card.
7. When finished saving It will give you the
notification that your file has been saved.
8. Before taking out the SD-card make sure you
always choose the safely eject button in Cura.
C5. Print with quick print profile First time starting up Cura
15
C3. Basic orientation
The following mouse actions are used to work, navigate and view the 3D model.
You can use those orientation movements in the blue 3D interface.
Scrollwheel button
Use the scroll wheel to zoom in
or out.
Leftmouse button
Select objects. Hold and move
the mouse to drag
object on the 3D print area.
Rightmouse button
Hold and move the mouse to
rotate the viewpoint around the
3D model.
+
Rightmouse button + Shift
Hold and move the mouse to
pan the 3D view
shift
Right and left mouse
button
Hold and move the mouse to
zoom
Loading a 3D model
The left icon on the top of the 3D
interface is the Load file button.
Through this button you can
search in your files to the
following 3D file extensions:
.stl .obj .dae .amf
Loading images
In Cura you can also load
images and convert them to
a 3D model. In the converting
settings you can choose several
option to shape a 3D model. You
can load the following file extentions; .jpg .bmp .png.
C3. Basic orientation First time starting up Cura
16
C4.Adjusting your model
When you have loaded your model you can change the size or orientation, the
following steps explain you the basic on how you can adjust you model on how
you want it to be.
Rotating your object
The left icon on the bottom of
the 3D interface is the rotation
button [1]. When you select and
click it, you can rotate the model
over it’s XYZ axis. You see also
more functions when you have
selected the rotation button.
3
the top icon’s action, lays your
model flat [3] on the surface,
2
to make sure your model is well
1
attached to the build plate while
printing.The second icon resets [2] the 3D models rotation. By click-select one
of the 3 orientation circles you adjust the rotation of the model. The rotation
degree appears in the number around the model. When rotating and clicking shift
you rotate per degree otherwise it’s per 15 degrees.
Scaling your object
The second left icon on the
bottom of the 3D interface is the
scaling button [1]. When you
select and click it, you can scale
the model in the XYZ direction.
The top icon that appears has
the function to scale your object
to max size [3] for your printer.
The icon above resets [2] the 3D
models rotation.
By unlocking [4] the lock you
have the possiblity to scale the
object in each particular
dimension.
3
2
1
4
By select and slide one of the 3 scaling squares
you adjust the uniform scale of the model. The
amount of scaling and size dimensions appears in the number next to the model.
C4. Adjusting your model First time starting up Cura
17
Mirror your object
The third left icon on the bottom
of the 3D interface is the mirror
button [1]. When you select on
the mirroring functions you can
flip you model with the other
buttons above [1] in the:
- X dimension [2]
- Y dimension [3]
- Z dimension [4]
4
3
2
1
Right mouse click on your model.
When you select your model and
give a right mouse click on it you
get some more functions.
With Delete object [1] [5] you
remove your model(s) from cura.
Center on platform [2] positions
your model in the center of the
build plate.
With multiply object [3] you
can decide to make more of the
selected object. If you number is
to much for the amount of space
on your build volume cura will
place it automatically it on maximum quantity.
1
2
3
4
5
3
There is also a function Split
object into parts [4], This function is used to split an model file
which contains multiple parts
4
into separate parts to be printed
one at a time. For example, if you
downloaded an STL file that contains 4 parts of a puzzle, you can
split it into 4 separate parts for
printing. For now it works very
slowly and you might need some patience to split objects, for now we advice your to split
parts in your 3D design program.
C4. Adjusting your model First time starting up Cura
18
C5.Were Ultimaker 2 and Ultimaker Original differ in Cura
With the development of the Ultimaker 2 we decided that the print should know
what kind of material it has. That’s why when you insert material in your
Ultimaker 2 that you also should tell what material it is going to use. The printer
adjust its settings to the material requirements, in this way printfiles (gcode’s)
became material independent and can be easier shared with others. That why you
also had to make a decision earlier in the configuration. There is also a slight difference in the Cura interface and user flow which we will explain on this page.
Ultimaker 2
You can recognize and see that
you have configured Cura to
Ultimaker 2 if the print bed in the
visual interface shows the
Ultimaker 2 logo.
Ultimaker Original
You can see the difference in the
logo in the blue area.
More imporantly you can find
this back in it’s material
functionality. Where Cura asks
you the which material you are
going to use and what thickness
it has.
You will see more functions in
those materials when you put
Cura in Full settings (chapter E).
Note: most of the images being used are setup for the Ultimaker 2, so keep in
mind that the images in this manual may not be the same as the one in your
Interface. We will mention where you need to do take some extra action or where
it differs.
C2. Were Ultimaker 2 and Ultimaker Original differ in Cura First time starting up Cura
19
C6. From SD-card to print your file
1. After saving the file and safely ejecting your SD-card from your computer, it is
time to insert it in the SD-card Slot of your Ultimaker.
Ultimaker 2
Ultimaker Original
2. By rotating the button and selecting [PRINT] (Ultimaker 2) or [Card Menu]
(Ultimaker Original), you can now choose your desired print model from the SDcard.
C6. From SD-card to print your file First time starting up Cura
20
THE USE OF
FULL SETTINGS
AND
DUAL EXTRUSION
25
E1. Switch and use of full settings
With Cura we aim for a very simple and friendly experience for our users. The
more experienced you become with 3D printing and our software the more
specific you might want to work in the production of a 3D print. More specific
settings can al be managed through a full setting function we included in the
software. We will explain you this in the following steps.
1. First go in the menu bar to
Expert and select Switch to Full
settings.
Note: When your Cura is configured to
Ultimaker Original you have a fourth
tab, start/end-Gcode, were you can
change the begin and end process of
your printfiles.
2. You can see that you have
more features in 3 different tabs:
Basic, Advanced and Plugins.
Basic settings: Quality
The height of each layer [1]. For
print quality and printing time
this is the most important setting. Usual settings are 0.2mm
for a low quality print. 0.1mm for
a medium quality print. 0.06mm
for a high quality print. And
0.02mm for an ultra-high quality
print.
The thickness of the side shells
[2], when printing a simple cube,
this is the thickness of the side
walls. Increasing it improves the
strength of the part.
1
2
3
Model from YouMagine
Fruit bowl by NachoKaoS
Model from YouMagine
Vase by Marrit
Retraction [3] is pulling the
filament back when moving over
a gap in the print. This reduces the amount of thin lines between printed parts. These thin
lines are called strings. Retraction is usually always enabled, unless you want to print faster
or are printing with a material that does not allow retraction. Some models don’t require
retraction, this vase for example, because there are no gaps.
E1. Upload from Cura to YouMagine.com. The use of full settings and dual extrusion
26
Basic settings: Fill
The bottom/top thickness [1] is
the outer shell thickness on the
top and bottom. For example,
when printing a simple cube, this 1
2
is the bottom square and top
3
square thickness that are put
down. Increasing this will make
a stronger part, and depending
on your model, it will make for
better solid tops.
Cura fills [2] the internal parts of your model with a structure. This grid is made for
strength and to support the top layers. The amount of infill you want is influenced
by this setting. More infill produces stronger parts that take longer to print. If
strength is not a requirement then this setting could be put on 5% for a low density infill that can still support the upper layers.
Basic settings: Print speed [3]
Print speed sets the speed at which the print is put down. The default of 50mm
per second is a bit low for an Ultimaker. But this is a safe starting point. People
have printed up to speeds of 120mm per second. But this requires a well calibrated
and tuned machine.
Basic settings: Support
Supports are structures printed
Model from YouMagine
Vase by Marrit
below the print object to
support parts that otherwise
would be unprintable. There are
2 options, support structures
[4] that need to touch the build 4
platform, or support structures 5
that can also touch the top of
your model.
The platform adhesion type [5]
is a setting to help the printed object stick on the printer bed. Large flat objects
might get lose from the printer bed because of an effect called warping
(curled up corners in the print). There is the option to use a raft, which is a thick
grid under the object which scars the bottom of your print. Or a brim, which are
lines around the bottom of your object and because of the larger area the corners
are kept down. Brim usually gives the best results as it does not scar the object.
But it requires more space on the printer bed.
E1. Upload from Cura to YouMagine.com. The use of full settings and dual extrusion
27
E2. Advanced settings
Advanced settings are settings you usually only change once because you have
special needs that do not match the defaults.
Nozzle size [1] : The size of the
hole in your nozzle. The Ultimaker comes with a 0.4mm nozzle
by default. Some people drill the
nozzle to 0.6 or 0.8mm for faster
printing at lower quality.
1
2
3
4
5
6
7
8
Initial layer thickness [2] : The
thickness of the first layer. This
first layer is set by 0.3mm by default. A 0.3mm layer gives a thick
bottom layer which is easy to
stick to the platform and allows
for variation in the platform.
Bottom layer speed [5]: The speed at which
the print head moves while it is laying down the
first layer. This is done to make the print stick
easier.
Cut off bottom [3] : Cut the bottom of the model, this effectively
sinks the object into the printer
bed. If your object does not
have a lot of contact area with
the printer bed then this feature
could help you.
Infill Speed [6]: The speed at which infill lines
are printed. If set to zero then same speed is
used as for the rest of the print. A slight loss in
outer quality can be expected if you use this
to print a fast infill due to changes in nozzle
pressure when switching between outside and
infill parts.
Travel speed [4]: The speed
at which the printhead moves
when it is not printing. The
default is set on 150mm/s. But
a well calibrated and oiled Ultimaker can go faster and up to
300mm/s. It is not uncommon
for a printer to achieve 200mm/s
or 250mm/s travel speed. But
if you are seeing shifts in your
print then the travel speed might
be the cause.
Minimal layer time [7]: The minimal time spend
on printing a single layer. If a layer takes less
time to print then this configured time, then the
layer is slowed down. This ensures that a layer
is cooled down and solid enough before the
next one is put on top.
Enable cooling fan [8]: The cooling fan is usually enabled and greatly improves print quality
for PLA. For some other materials you might
not want to use the cooling fan at all and this
setting will disable it.
E2. Advanced settings. The use of full settings and dual extrusion
28
E3. Extra full settings Ultimaker Original
As earlier mentioned, with the Ultimaker Original selected in Cura you have some extra
functions that you can tune. With these settings you can take control on the material temperature and the diameter and flow of the filament.
Basic settings: Print temperature and Filament
The print temperature [1] : is the
temperature at which you print.
This setting has a lot of impact
on the print. The default is set
on 220C, which is a bit high for
1
PLA. For PLA you can go down
to 190C to reduce the amount
of strings on the print. But if you 23
want to print faster you might
need to increase the temperatufilament has an average of 2.89mm thickness.
re above the 220 degree.
The filament diameter [2] : is
the diameter of your filament.
Accurate measurement of your
filament gives better quality
prints. This needs to be known
up to 2 decimals. Using digital
calipers to measure you filament
improves results. Ultimaker
The filament flow [3] : is a correction factor
to make extrusion higher or lower then usual.
Some systems or materials require a correction
next to the usual diameter setting. This flow
adjustment can be used for this.
Advanced settings: Retraction
Retraction speed [4] : The speed
at which the filament is pulled
back when the printerhead
needs to move over holes.
Retraction distance [5]: The
amount of mm the filament is
pulled back when a retraction
happens. 4.5mm gives good
results on almost all Ultimakers
with PLA. Other materials might
need different retraction settings.
4
5
Note: At the Ultimaker 2 this is a fine tuned setting that
you don’t need to tune in Cura.
E3. Extra full settings Ultimaker Original. The use of full settings and dual extrusion
29
E4. Cura plugins
Since Cura version 12.11 there is support for plugins. This enables people to easily
include their own features, without having to modify the source code of Cura or
the slicer. Plugins are unavailable in quick print mode, you need to have some
experience. If you want to use it, click on the [Full Settings] mode under [expert] in
the menu bar at the top.
Check this link/button for the plugins:
http://wiki.ultimaker.com/Category:CuraPlugin
In the screenshot above you see a list of plugins (e.g. Skew, Tweak at Z and Wave).
These can be enabled by clicking on the arrow down button. The plugin will appear in the Enabled plugins box. There you can configure the plugin.
Check on this link for how to write a plugin:
http://wiki.ultimaker.com/How_to_write_a_Cura_plug i n
E4. Cura plugins. The use of full settings and dual extrusion
30
E5. Start/End-GCode for Ultimaker Original
What is Gcode
GCode is the generic name for a control language for CNC (or Reprap) machines.
It is a way for you to tell the machine to move to various points at a desired speed,
control the spindle speed, turn on and off various coolants, and all sorts of other
things. It is fairly standard, and is a useful tool.
More about G-code: http://replicat.org/primer
Start/End-Gcode
The start and end gcode are the startup and end procedure of the print. These
pieces of code influence the startup procedure and can be customized. By default
the printer is heated up, homed to the corner, and the head is primed. Editing this
requires knowledge of GCode.
E5. Start/End-Gcode for Ultimaker Original. The use of full settings and dual extrusion
31