1
FrameCycler
Professional 2011
User Guide
Rev. 2011-C
IRIDAS
IRIDAS
FrameCycler Pro 2011 User Guide
Contents
Installation
Supported nVidia Graphics Cards
9
Installing FrameCycler Professional
10
Extract License File
10
Mac OS X Installation
10
Windows Installation 12
Linux Installation 13
Quick Start Guide
Step 1: Set Project Defaults
15
Step 2: Loading Footage
16
Step 3: Navigation and Zoom
17
Step 4: Save Your Project
17
Setup Scenarios
Typical Setup Scenarios
19
Overview19
Creating a Dual DVI Setup
20
Settings for Dual DVI Output
20
User Interface Overview
The Main User Interface Areas
22
The Desktop
22
© 2011 IRIDAS www.iridas.com
2
IRIDAS
FrameCycler Pro 2011 User Guide
The Timeline
23
The Viewport
24
The FrameCycler Professional Panel
25
Preset and other Browser Windows
26
The Output Section
27
Loading Footage
Navigating 30
Search Criteria
30
Refresh30
Loading Multiple Sequences
31
Loading Multiple Sequences at once
31
Inserting a Sequence inbetween Clips
31
Loading a FrameCycler Professional Project
31
Right Click Features to Manage Content
32
Tip: Autocomplete for Typed Directories
34
Adjust Settings for Precaching
35
Adjusting Playback and Viewport Features
Adjusting Playback Features
37
The Viewport
38
Positioning Images
38
Automatic Screen Layout
39
Working with the FrameCycler Timeline
The Timeline
41
Timeline Elements
42
Navigating along the Timeline
43
Adding Audio Tracks
44
© 2011 IRIDAS www.iridas.com
3
IRIDAS
FrameCycler Pro 2011 User Guide
Image Analysis Tools
Adjusting FrameCycler Professional’s Scope Presets
47
Global Grading
The Grading Panel
49
Grading Panel Basics
49
Alternating Grading Selector Modes
50
Reset Buttons
51
Matrix & LUT Panel
52
The Properties Panel
53
The Annotations Panel
54
Adding Notes
54
Removing Notes
54
Working with .Look Files
Applying a .Look
56
The .Look Browser
57
Complex Timelines and Advanced
Viewing Features
Managing Complex Timelines
59
Timeline View Tabs
59
Timeline Zoom
60
Working with Multiple Playheads
61
Creating additional Playheads
61
© 2011 IRIDAS www.iridas.com
4
IRIDAS
FrameCycler Pro 2011 User Guide
The Screen Layout
62
Working with A/B and Splitscreen Views
64
Working with alternating Screen Layouts
65
Editing Features
Editing Features
67
Split clips
67
Trim clips
67
Ripple all / remove gaps
67
Stereo 3D Workflow with DualStream NX
DualStream NX
69
Stereo 3D Setup Scenarios
70
Line-by-Line Systems
71
Selecting the correct output signal on DVI output
71
2x DVI stereo
72
Testing your Stereo Setup
73
Organizing Stereo 3D Footage
74
File Path Examples:
74
Tip: Customizing the Stereo Naming Convention
75
Working with Stereo 3D Footage
76
Verifying Stereo Pairs
76
Opening the Stereo Panel
76
Stereo Viewing Options
77
Reel Setup: Mirroring, Swapping,
Temporal Adjustments
78
Adjusting the Zero Parallax
80
© 2011 IRIDAS www.iridas.com
5
IRIDAS
FrameCycler Pro 2011 User Guide
Rendering
File Format Support
Universal RAW 5.0 Support
85
ARRI Alexa Support
86
ARRI D21 Support
87
ARRI M Scope
88
Phantom HD and Phantom 65 Support
89
RED Support (RED ONE / EPIC)
90
Silicon Imaging SI2K Support
92
WEISSCAM Support
93
Recommended Quicktime Formats
94
DNxHD and ProRes
94
FrameCycler File Format Support
95
Calibration LUT Support
96
Command Line
The FrameCycler Command Line
98
Accessing the Command Line
98
The Anatomy of a Command
99
Related Links
100
Customizing
Aspect Ratio: AspectRatio.fcps
102
Crop: Crop.fcps
103
Burn-in Menu: .burnin files
105
© 2011 IRIDAS www.iridas.com
6
IRIDAS
FrameCycler Pro 2011 User Guide
Hotkey Overview
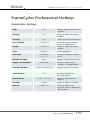
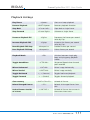
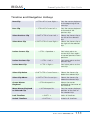
FrameCycler Professional Hotkeys
110
Appendix A: Change Log
120
New Features
120
Changes121
Bugfixes121
Credits
This documentation includes images from Angle Mort, Courtesy of Caramel Films,
Saigon Eclipse (thanks to Jo Nguyen); The Eagle Hunter’s Son, courtesy of Stromberg
Productions. Additional images from Erwin Van Der Stappen and Kadenza Media, Tim
Baier, Duy-Anh Pham
Apple, QuickTime, the QuickTime logo, Power Macintosh and iMac are trademarks of Apple Computer, Inc. registered in the U.S. and
other countries.
ARRI is a registered trademark of Arnold & Richter Cine Technik GmbH & Co. Betriebs KG.
Avid is a trademark or registered trademark of Avid Technology, Inc.
or its subsidiaries in the United States and/or other countries.
NVIDIA is a registered trademark of NVIDIA Corporation in the United States and other countries.
Windows is a registered trademark of Microsoft Corporation in the United States and other countries.
© 2011 IRIDAS www.iridas.com
7
IRIDAS
FrameCycler Pro 2011 User Guide
Installation
© 2011 IRIDAS www.iridas.com
8
IRIDAS
FrameCycler Pro 2011 User Guide
Supported nVidia Graphics Cards
FrameCycler Professional relies extensively on the OpenGL and shader technologies of
modern graphics cards.
All current generation nVidia® Quadro cards are certified for use with FrameCycler
Professional. Additionally, all high end Geforce cards will usually work well.
We recommend using the latest WHQL drivers from the nVidia web site.
If you’re running OS X please don’t install any additional driver packages. OS X doesn’t
require any driver installation as the OS supports every GPU natively. Installing the nVidia
CUDA driver might cause issues with vertical syncing, it’s highly recommended to not
install it.
© 2011 IRIDAS www.iridas.com
9
IRIDAS
FrameCycler Pro 2011 User Guide
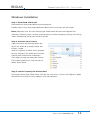
Installing FrameCycler Professional
Extract License File
Licenses are packaged as zip files and
sent to you by email. Before launching the
installer, you need to place the license file
on your desktop.
1. Delete any previous license files on your
desktop.
2. Drag the zipped license file from the
email to your desktop.
3. Double-click the zipped file to extract
the license (FrameCyclerPro.irlc). Windows
users: drag the license file from the Zip
window to your desktop, then close the
Zip window.
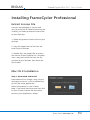
Mac OS X Installation
Step 1: Download and Install
Download the Disk Image (.dmg) to your
desktop and mount it with a double click.
Launch the setup application.
Follow the prompts in the installer.
Note: If you have more than one hard disk
on your system, choose the one which
contains your Applications folder.
© 2011 IRIDAS www.iridas.com
10
IRIDAS
FrameCycler Pro 2011 User Guide
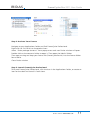
Step 2: Activate Your License
Navigate to your Applications folder and find FrameCycler Professional.
Right-click (or Ctrl+click) on the product icon
Select “Show package contents” from popup menu and new finder window will open.
Double click on the contents folder to open it. Then open the MacOS folder.
Then copy or drag and drop your license file (FrameCyclerPro.irlc) into the license folder
found there.
Close finder window
Step 3: Launch FrameCycler Professional
To launch FrameCycler Professional, click the icon in the Applications folder, or create an
icon for the dock and launch it from there.
© 2011 IRIDAS www.iridas.com
11
IRIDAS
FrameCycler Pro 2011 User Guide
Windows Installation
Step 1: Download and Install
Download the setup executable to your computer.
Double click on the setup executable and follow the instructions on the screen.
Note: please be sure to install FrameCycler Professional outside the Program Files
directory. Otherwise UAC settings might prevent you from changing settings and saving
.looks and backup files of your current session.
Step 2: Activate Your License
Copy the license file that has been sent
to you via email to an empty folder and
extract it there.
Open an Explorer window, then navigate
to your Program Files folder and find your
FrameCycler Professional installation.
Then copy or drag and drop your license
file (FrameCyclerPro.irlc) into the license
folder found there.
Step 3: Launch FrameCycler Professional
To launch FrameCycler Professional, click on the start menu, click on All Programs, open
the IRIDAS entry and find the submenu with your product.
© 2011 IRIDAS www.iridas.com
12
IRIDAS
FrameCycler Pro 2011 User Guide
Linux Installation
Step 1: Download and Install
- Download .tar.gz archive to your hard disk.
- Extract archive to folder (tar xvfz archive.tar.gz).
- Verify the bin subdirectory is executable (chmod 777)
Note:Because of binary compatibility problems between different LINUX distributions,
please make sure you download the LINUX installer package that was created for your
LINUX distribution. If your LINUX distribution is not supported, please contact us for
help in selecting the right package.
Step 2: Activate Your License
Copy the license file that has been sent to you via email to an empty folder and extract
it there. Then copy your license file (FrameCyclerPro.irlc) into the license subdirectory in
your FrameCycler installation.
Step 3: Launch FrameCycler
To launch your product, start the shell script from the /bin subdirectory (for example ./
bin/framecycler)
© 2011 IRIDAS www.iridas.com
13
IRIDAS
FrameCycler Pro 2011 User Guide
Quick Start Guide
© 2011 IRIDAS www.iridas.com
14
IRIDAS
FrameCycler Pro 2011 User Guide
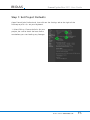
Step 1: Set Project Defaults
Open FrameCycler Professional, then click on the Settings tab to the right of the
Desktop or push <S> on your keyboard.
1. Select Editing. Choose defaults for your
project, be sure to check the base frame
rate before you start loading any footage.
© 2011 IRIDAS www.iridas.com
15
IRIDAS
FrameCycler Pro 2011 User Guide
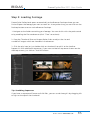
Step 2: Loading Footage
FrameCycler Professional opens automatically to the Browser Desktop where you can
find and open the footage you want to work on. At any other time, you can click on the
Desktop button to return to the Browser Desktop.
1. Navigate to the folder containing your footage. You can do this with the path control
or by enabling the file tree browser (click “Tree” to activate).
2. Drag the Thumbnail Size and Aspect Ratio sliders to adjust the size and
number of images which are viewable in the browser.
3. Click the plus icon (or just double-click on thumbnail) to add it to the timeline.
Repeat this with additional sequences. If you want to load all sequences shown on the
desktop at once, just click on “Add All”button.
Tip: Scrubbing Sequences
If you have a sequence of frames or RAW files, you can scrub through it by dragging left
or right at the top of the thumbnail.
© 2011 IRIDAS www.iridas.com
16
IRIDAS
FrameCycler Pro 2011 User Guide
Step 3: Navigation and Zoom
1. Close the Desktop (<D>). Use the playback command bar in the UI to control
playback and to navigate along the timeline. Useful hotkeys are listed in the chapter on
hotkeys.
2. Check zoom to fit and zoom to 100%:
- CTRL + HOME enables zoom to fit
- CTRL + SHIFT + HOME enables 100% view (pixel-to-pixel, avoiding any display scaling)
If you want to zoom into the image, simply use the +/- keys on the numpad.
3. Activate one of the burn-in presets such as “HD Rushes” to see metadata info
displayed as an overlay on your image output. See the chapter on Customisation to
learn about how to create workflow specific presets.
Step 4: Save Your Project
It is recommended to save the current project status frequently in case you need to go
back in time and find a previous save you liked better.
FrameCycler Professional stores all info created during a FrameCycler Professional session
in one XML file, the FrameCycler Professional *.ircp file.
© 2011 IRIDAS www.iridas.com
17
IRIDAS
FrameCycler Pro 2011 User Guide
Setup Scenarios
© 2011 IRIDAS www.iridas.com
18
IRIDAS
FrameCycler Pro 2011 User Guide
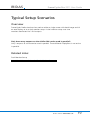
Typical Setup Scenarios
Overview
FrameCycler Professional can be used on either a single screen with both image and UI
on one display, or as a dual monitor setup. A dual monitor setup uses two
monitors connected via 2 DVI outputs.
FAQ: how many outputs on the nVidia GPU can be used in parallel?
Only 2 outputs at a time can be used in parallel. The additional DisplayPort is not active
in parallel.
Related Links:
Dual Monitor Setup
http://doc.iridas.com/index.php/Dual_Monitor_Support
© 2011 IRIDAS www.iridas.com
19
IRIDAS
FrameCycler Pro 2011 User Guide
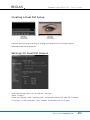
Creating a Dual DVI Setup
Connect one DVI output to your UI display, the second DVI / DP output to your
calibrated monitor or projector.
Settings for Dual DVI Output
Open the Settings (push <S> or click on “Settings”).
Select “Display”.
Check the settings under “Window Size”, the defaults values will work for 2 displays
using 1920 * 1080 resolution. Click “Enable” to activate Dual DVI Output.
© 2011 IRIDAS www.iridas.com
20
IRIDAS
FrameCycler Pro 2011 User Guide
User Interface Overview
© 2011 IRIDAS www.iridas.com
21
IRIDAS
FrameCycler Pro 2011 User Guide
The Main User Interface Areas
The Desktop
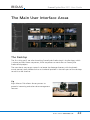
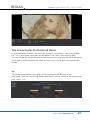
The first thing you’ll see after launching FrameCycler Professional is the Desktop, which
is where you load frame sequences, RAW sequences or movie files or FrameCycler
Professional projects.
The most basic way to get started is to locate the footage directory with the breadcrumb control, then double click on a thumbnail preview in the main part of the desktop
to add it to the timeline.
Tip
Right Mouse Click allows for easy access to
powerful renaming and other data management
features.
© 2011 IRIDAS www.iridas.com
22
IRIDAS
FrameCycler Pro 2011 User Guide
The Timeline
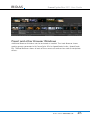
The timeline shows the assembly of clips from the Desktop. It allows for applying a calibration LUT, working with different views of the edit and creating multiple playheads
along the edit. The pull-downs for aspect ratio, resample, crop, burn-in and overlay
allow for customizing your image display.
Tip
The Visual Timeline shows each edit along the timeline as thumbnail preview.
To activate the visual timeline, click on the “Visual Tab” beneath the timeline.
© 2011 IRIDAS www.iridas.com
23
IRIDAS
FrameCycler Pro 2011 User Guide
The Viewport
In a single monitor setup the viewport is hidden under the desktop. Close the desktop
to view it. Use <CTRL + HOME> to adjust the size of the image to your screen size. In a
dual monitor setup the viewport is placed on the second monitor and will show images
while the desktop is open.
Tip
If you’re running a single screen setup, <SHIFT + H> allows to toggle between a
fullscreen footage view and your current work environmet with Timeline, Browsers and
Scopes open.
© 2011 IRIDAS www.iridas.com
24
IRIDAS
FrameCycler Pro 2011 User Guide
The FrameCycler Professional Panel
Directly above the timeline is the panel for Stereo 3D, annotations, setting clip properties. This is also where the scopes can be docked if you don’t want them to float.
You can change the size of the panel by positioning the cursor over the top of the panel,
and dragging the highlighted line. Show or hide it with <K> or push the FramceCycler
button.
Tip
The Stereo Panel provides easy access to the DualStream NX features in one
workspace. Once the FrameCycler Professional Panel is active, switch to the Stereo Panel
with <SHIFT + S>.
© 2011 IRIDAS www.iridas.com
25
IRIDAS
FrameCycler Pro 2011 User Guide
Preset and other Browser Windows
Additional Browser Windows can be activated as needed. The .Look Browser shows
grading presets generated with FrameCycler DDS or SpeedGrade OnSet / SpeedGrade
NX. The Reel Browser shows all reels of the current edit and can be used to manipulate
offsets.
© 2011 IRIDAS www.iridas.com
26
IRIDAS
FrameCycler Pro 2011 User Guide
The Output Section
For rendering a clip or an entire project the render dialog allows for selecting the output
format of choice as well as a number of options such as
resample and crop or adding a preview LUT.
Press the render button in the interface or use <CTRL + R> to open and close the dialog.
Tip
The new speed control display allows to estimate time of completion when rendering
locally.
© 2011 IRIDAS www.iridas.com
27
IRIDAS
FrameCycler Pro 2011 User Guide
Loading Footage
© 2011 IRIDAS www.iridas.com
28
IRIDAS
FrameCycler Pro 2011 User Guide
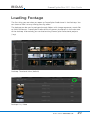
Loading Footage
The first thing you see when you open up FrameCycler Professional is the Desktop. You
can show or hide it at any time by pressing < D >.
The desktop can be used to navigate through folders with image sequences, movie files
or RAW file formats. FrameCycler Professional will present thumbnails in the main area
of the desktop. Alternatively you can load existing FrameCycler Professional projects
(.ircp)
Desktop: Thumbnail View (default)
Desktop: List, Video
© 2011 IRIDAS www.iridas.com
29
IRIDAS
FrameCycler Pro 2011 User Guide
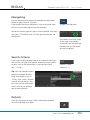
Navigating
Use the bread-crumb control to navigate to the correct
folder on your drive or network.
If you prefer tree view navigation, turn on the tree view
control (first button top left on the desktop).
Toggles the tree view
For easier viewing you can adjust the thumbnail size, drag
the slider “Thumbnail Size” to the right to enlargen the
thumbnails.
Thumbnail Size. Drag slider
to the right to enlargen
thumbnails on the desktop.
Double click on the arrow
to reset to default.
Search Criteria
If you want to only display data with a specific file extension or files starting with specific characters enter search
criteria, such as file extensions in the top right field
(e.g. “*.R3D”).
Search Criteria.
Default is *.*
Tip: You can create custom
presets for search criteria.
Enter the cirteria (such as
*.DPX), click “Add”, choose
a name for the preset. You
can now use the pull-down
menu next to the add button to select presets.
Refresh
Click on the refresh button if files have been updated
while the desktop was open.
© 2011 IRIDAS www.iridas.com
30
IRIDAS
FrameCycler Pro 2011 User Guide
Loading Multiple Sequences
Open the desktop. Double click on a thumbnail or select and drag to the timeline to add
the clip to the timeline. Repeat this with any additional thumbnail that you’d like to add
to your timeline. Every item you add will get placed after the last clip on the timeline.
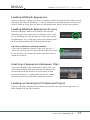
Loading Multiple Sequences at once
Open the desktop. Browse to the folder that includes
sequences you want to bring to the timeline. Click “Add
all” at the bottom of the desktop to add all files in order
of appearance. This usually gets used when loading RAW
data for creating dailies to create a virtual lab reel.
Tip: How to delete an existing timeline?
If you want to delete a timeline simply click on the “x”
icon at the right end of the row of buttons above the clips
on the timeline. You’ll need to confirm that you want to
delete the timeline.
Inserting a Sequence inbetween Clips
If you need to place a clip inbetween material that’s on
the timeline already, drag and drop the thumbnail from
the desktop onto the position on the timeline where
you’d like to place it. A highlighted red line will appear
once you’re at the right position. Release the mouse.
Loading a FrameCycler Professional Project
Open the desktop. Navigate to the folder that contains the .ircp file that you want to
load. Double click on the thumbnail.
© 2011 IRIDAS www.iridas.com
31
IRIDAS
FrameCycler Pro 2011 User Guide
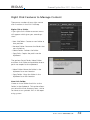
Right Click Features to Manage Content
There are a number of new right mouse
click functions in the 2011 Desktop.
Right Click a Folder
If you right click a folder a context menu
will appear which gives you several options:
- New SubFolder: Creates a new folder at
that position
- Rename Folder: Renames the folder that
was clicked on
- Delete Folder: Deletes the folder
- Copy Path: Copies the path into the
clipboard
The options Paste Folder, Move Folder
and New Link Folder are available when a
path was copied to the clipboard:
- Move Folder: Move the folder in the
clipboard to a new location
- Copy Folder: Copy the folder in the
clipboard to a new location
New Link Folder
Create a virtual folder that links to the
folder in the clipboard. This option allows
you to build virtual directory trees, similar
to shortcuts or symbolic links in the operating system.
© 2011 IRIDAS www.iridas.com
32
IRIDAS
FrameCycler Pro 2011 User Guide
Right click on a file or frame sequence
functionality
If you right click on a file or frame sequence you get a new context menu to
manipulate the entry:
- Copy to Clipboard: Copy the path of the
sequence or file to the clipboard
- Copy Sequence Here: If a sequence path
is in the clipboard, allows you to copy
the file or sequence to this location
- Move Sequence Here: If a sequence path
is in the clipboard, allows you to move
the file or sequence to this location
- Rename: Gives you the option to rename
the file, if it is a sequence, you can also
renumber it.
For renumbering, you can control the padding using the # characters. One # omits
padding, multiple ### pads to the number
of # characters. The second edit box to
the right indicates the start frame number.
© 2011 IRIDAS www.iridas.com
33
IRIDAS
FrameCycler Pro 2011 User Guide
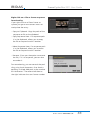
Tip: Autocomplete for Typed Directories
The 2011 Desktop supports autocomplete
in the path control for typed directories.
If you click into the directory bar at the
top of the sequence browser and start
typing, you will get a list of matching
directories. Simply select one using the
cursor up and down keys and hit enter to
move to that subfolder. Autocomplete will
automatically list the 10 subdirectories of
the newly entered folder, making it very
easy to browse complex folder structures with minimal effort, using only the
keyboard.
© 2011 IRIDAS www.iridas.com
34
IRIDAS
FrameCycler Pro 2011 User Guide
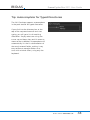
Adjust Settings for Precaching
Press <S> to open the settings, select Cache to increase or decrease the total amount of
RAM you want to assign to be used by FrameCycler.
You can also change the amount of frames that will be precached as you add material
to the timeline, enter values for “Read” to adjust the amount of frames FrameCycler will
precache from the current position of the Master Playhead.
© 2011 IRIDAS www.iridas.com
35
IRIDAS
FrameCycler Pro 2011 User Guide
Adjusting Playback
and Viewport Features
© 2011 IRIDAS www.iridas.com
36
IRIDAS
FrameCycler Pro 2011 User Guide
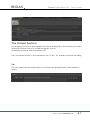
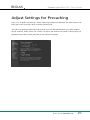
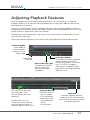
Adjusting Playback Features
Once a sequence or FrameCycler Professional project is on the timeline, it’s ready for
playback. Make sure to close the Desktop before you hit play (press <D> or click on the
Desktop button to close it).
You can use the Tangent CP200-TS playback controls, the on-screen playback buttons at
the bottom of the control console, or Hotkey shortcuts to control playback (for a full set of
hotkey shortcuts please refer to the last chapter).
To Play/Pause use the Space Bar. If you want to use step forward and backward use the
right and left arrow keys.
To go to a different position on the timeline drag the playhead to the desired position.
Playback Mode
Press <F6> to
switch modes:
Single Run, Ping
Pong, Loop
User-specified fps
To change the current playback
speed, double click on the
number and enter a new value.
Press < ENTER > to apply it.
Alternatively use page up and
page down to change playback
speed by 1 fps
Show/Hide
Desktop
Base frame rate (fps)
To choose a different
base fps open the
settings and select
“playback”
Disk icon turns red when
disk subsytem / CPU
can not deliver real time
decoding.
Display icon turns red
when GPU cannot provide
real-time performance or
display output is not in sync
Playback Buttons
From left to right:
- Go to in point
- First position of
current clip / edit
- Play backwards
- Pause
- Play forward
Playhead
indicates playback position.
Double click on TimeCode and
enter new TimeCode to move to
a different position
© 2011 IRIDAS www.iridas.com
37
IRIDAS
FrameCycler Pro 2011 User Guide
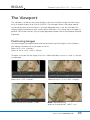
The Viewport
The Viewport is either on the same display as the user interface (single monitor setup)
or on a second display (Dual DVI or DVI/SDI). The Viewport shows the image according to the position on the timeline. If multiple playheads are in use, the Viewport will
display images according to your screen layout defintions. This can be up to 9 images in
parallel. For further info on using multiple playheads please refer to the chapter Multiple
Playheads.
Positioning Images
You can change the magnification and the positioning of the images in the Viewport.
Use Hotkeys for zoom to fit and zoom to 100%:
Zoom to fit: <Ctrl + Home>
Zoom to 100% <Ctrl + Shift + Home>
To zoom in and out of the image use <Ctrl + Mouse Wheel> or use <+> and <-> on the
number pad.
Zoom to fit: <Ctrl + Home>
Zoom to 100%: <Ctrl + Shift + Home>
Hide Timeline and Controls: <TAB>
NEW: Hide everything,
zoom to fit and center: <SHIFT + H>
© 2011 IRIDAS www.iridas.com
38
IRIDAS
FrameCycler Pro 2011 User Guide
Automatic Screen Layout
To open the Screen Layout window click on the button with the 9 squares right next to “Settings” (button
section bottom right). The default settings will show
“Automatic Layout” turned on.
Automatic Layout will allow you to:
• Add Playheads and automatically display them
• Remove playheads and automatically reflect the change
in the screen layout
While in automatic layout you can also turn on “Auto
Zoom”. This will automatically upscale all images along
the timeline to the highest resolution placed on the timeline in either horizontal or vertical resolution (select “keep
width” or “keep height” from the pull-down).
For advanced use of the Screen Layout please refer to the
chapter about Screen Layouts.
© 2011 IRIDAS www.iridas.com
39
IRIDAS
FrameCycler Pro 2011 User Guide
Working with the
FrameCycler Timeline
© 2011 IRIDAS www.iridas.com
40
IRIDAS
FrameCycler Pro 2011 User Guide
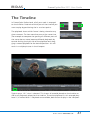
The Timeline
In FrameCycler Professional, all of your work is arranged
on the timeline. Determine which part of the timeline you
want to play by positioning the in- and out-points.
The playhead shows which frame is being viewed at any
given moment. To view more than one at the same time
(for example to compare the grading of different parts of
the same shot or scene) create additional playheads by
control clicking the right side of the playhead and dragging a second playhead to the desired position: this will
result in multiple pictures in the Viewport.
Typical setup: “All” view is selected. This shows all material placed on the timeline as
well as all playheads placed on the timeline. The active playhead (in this example playhead 1) is marked blue. 2 Playheads are available, both are on display in the Viewport.
© 2011 IRIDAS www.iridas.com
41
IRIDAS
FrameCycler Pro 2011 User Guide
Timeline Elements
Playheads
One playhead is always present with each
timeline. The Master playhead is marked
blue. This is the one that defines which
clip is active for grading and other adjustments.
In-Points and Out-Points
The default position is at the start and
end of a clip or playlist, however you can
move them manually with the mouse or by
double-clicking on the frame number and
entering a new number
In-point
Out-point
Ctrl + Click on in or out point to restore
default position.
Double click on a clip to set in and out
points for that clip.
Tracks
FrameCycler Professional uses tracks on the timeline for:
- Footage Clips (blue)
- Audio (solid green)
Footage and Audio Clips show the name of the source files.
© 2011 IRIDAS www.iridas.com
42
IRIDAS
FrameCycler Pro 2011 User Guide
Navigating along the Timeline
On a Timeline with multiple clips and multiple tracks you can navigate clip by clip and
track by track. Navigating clip to clip changes your master playhead position on the
timeline.
The most important Hotkleys are:
< CTRL > + < SHIFT > + Arrow Key Right
< CTRL > + < SHIFT > + Right Arrow Key Left < CTRL > + < SHIFT > + Arrow Key Up < CTRL > + < SHIFT > + Arrow Key Down
Go to next clip
Go to previous clip
Switch to track above
Switch to track below
For a full list of Hotkeys please refer to the Hotkey chapter at the end of this document.
© 2011 IRIDAS www.iridas.com
43
IRIDAS
FrameCycler Pro 2011 User Guide
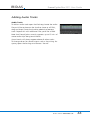
Adding Audio Tracks
Audio Tracks
To add an audio track open the Desktop, locate the audio
file you’d like to place on the timeline (wave or aiff file),
drag and drop it onto the timeline above the footage
track. Repeat this with additional files you’d like to add.
Note that FrameCycler currently supports up to 15 min. of
stereo audio clips along one timeline.
Sound tracks will always appear above all other tracks.
To change values for sound output such as the mixing frequency open the Settings and choose “Sound”.
© 2011 IRIDAS www.iridas.com
44
IRIDAS
FrameCycler Pro 2011 User Guide
Image Analysis Tools
© 2011 IRIDAS www.iridas.com
45
IRIDAS
FrameCycler Pro 2011 User Guide
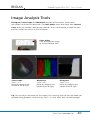
Image Analysis Tools
Histogram, Vectorscope and Waveform are part of FrameCycler Professional.
Use hotkeys to activate or deactivate. The color picker shows pixel color data, channel
views allow you to check specific color channels. Use it, for example, to check for compression artifacts or noise in R,G or B channel.
Color picker
Click anywhere on image
to show pixel color data
Vectorscope
Press < V >
Resize by dragging the
handle to left or right
Waveform
Press < W >
Resize by dragging the
handle to left or right
Histogram
Press < H >
Resize by dragging the
handle to left or right
Tip: You can adjust the ranges for the scopes, limit warnings and the way the scopes get
updated during playback in the Settings. Press < S > and select Tools to make changes.
© 2011 IRIDAS www.iridas.com
46
IRIDAS
FrameCycler Pro 2011 User Guide
Tip: You can detach the scopes from the FrameCycler
Professional Panel by clicking on the undock button. This
can be done for each scope separately. Click on the docking icon to bring it back to the FrameCycler Professional
Panel.
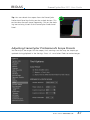
Adjusting FrameCycler Professional’s Scope Presets
You can adjust the ranges for the scopes, limit warnings and the way the scopes get
updated during playback in the Settings. Press < S > and select Tools to make changes.
© 2011 IRIDAS www.iridas.com
47
IRIDAS
FrameCycler Pro 2011 User Guide
Global Grading
© 2011 IRIDAS www.iridas.com
48
IRIDAS
FrameCycler Pro 2011 User Guide
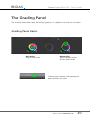
The Grading Panel
The Grading Panel offers tools for primary grading. It is applied to all clips on a timeline.
Grading Panel Basics
Axis point
Adjust values here
Master dial
Adjust ganged values
for this color wheel
Grading icon indicates that grading has
been done on this track
© 2011 IRIDAS www.iridas.com
49
IRIDAS
FrameCycler Pro 2011 User Guide
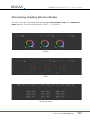
Alternating Grading Selector Modes
You can switch the main color controls between color wheel, slider, and numerical
value controls. To switch modes push < SHIFT > + < ENTER >.
Wheels
Sliders
Numerical values
© 2011 IRIDAS www.iridas.com
50
IRIDAS
FrameCycler Pro 2011 User Guide
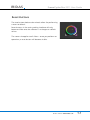
Reset Buttons
The two buttons below color wheels allow for performing
a reset to default.
Reset buttons in the main grading interface will only
become visible once the selector is no longer on default
values.
The same rule applies to all sliders - once you perform an
operation, a reset button will become visible.
© 2011 IRIDAS www.iridas.com
51
IRIDAS
FrameCycler Pro 2011 User Guide
Matrix & LUT Panel
This section is used to apply data that’s required to accurately reproduce color when
working with RAW image data from the ARRI D21, ARRI Alexa, Phantom HD / 65, Silicon Imaging SI2K. You’ll find the .Look files for cameras under settings/looks/
.Looks for ARRI D21: FrameCycler Professional can reproduce camera matrix data and
exposure LUT. Choose the .Look according to your original exposure.
© 2011 IRIDAS www.iridas.com
52
IRIDAS
FrameCycler Pro 2011 User Guide
The Properties Panel
The Properties Panel shows clip based info such as clip position on the timeline, time
warp and display options to mirror the picture or reverse the clip.
Clip position
Click on left or right
button to change the clip
position on the timeline
Length of the
source clip
Duration of the
clip after scaling
Scaling factor
in %
Timecode for current clip
based on source reel
Reverse playback
for current clip
Mirror current clip Mirror current clip
Horizontally
Vertically
© 2011 IRIDAS www.iridas.com
53
IRIDAS
FrameCycler Pro 2011 User Guide
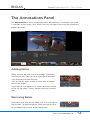
The Annotations Panel
Use Annotations to save and exchange notes and drawings. Annotations are saved
in the XML session script (.ircp). When the next user opens the script the annotations
appear for review.
Adding Notes
Select the text tool and click on the image. Type notes
into the text box. Color or size of type can be changed.
Click elsewhere to close text box.
Click on the text again to edit or move note to another
part of the image.
If you want this to appear on a single frame only instead
of the full clip select “Frame” before making an annotation.
Removing Notes
To remove notes click on the delete sign (x) at the right of
the text box. To delete drawings, select the line and click
on the delete sign (x) next to text tool button
© 2011 IRIDAS www.iridas.com
54
IRIDAS
FrameCycler Pro 2011 User Guide
Working with
.Look Files
© 2011 IRIDAS www.iridas.com
55
IRIDAS
FrameCycler Pro 2011 User Guide
.Look Files
FrameCycler Professional supports the use of .Look files. These files are only a few
kilobytes so they can easily be exchanged with others, such as the cinematographer, the
director, VFX supervisors etc.
You can apply .Looks created by the cinematographer with SpeedGrade OnSet or
FrameCycler DDS or SpeedGrade NX.
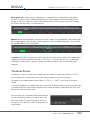
Applying a .Look
1. Select a clip
2. Open the Look browser by clicking on the
Looks button
3. Navigate from the browser tab to the folder containing
the .Look(s) you want to use.
4. click on a .Look, and press < ENTER > to
apply the .Look
© 2011 IRIDAS www.iridas.com
56
IRIDAS
FrameCycler Pro 2011 User Guide
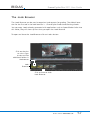
The .Look Browser
The .Look Browser can be used to organize .Look presets for grading. The default location for the first tab in the look browser is ../FrameCycler Professional/Settings/Looks.
You can copy .Looks already generated with applications such as SpeedGrade OnSet into
this folder, they will show up next time you open the .Look Browser
To open and close the .Look Browser click on Looks button.
Click on the plus
or minus signs
to view or hide
additional folders in
the browser
Look
Browser
Click to show or hide
Look Browser
© 2011 IRIDAS www.iridas.com
57
IRIDAS
FrameCycler Pro 2011 User Guide
Complex Timelines
and Advanced
Viewing Features
© 2011 IRIDAS www.iridas.com
58
IRIDAS
FrameCycler Pro 2011 User Guide
Managing Complex Timelines
To keep an overview of a very long or complex timeline, FrameCycler Professional offers
a variety of timeline views.
In addition, you can collapse (and expand) timeline tracks manually or automatically
when you want to focus on specific clips.
Press < Tab > to hide and show the timeline.
Timeline View Tabs
All View
shows the entire timeline. If you have many clips they will appear compressed together.
In/Out shows the section of the timeline between the in- and outpoints.
© 2011 IRIDAS www.iridas.com
59
IRIDAS
FrameCycler Pro 2011 User Guide
Selected displays the currently selected clip. A selected clip is highlighted with yellow
outlines. If you’re in this mode the playhead will move along one clip and keep the full
length of the clip visible. As soon as the playhead hits the next clip the view will change
and show the new clip in its entire length.
Master places the playhead in the center of the screen. During playback, the timeline rolls
past the playhead which remains fixed in position. With multiple playheads, you can click
on the P1 or P2 for the same effect.
Custom allows you to determine which part of the timeline you display. This mode works
independently from playhead positions. Click the “+” button next to “All” to generate
additional custom views. You can change the area of interest with the timeline zoom
features.
Timeline Zoom
In Master, P- and in Custom view modes you can zoom in and out by holding < CTRL >
and scrolling the mouse wheel while your mouse pointer is over the timeline.
To speed up the zoom process hold down < CTRL> + < SHIFT > and scroll the mouse
wheel.
In custom mode you can additionaly shift the entire timeline display to the left or the right,
just hold down left mouse over any part of the timeline display underneath the clips and
move to the left or to the right.
You can also use a standard zoom to 6 seconds
on the timeline by clicking on the 6s icon. The
icon next to 6s will zoom according to in and
out points, ALL zooms to show all elements on
the timeline.
© 2011 IRIDAS www.iridas.com
60
IRIDAS
FrameCycler Pro 2011 User Guide
Working with Multiple Playheads
FrameCycler Professional supports up to 9 playheads. You can use multiple playheads to
create A/B and splitscreen scenarios, to compare the beginning of a shot with its end,
to compare multiple versions of the same shot or to compare different episodes. Please
refer to the Screen Layout chapter for details about arranging playheads manually in the
Viewport.
Creating additional Playheads
Creating additional playheads is a simple drag and drop
operation. Click on the handle area of the master playhead (the area to the right of the “1” marked in blue).
Hold down CTRL and move away from the current position. You’ll see a semi-transparent copy of the playhead,
above it a green “+” sign. Drop the playhead at any position along the timeline where you want it. At the release
position there’s now a second playhead. If the screen
layout is on “Automatic Layout” a second image will
show in the Viewport.
Tip: to see both pictures completely use
< CTRL > + < HOME >, to see them pixel
accurate use < CTRL > + < SHIFT > + < HOME >.
If you want to create additional playheads you can drag
and drop again from the first playhead or from the newly
created 2nd playhead.
To delete additional playheads simply drag and drop them
into the viewport. Click on a playhead’s handle icon to
start the process. Note that you can’t delete the master
playhead (marked blue).
© 2011 IRIDAS www.iridas.com
61
IRIDAS
FrameCycler Pro 2011 User Guide
The Screen Layout
To open the Screen Layout window click on
the button with the 9 squares right next to
“Settings” (button section bottom right).
The default settings will show “Automatic
Layout” turned on.
Automatic Layout will allow you to:
• Add Playheads and automatically display
them
• Remove playheads and automatically
reflect the change in the screen layout
While in automatic layout you can additionally turn on “Prefer vertical orientation”.
This will add images for every additional
playhead in vertical orientation.
You can also turn on “Auto Zoom”. This will
automatically upscale all images along the
timeline to the highest resolution placed on
the timeline in either horizontal or vertical
resolution (select “keep width” or “keep
height” from the pull-down).
Note: all settings you make in the Screen
Layout will not effect your render output
settings.
© 2011 IRIDAS www.iridas.com
62
IRIDAS
FrameCycler Pro 2011 User Guide
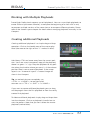
Automatic Screen Layout: the operator has placed 4 playheads along the timeline.
All 4 are the same size and can get displayed at once. Use < CTRL > and scroll the
mouse wheel to zoom in and out. Hold down the mouse wheel on the pictures within
the Viewport to pan around.
© 2011 IRIDAS www.iridas.com
63
IRIDAS
FrameCycler Pro 2011 User Guide
Working with A/B and Splitscreen Views
Whenever you select 2 playheads you can choose between 3 view modes:
A or B: Select 1 and 1 in the screen layout. Use the pull-down for playhead numbers to
select the playhead you’d like to display.
A/B side by side: Select 1 and 2 in the screen layout. This will display both playheads
side by side. You can place them top to bottom by selecting 2 and 1. Alternatively push
< F10 > to change the orientation.
Splitscreen: to go from A/B to splitscreen select “split” from the pull-down
or press < F9 >
To change the orientation of the split press < F10 >
To move the split position hold down < CTRL > over the viewport and move the mouse.
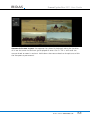
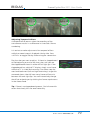
Splitscreen Layout: the operator has opened 2 timelines. Timeline 1 (with
playhead 1) shows a calibrated and corrected image, timeline 2 a copy of timeline 1
without correction and calibration. Playhead 1 is the left half of the split. To show just
the corrected picture instead of the splitscreen press < F9 >.
© 2011 IRIDAS www.iridas.com
64
IRIDAS
FrameCycler Pro 2011 User Guide
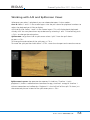
Working with alternating Screen Layouts
The Screen Layout allows for setting up two alternate
layouts. You can use this to create a general purpose layout that will work for all standard viewing purposes and
a second layout with either an advanced setup or a setup
you alter whenever you need viewing options aside from
“Automatic Layout”.
By default layout 1 is active. To change to layout 2 click
on “2”. The button will turn blue. Changes you make
in layout 2 will not affect layout 1, you can interactively
switch between them.
© 2011 IRIDAS www.iridas.com
65
IRIDAS
FrameCycler Pro 2011 User Guide
Editing Features
© 2011 IRIDAS www.iridas.com
66
IRIDAS
FrameCycler Pro 2011 User Guide
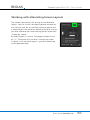
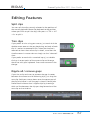
Editing Features
Split clips
You can split the clip currently selected at the position of
the master playhead. Move the playhead to the position
where you’d like to split the clip, then press <CTRL + ALT
+ S> to split it.
Trim clips
If you prefer to trim using your mouse, just work with the
double arrow areas at the very beginning and end of each
clip. It’s easiest to accomplish this when the timeline is
zoomed to show the current clip in detail, use either the
timeline zoom in master view or simply use the “selected”
view.
If you prefer to work with numerical input, just double
click on in or out point of the current clip and change
the offset with your keyboard. Press enter to commit the
change.
Ripple all / remove gaps
If you trim a clip and want to remove the gap it creates
between the current and all following clips, just drag the
next clip (hold your mouse down over the center part of
the clip) and move it until the gap is closed. FrameCycler
Professional indicates that it ripples clips by showing a
thick red line between the clip you drag forward and the
next clip on the timeline.
© 2011 IRIDAS www.iridas.com
67
IRIDAS
FrameCycler Pro 2011 User Guide
Stereo 3D Workflow
with DualStream NX
© 2011 IRIDAS www.iridas.com
68
IRIDAS
FrameCycler Pro 2011 User Guide
DualStream NX
The 5th generation of IRIDAS DualStream support for working with Stereo 3D material
includes support for virtually every display technology available today. A list of the most
common technologies and the required changes in your FrameCycler Professional setup
starts this section about using DualStream.
To take advantage of FrameCycler Professional’s capability to automatically load left
and right eye footage be sure to adopt one of the file naming conventions listed in the
section after the display setup scenario.
Finally the fun part: learn more about the 3D adjustment features in the last section on
using DualStream NX.
© 2011 IRIDAS www.iridas.com
69
IRIDAS
FrameCycler Pro 2011 User Guide
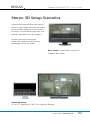
Stereo 3D Setup Scenarios
FrameCycler Professional can be used on
either a single screen with both 3D image
and UI on one display, or as a dual monitor setup. A dual monitor setup uses two
monitors connected via 2 DVI outputs
The best setup for FrameCycler
Professional depends on the display
technology for the 3D display.
Basic Setup: Single Screen, UI and S3D
Image on one screen
Advanced Setup:
24” or 27” display for UI, 46” S3D display for footage
© 2011 IRIDAS www.iridas.com
70
IRIDAS
FrameCycler Pro 2011 User Guide
Selecting the correct output signal on DVI output
The settings for S3D displays can be
selected in FrameCycler Professional’s
Display section. Open the Settings, choose
Display, use the second pull-down to turn
on the stereo display mode that works
with your display tpye. On systems without any specific stereo display technology use red/cyan to see both pictures in
standard red/cyan composition.
Line-by-Line Systems
These Stereo 3D Displays are line-by-line
systems (also called interlaced scanline
stereo). Select “interlaced scanlines” in
the stereo display mode selector under
Settings/Display to enable Stereo 3D
viewing on the JVC, Hyundai and Miracube 46”, LG 42” and 55”
© 2011 IRIDAS www.iridas.com
71
IRIDAS
FrameCycler Pro 2011 User Guide
2x DVI stereo
A number of stereo display setups require 2 DVI outputs from the workstation. Each
output carries one eye only. This applies to:
- Planar stereo screen (with passive glasses, linear polarization)
- Dual Projection (with passive glasses, linear or circular polarization - this setup can also
be driven via Dual SDI)
- L/R side by side setups using 2 displays
Basic 2x DVI Setup: NVIDIA OpenGL Stereo
Requirements:
- Windows 7
- NVIDIA Quadro 5000 or 6000
- certified driver for OpenGL Stereo
This setup allows you to send left and right image to 2 separate DVI / DP outputs. The
user interface will appear on the stereo output on both eyes. To enable OpenGL Stereo
acces the NVIDIA control panel, set both displays to NVIDIA clone mode. Then change
the following settings under “3D Performance Settings”:
- OpenGL Stereo: ON
- Tripple Buffering: ON
Restart the machine after making these changes. Then open the settings in FrameCycler
Professional (push “S”), choose Display. Select “Shutter Glasses” from the stereo pulldown menu. Restart the application.
© 2011 IRIDAS www.iridas.com
72
IRIDAS
FrameCycler Pro 2011 User Guide
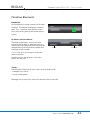
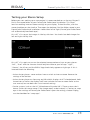
Testing your Stereo Setup
Before you start working on a new project it’s recommended to run the test file you’ll
find in the stereo folder of your FrameCycler Professional installation. This file allows for avoiding inversed stereo settings on your display. To load the files, click the
stereo checkbox on the timeline. Then open the desktop, find the folder stereo in your
FrameCycler Professional installation. Load either left or right (FrameCycler Professional
will automatically load both eyes).
Hit <ALT + D> to put the images in side-by-side view. You should see both images for
left and right side-by-side:
Hit <ALT + D> again to turn on the selected stereo mode and turn on your glasses.
“left”, “Dual” and the 4 arrows should only be visible to your left eye. “right”,
“Stream”, the 4 lines and the IRIDAS logo should only appear on right eye. If this is
inversed check the following:
- Active shutter glasses: some emitters have a switch to inverse stereo. Reverse the
settings of the emitter.
- Active shutter glasses on Samsung and Mitsubishi displays with TI checkerboard: both
the emitter as well as the display itself have switches to inverse stereo. Refer to the
user manual, be sure both don’t use inversed settings
- Passive systems (such as the JVC, Miracube and Hyundai 46”): These systems don’t
have a switch to inverse stereo. If the image seems to be inverted, it’s easiest to swap
eyes in the settings of FrameCycler Professional. Open the settings, choose Display,
use the checkbox for “swap eyes”.
© 2011 IRIDAS www.iridas.com
73
IRIDAS
FrameCycler Pro 2011 User Guide
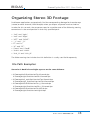
Organizing Stereo 3D Footage
DualStream applications automatically find the corresponding footage for the other eye
(stereo) or other channel (ARRI Mscope) when you drop a sequence into the timeline.
In order for this to work, the sequences need to use either one of the following naming
conventions in the same position in their fully qualified path:
• “left” and “right”
• “Left” and “Right”
• “LEFT” and “RIGHT”
• “_L” and “_R”
• “lf” and “rt”
• “LF” and “RT”
• “CamA” and “CamB”
• “LinkA” and “LinkB”
• “Link_A” and “Link_B”
The folder naming that includes the Link definition is usually used for Mscope only.
File Path Examples:
Scenario A: both left and right eye are on the same Volume:
• X:\Footage\left\Shot\Version\Test\frame#.dpx
X:\Footage\right\Shot\Version\Test\frame#.dpx
• X:\Footage\left_eye\Shot\Version\Test\frame#.dpx
X:\Footage\right_eye\Shot\Version\Test\frame#.dpx
• X:\Footage\left\Shot\Version\Test_L\frame#.dpx
X:\Footage\right\Shot\Version\Test_R\frame#.dpx
• X:\Footage\left\Shot\Version\Test\left#.dpx
X:\Footage\right\Shot\Version\right#.dpx
© 2011 IRIDAS www.iridas.com
74
IRIDAS
FrameCycler Pro 2011 User Guide
Scenario B: left and right eye are stored on 2 discrete Volumes:
Running OS X please ensure to use Volume Names LEFT and RIGHT. Running Windows
please use R:\ and L:\ drive letters.
• L:\Footage\Shot\Version\Test\frame#.dpx
• R:\Footage\Shot\Version\Test\frame#.dpx
Note: Make sure you don’t have any of the replacement wildcards as part of your regular filename, otherwise they will be replaced. These examples would not work:
• X:\Footage\left\Shot\Version\Test\Compositing_Shot_left_Lowres.#.dpx
• X:\Footage\right\Shot\Version\Test\Compositing_Shot_right_Lowres.#.dpx
(The _L in the left eye filename’s _Lowres would be substituted with _R, and result in
right right_Rowres.#.dpx which cannot be found)
Tip: Customizing the Stereo Naming Convention
DualStream NX allows for changing the preset structure, excluding existing presets or
adding new presets according to your pipeline standards.
The preset file is located in the settings folder of your FrameCycler Professional installation. It’s called “StereoNaming.fcps”, open it with a text editor like wordpad or textedit.
Each line in the xml file represents one set of stereo pair naming conventions. Simply
add a new line and add a tab between left and right to create an additional preset.
© 2011 IRIDAS www.iridas.com
75
IRIDAS
FrameCycler Pro 2011 User Guide
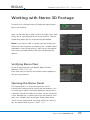
Working with Stereo 3D Footage
To work with a stereo timeline, enable the Stereo checkbox in the timeline.
Now use the desktop to add a shot or multiple shots from
either left or right eye branch to a new timeline. The corresponding other eye will automatically be loaded.
Note: If you mainly work in stereo, you can change the
default for new timelines by checking the “Enable Stereo”
checkbox in the Editing settings, then restart the application. Newly created timelines are now stereoscopic by
default.
Verifying Stereo Pairs
To verify that both eyes are loaded, open the Reel
Browser (CTRL + ALT + R) .
Each shot that you add to the timeline should appear as
left and right eye pair.
Opening the Stereo Panel
The Stereo Panel is a unique environment within
FrameCycler Professional to modify reel parameters such
as mirroring as well as clip based geometry adjustments,
0 parallax control and floating window. To get started be
sure a footage clip is marked active on the timeline, then
press <K> to open the FrameCycler Professional Panel.
Switch to the Stereo Panel by either clicking on the button for Stereo Panel or push < SHIFT + S >.
© 2011 IRIDAS www.iridas.com
76
IRIDAS
FrameCycler Pro 2011 User Guide
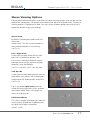
Stereo Viewing Options
FrameCycler Professional offers a variation of stereo viewing options that can be used to
analyze the stereo pairs. All options are visible at the top of the Stereo Panel. The active
viewing option is highlighted in blue. You can switch to other options by clicking on its
respective button or by using hotkeys.
Stereo View
By default FrameCycler Professional will
show the
Stereo View. This will use the stereo display method selected in the settings.
<ALT + S>
Left / Right View
If you want to show either left or right
eye, click its respective button. You
can use this feature to create a wiggle
between left and right eye at any given
speed by using the hotkeys:
<ALT + L> for left, <ALT + R> for right.
Side by side
If you want to show both pictures next to
each other, use side by side. FrameCycler
Professional will automatically scale to fit.
<ALT + D>
Tip: if you prefer splitscreen view between left and right, press <F9> to enter
splitscreen mode. Press <F9> again to
return to side by side.
Difference Matte
This view is helpful whenever you want to
show / adjust differences in geometry or
to identify and adjust 0 parallax.
<SHIFT + ALT>
© 2011 IRIDAS www.iridas.com
77
IRIDAS
FrameCycler Pro 2011 User Guide
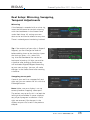
Reel Setup: Mirroring, Swapping,
Temporal Adjustments
Mirroring
If the footage is recorded with a mirror rig,
invert the horizontal or vertical mirroring
with the checkboxes in the Stereo Panel
under Reel Setup. All settings are nondestructive and can be altered at any time.
There’s no background rendering involved.
Tip: If the majority of your clips is flipped/
flopped, you can change the defaults
before adding them to the timeline. Open
the Settings (press <S>), select Editing. Use the checkboxes for vertical or
horizontal mirroring. All clips you add to
a timeline after changing these presets
will be loaded flipped/flopped according
to your new settings. You can still make
changes in the Stereo Panel after creating
a timeline.
Swapping stereo pairs
If one of your reels has swapped left and
right eye, you can correct for this with the
Exchange button.
Note: Make sure your display is set up
correctly before swapping stereo pairs.
The easiest way to verify this is to load the
left/right clip available in stereo subdirectory of your program installation. If left/
right are reversed, flip the eyes in the
display setup as discussed in the previous
chapter.
© 2011 IRIDAS www.iridas.com
78
IRIDAS
FrameCycler Pro 2011 User Guide
Adjusting Temporal Offsets
A temporal offset occurs when the recording of the
two cameras results in a difference in time code / frame
numbering.
It is easiest to make adjustments for temporal offsets
while the stereo image is displayed side-by-side. Press
<ALT+D> to toggle side-by-side and regular stereo view.
Play the shot you want to adjust. If there’s a clapperboard
at the beginning or end of the shot, play until you see
the clapperboard closed in either left or right eye. If the
clapperboard has a digital TC display, simply use a frame
while the TC is visible and counting. Use frame step forward and backward (left and right arrow keys) to get this
narrowed down. Identify how many frames offset exist
between left and right eye. You can interactively change
the offset on both eyes by clicking the frame step buttons
in the Stereo Panel.
Tip: if there’s no clapperboard present, find a frame with
action that clearly lasts for one frame only.
© 2011 IRIDAS www.iridas.com
79
IRIDAS
FrameCycler Pro 2011 User Guide
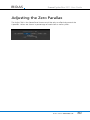
Adjusting the Zero Parallax
The Adjust Tab in the Stereo Panel shows one slider only to effectively control the
0 parallax. Values are shown in percentage of resolution as well as pixels.
© 2011 IRIDAS www.iridas.com
80
IRIDAS
FrameCycler Pro 2011 User Guide
Rendering
© 2011 IRIDAS www.iridas.com
81
IRIDAS
FrameCycler Pro 2011 User Guide
Rendering
FrameCycler Professional includes an internal render engine which supports various
frame sequence formats as well as movie file formats.
1. Select the area of the timeline you want to render
Set an in and out point along the timeline to define the area for rendering.
2. Open the render dialog
(click on the Render button in the user interface or press CTRL + R).
3. Select the output path
© 2011 IRIDAS www.iridas.com
82
IRIDAS
FrameCycler Pro 2011 User Guide
4. Select the file output name
If you want to create frame sequence output, padding will be added automatically. It is
recommended to use an underscore after the actual frame sequence name. A preview
of the resulting output name is displayed in 50% grey next to the field for entering the
output name.
5. Select the file output format
FrameCycler Professional comes with output presets for the most popular frame
sequence formats and some Quicktime formats FrameCycler Professional interprets
internally (see also the chapter on supported file formats for playback and rendering).
Select a format from the list or click on “Other” to see a list of available formats and
output options.
6. Choose options for burn-in and calibration LUT
By default burn-in will show “use the same as playback”, thus making this process wysiwyg. The calibration LUT is set to use no LUT since usually the calibration LUT shouldn’t
be part of the rendering process. If you require a LUT to be part of the output (e.g. for
sending it to devices that can’t handle LUTs), select the LUT that should be used for
rendering.
7. Select frame number offset
If the output format is a frame sequence type format, you can select an offset for the
padding for the sequence. Type the offset in frame numbers.
© 2011 IRIDAS www.iridas.com
83
IRIDAS
FrameCycler Pro 2011 User Guide
File Format Support
© 2011 IRIDAS www.iridas.com
84
IRIDAS
FrameCycler Pro 2011 User Guide
Universal RAW 5.0 Support
FrameCycler Professional supports the following digital film camera formats:
ARRIRAW Alexa v3 (.ari)
ARRI D21 S.Two RAW (.dpx)
Fully certified ARRIRAW color science.
Output LUTS for Rec709 EE and P3 incl.
The ARRI D21 RAW files recorded on an S.Two
Digital Film Recorder (.dpx file extension) are
supported. To enable the ARRI .dpx RAW files
open the settings dialog, select File Formats
and toggle the checkbox for SMPTE DPX /
ARRI D21 RAW.
Cineform (.avi/.mov)
DALSA Origin 4K RAW (.dpx)
Ikonoskop A-Cam
Supported via CinemaDNG
Phantom HD/4K (.cine)
For older Phantom RAW files with the .cin
extension, enable the corresponding flag in
the File Formats tab of your user settings.
REDCode RAW (.R3D)
FrameCycler Professional supports R3D
via the RED SDK. Dynamic Qualities allow
for adjusting playback paramaters such as
resolution to achieve real time playback.
Silicon Imaging SI 2K/SI Mini
(Cineform RAW .avi/.mov)
Includes matrix and .Look metadata support.
Silicon Imaging SI 2K/SI Mini
(Uncompressed .siv)
Includes matrix and .Look metadata support.
Weisscam HS-1 RAW (.wcr)
Support for .wcr
Weisscam HS-2 RAW
Support for .wcr and a subset of the
DM2 Digimag
© 2011 IRIDAS www.iridas.com
85
IRIDAS
FrameCycler Pro 2011 User Guide
ARRI Alexa Support
FrameCycler Professional supports all formats
recorded by the ARRI Alexa, including ARRIRAW
and ProRes 4444. in 12 bit.
ARRIRAW format acquired with disk recorders writing .ari
ARRIRAW is debayered natively using ARRI’s color science. All in-camera settings are
applied automatically.
ProRes 4444 recorded with SxS cards
FrameCycler Professional reads ProRes files on both OS X and Windows 7. The files are
decoded at original bit depth, maximum quality for all additional processing is ensured.
Please be sure to use the latest certified Quicktime for OS X or Windows:
http://doc.iridas.com/index.php/Quicktime_Codecs
Output Transform LUTs
ARRI provides LUTs for the Alexa in various formats. IRIDAS has tested and certified the
set of LUTs designed for use with Shake. You can download the LUTs from ARRI directly.
© 2011 IRIDAS www.iridas.com
86
IRIDAS
FrameCycler Pro 2011 User Guide
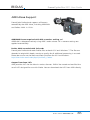
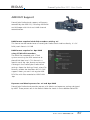
ARRI D21 Support
FrameCycler Professional supports all formats
recorded by the ARRI D21, including ARRIRAW
and M-Scope with LinkA and LinkB channel
recombination.
RAW format acquired with disk recorders writing .ari
This format can be loaded onto a FrameCycler Professional timeline directly. It is 3K
RAW, each frame is 9.1 MB
RAW format acquired as .dpx RAW
using S.TWO disk recorders
The RAW files recorded with S.TWO
systems are using the DPX container to
place RAW data into it. This format is a
special use of the .dpx format and requires
a change in the FrameCycler Professional
settings. Open the Settings Panel, select File
Formats, enable the checkbox for D21 DPX
support. Note: you can’t mix regular RGB
DPX files with files recorded as ARRI RAW
.dpx
Exposure and Matrix presets for .ari and .dpx RAW
FrameCycler Professional provides presets with Matrix and exposure settings designed
by ARRI. These presets are in the default folder for Looks in the subfolder called D21.
© 2011 IRIDAS www.iridas.com
87
IRIDAS
FrameCycler Pro 2011 User Guide
ARRI M Scope
This format utilises the 2 SDI outputs of the D21 to
record anamorphic HD images. The data captured with
tape or disk recorders is not RAW but 2 channels of
RGB data, each containing half of the image resolution.
FrameCycler Professional can recombine these 2 channels as part of its Dualstream capabilities. Note that bandwidth and other requirements
are similar to stereo playback and grading, please read the chapter on working with
stereo data for further information on hardware requirements.
To activate M Scope support in FrameCycler Professional open the settings, apply the
following changes:
- Display: use the second pull-down to select M Scope as stereo mode.
- Editing: check the last checkbox on this page to activate stereo timelines as default for
newly created timelines.
Delete the current timeline and make sure the stereo checkbox on the timeline is active
before adding M Scope data to the timeline.
© 2011 IRIDAS www.iridas.com
88
IRIDAS
FrameCycler Pro 2011 User Guide
Phantom HD and Phantom 65 Support
FrameCycler Professional supports all formats by
Phantom recorded as .cine. This includes the
Phantom HD as well as the Phantom 65.
Phantom .cine RAW
This format can be used directly without loading additional software or adjusting
settings parameter. Since it is uncompressed HD or 4K RAW, Phantom RAW real time
playback requires a fast disk system.
White balance presets
FrameCycler Professional reads white balance info recorded with all current Phantom
cameras (starting with firmware Ph 670).
© 2011 IRIDAS www.iridas.com
89
IRIDAS
FrameCycler Pro 2011 User Guide
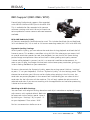
RED Support (RED ONE / EPIC)
FrameCycler Professional supports files recorded
with the RED ONE and RED Epic via the RED SDK.
This is available for files recorded with camera
software starting with build 16 and will continue
to be updated as newer camera software becomes
available.
RED ONE RedCode (.R3D)
All formats recorded as RedCode can be used. This includes RedCode 28 and RedCode
36 in windowed (2K, 3K) as well as full sensor recording mode (4K / 4.5K with RED MX).
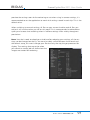
Dynamic Quality Settings
With Dynamic Quality, you can reduce the resolution during playback and load the full
frame at pause. This enables a workflow using 4K R3D files where you can access half
or quarter resolution proxies for real time playback, but see the full 4K frame during
paused image manipulation. Most of the work in color grading and quality control
is done while playback is paused, so this is an essential workflow enhancement. As
soon as you hit play, the image switches back to the lower proxy resolution, giving you
instant moving feedback on your correction.
To access the controls for Dynamic Quality, open the settings panel (click on “settings”
or press “S” on your keyboard). Click on “Dynamic Quality” on the settings panel. Then
choose the resolution you’d like to use for display when playing in the first row, the
resolution on paused playback in the second row. Additionally you can select a third
resolution for the idle status of the machine. This will only update the picture to the
selected resolution if you are not working with the application and no other processing
is done on the workstation.
Working with R3D Settings
You can work with original settings based on each clip’s metadata or replace all image
adjustments with a global default. Both can
be accessed via the settings panel. Open it
by clicking on “Settings” or just press “S”
on your keyboard. Then select “R3D”.
For fast turnaround on dailies or to re-
© 2011 IRIDAS www.iridas.com
90
IRIDAS
FrameCycler Pro 2011 User Guide
produce the settings seen while monitoring on set when using in-camera settings, it is
recommended to set the application to work with settings stored in each clip. This is the
default value.
When switching to manual settings, all files on your current timeline and all files you
add to it will use the values you set on this page. This is recommended to achieve best
quality and to ease shot matching when in-camera settings differ widely throughout
production.
Note: You don’t need to reload your timeline after adopting your settings, all the settings can be changed on the fly. You can also safely switch between the manual and
the default setup, this won’t change your files but only the way the get processed for
display. The settings that are active when
you commit a render job will define how the
images are treated for rendering.
© 2011 IRIDAS www.iridas.com
91
IRIDAS
FrameCycler Pro 2011 User Guide
Silicon Imaging SI2K Support
FrameCycler Professional supports several formats
recorded by
the SI2K.
Cineform RAW HD/2K
This format can be used directly without loading additional software or adjusting settings parameters. The
Cineform NeoPlayer is not required for working with
these files in FrameCycler Professional.
SI2K .siv RAW
This new format available with the SI2K records
uncompressed RAW files. FrameCycler Professional can
directly open .siv files.
White Balance and Matrix presets for SI2K Cineform RAW
FrameCycler Professional provides presets with Matrix and White Balance settings for
the Cineform RAW files designed by Silicon Imaging. These presets are in the default
folder for Looks in a subfolder called SI2K. They are in .look format, you can apply them
via the .Look browser
(see the chapter on
working with .Looks)
SI2K .siv RAW
This format records uncompressed RAW files. FrameCycler Professional can directly open
.siv files. White balance info is applied automatically.
.look files recorded with the camera are interpreted automatically if they are in the same
directory as the shot itself.
© 2011 IRIDAS www.iridas.com
92
IRIDAS
FrameCycler Pro 2011 User Guide
WEISSCAM Support
FrameCycler Professional supports files recorded with both HS1 and HS2 as .wcr RAW.
FrameCycler Professional also supports a subset
of the WEISSCAM DM2 Digimag formats in HD
resolution.
WEISSCAM Raw(.wcr)
You can work with .wcr files directly, just select them from the desktop and place them
on the timeline
WEISSCAM HS2 Digimag HD formats(.fhg*)
The following formats are supported with FrameCycler Professional:
- .fhgWR
- .fhgWD
- .fhgDI
- .fhgWC
- .fhgWE
© 2011 IRIDAS www.iridas.com
93
IRIDAS
FrameCycler Pro 2011 User Guide
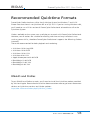
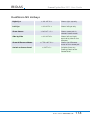
Recommended Quicktime Formats
FrameCycler Professional can utilise the Quicktime System for Windows 7 and OS X.
Please note that there is no Quicktime 64 as of Q3 2011. If you’re running Windows x64,
you’ll need to run a 32 bit version of FrameCycler Professional to be able to utilise the
Quicktime System.
Codecs available to the system can usually be put to work with FrameCycler Professional.
However, not all codecs are suitable for working real time and may introduce issues
such as gamma shifts, therefore FrameCycler Professional supports the following Codecs
internally.
These are recommended for both playback and rendering.
• AJA Kona 10-bit Log RGB
• AJA Kona 10-bit RGB
• AJA Kona 10-bit YUV
• AJA Kona 8-bit YUV
• Apple Uncompressed 8-bit RGB
• BlackMagic 10-bit RGB
• BlackMagic 10-bit YUV
• BlackMagic 8-bit YUV
DNxHD and ProRes
To put DNxHD and ProRes to work, you’ll need to install the Quicktime codecs provided
by Avid and Apple. Please check our online documentation area to get latest recommendations on Quicktime versions and Codec updates:
http://doc.iridas.com/index.php/Quicktime_Codecs
© 2011 IRIDAS www.iridas.com
94
IRIDAS
FrameCycler Pro 2011 User Guide
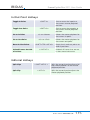
FrameCycler File Format Support
FrameCycler Professional supports the following industry standard file formats.
Format
Read
Write
Cineon (.cin)
Yes
Yes
DPX, DPX 2.0
Yes
Yes
Targa (.tga)
Yes
Yes
TIFF
Yes
Yes
Pixarlog TIFF
Yes
No
Floating Point TIFF
Yes
No
Maya IFF
Yes
Yes
Lightwave IFF
Yes
Yes
Softimage PIC
Yes
Yes
Wavefront RLA
Yes
Yes
Windows Bitmap
Yes
Yes
Gif
Yes
No
Jpeg
Yes
Yes
YUV
Yes
No
OpenEXR
Yes
Yes
© 2011 IRIDAS www.iridas.com
95
IRIDAS
FrameCycler Pro 2011 User Guide
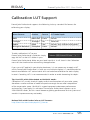
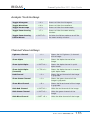
Calibration LUT Support
FrameCycler Professional supports the following industry standard file formats for
calibrating your display:
Manufacturer
Product
Format
LUT Node Depth
ARRI
ARRI CMS
.cube
various
Filmlight
Truelight
.lut
16x16x16
Kodak
KDM
.3dl
various, only without encryption
Rising Sun Research
Cinespace
.cube
various
To add a calibration LUT to your
FrameCycler Professional installation simply
copy the LUT to the LUTs folder in your
FrameCycler Professional folder on your local hard disk. It will show in the Calibration
menu on the timeline after relaunching the application.
If you use a LUT applied in your display hardware, it is not neccessary to apply a LUT
within FrameCycler Professional. In case you use multiple displays it is recommended to
leave the calibration LUT section blank and use hardware calibration for each display
instead. Cascading LUTs is not recommended in order to avoid decreasing bit depth.
Tip: Use LUTs with either 8x8x8 or 16x16x16 nodes
Calibration LUTs usually shouldn’t apply radical transformations of your color space,
therefore a smaller number of nodes are precise enough for accurate interpolation
of the target color space. 16x16x16 is a good compromise between performance
and accuracy if you apply it in software. FrameCycler Professional supports up to
256x256x256 nodes, but this would decrease grading performance on the system and
wouldn’t improve accuracy noticeably.
Related Link with further info on LUT formats:
http://doc.iridas.com/index.php/LUT_Formats
© 2011 IRIDAS www.iridas.com
96
IRIDAS
FrameCycler Pro 2011 User Guide
Command Line
© 2011 IRIDAS www.iridas.com
97
IRIDAS
FrameCycler Pro 2011 User Guide
The FrameCycler Command Line
FrameCycler supports an extensive command line interface.
Use the command line to launch the application with specified footage loaded, apply
playback parameters (such as resampling, playback speed etc.), and queue sequences
for dailies. These functions can, of course, all be accessed from the user interface, but
the command line offers advantages for some situations:
- For experienced users, it can be quicker than using the GUI to load shots and apply
parameters
- Special parameters (such as a custom crop), which are not available from the presets
in the dropdown menus, can be set.
- It allows for the use of scripting to integrate in-house workflow tools with
FrameCycler.
You can use the IRIDAS Product Launcher tool to apply a command to a running instance of FrameCycler or SpeedGrade.
Accessing the Command Line
Windows XP
Access the command line by clicking on the Start button and then clicking the “Run…”
icon. Type cmd into the box, click OK, and the command line prompt appears. Enter the
file path for the location of the application (SpeedGrade, FrameCycler or MetaRender)
and press enter. You are now ready to use the command line.
Example:
C:\>”Program Files\IRIDAS FrameCycler Professional 2007\bin\FrameCycler.exe”
Linux
Linux users need to run the terminal (if you are in a graphical environment). At the
prompt, navigate to the directory containing your product and you are ready to begin.
© 2011 IRIDAS www.iridas.com
98
IRIDAS
FrameCycler Pro 2011 User Guide
Mac OS X
Start up the Terminal in the Utilities folder (inside the Applications folder). Enter the file
path for your installation and you are ready to start.
The Anatomy of a Command
The core command line for all IRIDAS products consists of two parts:
[SequenceName] [Range/Offset Options]
For Example
FrameCycler C:\footage\frame#.dpx 1-100 –sC:\footage\test.aiff
The SequenceName is the fully qualified path to a frame in the sequence – or an abbreviated name such as seq#.tga. The application automatically detects all frames in a
sequence and treats it as a whole.
Range refers to the number of frames which will be affected by the command. It is
specified as FirstFrame-Lastframe. For example 10-100 will affect the sequence from
frame 10 through to frame 100.
Note: If you specify just one number, the application will interpret this as the first frame
and the command will affect the rest of the sequence from that point on.
If you specify a range that extends beyond the actual number of frames, or if frames are
missing, you will see the “failed to decode frame” image displayed as a placeholder for
these frames.
To reverse a clip, simply specify a reverse range:
FrameCycler C:\footage\frame#.dpx 100-1
An Offset can also be specified using -o followed by a positive or negative number
denoting the desired frame offset. The frames will be moved in the time line by the
specified offset. Negative offsets cut the specified number of frames from the beginning of the sequence.
© 2011 IRIDAS www.iridas.com
99
IRIDAS
FrameCycler Pro 2011 User Guide
Related Links
The Core Command line:
http://doc.iridas.com/index.php/Core_Command_Line
Product Launcher Tool:
http://doc.iridas.com/index.php/Product_Launcher
The FrameCycler Command Line:
http://doc.iridas.com/index.php/FrameCycler_and_SpeedGrade_Command_Line
© 2011 IRIDAS www.iridas.com
100
IRIDAS
FrameCycler Pro 2011 User Guide
Customizing
© 2011 IRIDAS www.iridas.com
101
IRIDAS
FrameCycler Pro 2011 User Guide
Customizing FrameCycler
Many aspects of FrameCycler Professional can be adapted to fit best into your workflow.
This goes for the presets for Aspect Ratio, Crop, Resample and the Burn-in Overlays.
The presets that come with FrameCycler Professional are designed to serve a wide range
of workflows, so there are usually 2 scenarios where it’s useful to apply changes:
1) The presets include more options than you need to be covered, so you drill them
down to a much shorter choice of options.
2) Your current project requires a specific option that is not covered by industry standards, so you add a new choice to the template.
All presets are done as simple, human readable text files. It is easy to make changes.
Presets are stored in the settings folder of FrameCycler Professional.
Note: you need to restart FrameCycler Professional before any changes will get applied.
It is recommended to create backup files of preset files you intend to change.
You can open all preset files with simple text editing applications such as Wordpad
(Windows) or Textedit (OS X).
Aspect Ratio: AspectRatio.fcps
What it does: if you are using a special pixel aspect ratio, for example for anamorphic
frames, you can choose between two kind of presets in the pixel aspect ratio menu or
add additional presets to the menu.
Changing the pixel aspect ratio is done in the display in real-time. Unlike resampling,
this command does not require reloading the frames into RAM.
How to change it: to add custom aspect ratios to the menu open AspectRatio.fcps.
This is how it looks in Wordpad or Textedit:
Anamorphic (stretch 2:1) 2:1
Anamorphic (squash 1:0.5) 1:0.5
© 2011 IRIDAS www.iridas.com
102
IRIDAS
FrameCycler Pro 2011 User Guide
To add a custom preset simply copy an existing entry and replace the part before the
TAB with the display name for the menu you’d like to use, then replace the actual aspect
ratio after the TAB with the aspect ratio you’d like to add. If you’d like to add 1.33:1, this
would look like this example:
AVID 1.33 (1.33:1) 1.33:1
After adding a custom preset save and close the file. The new preset will be available
next time you launch FrameCycler Professional.
Crop: Crop.fcps
What it does: The Crop Menu allows you to resize your frames by cropping away
part of the image. This can be useful for removing black borders or to check how the
sequence will appear on different display devices.
After cropping, the image width or height will always be less than (or max. equal to) the
actual frame size. FrameCycler Professional will not accept larger values - this would be a
job for a Pan & Scan track that also allows for scaling and repositioning.
How to change it: To customize the Crop Menu open Crop.fcps with a Text Editor.
Crop.fcps is located in the Settings directory of FrameCycler Professional.
You can simplify the menu by taking out entries that are not relevant to your workflow
or current project. A crop preset always includes the actual crop value and any number
of Display Names. If one Display Name is sufficient you can make the Display for 2.35:1
much shorter. The Original preset is:
2.35 : 1
CinemaScope 2.35 : 1
UltraPanavision 2.35 : 1
Panavision 2.35 : 1
Technirama 2.35 : 1
Todd-AO 2.35 : 1
Super 35 2.35 : 1
© 2011 IRIDAS www.iridas.com
103
IRIDAS
FrameCycler Pro 2011 User Guide
The shortest version for this preset would be:
2.35 : 1
CinemaScope 2.35 : 1
You can also use crop values based on pixel values, Crop.fcps already includes the
following:
PAL Video W720 H576
NTSC Video W720 H486
720p W1280 H720
1080p W1920 H1080
To add an additional pixel value based crop format simply add one line to this list, put a
Display Name first, press TAB, then put a value for W and for H.
A third method of defining crop values in Crop.fcps is using values in percentage or
absolute pixels. This method allows to define values for left, top, right and bottom
individually:
10% Border 10% 10% R10% B10%
20% Border 20% 20% R20% B20%
100 Pixel Border 100 100 R100 B100
If you’d like to crop 200 pixels from top and bottom, 140 from left and right, add this
line to Crop.fcps:
200/140 Pixel Border 140 200 R140 B200
After adding a custom preset or changing the list of presets save and close the file. The
updated list of presets will be available next time you launch FrameCycler Professional.
.
© 2011 IRIDAS www.iridas.com
104
IRIDAS
FrameCycler Pro 2011 User Guide
Burn-in Menu: .burnin files
The preset files to create burn-in data are slightly more complex than any of the .fcps
files. You can select the kind of data on display as well as its position and size on
screen. To allow for simple management of such presets, burn-in presets are stored in a
separate folder in the settings directory, each .burnin files shows up as one selection in
the Burn-in Menu in FrameCycler Professional.
What it does: You can use Burn-In templates to add text and graphical elements to
your frames at load time (and for rendering) . Placeholders are replaced with the current
file name, time code etc.
Using the Standard Burn-In
If you choose “Standard” from the list, three elements will be superimposed on the
footage displayed in the viewport:
- Current frame number
- Location on disk of current sequence
- Native Time Code of current frame (if this field doesn’t exist in the header of the file
format you’re using there will be no display of Time Code information)
The location of all three elements is always absolute to the actual image size. If you
want to be sure you see all burn-in elements, zoom to fit using < Ctrl + Home >
Using the All Fields Burn-In
The “All FIelds” Burn-In will display all data in the header of the file that is on display in
the viewport. This view is usually used for quality control purposes but also gives the full
represenation of Placeholders that can be used to create a custom Burn-In template.
Creating a Custom Burn-In
The easiest way to generate a customised Burn-In is to open the Standard Burn-In
and change it according to your needs. The Standard Burn-In file is located in your
FrameCycler Professional folder under settings/burn-in.
Open the file Standard.burnin with a Text Editor. Save the file under a different name
inside the same folder and then start to make changes (please refer to the paragpraph
below on how to change the file). Next time you launch your IRIDAS application the
new template will show in the pull-down for Burn-Ins.
© 2011 IRIDAS www.iridas.com
105
IRIDAS
FrameCycler Pro 2011 User Guide
Elements of a .burnin file
If you’d like to use a different frame size as reference for placing the burn-in content you
can make changes in the first section of the .burnin file:
<width>”2048”</width>
<height>”1556”</height>
For using the same file for full HD content please change this section to:
<width>”1920”</width>
<height>”1080”</height>
The next section includes the actual Parameters shown in the viewport. Every element is
called a textnote. In Standard.burnin the first textnote is
<textnote>
<text>”{Src.FrameNo}”</text>
<textsize>”2”</textsize>
<textcolor>”255,255,255,255”</textcolor>
<backgroundcolor>”0,0,0,0”</backgroundcolor>
<arrow>”0”</arrow>
<position>”40,40”</position>
</textnote>
If you want to change the size you can select from presets 0 (small) to 2 (large) or enter
pixel values. A much larger text than preset 2 can be created using the pixel value
method, e.g.:
<textsize>”60px”</textsize>
To change the color from white to black change the text color to (all color values are
listed in RGBA)
<textcolor>”0,0,0,0”</textcolor>
© 2011 IRIDAS www.iridas.com
106
IRIDAS
FrameCycler Pro 2011 User Guide
The background color is defined in RGBA as well, this example would give a solid black
bar:
<backgroundcolor>”0,0,0,255”</backgroundcolor>
To change the position of a text note just use x,y values, this example would place the
text note above the image:
<position>”40,-40”</position>
Adding a new Text Note
To add a new text note simply copy an existing text note in the standard.burnin and
paste it after the last text note. Change the position next to make sure the new text
note is not overlapping with any existing text note. Then replace the Placeholder with
the new Placeholder you want to add. The full list of Placeholders for the file format
you’d like to use is available in the All Fields view inside FrameCycler Professional, the
item in front of the colon can be used as a Placeholder in a text note.
Here’s a list of typical Placeholders that would apply to formats such as DPX, CIN, TGA:
Src.FileFormat
Src.SequenceName
Src.SequencePath
Src.FrameNumber
Timeline.Position
Timeline.FrameRate
© 2011 IRIDAS www.iridas.com
107
IRIDAS
FrameCycler Pro 2011 User Guide
If you’d like to add a text note for Playhead Position this could look like this:
<textnote>
<text>”{Timeline.Position}”</text>
<textsize>”2”</textsize>
<textcolor>”255,255,255,255”</textcolor>
<backgroundcolor>”0,0,0,0”</backgroundcolor>
<arrow>”0”</arrow>
<position>”40,100”</position>
</textnote>
After adding or changing text note elements, save the .burnin file. The new template
is ready to use and will show up in the pull-down for Burn-Ins next time you launch
FrameCycler Professional.
© 2011 IRIDAS www.iridas.com
108
IRIDAS
FrameCycler Pro 2011 User Guide
Hotkey Overview
© 2011 IRIDAS www.iridas.com
109
IRIDAS
FrameCycler Pro 2011 User Guide
FrameCycler Professional Hotkeys
Application Hotkeys
Help
< F1 >
Displays hotkey shortcuts and
functions
Settings
<S>
Shows or hides the settings
window
Desktop
<D>
Shows and Hides the Desktop
Save Timeline
< CTRL+S >
Saves the current timeline
and all its components.
Render
< CTRL+R >
Shows or hides the render
window
Close
< ALT+F4 >
Closes application
Fullscreen
Metadata Display
Toggle Lock Windows
Dual DVI Window
< ALT+Enter >
or < F >
Switches fullscreen mode on
or off.
<M>
Toggles the MetaData display
< Scroll Lock >
Locks or unlocks the all
windows in the application.
< SHIFT+CTRL+ALT+D >
Toggles the Dual DVI mode
.Look Browser
<P>
Reel Browser
< CTRL + ALT + R >
Activates the Browser
for .Look presets
Shows or hides the Reel
Browser
Timeline
< Tab >
Shows or hides all timelines.
Hide UI
< SHIFT + H >
SHows or hides all UI
elements, centers footage on
local viewport
© 2011 IRIDAS www.iridas.com
110
IRIDAS
FrameCycler Pro 2011 User Guide
Playback Hotkeys
Play/Pause
Reverse Playback
Step Back
Step Forward
<Space>
<SHIFT+Space>
Starts and stops playback
Reverses playback direction
<Cursor Left>
Steps back a single frame
<Cursor Right>
Advances a single frame
Decrease Playback FPS
<PgDn>
Decreases the frames per second
value by 1fps
Increase Playback FPS
<PgUp>
Increases the frames per second
value by 1fps
Next Playback FPS Step
<Numpad •>
Doubles frames per second
Prev Playback FPS Step
<Numpad />
Halves frames per second
Playback Mode
Toggle AutoMirror
Mirror Horizontal
Mirror Vertical
Toggle Backward
Toggle Forward
Clear memory
<F6>
<CTRL+M>
<ALT+M>
<SHIFT+M>
< , > (Comma)
< . > (Period)
< SHIFT+CTRL+F5 >
Switches between single play,
loop, and ping-pong playback
modes
Sequence flipped when the end
point reached
Mirror image horizontally
Mirror image vertically.
Toggles backward playback
Toggles forward playback
Unloads all frames
Reload Changed Frames
< F5 >
Reloads all changed frames from
disk.
Unload Frames Outside
of In/Outs
< SHIFT+F5 >
Unloads all frames that are not in
the current in/out area.
© 2011 IRIDAS www.iridas.com
111
IRIDAS
FrameCycler Pro 2011 User Guide
Pan and Zoom View Hotkeys
Pan Down
< SHIFT+Cursor Down >
Moves image down in
viewing area.
Pan Up
< SHIFT+Cursor Up >
Moves image up in viewing
area.
Pan Left
< SHIFT+Cursor Left >
Moves image left in viewing
area.
Pan Right
< SHIFT+Cursor Right >
Moves image right in
viewing area.
Reset Pan
< SHIFT+Home >
Centers image in the
viewing area.
Toggle Match
Channel Sizes
< ALT+Home >
Zoom In
< Numpad + >
Increases the zoom level.
Zoom Out
< Numpad - >
Decreases the zoom level.
< SHIFT CTRL Home >
Adjusts the zoom level to
100%
< CTRL+Home >
Adjusts the zoom level so
the entire image fits on
screen.
Zoom to 100%
Zoom to Fit
Show all Viewports
Makes all channels the
same size while preserving
their aspect ratio.
< SHIFT+CTRL+ALT+Home >
Ensures that all viewports fit
within the current viewing
area
Splitscreen View Hotkeys
Change Split
< F9 >
Changes the current split screen mode.
Change Split
Orientation
< F10 >
Changes the orientation (vertical/
horizontal) of current split screen mode.
Flip Split Channels
< F11 >
Switches the channel positions in the
current split.
© 2011 IRIDAS www.iridas.com
112
IRIDAS
FrameCycler Pro 2011 User Guide
Timeline and Navigation Hotkeys
Next Clip
< CTRL+ALT+Cursor Right >
Sets the master playhead
to the beginning of the
next clip.
Prev Clip
< CTRL+ALT+Cursor Left >
Sets the master playhead
to the end of the
previous clip.
< SHIFT+CTRL+Cursor Left >
Selects the closest clip to
the left of the selected
clip.
< SHIFT+CTRL+Cursor Right >
Selects the closest clip to
the right of the selected
clip.
Isolate Current Clip
< CTRL + Spacebar >
Sets in/out points to
current clip. Press again
to restore previous in/out
positions
Isolate Previous Clip
< CTRL + Left >
Sets in/out points to the
previous clip
Isolate Next Clip
< CTRL + Right >
Sets in/out points to the
next clip
Select Clip Below
< SHIFT+CTRL+Cursor Down >
Selects the closest clip
below the selected clip.
Select Clip Above
< SHIFT+CTRL+Cursor Up >
Selects the closest clip
above the selected clip.
Select Previous Clip
Select Next Clip
Center Master
Playhead
Move Master Playhead
to Selected Clip
< CTRL+Numpad 0 >
Moves the master
playhead to the center of
the timeline.
< ALT+Numpad 0>
Sets the master playhead
position to the start of
the selected clip.
Lock Timelines
< SHIFT L >
Locks all timelines.
Unlock Timelines
< SHIFT+U >
Unlocks all timelines.
© 2011 IRIDAS www.iridas.com
113
IRIDAS
FrameCycler Pro 2011 User Guide
DualStrem NX Hotkeys
Right Eye
< left ALT+R >
Shows right eye only
Left Eye
< left ALT+L >
Shows left eye only
Show Stereo
< left ALT + S >
Side by Side
< left ALT+D>
Shows left and right
eye side by side on the
viewport
Show Difference Matte
< CTRL+ALT+D >
Shows the difference
matte of the stereo pair
Switch to Stereo Panel
< SHIFT+S >
Shows stereo pair in
selected stereo mode
Switches from any
Grading Panel to the
Stereo Panel
© 2011 IRIDAS www.iridas.com
114
IRIDAS
FrameCycler Pro 2011 User Guide
In/Out Point Hotkeys
Toggle In-Point
<SHIFT+I>
Sets or resets the inpoint at
the current master playhead
position.
Toggle Out-Point
<SHIFT+O>
Sets or resets the outpoint at
the current master playhead
position.
Go to In-Point
<I> or <Home>
Moves the master playhead to
the current in-point.
Go to Out-Point
<O> or <End>
Moves the master playhead to
the current out-point.
<SHIFT+CTRL+ALT+O>
Resets the in and out points to
default positions.
< SHIFT+F5 >
Unloads all frames that are not
in the current in/out area.
Reset In/Out Points
Unload Frames Outside
of In/Outs
Editorial Hotkeys
Split Clips
< SHIFT+ALT+S >
Splits the currently active clip and all
clips directly above it at the master
playhead position.
Split Clip
< ALT+S >
Splits the currently active clip at the
master playhead position.
© 2011 IRIDAS www.iridas.com
115
IRIDAS
FrameCycler Pro 2011 User Guide
Analysis Tools Hotkeys
Toggle Histogram
<H>
Shows or hides the histogram
Toggle Waveform
<W>
Shows or hides the waveform
Toggel Vectorscope
<V>
Shows or hides the vectorscope
Toggle Zoom Overlay
<Z>
Shows or hides the zoom overlay
window.
Toggle Zoom Overlay
Follow Mouse
< SHIFT+Z >
Switches the follow mode on or off for
the zoom overlay window.
Channel View Hotkeys
Lightness Channel
<L>
Shows the HLS lightness (L) channel
of the image.
Show Alpha
<A>
Shows the alpha channel of an
image.
Show Quick Alpha
< SHIFT+A >
Shows the alpha channel in quick
alpha mode.
Show Quick Alpha
(inverted)
< CTRL+A >
Shows the alpha channel in inverted
quick alpha mode.
Red Channel
<R>
Shows the red channel of the image
in grayscale.
Show Green Channel
<G>
Shows the green channel of the
image in grayscale.
Show Blue Channel
<B>
Shows the blue channel of the image
in grayscale.
Hide Red Channel
< SHIFT+R >
Hides the red channel of the image.
Hide Green Channel
< SHIFT+G >
Hides the green channel of the
image.
Hide Blue Channel
< SHIFT + B >
Hides the blue channel of the image.
© 2011 IRIDAS www.iridas.com
116
IRIDAS
FrameCycler Pro 2011 User Guide
Alphabetical Index
2x DVI stereo
72
Accessing the Command Line
98
Adding Audio Tracks
44
Adding Notes
54
Adjusting FrameCycler Professional’s Scope Presets
47
Alternating Grading Selector Modes
50
Applying a .Look
56
ARRI Alexa Support
86
ARRI D21 Support
87
ARRI M Scope
88
Aspect Ratio: AspectRatio.fcps
102
Automatic Screen Layout
39
Bugfixes121
Burn-in Menu: .burnin files
105
Changes121
Creating additional Playheads
61
Creating a Dual DVI Setup
20
Crop: Crop.fcps
103
DNxHD and ProRes
94
Extract License File
10
File Path Examples:
74
Grading Panel Basics
49
Inserting a Sequence inbetween Clips
31
Line-by-Line Systems
71
Linux Installation 13
Loading a FrameCycler Professional Project
31
Loading Multiple Sequences
31
Loading Multiple Sequences at once
31
Mac OS X Installation
10
Navigating 30
Navigating along the Timeline
43
© 2011 IRIDAS www.iridas.com
117
IRIDAS
FrameCycler Pro 2011 User Guide
New Features
120
Opening the Stereo Panel
76
Overview19
Phantom HD and Phantom 65 Support
89
Positioning Images
38
Preset and other Browser Windows
26
RED Support (RED ONE / EPIC)
90
Reel Setup: Mirroring, Swapping,
Temporal Adjustments
78
Refresh30
Related Links
100
Removing Notes
54
Reset Buttons
51
Right Click Features to Manage Content
32
Ripple all / remove gaps
67
Search Criteria
30
Selecting the correct output signal on DVI output
71
Settings for Dual DVI Output
20
Silicon Imaging SI2K Support
92
Split clips
67
Step 1: Set Project Defaults
15
Step 2: Loading Footage
16
Step 3: Navigation and Zoom
17
Step 4: Save Your Project
17
Stereo Viewing Options
77
Testing your Stereo Setup
73
The Anatomy of a Command
99
The Desktop
22
The FrameCycler Professional Panel
25
The .Look Browser
57
The Output Section
27
The Timeline
23
© 2011 IRIDAS www.iridas.com
118
IRIDAS
FrameCycler Pro 2011 User Guide
The Viewport
24
Timeline Elements
42
Timeline View Tabs
59
Timeline Zoom
60
Tip: Autocomplete for Typed Directories
34
Tip: Customizing the Stereo Naming Convention
75
Trim clips
67
Verifying Stereo Pairs
76
WEISSCAM Support
93
Windows Installation 12
Working with A/B and Splitscreen Views
64
Working with alternating Screen Layouts
65
Working with Multiple Playheads
61
© 2011 IRIDAS www.iridas.com
119
IRIDAS
FrameCycler Pro 2011 User Guide
Appendix A: Change Log
2011 Release (Build 2011.6689.64)
New Features
Dual DVI support
Stereo Panel with 0 Parallax Control
Head-Up Display for Stereo 3D data
Fully compliant real time ARRI ALEXA ARRIRAW 3.0 color science support
New: Support for RED EPIC files
Universal RAW 5 algorithm siginificantly enhances RAW Bayer Interpolation
Crop/Resample/Aspect Ratio preview
Output framing controls for letterboxed etc. rendering
Automatic detection of RED stereo reels
Manual assignment of stereo reels
ReviewLink now searches for left/right naming conventions in stereo setups
CTRL + SHIFT + ENTER invokes the ReviewLink commit function
Stereo mode changes are now communicated via ReviewLink
Framing interace for rendering completely redesigned
On/Off switches for Crop, Resample, Aspect, Burn-in and Overlay
dropdowns for faster toggling.
© 2011 IRIDAS www.iridas.com
120
IRIDAS
FrameCycler Pro 2011 User Guide
Changes
Disabled AutoComplete for UNC paths as they may take a long time to compute,
blocking the input.
Enabled timecode reading from additional DPX subvariants
Updated CinemaDNG timecode support to the current and final spec
Default Dynamic Quality setting is now 16f/8
M hotkey will now invoke the metadata control. ALT M will mirror (mirror was too easily
invoked in many scenarios).
When the timeline is empty, clicking the stereo check box will change the
default mode for timelines
When detaching the scopes, the desktop will be hidden; when desktop is shown, the
scopes will be hidden
Added new standard render sizes
Support for vertically flipped .cine files.
Bugfixes
Crash when hovering over reel browser in some scenarios
Application stopped responding when path was set to “Home” in pop up browsers
Under rare circumstances the frame loader loaded the wrong frame when pausing,
resulting in a momentary change in image after paused.
Stereo metadata is now read from both eyes
© 2011 IRIDAS www.iridas.com
121
IRIDAS
FrameCycler Pro 2011 User Guide
Base path for sequences created from sub trees were invalid
Disabled AVX CPU instruction support on operating systems that do not enable it
Crash when deleting a timeline while the mouse was still hovering over a specific part of
the reels browser
© 2011 IRIDAS www.iridas.com
122