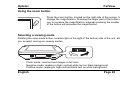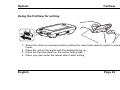
1
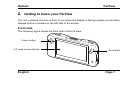
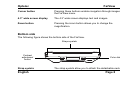
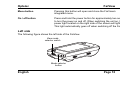
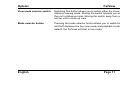
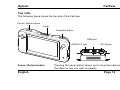
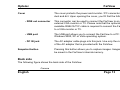
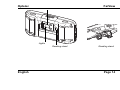
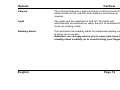
Optelec
FarView
FarView
User Manual
FarView Version 1.0
© 2008 Optelec, the Netherlands
All rights reserved
Optelec
P.O. Box 399
2990 AJ Barendrecht
The Netherlands
Phone: +31 (0)88 678 34 44
E-mail: [email protected]
Internet: www.optelec.com
English
Page 2
Optelec
FarView
Contents
1.
2.
3.
4.
Introduction...............................................................................................................................5
About this manual .............................................................................................................. 6
What’s in the box? ............................................................................................................. 6
Getting to know your FarView...................................................................................................7
Front side ........................................................................................................................... 7
Bottom side ........................................................................................................................ 8
Right side ........................................................................................................................... 9
Left side ........................................................................................................................... 10
Top side ........................................................................................................................... 12
Back side ......................................................................................................................... 13
Power and battery use............................................................................................................ 16
Charging the batteries...................................................................................................... 16
Turning the power on and off ........................................................................................... 17
Battery indicator ............................................................................................................... 17
Stand-by mode and system auto off ................................................................................ 17
Mode selector button ....................................................................................................... 18
Using the FarView for close-up viewing.................................................................................. 19
Using the zoom button ..................................................................................................... 20
Selecting a viewing mode ................................................................................................ 20
Contrast settings .............................................................................................................. 21
Using the FarView for writing ........................................................................................... 22
English
Page 3
Optelec
FarView
5.
Using the FarView for distance viewing.................................................................................. 23
Using the zoom button ..................................................................................................... 24
Selecting a viewing mode ................................................................................................ 24
Contrast settings .............................................................................................................. 25
Taking pictures with the FarView (Document Read Mode) .............................................. 26
Storing images and documents........................................................................................ 26
6. Picture Playback Mode ........................................................................................................... 28
Picture selection and adjustment ..................................................................................... 29
7. Using the FarView Menu ........................................................................................................ 31
Opening the menu ........................................................................................................... 31
Modifying settings in the menu......................................................................................... 32
8. Connecting the FarView to other equipment........................................................................... 37
Viewing images on an external monitor or TV.................................................................. 37
Connecting the FarView to a PC...................................................................................... 37
9. Others..................................................................................................................................... 39
Message display .............................................................................................................. 39
Troubleshooting ............................................................................................................... 40
Appendix A: Safety.................................................................................................................. 45
Appendix B: Technical information.......................................................................................... 46
English
Page 4
Optelec
FarView
1. Introduction
Congratulations on choosing the FarView, a pocketsize electronic video magnifier from Optelec.
Optelec’s FarView magnifies printed text and images, taken from any distance, up to 42 times in
live mode or up to 90 times in playback mode on a 4.3” wide screen display.
With its versatile camera, enabling both distance and close-up viewing, the FarView offers an
enhanced design that extends operating comfort. The integrated snapshot function and built-in
memory allow you to store and recall up to 100 images. The FarView is designed for every day
use in any location. Stored images can be recalled at any moment with a simple press of a
button. Ergonomically placed buttons and a built-in menu allow the user to enhance reading
comfort. The document read mode enables scrolling through a captured text via the ergonomic
scrolling button and auto-scroll to the beginning of the text.
If you have any questions or suggestions concerning the use of this product, please contact
your distributor or the Optelec headquarters using the contact information on the last page of
this manual. Your feedback is greatly appreciated. We hope you enjoy working with your
FarView.
English
Page 5
Optelec
FarView
About this manual
This manual will familiarize you with the FarView’s features and basic operation. Please read
this manual carefully before using your device.
What’s in the box?
The FarView’s packaging contains the following:
-
The FarView video magnifier
A detachable neck cord
A protection and carrying pouch
A power cable with power adapter
The user manual
Optional accessories for FarView include a RGB out IF cable that connects FarView to a VGA
monitor.
If any items are missing from your package, please contact your distributor.
English
Page 6
Optelec
FarView
2. Getting to know your FarView
The unit is placed correctly in front of you when the display is facing towards you and the plus
shaped button is located on the left side of the screen.
Front side
The following figure shows the front side of the FarView.
Cursor button
4.3” wide screen display
English
Zoom button
Page 7
Optelec
FarView
Cursor button
Pressing these buttons enable navigation through images and
the FarView menu.
4.3” wide screen display
The 4.3” wide screen displays text and images.
Zoom button
Pressing the zoom button allows you to change the
magnification.
Bottom side
The following figure shows the bottom side of the FarView.
Straps eyelets
Contrast
adjustment
button
Strap eyelets
English
Color dial button
The strap eyelets allow you to attach the detachable neck cord
Page 8
Optelec
FarView
that came with your FarView.
Contrast adjustment button
Rotating the adjustment button allows you to increase or
decrease the contrast
Color mode button
Rotating the color mode button allows you to change the
foreground and background colors of the FarView’s screen.
Right side
The following figure shows the right side of the FarView.
Menu button
On / off button
English
Page 9
Optelec
FarView
Menu button
Pressing this button will open and close the FarView’s
integrated menu.
On / off button
Press and hold the power button for approximately two seconds
to turn the power on and off. When switching the unit on, the
power light located on the right side of the screen will light up.
This light automatically goes off when switching off the FarView.
Left side
The following figure shows the left side of the FarView.
View mode
selector switch
Mode selector
button
English
Page 10
Optelec
FarView
View mode selector switch
Switching this button allows you to select either the close-up or
distance viewing mode. Moving the switch towards you will set
the unit to distance mode. Moving the switch away from you will
set the unit to close-up view.
Mode selector button
Pressing the mode selector button allows you to switch back
and forth between the live view mode and playback mode. By
default, the FarView will start in live mode.
English
Page 11
Optelec
FarView
Top side
The following figure shows the top side of the FarView.
Focus / Return button
Cover
Snapshot button
USB port
RGB OUT port
Focus / Return button
English
DC IN jack
Pressing the return button allows you to focus the camera on
the object or text you wish to magnify.
Page 12
Optelec
FarView
Cover
The cover protects the power and monitor / PC connectors from
dust and dirt. Upon opening the cover, you fill find the following:
- RGB out connector
This connector can be used to connect the FarView to an
external VGA monitor or TV. Please note that the optionally
available RGB OUT IF cable is required to connect the FarView
to a VGA monitor or TV.
- USB port
The USB port allows you to connect the FarView to a PC with
Windows 2000, XP or Vista operating system.
- DC IN jack
The AC adapter cable plugs into this jack. Use only the model
of the AC adapter that is provided with the FarView.
Snapshot button
Pressing this button allows you to capture images. Images will
be saved in the FarView’s internal memory.
Back side
The following figure shows the back side of the FarView.
Camera
English
Page 13
Optelec
FarView
Lights
Reading stand
English
Reading stand
Page 14
Optelec
FarView
Camera
The FarView features a high resolution continuous auto-focus
camera that can be used for both distance and close-up
viewing.
Light
The lights can be switched on and off. The lights will
automatically be switched on when the unit is switched into
close-up viewing mode.
Reading stand
Pull and place the reading stand for enhanced reading comfort
in close-up live mode.
Attention: we strongly advise you to open and close the
reading stand carefully as to avoid hurting your fingers.
English
Page 15
Optelec
FarView
3. Power and battery use
When the AC adapter is not connected, the FarView relies on the integrated batteries as its
main power source.
Charging the batteries
When using the FarView for the first time, make sure that the batteries are is fully charged.
Charging the batteries takes approximately 4.5 hours. When the batteries are fully charged, the
FarView’s operating time is approximately 2.5 hours in live mode and 4 hours in playback mode.
To charge the batteries, plug in the adapter that was supplied with the unit into the DC IN jack,
located at the top side of the unit. Plug the other end into a power outlet. The power indicator
located on the right side of the screen will blink to indicate that the batteries are charging. When
the batteries are fully charged this indicator will switch off.
The unit can continue to be used while it is still plugged into the AC adapter.
English
Page 16
Optelec
FarView
Turning the power on and off
Switch the unit on and off by pressing the rectangular button, located on the right side of the
unit, for approximately two seconds. By default the FarView will start in live viewing mode.
Battery indicator
When the unit is switched on, the battery level will be indicated on the screen for about two
seconds. When the batteries are exhausted, this indicator will start blinking and the unit will
generate a few beeps. Plug in the AC adapter to charge the batteries.
Stand-by mode and system auto off
This feature will switch the FarView into stand-by mode when not used for about 3 minutes.
While in stand-by mode, the LCD display will switch off and the power indicator will start
blinking. Pressing any button, other than the power button, will switch off the stand-by mode and
you will automatically return to the previous mode.
If the unit continues to go unused for an additional 4 minutes, while in stand-by mode, this
feature will automatically turn off the power off to save the batteries. Press the power button for
two seconds to switch the unit on again.
When plugged into an AC adapter, the unit will not go into stand-by mode.
English
Page 17
Optelec
FarView
Mode selector button
The FarView has two viewing modes: the “live viewing mode” and the “playback mode”.
Live viewing mode:
This is used for looking at objects and text at any distance in
real time. The image displayed on the screen can be captured
using the snapshot button. Alternatively, information can be
viewed and magnified in real-time.
Playback mode:
Images stored in the internal memory can be recalled and
displayed on the FarView’s 4.3” widescreen.
Pressing the mode selector button allows you to switch between the live viewing mode and
playback mode. By default the FarView will start in the live viewing mode when it is switched on.
English
Page 18
Optelec
FarView
4. Using the FarView for close-up viewing
To start using the FarView, turn on the power by pressing the on / off button on the right side of
the unit, and select the live viewing mode by pressing the rectangular button on the left side of
the unit.
1. Select the close-up mode by moving the view mode selector switch to close-up mode.
The view mode selector is located on the left side of the unit.
2. Unfold the reading stand and place the FarView over your reading material.
3. Press the focus / return button to focus the text.
4. Move the FarView over the text and use the zoom, contrast and color setting buttons to
adjust the image to your needs. You can also use the contrast adjustment and screen
brightness settings in the menu to adjust the contrast and brightness.
English
Page 19
Optelec
FarView
Using the zoom button
Press the zoom button, located on the right side of the screen, to
change the magnification. Pressing the larger part of the button allows
you to increase the magnification, whereas pressing the smaller part
of the button will decrease the magnification.
Selecting a viewing mode
Rotating the color mode button, located right on the right of the bottom side of the unit, allows
you to select among six viewing modes.
-
Photo mode: view text and images in full color
Negative mode: reading in high contrast white text on black background
Positive mode: reading in high contrast black text on white background
English
Page 20
Optelec
-
FarView
Yellow-Black mode: reading in high contrast yellow text on black background
Yellow-Blue mode: reading in high contrast yellow text on blue background
Blue-Yellow mode: reading in high contrast blue text on yellow background
Contrast settings
Rotating the contrast adjustment button, located left on the left of the bottom side of the unit,
allows you to adjust the contrast for a clearer image.
English
Page 21
Optelec
FarView
Using the FarView for writing
1. Select the close-up viewing mode by setting the view mode selector switch to close-up
mode.
2. Place the unit on the paper with the display facing up.
3. Press the FarView down on the cursor button side.
4. Place your pen under the raised side to start writing
English
Page 22
Optelec
FarView
5. Using the FarView for distance viewing
1. Select the distance mode by moving the view mode selector switch into distance mode.
The view mode selector is located on the left side of the unit.
2. Direct the unit to the text or object that you wish to look at, and use the zoom, contrast
and color settings buttons to adjust the image to your needs. You can also use the
contrast adjustment and screen brightness settings in the menu to adjust the contrast
and brightness.
English
Page 23
Optelec
FarView
Using the zoom button
Press the zoom button, located on the right side of the screen, to
change the magnification. Pressing the larger side of the button allows
you to increase the magnification, whereas pressing the smaller side
of the button will decrease the magnification.
Selecting a viewing mode
Rotating the color mode button, located on the right of the bottom side of the unit, allows you to
select among the six viewing modes.
-
Photo mode: view text and images in full color
Negative mode: reading in high contrast white text on black background
English
Page 24
Optelec
-
FarView
Positive mode: reading in high contrast black text on white background
Yellow-Black mode: reading in high contrast yellow text on black background
Yellow-Blue mode: reading in high contrast yellow text on blue background
Blue-Yellow mode: reading in high contrast blue text on yellow background
Contrast settings
Rotating the contrast adjustment button, located on the left of the bottom side of the unit, allows
you to adjust the contrast for a clearer image.
English
Page 25
Optelec
FarView
Taking pictures with the FarView (Document Read Mode)
-
-
Direct the FarView towards the text or image
Press the oval shaped snapshot button, located right at
the top side of the unit. The FarView generates a beep to
indicate that the focus is adjusted, followed by a second
beep, indicating that the picture is taken.
View the picture on the screen of the FarView
Captured images are automatically saved in the
FarView’s integrated memory for later reference.
Note! This function also allows you to capture a complete A4 or Letter size document or multiple
pages of a book or magazine. Store the pages in the internal memory and recall the page while
on the go or while sitting in a comfortable chair.
Storing images and documents
Pictures are automatically stored in the internal memory. When you take a picture, you will see
both the picture as well as the number of stored pictures displayed on the screen for
approximately two seconds. The FarView can store up to 100 images in the internal memory.
For more information about setting the maximum number of pictures, please refer to chapter 7
English
Page 26
Optelec
FarView
Please note that when the number of pictures exceeds the allowed 100 images, the first picture
will automatically be deleted. To protect pictures from automatic deletion, please refer to chapter
7.
English
Page 27
Optelec
FarView
6. Picture Playback Mode
The pictures stored in the FarView’s internal memory can be recalled and displayed on the
scren.
1. Switch the unit into playback mode by pressing the mode selector button on the left side
of the unit.
2. Use the cursor buttons, located on the left side of the screen, to navigate through the
images. Pressing the left cursor button will display the previous image, whereas pressing
the right cursor button will display the next image.
English
Page 28
Optelec
FarView
Picture selection and adjustment
The pictures stored in the FarView’s internal memory can be recalled and displayed on the
screen.
Use the zoom button, contrast adjustment button or color settings button to adjust the images to
your needs.
You can also use the menu to adjust the contrast, rotate the picture and adjust screen
brightness. More information about these and other features can be found in chapter 7.
To enhance reading comfort, you can use the skew settings, return / stop position setting and
scroll speed setting. Please keep in mind that the image displayed on the screen can only be
scrolled when the image is magnified.
FarView features an automatic scrolling feature, allowing automatic scrolling to the beginning of
the line. To optimally use this feature, follow the steps below:
1. Display the preferred position in the text to set the return position
2. Press and hold the focus / return button for approximately 2 seconds (until the unit
generates a beep) to set the return position. The return position is marked on the left side
of the screen.
3. Display the preferred position in the text to set the stop position.
English
Page 29
Optelec
FarView
4. Press and hold the snapshot button for approximately 2 seconds (until the unit generates
a beep) to set the stop position. The stop position is marked on the right side of the
screen.
Use the scrolling buttons to navigate through the text. Press the focus / return button when you
have reached the end of the line to scroll automatically to the beginning of the line.
To cancel the return and stop position, press respectively the focus / return or snapshot button.
Please note that the automatic scrolling feature will be disabled when:
- displaying other images;
- switching to live viewing mode;
- connecting the FarView to an external monitor or PC
Pressing the snapshot button will return the magnified image to its original size. Press the left
and right cursor buttons to continue navigating through the images saved in the unit’s memory.
For more information on rotating pictures or enhancing reading comfort, please refer to chapter
7.
English
Page 30
Optelec
FarView
7. Using the FarView Menu
The FarView has an integrated menu that enables you to adjust many built-in settings to your
needs.
Opening the menu
Press the menu button, located on the right side of the unit, to open the main menu. Use the
cursor buttons ‘up’ and ‘down’ to navigate through the menu. Press the right cursor button to
open the selected menu item.
To close the menu, press the menu button again and return to the viewing mode.
English
Page 31
Optelec
FarView
Modifying settings in the menu
The FarView menu has 12 items. These allow you to configure the FarView or to access
information about the FarView’s current status.
Menu
Open menu
Next menu item
Previous menu item
Select menu item
Modify value in menu field
Confirm value and close menu
Close menu
English
Button
Menu button
Cursor up button
Cursor down button
Cursor right button
Cursor up and down buttons
Press menu button twice
Menu button
Page 32
Optelec
FarView
Contrast (live view and playback view) can be adjusted using the ‘up’ and ‘down’ cursor
buttons. Either ‘AUTO’ contrast or ‘MANUAL’ contrast can be selected. Press the right cursor
button to confirm your selection.
Auto: the contrast is adjusted automatically.
Manual: the contrast is adjusted according to your needs, using the color mode button.
Please note that the unit automatically returns to the ‘AUTO’ setting when the unit is switched
off and back on again.
Light (live view): the light can be to set on or off in the close up live viewing mode. Press the
‘up’ and ‘down’ cursor buttons to select ‘ON’ or ‘OFF’ and press the right cursor button to
confirm your setting. By default, the unit starts in light ‘ON’ mode every time it is switched on.
Rotate (playback view): this feature allows you to rotate the image displayed on screen to 90º
toward the left or right, or to 180º. Use the ‘up’ and ‘down’ cursor buttons to navigate through
the different rotating options, and press the right cursor button to confirm your setting. Please
note that protected images cannot be rotated
Delete (playback view): display the picture on the screen that you wish to delete and press the
menu button. Select ‘DELETE’ and press the right cursor button to confirm. Select either ‘THIS’,
‘ALL’ or ‘NO’ to delete either the selected picture, all pictures or no pictures.
When selecting ‘ALL’ a dialog box will appear asking you if you want to delete all pictures.
Select either ‘YES’ or ‘NO’ and confirm your choice by pressing the right cursor button.
English
Page 33
Optelec
FarView
Please note that protected images cannot be deleted when selecting ‘DELETE ALL’. To delete
protected images, you must first cancel the protection setting in the ‘PROTECTION’ submenu.
Scroll speed (playback view): this can be adjusted to your needs by pressing ‘up’ and ‘down’
cursor buttons. Pressing the ‘up’ button will increase the scrolling speed. Pressing the ‘down’
button will decrease the scrolling speed.
Skew (playback view): when a picture is not aligned properly, the skew settings can be used to
correct the alignment. The skew can be adjusted by pressing the ‘up’ and ‘down’ cursor buttons.
The guideline will rotate 1º each time the ‘up’ or ‘down’ button is pressed. Press the menu
button twice to save your settings and to return to playback mode.
Please note that switching off the unit or selecting another image in playback mode will cancel
the settings. Pressing the left or right scrolling buttons, allows you to return to playback mode.
Brightness (live view and playback view): this can be adjusted by pressing the ‘up’ and ‘down’
cursor buttons. This submenu features four levels. Press the ‘up’ button to increase the
brightness and press the ‘down’ button to decrease the brightness. The brightness settings will
be saved automatically, even when the unit is switched off. Please note that the brightness
cannot be adjusted when the FarView is connected to an external monitor.
Protect (playback view): pictures stored in the internal memory can be protected from
accidental deletion. Select ‘PROTECT’ while the unit is in playback mode and then press the
English
Page 34
Optelec
FarView
right cursor button to confirm your setting. A protection mark will appear on screen to indicate
that the picture is protected. Pressing the ‘up’ and ‘down’ cursor buttons will cancel the
protection settings.
To continue protecting images, select another picture and repeat the same procedure.
Beep (live view and playback view): this can be switched ‘ON’ or ‘OFF’, by pressing the ‘up’ and
‘down’ cursor buttons. By default, sounds are switched on. Sound settings are automatically
saved when switching the unit off and back on again.
Language (live view and playback view): press the ‘up’ and ‘down’ cursor buttons to navigate
the language menu and press the right cursor button to confirm your setting. The language
menu features 7 different language options:
- Japanese
- English
- French
- German
- Spanish
- Italian
- Dutch
The language setting is automatically saved when the unit is switched off and back on again.
The default language setting is ‘ENGLISH’.
English
Page 35
Optelec
FarView
Number of image (live view): this setting allows you to set the maximum number of images that
can be stored in the FarView’s internal memory. You can select 30 images or 100 images.
Press the ‘up’ and ‘down’ cursor buttons followed by the right cursor button to select your
preferred setting. By default this setting is set to 30 images.
Reset (live view and playback view): this allows you to restore the factory settings. Selecting
this option will restore the ‘contrast’, ‘light’, ‘scroll’, ‘brightness’ and ‘beep’ settings.
English
Page 36
Optelec
FarView
8. Connecting the FarView to other equipment
The FarView can be connected to an external VGA monitor or PC to view images at a more
comfortable size.
Viewing images on an external monitor or TV
Plug the VGA cable (available as an option) into the RGB OUT port, located on the top side of
the unit. Plug the other end of the VGA cable to the external monitor or TV.
Please make sure that the power is switched off when connecting the unit to an external VGA
monitor or TV. When connecting the FarView to a TV, make sure that the select the external
input mode on your television is selected.
Connecting the FarView to a PC
Connect the FarView to your computer to save, play, print and email your pictures.
1. Switch the power off and connect the FarView to the AC adapter into your FarView.
2. Switch the power back on.
3. Connect the FarView to the PC by using a USB cable (available in store)
English
Page 37
Optelec
FarView
Once connected to the PC the text ‘PC CONNECTED’ will appear on the screen. Unplugging
the USB cable will switch the unit back into the previous used mode.
The FarView’s drive can be found in the ‘My Computer’ folder on your PC.
To exit the PC mode, please follow the instruction in the ‘Safely remove hardware’ dialog box
found in your PC’s system task tray.
English
Page 38
Optelec
FarView
9. Others
Message display
MESSAGE
No Image
Irregular Image data
Please connect AC adapter
Accessing
This image is protected
Too many protected image. Please protect off.
English
ACTION
No saved images. Take pictures and store
them in the internal memory.
The image might be damaged, making it
impossible to view the image in playback
mode. Please delete file.
When connecting the unit to a PC via a USB
cable, make sure that the AC adapter is
plugged in.
Please do not unplug the USB cable or AC
adapter when accessing the memory, as this
may automatically delete images stored in the
internal memory.
Release the protection before deleting or
rotating images.
Cancel protection and delete images to gain
extra space.
Page 39
Optelec
FarView
Cannot save, please delete some images
Cannot operate
Memory is full
Memory card access error
Camera / Lens error
Communication error
When more than 30 images are stored, the
number of images option cannot be set to 30.
Please make sure to:
• Delete images until the number of
pictures equals or is lower than 30.
• Set the number of images to 100.
The image might be damaged, making it
impossible to protect or rotate the image.
Please delete file.
• Delete images (make sure to cancel
protection settings to delete protected
images).
• Check if the number of images is set to
100.
Please turn the unit off and back on again.
Please turn the unit off and back on again.
Please turn the unit off and back on again.
Troubleshooting
Battery and power source
Questions
English
Answers
Page 40
Optelec
Unit does not work even when power is turned
on
LCD monitor lights shut off even if power is
turned on
Unit switches off as soon as power is turned
on
The power cannot be turned off
FarView
•
Press and hold the power button (for
approximately 2 seconds)
• Press and hold focus / return button
and menu button for approximately 2
seconds simultaneously
• Battery is exhausted. Please recharge.
When the unit is connected to an external
monitor, the lights of the display automatically
switch off
Batteries are exhausted. Please recharge.
Press and hold both the return and menu
buttons down (for approximately 2 seconds)
simultaneously.
Battery and power source
Questions
Cannot record picture
Recorded picture looks white
English
Answers
• Check if the unit is in the live viewing
mode
• Cancel protection settings
• Lens is dirty (fingerprints, etc.)
Turn the power off and gently clean the
Page 41
Optelec
The object is not focused properly
FarView
lens surface with a soft dry cloth
• Make sure to select the correct viewing
mode; close-up viewing or distance
viewing
• Object or text is outside of focus range
• Caused by subject movement or hand
movement
• Make sure to take the picture right after
the shutter button is pressed
Do not move the unit or object until the
picture has been taken and is fixed on the
screen
Lens
Questions
Picture is skewed or color surroundings differ
from the actual scene
Answers
While recording pictures, the images may
skew slightly or may be colored on the outline.
LCD monitor
Questions
LCD monitor lights switch off while the power
is turned on.
English
Answers
When the unit goes unused for about 3
minutes, it automatically switches into standby
Page 42
Optelec
FarView
mode. Press any button, except for the on / off
button, to switch the lights back on.
Brightness is unstable
This might occur when the aperture value is
set (this does not affect the recorded pictures.)
Monitor flickers indoors
Monitor may flicker after switching unit on (this
prevents any influences from fluorescent
lighting).
Black/blue/red/green dots or interference
This is not a malfunction. These dots will not
appears. Monitor looks distorted when touched be recorded on the actual picture.
Playback
Questions
Cannot view pictures
•
Picture is too bright or too dark
•
•
•
Answers
Check if the unit is set to playback
mode.
No pictures in the internal memory.
Check if the unit is set to playback
mode.
Adjust the brightness by rotating the
contrast adjustment button.
Connection with an external monitor or PC
Questions
English
Answers
Page 43
Optelec
FarView
No image appears on TV or external monitor
•
•
Cannot send pictures to computer
•
•
•
The unit is not connected properly
When the unit is connected to a TV,
make sure to set the TV input to
external input mode
The unit is not connected properly.
Check if the computer has recognized
the camera.
Plug the AC adapter into the computer.
Others
Questions
Unit is warm
English
Answers
The unit may become a warm during use or
while charging. This does not affect the unit’s
performance or quality.
Page 44
Optelec
FarView
Appendix A: Safety
•
•
•
•
•
•
•
•
•
•
Do not drop or knock the unit or put a lot of pressure on it. This may damage the FarView,
lens or monitor.
Do not use the FarView near electromagnetic equipment, radio transmitters or high voltage
lines.
Do not expose the FarView to excessive heat or direct sunlight as to avoid the risk of fire.
Do not remove any parts of the FarView. Contact an Optelec authorized service organisation
in your area.
To avoid risk of electrical damage, keep your FarView away from fluids and chemicals.
Handle the FarView with care. Rough handling will damage its internal components.
Do not use the FarView near inadequately-shielded medical devices.
Contact your dealer to service this equipment if necessary. Do not open your unit as it will
void the warranty.
Always unplug the system before cleaning it. Use a soft damp cloth to clean the exterior. Do
not use cleaning agents or abrasive materials as they will damage your unit.
Use only the supplied power adapter.
Use of the FarView other than described in this manual will exclude it from warranty conditions.
English
Page 45
Optelec
FarView
Appendix B: Technical information
Magnification
Up to 42 times
Live viewing mode (close-up): 3 – 12 times
Live viewing mode (distance): 3 – 42 times
Playback mode: Up to 14 times zoom
Viewing modes
Full color photo mode,
High contrast white on black, High contrast black on white,
High contrast blue on yellow, High contrast yellow on blue,
High contrast yellow on black
Focus
Auto-focus
Screen
4.3” widescreen TFT
Battery power
Up to 4 hours continuous use
Live viewing mode: 2.5 hours
Playback mode: 4 hours
Charging time 4.5 hours
Battery model
Lithium-ion (Li-ion) rechargeable batteries
Weight
290 grams / 10.2 ounces (incl. batteries and excl. adapter)
Input
100 – 240V, 50 – 60Hz
English
Page 46
Optelec
FarView
Storage and transport conditions:
Relative humidity: 10 – 80%, no condensation
Temperature:
0° – 40 ° C
Note: Used batteries should be disposed of in a depot that is designated by
competent local authorities.
About picture data
Recorded data may be damaged or lost if the unit breaks down due to inappropriate handling.
Neither Optelec nor its partners will be held liable for any damages suffered due to loss of
recorded data.
WARNING: The use of accessories, transducers and cables, with the exception of transducers
and cables sold by the FarView’s manufacturer as replacement parts, may result in increased
emissions or decreased immunity of the FarView.
-If you see this symbol-
English
Page 47
Optelec
FarView
Information on Disposal for other Countries outside the
European Union.
This symbol is only valid in the European Union.
If you wish to discard this product, please contact your local
authorities or dealer and ask for the correct method of disposal.
This product complies with the safety and EMC requirements of the directives:
IEC 60601-1;
IEC 60601-1-2
FCC
FCC part 15 Class B
This device bears the CE and FCC approval mark
English
Page 48
Optelec
FarView
Optelec offices worldwide
Optelec U.S. Ltd
3030 Enterprise Court, Ste C
Vista, CA 92081
U.S.A.
T : +1 (800) 826-4200
www.optelec.com
Optelec Canada
1832 Marie-Victorin
Longueuil, QC J4G 1Y9
Canada
T : +1 (450) 677-1171
www.optelec.com
Optelec Nederland BV
Breslau 4
2993 LT Barendrecht
The Netherlands
T : +31 (0)88 678 3555
www.optelec.nl
Optelec Limited
2 Millfield House
Woodshots Meadow
Croxley Business Park
Watford WD18 8YX
United Kingdom
T: +44 1923 23 13 13
www.optelec.co.uk
Optelec NV
Baron Ruzettelaan 29
8310 Brugge
Belgium
Tieman GmbH
Fritzlarer Strasse 25
34613 Schwalmstadt
Germany
T: +32 (0)50 35 75 55
www.optelec.be
T: +49 669 196 170
www.tieman.de
Optelec Corporate Headquarters: Breslau 4 – 2993 LT Barendrecht – The Netherlands –
T: +31 (0)88 678 3444 – www.optelec.com
UDC-02009A