1
TestStudio:
An environment
for automatic test generation
based on Design by ContractTM
Diploma Thesis
Ilinca Ciupa
Supervised by Prof. Dr. Bertrand Meyer and Dr. Karine Arnout
ETH Zürich
March 1, 2004 – July 31, 2004
TestStudio – Diploma project
ACKNOWLEDGEMENTS
There are many people who contributed to this project. First, I would like to thank Dr.
Karine Arnout for her supervision of this thesis, her support and very helpful comments and
suggestions. My deep gratitude also goes to Prof. Dr. Bertrand Meyer, for giving me the
opportunity to work on this topic in the Chair of Software Engineering at ETH Zurich and for
the constant support he has given me during my internship at ETH. Being able to work under
his supervision and to attend his lectures and talks has been an honor for me.
I also thank several people who contributed ideas and implementation to the TestStudio
and to the tool it is based on (the Test Wizard): Nicole Greber, Xavier Rousselot, Eric
Bezault, Per Madsen and Andreas Leitner.
I would also like to thank all the members of the Chair of Software Engineering at ETH
Zurich, for their support and for everything I have learnt from them. Working in the group has
been a great opportunity and a real pleasure for me.
Finally, I am deeply grateful to my parents for their love and support.
i
TestStudio – Diploma project
ii
TestStudio – Diploma project
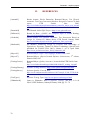
ABSTRACT
The importance of testing in the software development process is recognized as a matter
of fact nowadays. However, practice shows that, in spite of on-going research in the field,
testing methodologies and tools have not yet managed to provide software developers with
adequate support for testing activities.
In this project, we suggest a different approach to testing: the testing process is fully
automatic. Our methodology is based on Design by Contract™. Contracts are a valuable
source of information regarding the intended semantics of the software. By checking that the
software respects its contracts, we can ascertain its validity. Therefore, contracts provide the
basis for automation of the testing process.
The goal of this project was to develop an environment for automatic generation of tests,
which we call TestStudio. It has a friendly user interface and allows the user to generate,
compile and run tests on the push of a button. It also allows fine tuning of the testing process.
We used this tool to test several Eiffel libraries and found bugs in them. We consider
this to be clear proof of the effectiveness of the approach.
iii
TestStudio – Diploma project
iv
TestStudio – Diploma project
TABLE OF CONTENTS
1.
INTRODUCTION ....................................................................................................................................... 1
2.
MAIN RESULTS......................................................................................................................................... 3
3.
PROJECT PLAN......................................................................................................................................... 5
3.1.
3.2.
3.3.
3.4.
4.
SCOPE OF THE WORK...................................................................................................................... 5
INTENDED RESULTS ....................................................................................................................... 5
BACKGROUND MATERIAL ............................................................................................................ 7
PROJECT MANAGEMENT ............................................................................................................... 8
THEORETICAL BACKGROUND ......................................................................................................... 11
4.1.
4.2.
4.3.
5.
TERMINOLOGY .............................................................................................................................. 11
THE TESTING PROCESS ................................................................................................................ 11
MANUAL VS. AUTOMATED TESTING........................................................................................ 12
THE TEST WIZARD................................................................................................................................ 13
5.1.
FUNCTIONALITY ........................................................................................................................... 13
5.2.
ARCHITECTURE ............................................................................................................................. 13
5.2.1. EIFFEL ANALYZER ..................................................................................................................... 14
5.2.2. INFORMATION HANDLER ......................................................................................................... 15
5.2.3. CODE GENERATOR .................................................................................................................... 15
6.
DESIGN AND IMPLEMENTATION OF TESTSTUDIO .................................................................... 17
6.1.
TEST SCOPE, DATA AND OPTIONS ............................................................................................. 17
6.2.
GRAPHICAL USER INTERFACE (GUI)......................................................................................... 18
6.2.1. DESIGN OF THE GUI.................................................................................................................. 18
6.2.2. IMPLEMENTATION OF THE GUI .............................................................................................. 20
6.3.
COMMAND LINE ............................................................................................................................ 33
6.4.
STORING TEST CONFIGURATIONS ............................................................................................ 34
6.5.
TEST GENERATION AND EXECUTION....................................................................................... 37
7.
ADVANTAGES AND LIMITATIONS OF TESTSTUDIO .................................................................. 42
7.1.
7.2.
8.
BENEFITS OF USING TESTSTUDIO ............................................................................................. 42
LIMITATIONS.................................................................................................................................. 43
RESULTS................................................................................................................................................... 48
8.1.
8.2.
8.3.
9.
TEST RESULTS................................................................................................................................ 48
EXAMPLES OF FOUND BUGS....................................................................................................... 48
PROBLEMS ENCOUNTERED WHEN RUNNING TESTS ............................................................ 51
DIRECTIONS FOR FUTURE WORK ................................................................................................... 54
10.
USER MANUAL................................................................................................................................... 56
10.1.
SYSTEM REQUIREMENTS ............................................................................................................ 56
10.2.
INSTALLATION .............................................................................................................................. 56
10.3.
HOW TO USE TESTSTUDIO........................................................................................................... 56
10.3.1.
HOW TO USE THE GUI VERSION OF TESTSTUDIO........................................................... 56
10.3.2.
HOW TO USE THE COMMAND LINE VERSION OF TESTSTUDIO .................................... 71
10.4.
EXAMPLES ...................................................................................................................................... 73
10.4.1.
EXAMPLE FOR THE GUI VERSION OF TESTSTUDIO........................................................ 73
10.4.2.
EXAMPLE FOR THE COMMAND LINE ................................................................................ 74
11.
CONCLUSIONS ................................................................................................................................... 76
12.
REFERENCES ..................................................................................................................................... 78
v
TestStudio – Diploma project
vi
TestStudio – Diploma project
LIST OF FIGURES
FIGURE 1: ARCHITECTURE OF THE TEST WIZARD ............................................................................ 14
FIGURE 2: MAIN WINDOW OF TESTSTUDIO........................................................................................... 19
FIGURE 3: DIAGRAM CONTAINING THE MAIN GUI CLASSES OF TESTSTUDIO. ........................ 20
FIGURE 4: SCREENSHOT OF THE TESTSTUDIO MAIN WINDOW. .................................................... 23
FIGURE 5: FEATURE CLOSE_PROJECT OF CLASS TS_MAIN_WINDOW. ............................................... 25
FIGURE 6: EXTRACT FROM ROUTINE GET_TEST_RESULTS OF CLASS TS_MAIN_WINDOW....... 26
FIGURE 7: EXTRACT FROM ROUTINE SAVE_CLUSTER_INFO OF CLASS TS_MAIN_WINDOW...... 27
FIGURE 8: TESTSTUDIO SCREEN FOR ENTERING VALUES FOR BASIC AND OTHER TYPES. 29
FIGURE 9: PART OF THE CODE OF ROUTINE SPECIFIC_STRESS_LEVEL_SET OF CLASS
TSG_STRESS_LEVEL_VERTICAL_BOX. ........................................................................................................ 31
FIGURE 10: GENERATED CODE TO CREATE AN OBJECT OF TYPE ARRAY [ANY]. .................... 38
FIGURE 11: DISTINGUISHING BETWEEN PRECONDITIONS VIOLATED BY THE TEST CASE
AND BY A FEATURE UNDER TEST. ............................................................................................................ 40
FIGURE 12: CREATION PROCEDURE MAKE OF CLASS ARRAY. ........................................................... 49
FIGURE 13: ROUTINE MAKE_AREA OF CLASS TO_SPECIAL [T]. ....................................................... 49
FIGURE 14: ROUTINE INFIX “//” OF CLASS INTEGER_REF............................................................. 50
FIGURE 15: ROUTINE INFIX “|…|” OF CLASS INTEGER_REF. ......................................................... 50
FIGURE 16: FUNCTION COUNT OF CLASS INTEGER_INTERVAL......................................................... 51
FIGURE 17: PROCEDURE FORCE OF CLASS ARRAY. ............................................................................... 51
FIGURE 18: MAIN WINDOW OF TESTSTUDIO, WHEN NO PROJECT IS OPEN............................... 57
FIGURE 19: FIRST DIALOG OF THE WIZARD FOR CREATING A NEW PROJECT........................ 57
FIGURE 20: WIZARD DIALOG FOR ENTERING THE ACE FILE. ........................................................ 58
FIGURE 21: WIZARD DIALOG FOR SELECTING THE CLUSTERS THAT WILL BE TESTED. ..... 59
FIGURE 22: INFORMATION DIALOG DISPLAYED TO THE USER WHEN ATTEMPTING TO
INCLUDE A CLUSTER WITH NO CLASS OF ITS OWN........................................................................... 59
FIGURE 23: WIZARD DIALOG FOR SELECTING THE CLASSES TO BE INCLUDED IN THE
TEST. ................................................................................................................................................................... 60
FIGURE 24: WIZARD DIALOG FOR SELECTING THE FEATURES THAT WILL BE TESTED...... 60
FIGURE 25: MAIN WINDOW OF TESTSTUDIO AFTER CREATING A NEW PROJECT WITH THE
PROJECT WIZARD. ......................................................................................................................................... 61
FIGURE 26: DIALOG SHOWN WHEN THE USER WANTS TO OPEN A PROJECT AND THERE IS
ALREADY AN OPEN PROJECT..................................................................................................................... 62
FIGURE 27: DIALOG TO OPEN A PROJECT. ............................................................................................ 62
FIGURE 28: EXAMPLE OF A DIALOG DISPLAYED WHEN AN ERROR IS ENCOUNTERED
WHILE LOADING A PROJECT. .................................................................................................................... 62
FIGURE 29: DIALOG SHOWN WHEN A PROJECT IS SAVED SUCCESSFULLY. .............................. 63
FIGURE 30: DIALOG TO SAVE A PROJECT UNDER A DIFFERENT NAME AND/OR DIRECTORY.
.............................................................................................................................................................................. 63
vii
TestStudio – Diploma project
FIGURE 31: TREE-LIKE BROWSER DISPLAYING THE CATEGORIES OF INFORMATION
CONTAINED IN A PROJECT. ........................................................................................................................ 63
FIGURE 32: MAIN WINDOW OF TESTSTUDIO, SHOWING THE PANEL TO ENTER VALUES FOR
TYPES.................................................................................................................................................................. 64
FIGURE 33: DIALOG FOR ENTERING A VALUE FOR A NON-BASIC TYPE. .................................... 65
FIGURE 34: MAIN WINDOW OF TESTSTUDIO SHOWING THE PANEL FOR SETTING THE
STRESS LEVEL. ................................................................................................................................................ 66
FIGURE 35: DIALOG FOR CHANGING THE MAPPING BETWEEN STRESS LEVELS AND
UNDERLYING PARAMETERS....................................................................................................................... 67
FIGURE 36: MAIN WINDOW OF TESTSTUDIO SHOWING THE PANEL FOR SETTING TEST
OPTIONS............................................................................................................................................................. 68
FIGURE 37: TESTSTUDIO MAIN WINDOW, SHOWING THE COMPILATION PROGRESS FOR
THE GENERATED TEST................................................................................................................................. 69
FIGURE 38: DIALOG DISPLAYED WHEN TEST RUNNING SUCCEEDS............................................. 69
FIGURE 39: TEST RESULTS SAVED IN HTML FORMAT DISPLAYED INSIDE A BROWSER. ...... 71
FIGURE 40: DIALOG INFORMING THE USER ABOUT THE RESULTS BEING SAVED IN HTML
FORMAT............................................................................................................................................................. 71
FIGURE 41: MAIN WINDOW OF TESTSTUDIO, SHOWING THE FEATURES INCLUDED IN THE
TEST. ................................................................................................................................................................... 74
viii
TestStudio – Diploma project
1. INTRODUCTION
The most important quality factor of software applications is correctness, defined as “the
ability of software products to perform their exact tasks, as defined by their specification”
[Meyer97]. This is the first requirement that customers have and there should be no trade-off
where it is concerned: software developers should never sacrifice correctness in favor of other
quality factors, of meeting deadlines or of other constraints.
However, ensuring correctness is an extremely difficult task. We can group the methods
for checking the correctness of software into the following categories: validation, verification,
and testing. Validation means checking that the system does what it is supposed to do, while
verification checks that the system does it correctly. The purpose of testing is to find faults in
programs. After having identified faults (widely known as “bugs”), you must remove the
errors that caused them from the program code.
In spite of its importance, testing is not performed thoroughly and exhaustively. Data
from a survey [TestingSurvey] of 240 North American and European software companies
conducted in 1996 shows that 8% of companies release beta versions of applications without
any testing. 83% of developers don’t like testing code. 53% find testing their own code
tedious. 30% don’t like testing because they find the tool support inadequate.
To address the problems outlined by this survey, we have developed an environment for
automatic generation of tests based on the ideas of Design by Contract™. The information
that contracts (preconditions, postconditions, class invariants, loop variants and invariants,
and check instructions) provide can be used to check whether the software fulfills its intended
purpose. Based on this observation, we have created an environment which we call TestStudio
and which generates tests automatically, runs these tests using a wide range of values and
offers all the benefits of an intuitive user interface.
Note: For simplicity reasons, this report uses words such as “he” and “his” to refer to
unspecified persons, instead of using longer constructs such as “he or she” and “his or her”,
with no connotation of gender.
1
TestStudio – Diploma project
2
TestStudio – Diploma project
2. MAIN RESULTS
The purpose of this project was to develop an environment for automatic test generation.
To do so, we have extended an already existing tool, called Test Wizard, which implements
the basic functionality for the automatic generation of tests based on contracts.
The main contributions of the current project are:
•
Providing a Graphical User Interface to the Test Wizard, which allows the user to:
o create test configurations as projects, save them and reload them again later;
o set a wide range of test criteria and options;
o generate and compile the test code (according to the test configuration) on a
button-click;
o run the generated test on a button-click;
o display the test results;
•
Providing a command-line facility to complement the GUI version;
•
Extending and refining the test generation mechanism of the Test Wizard.
Using TestStudio we tested some Eiffel libraries, and found previously unknown bugs.
We describe some of these bugs in section 8.2. We also tested examples that we created and
in which we planted bugs on purpose, to assess the capabilities of TestStudio. This proved the
effectiveness of the approach and showed that TestStudio does meet its intent.
3
TestStudio – Diploma project
4
TestStudio – Diploma project
3. PROJECT PLAN
We provide an outline of the objectives of the project and their priorities. We describe
which objectives were reached and which still need to be done, and also some work that was
done but not yet concluded.
3.1. SCOPE OF THE WORK
TestStudio is based largely on a tool that was implemented as Master’s project
[Greber04] by Nicole Greber at ETH Zurich. The tool (called Test Wizard) automatically
generates tests from contract-equipped classes. The goal of the current project was to provide
a graphical user interface (GUI) for that tool and also to extend some of its existing
functionality. The design and capabilities of the Test Wizard are explained briefly in section
5. Here we only outline the scope of the current project.
TestStudio is meant to address the major drawbacks of the Test Wizard, to turn it into a
user-friendly tool, with all the facilities needed for effective and productive operation.
The Test Wizard takes an Eiffel library as input and generates tests, which it executes
and evaluates using the contract information. No user interaction is possible, except for
providing the library to be tested. Changing the test scope and criteria requires editing the
source code. Another issue is that the Test Wizard does not run the generated test
automatically; the user has to launch it manually. These aspects are of utmost importance in
turning the Test Wizard into a user-friendly, powerful application, which can be used to
automatically generate and run extensive and highly tunable tests on existing software.
Therefore, this project aims to provide a user interface to the Test Wizard, while also adding
some functionality and refining the existing implementation of the test generator.
3.2. INTENDED RESULTS
Implementation:
a) Developing a graphical user interface (GUI) for the Test Wizard, which allows the
user to interact with the tool at the following stages:
o Choosing the following test criteria for defining the test scenario:
Scope of the test: which clusters, classes, features should we test?
Stress level: how many times should we call each feature and should
we also test features in descendants? (It will be possible to set this level
globally and on a per-cluster, per-class and per-feature basis.)
5
TestStudio – Diploma project
Context:
•
the values used for instantiating basic types and for other types;
•
the level of randomness, defined as the number of objects of
each class that we create.
Tolerance: the level of assertion checking (preconditions,
postconditions, class invariants, loop invariants and variants, check
instructions).
Testing order: we can perform tests
•
on one feature at a time;
•
on one class at a time;
•
on as many features as possible.
o When we have generated the test scenario, we display it to the user to allow
them to change:
the list of calls that will be performed (by adding or removing feature
calls);
the order of calls;
the arguments used for the calls.
o After running the tests, we display the results to the user, in a format which
makes it easy to find the results for any of the tested features.
b) Automatically running the generated test code, without any intervention from the user
once they have set all the test criteria.
c) Providing a storing functionality for the Test Wizard in order to:
o Store the test scenario once it has been completely defined;
o Store the objects that will be used in the tests;
o Store the test results;
o Retrieve the results of previously run tests.
d) Adding a command-line facility to complement the GUI.
e) Extending the functionality currently available with the following improvements:
o Using several creation procedures to instantiate classes;
o Enabling the user to change the list of modifiers that the tool automatically
selects;
6
TestStudio – Diploma project
o Distinguishing between preconditions violated by the test case and by a feature
under test;
o Outputting test results in the Gobo Eiffel Test format;
o Checking catcalls (for anchored arguments of features) in case the anchor is an
attribute or function of the enclosing class;
o Enabling the user to define whether a test has passed or not in case a rescued
exception occurs in the feature while running the test;
o Automatically setting the path to the compiler and the path to finish freezing
(which the user must do manually in the Test Wizard);
o Enabling the user to choose the type used for instantiating generic parameters
(the Test Wizard only uses the constraining type);
o Enabling the user to choose whether obsolete classes and/or features are tested.
Documentation:
Developer manual:
presents the architecture of the software, discusses issues involved in
the design and implementation and lists the advantages, limitations and
possible future extensions of the tool.
User manual:
explains how to install and use TestStudio.
Project report:
consists of a theoretical description of the concepts involved, the
developer manual, the user manual, and presents some results obtained
by running the tool.
3.3. BACKGROUND MATERIAL
READING LIST
•
“Object-Oriented Software Construction” [Meyer97], in particular:
o Chapter 1: Software quality
o Chapter 10: Genericity
o Chapter 11: Design by Contract: building reliable software
o Chapter 12: When the contract is broken: exception handling
o Chapter 14: Introduction to inheritance
o Chapter 15: Multiple inheritance
o Chapter 16: Inheritance techniques
o Chapter 17: Typing
o Chapter 26: A sense of style
7
TestStudio – Diploma project
o Chapter 28: The software construction process
o Chapter 32: Some OO techniques for graphical interactive applications
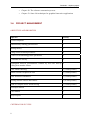
3.4. PROJECT MANAGEMENT
OBJECTIVES AND PRIORITIES
Objective
Priority
GUI development
1
Automatically running generated test
1
Storing facility
1
Using several creation procedures
2
Control on instantiating generic parameters
2
Command-line facility
2
Distinguish between preconditions violated by test case and by 2
calling from another feature
Finer catcall checking
3 (if time permits)
Allow rescued exceptions in tests
3 (if time permits)
Finer selection of modifiers
3 (if time permits)
Testing obsolete classes and features
3 (if time permits)
Paths to compiler and to finish freezing
3 (if time permits)
Developer manual
1
User manual
1
Project report
1
CRITERIA FOR SUCCESS
8
TestStudio – Diploma project
The criteria for success is the quality of the software and the documentation. The result
may be a partial implementation of the objectives without implying any penalty on the
success of the project.
Quality of software:
•
Use of Design by Contract
o Routine pre- and postconditions;
o Class invariants;
o Loop variants and invariants.
•
Careful design
o Design patterns;
o Extendibility;
o Reusability;
o Careful abstraction.
•
Core principles of OOSC2 [Meyer97]
o Command/query separation;
o Simple interfaces;
o Uniform access;
o Information hiding;
o Etc.
•
Style guidelines.
•
Correct and robust code.
•
Readability of the source code.
•
Ease of use.
Quality of documentation:
•
Completeness.
•
Understandability.
•
Usefulness.
•
Structure.
METHOD OF WORK
The technologies involved are:
•
Gobo Eiffel Lint [Bezault04];
•
Programming language: Eiffel [Meyer92] (EiffelStudio 5.4).
9
TestStudio – Diploma project
QUALITY MANAGEMENT
Quality is ensured by:
10
•
Progress reports to the supervisor;
•
Review of each milestone by the supervisor;
•
Intermediary project presentations;
•
Final project presentation;
•
Documentation.
TestStudio – Diploma project
4. THEORETICAL BACKGROUND
4.1. TERMINOLOGY
There are several kinds of software testing, depending on the purpose. In this project we
only deal with functional testing, defined as “validating that an application […] conforms to
its specifications and correctly performs all its required functions” [TestTypes]. The word
“testing” is used to mean “functional testing” in this document.
An error in the software construction process causes faults to appear in the application,
which may lead to failure of the program execution [TestingCourse].
The purpose of testing is to find faults (“bugs”) in it. Debugging a program means
trying to find and remove bugs from it [TestingCourse].
The term “test case” refers to a specific test. It consists of information regarding
requirements testing, test steps, verification steps, prerequisites, outputs, test environment, etc.
A test suite is a sequence of test cases. A test driver is a program or tool used to execute tests
[TestingGlossary]. A test oracle defines the expected behavior of the program on running the
test. A test plan is a “document describing the scope, approach, resources, and schedule of
intended testing activities. It identifies test items, the features to be tested, the testing tasks,
who will do each task and any risks requiring contingency planning” [TestingGlossary].
Black-box testing relies on the specification of the software, without any reference to
its internal workings; its purpose is to test whether the software fulfills the requirements. In
contrast, white-box testing (also known as structural testing) uses knowledge of the internal
structure of the software.
4.2. THE TESTING PROCESS
The testing process consists of the following steps [TestingCourse]:
1. Choosing which elements to test (the granularity can vary from an instruction to a
component or library);
2. Building test cases and test oracles;
3. Executing them;
4. Comparing actual results with expected results (as given by the oracle);
5. Measuring execution characteristics (time, memory, etc.).
Traditional approaches require the tester (or developer) to manually execute all these
steps. The second one is especially cumbersome and effort- and time-consuming. It is also
prone to omissions, because the tester might not consider some cases.
You can run tests at several levels [TestingCourse]:
11
TestStudio – Diploma project
•
Unit testing – a single program unit is tested;
•
Integration testing – units are assembled into a system and tested as a whole; you can
do this either progressively or as “big bang” (meaning that you run the integration
tests only after you have constructed the whole system);
•
Regression tests – after updating software, you re-execute tests that you ran
successfully in the past, to ensure that no new bugs have been introduced.
A test plan governs the testing process. It documents the decisions that are made with
respect to various options [TestingCourse]:
•
Who will perform the testing: developers or specialized testers?
•
What resources (in terms of people, time and effort) will we allocate for the testing
activity?
•
At which level will we perform tests?
•
Will we carry out the test manually or automatically?
•
How will we save test configurations and results?
•
What are the risks involved in the testing process?
•
What actions will we take depending on the test results?
4.3. MANUAL VS. AUTOMATED TESTING
As suggested by the survey presented in section 1, the problems we need to address are
that developers don’t like testing, find it tedious, and consider the tool support for it
inadequate. However, there is another major drawback to manual testing: inevitably, some
cases will remain untested, and it might be exactly the extreme ones – which the developer
might not even think of testing – that cause malfunctions in the final product.
However, even when developers perform thorough tests, errors do appear in the
software product. The reason why bugs escape testing can be any of the following
[Whittaker00]:
•
One or several combinations of input values remain untested;
•
Parts of the code remain untested;
•
An order in which statements can be executed remains untested;
•
Tests are not run for every possible execution environment.
Automated testing does not address all of these problems. Exhaustive testing (in terms
of input values tested and path coverage) is impossible, except for extremely simple
programs. Still, tools which automatically generate tests can, if designed correctly, achieve
much better path coverage and test a wider range of input values, some of which a tester
might not even consider. Such a tool has to be highly tunable, to allow testers to adapt the
testing process to their particular needs and preferences.
12
TestStudio – Diploma project
5. THE TEST WIZARD
The Test Wizard is a tool that was implemented at ETH Zurich by Nicole Greber as
Master project [Greber04]. The goal of the current project was to extend the Test Wizard.
Therefore, we briefly describe its architecture and capabilities.
5.1. FUNCTIONALITY
The Test Wizard implements the basic functionality for automatically generating blackbox tests for programs written in Eiffel. It takes as input (provided as command-line
argument) the path to the ace file for the system to be tested and generates and compiles the
test code. Then, the user needs to run the test by hand. Result information is saved as follows:
an Excel-compatible text file and an XML file containing the summary of test results for each
feature, and an Excel-compatible text file containing details about the tests that failed.
We classify the results into four categories:
•
Failed – the feature produced an assertion violation, some exception occurred during
its execution or one or several of its calls were possible catcalls1;
•
No call was valid – no call to the feature fulfilled its precondition, so the feature does
not fail the test but does not pass either – it simply was not actually tested;
•
Could not be tested – the Test Wizard could issue no call to the feature, because it
could not instantiate the target object or one of the arguments;
•
Passed – at least one of the feature calls succeeded (fulfilled the precondition) and its
execution did not produce any exceptions or assertion violations (the assertions that
are actually checked during the execution of the test can be set by the user when
defining the test scenario).
5.2. ARCHITECTURE
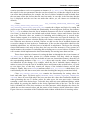
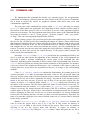
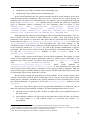
The following picture shows the architecture of the Test Wizard (there is no
implementation for the items with dotted outlines) [Greber04]:
1
A call is a catcall if some redefinition of the routine (in an heir of the class) would make it invalid because of a
change of export status or argument type [Meyer97].
13
TestStudio – Diploma project
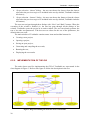
Figure 1: Architecture of the Test Wizard
The above figure shows the basic components and the data flow between them. The Test
Wizard works as follows:
(1) Gather system information.
(2) Display system information and allow the user to set various test options.
(3) After generating the test scenario, allow the user to adapt it (change the order of class
instantiations, the order of calls to the tested features, the arguments used, etc.)
(4) Store the test scenario.
(5) Generate a test executable corresponding to the test scenario and run it.
(6) Store information regarding the test executable.
(7) Store test results.
(8) Display the results.
The building blocks of the Test Wizard are:
•
Eiffel analyzer (see section 5.2.1);
•
Information handler (see section 5.2.2);
•
Code generator (see section 5.2.3).
5.2.1. EIFFEL ANALYZER
The Eiffel analyzer parses the Eiffel library provided as input get the system
information. It relies on the parsing tool Gobo Eiffel Lint [Bezault04], also known as gelint,
which analyzes Eiffel source code and gathers the necessary information: the list of clusters,
deferred and effective classes, their generic parameters and descendants, deferred and
effective features, their arguments and result types as well as modifiers and creation
procedures. It also reports errors and warnings. The Eiffel analyzer then passes this
information to the information handler.
14
TestStudio – Diploma project
5.2.2. INFORMATION HANDLER
The information handler generates the test scenario from the system information
received from the Eiffel analyzer; it also takes into account the criteria set by the user (in the
Test Wizard, the user can set these criteria only by modifying the source code of the wizard).
The test criteria consist of the test scope (the items that the user wants to test: clusters, classes
or features), test data (the user can define values that will be used to instantiate classes), and
options. We describe the test criteria in more detail in section 6.1.
Once it has set all the test parameters, the information handler defines the test scenario
according to these parameters. The code generator uses this scenario to create a test
executable.
5.2.3. CODE GENERATOR
The code generator has the following components:
a) Test generator - generates Eiffel code according to the test scenario and calls the Eiffel
compiler, which builds the test executable;
b) Context handler – establishes how and in which order to instantiate the needed classes;
c) Context generator – creates the objects and then randomly calls modifiers on them, to
create a pool of objects, which we call the “context”;
d) Call simulator – performs the calls to the features that the user wants to test. To do
this, it chooses target and argument objects from the context, so that their types match
the types required by the feature’s signature. It needs to wrap all feature calls in rescue
blocks, so that the wizard can recover from any assertion violation or exception that
occurs and report it in the test results.
15
TestStudio – Diploma project
16
TestStudio – Diploma project
6. DESIGN AND IMPLEMENTATION OF TESTSTUDIO
In this section, we describe the design and some implementation issues of TestStudio.
As mentioned before, TestStudio extends an already existing tool, the Test Wizard, which we
described in Chapter 5. Therefore, this chapter – unless otherwise noted –only discusses the
architecture of what is added to the Test Wizard, namely the contribution of this project.
6.1. TEST SCOPE, DATA AND OPTIONS
We outline here the various test criteria that can be set by the user. These criteria are
also present in the Test Wizard, but the user can only set them by modifying the source code
of the Wizard, whereas in TestStudio they are set through the GUI.
We divide the test criteria into the following categories:
a) Test scope – defines the items that the user wants to test. TestStudio can work on
different levels of granularity: the user can include whole clusters in the test (which
means that all classes in these clusters with all their features will be tested), whole
classes (all their features will be included in the test), or individual features.
b) Test data – the user can:
•
Set the values used for instantiating basic types (INTEGER, REAL, DOUBLE,
BOOLEAN, CHARACTER, STRING) or use the default values provided by TestStudio.
This is an addition of TestStudio: the Test Wizard does not allow users to set these
values.
•
Add values for other types. These objects will be part of the context, but other
values for their corresponding types will also be created by the context generator.
To add values for non-basic types, the user has to write a function returning an
object of the desired type. The GUI of TestStudio fully supports this.
•
Set the stress levels for the tested elements (this feature was also not present in the
Test Wizard). The user can do this globally or on a per-cluster, per-class or perfeature basis. Setting a stress level globally means setting it for all clusters
included in the test, for all their classes and for all the features. Setting a stress
level for a cluster will assign that stress level to all the cluster’s classes and to all
their features, and so on. Setting the stress level for a particular feature will
override the stress level that was assigned to it from its enclosing class; likewise
for classes and clusters. The stress level varies on the following scale: very low,
low, moderate, high, critical. All these levels actually map to values of two
parameters: the number of method calls (this is an INTEGER which, by default,
varies with the stress level from 10 to 100) and whether features should also be
tested in descendants (BOOLEAN parameter, which by default is False). The user
can set the mapping between stress levels and values for these parameters.
c) Test options:
17
TestStudio – Diploma project
•
Level of assertion checking: the user can specify which of the following types of
assertions they want to check in the generated test:
o Preconditions
o Postconditions
o Class invariants
o Loop variants and invariants
o Check instructions.
•
Testing order – can be one of the following:
o As many features as possible – call all features once before calling them a
second time;
o One feature at a time – perform all calls on a feature before calling the next
one;
o One class at a time – perform all calls on the features of a class before
calling the features of the next one.
•
Level of support for genericity – the user can choose the types which will be used
for instantiating generic parameters:
o Only the constraining type;
o Basic types if they conform to the constraining type, otherwise only the
constraining type;
o All types conforming to the constraining type.
6.2. GRAPHICAL USER INTERFACE (GUI)
Designing and implementing the GUI of TestStudio was the biggest part of this project.
We paid special attention to the design, because TestStudio allows the user to set a wide range
of parameters, and this needs to be done easily and intuitively.
6.2.1. DESIGN OF THE GUI
The GUI of TestStudio must allow the user to:
18
•
Set all parameters listed in section 6.1, but not force the user to do it (by providing
defaults);
•
Save the values that the user sets, so that it is possible to run the same test again;
•
Open a previously saved test configuration;
•
Generate and compile the test code, then run the executable;
TestStudio – Diploma project
•
Display the test results in a format that is easy to use and to browse through.
The most important objectives in the design of the GUI were: the ease of learning how
to use it, the ease of using it, its intuitiveness, but also the fact that it should fulfill all the
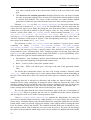
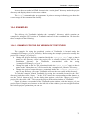
functions listed above. Therefore, we designed a project-oriented GUI: TestStudio saves all
the test information (scope, data and options) as a project, which it can then open again. The
main window of TestStudio displays a browser-like tree on its left-hand side, corresponding
to the structure of the project data. We will call this the project tree browser. By clicking on
the leaves of the tree, the user can display various panels in the right-hand side of the window,
which allow him to set the different test parameters. We will refer to these as project panels.
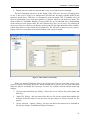
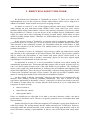
Figure 2 shows a screenshot of the main window, with a project loaded.
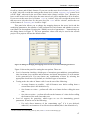
Figure 2: Main window of TestStudio.
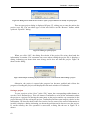
When you launch TestStudio, there is no open project. The user can either create a new
project or open a previously saved one. When creating a new project, the user must enter data
about the project and define the test scope. For this, we created a wizard with the following
dialogs:
1. “Project name and directory” dialog - allows the user to choose the project name and
directory;
2. “Input file” dialog – the user must select the ace file for the system that contains the
elements which he wants to test; the user can also choose to create a log file for the
project;
3. “Scope selection - clusters” dialog – the user can choose the clusters to be included in
the test (by default, TestStudio includes all clusters);
19
TestStudio – Diploma project
4. “Scope selection - classes” dialog – the user can choose the classes (from the clusters
selected at the previous step) to be included in the test (by default, TestStudio includes
all classes);
5. “Scope selection - features” dialog – the user can choose the features (from the classes
selected at the previous step) to be included in the test (by default, TestStudio includes
all features).
The user can navigate through these dialogs with “Next” and “Back” buttons. When the
execution of the wizard is finished (i.e. the user has gone through all the dialogs of the
wizard), TestStudio opens the project in its main window. The user can already generate the
test or set other test parameters. If he does not set values for the rest of the parameters, the
default values are used.
The main window of TestStudio contains menu items and toolbar buttons for:
•
Creating a new project;
•
Opening a project;
•
Saving an open project;
•
Generating and compiling the test code;
•
Running the test;
•
Displaying the test results.
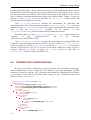
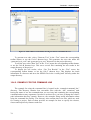
6.2.2. IMPLEMENTATION OF THE GUI
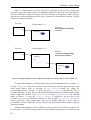
The main classes used for implementing the GUI of TestStudio are represented in the
class diagram in Figure 3. Refer to this figure to follow the description in the text.
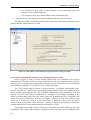
Figure 3: Diagram containing the main GUI classes of TestStudio.
20
TestStudio – Diploma project
Implementation of the wizard for creating a new project
The wizard for creating a new project is made of five dialogs where the user can enter
information about the project and define the test scope. To achieve this, we use a dialog
(implemented by class TSG_WIZARD_DIALOG), whose content (the box that is displayed
inside it) changes when the user presses the “Next” or “Back” button.
Class TSG_WIZARD_DIALOG inherits from EV_DIALOG; its content is an instance of
class TSG_DIALOG_BOX (not a direct instance, because the class is deferred, but an instance
of one of its effective descendants). This class is the ancestor of all classes implementing
boxes that can be displayed in the wizard. It inherits from EV_VERTICAL_BOX and any class
which represents a box that can be displayed in the wizard must inherit from it.
TSG_DIALOG_BOX contains the functionality for navigating between the boxes. To do
this, it keeps track of the next and previous boxes that it can display, by using the attributes
next_box and previous_box, both of type TSG_DIALOG_BOX.
To implement the lower bar of the dialog containing buttons “Next”, “Back”, “Cancel”
and “Help”, we created class TSG_LOWER_BUTTON_BAR. It keeps a reference to the dialog
that contains it (in attribute parent_dialog of type TSG_WIZARD_DIALOG) and has
procedures that will be executed when the user presses the “Back” and “Cancel” buttons. It
also contains procedure add_new_forward_action for adding a procedure which will be
executed when the user presses the “Next” button.
Class TSG_DIALOG_BOX has a reference to an object of type
TSG_LOWER_BUTTON_BAR and a deferred method create_lower_button_bar, which its
effective descendants implement according to their specific needs.
The descendants of TSG_DIALOG_BOX are: TSG_WIZARD_NEW_PROJECT_BOX,
TSG_WIZARD_INPUT_FILE_BOX,
TSG_WIZARD_CLUSTER_SELECTION_BOX,
TSG_WIZARD_CLASS_SELECTION_BOX and TSG_WIZARD_FEATURE_SELECTION_BOX.
Each of them corresponds to one of the steps in the execution of the wizard for creating a new
project. All of these classes define a procedure to be executed when the user presses the
“Next” button. To add this procedure to the list of actions executed on the selection of the
“Next” button, they call add_new_forward_action of class TSG_LOWER_BUTTON_BAR
and pass the procedure they want to add as argument.
TSG_WIZARD_NEW_PROJECT_BOX inherits from TSG_PROJECT_NAME_DIR_BOX,
which contains the widgets for entering a name and directory for the project. The reason for
having a class TSG_PROJECT_NAME_DIR_BOX is that this class will also be used when the
user wants to save a project under a different name and/or in another directory (the “Save
as…” function of TestStudio). Class TSG_WIZARD_NEW_PROJECT_BOX only needs to extend
it with the procedure that will be executed when the user presses the “Next” button and the
implementation
of
the
procedure
for
creating
the
lower
button
bar
(create_lower_button_bar). In short, class TSG_PROJECT_NAME_DIR_BOX contains
the functionality for setting a project name and directory, and class
TSG_WIZARD_NEW_PROJECT_BOX just adds to it some wizard-specific behavior.
Classes
TSG_WIZARD_CLASS_SELECTION_BOX
encapsulate
instances
of
classes
TSG_WIZARD_CLUSTER_SELECTION_BOX,
TSG_WIZARD_FEATURE_SELECTION_BOX
TSG_CLUSTER_SELECTION_VERTICAL_BOX,
and
TSG_CLASS_SELECTION_VERTICAL_BOX
and
TSG_FEATURE_SELECTION_VERTICAL_BOX, respectively. These latter classes contain the
21
TestStudio – Diploma project
widgets and functionality for selecting the clusters, classes and features that the user wants to
test. The wizard classes just add to them some wizard-like functions (actions to be executed
when the user presses the “Next” button, creating the lower button bar, etc.). The TestStudio
main window also uses these classes when it displays the scope selection panels.
Classes TS_TEST_DATA and TS_TG_TEST_RESULT
We created a class called TS_TEST_DATA which holds all information about a certain
project (name, directory, output directory) and about the test parameters for that project (all
those listed in section 6.1, plus a reference to the instance of the test generator and the input
ace file). We also need to record whether the user has specifically set the stress level for a
cluster, class or feature, or if we set its stress level by copying the stress level of the more
general (enclosing) element. For this we use three attributes of type HASH_TABLE
[BOOLEAN, STRING] where the keys are names of clusters/classes/features and the values
are set to True if the user has specifically set that element’s stress level.
Class TS_TEST_DATA contains:
•
Setter methods for all its attributes;
•
A few convenience features, such as:
o include_all_classes - adds all classes in the included clusters to the test;
o include_all_features – adds all features of the included classes to the
test;
o select_clusters - receives a list of cluster names as argument and deletes
the clusters whose names are not in this list from the list of included clusters;
o select_classes and select_features - do the same for classes and
features respectively;
•
Features for deleting the values of some attributes (stress levels for clusters, classes
and features, and the lists of included classes and features);
•
Functions for checking if the values that the user wants to set are legal values for the
corresponding attribute. For example, is_valid_testing_order checks if the
INTEGER that it receives as argument is a legal value for the testing order;
is_valid_genericity_support_level does the same for a level of support for
genericity;
•
Procedures which are not exported and which some of the features described above
use as agents, e.g. for deleting an element from a list or a hash table, for deleting a
cluster from the list of included clusters (this will also delete all its classes and all
their features), for excluding a cluster (without excluding all its classes and their
features), or for excluding a class.
Class TS_TG_TEST_RESULT encapsulates information about test results for each
feature. It records:
22
•
the name of the class the feature belongs to
•
the name of the feature
•
the result type
•
the number of calls to the feature that produced no exceptions
TestStudio – Diploma project
•
the number of calls that violated the feature’s preconditions2
•
the number of calls that produced assertion violations3
•
the number of calls that produced other exceptions
•
the number of possible catcalls
•
the number of calls that were attempted on a void target.
The class also contains setter routines for all these attributes.
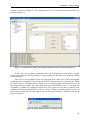
Implementation of the TestStudio main window
The main window of TestStudio must allow the user to perform project-related
operations (creating, opening, saving a project), to generate, compile and run the test, and then
display test results. It must also display, when a project is open, all the information regarding
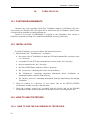
it and allow the user to change it. As described in section 6.2.1, the window is split into two
vertical parts (see Figure 4): a tree-like browser on the left side and a panel displaying
information corresponding to the selected tree item on the right side. At the bottom of the
window, there is a text area (not editable by the user) displaying the compiler output.
Figure 4: Screenshot of the TestStudio main window.
The window contains menu items and toolbar buttons for operations on projects and for
test generation and execution. When there are both a menu item and a toolbar button for a
2
This refers to a precondition of the feature being violated because of the test case. It does not signal a bug in the
feature.
3
This refers to assertion violations that occur during the execution of the feature, which signal the presence of
bugs in the tested feature.
23
TestStudio – Diploma project
certain operation (which is the case for all menu options except “Save as…”, “Exit” and
“Help”), they trigger the execution of the same agent. We will describe below the operation
and implementation of some of these agents:
•
Routines concerned with project management:
o create_new_project – It is called when the user selects the menu item or the
toolbar button for creating a new project. It first checks whether there is already an
open project, and if so calls the procedure for closing a project (close_project).
If closing the project was successful or if there was no open project, it launches the
wizard for creating a new project (described above). When execution returns from
the wizard, it checks if the project and test data have been set correctly (in other
words, if the user did not interrupt the execution of the wizard at some point by
pressing “Cancel”). If this check is successful, feature create_new_project
adjusts some GUI elements of the window to reflect that now there is an open
project. When the wizard finishes its execution (the user presses the “OK” button
on the last screen of the wizard and all entered data is valid), it calls feature
show_test_panel, which creates and displays the tree-like browser on the left
side of the TestStudio main window.
o save_project - It is called when the user selects the menu item or the toolbar
button for saving a project. It first records the test information contained in the
currently displayed project panel. Then it also records the information regarding
values of types entered by the user, stress levels and options (we record these
values when the corresponding project panels are hidden, which might not happen
before saving the project). Here by “recording” we mean saving the information in
an instance of class TS_TEST_DATA, which we keep in an attribute (called
test_data) of TS_MAIN_WINDOW. If everything could be recorded successfully,
it creates an instance of class TS_XML_GENERATOR, and calls its save_project
procedure, passing it test_data as argument (we describe this routine below).
o save_project_as – It is called when the user selects the “Save as…” menu
item. It records the new project name and directory in test_data and then calls
routine save_project.
o open_project – It is called when the user selects the menu item or the toolbar
button for opening a project. If there is an open project, it closes it (by calling
procedure close_project). If closing the project was successful or if there was
no open project, it creates a new instance of TS_TEST_DATA, by overwriting the
value contained by attribute test_data. Then it displays the dialog for opening a
project (described in section “Additional dialogs”) and after control returns from
that dialog, it adjusts some elements of the graphical interface to the newly opened
project.
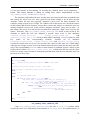
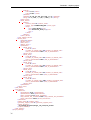
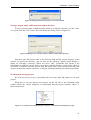
o close_project – This feature is not exported; it is only called by routines
open_project and create_new_project. It first displays a dialog which asks
the user whether he wants to save the project that is currently open before
proceeding (the user can also cancel the operation); if the user wants to save the
project, it calls procedure save_project, then it adjusts some graphical elements
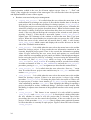
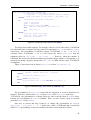
to reflect that there is currently no open project. Figure 5 shows the code of feature
close_project.
24
TestStudio – Diploma project
close_project is
-- Close the currently open project.
-- (Is called by `open_project' and `create_new_project')
local
confirm_dialog: EV_CONFIRMATION_DIALOG
button_labels: ARRAYED_LIST [STRING]
do
create confirm_dialog.make_with_text (
Close_project_confirmation_text)
create button_labels.make (0)
button_labels.extend (Yes_button_text)
button_labels.extend (No_button_text)
button_labels.extend (Cancel_button_text)
confirm_dialog.set_buttons (button_labels)
confirm_dialog.set_default_push_button (confirm_dialog.button (
Yes_button_text))
confirm_dialog.show_modal_to_window (Current)
if equal (confirm_dialog.selected_button, Yes_button_text) then
-- Save the project that was previously open and
-- then close it.
save_project
end
if (equal (confirm_dialog.selected_button, Yes_button_text) and
save_successful) or equal (
confirm_dialog.selected_button, No_button_text)
then
set_title (Window_title)
split_area.wipe_out
save_menu_item.disable_sensitive
save_toolbar_button.disable_sensitive
save_as_menu_item.disable_sensitive
generate_test_menu_item.disable_sensitive
generate_test_toolbar_button.disable_sensitive
run_test_menu_item.disable_sensitive
run_test_toolbar_button.disable_sensitive
get_test_results_menu_item.disable_sensitive
get_test_results_toolbar_button.disable_sensitive
output_text_area.set_text ("")
exists_open_project := False
test_data := Void
ok_to_go_on := True
else
ok_to_go_on := False
end
end
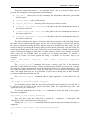
Figure 5: Feature close_project of class TS_MAIN_WINDOW.
•
Routines concerned with test generation and running:
o generate_test – It is called when the user selects the menu item or the toolbar
button for generating and compiling the test code. It first needs to save the project
information (i.e. record it in test_data) in the same manner as described for
feature save_project. Then it calls procedure generate_test on an object of
class TS_TG_ROOT_GENERATOR, which actually does the work of generating the
test code and compiling it. Then it checks if compilation was successful by looking
for an executable file of the test and displays an information dialog which lets the
user know about the result of the test generation.
o run_test – It is called when the user selects the menu item or the toolbar button
for running the generated test executable. It calls procedure run_test on an
object of class TS_TG_ROOT_GENERATOR, which actually executes the test. Then
25
TestStudio – Diploma project
it checks whether there is a result file in the output directory of the project, to
determine if the test was run successfully, and displays an information dialog to
the user.
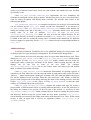
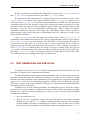
o get_test_results - It is called when the user selects the menu item or the
toolbar button for displaying the test results. To generate HTML files for the
results and then display them, it first creates an instance of class TS_CSV_READER,
and calls its get_test_results routine. This function reads the CSV4 file
containing the test results and returns an array of instances of class
TS_TG_TEST_RESULT (described above). If parsing the CSV file is successful,
get_test_results generates the HTML files by calling procedure
generate_html on an instance of class TS_HTML_GENERATOR. This will also
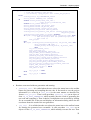
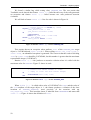
display the test results in a browser. Figure 6 shows an extract from the code of
routine get_test_results.
if checker.is_valid_file (test_data.output_directory + "\" +
test_res_cts.Results_csv_file_name) then
-- Read the CSV file to get the test results.
create csv_reader.make (test_data.output_directory + "\" +
test_res_cts.Results_csv_file_name)
results := csv_reader.get_test_results
if results = Void then
-- Display info dialog.
create info_dialog.make_with_text (Invalid_csv_file_text)
info_dialog.show_modal_to_window (Current)
else
-- Generate HTML.
create html_generator
html_generator.generate_html (results, test_data.output_directory)
create info_dialog.make_with_text (Html_results_saved_text +
test_data.output_directory + "\" +
test_res_cts.Html_results_dir_name + ".")
info_dialog.show_modal_to_window (Current)
end
else
-- Display info dialog.
create info_dialog.make_with_text ("There is no file called " +
test_res_cts.Results_csv_file_name + " in directory " +
test_data.output_directory + ".")
info_dialog.show_modal_to_window (Current)
end
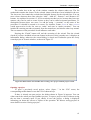
Figure 6: Extract from routine get_test_results of class TS_MAIN_WINDOW.
•
4
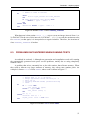
Routines for displaying project panels - all these procedures work in the same way:
they display the corresponding box (an instance of one of the classes described below)
and add an agent to the deselect actions of the corresponding browser-tree node, agent
which saves the information set through that panel. The agents for saving the test
scope (clusters, classes and features) follow a typical scenario: they check if anything
has really changed in the box (for example, if the list of included clusters is different
from the one already recorded in test_data), and if that is the case they call the
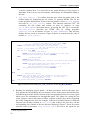
corresponding save routine of the box that was displayed. (Figure 7 shows an extract
from the code of procedure save_cluster_info.) The rest of the agents do not
Comma-separated values
26
TestStudio – Diploma project
check for changes, but just call the save procedures of the boxes (because the
operations they have to perform for saving are quite simple, it is not worth to check for
changes before doing the actual saving). All agents set the save_successful
BOOLEAN attribute, to show whether the data to be saved was valid.
changed := False
old_cluster_list := test_data.cluster_list
if old_cluster_list.count /= cluster_selection_box.included_list.count then
changed := True
else
from
old_cluster_list.start
until
changed or else old_cluster_list.after
loop
cluster_name := old_cluster_list.item.name
-- Look for a cluster with name `cluster_name' in the
-- list of included clusters of the cluster selection box.
found := False
from
cluster_selection_box.included_list.start
until
found or else cluster_selection_box.included_list.after
loop
if equal (cluster_selection_box.included_list.item.text,
cluster_name) then
found := True
end
cluster_selection_box.included_list.forth
end
if not found then
changed := True
end
old_cluster_list.forth
end
end
if changed then
cluster_selection_box.save_info (test_data)
save_successful := cluster_selection_box.save_successful
end
Figure 7: Extract from routine save_cluster_info of class TS_MAIN_WINDOW.
We use the lower part of the TestStudio main window (an instance of EV_TEXT which
the user cannot edit) for displaying the output of the compiler. We will refer to this as the
“output text area”. To redirect the compiler output, we had to modify feature compile of
class TS_TG_CODE_GENERATOR, which launches the compilation process. We use an object
of WEL_PROCESS_LAUNCHER, on which we call routine launch with an agent encapsulating
a procedure of class TS_MAIN_WINDOW as argument. This procedure displays the string it
receives as argument in the output text area.
Boxes displayed in project panels
We present the classes implementing the boxes displayed when the user selects one of
the leaves of the project tree browser. All of them inherit from EV_VERTICAL_BOX and their
27
TestStudio – Diploma project
creation procedures receive as argument an instance of TS_TEST_DATA. This object contains
the values for the test parameters that the user has already set, so that the widgets in the box
can reflect that information (for example, the lists of clusters included in and excluded from
the test must reflect the choices that the user has made; in case this is the first time that the
box is displayed and the user has not made that choice yet, all clusters are included by
default).
Classes
TSG_CLUSTER_SELECTION_VERTICAL_BOX,
TSG_CLASS_SELECTION_VERTICAL_BOX
and
TSG_FEATURE_SELECTION_VERTICAL_BOX contain the widgets and logic for setting the
project scope. They need to include the functionality for moving items from one list (instance
of EV_LIST) to another (from the list of included elements to the list of excluded elements or
vice-versa), so that the user can include and exclude clusters, classes and features from the
test scope. Therefore, there are routines for including and excluding one or several items.
These routines operate in a similar way, but some of them also need specific behavior. For
instance, the box for cluster selection displays all clusters contained in the input ace file as a
tree. When the user chooses to include a cluster, we add it to the list of included clusters and
we need to change its icon in the tree. Furthermore, if the user has selected the check box for
including subclusters, we will also have to include all its subclusters. The boxes for selecting
classes and features work only on lists (they don’t use tree-like structures). They operate in a
similar manner: the routines for including and excluding one or several classes or features just
call a routine which implements the basic functionality for moving items between lists.
These classes also have features for saving the data set through the box in an instance of
TS_TEST_DATA. Again, they operate in a similar manner: first they check an integrity
constraint (the fact that the user has included at least one cluster/class/feature), then they set
the corresponding attributes of the test_data object and reset the values of attributes that
are influenced by the change. (For example, when the list of included clusters changes, it
makes no sense to keep the lists of included classes and features that we had before; we need
to reset these lists, so that they contain all classes of the included clusters and all their
features). Finally, they set a BOOLEAN attribute called save_successful which shows if we
could actually save the data or not (in the case that checking the integrity constraints failed).
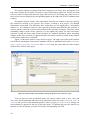
Class TSG_VALUES_VERTICAL_BOX contains the functionality for setting values for
basic and other types. For basic types (INTEGER, REAL, DOUBLE, BOOLEAN, CHARACTER,
STRING), there are text fields where the user can enter the values that TestStudio should use
when generating the test. To define values for other types, the user must write a function
returning a value of the desired type. To do this, they must use some additional dialogs, which
they launch by pressing the buttons in the lower right-hand side of the box. The list in the
lower left-hand side of the box contains a tree-like structure, which displays the classes for
which the user has entered values and the names of the features which return those values.
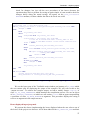
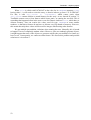
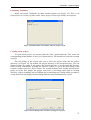
Figure 8 shows a screenshot of the TestStudio main window with the box for entering values.
28
TestStudio – Diploma project
Figure 8: TestStudio screen for entering values for basic and other types.
The buttons in the lower right-hand side are enabled or disabled depending on what is
selected in the tree:
•
The “Add new value” button is always enabled. It displays a dialog (implemented by
class TSG_ADD_VALUE_DIALOG) which allows the user to enter the name of the
feature, its return type and body. When the user has entered the data, this dialog calls
procedure add_new_value of an object of class TSG_VALUES_VERTICAL_BOX,
which adds the new value to the tree (after checking that there is not already a feature
with the same name). To do this, it looks for nodes in the tree for the same type, and if
it finds one, it adds the name of the new routine under that node; otherwise, it creates a
new node (root) in the tree and adds to it a child node containing the feature name.
•
The “Edit/View value definition” button is only enabled when the name of a feature
is selected in the tree. When the user clicks this button, a dialog is displayed
(implemented in class TSG_EDIT_VIEW_VALUE_DIALOG), similar to the one for
adding a new value. The only difference is that the fields for the name, return type and
body of the function are filled in with those of the feature selected in the tree. This
dialog allows the user to see and edit the body of the feature. If the user wants to
change the name or return type of a function, he has to delete the old feature and
create a new one.
•
The “Delete value definition” button is only enabled when the name of a feature is
selected in the tree. It triggers the deletion of the selected function. If there are no
other features returning an object of the same type, we also delete the node for the type
from the tree.
•
The “Create new value for class” button is only enabled when the name of a class is
selected in the tree. When the user selects this button, we open the dialog for adding a
29
TestStudio – Diploma project
new value, with the name of the selected class filled in in the text field for the return
type.
•
The check box for random generation (through which the user can choose whether
he wants to generate random values for types for which he has already defined values)
is selected and disabled. The reason is that currently we cannot disable random
generation of values for types other than the basic ones in the context generator.
Function save_info of class TSG_VALUES_VERTICAL_BOX saves the values that the
user entered (in an instance of TS_TEST_DATA). As described above, the user must enter the
values for basic types in text fields. By getting the texts from these fields, we obtain strings
which have to be parsed in ordered to get the integers, reals, etc. they contain. For this, we
created a utility class called TSU_STRING_PARSER, which contains functions get_ints,
get_reals, get_doubles, get_booleans, get_chars, and get_strings (all
receiving a STRING as argument) for parsing a string to get different kinds of values from it.
All these functions return arrays of objects of the corresponding basic type. Then we save
these arrays in an instance of TS_TEST_DATA.
The functions of class TSU_STRING_PARSER use instances of special parser classes
(contained in cluster scanner): TSG_INTEGER_SCANNER, TSG_REAL_SCANNER,
TSG_DOUBLE_SCANNER, TSG_CHARACTER_SCANNER and TSG_STRING_SCANNER. (For
booleans it’s not necessary to have a special scanner class, because we can just test if the
string contains a “true” substring and a “false” substring, as these are the only legal values for
type BOOLEAN.) We generated these classes using Gobo Eiffel Lex (gelex [Bezault04]). Gelex
takes as input a lex-type file which contains three sections:
•
Declarations – start conditions, options, name definitions and Eiffel code which gelex
will copy at the beginning of the generated scanner class;
•
Rules – a series of rules of the form “pattern action”;
•
User code – Eiffel code which gelex will copy at the end of the generated scanner
class.
For all the above-mentioned classes, the user code section contains a function called
scan_text, which reads tokens one at a time and performs different actions depending on
the type of the token that it finds. We declare the token types as constants at the end of the
class.
Having intervals is allowed for characters and strings (an interval inside a string is
interpreted as the string containing all characters whose codes are between the code of the
character starting the interval and the code of the character ending the interval). So the parsers
for characters and strings need to take this into account, and when they encounter the “…”
token, actually add all elements of the interval to the array they return.
We save the values that the user enters for non-basic types, as they are, in an instance of
TS_TEST_DATA. When we generate the test code, we assemble them into feature definitions
and we copy their code as it is in the context generator class.
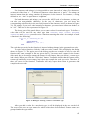
Class TSG_STRESS_LEVEL_VERTICAL_BOX contains the functionality for setting the
stress levels associated with tested items, either globally, or on a per-cluster, per-class, or perfeature basis. It initially displays only the radio buttons for setting the global stress level and a
button which, when it is pressed, triggers the display of the widgets used for setting the stress
level for clusters, classes and features. The elements included in the test are shown in a treelike structure, and for each element the user can set the stress level. The user can also change
the values of the parameters which map to stress levels (number of method calls and whether
30
TestStudio – Diploma project
we also test features in descendants), by selecting the “Modify stress levels parameters…”
button. This button launches a dialog for setting these values (implemented in class
TSG_STRESS_LEVEL_PARAMETERS_DIALOG).
The functions called when the user sets the stress level need to take into account the fact
that setting the stress level on a more general level means setting it for all more specific
elements, unless the user has expressly assigned a stress level for those elements. For
example, setting a stress level of “high” for a cluster will set this stress level for all the classes
of that cluster and all their features, except those classes and features to which the user has
already assigned a stress level. If the user has assigned “moderate” stress level to class C in
that cluster, this stress level will not be overwritten by setting the “high” stress level for the
cluster. Therefore, class TSG_STRESS_LEVEL_VERTICAL_BOX needs to keep track of the
elements to which the user has assigned a specific stress level. It uses attributes
clusters_stress_level_set,
classes_stress_level_set
and
features_stress_level_set, which are hash tables containing BOOLEAN values for each
key (name of the corresponding element). Another set of attributes
(clusters_stress_level, classes_stress_level and features_stress_level)
records the actual stress levels set. We overwrite the values in this latter set of hash tables
when the user assigns a stress level to an element (from the more general to the more specific)
only if the corresponding BOOLEAN value for that element is not True. Figure 9 shows a part
of the code of routine specific_stress_level_set (called when the user sets the stress
level for a cluster, class or feature), namely the part that deals with the case when the user sets
the stress level for a class.
class_name := tree.selected_item.text
if user_set then
classes_stress_level_set.replace (True, class_name)
end
classes_stress_level.replace (value, class_name)
feature_names := features_stress_level.current_keys
from
i := 1
until
i > feature_names.count
loop
if feature_names.item (i) /= Void then
aux_class_name := feature_names.item (i).substring (1,
feature_names.item (i).index_of ('.', 1) - 1)
if equal (aux_class_name, class_name) then
-- The current feature belongs to the selected class.
if not (features_stress_level_set @ feature_names.item (i))
then
features_stress_level.replace (value,
feature_names.item (i))
end
end
end
i := i + 1
end
Figure 9: Part of the code of routine specific_stress_level_set of class
TSG_STRESS_LEVEL_VERTICAL_BOX.
Class TSG_STRESS_LEVEL_VERTICAL_BOX also has a save_info routine which
records the stress level information in an instance of TS_TEST_DATA. As explained above, it
31
TestStudio – Diploma project
needs to save both the actual stress levels for each element, and whether the user set them
specifically or not.
Class TSG_TEST_OPTIONS_VERTICAL_BOX implements the box containing the
elements for setting the various project options. All this class does is to use a few other boxes,
each for setting an option, and display them vertically. We describe these boxes in the
following paragraph.
TSG_ASSERTION_VERTICAL_BOX contains check boxes for each type of assertions that
can be checked and its save_info routine records this information in an instance of
TS_TEST_DATA. Class TSG_TESTING_ORDER_VERTICAL_BOX contains radio buttons for
setting the testing order and it also has a save_info procedure which saves the desired
testing order in a field of attribute test_data of type TS_TEST_DATA.
TSG_OUTPUT_DIR_VERTICAL_BOX allows the user to select the output directory for the
project (the directory in which we generate test results). TSG_GENERICITY_VERTICAL_BOX
is similar to the class for setting the testing order: it contains radio buttons for the different
levels of support for genericity and its save_info routine sets the corresponding attribute in
test_data.
Additional dialogs
As already mentioned, TestStudio uses a few additional dialogs for various tasks, such
as editing values for types and project management. We describe these dialogs below.
Some of them are involved in entering values for types other than the basic ones. These
dialogs are TSG_ADD_VALUE_DIALOG and TSG_EDIT_VIEW_VALUE_DIALOG. Both of them
use an object of class TSG_EDIT_VALUE_VERT_BOX, which contains the text fields for
entering the name, return type and body of the feature. When creating this box, the two
dialogs can set the text in some of the text fields. For example,
TSG_EDIT_VIEW_VALUE_DIALOG will set the feature name and return type and disable
them, so that the user cannot edit them.
Class TSG_OPEN_PROJECT_DIALOG contains the functionality for opening a project. It
contains a text field where the user can enter the name of (and path to) the project file and a
“Browse…” button which opens a dialog for selecting a file. The name and path to the project
file will be displayed in the text field. When the user presses the “OK” button, it loads the
project (with a progress bar in the dialog showing the status of the loading process), and calls
routine show_test_panel on the object of class TS_MAIN_WINDOW, so that the main
window of TestStudio shows the open project.
Class TSG_SAVE_PROJECT_AS_DIALOG contains the widgets and logic for saving a
project under a different name and to a possibly different directory. It uses the same box as
the dialog for creating a new project, in the first step of the wizard, i.e. an object of class
TSG_PROJECT_NAME_DIR_BOX, which contains the text fields for setting the project name
and directory. Before saving the project under the new name, procedure save_project
checks that the user entered a non-empty name and a valid directory for it. Then, for the actual
saving, it calls an agent that it receives as argument (routine save_project_as of
TS_MAIN_WINDOW).
32
TestStudio – Diploma project
6.3. COMMAND LINE
We implemented the command line facility as a separate project. For test generation,
compilation and running, it basically uses the same classes as the GUI version of TestStudio,
but it needs to replace the classes for graphical elements with classes that work with
command-line arguments.
The root class of the command line system (called TS_CL_ROOT) has only one routine
(execute), which parses the arguments, and, depending on their content, decides which of
the routines of the other classes to call, or, in case there is an error in the arguments supplied,
prints an error message. The first argument must always be the name of the command that the
user wants to execute, i.e. one of: “create_project”, “generate_compile”, “run”, “get_results”
or “help”. The rest of the arguments depend on the first one.
When creating a project, the user must specify the name and directory of the project and
the ace file. He can also specify files containing the names of clusters, classes and features
that should be included in the test. Unless otherwise specified, all clusters (and all classes and
their features) referenced in the ace file are included in the test. When he wants to generate
and compile the test, the user must only indicate the project (.tsp) file containing the test
criteria. To run the test, the user must only supply the project directory. Similarly, tor display
test results, he must only provide the output directory of the project (which contains the
results saved when running the test).
Procedure execute of class TS_CL_ROOT checks that the command specified by the
user is a valid one, then checks the arguments of the command. If any of the arguments are
not valid, it prints a message explaining the correct usage of the command line tool.
Otherwise, depending on the command, it calls a routine of the corresponding class. However,
execute does not perform any checks based on the semantics of the arguments. For instance,
it does not check if the argument following the “run” command is the name or path to an
existing directory. It just passes the arguments as they are, as strings, to the corresponding
methods.
Class TS_CL_PROJECT_GENERATOR contains the functionality for creating projects. Its
creation procedure make takes as arguments the name of the ace file, the project name and
directory, and the names of the files specifying the clusters, classes and features that should be
included in the test. All of these arguments are strings. Any and all of the last three can be
Void, as the user does not have to specify any of these. If the user does specify files for
clusters or classes, make calls the helper routine get_strings, which parses the files to get
the names of the elements. The files must contain the name of each element on one line. To
get information about the features, make calls routine get_feature_names. A specialized
routine is necessary for features because the format of the file is different: each line begins
with the name of the class, followed by a colon and then a comma-separated list of names of
features belonging to that class. In the case of creation procedures, we need to distinguish
between the two statuses that they can have (creators or normal procedures). Therefore, the
name of a procedure which the user wants to include in the test as a creator must be followed
by the string “(creation)”.
Routine generate_tsp_file of class TS_CL_PROJECT_GENERATOR contains the
code to create the project and to save it to a .tsp file. It first creates an instance of
TS_TEST_DATA in which it will record all data of the project. Then it sets its attributes
referring to the ace file, project name and directory. It creates an instance of
TS_TG_ROOT_GENERATOR by calling its execute routine, which will parse the ace file to
33
TestStudio – Diploma project
get the system information. Then it sets the test scope, by first including all clusters, classes
and features and then selecting only the ones specified by the user through the files, if any. It
sets the global stress level and the values used for basic types to the defaults. It also sets the
level of assertion checking and the testing order to the default values. Finally, it creates an
instance of class TS_XML_GENERATOR and calls its save_project routine, which will
write the project information to a .tsp file.
Class TS_CL_TEST_GENERATOR contains the functionality for generating and
compiling the test code. Its most important routine is generate_compile_test. It uses an
instance of class TS_XML_READER to read in the project information from the project file,
then it calls the generate_test procedure on an instance of class
TS_TG_ROOT_GENERATOR, which will generate and compile the test code.
The main routine of class TS_CL_TEST_RUNNER is run_test, which launches the
execution
of
the
“generated_test.exe”
file
in
the
directory
“generated_test_root\EIFGEN\F_code”.
Class TS_CL_RESULT_DISPLAYER contains the functionality for creating HTML files
for the test results and displaying them in a browser. Its main routine is get_test_results,
which uses an object of class TS_CSV_READER and calls its get_test_results function to
read the results from the CSV file. If an error occurs while reading the results, it prints a
message; otherwise it creates an object of TS_HTML_GENERATOR and calls its
generate_html routine to create the HTML files.
6.4. STORING TEST CONFIGURATIONS
We must save all data contained in a project (test scope, data and options, and projectrelated information) to reuse it again later. We decided to save this information in XML
format, as a single file (with the “.tsp” extension, which stands for TestStudio Project). Below
is an example of such a file, for a project called “integer_ref_test”, which tests some of the
features of class INTEGER_REF.
<?xml version="1.0" encoding="ISO8859-1" ?>
- <project_settings>
<project_name>integer_ref_test</project_name>
<project_dir>D:\Testing\projects\integer_ref_test</project_dir>
<ace_file>D:\Testing\test_libraries\librarybase.ace</ace_file>
- <test_scope>
- <cluster_selection>
<cluster>kernel</cluster>
</cluster_selection>
- <class_selection>
- <cluster>
<name>kernel</name>
- <classes>
<class_name>INTEGER_REF</class_name>
</classes>
</cluster>
</class_selection>
- <feature_selection>
- <class>
<name>INTEGER_REF</name>
34
TestStudio – Diploma project
- <features>
<feature_name>item</feature_name>
<feature_name>sign</feature_name>
<feature_name>set_item</feature_name>
<feature_name>divisible</feature_name>
<feature_name>exponentiable</feature_name>
<feature_name>is_valid_character_code</feature_name>
<feature_name>abs</feature_name>
<feature_name>infix "+"</feature_name>
<feature_name>infix "-"</feature_name>
<feature_name>infix "*"</feature_name>
<feature_name>infix "/"</feature_name>
<feature_name>prefix "+"</feature_name>
<feature_name>prefix "-"</feature_name>
<feature_name>infix "//"</feature_name>
<feature_name>infix "\\"</feature_name>
<feature_name>infix "|..|"</feature_name>
<feature_name>infix "|"</feature_name>
<feature_name>infix ">"</feature_name>
<feature_name>infix ">="</feature_name>
<feature_name>max</feature_name>
<feature_name>min</feature_name>
</features>
</class>
</feature_selection>
</test_scope>
- <test_data>
- <user_defined_values>
- <basic_types>
- <integer>
<value>-1</value>
<value>0</value>
<value>1</value>
<value>2</value>
<value>-2</value>
<value>10</value>
<value>-10</value>
<value>100</value>
<value>-100</value>
<value>2147483647</value>
<value>-2147483648</value>
</integer>
- <real>
<value>-1</value>
<value>0</value>
<value>1</value>
<value>2</value>
<value>-2</value>
<value>10</value>
<value>-10</value>
<value>100</value>
<value>-100</value>
<value>3.40282e+38</value>
<value>1.17549e-38</value>
<value>1.19209e-07</value>
</real>
- <double>
<value>-1</value>
<value>0</value>
<value>1</value>
<value>2</value>
<value>-2</value>
<value>3.1415926535897932</value>
<value>-2.7182818284590452</value>
<value>1.7976931348623156e+308</value>
<value>2.2250738585072012e-308</value>
<value>2.2204460492503132e-16</value>
</double>
35
TestStudio – Diploma project
- <boolean>
<value>True</value>
<value>False</value>
</boolean>
<character>0...64, 91...96, 123...255, 'a', 'Z'</character>
<string>"a...z", void, "", "/01/.../255/", "x"</string>
</basic_types>
- <other_values>
- <feature>
<feature_name>f1</feature_name>
<return_type>CHARACTER_REF</return_type>
- <body>
<line>create Result</line>
<line>Result.set_item ('o')</line>
<line />
</body>
</feature>
</other_values>
</user_defined_values>
- <stress_level>
<global>3</global>
<cluster_level />
<class_level />
<feature_level />
- <parameters>
- <stress_level>
<level>1</level>
<number_of_method_calls>10</number_of_method_calls>
<test_in_descendants>False</test_in_descendants>
</stress_level>
- <stress_level>
<level>2</level>
<number_of_method_calls>20</number_of_method_calls>
<test_in_descendants>False</test_in_descendants>
</stress_level>
- <stress_level>
<level>3</level>
<number_of_method_calls>30</number_of_method_calls>
<test_in_descendants>False</test_in_descendants>
</stress_level>
- <stress_level>
<level>4</level>
<number_of_method_calls>50</number_of_method_calls>
<test_in_descendants>True</test_in_descendants>
</stress_level>
- <stress_level>
<level>5</level>
<number_of_method_calls>100</number_of_method_calls>
<test_in_descendants>True</test_in_descendants>
</stress_level>
</parameters>
</stress_level>
</test_data>
- <test_options>
- <assertions>
<preconditions>True</preconditions>
<postconditions>True</postconditions>
<class_invariants>True</class_invariants>
<loop_variants_and_invariants>False</loop_variants_and_invariants>
<check_instructions>False</check_instructions>
</assertions>
<testing_order>2</testing_order>
<genericity_support_level>2</genericity_support_level>
<output_directory>
D:\Testing\projects\integer_ref_test\test_results
</output_directory>
</test_options>
</project_settings>
36
TestStudio – Diploma project
We use two classes for creating and reading this file respectively: TS_XML_GENERATOR
and TS_XML_READER. These classes are part of the xml_parser cluster.
We generate the file sequentially, by writing each tag and its content in order. Class
TS_XML_GENERATOR only has one exported routine, called save_project, which receives
an object of class TS_TEST_DATA and writes this information to an XML file. This procedure
creates the project file in the directory of the project (giving it the name of the project), writes
the XML header, the project-related information (project name and directory) and the path
and name of the ace file (in corresponding enclosing tags). Then it calls some helper,
specialized routines for saving the test scope, data, and options. These routines operate in
similar manners: they write every piece of information to the file, enclosing it in tags, as the
above example illustrates.
Class TS_XML_READER also has only one exported feature, called load_project. It
sequentially reads information from the file it gets as argument, and records it in an instance
of TS_TEST_DATA. At every step, it checks if the XML file is well-formed and if its tags are
correct and in the right order. If it finds any error, it calls an agent that it has received as
argument, passing it a string with information about the error. This is actually a procedure of
class TS_MAIN_WINDOW, which displays the string it receives in a dialog. Thus, the user gets
very specific information about the error encountered while parsing the project XML file.
Procedure load_project uses a few helper routines for reading specific parts of the XML
file, so that the process of loading project data is modularized.
6.5. TEST GENERATION AND EXECUTION
As described in section 5, the Test Wizard implements the functionality for test case
generation. TestStudio only extends this functionality.
The main drawbacks of the test generation mechanism of the Test Wizard are that it uses
only one creation procedure for each class (all instances of each class are created by calling
the same procedure) and that it only instantiates generic parameters by using the constraining
type (or ANY, in the case of unconstrained genericity). Both of these deficiencies seriously
affect the coverage of the tests performed. Therefore, we concentrated on eliminating these
drawbacks in the test generation.
TestStudio uses several creation procedures for instantiating classes. When the context
generator has to create an object, it randomly selects one of the creation procedures available
for that class. Out of all creation procedures for a class, we select only the ones which fulfill
all following conditions:
•
They are exported to ANY;
•
They do not use an argument of the same type (Because the only object available
initially for every type is Void, calling a creation procedure that takes it as argument
would probably not produce an interesting new object. In fact, in most cases it would
fail, because the preconditions of such features require the argument not to be Void.);
37
TestStudio – Diploma project
•
They do not use pointers. (The policy that the Test Wizard uses regarding pointers is
explained in more detail in section 7.2.)
This process of random selection is very similar to the one performed on modifiers. As
soon as we have two objects of a certain type (we need two because, as mentioned above, the
first object is always Void), we randomly call modifiers on them. Currently, TestStudio
automatically tags as modifiers all routines without a return type (based on the CommandQuery Separation principle [Meyer97]). In Eiffel, creation procedures have double status:
they are both procedures used for instantiating classes and regular procedures. For this reason,
TestStudio records them twice (if the export status allows it, of course) and gives the user the
possibility of choosing to include them as either creation, or regular procedures, or both. This
double status of creation routines means that they will also be selected as modifiers (since
they don’t have a return type). Figure 10 shows the generated code for creating an object of
type ARRAY [ANY].
create_arrayed_list_ANY_object is
-- Create an object.
local
arrayed_list_ANY_variable: ARRAYED_LIST [ANY]
failure: INTEGER
do
if (failure < 10) then
random.forth
inspect (random.item \\ 3)
when 0 then
create arrayed_list_ANY_variable.make (
context_integer)
when 1 then
create
arrayed_list_ANY_variable.make_filled (
context_integer)
when 2 then
create
arrayed_list_ANY_variable.make_from_array (
context_array_ANY)
end
arrayed_list_ANY_objects.force (arrayed_list_ANY_variable)
else
print
(
"Couldn't
create
object
of
class
ARRAYED_LIST
[ANY]%N")
end
rescue
failure := failure + 1
retry
end
Figure 10: Generated code to create an object of type ARRAY [ANY].
Another important direction in extending the test generation capabilities of the Test
Wizard was to improve its support for genericity, by using for generic parameters direct
instances of any type conforming to the constraining type5. The user can choose one of three
levels:
•
5
using only instances of the constraining type (or of its effective descendants, if it is
deferred);
Here we also include the case of unconstrained genericity, with ANY being the constraining type.
38
TestStudio – Diploma project
•
using basic types if they conform to the constraining type;
•
using all types that conform to the constraining type.
In the second and third case, the context generator needs to create instances for the type
with all possible generic parameters. When we receive a request for one of these objects, we
randomly select an object of a conforming type. For instance, if the test application needs an
object of type ARRAYED_LIST [ANY] and the user has selected the option for using basic
types to instantiate generic parameters, we will randomly select an object of type
ARRAYED_LIST
[ANY],
ARRAYED_LIST
[INTEGER_REF],
ARRAYED_LIST
[INTEGER_8_REF],
ARRAYED_LIST
[INTEGER_16_REF],
ARRAYED_LIST
[INTEGER_64_REF], ARRAYED_LIST [REAL_REF], ARRAYED_LIST [DOUBLE_REF],
ARRAYED_LIST [CHARACTER_REF], or ARRAYED_LIST [BOOLEAN_REF].
Implementing this required several changes in the test generation mechanism. First, we
had to modify how the context is built. Whenever we add a class with formal generic
parameters to the context, we must also add classes that are generically derived from it. The
routine that does this is add_generically_derived_classes_to_context from class
TS_TG_INFORMATION_HANDLER. It first determines the types that conform to the
constraining type of each generic parameter, and then adds them to the context. We also add
to the context an instance of TS_OBJECT6 for each of the possible combinations of generic
parameters. We also need to record for each object which its conforming objects are. Thus,
we add the conforming_objects attribute to class TS_OBJECT, which is an
ARRAYED_LIST [TS_OBJECT].
When we add a feature to the context, we also add its arguments. Here again, we must
check if each argument has generic parameters, and if so, add the types conforming to the
argument type to the context. To achieve this, procedure add_feature_to_context of
TS_TG_INFORMATION_HANDLER
calls
routine
class
add_generically_derived_types_to_context,
which
works
similarly
to
add_generically_derived_classes_to_context. It first determines the types that
can be used for the actual generic parameters of the type provided as argument, adds the
classes of these types and their instances to the context, and then adds these objects to the list
of conforming objects of the initial type’s object.
We also had to change the generation of access methods7 for the context, because now
we don’t necessarily return an object of that type, but we can also return any object whose
actual generic parameters conform to the generic parameters of the requested object. We do
the selection randomly. To generate it, we use the conforming_objects attribute of class
TS_OBJECT.
There were some other aspects of the test generation that had to be improved. One of
them was reporting of precondition violations. We must distinguish between two cases8:
•
when the test case (directly) calls a feature, it might violate its precondition because of
the values used;
•
a precondition violation can also occur at any other place in the call chain, for instance
if a tested feature (r1) calls another routine (r2) and this call violates r2’s
precondition.
6
The class used by the Test Wizard for storing meta-information about objects in the test context.
Access methods are called on the context in the generated test whenever an object of a certain type is needed,
and they randomly return one of the objects in the container for that type.
8
This idea was first suggested by Per Madsen, Aalborg University, Denmark.
7
39
TestStudio – Diploma project
Figure 11 depicts these two cases. The first is a problem in the test case, whereas the
second is a bug in the tested routine, and should be reported as such. The Test Wizard did not
make this difference, which is clearly an error. We fixed this in TestStudio, so that, when we
generate test result information, the first case is reported as “precondition violation”, and the
second as “assertion violation”.
Test case
…
x.r1 (-1)
…
Test case
…
x.r1 (1)
…
Tested routine (r1)
r1 (i: INTEGER) is
require
i > 0
…
Case 1:
Precondition violated by
test case
Tested routine (r1)
r1 (i: INTEGER) is
require
i > 0
do
…
y.r2 (i - 1)
…
Case 2:
Assertion violation (bug
in the tested feature)
r2 (i: INTEGER) is
require
i > 0
do
…
Figure 11: Distinguishing between preconditions violated by the test case and by a feature under test.
To make this distinction, we had to change the generated rescue clause of routine run
of class TSGEN_TEST. This class is deferred and all the classes that are generated for testing
each feature inherit from it, effecting its test_feature routine (by calling the
corresponding feature). All that run does is to call test_feature, and then take care of
exception handling. To have access to detailed information about the exception that the tested
feature might have thrown, class TSGEN_TEST is an heir of EXCEPTIONS. The rescue
clause of feature run tests the original_exception attribute to get the type of the
exception. If it was a precondition violation, we have to check recipient_name. If it is
equal to the name of the tested feature, then we are dealing with case 1, so we report a
precondition violation. Otherwise, we have found a bug in the tested feature, and we report an
assertion violation.
Another disadvantage of the Test Wizard is that it doesn’t test creation procedures. To
be more precise, it doesn’t test them with the creation status (as shown above, we add creation
40
TestStudio – Diploma project
procedures to the test scope both as creation and as regular routines). We considered this to be
an error, so we added testing of creation procedures as part of the extension of the test
generation mechanism in TestStudio.
TestStudio cannot currently handle infinite loops in the features it tests. If the execution
of a feature does not finish, the execution of the test doesn’t finish, so the TestStudio window
becomes blocked. There is no way of interrupting the execution of the test as a whole or of the
feature. This drawback is also present in the Test Wizard.
We tried several approaches for eliminating this disadvantage, but the work is not
finished yet. The idea we wanted to implement was to stop the execution of a feature after a
certain time, which could be set by the user or could be a default value, such as one or several
minutes. This means that we must launch the execution of the feature in a separate thread. We
time the execution of the thread and stop it if it does not finish before the set time interval
elapses.
To implement this, we first tried using the EiffelThread library. However, there is no
way of stopping a thread in this library. We then tried to use e-POSIX [DeBoer04], the Eiffel
library providing access to the POSIX API. The problem with this was that interrupting the
execution of a thread at any random point can cause runtime panic. Another possible solution
that we looked at was to use external calls to C routines, which would have allowed us to use
the thread mechanism from C. Although this seemed like a possible solution, we did not have
time to fully implement and test it.
Future versions of TestStudio should fix this problem, as it can be a serious drawback in
automatic test execution.
In the Test Wizard, the user has to manually set the paths to the Eiffel compiler and to
finish freezing (in the corresponding attributes of class TS_TG_CODE_GENERATOR).
TestStudio eliminates this disadvantage, by using the value associated with the $ISE_EIFFEL
environment variable. The locations of the compiler and finish freezing executables are fixed
relative to the ISE Eiffel installation directory. Therefore, assuming that the user has set the
$ISE_EIFFEL environment variable, from the value of this variable we can deduce the paths
to the compiler and to finish freezing.
41
TestStudio – Diploma project
7. ADVANTAGES AND LIMITATIONS OF TESTSTUDIO
7.1. BENEFITS OF USING TESTSTUDIO
TestStudio is an environment for automatic generation of tests for contract-equipped
classes. The presence of contracts is of utmost importance for the test generation process. By
taking advantage of the information contained in contracts, TestStudio can automatically
decide if a feature fulfills its task. This is the greatest advantage that TestStudio brings: the
testing process is completely automatic; the user only has to specify what he wants to test, and
TestStudio performs the rest of the process (creating tests, compiling them, running them and
then displaying the result information). Traditional approaches to testing require the user to
write at least the tests and the test oracles. Writing the test code can be automated, but,
without contracts, there is no way for the tool to know if the tests are successful (if the tested
features work according to specification) or not, so the user is required to specify this
manually.
TestStudio implements the idea of push-button testing: once the user has specified the
test scope, test generation and compilation is done on the push of a button. Running the test
and then getting the test results also require only a button-push. Test generation and running is
completely automatic, and this is the greatest advantage of using TestStudio.
However, the tool must allow the user to adapt the testing process to his own needs
and preferences. This is especially important since the tests are generated automatically,
without any intervention from the user; therefore, the user must be able to adjust the test
configuration before the actual code generation begins.
TestStudio allows the user to set a wide range of parameters of the test configuration:
•
test scope: which clusters, classes, and features it will test – there are no restrictions
here, except that the ace file that the user supplies must include all tested elements
(and any other elements they need);
•
test data:
o what values TestStudio will use for basic types (INTEGER, REAL, DOUBLE,
BOOLEAN, CHARACTER, STRING) and for other types (however, for other
types, TestStudio will also randomly generate objects, in addition to those that
the user creates);
o the stress level associated with each cluster, class and feature (this actually
maps to two other parameters: the number of calls performed on a feature and
whether we also test it in descendants);
•
various options:
o testing order;
o which assertions we monitor in the test;
o level of support for genericity.
42
TestStudio – Diploma project
All these parameters allow great flexibility in setting up a configuration for which
TestStudio then generates the test code. The user does not have to set all these options,
because TestStudio provides defaults for all of them.
Naturally, the graphical user interface for setting these options has to be intuitive and
easy to use. The studio-like design of our application accomplishes this task. The user can
navigate between the various parameters using a browser. Selecting items in the browser
displays different panels, for setting one or several related parameters of the test
configuration. Some of these panels communicate between them if the information set in one
influences the data displayed in another. For example, if the selection of clusters included in
the test changes, the panels for selecting classes and features also change, because we include
all classes (and all their features) by default. In addition to the GUI, TestStudio also has a
command-line version.
Another great benefit that TestStudio brings is the possibility of saving test
configurations and using them again later. For this, it uses the notion of “project”. A project
incorporates all the above-mentioned data about a test and it can be saved and reloaded.
Although the testing process is completely automatic, it must be thorough and produce
relevant information. To achieve this, TestStudio uses a wide range of values on which it runs
tests, to ensure that it covers as many cases as possible. The user provides the values used for
basic types (or can use the defaults that TestStudio supplies), and for the other types the
context creator generates objects randomly (by first calling random creation procedures and
then random modifiers on the objects just created). The user can also specify values for nonbasic types. Although this method of creating objects has some disadvantages (described in
detail in section 8.3) and does not guarantee the diversity of the test data, practice has shown
that we actually test a wide range of cases, some of which developers do not think of
including in the tests they write. (See section 8 for a discussion of test results obtained using
TestStudio.)
The information the user gets about test results is also important. The user must know at
least if the test of a feature failed or succeeded, and, in the case of failure, what was the reason
for it. TestStudio offers this information: the test results it saves contain, for each feature, the
number of feature calls which produced no exception, a precondition violation, an assertion
violation, another exception, the number of calls that were possible catcalls and the number of
calls attempted on a void target object. For the features that fail, if the cause of the failure is
an assertion violation, we also record the tag of that assertion. However, saving test results
can still be improved, as shown in section 7.2.
The level of support for genericity that TestStudio provides is advanced. The user can
choose between three levels (as explained in section 6.5). If he chooses the highest level,
objects of any type conforming to the constraining type will be used for actual generic
parameters. In this case, when a request for an object of a generically-derived type arrives, we
randomly select an object of a conforming type. Again, the reason for this is to try to test as
many cases as possible.
7.2. LIMITATIONS
43
TestStudio – Diploma project
Future versions will have to improve several features of TestStudio, especially regarding
the test generation process. An important point is that we cannot automatically test features in
descendants of a class, unless the user explicitly includes them in the test. This is a serious
disadvantage, because of polymorphism and dynamic binding. The user should have the
option of turning on or off the testing of features in descendant classes.
When the user specifies values for non-basic types, we also generate random values for
those types. When we need an object of that type during test running, we randomly select one
of the available objects. This means that there is actually no guarantee that we will use the
objects the user supplied in the test. Therefore, the user should have the possibility to enable
and disable automatic generation of objects for the types for which he has already defined
values. If he disables automatic generation, the only objects used in the test will be the ones
he creates. This gives a further degree of control of the testing process. The current version of
TestStudio does not allow disabling automatic generation of objects. The panel which allows
the user to enter values for basic and non-basic types in the TestStudio main window contains
a check box for this purpose, but the test generator does not support the required functionality,
so the check box is always set and disabled, so that the user cannot change its setting.
Another serious drawback of TestStudio is that it cannot save the randomly generated
values used in a test. If we run a generated test several times, the same values will be used,
but, if we generate the test again for the same configuration, new values will also be
generated, making it impossible to run the exact same tests. Being able to save these values is
also important for regression testing. If anything changes in the software and we want to run
the same tests on it, this will require a new generation of the test code, and, as shown above,
other values will be used. This means that we are actually not running the same tests, so we
are not doing regression testing. However, if we were able to save these values, this is all we
would need to have real regression testing. All the other necessary support is already there in
TestStudio.
TestStudio cannot generate tests if the input ace file lists several clusters with the same
name (even if the names of the parent clusters are different). Therefore, the user needs to pay
special attention to the way they name clusters, so that there are no name clashes.
A feature which would be useful in TestStudio is an “import” facility, allowing the user
to get some settings from a project and reuse them in another project. Thus it would be
possible to set the test scope by importing it from another project, to use the same values (for
basic and non-basic types) as in another project, to copy the stress levels (if the test scopes
match) or the stress level parameters used in another project, or to set the same test options as
in another project.
In the current version of TestStudio, we map stress levels to two parameters: the number
of method calls and whether or not we test features in descendants. Another parameter that is
connected to the notion of stress level is the number of objects of each type that we create.
Currently, the user cannot set this number. A default value is used for all types in the context.
It would be important for the user to be able to set it, possibly as part of the stress level, if not
as a separate parameter.
Future versions can add various improvements to TestStudio in terms of the degree of
control it allows, in order to make the testing process even more flexible. For instance, it
should be possible to specify which assertions are checked on a cluster- or class-level, so that
the user is able to check different types of assertions for different classes or clusters. Finergrained control of the level of support for genericity would also improve the testing process:
the user would be able to assign different levels to different classes (or clusters), depending on
what he wants to test more thoroughly.
44
TestStudio – Diploma project
TestStudio cannot handle nested genericity. Although nested genericity is not too
common in practice (in the EiffelBase library, there is only one class which uses it, plus its
descendants), this can still be a serious disadvantage, which later versions of TestStudio need
to fix.
Currently, the test results that TestStudio saves do not contain any information about the
objects (target objects for feature calls and argument objects) for which calls fail. This is
valuable information. Without it, the user must actually debug the generated code to see
which values caused the failure, identify the bug and then fix it. Therefore, future versions of
TestStudio should save at least this information, if not even more data about the state of the
system when the failure occurred.
A feature that would be useful in TestStudio is the possibility of displaying diagrams for
test results, so that the information gathered from the test results is represented in a graphical
manner. For instance, we could have charts showing the number of features that passed the
test and the number of features that failed. We could also show how many feature calls
triggered precondition violations, opposed to how many were valid. This kind of information
can easily be represented with graphs, charts or diagrams, so that the user can have a quick
overview of the obtained results.
Limitations “inherited” from the Test Wizard
There are several limitations of the Test Wizard which TestStudio inherits and does not
fix. Some of them are inherent to automatic testing, others we can eliminate.
TestStudio cannot test a few classes like FILE, POINTER, EXCEPTIONS and their heirs.
For the first two, the reason is that it is dangerous to randomly call their routines. Users
probably would not want TestStudio to start creating and deleting random files on their
systems. Randomly allocating pointers and randomly calling routines on them is also
dangerous and very likely to fail. TestStudio tries to avoid pointers as much as possible, by
excluding creation procedures and modifiers which use them. However, it is allowed to test
routines having pointer arguments and routines calling other routines which use pointers. This
will not be a problem anymore once we can turn off random generation of values, so that only
the values given by the user are used for certain types. The problem with class EXCEPTIONS
is only its die routine, because TestStudio terminates when it calls that routine. The user can
still test the class if he excludes procedure die from the test.
TestStudio cannot test expanded types. The reason for this is that routines which have an
anchored type as argument can cause panic if they receive an expanded type for the argument.
A more detailed explanation of this is available in [Greber04], section 5.2.
TestStudio cannot handle features calling C routines. If such a feature fails, it causes
runtime panic, and TestStudio cannot recover from it.
If a routine goes into an infinite loop, TestStudio also cannot recover. Of course, the
user still has the option of debugging the generated code and seeing where the loop occurs,
but the studio provides no support for this. It cannot detect infinite loops and take measures to
stop their execution. We describe some work done on this (but not completed) in section 6.5.
TestStudio does catcall checking only if the anchor refers to an argument of the routine
or to Current. This means that it overlooks the case of anchored types referring to a feature
of the enclosing class.
TestStudio automatically selects modifiers for each class by choosing routines with no
return type (according to the command-query separation principle [Meyer97]). However,
45
TestStudio – Diploma project
some of these routines do not modify the state of the target object. The code of the routines
could be analyzed to determine if they actually modify the state of the object.
46
TestStudio – Diploma project
47
TestStudio – Diploma project
8. RESULTS
8.1. TEST RESULTS
We tested TestStudio by running it on some Eiffel libraries (ISE EiffelBase, EiffelTime,
EiffelLex, EiffelParse) and on smaller examples we created. This showed some of the
limitations of TestStudio listed in section 7.2 and some advantages and disadvantages of
automatic test generation (we discuss disadvantages in section 8.3).
From running these tests, we can say that the test generation and compilation works
well, but running automatically generated tests poses problems (see section 8.3).
Nevertheless, automatic generation of tests is a big advantage because the user can manually
run the generated code and see, if he encounters problems, what the cause is and remove it.
We discuss possible improvements and extensions of TestStudio in detail in sections 7.2 and
9.
8.2. EXAMPLES OF FOUND BUGS
We tested some Eiffel libraries with TestStudio and found bugs. As developers had
thoroughly tested these libraries, TestStudio’s ability to find bugs proves the value of
automatic test generation.
Many of the bugs we discovered had to do with using “extreme” values for types, such
as the minimum and maximum values for integers. We provide an example of such a bug
below.
The tests we ran often fail because of the failure of creation procedure make of class
ARRAY, whose code is shown in Figure 12.
48
TestStudio – Diploma project
make (min_index, max_index: INTEGER) is
-- Allocate array; set index interval to
-- `min_index' .. `max_index'; set all values to default.
-- (Make array empty if `min_index' = `max_index' + 1).
require
valid_bounds: min_index <= max_index + 1
do
lower := min_index
upper := max_index
if min_index <= max_index then
make_area (max_index - min_index + 1)
else
make_area (0)
end
ensure
lower_set: lower = min_index
upper_set: upper = max_index
items_set: all_default
end
Figure 12: Creation procedure make of class ARRAY.
The bug in this routine appears, for example, when we call it with values -2147483648
(the minimum value an integer can have) and 10 for arguments min_index and max_index,
respectively. The precondition is fulfilled, because -2147483648 <= 10 + 1, so make is
executed. Since -2147483648 <= 10, we will execute the call to make_area with the
argument given by max_index – min_index + 1. However, when this number is
calculated, the result exceeds the maximum representable integer number. Consequently, it is
interpreted as being a negative integer and make_area is called with the value -2147483639
as argument.
Figure 13 shows the code of feature make_area of class TO_SPECIAL [T].
make_area (n: INTEGER) is
-- Creates a special object for `n' entries.
require
non_negative_argument: n >= 0
do
create area.make (n)
ensure
area_allocated: area /= Void and then area.count = n
end
Figure 13: Routine make_area of class TO_SPECIAL [T].
The precondition of make_area states that the argument it receives should not be
negative. Therefore, when feature make of class ARRAY calls make_area with value
-2147483639, the precondition is violated. However, this is not the fault of make’s client,
because the precondition of make is fulfilled. Thus, we have found a bug in creation
procedure make of class ARRAY.
One way to correct this bug would be to change the precondition of make to
max_index – min_index + 1 >= 0. In this case, values -2147483648 and 10 would not
fulfill make’s precondition, so the user would not be able to call it with these values.
49
TestStudio – Diploma project
We found a similar bug while testing class INTEGER_REF. The test results that
TestStudio saved showed that feature infix “//” failed because one of the calls generated
an exception and feature infix “|…|” failed because two calls produced assertion
violations.
We will look at feature infix “//” first. Its code is shown in Figure 14.
infix "//" (other: like Current): like Current is
-- Integer division of Current by `other'
require -- from NUMERIC
other_exists: other /= Void
good_divisor: divisible (other)
do
create Result
Result.set_item (item // other.item)
ensure -- from NUMERIC
result_exists: Result /= Void
end
Figure 14: Routine infix “//” of class INTEGER_REF.
This routine throws an exception when attribute item of the INTEGER_REF target
object is -2147483648 and other.item is -1. When calling Result.set_item (item //
other.item), an unhandled exception is generated. The reason is that the result of dividing
item by other.item should be 2147483648, but this number is greater than the maximum
representable integer (2147483647).
Routine infix “|…|” also produces an assertion violation when it is called with the
maximum value for INTEGER. Figure 15 shows its code.
infix "|..|" (other: INTEGER): INTEGER_INTERVAL is
-- Interval from current element to `other'
-- (empty if `other' less than current integer)
do
create Result.make (item, other)
end
Figure 15: Routine infix “|…|” of class INTEGER_REF.
When infix “|…|” is called with a value of 2147483647 for other and the value of
the item attribute of the target object is -1, the feature produces a violation of the class
invariant of INTEGER_INTERVAL, more precisely of the assertion with tag
non_negative_count. This invariant clause is inherited from INDEXABLE and states that
count >= 0. Figure 16 shows the definition of count.
50
TestStudio – Diploma project
count: INTEGER is
-- Number of items in interval
do
check
finite: upper_defined and lower_defined
end
if upper_defined and lower_defined then
Result := upper - lower + 1
end
ensure then
definition: Result = upper - lower + 1
end
Figure 16: Function count of class INTEGER_INTERVAL.
What happens is that routine infix “|…|” tries to create an integer interval from -1 to
2147483647, but the size of this interval (2147483647 – (-1) + 1) exceeds the maximum value
for INTEGER, so that again, it is interpreted as a negative number. Therefore, the invariant of
class INTEGER_INTERVAL is broken.
8.3. PROBLEMS ENCOUNTERED WHEN RUNNING TESTS
As outlined in section 8.1, although test generation and compilation work well, running
the automatically generated tests poses several problems, mainly due to using completely
random values.
A problem that arises constantly has to do with routines that allocate memory. When
they need to allocate very large amounts of memory, they often cause runtime panic. An
example is feature force of class ARRAY, whose code is shown in Figure 17.
force (v: like item; i: INTEGER) is
-- Assign item `v' to `i'-th entry.
-- Always applicable: resize the array if `i'
-- falls out of
-- currently defined bounds; preserve existing
-- items.
do
if i < lower then
auto_resize (i, upper)
elseif i > upper then
auto_resize (lower, i)
end
put (v, i)
ensure
inserted: item (i) = v
higher_count: count >= old count
end
Figure 17: Procedure force of class ARRAY.
51
TestStudio – Diploma project
When force is called with 2147483647 as the value for its INTEGER argument, lower
having value 1, it will need to resize the array, so that its indexes go from 1 to 2147483647.
For this, it calls auto_resize (1, 2147483647), which causes panic when
auto_resize cannot allocate so much memory for the array. As we showed in section 7.2,
TestStudio cannot recover from features which cause panic, so running the test fails. This is
something that happened often in the tests we ran for features similar to force, which have to
allocate memory. One can restrict the values used for type INTEGER to some smaller
numbers, so that these features do not have to allocate very big chunks of memory. However,
this means that only these values will be used for integers when testing other features.
We got multiple precondition violations when running the tests. Naturally, this is bound
to happen if we use completely random values. However, since we randomly generate objects,
it might happen that none of the objects we generate satisfies the precondition of a feature we
have to test. Consequently, we cannot test that feature. We discuss this problem and possible
solutions to it in section 9.
52
TestStudio – Diploma project
53
TestStudio – Diploma project
9. DIRECTIONS FOR FUTURE WORK
We described some limitations of TestStudio in section 7.2. Those were close to the
implementation level. In this section we discuss other features which can be improved or
added to TestStudio. Some of them are topics for on-going research.
As shown in section 8.3, one of the biggest problems when using TestStudio arises
when running the tests and using totally random values. Such values can cause various
problems when calling some features, such as when memory allocation is involved or when
the precondition of a feature is not met by any of the available objects. Furthermore, some
values for a type can be more interesting for testing a certain feature, while others are more
useful for testing another feature. Therefore, we should adapt object creation to the needs of
the tested features.
In the current version of TestStudio, we generate objects completely randomly. When
we need an object of a certain type, we select it from a pool of available objects of that type.
This selection is also completely random. No information about the called feature is used
either in the creation or in the selection. The random nature of the process causes all the
problems listed above.
The solution is to have an “intelligent” object factory, which can adapt object creation
and selection to the requirements of the tested features. This kind of object creator would be
able to analyze the precondition of each feature and return objects which satisfy it. In
addition, it would also be able to produce “interesting” objects for test cases, objects which
could bring a lot of information if used in the tests.
As mentioned in section 8.3, a lot of precondition violations occur when running the
automatically generated tests. This means that many useless calls are made. In some cases, we
can’t even test a feature because none of the calls fulfills its precondition. The “intelligent”
object creator could solve both problems, by looking at the preconditions and supplying only
objects that fulfill them. This is an area of research that is currently being pursued by Andreas
Leitner at the Technical University of Graz, Austria. The goal is to provide TestStudio with a
means of creating objects that do not violate the preconditions of features.
An idea related to having “interesting” objects to run tests on was introduced by Per
Madsen, from Aalborg University, Denmark [Madsen04]. This idea is based on using
equivalence partitioning to determine “classes” (categories) of objects on which to run tests.
For instance, if input values for a feature must be in the interval [a..b], we could define the
categories of values as being
•
values less than a;
•
values between a and b;
•
values greater than b.
Hence, we should test one value that is less than a, one that is between a and b, one that is
greater than b, and also a and b. The user can specify partitions or we can deduce them from
class invariants.
Another direction for the further development of TestStudio is going from black box to
white box testing. The testing strategy that the studio currently uses is black box. However,
knowledge about the internal structure of the software can bring great benefits, such as the
ones listed above: parsing of preconditions so that we can create objects that satisfy them,
54
TestStudio – Diploma project
parsing class invariants in order to determine partitions. White box testing would also allow
us to check the path coverage of the tests and adapt them to test (if possible) all branches of
the code. This would be an important extension of TestStudio because currently we cannot tell
anything about the coverage of the tests we run.
55
TestStudio – Diploma project
10.
USER MANUAL
10.1. SYSTEM REQUIREMENTS
Currently, the only operating system that TestStudio supports is Windows. We have
only tested it on Windows XP, but expect that it should also run on Windows 2000. Future
versions will be available for other platforms too.
Version 5.4 (or later) of EiffelStudio is required to run TestStudio. This version is
needed for assertion checking to be enabled and disabled correctly [Greber04].
10.2. INSTALLATION
To install TestStudio, you need to follow the instructions below:
1. Download the file “TestStudio.zip”. It contains:
•
the source code of TestStudio (for both the GUI and command line versions) in the
“src” directory;
•
executables for the GUI and command line versions in the “bin” directory;
•
the user manual in the “doc” directory;
•
the Gobo Eiffel library under the “library” directory;
•
file “License.txt” containing the license for the software;
•
file “Readme.txt” containing important information about TestStudio, its
installation and the contents of the delivery;
•
file “Release_notes.txt” containing information about the requirements for running
TestStudio.
2. Unzip its content to a directory of your choice and set the $TEST_STUDIO
environment variable to point to that directory.
3. Unzip the package “gobo33.zip” provided with this release and set the $GOBO
environment variable so that it points to the directory where you unzipped the file.
10.3. HOW TO USE TESTSTUDIO
10.3.1. HOW TO USE THE GUI VERSION OF TESTSTUDIO
56
TestStudio – Diploma project
Launching TestStudio
When you launch TestStudio, its main window appears (see Figure 18). There is no
open project, so you have to either create a new project or open a previously saved project.
Figure 18: Main window of TestStudio, when no project is open.
Creating a new project
To create a new project, you can use either the “New” option under the “File” menu, the
corresponding toolbar button, or the Ctrl+N shortcut keys. This launches a wizard for creating
a project.
The first dialog of the wizard asks you to enter the project name and the project
directory (see Figure 19). By default, the project directory is the current directory. You can
change it either by typing in the path to the desired directory or by choosing the directory
from a dialog, launched by pressing the “Browse” button. To go to the next dialog of the
wizard, you must press the “Next” button. The wizard performs some validity checks before
going on to the next dialog: the project must have a non-empty name and an existing
directory. If these conditions are not fulfilled, the wizard brings up a dialog telling you what is
wrong and it does not display the next dialog until the entered information is correct.
Figure 19: First dialog of the wizard for creating a new project.
57
TestStudio – Diploma project
The second dialog asks you to indicate the input ace file containing the clusters that you
want to test and any other clusters that they need (see Figure 20). You can type in the full path
to this file in the text field or use the “Browse” button. This dialog also allows you to specify
whether you want to save warnings to a log file. If you select the corresponding check box,
the text field for entering the path to the directory where the log file should be saved is
enabled. By default, this directory is the project directory. You can change it (only if you have
selected the check box) by either typing in the path to the directory or by using the “Browse”
button. The name of the log file is fixed (“test_studio_log.txt”). TestStudio will create this file
under the directory that you specify.
Figure 20: Wizard dialog for entering the ace file.
The only warnings that TestStudio currently produces are related to the classes that it
cannot test, which it determines when parsing the ace file. TestStudio cannot test a class if
either of the following occurs:
•
gelint finds errors when parsing or compiling it;
•
it is obsolete;
•
it has no creation procedure exported to ANY.
Therefore, it you select the option, information about the excluded classes will be saved to the
log file.
The progress bar in the lower part of the dialog is enabled when you press the “Next”
button. If the information entered in this dialog is valid (the ace file exists and, if the check
box is selected, the directory for the log file is valid), gelint parses the ace file to get the
system information. It updates the progress bar according to the progress of the compilation.
When compilation is finished, the wizard displays the next dialog. Figure 21 shows this
dialog. This and the subsequent wizard dialogs allow you to define the test scope. The current
dialog deals with the clusters that will be included in the test. By default, all clusters in the
given ace file are included.
58
TestStudio – Diploma project
Figure 21: Wizard dialog for selecting the clusters that will be tested.
The box on the left side of this dialog lists all available clusters (the ones included in the
ace file), in a tree-like structure. The icons next to the cluster names indicate their status: the
check sign marks included clusters, whereas the “X” sign marks the rest of the clusters.
Included clusters are also recorded in the list on the right side of the dialog. You can add
clusters to the included list or remove clusters from it by using the “Add”, “Add all”,
“Remove” and “Remove all” buttons. Additionally, if you have selected the “Include
subclusters” check box, when you select a certain cluster and then press “Add”, all the
subclusters of that cluster are also included.
You cannot include test clusters which have no classes of their own. In the example
shown in Figure 21, clusters ise or base can’t be included. If you select one of them and
press “Add”, a dialog similar to the one shown in Figure 22 is displayed. The reason for this is
that it does not make sense to include such a cluster without any of its subclusters that actually
contain classes because there is nothing to test.
Figure 22: Information dialog displayed to the user when attempting to include a cluster with no class of
its own.
When you press the “Next” button, the dialog checks that at least one cluster is included
and that at least one of the included clusters contains classes of its own. If one of these
conditions is not fulfilled, a dialog is displayed telling you what the problem is and how to fix
it. If the check succeeds, the next dialog of the wizard appears.
The fourth dialog of the wizard (shown in Figure 23) allows you to select the classes
that will be included in the test. The list in the upper part of the dialog window contains the
59
TestStudio – Diploma project
clusters included at the previous step. When you select one of these clusters, its classes are
displayed in the lower lists. By default, all classes of all clusters are included.
Figure 23: Wizard dialog for selecting the classes to be included in the test.
The lower two lists in the dialog contain the excluded and included classes. To move
classes between these lists, use the “Add”, “Add all”, “Remove” and “Remove all” buttons.
When you press “Next”, the wizard checks if you have included at least one class in the test.
If this is not the case, it displays a dialog informing you about the problem; otherwise, it
shows the next dialog.
The final dialog in the wizard (Figure 24) lets you select the features that you want to
test. By default, all features of all classes under test are included.
Figure 24: Wizard dialog for selecting the features that will be tested.
60
TestStudio – Diploma project
The combo box at the top of the window contains the clusters under test. The list
underneath contains the classes of the selected cluster which have been included in the test.
The lower two lists contain the excluded and included features for the selected class. You can
move classes between these lists using the “Add”, “Add all”, “Remove” and “Remove all”
buttons. As explained in section 6.2, we list creation procedures twice, because they have two
statuses: they can be used to create objects or they can be called as normal procedures. To
distinguish between these two cases, we add the string “ (creation)” to the name of the
procedure if it should be treated as a creator. For instance, feature make of class STRING
would appear twice in the list, once as “make” and once as “make (creation)”. You can
include the creation procedure separately from the normal one, and also the other way around.
The two statuses of the procedure do not influence each other.
Pressing the “Finish” button will end the execution of the wizard. First the wizard
checks if you have included at least one feature in the test. If this is not the case, it displays an
information dialog, otherwise the wizard dialog is closed and TestStudio opens the newly
created project in its main window, as shown in Figure 25.
Figure 25: Main window of TestStudio after creating a new project with the project wizard.
Opening a project
To open a previously saved project, select “Open…” in the “File” menu, the
corresponding toolbar button or use the Ctrl+O shortcut keys.
If there is already an open project, the dialog shown in Figure 26 appears. You can
either cancel the action (not open another project), or open a project with or without saving
the one that is currently open. If you choose to save the project, a dialog is displayed
informing you about the success or failure of the operation. We discuss saving projects in
more detail in section “Saving a project”.
61
TestStudio – Diploma project
Figure 26: Dialog shown when the user wants to open a project and there is already an open project.
Then an open project dialog is displayed (Figure 27), asking you to enter the path to the
project (.tsp) file. You can either type it in the text field or use the “Browse” button, which
opens an “open file” dialog.
Figure 27: Dialog to open a project.
When you click “OK”, the dialog first checks if the project file exists, then loads the
information it contains. If it encounters any errors when reading the project file, it displays a
dialog, informing you about what went wrong, and it does not load the project. Figure 28
shows such a dialog.
Figure 28: Example of a dialog displayed when an error is encountered while loading a project.
Otherwise, the project is opened (the progress bar becomes enabled and reflects the
progress of loading the project) and displayed in the main window of TestStudio.
Saving a project
To save a project, select “Save” in the “File” menu, the corresponding toolbar button, or
use the Ctrl+S shortcut keys. This will instruct TestStudio to write all the information about
the project to a project file (having the same name as the project and the .tsp extension) in the
project directory. Before saving the project, TestStudio performs some integrity checks on the
information. We describe them in the next section. In case some of the entered information is
invalid, it displays a dialog informing you about the problem and it does not save the project.
If, on the contrary, the save operation is successful, a dialog like the one in Figure 29 is
shown.
62
TestStudio – Diploma project
Figure 29: Dialog shown when a project is saved successfully.
Saving a project under a different name and/or directory
To save a project under a different name and/or in a different directory, use the “Save
As” option from the “File” menu. This will display the dialog shown in Figure 30.
Figure 30: Dialog to save a project under a different name and/or directory.
You must enter the project name in the first text field and the project directory in the
second. To specify the directory, you can also use the “Browse” button, which displays a
dialog for selecting a directory. When you press “OK”, TestStudio first checks if the
information is valid (the project name is not empty and the directory exists). If the check is
successful, TestStudio saves the project with the given name in the specified directory and
opens it in the main window; otherwise, it displays a dialog informing you about the problem.
Working with an open project
We will now look at ways of specifying the test scope, data and options in an open
project.
When there is an open project, the browser on the left side of the TestStudio main
window shows the various categories of information that the project contains. Figure 31
shows the browser.
Figure 31: Tree-like browser displaying the categories of information contained in a project.
63
TestStudio – Diploma project
The project settings are grouped into three categories: test scope, data, and options. The
test scope contains the selection of clusters, classes and features under test, and the test data
refers to values for basic and non-basic types and stress levels. Selecting any of the leaves of
the tree-like browser displays the corresponding panel on the right side of the TestStudio main
window.
The panels used for cluster, class and feature selection are similar to the ones used by
the wizard for creating a new project. See section “Creating a new project” for detailed
information about them. The difference here is that they are not displayed in a wizard-like
manner (i.e. in a sequence); however, the selection of clusters must influence the selection of
classes, and the selection of classes must influence the selection of features. Therefore, when
something changes in the cluster selection, we also update the panels for class and feature
selection, so that all classes and all their features are included. Similarly, when something
changes in the class selection, we update the panel for feature selection, so that all the features
of the classes under test are included.
Figure 32 shows the panel to enter values for types. The upper part of the panel contains
text fields for entering the values that TestStudio will use to instantiate basic types (INTEGER,
REAL, DOUBLE, BOOLEAN, CHARACTER and STRING). Only the values that you enter in these
fields will be used for basic types.
Figure 32: Main window of TestStudio, showing the panel to enter values for types.
You can also use some predefined names for special values, such as min_value and
max_value for the minimum and respectively maximum values for a type (INTEGER, REAL, or
DOUBLE) and epsilon for the minimum positive value of a type (REAL or DOUBLE). Strings can
also be Void, as opposed to the rest of the basic types. To indicate that you also want to use
Void as a value for strings, just enter Void in the corresponding text field.
64
TestStudio – Diploma project
For characters and strings, it is also possible to enter intervals of values. For characters,
an interval of the form ‘a’…‘f’ defines all character values between ‘a’ and ‘f’. For strings, an
interval means that the string contains all characters in the interval. For instance, a string
defined as “ae…imn” is equivalent to “aefghimn”.
For both characters and strings, you can use the ASCII code of a character, so that you
can also test non-printable characters. In the case of characters, you can insert the
corresponding code directly in the text field, instead of the character itself (as shown in Figure
32). For strings, if you use a code instead of a character, you must insert it between slashes, as
in “/10/”. This case is also represented in Figure 32.
The lower part of the panel allows you to enter values for non-basic types. To define a
value that will be used for any other type than INTEGER, REAL, DOUBLE, BOOLEAN,
CHARACTER and STRING, you must write a function returning that value. An example of such
a function is the following:
character_m: CHARACTER_REF is
do
create Result
Result.set_item ('m')
end
The code that you write for the function is inserted without change in the generated test code.
To write such a function, click the “Add new value” button. This will display the dialog
shown in Figure 33. The upper part of the dialog provides an example of how to write the
function (the same example as the one given above). You must enter a name for the feature
(this name has to be unique among the names for all features that you define), a return type
and a body. When you click the “Add value” button, TestStudio checks that the feature name,
return type and body are not empty, but it does not compile the code you write. Therefore, if
there are errors in the function, TestStudio will only report them when it generates and
compiles the test code.
Figure 33: Dialog for entering a value for a non-basic type.
After you add a value for a non-basic type, it will be displayed in the tree on the left.
The roots of the tree are type names for which values have been defined. Feature names are
grouped under the type names.
65
TestStudio – Diploma project
When a type name is selected in the tree, the “Create new value for class” button is
enabled. Pressing it displays a dialog similar to the one in Figure 33, only with the class name
filled in. When a feature name is selected, the “Edit/view value definition” and “Delete value
definition” buttons are enabled. The former displays a dialog similar to the one shown in
Figure 33, but with the feature name and return type filled in and disabled, so that you can
only change the feature body. If you want to change the name or return type, you must delete
the old feature (by using the “Delete value definition button”) and write a new one. When you
delete a value, TestStudio checks if there are any other values for that type. If this is not the
case, it also removes the node containing the type name from the tree.
This panel also contains a check box that enables or disables random generation of
values for types for which you have already defined at least one value. This check box is
currently selected and disabled, so it cannot be deselected. The reason for this is that currently
TestStudio cannot turn random generation of values off. This will be fixed in a future version
and then the check box will be enabled.
Figure 34 shows the panel for setting the stress level. When the “stress level” tree node
is selected in the browser, the panel that is displayed contains only the radio buttons for
setting the global stress level. The “Finer selection” subpanel is hidden. Pressing the button
expands it, pressing it again hides it.
Figure 34: Main window of TestStudio showing the panel for setting the stress level.
You can set the stress level globally or on a per-cluster, per-class, or per-feature level.
To set it globally, use the upper group of radio buttons. Otherwise, the “Finer selection”
subpanel must be expanded and you must select (in the tree on the left side) the element
(cluster, class or feature) for which you want to set a specific stress level. Setting the stress
level for more specific elements overrides the setting obtained from more general elements.
For instance, if you set the stress level of cluster kernel to “low”, this stress level will be set
66
TestStudio – Diploma project
for all its classes and all their features. If you now set the stress level of class INTEGER_REF
to “high”, this will override the setting at the cluster level, so that INTEGER_REF’s stress level
will be “high”, whereas for the rest of the classes in the cluster it will be “low”. Because you
have set the stress level of the class, the same stress level will be attributed to all its features.
If you now set the stress level of feature item to “critical”, this will override the stress level
that was set to it by the class. So, the stress level for item will be “critical”, and for the rest
of the features of INTEGER_REF it will be “high”.
This panel also allows you to change the mapping between the stress levels and the
underlying parameters: the number of calls performed on each feature and whether or not we
test features in descendants. Pressing the “Modify stress level parameters…” button brings up
the dialog shown in Figure 35. The new parameter values will only be used in the current
project. New projects will use the default values.
Figure 35: Dialog for changing the mapping between stress levels and underlying parameters.
Figure 36 shows the panel for setting the test options. These are:
•
Level of assertion checking: which types of assertions (preconditions, postconditions,
class invariants, loop variants and invariants, and check instructions) we will monitor
in the generated test. You can choose any combination of these by selecting the
appropriate check boxes. By default, we check all types of assertions.
•
Testing order: the order of feature calls. It can be one of the following:
o As many features as possible – call all features once before calling them a
second time (this is the default level);
o One feature at a time – perform all calls on a feature before calling the next
one;
o One class at a time – perform all calls on the features of a class before calling
the features of the next class under test.
•
Level of support for genericity: which types we use for instantiating generic
parameters. It can be one of the following:
o Use only direct instances of the constraining type9 if it is not deferred;
otherwise, use instances of its effective descendants (this is the default level);
9
We also include unconstrained genericity here, with ANY as the constraining type.
67
TestStudio – Diploma project
o Use instances of basic types if they conform to the constraining type, and
instances of the constraining type;
o Use instances of any types that conform to the constraining type.
•
Output directory: the directory in which TestStudio will save the test results.
The only check that TestStudio performs when saving the information contained in this
panel is that the output directory is valid.
Figure 36: Main window of TestStudio showing the panel for setting test options.
Generating, compiling and running tests, and displaying test results
Once a project is open, you can already generate the test according to the criteria
contained in it. Therefore, when you create a new project, after the execution of the wizard is
finished, you can already start test generation, because all test criteria that are not set through
the wizard have defaults, so you don’t have to set them explicitly.
The “Test” menu contains options to work with tests. To generate and compile a test,
use the “Generate test” option, the corresponding toolbar button, or the Ctrl+G shortcut keys.
Before actually generating the test code, TestStudio updates the project information with the
data set in the last panel that you modified. For example, if you change something in the
feature selection panel, then select the menu option for generating the test, TestStudio will
update the project information with the new feature selection. It will also perform some
checks on it: in this case, whether at least one feature is included in the test. If the checks
succeed, the test generation starts; otherwise, a dialog is displayed informing you about the
problem and the test is not generated until the information is valid.
Test generation actually consists of two steps: automatic generation of the test code and
compilation. The output of the compiler is displayed in the lower part of the TestStudio main
68
TestStudio – Diploma project
window, as shown in Figure 37. We compile the test code in finalization mode and then run
finish freezing on it.
Figure 37: TestStudio main window, showing the compilation progress for the generated test.
If any errors occur during compilation, they will be displayed as part of the compiler
output and TestStudio will also bring up a dialog telling you that there were problems during
test compilation.
Once there is an executable for the test, the menu item (“Run Test”) and corresponding
toolbar button are enabled. You can also use the Ctrl+R shortcut keys to run the test. When
you load a project, TestStudio checks if there is an executable (called “generated_test.exe”) in
the project directory (under the path “generated_test_root\EIFGEN\F_code”). If it finds the
executable, it enables the widgets to run the test. The reason for this check is that the user
might have already generated the test code for a project. When he reopens that project, he will
not need to generate the test code again. If the test is run successfully, a dialog like the one in
Figure 38 appears.
Figure 38: Dialog displayed when test running succeeds.
69
TestStudio – Diploma project
If running the test fails (for example, if one of the feature calls generates runtime panic,
from which TestStudio cannot recover), a dialog is shown informing you about the failure of
the operation.
When running the test is successful, test results are saved in several files:
•
“results.csv”, “results.txt” and “results.xml” contain the same information in various
formats (comma-separated values, text and XML). These files contain the following
information for each tested feature:
o The result type:
Failed – a feature fails if any of its calls causes an assertion violation or
another exception or is a possible catcall;
No call was valid – none of the calls to the feature fulfilled its
precondition;
Could not be tested – it was not possible to call the feature, because we
could not instantiate the target object or one of the arguments;
Passed – the feature was executed at least once and none of its calls
produced assertion violations or other kinds of exceptions or were
possible catcalls.
o Number of calls that produced no exceptions;
o Number of calls that violated the feature’s precondition;
o Number of calls that produced assertion violations;
o Number of calls that produced other exceptions;
o Number of calls that were possible catcalls;
o Number of calls that were tried on void target objects.
•
“details.txt” – for all features whose precondition was violated by the test case or
which produced assertion violations, it records the class and name of the feature, the
type of assertion that was violated and the tag of that assertion.
All these files are created in the output directory specified in the project.
The number of calls performed on a feature is set internally by TestStudio (currently to
30). In future versions of the tool, it will be possible for the user to set this number. The calls
that violate the feature’s precondition are not counted, so that only calls that actually lead to
the feature being executed increase the number of performed calls.
Successfully running a test will produce a “results.csv” file. TestStudio looks for this
file (in the project output directory) and, if it finds it, enables the menu option (“Get Test
Results”) and toolbar button for displaying test results in HTML format. You can also use the
Ctrl+T shortcut keys for the same purpose. This will save the information contained in file
“results.csv” in HTML format and display it in a browser (see Figure 39). The HTML files
are created in the output directory of the project, in the “results_html” directory. A dialog
(similar to the one in Figure 40) is also displayed, informing you about the success of the
operation.
70
TestStudio – Diploma project
Figure 39: Test results saved in HTML format displayed inside a browser.
We use an HTML menu (shown on the left side of the window) to display the results. It
contains the features that were tested and groups features belonging to the same class under
the name of that class. Clicking on the name of a feature displays the results for it in the right
panel of the window.
Figure 40: Dialog informing the user about the results being saved in HTML format.
10.3.2. HOW TO USE THE COMMAND LINE VERSION OF TESTSTUDIO
The command line version of TestStudio takes several arguments, depending on what
the user wants to do. We will call the first of these arguments the “command”. It can be one of
the following: “create_project”, “generate_compile”, “run”, “get_results”, or “help”.
The number and semantics of the rest of the arguments depends on the command. We will
describe each of them.
If you want to create a new project, you must use the “create_project” command.
This command must be followed by arguments according to the following pattern:
test_studio_cl create_project <ace_file> <project_name> <project_directory>
{-clusters <file_name>} {-classes <file_name>} {-features <file_name>}
71
TestStudio – Diploma project
The items included between {} are optional. None, one or several of them can be
present. The semantics of the arguments is the following:
•
<ace_file> – path to the ace file containing the information about the system that
will be tested;
•
<project_name> – name of the project;
•
<project_directory> – directory where the project will be created;
•
-clusters <file_name> - file_name is the path to the file containing the names of
the clusters under test;
•
-classes <file_name> - file_name is the path to the file containing the names of
the classes under test;
•
-features <file_name> - file_name is the path to the file containing the names of
the features under test.
The files containing the names of clusters and classes must have the following format:
the name of each element should appear on one line. For the features, you must also specify
the class to which they belong (because features cannot be identified by name only). So, the
format of the file specifying the features under test must be the following: each line of the file
must begin with the name of the class, followed by a colon and then a comma-separated list of
names of features belonging to that class. Creation features can have two statuses, as shown
above: they can be included either as creators or as regular procedures. To include a
procedure as creator, you must append the string “ (creation)” to its name. Here is an
example:
STRING:
make_filled
keep_tail
(creation),
make,
prune,
prune_all,
keep_head,
The “create_project” command will create a project (.tsp) file. If not otherwise
specified, it will include all clusters, classes and features by default. If you provide a cluster
file, only the clusters mentioned in it will be included; likewise for classes and features. The
rest of the test criteria (stress level, values for basic types, level of assertion checking, testing
order, and output directory) are set to defaults. If you want to change any of these defaults,
you must modify the generated .tsp file.
The “generate_compile” command takes a single argument, i.e. the path to the .tsp
file:
test_studio_cl generate_compile <tsp_file>
It will load the project from the given file and generate and compile the test code for it.
It will save the test code in the project directory under the “generated_test_code” and
“generated_test_root” directories.
To run the generated test, use the “run” command. It needs the path to the project
directory as argument:
test_studio_cl run <project_directory>
This will also create the result files (“results.csv”, “results.txt”, “results.xml” and
“details.txt”) in the output directory of the project.
Finally, the “get_results” command needs the path to the project output directory as
argument:
test_studio_cl get_results <project_output_directory>
72
TestStudio – Diploma project
It saves the test results in HTML format in the “results_html” directory under the project
directory and displays them in a browser window.
The “help” command takes no arguments. It prints a message informing you about the
correct usage of the command line facility.
10.4. EXAMPLES
The delivery for TestStudio includes the “examples” directory, which contains an
example for using the GUI version of TestStudio and one for the command line. We describe
these examples in the following.
10.4.1. EXAMPLE FOR THE GUI VERSION OF TESTSTUDIO
The example for using the graphical version of TestStudio is located under the
“examples\GUI\integer_ref_test” directory. Before using the example you need to modify the
project file (“integer_ref_test.tsp”):
• Change the project directory (contained inside the “<project_dir>” tags) so that it
points to the directory where the project file is actually located (this will be the
installation directory for
TestStudio, concatenated
with the
string
“\examples\GUI\integer_ref_test”);
• Change the path to the ace file (contained inside the “<ace_file>” tags) so that it
points to the “librarybase.ace” file located in the “examples\test_libraries” directory;
• Change the project output directory (contained inside the “<output_directory>”
tags) to any directory you want. TestStudio will save the test results in this directory.
To run this example, launch TestStudio (by using the executable located in the “bin”
directory) and then select “Open…” in the “File” menu, the corresponding toolbar button, or
use the Ctrl+O shortcut keys. In the dialog that appears, select the “integer_ref_test.tsp”
project file, then click “OK”. This opens the project in the main window of TestStudio.
Figure 41 shows a screenshot of the TestStudio main window, with the integer_ref_test
project open. Using the tree-browser on the left side of the window, you can navigate between
the various project options that you can set.
73
TestStudio – Diploma project
Figure 41: Main window of TestStudio, showing the features included in the test.
To generate test code, select “Generate Test” in the “Test” menu, the corresponding
toolbar button, or use the Ctrl+G shortcut keys. This generates the test code under the
“generated_test_code” and “generated_test_root” directories in the project directory.
To run the test, select “Run Test” in the “Test” menu, the corresponding toolbar button,
or use the Ctrl+R shortcut keys. This saves several files containing the test results in the
output directory of the project.
To display the test results, select “Get Test Results” in the “Test” menu, the
corresponding toolbar button, or use the Ctrl+T shortcut keys. This displays the result
information in a browser and saves the HTML files in the “results_html” directory under the
output directory.
10.4.2. EXAMPLE FOR THE COMMAND LINE
The example for using the command line is located in the “examples\command_line”
directory. This directory contains four executable files (with the “.bat” extension), each
having the name of one the commands that you can issue and containing the corresponding
command and necessary arguments. In order to use these files, you have to change the relative
path information that they contain. However, the examples bring useful information about
using the command line facility. The directory also contains three text files, which are used
for creating a project. Each of them provides an example for how to specify the clusters,
classes and respectively features under test.
74
TestStudio – Diploma project
75
TestStudio – Diploma project
11.
CONCLUSIONS
The goal of this project was to extend a tool for automatic generation of tests with a
graphical user interface and several other functionalities. The resulting application is called
TestStudio and it is an environment that allows the user to automatically generate tests for
contract-equipped classes, compile these tests, run them and get the results. The user can also
set a wide range of parameters, which enables him to finely adapt the testing process to his
own needs and preferences.
TestStudio is a proof of concept for push-button testing. It shows that, in the presence of
contracts, a fully automatic testing process is possible. In fact, it is not only possible, but also
effective and efficient. By using TestStudio, we discovered several bugs in Eiffel libraries,
bugs that had escaped thorough manual testing performed by library developers.
Contracts are vital to the success of our approach. They express the intended semantics
of the software. Only in their presence can it be checked automatically that the software
performs its required functions. However, the correctness of the test results is highly
dependent on the quality of the contracts. If contracts are not accurate enough, the test results
will also not be accurate. For example, if the postcondition of a feature does not specify one
of its intended effects, TestStudio will not be able to test the feature for that particular
outcome. Therefore, another benefit of using contracts for testing is that it leads to several
guidelines for writing contracts, which could be developed into a full methodology.
Although much work remains to be done on TestStudio, the results we have obtained so
far are very encouraging. The success of the approach also proves the importance of contracts
in the design and implementation of software systems. It proves that they are an integral part
of the software and provide valuable information about it, information without which
automatic testing would not be possible.
76
TestStudio – Diploma project
77
TestStudio – Diploma project
12.
REFERENCES
[Arnout03]
Karine Arnout, Xavier Rousselot, Bertrand Meyer: Test Wizard:
Automatic Test Case Generation Based on Design by Contract™, draft
report,
ETH
Zurich,
June
2003,
http://se.inf.ethz.ch/people/arnout/arnout_rousselot_meyer_test_wizard.
pdf
[Bezault04]
Eric Bezault: Gobo Eiffel Project, http://www.gobosoft.com
[DeBoer04]
Berend de Boer: e-POSIX, the Complete Eiffel to POSIX Binding,
http://www.berenddeboer.net/eposix/
[Greber04]
Nicole Greber: Test Wizard: Automatic Test Generation Based on
Design by Contract™, Master thesis, ETH Zurich, January 2004,
http://se.inf.ethz.ch/projects/nicole_greber/tw_final_report.pdf
[Madsen04]
Per Madsen: Enhancing Design by Contract with Knowledge of
Equivalence Partitions, Journal of Object Technology (Special issue
published for TOOLS USA 2003), volume 3, no 4, April 2004,
http://www.jot.fm/issues/issue_2004_04/article1.pdf
[Meyer92]
Bertrand Meyer: Eiffel: The Language, Prentice Hall, 1992
[Meyer97]
Bertrand Meyer: Object-Oriented Software Construction, 2nd edition,
Prentice Hall, 1997
[TestingCourse]
Bertrand Meyer: Quality Assurance, lecture held at ETH Zurich, June
2004,
http://se.inf.ethz.ch/teaching/ss2004/0004/slides/25_testing_1up.pdf
[TestingGlossary]
Software Testing Glossary, http://www.aptest.com/glossary.html
[TestingSurvey]
Software Quality: Facts & Stats,
http://www.computerworld.com/news/1997/story/0,11280,17522,00.ht
ml
[TestTypes]
Software Testing Types, http://www.aptest.com/testtypes.html
[Whittaker00]
James A. Whittaker: What Is Software Testing? And Why Is It So
Hard?, IEEE Software, January/February 2000, pp. 70 - 79
78