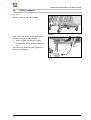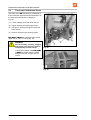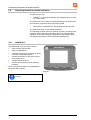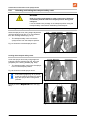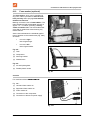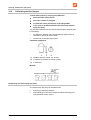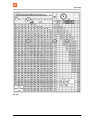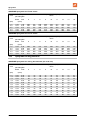
1
Operating Manual az UF 901 UF 1201 UF 1501 UF 1801 Mounted field sprayer MG3168 BAG0012.6 03.15 Printed in Germany en Please read this operating manual before commissioning. Keep it in a safe place for future use. Reading the instruction Manual and following it should seem to be inconvenient and superfluous as it is not enough to hear from others and to realize that a machine is good, to buy it and to believe that now everything should work by itself. The person in question would not only harm himself but also make the mistake of blaming the machine for possible failures instead of himself. In order to ensure success one should enter the mind of a thing, make himself familiar with every part of the machine and get acquainted with how it's handled. Only in this way could you be satisfied both with the machine and with yourself. This goal is the purpose of this instruction manual. Leipzig-Plagwitz 1872. 2 UF BAG0012.6 03.15 Identification data Identification data Manufacturer: AMAZONEN-WERKE H. DREYER GmbH & Co. KG Machine ID no.: Type: UF Permissible system pressure (bar) Maximum 10 bar Year of manufacture: Factory: Basic weight (kg): Permissible total weight (kg): Maximum load (kg): Manufacturer's address AMAZONEN-WERKE H. DREYER GmbH & Co. KG Postfach 51 D-49202 Hasbergen, Germany Tel.: + 49 (0)5405 501-0 E-mail: [email protected] Spare part orders Spare parts lists are freely accessible in the spare parts portal at www.amazone.de. Please send orders to your AMAZONE dealer. Formalities of the operating manual Document number: MG3168 Compilation date: 03.15 Copyright AMAZONEN-WERKE H. DREYER GmbH & Co. KG, 2015 All rights reserved. Reprinting, even of extracts, is only possible with the approval of AMAZONEN-WERKE H. DREYER GmbH & Co. KG. UF BAG0012.6 03.15 3 Foreword Foreword Dear Customer, You have chosen one of the quality products from the wide product range of AMAZONEN-WERKE, H. DREYER GmbH & Co. KG. We thank you for your confidence in our products. On receiving the machine, check to see if it has been damaged during transport or if parts are missing. Using the delivery note, check that the machine has been delivered in full, including any special equipment ordered. Damage can only be rectified if problems are signalled immediately. Before commissioning, read and understand this operating manual, and particularly the safety information. Only after careful reading will you be able to benefit from the full scope of your newly purchased machine. Please ensure that all the machine operators have read this operating manual before the machine is commissioned. Should you have any questions or problems, please consult this operating manual or contact your local service partner. Regular maintenance and timely replacement of worn or damaged parts increases the lifespan of your machine. User evaluation Dear Reader, We update our operating manuals regularly. Your suggestions for improvement help us to create ever more user-friendly manuals. AMAZONEN-WERKE H. DREYER GmbH & Co. KG Postfach 51 D-49202 Hasbergen, Germany 4 Tel.: + 49 (0)5405 501-0 E-mail: [email protected] UF BAG0012.6 03.15 Table of Contents 1 User Information .......................................................................................... 9 1.1 1.2 1.3 Purpose of the document ......................................................................................................... 9 Locations in the operating manual ........................................................................................... 9 Diagrams .................................................................................................................................. 9 2 General safety instructions ....................................................................... 10 2.1 2.2 2.3 2.4 2.5 2.6 2.7 2.8 2.9 2.10 2.10.1 2.11 2.12 2.13 2.13.1 2.14 2.15 2.16 2.16.1 2.16.2 2.16.3 2.16.4 2.16.5 2.16.6 Obligations and liability .......................................................................................................... 10 Representation of safety symbols .......................................................................................... 12 Organisational measures ....................................................................................................... 13 Safety and protection equipment ........................................................................................... 13 Informal safety measures....................................................................................................... 13 User training ........................................................................................................................... 14 Safety measures in normal operation .................................................................................... 15 Danger from residual energy ................................................................................................. 15 Maintenance and repair work, fault elimination ..................................................................... 15 Design changes ..................................................................................................................... 15 Spare and wear parts and aids .............................................................................................. 16 Cleaning and disposal............................................................................................................ 16 User workstation .................................................................................................................... 16 Warning symbols and other signs on the machine ................................................................ 17 Positions of warning symbols and other labels ...................................................................... 18 Dangers if the safety information is not observed.................................................................. 26 Safety-conscious working ...................................................................................................... 26 Safety information for users ................................................................................................... 27 General safety and accident prevention information ............................................................. 27 Hydraulic system .................................................................................................................... 30 Electrical system .................................................................................................................... 31 Universal joint shaft operation................................................................................................ 31 Field sprayer operation .......................................................................................................... 33 Cleaning, maintenance and repairs ....................................................................................... 34 3 Loading and unloading ............................................................................. 35 4 Product description ................................................................................... 35 4.1 4.2 4.3 4.4 4.5 4.6 4.7 4.8 4.9 4.10 4.11 4.12 4.12.1 4.12.2 4.12.3 4.13 4.14 Overview of the assemblies ................................................................................................... 36 Safety and protection equipment ........................................................................................... 37 Liquid circuit UF .................................................................................................................... 38 Supply hoses between the tractor and the machine .............................................................. 39 Transportation equipment ...................................................................................................... 39 Intended use .......................................................................................................................... 40 Regular device inspections .................................................................................................... 41 Consequences of using certain crop protection agents ......................................................... 41 Danger areas and danger points ........................................................................................... 42 Rating plate and CE mark ...................................................................................................... 43 Conformity .............................................................................................................................. 43 Technical Data ....................................................................................................................... 44 Basic machine ........................................................................................................................ 44 Q-plus sprayer boom ......................................................................................................... 45 Super-S sprayer boom ..................................................................................................... 45 Required tractor equipment ................................................................................................... 46 Noise emissions data ............................................................................................................. 46 5 Construction and function of the basic machine .................................... 47 5.1 5.2 Function ................................................................................................................................. 47 Control terminal ...................................................................................................................... 48 UF BAG0012.6 03.15 5 Table of Contents 5.3 5.4 5.5 5.6 5.6.1 5.6.2 5.7 5.7.1 5.7.2 5.8 5.8.1 5.8.2 5.8.3 5.8.4 5.9 5.9.1 5.9.2 5.9.3 5.9.4 5.9.5 5.9.6 5.10 5.11 5.12 5.13 5.14 5.14.1 5.14.2 5.14.3 5.14.4 5.14.5 5.15 5.16 5.17 5.18 5.19 5.20 5.21 5.22 Switch tap on the control terminal ......................................................................................... 49 Parking supports ................................................................................................................... 51 Three-point attachment frame ............................................................................................... 52 PTO shaft .............................................................................................................................. 53 Coupling the PTO shaft ......................................................................................................... 55 Uncoupling the PTO shaft ..................................................................................................... 56 Hydraulic connections ........................................................................................................... 57 Coupling the hydraulic hose lines ......................................................................................... 58 Uncoupling the hydraulic hose lines...................................................................................... 59 Operating terminal or manual operation................................................................................ 60 AMATRON 3 ......................................................................................................................... 60 AMASPRAY+ ......................................................................................................................... 61 AMASET+ .............................................................................................................................. 61 HB manual operation............................................................................................................. 62 Spray liquid tank .................................................................................................................... 65 Hinged/screw lid for the filling opening.................................................................................. 65 Filling the spray liquid tank (optional) ................................................................................... 65 Fill level indicator ................................................................................................................... 66 Step ....................................................................................................................................... 66 Agitator .................................................................................................................................. 66 Suction port for filling the spray liquid tank (optional) ........................................................... 67 Flushing water tank ............................................................................................................... 68 Fresh water tank.................................................................................................................... 69 Induction bowl with injector and canister flushing ................................................................. 70 Pump equipment ................................................................................................................... 71 Filter equipment..................................................................................................................... 72 Filling sieve............................................................................................................................ 72 Bottom sieve in the induction bowl ........................................................................................ 72 Suction filter........................................................................................................................... 72 Self cleaning pressure filter ................................................................................................... 73 Nozzle filters .......................................................................................................................... 73 Quick coupling system (optional) .......................................................................................... 74 Removable transportation device (optional) ......................................................................... 75 Exterior wash down kit (optional) .......................................................................................... 76 Secure container for protective clothing (optional)................................................................ 76 Work lights............................................................................................................................. 77 FT 1001 front tank (optional) ............................................................................................. 78 Camera system (option) ........................................................................................................ 78 Comfort equipment (optional)................................................................................................ 79 6 Construction and function of the sprayer boom .................................... 80 6.1 6.1.1 6.1.2 6.1.3 6.1.4 6.2 6.2.1 6.2.2 6.3 6.4 6.5 6.6 6.7 6.8 6.8.1 Q-plus boom ..................................................................................................................... 85 Unlocking and locking the transport safety catch.................................................................. 86 Q-plus boom manually folded ........................................................................................... 87 Q-plus boom, folding via the tractor control unit ............................................................... 89 Working on one side using the right-hand boom .................................................................. 90 Super-S boom ................................................................................................................. 91 Unlocking and locking the transport safety catch.................................................................. 92 Super-S boom, folding via the tractor control unit ........................................................... 93 Reduction joint on the outer boom (optional) ........................................................................ 95 Boom width reduction (option) .............................................................................................. 96 Boom extension (option) ....................................................................................................... 97 Hydraulic tilt adjustment (optional) ........................................................................................ 97 Distance Control (optional) .................................................................................................... 98 Spray lines and nozzles ........................................................................................................ 99 Technical data ....................................................................................................................... 99 6 UF BAG0012.6 03.15 Table of Contents 6.8.2 6.8.3 6.8.4 6.8.5 6.8.6 6.9 6.9.1 6.9.2 6.9.3 6.10 6.11 6.12 Single nozzles ...................................................................................................................... 101 Multi nozzles (optional) ........................................................................................................ 101 Electric boundary nozzles (optional) .................................................................................... 103 Electric end nozzle switching (optional) ............................................................................... 103 Electric additional nozzle switching (optional) ..................................................................... 103 Special optional equipment for liquid fertiliser ..................................................................... 104 Three-ray nozzles ................................................................................................................ 104 7 hole nozzles / FD- nozzles (optional) ................................................................................ 105 Drag hose unit for liquid fertiliser (optional) ......................................................................... 106 Foam marker (optional)........................................................................................................ 107 DUS pressure circulating system (optional)......................................................................... 108 Line filter for spray lines (optional) ....................................................................................... 109 7 Commissioning ........................................................................................ 110 7.1 7.1.1 7.5.1 7.5.2 7.6 Checking the suitability of the tractor ................................................................................... 111 Calculating the actual values for the total tractor weight, tractor axle loads and tyre load capacities, as well as the minimum ballast .......................................................................... 111 Installing the PTO shaft........................................................................................................ 115 Adjusting the length of the PTO shaft to the tractor ............................................................. 116 Securing the tractor / machine against unintentional start-up and rolling ............................ 118 Installing sensor "X" (cardan shaft / wheel) for determining the distance travelled and operational speed ................................................................................................................ 119 Installation on a tractor without all-wheel drive .................................................................... 119 Installation on a tractor with all-wheel drive or an Mb-trac .................................................. 120 Adjusting the system setting screw on the hydraulic block .................................................. 121 8 Coupling and uncoupling the machine .................................................. 122 8.1 8.2 Coupling the machine .......................................................................................................... 122 Uncoupling the machine ...................................................................................................... 125 9 Adjustments ............................................................................................. 126 9.1 Positions of the control elements for the different operation modes.................................... 126 10 Transportation ......................................................................................... 127 11 Using the machine ................................................................................... 129 11.1 11.2 11.2.1 11.2.2 11.3 11.3.1 11.3.2 11.4 11.5 11.5.1 11.5.2 11.5.3 11.5.4 11.5.5 11.6 11.6.1 11.6.2 11.6.3 11.7 11.7.1 Preparing for spraying operation ......................................................................................... 131 Preparing the spray liquid .................................................................................................... 132 Calculating the filling and re-fill quantity .............................................................................. 136 Filling table for remaining spray area ................................................................................... 137 Filling with water .................................................................................................................. 139 Filling the spray liquid tank via the filling opening ................................................................ 140 Filling the spray liquid tank via the suction port on the control terminal .............................. 140 Filling the fresh water tank ................................................................................................... 142 Inducting agents ................................................................................................................... 142 Inducting liquid agents ......................................................................................................... 143 Ecofill.................................................................................................................................... 144 Inducting agents in powder form and urea .......................................................................... 145 Preliminary cleaning of the canister using spray liquid ........................................................ 146 Cleaning the canister with flushing water ............................................................................ 147 Spraying operation ............................................................................................................... 148 Applying the spray liquid ...................................................................................................... 150 Drift reduction measures ...................................................................................................... 152 Dilute the spray liquid with flushing water ............................................................................ 152 Residues .............................................................................................................................. 153 Diluting the residue in the spray liquid tank and spraying the diluted residue at the end of spraying operation ........................................................................................................... 154 Draining the spray liquid tank using the pump ..................................................................... 156 7.2 7.3 7.4 7.5 11.7.2 UF BAG0012.6 03.15 7 Table of Contents 11.8 11.8.1 11.8.2 11.8.3 11.8.4 11.8.5 11.8.6 11.8.7 11.8.8 11.8.9 Cleaning the field sprayer ................................................................................................... 157 Cleaning the sprayer with the tank empty ........................................................................... 158 Draining the final residues ................................................................................................... 159 Cleaning the suction filter .................................................................................................... 160 Cleaning the suction filter when tank is full ......................................................................... 160 Cleaning the pressure filter when the tank is empty ........................................................... 161 Cleaning the pressure filter when the tank is full ................................................................ 161 External cleaning ................................................................................................................. 162 Cleaning the sprayer during a critical agent change ........................................................... 163 Cleaning the sprayer with a full tank (work interruption) ..................................................... 164 12 Faults........................................................................................................ 165 13 Cleaning, maintenance and repairs ....................................................... 166 13.1 13.2 13.3 13.4 13.5 13.5.1 13.5.2 13.5.3 13.5.4 13.5.5 13.5.6 13.5.7 13.6 13.6.1 13.6.2 13.7 13.8 13.8.1 13.8.2 13.8.3 13.8.4 13.9 13.9.1 13.10 13.11 13.11.1 13.11.2 13.12 13.13 13.14 13.15 13.16 13.17 Cleaning .............................................................................................................................. 168 Winter storage and long periods out of operation ............................................................... 169 Lubrication instructions ....................................................................................................... 173 Maintenance schedule – overview ...................................................................................... 174 Hydraulic system ................................................................................................................. 176 Labelling of hydraulic hose lines ......................................................................................... 177 Maintenance intervals ......................................................................................................... 177 Inspection criteria for hydraulic hose lines .......................................................................... 177 Installing and removing hydraulic hose lines ...................................................................... 178 Fluid filter ............................................................................................................................. 179 Cleaning the solenoid valves .............................................................................................. 179 Clean / exchange the filter in the hydraulic plug ................................................................. 180 Adjusting the hydraulic throttle valve................................................................................... 181 Q-plus boom ................................................................................................................... 181 Super-S boom ............................................................................................................... 182 Settings on the folded-out sprayer boom ............................................................................ 184 Pump ................................................................................................................................... 185 Checking the oil level .......................................................................................................... 185 Changing the oil .................................................................................................................. 185 Checking and replacing the suction and pressure-side valves ........................................... 187 Checking and replacing piston diaphragms (workshop work)............................................. 188 Calibrating the field sprayer ................................................................................................ 190 Determining the actual spray rate by driving a calibration distance.................................... 191 Setting the volumetric remote control.................................................................................. 193 Nozzles ................................................................................................................................ 194 Fitting the nozzle ................................................................................................................. 194 Removing the diaphragm valve if the nozzle is dripping ..................................................... 194 Line filter .............................................................................................................................. 195 Instructions on testing the field sprayer............................................................................... 196 Electric lighting system ........................................................................................................ 197 Upper and lower link pins .................................................................................................... 197 Screw tightening torques ..................................................................................................... 198 Disposing of the field sprayer .............................................................................................. 199 14 Spray table ............................................................................................... 200 14.1 14.2 14.2.1 14.3 14.3.1 14.4 14.5 Spray tables for flat-fan, anti-drift, injector and airmix nozzles, spraying height 50 cm ..... 200 Spraying nozzles for liquid manure ..................................................................................... 204 Spray table for three-ray nozzles, spraying height 120 cm ................................................. 204 Spray table for 7-hole nozzles............................................................................................. 205 Spray table for FD- nozzles ................................................................................................. 207 Spray table for drag hose unit ................................................................................................. 208 Conversion table for spraying ammonium nitrate / urea solution (AUS) liquid fertiliser ...... 211 8 UF BAG0012.6 03.15 User Information 1 User Information The User Information section provides information on use of the operating manual. 1.1 Purpose of the document This operating manual 1.2 • describes the operation and maintenance of the machine. • provides important information on safe and efficient handling of the machine. • is a component part of the machine and should always be kept with the machine or the towing vehicle. • Keep it in a safe place for future use. Locations in the operating manual All the directions specified in the operating manual are always seen in the direction of travel. 1.3 Diagrams Instructions and responses Activities to be carried out by the user are given as numbered instructions. Always keep to the order of the instructions. The response to an instruction is given by an arrow. Example: 1. Instruction 1 → Machine response to instruction 1 2. Instruction 2 Lists Lists without an essential order are shown as a list with bullets. Example: • Point 1 • Point 2 Item numbers in diagrams Numbers in round brackets refer to the item numbers in the diagrams. The first number refers to the diagram and the second number to the item. Example: (Fig. 3/6) UF BAG0012.6 03.15 • Figure 3 • Item 6 9 General safety instructions 2 General safety instructions This section contains important information on safe operation of the machine. 2.1 Obligations and liability Comply with the instructions in the operating manual Knowledge of the basic safety information and safety regulations is a basic requirement for safe handling and fault-free machine operation. Obligations of the operator The operator is obliged only to let those people work with/on the machine who • are aware of the basic workplace safety information and accident prevention regulations. • have been instructed in working with/on the machine. • have read and understood this operating manual. The operator is obliged • to keep all the warning symbols on the machine in a legible state. • to replace damaged warning symbols. • If you still have queries, please contact the manufacturer. Obligations of the user Before starting work, anyone charged with working with/on the machine is obliged • to comply with the basic workplace safety instructions and accident prevention regulations. • to read and follow the "General safety information" section of this operating manual. • to read the section "Warning symbols and other labels on the machine" (page 17) of this operating manual and to follow the safety instructions represented by the warning symbols when operating the machine. • to get to know the machine. • to read the sections of this operating manual that are important for carrying out their work. If the user discovers that a function is not working properly, then they must eliminate this fault immediately. If this is not the task of the user or if the user does not possess the appropriate technical knowledge, then they should report this fault to their superior (operator). 10 UF BAG0012.6 03.15 General safety instructions Risks in handling the machine The machine has been constructed to the state-of-the art and the recognised rules of safety. However, operating the machine may cause risks and restrictions to • the health and safety of the user or third parties, • the machine, • other property. Only use the machine • for the purpose for which it was intended. • in a perfect state of repair. Eliminate any faults immediately which could impair safety. Guarantee and liability Our "General conditions of sales and delivery" are always applicable. These shall be available to the operator, at the latest on conclusion of the contract. Guarantee and liability claims for damage to people or property will be excluded if they can be traced back to one or more of the following causes: UF BAG0012.6 03.15 • Improper use of the machine. • Improper installation, commissioning, operation and maintenance of the machine. • Operation of the machine with defective safety equipment or improperly attached or non-functioning safety equipment. • Non-compliance with the instructions in the operating manual regarding commissioning, operation and maintenance. • Unauthorised design changes to the machine. • Insufficient monitoring of machine parts which are subject to wear. • Improperly executed repairs. • Disasters through the impact of foreign bodies and Acts of God. 11 General safety instructions 2.2 Representation of safety symbols Safety instructions are indicated by the triangular safety symbol and the highlighted signal word. The signal word (DANGER, WARNING, CAUTION) describes the gravity of the risk and has the following significance: DANGER Indicates an immediate high risk which will result in death or serious physical injury (loss of body parts or long term damage) if not avoided. If the instructions are not followed, then this will result in immediate death or serious physical injury. WARNING Indicates a medium risk, which could result in death or (serious) physical injury if not avoided. If the instructions are not followed, then this may result in death or serious physical injury. CAUTION Indicates a low risk which could cause minor or medium level physical injury or damage to property if not avoided. IMPORTANT Indicates an obligation to special behaviour or an activity required for proper machine handling. Non-compliance with these instructions can cause faults on the machine or disturbance to the environment. NOTE Indicates handling tips and particularly useful information. These instructions will help you to use all the functions of your machine in the best way possible. 12 UF BAG0012.6 03.15 General safety instructions 2.3 Organisational measures The operator must provide the necessary personal protective equipment as per the information provided by the manufacturer of the crop protection agent to be used, such as: • Chemical-resistant gloves, • Chemical-resistant overalls, • Water-resistant footwear, • A face mask, • Breathing protection, • Safety glasses; • Skin protection agents, etc. The operating manual • must always be kept at the place at which the machine is operated. • must always be easily accessible for the user and maintenance personnel. Check all safety equipment regularly. 2.4 Safety and protection equipment Before starting up the machine each time, all the safety and protection equipment must be properly attached and fully functional. Check all safety and protection equipment regularly. Faulty safety equipment Faulty or disassembled safety and protection equipment can lead to dangerous situations. 2.5 Informal safety measures As well as all the safety information in this operating manual, comply with the general, national regulations pertaining to accident prevention and environmental protection. When driving on public roads and routes you should comply with the statutory road traffic regulations. UF BAG0012.6 03.15 13 General safety instructions 2.6 User training Only those people who have been trained and instructed may work with/on the machine. The operator must clearly specify the responsibilities of the people charged with operation and maintenance work. People being trained may only work with/on the machine under the supervision of an experienced person. Person Activity Person special- Trained operaly trained for the tor2) 1) activity Person with specialist training (specialist workshop*)3) Loading/Transport X X X Commissioning -- X -- Set-up, tool installation -- -- X Operation -- X -- Maintenance -- -- X Troubleshooting and fault elimination X -- X Disposal X -- -- Legend: X..permitted --..not permitted 1) A person who can assume a specific task and who can carry out this task for an appropriately qualified company. 2) Instructed persons are those who have been instructed in their assigned tasks and in the possible risks in the case of improper behaviour, have been trained if necessary, and have been informed about the necessary protective equipment and measures. 3) People with specialist technical training shall be considered as a specialist. Due to their specialist training and their knowledge of the appropriate regulations, they can evaluate the work with which they have been charged and detect possible dangers. Comment: A qualification equivalent to specialist training can be obtained from several years' experience in the relevant field. If maintenance and repair work on the machine is additionally marked "Workshop work", only a specialist workshop may carry out such work. The personnel of a specialist workshop shall possess the appropriate knowledge and suitable aids (tools, lifting and support equipment) for carrying out the maintenance and repair work on the machine in a way which is both appropriate and safe. 14 UF BAG0012.6 03.15 General safety instructions 2.7 Safety measures in normal operation Only operate the machine if all the safety and protection equipment is fully functional. Check the machine at least once a day for visible damage and check the function of the safety and protection equipment. 2.8 Danger from residual energy Note that there may be residual mechanical, hydraulic, pneumatic and electrical/electronic energy on the machine. Use appropriate measures to inform the operating personnel. You can find detailed information in the relevant sections of this operating manual. 2.9 Maintenance and repair work, fault elimination Carry out prescribed setting, maintenance and inspection work in good time. Secure all media such as compressed air and the hydraulic system against unintentional start-up. Carefully fix and secure larger assemblies to lifting gear when carrying out replacement work. Check all the screw connections for firm seating. On completion of the maintenance work, check the function of the safety devices. 2.10 Design changes You may make no changes, expansions or modifications to the machine without the authorisation of AMAZONEN-WERKE. This also applies when welding support parts. Any expansion or modification work shall require the written approval of AMAZONEN-WERKE. Only use modification and accessory parts approved by AMAZONEN-WERKE so that the type approval, for example, remains valid in accordance with national and international regulations. Vehicles with an official type approval or with equipment connected to a vehicle with a valid type approval or approval for road transport according to the German road traffic regulations must be in the state specified by the approval. WARNING Risk of crushing, cutting, catching, being drawn in or impact from the failure of support parts. It is strictly forbidden to UF BAG0012.6 03.15 • drill holes in the frame or on the running gear. • increase the size of existing holes on the frame or the running gear. • weld support parts. 15 General safety instructions 2.10.1 Spare and wear parts and aids Immediately replace any machine parts which are not in a perfect state. Only use genuine AMAZONE spare and wear parts or those approved by AMAZONEN-WERKE so that the type approval remains valid according to the national and international regulations. The use of spare and wear parts from third parties does not guarantee that they have been constructed in a way as to meet the requirements placed on them. AMAZONEN-WERKE shall accept no liability for damage caused by the use of non-approved spare and wear parts or aids. 2.11 Cleaning and disposal Handle and dispose of any materials used carefully, in particular 2.12 • when carrying out work on lubrication systems and equipment and • when cleaning using solvents. User workstation The machine may only be operated by one person sitting in the driver's seat of the tractor. 16 UF BAG0012.6 03.15 General safety instructions 2.13 Warning symbols and other signs on the machine Always keep all the warning symbols on the machine clean and in a legible state. Replace illegible warning symbols. You can obtain the warning symbols from your dealer using the order number (e.g. MD 075). Warning symbols - structure Warning symbols indicate danger areas on the machine and warn against residual dangers. At these points, there are permanent or unexpected dangers. A warning symbol consists of two fields: Field 1 is a symbol describing the danger, surrounded by triangular safety symbol. Field 2 is a symbol showing how to avoid the danger. Warning symbols - explanation The column Order number and explanation provides an explanation of the neighbouring warning symbol. The description of the warning symbols is always the same and specifies, in the following order: 1. A description of the danger. For example: risk of cutting 2. The consequence of non-compliance with the risk avoidance instructions. For example: causes serious injuries to fingers or hands. 3. Risk avoidance instructions. For example: only touch machine parts when they have come to a complete standstill. UF BAG0012.6 03.15 17 General safety instructions 2.13.1 Positions of warning symbols and other labels Warning symbols The following diagrams show the arrangement of the warning symbols on the machine. Fig. 1 Fig. 2 18 Fig. 3 UF BAG0012.6 03.15 General safety instructions Super-S boom Fig. 4 Q-Plus boom Fig. 5 UF BAG0012.6 03.15 19 General safety instructions Order number and explanation Warning symbols MD 078 Risk of crushing fingers or hands due to accessible moving parts in the machine. This danger can cause extremely serious injuries and the loss of body parts. Never reach into the danger area when the tractor engine is running with PTO shaft / hydraulic / electronics system connected. MD 082 Risk of falling due to personnel riding on treads or platforms. This danger can cause extremely serious and potentially fatal injuries. It is forbidden to ride on the machine or climb the machine when it is running. This also applies to machines with treads or platforms. Make sure that nobody is riding on the machine. MD 084 Risk of crushing the entire body due to standing in the swivel range when machine parts are being lowered. This danger can cause extremely serious and potentially fatal injuries. • It is forbidden to stand in the swivel range of the machine when machine parts are being lowered. • Instruct personnel to leave the swivel range of any machine parts which can be lowered before you lower the parts. 20 UF BAG0012.6 03.15 General safety instructions MD 086 Risk of crushing the entire body due to necessary periods spent under raised, unsecured machine parts. This danger can cause extremely serious and potentially fatal injuries. Before spending time in the danger area underneath raised machine parts, secure the raised parts to prevent them being accidentally lowered. To do this, use the mechanical support device or the hydraulic locking device. MD 094 Danger from electric shock or burns due to unintentional contact with electric transmission lines or from approaching high-voltage transmission lines without authorisation. These dangers can cause extremely serious and potentially fatal injuries. Maintain an adequate safety distance from transmission lines carrying high voltage. Nominal voltage up to 1 kV over 1 up to 110 kV over 110 up to 220 kV over 220 up to 380 kV Safety distance from transmission lines 1m 2m 3m 4m MD 095 Read and follow the operating manual and safety information before starting up the machine! UF BAG0012.6 03.15 21 General safety instructions MD 096 Danger from escaping high-pressure hydraulic fluid due to leaking hydraulic hose lines. This danger may cause serious injuries, perhaps even resulting in death, if escaping high-pressure hydraulic fluid passes through the skin and into the body. • Never attempt to plug leaks in hydraulic hose lines using your hand or fingers. • Read and observe the information in the operating manual before carrying out maintenance work on the hydraulic hose lines. • If you are injured by hydraulic fluid, contact a doctor immediately. MD 097 Risk of crushing the entire body due to standing in the stroke area of the three-point suspension when the three-point hydraulics are actuated. This danger can cause extremely serious and potentially fatal injuries. • Personnel are prohibited from entering the stroke area of the three-point suspension when the three-point hydraulics are actuated. • Only actuate the operator controls for the tractor's three-point hydraulic system ο from the intended workstation. ο if you are outside of the stroke area between the tractor and the machine. MD 100 This symbol indicates anchorage points for fastening slinging gear when loading the machine. 22 UF BAG0012.6 03.15 General safety instructions MD 102 Danger from intervention in the machine, e.g. installation, adjusting, troubleshooting, cleaning, maintaining and repairing, due to the tractor and the machine being started unintentionally and rolling. These dangers can cause extremely serious and potentially fatal injuries. • Secure the tractor and the machine against unintentional start-up and rolling before any intervention in the machine. • Depending on the type of intervention, read and observe the information in the relevant sections of the operating manual. MD 104 Risk of crushing the entire body or impacts due to standing in the swivel range of laterally moving machine parts. These dangers can cause extremely serious and potentially fatal injuries. • Maintain an adequate safety distance from moving machine parts while the tractor engine is running. • Ensure that all personnel maintain an adequate safety distance from moving machine parts. MD 118 This symbol identifies the maximum drive speed (max. 540 rpm) and direction of rotation of the machine drive shaft. MD 153 This symbol indicates a hydraulic fluid filter. UF BAG0012.6 03.15 23 General safety instructions MD 159 Only fill the fresh water tank with clear fresh water, and never with crop protection agents. MD162 Maximum support load 800 kg. MD 173 Risk of breathing in hazardous materials via poisonous vapours from the spray liquid tank. This danger can cause extremely serious and potentially fatal injuries. Never climb into the spray liquid tank. MD176 Danger from insufficient stability of the unhitched field sprayer attachment due to improper uncoupling. These dangers can cause extremely serious and potentially fatal injuries. Before uncoupling the field sprayer attachment, always pull the parking supports out of their transport position into the parking position. MD192 Danger from liquid escaping under high pressure caused by working on lines and connections that are under pressure! This danger can cause extremely serious injuries to any part of the body. Working on this component is not permitted. 24 UF BAG0012.6 03.15 General safety instructions MD 199 The maximum operating pressure of the hydraulic system is 210 bars. MD 224 Risk of contact with hazardous materials due to improper use of clear fresh water from the hand wash tank. This danger can cause extremely serious and potentially fatal injuries. Never use the clear fresh water from the hand wash tank as drinking water. MD 226 Risk of crushing the entire body due to standing under suspended loads or raised machine parts. This danger can cause extremely serious and potentially fatal injuries. • It is forbidden to stand under suspended loads or raised machine parts. • Maintain an adequate safety distance from any suspended loads or raised machine parts. • Ensure that all personnel maintain an adequate safety distance from suspended loads or raised machine parts. ME 525 Keep the boom carrier in an upright position. This helps maintain optimum boom ride, particularly when using Distance Control (optional). UF BAG0012.6 03.15 25 General safety instructions ME 985 The system pressure is 10 bar. 2.14 Dangers if the safety information is not observed Non-compliance with the safety information • can pose both a danger to people and also to the environment and machine. • can lead to the loss of all warranty claims. In particular, non-compliance with the safety information could pose the following risks: 2.15 • Danger to people through non-secured working areas. • Failure of important machine functions. • Failure of prescribed methods of maintenance and repair. • Danger to people through mechanical and chemical influences. • Risk to the environment through leakage of hydraulic fluid. Safety-conscious working Besides the safety information in this operating manual, the generally applicable national workplace safety and accident prevention regulations are binding. Comply with the accident prevention instructions on the warning symbols. When driving on public roads and routes, comply with the appropriate statutory road traffic regulations. 26 UF BAG0012.6 03.15 General safety instructions 2.16 Safety information for users WARNING Risk of crushing, cutting, catching, being drawn in or impacts from inadequate roadworthiness and operational safety. Before starting up the machine and the tractor, always check their roadworthiness and operational safety. 2.16.1 General safety and accident prevention information • Beside these instructions, comply with the generally applicable national safety and accident prevention regulations. • The warning symbols and other labels attached to the machine provide important information on safe machine operation. Compliance with this information is in the interests of your safety. • Before moving off and starting up the machine, check the immediate area of the machine (children). Ensure that you can see clearly. • It is forbidden to ride on the machine or use it as a means of transport. • Drive in such a way that you always have full control over the tractor with the attached machine. In so doing, take your personal abilities into account, as well as the road, traffic, visibility and weather conditions, the driving characteristics of the tractor and the connected machine. Coupling and uncoupling the machine UF BAG0012.6 03.15 • Only connect and transport the machine with tractors suitable for the task. • When coupling machines to the tractor's three-point linkage, the linkages of the tractor and the machine must always be the same. • Connect the machine to the prescribed equipment in accordance with the specifications. • When coupling machines to the front or the rear of the tractor, the following may not be exceeded: ο The approved total tractor weight ο The approved tractor axle loads ο The approved load capacities of the tractor tyres • Secure the tractor and the machine against rolling unintentionally before coupling or uncoupling the machine. • It is forbidden for people to stand between the machine to be coupled and the tractor whilst the tractor is moving towards the machine. Any helpers may only act as guides standing next to the vehicles, and may only move between the vehicles when both are at a standstill. • Before connecting the machine to or disconnecting the machine from the tractor's three-point linkage, secure the operating lever of the tractor hydraulic system so that unintentional raising or lowering is prevented. 27 General safety instructions • When coupling and uncoupling machines, move the support equipment (if available) to the appropriate position (stability). • When actuating the support equipment, there is a risk of injury from crushing and cutting points. • Be particularly careful when coupling the machine to the tractor or uncoupling it from the tractor. There are crushing and cutting points in the area of the coupling point between the tractor and the machine. • It is forbidden to stand between the tractor and the machine when actuating the three-point linkage. • Coupled supply lines must give slightly to all movements while cornering without tensioning, kinking or rubbing. ο must not chafe against other parts. The release ropes for quick couplings must hang loosely and must not release themselves when lowered. ο • • Also ensure that uncoupled machines are stable. • Before starting work, ensure that you understand all the equipment and actuation elements of the machine and their function. There is no time for this when the machine is already in operation. • Do not wear loose-fitting clothing. Loose clothing increases the risk of being caught by the drive shaft. • Only start-up the machine, when all the safety equipment has been attached and is in the safety position. • Comply with the maximum load for the connected machine and the permissible axle and drawbar loads for the tractor. If necessary, drive only with a partially filled tank. • It is forbidden to stand in the working area of the machine. • It is forbidden to stand in the turning and swivel range of the machine. • There are crushing and cutting points at externally-actuated (e.g. hydraulic) machine points. • Only actuate externally-actuated machine parts when you are sure that no-one is standing within the prescribed safety distance. • Before leaving the tractor, Use of the machine ο ο ο 28 lower the machine onto the ground switch off the tractor engine remove the ignition key UF BAG0012.6 03.15 General safety instructions Machine transportation UF BAG0012.6 03.15 • Comply with the national road traffic regulations when using public highways. • Before moving off, check: ο the correct connection of the supply lines ο the lighting system for damage, function and cleanliness ο the brake and hydraulic system for visible damage ο that the parking brake is completely disengaged ο the function of the brake system • Ensure that the tractor has sufficient steering and braking power. Any machines and front/rear weights connected to the tractor influence the driving behaviour and the steering and braking power of the tractor. • If necessary, use front weights. The front tractor axle must always be loaded with at least 20% of the tractor empty weight, in order to ensure sufficient steering power. • Always fix the front or rear weights to the intended fixing points according to regulations. • Comply with the maximum load for the connected machine and the approved axle and drawbar loads for the tractor. • The tractor must guarantee the prescribed brake delay for the loaded vehicle combination (tractor plus connected machine). • Check the brake power before moving off. • When turning corners with the machine connected, take the broad load and balance weight of the machine into account. • If the machine is fixed to the tractor's three-point linkage or lower links, before moving off, ensure sufficient side locking of the tractor lower links. • Before moving off, move all the swivellable machine parts to the transport position. • Before moving off, secure all swivellable machine parts in the transport position against dangerous position changes. Use the transport safety catches intended for this. • Before moving off, secure the operating lever of the three-point hydraulic system against the unintentional raising or lowering of the connected machine. • Check that the transport equipment, e.g. lighting, warning equipment and protective equipment, is correctly mounted on the machine. • Carry out a visual check that the upper and lower link pins are firmly fixed with the linchpin against unintentional release. • Adjust your driving speed to the prevailing conditions. • Before driving downhill, switch to a low gear. • Before moving off, always switch off independent wheel braking (lock the pedals). 29 General safety instructions 2.16.2 Hydraulic system • The hydraulic system is under a high pressure. • Ensure that the hydraulic hose lines are connected correctly. • When connecting the hydraulic hose lines, ensure that the hydraulic system is depressurised on both the machine and tractor sides. • It is forbidden to lock the operator controls on the tractor used for hydraulic and electrical movements of components, e.g. folding, swivelling and pushing movements. The movement must stop automatically when you release the appropriate control. This does not apply to equipment movements that • 30 ο are continuous ο are automatically controlled ο require a floating position or pressed position to function Before working on the hydraulic system, ο lower the machine ο depressurise the hydraulic system ο shut off the tractor engine ο apply the parking brake ο remove the ignition key • Have the hydraulic hose lines checked at least once a year by an expert to ensure they are in safe working order. Replace the hydraulic hose lines if they are damaged or worn. Only use genuine AMAZONE hydraulic hose lines. • The hydraulic hose lines should not be used for longer than six years, including any storage time of maximum two years. Even with proper storage and approved use, hoses and hose connections are subject to natural ageing, thus limiting storage time and the length of use. However, it may be possible to specify the length of use from experience values, in particular when taking the risk potential into account. In the case of hoses and hose connections made from thermoplastics, other guide values may be decisive. • Never attempt to plug leaks in hydraulic hose lines using your hand or fingers. Escaping high pressure fluid (hydraulic fluid) may pass through the skin and ingress into the body, causing serious injuries. If you are injured by hydraulic fluid, contact a doctor immediately. Risk of infection • When searching for leaks, use suitable aids to avoid the serious risk of infection. UF BAG0012.6 03.15 General safety instructions 2.16.3 2.16.4 Electrical system • When working on the electrical system, always disconnect the battery (negative terminal). • Only use the prescribed fuses. If fuses are used that are too highly rated, the electrical system will be destroyed – risk of fire. • Ensure that the battery is connected correctly - firstly connect the positive terminal and then connect the negative terminal. When disconnecting the battery, disconnect the negative terminal first, followed by the positive terminal. • Always place the appropriate cover over the positive battery terminal. If there is accidental earth contact, there is a risk of explosion. • Risk of explosion. Avoid sparking and naked flames in the area of the battery. • The machine may be equipped with electronic components whose function is influenced by electromagnetic interference from other units. Such interference can pose risks to people, if the following safety information is not followed. ο If retrofitting electrical units and/or components on the machine with a connection to the on-board power supply, the user is responsible for checking whether the installation might cause faults on the vehicle electronics or other components. ο Ensure that the retrofitted electrical and electronic components comply with the EMC directive 2004/108/EC in the appropriate version and bear the CE mark. Universal joint shaft operation • Use only the PTO shafts prescribed by the AMAZONEN-WERKE factories, equipped with the proper safety devices. • Also read and follow the operating manual from the PTO shaft manufacturer. • The protective tube and PTO shaft guard must be undamaged, and the shield of the tractor and machine universal joint shaft must be attached and be in proper working condition. • Work is prohibited while the safety devices are damaged. • You may install or remove the PTO shaft only after you have done all of the following: • UF BAG0012.6 03.15 ο Switched off the universal joint shaft ο Switched off the tractor engine ο Applied the parking brake ο Removed the ignition key Always ensure that the PTO shaft is installed and secured correctly. • When using wide-angle PTO shafts, always install the wide angle joint at the pivot point between the tractor and machine. • Secure the PTO shaft guard by attaching the chain(s) to prevent movement. • Observe the prescribed pipe overlaps in transport and operational positions. (Read and follow the operating manual from the PTO shaft manufacturer.) 31 General safety instructions 32 • When turning corners, observe the permitted bending and displacement of the PTO shaft. • Before switching on the universal joint shaft, check that the selected universal joint shaft speed of the tractor matches the permitted drive speed of the machine. • Instruct people to leave the danger area of the machine before you switch on the universal joint shaft. • While work is being carried out with the universal joint shaft, there must be no one in the area of the universal joint or PTO shaft while it is turning. • Never switch on the universal joint shaft while the tractor engine is shut off. • Always switch off the universal joint shaft whenever excessive bending occurs or it is not needed. • WARNING! After the universal joint shaft is switched off, there is a danger of injury from the continued rotation of freewheeling machine parts. Do not approach the machine too closely during this time. You may work on the machine only after all machine parts have come to a complete stop. • Secure the tractor and machine against unintentional starting and unintentional rolling before you perform any cleaning, servicing or maintenance work on universal joint shaft-driven machines or PTO shafts. • After decoupling the PTO shaft, place it on the holder provided. • After removing the PTO shaft, attach the protective sleeve to the universal joint shaft stub. • When using the travel-dependent universal joint shaft, note that the universal joint shaft speed depends on the drive speed, and that the direction of rotation reverses when you drive in reverse. UF BAG0012.6 03.15 General safety instructions 2.16.5 Field sprayer operation • UF BAG0012.6 03.15 Observe the recommendations of the crop protection agent manufacturer in respect of ο protective clothing ο warning information on exposure to crop protection agents ο regulations on dosing, applications and cleaning • Observe the information in the German Plant Protection Law. • Never open lines which are under pressure. • Only use genuine AMAZONE replacement hoses which stand up to chemical, mechanical and thermal requirements. Only use hose clamps made from V2A for installation. • The nominal volume of the spray liquid tank must not be exceeded during filling. • When there will be exposure to crop protection agent, wear the proper protective clothing, i.e. gloves, overalls, safety glasses, etc. • When using tractors with a cab with ventilation fans, replace the fresh air filters with activated carbon filters. • Observe the information on the compatibility of crop protection agents and substances for the field sprayer. • Do not spray any crop protection agents which have a tendency to stick together or set. • Do not fill field sprayers with water from bodies of water which are open to the public, for the protection of people, animals and the environment. • Only fill field sprayers ο using a free flow from the mains water supply. ο using genuine AMAZONE filling equipment. 33 General safety instructions 2.16.6 Cleaning, maintenance and repairs • Due to toxic vapours in the spray liquid tank, climbing into the spray liquid tank is always forbidden. • Repair work in the spray liquid tank must only be carried out by a specialist workshop! • Only carry out cleaning, maintenance and repair work on the machine when ο the drive is switched off ο the tractor engine has come to a complete stop ο the ignition key has been removed ο the machine connector has been removed from the onboard computer • Regularly check the nuts and bolts for firm seating and retighten them as necessary. • Secure the raised machine and/or raised machine parts against unintentional lowering before performing any cleaning, maintenance or repair work on the machine. • When replacing work tools with blades, use suitable tools and gloves. • Dispose of oils, greases and filters in the appropriate way. • Disconnect the cable to the tractor generator and battery before carrying out electrical welding work on the tractor and on attached machines. • Spare parts must meet at least the specified technical requirements of AMAZONEN-WERKE. This is ensured through the use of genuine AMAZONE spare parts. • When repairing field sprayers which have been used for liquid fertiliser application with ammonium nitrate / urea solution, observe the following points: Residues of ammonium nitrate / urea solutions may form salts by the evaporation of the water on or in the spray liquid tank. This produces pure ammonium nitrate and urea. In its undiluted form, ammonium nitrate is explosive when combined with organic substances, e.g. urea, and subjected to critical temperatures during repair work (e.g. welding, grinding, filing). This danger can be eliminated by thoroughly washing out the spray liquid tank or the parts intended for repair with water, because the salt of the ammonium nitrate / urea solution is watersoluble. For this reason, clean the field sprayer thoroughly with water before carrying out repair work. 34 UF BAG0012.6 03.15 Loading and unloading 3 Loading and unloading Loading using a lifting crane The machine has two attachment points (Fig. 6/1). Danger When loading the machine using a lifting crane, use the marked attachment points (Fig. 6/1) for lifting belts. Danger The minimum tensile strength of each lifting belt must be 1,000 kg! Fig. 6 4 Product description This section: • provides a comprehensive overview of the machine structure. • provides the names of the individual modules and controls. If possible, read this section when actually at the machine. This helps you to understand the machine better. The field sprayer is composed of the following main components: UF BAG0012.6 03.15 • Basic machine • Pressure gauge • Pump equipment for the 540 rpm drive • Sprayer boom • Spray lines with part width section valves 35 Product description 4.1 Overview of the assemblies Fig. 7 Fig. 7/... (1) Spray liquid tank (7) Upper link connection with inserting pin (2) Spray liquid tank filling port with hinged lid and filling sieve (8) Lower link connection (cat. II) (3) Control terminal (10) Swivel-out induction bowl (optional) (4) Fresh water tank (11) Pull-out step (5) Fill level indicator (12) Swivel-out parking supports (6) Flushing water tank (13) Parking device castors with braking device (9) Piston diaphragm pump (14) Fluid filter (Profi-folding) (15) Flushing water tank filling level indicator 36 UF BAG0012.6 03.15 Product description 4.2 • Safety and protection equipment Left and right-hand parking supports (Fig. 8) to prevent the machine from falling over when parked Fig. 8 • Transport locking mechanism (Fig. 9/1) to prevent the Q-plus boom from folding out unintentionally Fig. 9 • Transport locking mechanism (Fig. 10) to prevent the Super-S boom from folding out unintentionally Fig. 10 • Fig. 11/… (1) Visual check of the Super-S boom lock Fig. 11 • Fig. 12/… (1) PTO shaft guard (2) Machine PTO shaft guard Fig. 12 UF BAG0012.6 03.15 37 Product description 4.3 Liquid circuit UF Fig. 13 A VARIO control, suction side 10. Piston diaphragm pump B VARIO control, pressure side 11. Induction bowl C Switch tap for the agitator / dump pressure filter 12. Ring line D Switch tap for fill / quick empty 13. Canister flushing E Switch tap for ring line induction bowl / canister 14. flushing 15. F Switch tap for suction / induction 16. 1. Spray liquid tank Spray pressure limiting valve Self cleaning pressure filter Injector for extracting liquid from the induction bowl 2. Flushing water tank 17. Spray lines 3. Internal tank cleaning 18. Return flow meter on the AMATRON 3 4. Agitator 19. Spray pressure sensor 5. Fresh water tank 20. Part width section valves 6. Drain tap for the fresh water tank 21. Flow meter on the AMATRON 3 / AMASPRAY+ 7. Filling connection for the suction hose 8. Spray pressure control 9. Suction filter 38 22. Machine computer on the AMATRON 3 23. AMATRON 3 alternatively AMASPRAY+ / AMASET+ UF BAG0012.6 03.15 Product description 4.4 Supply hoses between the tractor and the machine Supply hoses in parking position: Fig. 14/… (1) Hydraulic hose lines (depending on equipment provided) (2) Cable with connection for lighting (3) Computer cable with machine connector Fig. 14 4.5 Transportation equipment Fig. 15: Rear lighting (1) Rear lights, brake lights, turn indicators (required if the turn indicators on the tractor are obscured) (2) 2 warning signs (3) 1 registration plate holder with lighting (required if the registration plate on the tractor is obscured) (4) Rectangular emitter, yellow Fig. 16: Front lighting (only for Q-plus sprayer boom) Fig. 15 (1) 2 front side lights (2) 2 warning signs Fig. 16 Connect the lighting system via the connector to the 7-pin tractor socket. One additional warning sign on each side in France. UF BAG0012.6 03.15 39 Product description 4.6 Intended use The field sprayer • is intended for the transport and application of crop protection agents (insecticide, fungicide, herbicide, etc.) in suspension, emulsion or as a mixture, and of liquid fertilisers. • is designed exclusively for agricultural use for treating field crops. • is attached to the tractor's three-point hydraulic system and operated by one person. Sloping terrain can be traversed as follows: • Along the contours Direction of travel to left 20 % Direction of travel to right 20 % ● Along the gradient Up the slope 20 % Down the slope 20 % The intended use also includes: • Compliance with all the instructions in this operating manual. • Execution of inspection and maintenance work. • Exclusive use of genuine AMAZONE spare parts. Other uses to those specified above are forbidden and shall be considered as improper. For any damage resulting from improper use: 40 • the operator bears the sole responsibility, • the manufacturer will assume no liability whatsoever. UF BAG0012.6 03.15 Product description 4.7 Regular device inspections The implement underlies the European Union universally applicable regular device inspections (Crop Protection Directive 2009/128/EC). Have the device inspected at regular intervals by a recognised and certified inspection workshop. The date for performing the next device inspection is written on the inspection plate on the implement. Fig. 17 4.8 Consequences of using certain crop protection agents We would like to draw attention to the fact that extended exposure (20 hours) to crop protection agents with which we are familiar, e.g. Lasso, Betanal and Tramat, Stomp, Iloxan, Mudecan, Elancolan and Teridox, can cause damage to the pump diaphragms, hoses, spray lines and tanks. The examples given are in no way intended to represent a comprehensive list. In particular, we warn against unauthorised mixtures of two or more different crop protection agents. Substances which have a tendency to stick together or set must not be applied. When using such aggressive crop protection agents, it is recommended that the spray liquid be applied immediately after preparation and then that the sprayer be thoroughly cleaned with water. Desmopan diaphragms may be supplied as a replacement for the pump diaphragms. These are resistant to solvent-containing crop protection agents. However their service life is reduced by use at low temperatures (e.g. AUS in frosty conditions). The materials and components used in the construction of AMAZONE field sprayers are safe for liquid fertiliser. UF BAG0012.6 03.15 41 Product description 4.9 Danger areas and danger points The danger area is the area around the machine in which people can be caught by: • work movements made by the machine and its tools • materials or foreign bodies thrown out of the machine • tools rising or falling unintentionally • unintentional rolling of the tractor and the machine Within the machine danger area, there are danger points with permanent or unexpected risks. Warning symbols indicate these danger points and warn against residual dangers, which cannot be eliminated for practical reasons. In such cases, the special safety regulations in the appropriate section are valid. No-one may stand in the machine danger area: • if the tractor engine is running with the PTO shaft / hydraulic system connected. • if the tractor and machine are not protected against unintentional start-up and rolling. The operating person may only move the machine or switch or drive the tools from the transport position to the working position or viceversa when there is no-one in the machine danger area. Danger points exist: 42 • between the tractor and the field sprayer attachment, especially when coupling and uncoupling. • near moving parts. • when climbing onto the machine. • in the swivel range of the sprayer boom. • in the spray liquid tank due to poisonous vapours. • underneath raised, unsecured machines or machine parts. • when unfolding/folding the sprayer boom in the vicinity of overhead electricity cables, through contact with the cables. UF BAG0012.6 03.15 Product description 4.10 Rating plate and CE mark The following diagrams show the positions of the rating plate and the CE mark. The rating plate shows: • Machine ID no.: • Type • Basic weight (kg) • Permissible system pressure (bar) • Permissible total weight (kg) • Factory • Model year 4.11 Fig. 18 Conformity Directives/Standards designation The implement complies with the UF BAG0012.6 03.15 • Implement directive 2006/42/EC • EMC directive 2004/108/EC • EN ISO 16119 43 Product description 4.12 Technical Data The following tables show the technical data for the individual assemblies. Combining individual assemblies results in many model variants so, for example, to determine the total weight, add the respective weights of the individual assemblies. 4.12.1 Basic machine UF model 901 1,201 1,501 1,801 1050 1350 1720 1920 Nominal volume 900 1200 1500 1800 Basic machine weight 393 408 550 570 2400 2700 3200 3600 1120 1370 1400 1600 Spray liquid tank Actual volume [l] Permissible total weight Permissible system pressure [kg] [bar] Filling height from the step 10 [mm] Overall length* 800 1,000 Overall width 2,290 Three-point connection Cat. II II Working width ≥ 21 m: use upper link connection (Cat. III) Suction chest technical residue • On the flat • Along the contours** ο ο • 8 Direction of travel 20 % to left Direction of travel 20 % to right 10 [l] 11 Along the gradient** ο 20 % up the slope 9 ο 20 % down the slope 9 Central switching mechanism Electric, part width section valve coupling Spray pressure adjustment Spray pressure setting range Electric [bar] 0.8 – 10 Spray pressure display Digital spray pressure display Pressure filter 50 (80,100) mesh Agitator Infinitely adjustable Centre of gravity distance d [mm] 901 / 1201 1501 / 1801 Q-plus sprayer boom 0.55 0.65 Super-S sprayer boom 0.65 0.75 * Dimension from lower link connection ** Percentage figures relate to the slope in the given gradient 44 UF BAG0012.6 03.15 Product description 4.12.2 Q-plus sprayer boom Working width [m] Transport width 12 12,5 15 2560 2560 2998 Overall length Height when machine is parked 850 [mm] 2460 Nozzle height Weight * * 500 / 2100 [kg] 287 306 increases with special equipment attached • by 7 kg with electric tilt adjustment. • 4.12.3 by 24 kg with Profi-folding I. Super-S sprayer boom Working width [m] 15 16 18 Transport width Height when machine is parked 21 21/15 24 900 [mm] Nozzle height Weight * 20 27 28 2,400 Overall length * 320 1,000 2,900 (without parking device) 500 - 2,100 [kg] 500 508 516 500 - 2,200 630 638 633 656 713 715 increases with special equipment attached • by 7 kg with electric tilt adjustment. • by 26 kg with Profi-folding I. • by 36 kg with Profi-folding II. The basic weight is the sum of the weights of the basic machine and of the boom. Payload = permissible total weight - basic weight UF BAG0012.6 03.15 45 Product description 4.13 Required tractor equipment To be used with the machine, the tractor must fulfil the performance requirements and be equipped with the required electrical, hydraulic and brake connections for the brake system. Tractor engine power UF 901 from 60 kW (82 bhp) upwards UF 1201 from 65 kW (90 bhp) upwards UF 1501 from 90 kW (125 bhp) upwards UF 1801 from 95 kW (130 bhp) upwards Electrical system Battery voltage: • 12 V (volts) Lighting socket: • 7 pin Hydraulic system Maximum operating pressure: • 210 bar Tractor pump capacity: • At least 20 l/min at 150 bar for the hydraulic block (with Profifolding, optional) Implement hydraulic fluid: • HLP68 DIN 51524 The implement hydraulic fluid is suitable for the combined hydraulic fluid circuits of all standard tractor brands. Control units: • Depending on equipment, see page 57 Required speed: • 540 rpm Direction of rotation: • Clockwise, viewed from rear toward the tractor. ● The tractor's lower links must have lower link hooks. ● The tractor's upper links must have upper link hooks. Universal joint shaft Three-point attachment 4.14 Noise emissions data The workplace-related emissions value (acoustic pressure level) is 74 dB(A), measured during operation at the ear of the tractor driver with the cab closed. Measuring unit: OPTAC SLM 5. The noise level is primarily dependent on the vehicle used. 46 UF BAG0012.6 03.15 Construction and function of the basic machine 5 Construction and function of the basic machine The following section provides information on the machine structure and the functions of the individual components. 5.1 Function Fig. 19 The piston diaphragm pump (10) draws the spray liquid from the spray liquid tank (1) via the VARIO control, suction side (A), the suction line (24) and the suction filter (9). The spray liquid which is drawn up is conveyed via the pressure hose (14) to the VARIO control, pressure side (B). The liquid reaches the pressure gauge via the VARIO control, pressure side (B). The pressure gauge consists of the spray pressure control (8) and the self cleaning pressure filter (15). From the pressure gauge, the spray liquid is pumped via the flow meter (AMATRON 3/ AMASPRAY+ only) (21) to the part width section valves (20). The part width section valves (20) take on the task of distributing the liquid to the individual spray lines (17). The return flow meter (18) (AMATRON 3 only) determines the quantity of spray liquid to be conveyed back to the spray liquid tank (1) in the case of a low application rate. In its switched-on state, the agitator (4) ensures that the spray liquid in the spray liquid tank (1) remains homogenous. The stirring performance of the agitator can be set at the switch tap (C). The field sprayer is operated from the tractor via • • the AMATRON 3 operating terminal (23), AMASPRAY+ or AMASET+ the manually-operated valve. To prepare the spray liquid, fill the induction bowl (11) with the agent quantity required to fill the spray liquid tank, and draw it into the spray liquid tank (1). The fresh water from the flushing water tank (2) is used for cleaning the spraying system. UF BAG0012.6 03.15 47 Construction and function of the basic machine 5.2 Control terminal Fig. 20 (1) Filling connection for the suction hose (A) VARIO control, suction side (2) Suction filter (B) VARIO control, pressure side (3) Filling connection flushing water tank / spray liquid tank, (optional) (C) Switch tap for the agitator / dump pressure filter (4) Connection for quick emptying (optional) (D) Switch tap for fill / quick empty (5) Self cleaning pressure filter (E) Switch tap for ring line induction bowl / canister flushing (6) Drain tap for the fresh water tank (7) Filling opening for the fresh water tank (8) Filling connection on the induction bowl (9) Outlet suction filter / spray liquid tank 48 (F) Switch tap for suction / induction (G) Schalthahn Befüllen Spülwasser-Behälter (H) Schalthahn Befüllen Spritzbrühe-Behälter UF BAG0012.6 03.15 Construction and function of the basic machine 5.3 • Switch tap on the control terminal A - VARIO control, suction side Draw from an external source ο ο tank ο Dump the technical residue from the valve chest, suction hose, pump and suction filter ο Dump the technical residue from the spray liquid tank B – VARIO control, pressure side ο External cleaning with flushing water (H2O) ο Spraying operation ο Internal tank cleaning with flushing water (H2O) Filling ο → "D" – quick emptying (optional,D) • Fig. 21 Draw from the spray tank ο • Draw from the flushing water Fig. 22 C – Switch tap for the agitator / dump pressure filter Agitator ο ο ο 0 Zero setting Dump the technical residue from the valve chest and pressure filter Fig. 23 UF BAG0012.6 03.15 49 Construction and function of the basic machine • D – Switch tap for filling / quick emptying Filling ο ο 0 Zero setting Quick emptying ο Fig. 24 • E – Switch tap for ring line induction bowl / canister flushing Canister flushing ο ο 0 Zero setting Ring line ο Fig. 25 • F – Switch tap for suction / induction Draw from an external source ο ο ο 0 Zero setting Induct Fig. 26 All stop taps are 50 • open when lever position is in direction of flow • closed when lever position is transverse to direction of flow UF BAG0012.6 03.15 Construction and function of the basic machine 5.4 Parking supports Fig. 27: Machine parked on the parking device. Fig. 27 When raised and hitched to the tractor, swivel the parking supports on the machine • back (Fig. 28/1) into the park position. • forwards (Fig. 28/2) into the transport position. A tension spring holds the parking supports in the current end position. Fig. 28 UF BAG0012.6 03.15 51 Construction and function of the basic machine 5.5 Three-point attachment frame The frame of the UF field sprayer is designed so that it meets the requirements and dimensions of the three-point attachment of category II. Fig. 29/… (1) Lower coupling points with lower link pin (2) Upper coupling point with upper link pin (3) Clip pin for securing the upper link pin and lower link pin (4) Hook to hold the quick coupling system UF 1501 / 1801 are equipped with a double upper link pin, Cat. II / Cat. III (Fig. 30). WARNING Risk of crushing, catching, trapping and impact if the machine releases unexpectedly from the tractor. Fig. 29 If the working widths of the UF 1501 / 1801 are greater than 21 metres, always use a Cat. III upper link connection. Fig. 30 52 UF BAG0012.6 03.15 Construction and function of the basic machine 5.6 PTO shaft The PTO shaft transmits power between the tractor and machine. Fig. 31: • PTO shaft W100E (810 mm) Fig. 31 Fig. 32: • Telespace PTO shaft W100E (810 mm, telescoping) Fig. 32 WARNING Risk of crushing from the tractor and machine unintentionally starting up or rolling. Only couple or uncouple the PTO shaft and tractor when the tractor and machine have been secured against both unintentional starting and unintentional rolling. WARNING Risk of being caught and drawn in by the unguarded PTO shaft or due to damaged safety devices. • Never use the PTO shaft if the safety device is missing or damaged, or without correctly using the supporting chain. • Before each use, check that ο all PTO shaft protective devices are installed and fully functional. ο the clearance around the PTO shaft is sufficient in all operating positions. Insufficient clearance will result in damage to the PTO shaft. Attach the supporting chains in a way that ensures a sufficient swivel range of the PTO shaft in all operating positions. Supporting chains must not become caught on machine or tractor parts. • UF BAG0012.6 03.15 • Have any damaged or missing parts of the PTO shaft replaced immediately with genuine parts from the PTO shaft manufacturer. Note that only a specialist workshop may repair a PTO shaft. • With the machine uncoupled, place the PTO shaft in the holder provided. This protects the PTO shaft from damage and dirt. ο Never use the supporting chain of the PTO shaft to suspend the uncoupled PTO shaft. 53 Construction and function of the basic machine WARNING Risk of being caught and drawn in by unguarded PTO shaft parts in the power transmission area between the tractor and driven machine. Work only when the drive between the tractor and driven machine is fully guarded. • The unguarded parts of the PTO shaft must always be guarded by a shield on the tractor and a PTO shaft guard on the machine. • Check that the shield on the tractor or the PTO shaft guard on the machine and the safety devices and guards of the extended PTO shaft overlap by at least 50 mm. If they do not, you must not power the machine via the PTO shaft. • Use only the PTO shaft provided or one of the same type. • Read and follow the operating manual provided for the PTO shaft. Correct use and maintenance of the PTO shaft prevents serious accidents. • When coupling the PTO shaft ο ο ο ο 54 refer to the operating manual provided for the PTO shaft. observe the permissible drive speed of the machine. observe the correct installation length of the PTO shaft. Refer to the section "Adjusting the length of the PTO shaft to the tractor", page 122. observe the correct installation position of the PTO shaft. The tractor symbol on the protective tube of the PTO shaft identifies the tractor-side connection of the PTO shaft. • Always mount the overload or freewheel clutch on the machine if the PTO shaft has an overload or freewheel clutch. • Before switching on the universal joint shaft, read and follow the safety precautions for universal joint shaft operation in the section "Safety information for the user", page 31. UF BAG0012.6 03.15 Construction and function of the basic machine 5.6.1 Coupling the PTO shaft WARNING Risk of crushing or impact if there is insufficient clearance when coupling the PTO shaft. Couple the PTO shaft with the tractor before coupling the machine with the tractor. This will ensure the necessary clearance for safe coupling of the PTO shaft. 1. Drive the tractor up to the machine, leaving a clearance (approx. 25 cm) between the tractor and the machine. 2. Secure the tractor against unintentional starting and rolling, see the section "Securing the tractor against unintentional starting and rolling", starting on page 118. 3. Check whether the tractor universal joint shaft is switched off. 4. Clean and grease the tractor universal joint shaft. 5. Fit the latch of the PTO shaft over the universal joint shaft of the tractor until the latch is heard to engage. When coupling the PTO shaft, refer to the operating manual provided for the PTO shaft and observe the permissible universal joint shaft speed of the machine. 6. Secure the PTO shaft guard using the supporting chain(s) to prevent movement. 6.1 Fasten the supporting chain(s) so that it as perpendicular to the PTO shaft as possible. 6.2 Attach the supporting chain(s) in a way that ensures sufficient swivel range of the PTO shaft in all operating positions. CAUTION Supporting chains must not become caught on machine or tractor parts. 7. Check that there is sufficient clearance around the PTO shaft in all operating conditions. Insufficient clearance will result in damage to the PTO shaft. 8. Provide the necessary clearance (if required). UF BAG0012.6 03.15 55 Construction and function of the basic machine 5.6.2 Uncoupling the PTO shaft WARNING Risk of crushing or impact if there is insufficient clearance when uncoupling the PTO shaft. First uncouple the machine from the tractor before uncoupling the PTO shaft from the tractor. This will ensure the necessary clearance for safe uncoupling of the PTO shaft. CAUTION Risk of burning on hot components of the PTO shaft. This danger can cause minor to serious injuries to the hands. Do not touch components of the PTO shaft that have become hot (particularly clutches). 1. Uncouple the machine from the tractor. Refer to the section "Uncoupling the machine", page 125. 2. Drive the tractor up to the machine, leaving a clearance of approximately 25 cm between the tractor and the machine. 3. Secure the tractor against unintentional starting and rolling, see the section "Securing the tractor against unintentional starting and rolling", starting on page 118. 4. Pull the latch of the PTO shaft off the universal joint shaft of the tractor. Observe the operating manual supplied with the PTO shaft when uncoupling the PTO shaft. 5. Place the PTO shaft in the holder provided. 6. Clean and lubricate the PTO shaft if it is not going to be used for a longer period of time. 56 UF BAG0012.6 03.15 Construction and function of the basic machine 5.7 Hydraulic connections • All hydraulic hose lines are equipped with grips. Coloured markings with a code number or code letter have been applied to the gripping sections in order to assign the respective hydraulic function to the pressure line of a tractor control unit! Films are stuck on the implement for the markings that illustrate the respective hydraulic function. • The tractor control unit must be used in different types of activation, depending on the hydraulic function. Latched, for a permanent oil circulation Tentative, activate until the action is executed Float position, free oil flow in the control unit Marking Function Tractor control unit raise yellow height adjustment green boom folding lower fold out fold in Double acting Double acting lift left-hand boom natural tilt adjustment lift right-hand boom Double acting Profi- folding Marking Function red Permanent oil circulation red Pressure-free return flow UF BAG0012.6 03.15 Tractor control unit Single-acting 57 Construction and function of the basic machine Profi-folding: Maximum permissible pressure in oil return: 5 bar Therefore do not connect the oil return to the tractor control unit, but to a pressure-free oil return flow with a large plug coupling. WARNING For the oil return, use only DN16 lines and select short return paths. Pressurise the hydraulic system only when the free return has been correctly coupled. Install the coupling union (supplied) on the pressure-free oil return flow. WARNING Risk of infection from hydraulic fluid escaping at high pressure. When coupling and uncoupling the hydraulic hose lines, ensure that the hydraulic system is depressurised on both the machine and tractor sides. If you are injured by hydraulic fluid, contact a doctor immediately. 5.7.1 Coupling the hydraulic hose lines WARNING Risk of crushing, cutting, catching, drawing in and impact from faulty hydraulic functions when the hydraulic hose lines are incorrectly connected. When coupling the hydraulic hose lines, observe the coloured markings on the hydraulic plugs. • Check the compatibility of the hydraulic fluids before connecting the machine to the tractor hydraulic system. Do not mix any mineral oils with biological oils. • Observe the maximum permissible hydraulic fluid pressure of 210 bars. • Only couple clean hydraulic connectors. • Slide the hydraulic connector(s) into the hydraulic sockets until they are heard to engage. • Check the coupling points of the hydraulic hose lines for correct, tight seating. 1. Swivel the actuation lever on the control valve on the tractor to float position (neutral position). 2. Clean the hydraulic plug for the hydraulic hose lines before connecting them to the tractor. 3. Connect the hydraulic hose line(s) to the tractor control unit(s). 58 UF BAG0012.6 03.15 Construction and function of the basic machine 5.7.2 Uncoupling the hydraulic hose lines 1. Swivel the actuation lever on the control unit on the tractor to float position (neutral position). 2. Unlock the hydraulic connectors from the hydraulic sockets. 3. Protect the hydraulic plug and hydraulic socket against soiling using the dust protection caps. 4. Place the hydraulic hose lines in the hose cabinet. UF BAG0012.6 03.15 59 Construction and function of the basic machine 5.8 Operating terminal or manual operation UF field sprayers with • AMASET+ or HB manual operation are equipped with a volumetric remote control. The spread rate can be set by manually adjusting the spray pressure and is directly proportional to the pump drive speed. • AMATRON 3 or AMASPRAY+ are equipped with a flow meter. The spread rate is set on the operating terminal. The operating terminal controls a machine computer, providing it with all the necessary information and taking charge of the area-based regulation of the spray rate [l/ha], depending on the specified spray rate (target rate) and the current operational speed [km/h]. 5.8.1 AMATRON 3 The AMATRON 3 (Fig. 33) can be used to: • enter machine-specific data. • enter job-related data. • cause the field sprayer to change the spray rate used in spraying operation. • operate all functions on the sprayer boom (Profi-folding only). • operate special functions. monitor the field sprayer during spraying operation. Once a job has been started, the AMATRON 3 stores the data acquired. • Fig. 33 See also the AMATRON 3 operating manual. 60 UF BAG0012.6 03.15 Construction and function of the basic machine 5.8.2 AMASPRAY+ The AMASPRAY+ (Fig. 34) can be used to: • enter machine-specific data. • cause the field sprayer to change the spray rate used in spraying operation. • preselect hydraulic functions which are operated using the tractor control unit. • operate special functions. • monitor the field sprayer during spraying operation. • switch part width sections on and off Current spread rate, speed, worked area, total area, quantity applied and overall spread rate, working time and distance travelled are continuously detected. Fig. 34 See also the AMASPRAY+ operating manual. 5.8.3 AMASET+ The AMASET+ (Fig. 35) can be used to: • display the spray pressure • set the spray pressure • control end/boundary nozzles • switch spraying on/off • fold in the left/right sprayer boom individually • switch part width sections on and off See also the AMASET+ operating manual. UF BAG0012.6 03.15 Fig. 35 61 Construction and function of the basic machine 5.8.4 HB manual operation The manually operated HB volumetric remote control has the following functions: • switch spraying on and off • switch part width sections on and off. • display the spray pressure • spread rate adjustment via spray pressure. (1) Pressure regulation valve (2) Switch tap for spraying on/off • Position A – Spraying switched on • Position B – Spraying switched off (3) Pressure gauge (4) 5 part width section valves Fig. 36 (1) Part width section valve switched on (2) Part width section valve switched off (3) Rotary knob for pressure equalisation setting Fig. 37 62 UF BAG0012.6 03.15 Construction and function of the basic machine 5.8.4.1 Use 1. Prepare and stir the spray liquid correctly in accordance with the instructions from the crop protection agent manufacturer. 2. Set the reverse taps on the control terminal to "Spray"; see page 151. 3. Read from the tractor meter which gear is required for an operational speed of 6 to max. 8 km/h. Adjust the tractor engine speed at a constant rate with the manual accelerator lever, taking into account the pump drive speed (min. 400 rpm and max. 550 rpm). 4. Using tractor control unit yellow raise the sprayer boom until the transport safety catch locks in place. 5. Fold out the sprayer boom. ο using tractor control unit green ο using manual operation 6. Set the spraying height using tractor control unit yellow. 7. Close all part width section valves. 8. Set the switch tap on the valve chest to "Spray". 9. Set the liquid output by means of the required spray pressure on the pressure regulation valve according to the spray table. 10. Set the switch tap to "Spraying off". 11. Switch on the part width sections required to begin spraying. 12. Select the right tractor gear and move off. 13. Set the switch tap on the valve chest to "Spray". Maintain the selected tractor gear and speed during spraying. 14. After work is completed: set the switch tap on the valve chest to "Spray off", switch off the PTO shaft, fold in the boom and secure it in transport position. Automatic dosing: Within a tractor gear, dosing is dependent on operational speed. This means that if the tractor engine speed falls, for example as a result of a rise in the terrain, in addition to the operational speed the tractor universal joint shaft speed also decreases, as does the pump drive speed in the same ratio. This also alters the volume conveyed by the pump in the same ratio and the desired spray rate [l/ha] remains constant - within a tractor gear. At the same time, the set spray pressure also changes. UF BAG0012.6 03.15 63 Construction and function of the basic machine WARNING In the interests of attaining optimum effectiveness of the spray liquid to be applied and to avoid unnecessary pollution, the spray pressure must be maintained within the appropriate pressure range for the nozzle in use (see spray table). Example: If the set spray pressure is e.g. 3.2 bar, spray pressures between 2.4 and 4.0 are permitted. Do not stray in any circumstances from the permitted pressure range for the nozzle fitted. When increasing operational speed, do not exceed the maximum permissible pump drive speed of 550 rpm. WARNING Large variations in spray pressure cause undesirable changes in the drop size of the spray liquid. • Only switch sprayers on and off while in motion. • During the spraying procedure, maintain the exact tractor gear preselected for the spray pressure setting and the stirring stage, as there may otherwise be deviations from the desired spray rate. Adjust the volumetric remote control 64 • once a year. • each time a nozzle is changed. UF BAG0012.6 03.15 Construction and function of the basic machine 5.9 Spray liquid tank Fig. 38/… (1) Spray liquid tank The spray liquid tank is filled via • the filling opening on the filling dome, • the suction hose (optional) on the suction port, • the pressure filling connection (optional) (2) Hinged/screw lid for the filling opening (3) Fill level indicator (4) Step-up handle (5) Step (6) Setting tap for the agitator in the spray liquid tank 5.9.1 Hinged/screw lid for the filling opening • To open the lid, rotate to the left and swing open. • To close the lid, fold down and rotate to the right until tight. 5.9.2 Fig. 38 Filling the spray liquid tank (optional) (1) Filling connection for the flushing water tank / spray liquid tank (2) Switch tap for the spray liquid tank Fig. 39 UF BAG0012.6 03.15 65 Construction and function of the basic machine 5.9.3 Fill level indicator The fill level indicator shows the tank capacity [l] of the spray liquid tank. Read the tank capacity on the scale from the pointer read-off edge. Tank capacity [l] = value displayed on the scale Electronic fill level indicator (optional, Fig. 40) 5.9.4 Fig. 40 Step Pull-out step to reach the filling dome. • To climb up, pull out the ladder with platform and fold down the ladder. • If the ladder is no longer needed, swing it up and slide it under the control terminal, along with the platform. Make absolutely sure that the step is locked in its end position when slid away. DANGER 5.9.5 • Never climb into the spray liquid tank. • Risk of injury from poisonous vapours. • It is strictly forbidden to ride on the field sprayer. • Riding on the machine creates a risk of falling. Agitator When switched on, the agitator stirs the spray liquid in the spray liquid tank, ensuring that the spray liquid is homogenous. The stirring performance can be set at the setting tap (Fig. 41/C). • Position Fig. 41/1: Agitator off. • Position Fig. 41/2: Agitator at maximum stirring performance. For spraying operation, select a central position for the setting tap. Fig. 41 66 UF BAG0012.6 03.15 Construction and function of the basic machine 5.9.6 Suction port for filling the spray liquid tank (optional) Observe the relevant instructions when filling the spray liquid tank from public water points using the suction hose (see also the section "Use of the machine", Seite 139). Fig. 42/... (1) Suction hose (8 m, 2"). (2) Quick coupling. (3) Suction filter for filtering the intake water. (4) Non-return valve. Prevents liquid already in the spray liquid tank from running out if the vacuum suddenly collapses during the filling process. Fig. 42 Fig. 43: Super-S boom only: (1) Suction hose holder (optional) Fig. 43 UF BAG0012.6 03.15 67 Construction and function of the basic machine 5.10 Flushing water tank Fig. 44 (1) Flushing water tank (2) Filling opening (3) Filling level indicator The flushing water tank introduces clear fresh water to the mixture. The water serves to • thin the residue in the spray liquid tank at the end of spraying operation. • clean (flush) the whole field sprayer in the field. • clean the suction chest and the spray lines when the tank is full. Screw lid with breather valve for the fill opening. Only fill the flushing water tank with clear fresh water. Tank capacity:: • 125 litres (UF901 / UF1201) • 180 litres (UF1501 / UF1801) (1) Filling connection for the flushing water tank / spray liquid tank (2) Switch tap for the flushing water tank Fig. 45 68 UF BAG0012.6 03.15 Construction and function of the basic machine 5.11 Fresh water tank Fresh water tank (Fig. 46/1) with drain tap (Fig. 46/2) for clear fresh water ο for washing hands or ο for cleaning the spraying nozzles. Tank capacity: 18 litres Only fill the fresh water tank with clear fresh water. WARNING Danger of poisoning from using unclean water in the fresh water tank. Fig. 46 Never use the water from the fresh water tank as drinking water. The materials used to construct the fresh water tank are not food-safe. UF BAG0012.6 03.15 69 Construction and function of the basic machine 5.12 Induction bowl with injector and canister flushing (Optional on the UF901 /1201) Fig. 47/... (1) Swivel-out induction bowl for receiving, dissolving and drawing in crop protection agents and urea. The induction bowl engages into its respective end positions. (2) Hinged lid with spray table (refer to the "Spray table" section, page 201. ο The lid locks automatically when folded shut. ο Before opening the lid, release the locking mechanism. Fig. 47 (3) Switch tap for suction / induction. (4) Filling connection on the induction bowl / alternative Ecofill connection for extracting spraying agent from Ecofill tanks (optional). (5) Suction line for the induction bowl. Fig. 48/... (1) Switch tap for ring line / canister flushing. (2) Bottom sieve. (3) Rotating canister flushing nozzle for washing out canisters or other containers. (4) Pressure plate. (5) Ring line to dissolve and induct crop protection agent and urea. (6) Scale Water escapes from the canister flushing nozzle (Fig. 48/3) if ● the pressure plate (Fig. 48/4) is pressed down by the canister. • the closed folding cover is pressed downwards. Fig. 48 WARNING Close the induction bowl before rinsing out. 70 Fig. 49 UF BAG0012.6 03.15 Construction and function of the basic machine 5.13 Pump equipment The pumps may be supplied with a delivery capacity of either 160 l/min., 210 l/min or 250 l/min, as required. All components which come into direct contact with crop protection agents are either produced from die-cast aluminium with a plastic coating or from plastic. Based on the current state of knowledge, these pumps are suitable for spreading standard crop protection agents and liquid fertilisers. Never exceed the maximum permissible pump drive speed of 540 rpm. Fig. 50 Technical data on the pump equipment Pump equipment 160 l/min 210 l/min 250 l/min BP 171 BP 235 BP 280 at 2 bar 160 210 250 at 20 bar 154 202 240 7.0 8.4 9.8 Pump model Delivery capacity at 540 rpm Power requirement [l/min] [kW] at 20 bar Construction type 4-cylinder piston diaphragm pump 6-cylinder piston diaphragm pump Pulsation damping Pressure reservoir Fluid damping Residue Total weight of pump equipment UF BAG0012.6 03.15 [l] 5 6 6 [kg] 26 34 37 71 Construction and function of the basic machine 5.14 5.14.1 Filter equipment • Use all the filters provided. Clean the filters regularly (see the "Cleaning" section, Seite 168). Fault-free field sprayer operation can only be achieved by correct filtering of the spray liquid. Correct filtering has a significant effect on the success of the crop protection measures. • Pay attention to the permissible combinations of filters and mesh sizes. The mesh sizes for the self cleaning pressure filter and the nozzle filters must always be smaller than the nozzle opening of the nozzles in question. • Ensure that the use of pressure filter inserts with 80 or 100 mesh/inch for some crop protection agents can filter out active agents. In individual cases, enquire with crop protection agent manufacturers. Filling sieve The filling sieve (Fig. 51/1) prevents the spray liquid from being contaminated when the spray liquid tank is being filled via the filling dome. Filter area: 3,750 mm² Mesh size: 1.00 mm Fig. 51 5.14.2 Bottom sieve in the induction bowl The bottom sieve in the induction bowl prevents lumps and foreign bodies from being drawn in. 5.14.3 Suction filter The suction filter (Fig. 52/1) filters • the spray liquid during the spraying operation. • the water when filling the spray liquid tank via the suction hose. • the water during the rinsing process. Filter area: Mesh size: 72 660 mm² 0.60 mm Fig. 52 UF BAG0012.6 03.15 Construction and function of the basic machine 5.14.4 Self cleaning pressure filter The self cleaning pressure filter (Fig. 53/1) • prevents the nozzle filter upstream of the spraying nozzle from becoming blocked. • has a greater mesh count/inch than the suction filter. With the hydraulic agitator switched on, the inside surface of the pressure filter insert is constantly rinsed through, and undissolved particles of spraying agent and dirt are conveyed back into the spray liquid tank. Overview of the pressure filter inserts • 50 mesh/inch (standard), blue for nozzle size '03' and larger Filter area: 216 mm² Mesh size: 0.35 mm • 80 mesh/inch, yellow for nozzle size '02' Filter area: 216 mm² Mesh size: 0.20 mm • 100 mesh/inch, green for nozzle size '015' and smaller Filter area: 216 mm² Mesh size: 0.15 mm 5.14.5 Fig. 53 Nozzle filters The nozzle filters (Fig. 54/1) prevent the spraying nozzle from becoming blocked. Overview of the nozzle filters • 24 mesh/inch, for nozzle size '06' and larger Filter area: 5.00 mm² Mesh size: 0.50 mm • 50 mesh/inch (standard), for nozzle size '02' to '05' Filter area: 5.07 mm² Mesh size: 0.35 mm • 100 mesh/inch, for nozzle size '015' and smaller Filter area: 5.07 mm² Mesh size: 0.15 mm UF BAG0012.6 03.15 Fig. 54 73 Construction and function of the basic machine 5.15 Quick coupling system (optional) The quick coupling system (Fig. 55/1) • is attached to the tractor's rear three-point attachment. • assists in quickly fitting the field sprayer to the tractor. To fit the quick coupling system • use the upper link pin (Fig. 55/2) of the coupling triangle, fit with a ball sleeve and secure with a linchpin. • fit the lower link pin with ball sleeves, fit the spacer sleeves (Fig. 55/3) and secure with a linchpin. The field sprayer is coupled to the quick coupling system using the hook on the three-point attachment frame. Fig. 55 The spring-loaded ratchets (Fig. 56/1) lock automatically, securing the coupling between the field sprayer and the quick coupling system. To uncouple the parked field sprayer, release the ratchets from the tractor using a bowden cable (Fig. 56/2). For information on coupling and uncoupling, see also the "Coupling and uncoupling" section, page 122. Fig. 56 74 UF BAG0012.6 03.15 Construction and function of the basic machine 5.16 Removable transportation device (optional) The removable transportation device enables easy coupling to the tractor's three-point hydraulic system and easy manoeuvring in the yard and indoors. To prevent the field sprayer from rolling, the castors are equipped with a locking system. WARNING When installing/removing the transportation device, secure the raised machine against unintended lowering. Installation / removal: 1. Couple the machine to the tractor. 2. Raise the machine with the tractor's hydraulic system. Fig. 57 3. Secure the machine against unintentional starting and unintentional rolling. 4. Support the raised machine so that it cannot be lowered unintentionally. For initial installation: • • Secure the linchpins on the machine (Fig. 57/5; Fig. 58/5) with the securing strap (Fig. 57; Fig. 58/3). Press the wire hooks together on the securing strap with pliers. Fig. 58 5. Front steerable castors (Fig. 57/1) / fixed rear castors (Fig. 58/1) ο ο Fit and secure with a clip pin (Fig. 57; Fig. 58/2) or Remove. When the transport castors are not in use, secure the clip pins in the parking position (Fig. 57/4Fig. 58/4). When installing the fixed castors ensure that the pin (Fig. 58/6) goes through the hole in the frame, thus holding the castors in a longitudinal orientation. UF BAG0012.6 03.15 75 Construction and function of the basic machine 5.17 Exterior wash down kit (optional) Fig. 59/… Exterior wash down kit for cleaning the field sprayer, includes (1) Hose coiler, (2) 20 m pressure hose, (3) Spray gun Operating pressure: 10 bar Water output: 18 l/min WARNING Fig. 59 Danger from liquids escaping under pressure and contamination with spray liquid if the spray gun is activated accidentally. Secure the spray gun against unintentional spraying using the locking mechanism (Fig. 60/1) • before each pause in spraying. • before depositing the spray gun in its holder after cleaning work is complete. Fig. 60 5.18 Secure container for protective clothing (optional) Secure container for protective clothing (Fig. 61/1), includes one compartment for clean protective clothing and another for contaminated protective clothing. Fig. 61 76 UF BAG0012.6 03.15 Construction and function of the basic machine 5.19 Work lights Separate power supply from the tractor is required. Work floodlights: Fig. 62 LED-individual nozzle illumination: Fig. 63 UF BAG0012.6 03.15 77 Construction and function of the basic machine 5.20 FT 1001 front tank (optional) The FT 1001 has a tank capacity of 1,000 l and is fitted to the tractor's front hydraulic system. Fig. 64 5.21 Camera system (option) Fig. 65/… (1) Camera on the sprayer boom for reversing safely. Fig. 65 Fig. 66/… (1) Camera on the front tank for manoeuvring safely. Fig. 66 78 UF BAG0012.6 03.15 Construction and function of the basic machine 5.22 Comfort equipment (optional) Comfort equipment for machines with AMATRON 3. Comfort equipment functions: • Cleaning – remote-controlled residue dilution and internal cleaning ο Remote-controlled switching of the intake cock from spraying • to flushing . ο Automatic agitator cutout during flushing. ο Remote-controlled switching on and off of internal cleaning. Filling stop when filling via suction port ο Filling stopped automatically when the desired fill level is reached (signal limit). ο Filling stopped manually. →Remote-controlled switching of intake cock from filling to spraying . The intake cock is operated: • by remote control via the AMATRON 3 and electric motor. For remote control, the hand lever must be engaged with the cylinder screw (2) in the hole of the slewing ring (3). • manually at the control terminal. For manual operation • • ο swivel the hand lever (1) to guide the cylinder screw (2) out of the slewing ring ο turn the hand lever to the desired position. Remote-controlled ο Spraying ο Filling ο Flushing Manually operated ο Drain spray liquid tank ο Drain suction chest Fig. 67 UF BAG0012.6 03.15 79 Construction and function of the sprayer boom 6 Construction and function of the sprayer boom The proper condition of the sprayer boom and how it is suspended have considerable influence on the distribution accuracy of the spray liquid. With the spraying height of the sprayer boom to the crop set correctly, a complete overlap is achieved. Nozzles are attached to the boom at intervals of 50 cm. Profi-folding: The boom is operated via the control terminal. To do this, locate tractor control unit red during use. See separate operating manual for the implement software!. Profi-folding consists of the following functions: • Folding the sprayer boom in and out, • Hydraulic height adjustment, • Hydraulic tilt adjustment, • Folding in one side of the sprayer boom • One-sided, independent raising and lowering of the sprayer boom / boom extension (Profi-folding II only). Folding via the tractor control unit The boom is operated via tractor control units. • Depending on the version, sprayer boom folding is preselected via the operating terminal and then executed using tractor control unit green (preselected folding). See separate operating manual for the operating terminal. • Height adjustment is controlled via tractor control unit green. • The boom is folded manually. • Height adjustment is controlled via tractor control unit yellow . Manual folding 80 UF BAG0012.6 03.15 Construction and function of the sprayer boom Folding out and in CAUTION It is prohibited to fold the sprayer boom in and out during travel. DANGER Always maintain an adequate distance from overhead cables when folding the sprayer boom out and in. Contact with overhead cables may lead to fatal injuries. WARNING Risk of crushing the entire body and impact due to personnel becoming trapped by laterally-swivelling machine parts. These dangers can cause extremely serious and potentially fatal injuries. Maintain an adequate safety distance from moving machine parts while the tractor engine is running. Ensure that all personnel maintain an adequate safety distance from moving machine parts. Instruct personnel to leave the swivel range of any moving machine parts before swivelling the parts. WARNING Danger for third parties from crushing, being drawn in and/or caught by the moving parts of the boom or impact if they stand in the swivel range of the boom while it is folding out or in. • Instruct personnel to leave the swivel range of the boom before you fold the boom out or in. • Release the control for folding the boom out and in immediately if someone enters the swivel range. The hydraulic cylinders for boom folding maintain their respective end positions (transport position and working position) in both the folded-in and folded-out boom state. UF BAG0012.6 03.15 81 Construction and function of the sprayer boom Working with the sprayer boom folded out on one side Working with the sprayer boom only folded out on one side is only permissible • with the swing compensation locked. • only if the other boom is folded down as a package from the transport position (Super S boom). • briefly for passing obstacles (trees, electricity pylons, etc.). • Lock the swing compensation before folding up the sprayer boom on one side. If the swing compensation is not locked, the sprayer boom may swing off to one side. If the folded-up boom strikes the ground, this may cause damage to the sprayer boom. • Use a significantly reduced speed for spraying operation to avoid the sprayer boom swinging out and coming into contact with the ground with the swing compensation locked. Unless the sprayer boom is guided smoothly, even lateral distribution cannot be guaranteed. Setting the spraying height WARNING Risk of crushing and impact for personnel who are caught while the height of the sprayer boom is being raised or lowered. Direct people out of the danger area of the machine before raising or lowering the sprayer boom using height adjustment. 1. Direct people out of the danger area of the machine. 2. Set the spraying height in accordance with the spray table via the • tractor control unit yellow , • AMATRON 3 (with Profi-folding). Always align the sprayer boom parallel to the ground; only then can the specified spraying height be achieved on all nozzles. 82 UF BAG0012.6 03.15 Construction and function of the sprayer boom Collision protection devices The collision protection devices protect the sprayer boom from damage when the outer boom section comes up against fixed obstacles. The respective plastic clutch (Fig. 68/1) allows the outer boom section to avoid collision by moving around the articulated axle (Fig. 68/2), in and against the direction of travel; it is then automatically returned to its working position. Fig. 68 UF BAG0012.6 03.15 83 Construction and function of the sprayer boom Swing compensation The locking mechanism (Fig. 70/2) for the swing compensation is indicated • on the operating terminal. • for UF without an operating terminal, above the spray liquid tank Marking (Fig. 69/1) in the red area (Fig. 69/2) → swing compensation locked. Marking (Fig. 69/1) in the green area (Fig. 69/3) → Fig. 69 swing compensation unlocked. Fig. 70/… (1) Swing compensation unlocked. (2) Swing compensation locked. For illustration purposes, in this image the protective device has been removed from the swing compensation. Fig. 70 Unlocking the swing compensation: Even lateral distribution can only be achieved with the swing compensation unlocked. After the sprayer boom is fully folded out, actuate the operating lever for another 5 seconds. → The swing compensation unlocks and the folded-out sprayer boom can swing freely in relation to the boom carrier. Locking the swing compensation: ο For road transport ο When folding the boom out and in. Folding via the tractor control unit green: the swing compensation locks automatically before the boom folds in. 84 UF BAG0012.6 03.15 Construction and function of the sprayer boom 6.1 Q-plus boom Overview – Q-plus boom Fig. 71 (1) Boom carrier frame for sprayer boom height adjustment (2) Spray lines (3) (4) (5) (6) (7) (8) Flow meter for determining the spray rate [l/ha] (only with quantity regulation) (9) Return flow meter for determining how much spray liquid is to be conveyed back into the Boom centre section spray liquid tank (AMATRON 3 only) Transport locking for locking the folded-in sprayer boom in its transport position to pre- (10) Motor valves for switching the part width sections on and off (control unit) vent it from folding out unintentionally – unlocked in the above example (11) Bypass valve (12) Pressure connection for the sprayingLockable swing compensation pressure pressure gauge Tension springs for parallel boom alignment. (13) Pressure relief, reduces excess pressure in Shock absorber the spray lines after a part width section is switched off UF BAG0012.6 03.15 85 Construction and function of the sprayer boom 6.1.1 Unlocking and locking the transport safety catch WARNING Risk of crushing and impact for other road users if the boom accidentally unfolds from the transport position during road transport. Lock the folded boom package in the transport position using the transport safety catch before undertaking road transport. Unlocking the transport safety catch Raise the folded boom package using height adjustment until the automatic transport safety catch releases the locked boom package (height approx. 2/3 of the boom carrier length). → The transport safety catch unlocks the sprayer boom from its transport position and the sprayer boom can then be folded out. Fig. 72/1 shows the unlocked transport safety catch. Fig. 72 Locking the transport safety catch Lower the folded boom package using height adjustment until the automatic transport safety catch locks the boom package (the distance between the lower edge of the boom carrier and the lower edge of the sprayer boom is only approx. 30 cm). → The transport safety catch locks the sprayer boom in the transport position to prevent the folded boom package from folding out unintentionally. Fig. 73/1 shows the locked transport safety catch Fig. 73 86 UF BAG0012.6 03.15 Construction and function of the sprayer boom 6.1.2 Q-plus boom manually folded WARNING When folding the boom only hold it at the points indicated. Fold only the lowered and locked booms. CAUTION Observe the sequence specified in Fig. 75 for folding the boom out. To fold in, use the reverse sequence. Fig. 74 Fig. 75 Folding out the sprayer boom 1. Unlock the transport safety catch by lifting the bar (Fig. 76). 2. Fold out the right-hand boom (Fig. 75/1,2). 3. Fold out the left-hand boom (Fig. 75/3,4). 4. Unlock the swing compensation using the hand lever on the left-hand boom. Fig. 76 → Fig. 77/1: Hand lever in the unlocked position. Fig. 77 UF BAG0012.6 03.15 87 Construction and function of the sprayer boom Folding in the sprayer boom 1. Lock the swing compensation using the hand lever on the left-hand boom. → Fig. 78/1: Hand lever in the locked position. 2. Fold in the left-hand boom. 3. Fold in the right-hand boom. 4. After the booms are folded in, ensure that the transport safety catch engages correctly (Fig. 79). Fig. 78 Fig. 79 88 UF BAG0012.6 03.15 Construction and function of the sprayer boom 6.1.3 Q-plus boom, folding via the tractor control unit To fold out the sprayer boom, depending on the version, the preselection button "Fold sprayer boom" must be pressed on the operating terminal before tractor control unit green is actuated. See separate operating manual for the operating terminal. Folding out the sprayer boom The folded boom package is in the locked transport position. 1. Unlock the transport safety catch. Refer to the section "Unlocking the transport safety catch", page 86. 2. Actuate tractor control unit green until → the individual segments of the two booms are fully folded out and → the swing compensation is unlocked. ● When unfolding, first the right-hand and then the left-hand boom folds out. ● The swing compensation is unlocked when the green section of the (un)locking indicator is visible. • The appropriate hydraulic cylinders lock the booms in their working position. 3. Actuate tractor control unit yellow → Set the spraying height for the sprayer boom. Folding in the sprayer boom 1. Actuate tractor control unit yellow . → Raise the sprayer boom to a medium height. 2. Set tilt adjustment to "0" (if present). 3. Actuate tractor control unit green until → the individual segments of the two booms are fully folded in. When folding, first the left-hand and then the right-hand boom folds in. 4. Lock the transport safety catch. Refer to the section "Locking the transport safety catch" Seite 86. UF BAG0012.6 03.15 89 Construction and function of the sprayer boom 6.1.4 Working on one side using the right-hand boom The sprayer boom is fully folded out. 1. Actuate tractor control unit green until → the left-hand boom is fully folded in. The swing compensation locks automatically before the left-hand boom folds in. 2. Actuate tractor control unit yellow . → Set the spraying height for the sprayer boom such that the sprayer boom is a minimum of one metre off the ground. → The automatic transport safety catch locks the folded, left-hand boom. 3. Switch off the boom part width sections of the left-hand boom. 4. During spraying operation, drive at a significantly reduced speed. 5. Unlock the automatic transport safety catch again before folding the left-hand boom back out. Refer to the section "Unlocking the transport safety catch", page 86. After one-sided spraying: 6. Actuate tractor control unit green until → the folded-in boom is fully folded out again. → the swing compensation unlocks. 7. Switch all part width sections back on. 90 UF BAG0012.6 03.15 Construction and function of the sprayer boom 6.2 Super-S boom Overview – Super-S boom Fig. 80 (1) Spray lines (2) Transport locking (3) Lockable swing compensation (4) Flow meter for determining the spray rate [l/ha] (only with quantity regulation) (5) Return flow meter for determining how much spray liquid is to be conveyed back into the spray liquid tank (AMATRON 3 only) (6) Motor valves for switching the part width sections on and off (control unit) (7) Bypass valve (8) Pressure connection for the sprayingpressure pressure gauge UF BAG0012.6 03.15 (9) Pressure relief, reduces excess pressure in the spray lines after a part width section is switched off (10) Valve and reverse tap for the DUS system (11) Box for protective clothing (12) External cleaning (13) Spacer (14) Nozzle pipe protection (15) Visual check of the Super-S boom lock 91 Construction and function of the sprayer boom 6.2.1 Unlocking and locking the transport safety catch WARNING Risk of crushing and impact for other road users if the boom accidentally unfolds from the transport position during road transport. Lock the folded boom package in the transport position using the transport safety catch before undertaking road transport. Unlocking the transport safety catch Raise the sprayer boom using height adjustment until the catching lugs (Fig. 81 /1) are released from the catching sockets (Fig. 81 /2). → The transport safety catch unlocks the sprayer boom from the transport position. Fig. 81 shows the unlocked sprayer boom. Fig. 81 Locking the transport safety catch Lower the sprayer boom fully using height adjustment until the catching lugs (Fig. 82/1) are grasped by the catching sockets (Fig. 82/2). → The transport safety catch locks the sprayer boom in the transport position. Fig. 82 shows the locked sprayer boom. If the catching lugs (Fig. 82 /1) do not grasp the catching sockets (Fig. 82 /2), align the sprayer boom using tilt adjustment. Fig. 82 Visually check the Super-S boom lock (Fig. 83/1). Fig. 83 92 UF BAG0012.6 03.15 Construction and function of the sprayer boom 6.2.2 Super-S boom, folding via the tractor control unit For information on Profi-folding, refer to the AMATRON 3 operating manual. To fold out the sprayer boom, depending on the version, the preselection button "Fold sprayer boom" must be pressed on the operating terminal before tractor control unit green is actuated. See separate operating manual for the operating terminal. Folding out the sprayer boom 1. Actuate tractor control unit yellow . → Raise the boom to unlock it from its transport position. 2. Actuate tractor control unit green until → both boom packages are folded out → the individual segments of the two booms are fully folded out and → the swing compensation is unlocked. The appropriate hydraulic cylinders lock the boom in its working position. Folding out does not always happen symmetrically. • • 3. Actuate tractor control unit yellow → Set the spraying height for the sprayer boom. Folding in the sprayer boom 1. Actuate tractor control unit yellow → Raise the sprayer boom to a medium height. 2. Set tilt adjustment to "0" (if present). 3. Actuate tractor control unit green until → the individual segments of the two booms are fully folded in. → the two boom packages are folded in. 4. Actuate tractor control unit yellow. → Lower the boom, locking it in the transport position. The swing compensation locks automatically before the boom folds in. UF BAG0012.6 03.15 93 Construction and function of the sprayer boom Working with the sprayer boom folded out on one side Only possible with hydraulic preselected folding (optional). See separate operating manual for the operating terminal. The sprayer boom is fully folded out. 1. Actuate tractor control unit. → Raise the boom to a medium height. → Swing compensation locks automatically. 2. Preselect the boom on the operating terminal which is to be folded in. 3. Actuate tractor control unit green. → The selected boom folds in. WARNING After folding in, the boom lifts into the transport position. → Interrupt the folding process at the right point. 4. Align the sprayer boom using tilt adjustment so it is parallel to the target surface. 5. Set the spraying height for the sprayer boom such that the sprayer boom is a minimum of 1 m off the ground. 6. Switch off the part width sections of the folded-in boom. 7. During spraying operation, drive at a significantly reduced speed. After one-sided spraying: 8. Cancel the preselection on the operating terminal. 9. Actuate tractor control unit green until → the folded-in boom is fully folded out again. → the swing compensation unlocks. 10. Switch all part width sections back on. 94 UF BAG0012.6 03.15 Construction and function of the sprayer boom 6.3 Reduction joint on the outer boom (optional) Using the reduction joint, the outer element of the outer boom can be folded manually to reduce the working width. Case 1: Number of nozzles outer part width section → = Number of nozzles on the foldable outer element When spraying with a reduced working width, keep the outer part width sections switched off. Case 2: Number of nozzles outer part width section ≠ Number of nozzles on the foldable outer element → Close the outer nozzles manually (triple nozzle head). → Perform changes on the control terminal. ο Enter the changed working width. ο Enter the changed number of nozzles on the outer part width sections. Fig. 84 2 bolts lock the folded and unfolded outer element in its respective end positions. CAUTION Before road transport, unfold the outer elements again so that the transport locking mechanism is active when the boom is folded. UF BAG0012.6 03.15 95 Construction and function of the sprayer boom 6.4 Boom width reduction (option) With the boom width reduction, one or two booms can remain folded in during operation depending on the version. The boom damping (option) has to be switched on as well. The respective boom part width sections have to be activated in the on-board computer. Fig. 85 (1) Boom width reduction (2) Boom width damping (option) (A) Stop tap opened (B) Stop tap closed Working with reduced working width 1. Reduce the boom width hydraulically. 2. Close the stop taps for the boom width reduction. 3. Open the stop tap for the boom damping. 4. Deactivate the respective boom part width sections in the onboard computer. 5. Perform work with reduced working width. Close the stop tap for the boom damping. 96 • For road transport • For use with full working width UF BAG0012.6 03.15 Construction and function of the sprayer boom 6.5 Boom extension (option) The boom extension increases the working width infinitely up to 1.20 metres. Fig. 86 (1) Boom extension in transport position (2) Boom extension in working position (3) Stop tap for the outer nozzle (A) Stop tap opened (B) Stop tap closed (4) Wing bolts for securing the boom extension in the transport or working position 6.6 Hydraulic tilt adjustment (optional) In unfavourable ground conditions, e.g. when there are ruts of variable depth or when driving with one side of the vehicle in a furrow, the sprayer boom can be aligned parallel to the ground or to the target surface using hydraulic tilt adjustment. Associated information is displayed on the operating terminal. Depending on the model, it is set either via • the AMATRON 3 or • tractor control unit natural. See the operating manual for the operating terminal. UF BAG0012.6 03.15 97 Construction and function of the sprayer boom 6.7 Distance Control (optional) The Distance Control regulating unit for the sprayer boom automatically holds the sprayer boom parallel at the desired distance from the target surface. Two ultrasound sensors (Fig. 87/1) detect the distance to the ground or the crop. If there is a deviation from the desired height, Distance Control readjusts to the correct height. When switching off spraying at the headland, the sprayer boom is raised automatically. When switched back on again, the sprayer boom is lowered back to the calibrated height. For information on configuring the ultrasound sensors, → Fig. 87 see Fig. 87 See the AMATRON 3 operating manual. 98 UF BAG0012.6 03.15 Construction and function of the sprayer boom 6.8 Spray lines and nozzles The sprayer booms can be equipped with different spray lines. In turn, the spray lines can be fitted with single nozzles or multi nozzles, depending on the predominant conditions of use. Fig. 88 6.8.1 Technical data Ensure that the residue in the spray line is still being sprayed at an undiluted concentration. Always spray this residue on an untreated area. The residue contained in the spray line is dependent on the sprayer boom working width. Formula for calculating the required distance in [m] for spraying out the undiluted residue in the spray line: Required distance [m] = Undiluted residue [l] x 10,000 [m2/ha] Spray rate [l/ha] x working width [m] Total 12 5.5 8.5 7,0 5 5-4-6-4-5 3.5 6.5 10.0 7,0 12,5 5 5-5-5-5-5 3.5 6.5 10.0 7,0 15 3 10-10-10 3.5 6.0 9.5 8,0 5 6-6-6-6-6 4.0 7.0 11.0 8,0 [kg] [l] UF BAG0012.6 03.15 Weight not dilutable 3.0 dilutable Number of spraying nozzles per part width section 9-6-9 Residue Number of part width sections 3 [m] Working width Spray line for the Q-plus sprayer boom with single nozzles or multi nozzles 99 Construction and function of the sprayer boom 15 11,0 7 3-5-5-4-5-5-3 4,5 7,5 12,0 13,0 1,0 14,0 12,0 16 5 7-6-6-6-7 4,5 7,5 12,0 13,0 1,0 14,0 12,0 5 6-8-8-8-6 4,5 8,0 12,5 13,5 1,0 14,5 18 13,0 7 5-6-5-4-5-6-5 4,5 8,5 13,0 14,0 1,0 15,0 14,0 20 21 21/15 24 27 28 100 [l] [kg] Weight (spray line) 13,5 total 1,0 not dilutable 12,5 Residue with a pressure circulating system (DUS) dilutable 11,5 total 7,0 not dilutable 4,5 dilutable Number of nozzles per part width section 6-6-6-6-6 Residue Number of part width sections 5 [m] Working width Spray line for the Super-S sprayer boom with single nozzles or multi nozzles 5 8-8-8-8-8 4,5 8,5 13,0 14,0 1,0 15,5 15,0 7 5-6-5-4-5-6-5 4.5 9.5 14.0 15.0 1.0 16.0 16,0 5 9-8-8-8-9 4,5 9,0 13,5 14,0 1,5 16,0 18,0 7 6-6-6-6-6-6-6 5,0 10,0 15,0 16,0 1,5 17,5 20,0 9 4-4-6-5-4-5-6-4-4 5,0 11,0 16,0 17,0 1,5 18,5 22,0 11 4-4-3-3-5-4-5-3-3-4-4 5.5 15.5 21.0 17.5 1.5 19.0 24,0 7 6-6-6-6-6-6-6 5,0 10,0 15,0 16,0 1,5 17,5 20,0 9 4-4-6-5-4-5-6-4-4 5,0 11,0 16,0 17,0 1,5 18,5 22,0 11 3-3-4-4-5-4-5-4-4-3-3 5.5 15.5 21.0 17.5 1.5 19.0 24,0 5 9-10-10-10-9 5,0 10,0 15,0 16,0 1,5 17,5 21,0 7 6-6-8-8-8-6-6 5,0 11,5 16,5 17,5 1,5 19,0 22,0 9 6-5-6-5-4-5-6-5-6 5,0 12,0 17,0 18,0 1,5 19,5 23,0 11 4-4-5-4-5-4-5-4-5-4-4 5.5 16.5 22.0 23.5 1.5 25.0 24,0 7 9-6-8-8-8-6-9 5,0 12,5 17,5 18,5 2,0 20,5 27,0 9 6-6-6-6-6-6-6-6-6 5,5 17,5 23,0 24,0 2,0 26,0 29,0 11 4-5-5-6-5-4-5-6-5-5-4 5.5 21.5 27.0 28.0 2.0 30.0 31,0 7 8-8-8-8-8-8-8 5,0 13,0 18,0 19,0 2,0 21,0 28,0 9 7-6-6-6-6-6-6-6-7 5,5 17,5 23,0 24,0 2,0 26,0 30,0 11 5-5-5-6-5-4-5-6-5-5-5 5.5 22.5 28.0 29.0 2.0 31.0 32,0 UF BAG0012.6 03.15 Construction and function of the sprayer boom 6.8.2 Single nozzles Fig. 89/... (1) Nozzle body with bayonet connection (standard). (2) Diaphragm. If the pressure in the spray line falls below approx. 0.5 bar, the spring element (3) presses the diaphragm onto the diaphragm seat (4) in the nozzle body. This ensures that when the sprayer boom is switched off, the nozzles are deactivated without subsequent dripping. (3) Spring element. (4) Diaphragm seat. (5) Slider - holds the entire diaphragm valve in the nozzle body. (6) Nozzle filter; fitted as standard on machines with 50 mesh/inch, is inserted from below into the nozzle body. Refer to the "Nozzle filter" section. (7) Rubber seal. (8) Nozzle. (9) Bayonet connection. (10) Coloured bayonet cap. (11) Spring element housing. Fig. 89 6.8.3 Multi nozzles (optional) When using multiple nozzle types, it is beneficial to use multi nozzles in the form of triple nozzle heads (Fig. 90). In each case, the nozzle pointing upwards is the one that is supplied. Turning the triple nozzle head (Fig. 90/1) clockwise brings a different nozzle into play. The triple nozzle head is switched off in the intermediate positions. This provides the possibility of reducing the working width of the sprayer boom. Flush the spray lines with flushing water before turning the triple nozzle head to a different nozzle type. Fig. 90 UF BAG0012.6 03.15 101 Construction and function of the sprayer boom Fig. 91/... (1) Nozzle carrier. (2) Triple nozzle head. (3) Diaphragm. If the pressure in the nozzle line falls below approx. 0.5 bar, the spring element (4) presses the diaphragm onto the diaphragm seat (5) in the three-way nozzle carrier. This ensures that when the sprayer boom is switched off, the nozzles are deactivated without subsequent dripping. (4) Spring element. (5) Diaphragm seat. (6) Sleeve nut - holds the entire diaphragm valve in the three-way nozzle carrier. (7) Nozzle filter; fitted as standard on machines with 50 mesh/inch. (8) Rubber seal. (9) Bayonet connection. (10) Red bayonet cap. (11) Green bayonet cap. (12) Black bayonet cap. Fig. 91 (13) Yellow bayonet cap. (14) O-ring. (15) O-ring. 102 UF BAG0012.6 03.15 Construction and function of the sprayer boom 6.8.4 Electric boundary nozzles (optional) Using boundary nozzle switching, the last nozzle can be switched off from the tractor and a boundary nozzle can be electrically switched on 25 cm further out (right at the edge of the field). Fig. 92 6.8.5 Electric end nozzle switching (optional) Using end nozzle switching, up to three of the outer nozzles at the edge of the field close to a water source can be electrically switched off from the tractor). Fig. 93 6.8.6 Electric additional nozzle switching (optional) With the additional nozzle switching, another exterior nozzle is cut in, increasing the working width by one metre. Fig. 94 UF BAG0012.6 03.15 103 Construction and function of the sprayer boom 6.9 Special optional equipment for liquid fertiliser There are currently two main types of liquid fertiliser available: ● Ammonium nitrate / urea solution (AUS) with 28 kg N per 100 kg AUS. ● An NP solution 10-34-0 with 10 kg N and 34 kg P2O5 per 100 kg NP solution. If the liquid fertiliser is sprayed using flat-fan nozzles, multiply the corresponding values from the spray table for the spray rate (l/ha) by 0.88 for AUS and by 0.85 for NP solutions, as the spray rates listed (in l/ha) only apply for water. As a rule: Use coarse-dropped application for liquid fertiliser to avoid chemical burns to the plants. Overly large drops roll off the leaf and drops which are too small cause a magnifying glass effect, which burns the leaves. Too much fertiliser may cause burns to appear on the leaves due to the salt concentration in the fertiliser. As a rule, do not spray more liquid fertiliser than, for example, 40 kg N (see also "Conversion table for spraying liquid fertiliser"). Always discontinue nozzle-based AUS fertilisation at development stage EC-39, because chemical burns to on ears have a particularly bad effect. 6.9.1 Three-ray nozzles The use of three-ray nozzles for applying liquid fertiliser is beneficial if the liquid fertiliser needs to be taken up more by the roots of the plant than through the leaves. Thanks to its three openings, the dosing aperture, which is integrated into the nozzle, ensures a coarse-dropped, almost depressurised distribution of the liquid fertiliser. This prevents an undesirable spray mist and the formation of smaller drops. The coarse drops produced by the three-ray nozzle hit the plants with little force and roll off their surface. Although this avoids damage from burns to the greatest extent possible, avoid the use of three-ray nozzles for late top dressing and use drag hoses. For all three-ray nozzles listed in the following, only use the black bayonet nut. Different three-ray nozzles and their operational areas (at 8 km/h) 104 • three-ray, yellow 50 - 80 l AUS/ha • three-ray, red 80 - 126 l AUS/ha • three-ray, blue 115 - 180 l AUS/ha • three-ray, white 155 - 267 l AUS/ha UF BAG0012.6 03.15 Construction and function of the sprayer boom 6.9.2 7 hole nozzles / FD- nozzles (optional) The same conditions apply for using 7 hole nozzles / FD nozzles as for the three-ray nozzles. In contrast to the three-ray nozzle, in the case of the 7 hole nozzle / FD nozzles, the outlets are not oriented downwards, but instead point to the side. This allows very large drops to be produced on the plants using only slight impact forces. Fig. 95: → 7 hole nozzle Fig. 96: → FD nozzle Fig. 95 Fig. 96 The following 7-hole nozzles are available (at 8 km/h) • SJ7-02-CE 74 – 120l AUS • SJ7-03-CE 110 – 180l AUS • SJ7-04-CE 148 – 240l AUS • SJ7-05-CE 184 – 300l AUS • SJ7-06-CE 222 – 411l AUS • SJ7-08-CE 295 – 480l AUS The following FD nozzles are available (at 8 km/h) UF BAG0012.6 03.15 • FD 04 150 - 240 l AHL/ha • FD 05 190 - 300 l AHL/ha • FD 06 230 - 360 l AUS/ha • FD 08 300 - 480 l AUS/ha • FD 10 370 - 600 l AUS/ha* 105 Construction and function of the sprayer boom 6.9.3 Drag hose unit for liquid fertiliser (optional) Fig. 97 (1) Numbered, separate drag hose part width sections with 25 cm nozzle distance and hose distance. No. 1 on the left-hand side is fitted on the outside (looking in the direction of travel), no. 2 next to it and so on. (2) Thumb nuts for securing the drag hose unit. (3) Turned plug connection for connecting the hoses. (4) Metal weights - stabilise the position of the hoses during operation. The dosing discs determine the spray rate [l/ha]. The following dosing discs are available (at 8 km/h) • 4916-26 dia. 0.65 50 - 104 l AUS/ha • 4916-32 dia. 0.8 80 - 162 l AUS/ha • 4916-39 dia. 1.0 115 - 226 l AUS/ha (standard) • 4916-45 dia. 1.2 150 - 308 l AUS/ha • 4916-55 dia. 1.4 225 - 450 l AUS/ha Refer to the section "Spray table for the drag hose unit", Seite 208. 106 UF BAG0012.6 03.15 Construction and function of the sprayer boom 6.10 Foam marker (optional) The foam marker, which can be retrofitted at any point, makes it possible to drive the next bout precisely when spraying fields without marked-out tramlines. Marking involves the use of foam bubbles. The foam bubbles are laid at adjustable intervals of approx. 10 – 15 metres, providing a clearlyvisible orientation line. The foam bubbles dissolve after a certain time without leaving any residue behind. Set the interval between the individual applications of bubbles on the slotted screw (Fig. 98/4) as follows: ο turn to the right – interval gets larger. ο turn to the left – Fig. 98 interval gets smaller. Fig. 98/... (1) Tank (2) Compressor (3) Securing bracket (4) Slotted screw Fig. 99/... (1) Air and liquid agitator (2) Flexible plastic nozzle Fig. 99 Controls For machines without AMATRON 3: Fig. 100/... (1) Left-hand foam marker on (2) Right-hand foam marker on (3) Foam marker off (4) Connection to the compressor (5) Connection to the tractor power supply Fig. 100 UF BAG0012.6 03.15 107 Construction and function of the sprayer boom 6.11 DUS pressure circulating system (optional) • For normal spraying operation, the pressure circulating system should usually be switched on. • When using drag hoses, the pressure circulating system should usually be switched off. The pressure circulating system • enables the constant circulation of liquid in the spray line. For these purposes, a suction port hose (Fig. 101/1) is assigned to each part width section. • enables operation using spray liquid or flushing water, as desired. • reduces the undiluted residue for all spray lines to 2 l. The constant circulation of liquid • enables production of an even spray pattern right from the start, because spray liquid is available at every spraying nozzle immediately after the sprayer boom is switched on, with no delay. • prevents damage to the spray line. Fig. 101 The principal components of the pressure circulating system are: • one suction port hose (Fig. 101/1) per part width section. • the DUS switch tap (Fig. 102/1). • the DUS pressure relief valve (Fig. 102/2). The DUS pressure relief valve is permanently set at the factory and reduces the pressure in the pressure circulating system to 1 bar. → If the DUS switch tap is in position (Fig. 102/A), the pressure circulating system is switched on. → If the DUS switch tap is in position (Fig. 102/B), the pressure circulating system is switched off. → if the DUS switch tap is in position (Fig. 102/C), liquid is released from the field sprayer. 108 Fig. 102 UF BAG0012.6 03.15 Construction and function of the sprayer boom Overview – pressure circulating system (DUS) Fig. 103 (1) Pressure circulating system (DUS) (3) DUS pressure limiting valve (2) DUS switch tap (4) DUS return valve 6.12 Line filter for spray lines (optional) Line filters (Fig. 104/1) are • fitted in the spray lines in each part width section. • an additional measure to avoid contamination of the spraying nozzles. Overview of the filter inserts • Filter insert with 50 mesh/inch (blue) • Filter insert with 80 mesh/inch (grey) • Filter insert with 100 mesh/inch (red) UF BAG0012.6 03.15 Fig. 104 109 Commissioning 7 Commissioning This section contains information • on commissioning your machine. • on checking if it is possible to connect the machine to your tractor. • Before operating the machine for the first time the operator must have read and understood the operating manual. • Comply with the section "Safety information for the user", starting on page 27 when ο coupling and uncoupling the machine ο transporting the machine ο using the machine • Only couple and transport the machine to a tractor which is suitable for the task. • The tractor and machine must meet the national road traffic regulations. • The operator and the user shall be responsible for compliance with the statutory road traffic regulations. WARNING Risk of crushing, shearing, cutting, and being drawn in or trapped in the vicinity of hydraulically or electrically actuated components. Do not block the operator controls on the tractor which are used for hydraulic and electrical movements of components, e.g. folding, swivelling and pushing movements. The movement must stop automatically when you release the appropriate control. This does not apply to equipment movements that: 110 • are continuous or • are automatically locked or • require a floating position or pressed position to function UF BAG0012.6 03.15 Commissioning 7.1 Checking the suitability of the tractor WARNING Risk of breaking during operation, insufficient stability and insufficient tractor steering and braking power from improper use of the tractor. • Check the suitability of your tractor, before connecting the machine to the tractor. You may only connect the machine to tractors suitable for the purpose. • Carry out a brake test to check whether the tractor achieves the required braking rate with the machine connected. Requirements for the suitability of a tractor are, in particular: • Permissible total weight • Permissible approved axle loads • Permissible drawbar load at the tractor coupling point • Load capacity of the tyres fitted • The approved trailer load must be sufficient You can find this data on the rating plate or in the vehicle documentation and in the tractor operating manual. The front axle of the tractor must always be subjected to at least 20% of the dead-weight of the tractor. The tractor must achieve the brake rate specified by the tractor manufacturer, even with the machine connected. 7.1.1 Calculating the actual values for the total tractor weight, tractor axle loads and tyre load capacities, as well as the minimum ballast The permissible total tractor weight, specified in the vehicle documentation, must be greater than the sum of the • Tractor empty weight, • Ballast weight and • Total weight of the connected machine or drawbar load of the connected machine This information is only valid for the Federal Republic of Germany: If, having tried all possible alternatives, it is not possible to comply with the axle loads and / or the permissible total weight, then a survey by an officially-recognised motor vehicle traffic expert can, with the approval of the tractor manufacturer, be used as a basis for the authority responsible to issue an exceptional approval according to § 70 of the German Regulations Authorising the Use of Vehicles for Road Traffic and the required approval according to § 29, paragraph 3 of the German Road Traffic Regulations. UF BAG0012.6 03.15 111 Commissioning 7.1.1.1 Data required for the calculation Fig. 105 TL [kg] Tractor empty weight TV [kg] Front axle load of the empty tractor TH [kg] Rear axle load of the empty tractor GH [kg] Total weight of rear-mounted machine or rear ballast See technical data for machine or rear ballast GV [kg] Total weight of front-mounted machine or front ballast See technical data for front-mounted machine or front ballast a [m] Distance between the centre of gravity of the See technical data of tractor and front mafront machine mounting or the front ballast chine mounting or front ballast or measureand the centre of the front axle (total a1 + a2) ment a1 [m] Distance from the centre of the front axle to See tractor operating manual or measurethe centre of the lower link connection ment a2 [m] Distance between the centre of the lower See technical data of front machine mountlink connection point and the centre of gravi- ing or front ballast or measurement ty of the front machine mount or front ballast (centre of gravity distance) b [m] Tractor wheel base c [m] Distance between the centre of the rear axle See tractor operating manual or vehicle and the centre of the lower link connection documents or measurement d [m] Distance between the centre of the lower See technical data of machine link connection point and the centre of gravity of the rear-mounted machine or rear ballast (centre of gravity distance) 112 See tractor operating manual or vehicle documentation See tractor operating manual or vehicle documents or measurement UF BAG0012.6 03.15 Commissioning 7.1.1.2 Calculation of the required minimum ballasting at the front GV min of the tractor to ensure steering capability GV min = GH • (c + d ) − TV • b + 0,2 • TL • b a+b Enter the numeric value for the calculated minimum ballast, GV min, required on the front of the tractor, in the table (page 114). 7.1.1.3 Calculation of the actual front axle load of the tractor TV tat TV tat = GV • (a + b) + TV • b − GH • (c + d ) b Enter the numeric value for the calculated actual front axle load and the approved tractor front axle load specified in the tractor operating manual, in the table (page 114). 7.1.1.4 Calculation of the actual total weight of the combined tractor and machine Gtat = GV + TL + GH Enter the numeric value for the calculated actual total weight and the approved total tractor weight specified in the tractor operating manual in the table (page 114). 7.1.1.5 Calculation of the actual rear axle load of the tractor TH tat TH tat = Gtat − TV tat Enter the numeric value for the calculated actual rear axle load and the approved tractor rear axle load specified in the tractor operating manual in the table (page 114). 7.1.1.6 Tractor tyre load-bearing capacity Enter double the value (two tyres) of the permissible load capacity (see, for example, the tyre manufacturer's documentation) in the table (page 114). UF BAG0012.6 03.15 113 Commissioning 7.1.1.7 Table Actual value according to calculation Minimum ballast front / rear / Permissible value according to tractor operating manual kg Double the permissible load capacity (two tyres) -- -- Total weight kg ≤ kg -- Front axle load kg ≤ kg ≤ kg Rear axle load kg ≤ kg ≤ kg • You can find the permissible values for the total tractor weight, axle loads and load capacities in the tractor registration papers. • The actually calculated values must be less than or equal to ( ≤ ) the permissible values. WARNING Risk of crushing, cutting, being trapped or drawn in, or impact through insufficient stability of the tractor and insufficient tractor steering capability and braking power. It is forbidden to couple the machine to the tractor used as the basis for calculation, if 114 • one of the actual, calculated values is greater than the permissible value. • there is no front ballast (if required) attached to the tractor for the minimum front ballast (GV min). • Ballast your tractor with weights at the front or rear if the tractor axle load is exceeded on only one axle. • Special cases: ο If you do not achieve the minimum ballast at the front (GV min) from the weight of the front-mounted machine (GV), you must use ballast weights in addition to the frontmounted machine. ο If you do not achieve the minimum ballast at the rear (GH min) from the weight of the rear-mounted machine (GH), you must use ballast weights in addition to the rearmounted machine. UF BAG0012.6 03.15 Commissioning 7.2 Installing the PTO shaft CAUTION • Use only the PTO shaft prescribed by AMAZONE. • Only install the PTO shaft before the field sprayer is fitted and with the tanks empty. 1. Clean and grease the pump input shaft (Fig. 106/1). 2. Press in the PTO shaft spring pin (Fig. 107/1). 3. Insert the PTO shaft until the spring pin engages, securing the PTO shaft axially. 4. Secure the PTO shaft guard against simultaneous rotation by attaching the chain (Fig. 107/2) to the machine (Fig. 106/2). Fig. 106 Fig. 107 UF BAG0012.6 03.15 115 Commissioning 7.3 Adjusting the length of the PTO shaft to the tractor WARNING Danger from • damaged and/or destroyed, flying parts for the operator / third party if the PTO shaft is compressed or pulls apart while the machine coupled to the tractor is being raised/lowered, because the length of the PTO shaft has not been adjusted properly. • being caught and drawn in if the PTO shaft is installed incorrectly or if unauthorised design changes are made. Have the length of the PTO shaft checked in all operating positions by a specialist workshop and, if necessary, adjusted before coupling the PTO shaft to your tractor for the first time. Always observe the operating manual supplied with the PTO shaft when adjusting the PTO shaft. This adjustment of the PTO shaft applies only for the current tractor type. You may need to readjust the PTO shaft if you couple the machine to another tractor. WARNING Risk of being caught and drawn in if the PTO shaft is installed incorrectly or if unauthorised design changes are made. Only a specialist workshop may make design changes to the PTO shaft. When doing so, read and follow the operating manual from the manufacturer. Adjusting the length of the PTO shaft is permitted with consideration of the minimum profile overlap. Design changes to the PTO shaft that are not described in the operating manual from the PTO shaft manufacturer are not permitted. WARNING Risk of crushing between the rear of the tractor and the machine when raising and lowering the machine to determine the shortest and longest operating position of the PTO shaft. Only actuate the operator controls for the tractor's three-point linkage 116 • from the intended workstation. • if you are outside of the danger area between the tractor and the machine. UF BAG0012.6 03.15 Commissioning WARNING Risk of crushing from unintentional: • rolling of the tractor and the connected machine. • lowering of the raised machine. Secure the tractor and machine from unintentionally starting or rolling and secure the raised machine against unintentional lowering before entering the danger zone between the tractor and raised machine in order to adjust the PTO shaft. The PTO shaft is at its shortest when it is horizontal. The PTO shaft is at its longest when the machine is fully lifted. 1. Couple the tractor to the machine (do not connect the PTO shaft). 2. Apply the tractor's parking brake. 3. Determine the clearance height of the machine with the shortest and longest operating position for the PTO shaft. 3.1 To do so, raise and lower the machine via the tractor's three-point hydraulic system. While doing so, actuate the manual controls for the tractor's three-point hydraulic system on the rear of the tractor, from the provided workstation. 4. Secure the machine, lifted in the measured clearance height, against unintentional lowering (for example, by supporting it or hooking it to a crane). 5. Secure the tractor from unintentional starting before entering the danger area between the tractor and machine. 6. When measuring the length and shortening the PTO shaft, read and follow the operating manual from the PTO shaft manufacturer. 7. Put the shortened halves of the PTO shaft back together. 8. Grease the universal joint shaft of the tractor and the pump input shaft before connecting the PTO shaft. The tractor symbol on the protective tube of the PTO shaft identifies the tractor-side connection of the PTO shaft. UF BAG0012.6 03.15 117 Commissioning 7.4 Securing the tractor / machine against unintentional start-up and rolling WARNING Risk of crushing, shearing, cutting, being caught and/or drawn in, or impact when making interventions in the machine, through • unintentional falling of the unsecured machine raised using the tractor's three-point linkage. • unintentional falling of raised, unsecured machine parts. • unintentional start-up and rolling of the tractor-machine combination. • Secure the tractor and the machine against unintentional startup and rolling before making any intervention in the machine. • It is forbidden to make any intervention in the machine, such as installation, adjustment, troubleshooting, cleaning, maintenance and repairs ο when the machine is running ο for as long as the tractor engine is running with a connected PTO shaft / hydraulic system. ο when the ignition key is inserted in the tractor and the tractor engine with the connected PTO shaft / hydraulic system could be started unintentionally. ο when the tractor and machine are not secured against unintentional rolling using their parking brakes and/or wheel chocks. ο when moving parts are not locked against unintentional movement. When carrying out such work, there is a high risk of contact with unsecured components. 1. Lower the raised, unsecured machine / raised, unsecured parts of the machine. → This is how to prevent unintentional falling: 2. Shut down the tractor engine. 3. Remove the ignition key. 4. Apply the tractor's parking brake. 5. Secure the machine against unintentional rolling (only attached machine) 118 ο On flat ground using the parking brake (if present) or wheel chocks. ο On uneven ground or slopes using the parking brake and wheel chocks. UF BAG0012.6 03.15 Commissioning 7.5 Installing sensor "X" (cardan shaft / wheel) for determining the distance travelled and operational speed • If the tractor electronics already offer the option to allow the tractor to determine the operational speed, the "Pulse per 100 m" speed signals for the AMATRON 3 can be taken from the DIN 9684 signal socket intended for this purpose. Then swap sensor "X" (cardan shaft/wheel), which is fitted as standard, for the tractor-specific adaptor cable (optional). • 7.5.1 When fitting sensor "X", the following stipulations must be observed: ο The fastening bolt for the magnets must be pointing towards the end of the sensor. ο The gap between the magnet and the sensor must be 5 – 10 mm. ο The magnets' direction of movement must be at right angles to the sensor. ο Fit the magnets to the iron using the supplied V4A screws. ο The sensor must project at least 25 mm from the holder. ο Route the sensor cable so that it is not damaged at steering lock. Installation on a tractor without all-wheel drive 1. Spread the magnets (Fig. 108/1) out evenly on a bolt circle in the wheel shell of the tractor's front wheel. 2. Attach the magnets (Fig. 108/1) using screws (Fig. 108/2) made from nonmagnetic material (brass screws or V4A screws). • The number of magnets used will depend on the size of the tractor wheel. • The distance covered between 2 pulses from neighbouring magnets must not exceed 60 cm. Fig. 108 UF BAG0012.6 03.15 119 Commissioning 3. The number of magnets required should be calculated as follows: Calculation: Wheel circumference [cm] = Number of magnets 60 cm Example: 256 cm 60 cm = 4.27 = min. 5 magnets 4. Fit the sensor (Fig. 108/3) to the axle stub on the tractor's front wheel – behind the axle when viewed in the direction of travel using a universal holder (Fig. 108/4). 7.5.2 Installation on a tractor with all-wheel drive or an Mb-trac • Only fit the magnets in a place which is not subject to angular displacement from the cardan shaft. • Set the gap between the magnet and the sensor in the range between 5 and 10 mm. • The sensor must project at least 25 mm from the holder. 1. Secure the magnets (Fig. 109/1) to the cardan shaft with the hose clip (Fig. 109/2). 2. Secure the sensor (Fig. 109/3) to the vehicle frame opposite the magnet using a universal holder (Fig. 109/4). Fig. 109 120 UF BAG0012.6 03.15 Commissioning 7.6 Adjusting the system setting screw on the hydraulic block Profi-folding only: Always adjust the system setting screw to the hydraulic system on your tractor. Increased hydraulic fluid temperatures are the result of incorrect adjustment of the system setting screw, caused by constant stress on the pressure relief valve in the tractor hydraulics system Fig. 110/… (1) System converting bolt (2) LS connection for load sensing control line The setting for the system setting screw is dependent on the hydraulic block (Fig. 111/1) in the associated tractor hydraulic system. Depending on the properties of the hydraulic system, the system setting screw should be ● ● screwed out up to the stop (factory setting) on tractors with ○ open-centre hydraulic system (constant flow system, geared pump hydraulics). ○ load-sensing hydraulic system (pressure and power controlled setting pump) – fluid extraction via the control unit red. Fig. 110 screwed in up to the stop (in contrast to the factory setting) on tractors with ○ closed-centre hydraulic system (constant pressure system, pressure regulated setting pump). ○ load-sensing hydraulic system (pressure and power controlled setting pump) with direct load-sensing pump connection. Fig. 111 The machine must be depressurised before making adjustments. UF BAG0012.6 03.15 121 Coupling and uncoupling the machine 8 Coupling and uncoupling the machine When coupling and decoupling the machine, comply with the section "Safety information for the user", page 27. WARNING Risk of crushing from unintentional starting and rolling of the tractor and machine when coupling or uncoupling the machine. When coupling or decoupling the machine, secure the tractor and machine against unintentional start-up and rolling before entering the danger area between the tractor and machine; refer to page 118. WARNING Risk of crushing between the rear of the tractor and the machine when coupling and uncoupling the machine. Only actuate the operator controls for the tractor's three-point linkage 8.1 • from the intended workstation. • if you are outside of the danger area between the tractor and the machine. Coupling the machine WARNING Risk of breaking during operation, insufficient stability and insufficient tractor steering and braking power from improper use of the tractor. You may only connect the machine to tractors suitable for this purpose. Refer to the section "Checking the suitability of the tractor", page 111. WARNING Risk of crushing when coupling the machine and standing between the tractor and the machine. Instruct people to leave the danger area between the tractor and the machine before you approach the machine. Any helpers may only act as guides standing next to the tractor and the machine, and may only move between the vehicles when both are at a standstill. 122 UF BAG0012.6 03.15 Coupling and uncoupling the machine WARNING Risk of crushing, being caught or pulled in, or impact when the machine is unexpectedly released from the tractor. • Use the intended equipment to connect the tractor and the machine in the proper way. • When coupling the machine to the tractor's three-point hydraulic system, ensure that the attachment categories of the tractor and the machine are the same. Be absolutely certain to upgrade the machine's category II lower link pin to category III using reducing sleeves if your tractor has a category III three-point linkage. • Only use the upper and lower link pins provided to couple up the machine (original pins). • Check the upper and lower link pins for visible defects whenever the machine is coupled. Replace the upper and lower link pins in the event of clearly visible wear. • Secure the upper link pin and lower link pin in the attachment points of the three-point attachment frame against unintentional detachment using a linchpin. • Perform a visual inspection to ensure that the upper and lower link hooks are correctly locked before reversing the tractor. WARNING Risk of energy supply failure between the tractor and the machine due to damaged power supply lines. During coupling, check the course of the power supply lines. The power supply lines • must give slightly to all movement of the connected machine without tensioning, kinking or rubbing. • must not chafe against other parts. 1 If the machine is equipped with a parking device, secure the machine to prevent it from accidentally rolling – see the section "Transportation device" on page 75. 2. Always check for visible damage when coupling the machine: See the section "Obligations of the user" on page 10. 3. Fasten the ball sleeves over the upper link pins and fasten the lower link pins in the attachment points of the three-point attachment frame. If the working widths of the UF 1501 / 1801 are greater than 21 metres, always use a Cat. III upper link connection. 4. Secure the upper link pin with a linchpin to ensure that it does not accidentally become loose. 5. Secure each of the ball sleeves with linchpins to ensure that they do not accidentally come loose. 6. Direct people out of the danger area between the tractor and machine before you approach the machine with the tractor. UF BAG0012.6 03.15 123 Coupling and uncoupling the machine 7. First couple the PTO shaft and the supply lines to the tractor before you couple the machine with the tractor as follows: 7.1 Drive the tractor up to the machine, leaving a clearance of approximately 25 cm between tractor and machine. 7.2 Secure the tractor against unintentional starting and unintentional rolling. For this, see the section "Securing the tractor against unintentional starting and rolling", starting on page 118. 7.3 Check whether the universal joint shaft of the tractor is switched off. 7.4 Couple the PTO shaft, see the section "Coupling the PTO shaft", starting on page 55. 7.5 Couple the hydraulic hose lines, see the section "Coupling the hydraulic hose lines", starting on page 58. 7.6 Couple the lighting system, see the section "Transportation equipment", page 39. 7.7 Connect the machine cable to the operating terminal. 7.8 Align the lower link hooks so that they are flush with the lower attachment points of the machine. 8. Now continue to reverse the tractor up to the machine so that the lower attachment points of the machine pick up the lower link hook of the tractor. 9. Raise the three-point hydraulic system of the tractor until the lower link hooks receive the ball sleeves and automatically interlock. 10. From the tractor seat, couple the upper link to the top attachment point of the three-point attachment frame using the upper link hook. → The upper link hooks lock automatically. 11. Lift the mounted field sprayer to its working position. 12. Direct people out of the danger area behind the mounted field sprayer. 13. Alter the length of the upper link so that the boom carrier is in an upright position relative to the mounted field sprayer. 14. Perform a visual inspection to ensure that the upper and lower link hooks are correctly locked before reversing the tractor. 15. Place the parking supports in their transport position; refer to the "Parking supports" section, page 79. Remove the rollers of the transporting device when treating leaves or high stocks to avoid damaging the cereal. 124 UF BAG0012.6 03.15 Coupling and uncoupling the machine 8.2 Uncoupling the machine WARNING Risk of crushing and/or impact • due to insufficient stability and the machine tipping over on soft or uneven ground. • due to the machine unintentionally rolling when parked on a transportation device. • Swing the parking supports into the support position before you uncouple the machine. • Always place the uncoupled machine with the tank empty on a horizontal storage space with a solid base. • Secure the machine against unintentionally rolling when parked on a transportation device. Refer to the section "Transportation device", page 118. When uncoupling the machine, there must always be enough space in front of the machine so that you can align the tractor with the machine if necessary. 1. Move the parking supports into the parking position. 2. Park the empty machine on a horizontal space with a hard surface. 3. Uncouple the machine from the tractor. 3.1 Secure the machine against unintentionally rolling. See page 118. 3.2 Relieve the load from the upper link. 3.3 Unlock and uncouple the upper link hooks from the tractor seat. 3.4 Relieve the load from the lower link. 3.5 Unlock and uncouple the lower link hooks from the tractor seat. 3.6 Draw the tractor approximately 25 cm forwards. → The space created between the tractor and the machine allows better access for decoupling the PTO shaft and the power supply lines. 3.7 Secure the tractor and machine against unintentional starting and unintentional rolling. 3.8 Decouple the PTO shaft. 3.10 Uncouple the supply lines. 3.11 Move the supply lines into the parking position. UF BAG0012.6 03.15 125 Adjustments 9 Adjustments 9.1 Positions of the control elements for the different operation modes Fig. 112 126 1 Function Filling using the suction port on the control terminal see page 140 2 Spraying operation 3 Cleaning the sprayer with a full tank 164 4 Cleaning the emptied spray liquid tank 169 5 Diluting the residue in the spray liquid tank 154 6 Draining the final residues from the spray liquid tank 159 7 Draining the final residues from the suction chest 158/160 8 Draining the final residues from the pressure filter 161 9 Inducting liquid agents and filling the spray liquid tank using the suction port on the control terminal 143 10 Inducting liquid agents 143 10 Inducting agents in powder form and urea using the ring line 145 10 Prewashing the canister using canister flushing 146 11 Filling using the suction port on the control terminal and the induction bowl 140 12 External cleaning 162 13 Emptying the spray liquid tank using the pump 156 14 Cleaning the canister with flushing water 147 15 Flushing the sprayer boom using DUS 120/155 UF BAG0012.6 03.15 Transportation 10 Transportation WARNING Risk of crushing, cutting, being caught and/or drawn in, or impact through unintentional releasing of the coupled machine. Carry out a visual check that the upper and lower link pins are firmly fixed with the linchpin against unintentional release. WARNING Risk of crushing, shearing, cutting, being caught and/or drawn in, or impact when making interventions in the machine, through unintentional machine movements. • On foldable machines, check that the transport locks are correctly locked. • Secure the machine against unintentional movements before starting transportation. WARNING Risk of crushing, cutting, being caught and/or drawn in, or impact from tipping and insufficient stability. • Drive in such a way that you always have full control over the tractor with the attached machine. In so doing, take your personal abilities into account, as well as the road, traffic, visibility and weather conditions, the driving characteristics of the tractor and the connected machine. • Before transportation, fasten the side locking device of the tractor lower link, so that the connected or coupled machine cannot swing back and forth. WARNING Risk of breaking during operation, insufficient stability and insufficient tractor steering and braking power from improper use of the tractor. These risks pose serious injuries or death. Comply with the maximum load of the connected machine and the permissible axle and drawbar loads of the tractor. If necessary, drive only with a partially filled tank. WARNING Risk of falling when riding on the machine, contrary to instructions. It is forbidden to ride on the machine and/or climb the machine while it is running. Instruct people to leave the loading site before approaching the machine. UF BAG0012.6 03.15 127 Transportation The tractor headlights are covered when using the front tank! If roof headlights are used instead, the transport speed may be maximum 30 km/h. CAUTION 128 • If a boom extension (option) is mounted, move it into the transport position. • Switch the work lights off during transport to avoid blinding other motorists. UF BAG0012.6 03.15 Using the machine 11 Using the machine When using the machine, observe the information in the following sections: • "Warning symbols and other labels on the machine" starting on page 17 and • "Safety information for the user", starting on page 27 ff. Observing this information is important for your safety. WARNING Risk of breaking during operation, insufficient stability and insufficient tractor steering and braking power from improper use of the tractor. Observe information on the maximum load of the coupled machine and the permissible axle and drawbar loads of the tractor. If necessary, drive only with a partially filled tank. WARNING Risk of crushing, cutting, being caught and/or drawn in, or impact through insufficient stability and tipping of the tractor and/or the connected machine. Drive in such a way that you always have full control over the tractor and the attached machine. In so doing, take your own abilities into account, as well as the road, traffic, visibility and weather conditions, the driving characteristics of the tractor and the coupled machine. WARNING Risk of crushing, cutting, being caught and/or drawn in, or impact through unintentional releasing of the coupled machine. Before machine use, carry out a visual check that the upper and lower link pins are firmly fixed with the linchpin against unintentional release. WARNING Danger for the operator or third parties from damaged components being ejected due to impermissibly high drive speeds of the tractor universal joint shaft. Observe the permissible machine drive speed before switching on the tractor universal joint shaft. UF BAG0012.6 03.15 129 Using the machine WARNING Risk of being caught and drawn in and danger from foreign objects being caught and thrown out in the danger area of the driven PTO shaft. • Whenever the machine is used, first check to ensure that the safety devices and guards of the PTO shaft are fully intact and functional. Have damaged safety devices and guards of the PTO shaft replaced immediately by a specialist workshop. • Check that the PTO shaft guard is secured against rotation by the supporting chain. • Maintain a sufficient safety clearance between you and the driven PTO shaft. • Direct people out of the danger area of the driven PTO shaft. • Shut down the tractor engine immediately in case of danger. WARNING Risk of accidental contact with crop protection agents / spray liquid. • Wear personal protective equipment ο when preparing the spray liquid. ο when cleaning / replacing the spraying nozzles during spraying operation. for all cleaning work carried out on the field sprayer after spraying operation. ο • 130 When wearing the required protective clothing, always observe the manufacturer's instructions, the product information, the user manual, the safety datasheet or the operating manual for the crop protection agent to be used. For example, use: ο Chemical-resistant gloves ο Chemical-resistant overalls ο Water-resistant footwear ο A face mask ο Breathing apparatus ο Safety glasses ο Skin protection agents, etc. UF BAG0012.6 03.15 Using the machine WARNING Risk to health from accidental contact with crop protection agents or spray liquid. • • 11.1 Put on protective gloves before ο using crop protection agent, ο carrying out work on a contaminated field sprayer or ο cleaning the field sprayer. Wash the gloves with clear fresh water from the fresh water tank ο immediately after contact with crop protection agent. ο before removing the gloves. Preparing for spraying operation • The field sprayer must be operating properly in order to guarantee correct application of the crop protection agent. Have the field sprayer tested regularly on a test rig. Rectify any deficiencies immediately. • Make sure of using the correct filter equipment. • Clean the field sprayer thoroughly before spreading a different crop protection agent. • Flush the nozzle line before: ο each time changing a nozzle. ο before rotating the multiple-nozzle head to another nozzle. See the section on "Cleaning", page 168 • UF BAG0012.6 03.15 Fill the flushing water tank and the clear water tank. 131 Using the machine 11.2 Preparing the spray liquid WARNING Risk of accidental contact with crop protection agent and/or spray liquid. 132 • Always induct the crop protection agent into the spray liquid tank using the induction bowl. • Swivel the induction bowl into the filling position before pouring in crop protection agent. • Observe the safety regulations on physical protective equipment and breathing apparatus for use when handling crop protection agent and preparing the spray liquid, in the instructions for use of the crop protection agent. • Do not prepare the spray liquid in the vicinity of wells or surface water. • Avoid leaks and contamination with crop protection agent and/or spray liquid through appropriate conduct and wearing appropriate physical protection equipment. • To avert risks to third parties, do not leave the prepared spray liquid, unused crop protection agent or used crop protection agent canisters and the uncleaned field sprayer unattended. • Protect contaminated crop protection agent canisters and the contaminated field sprayer from precipitation. • During and after preparing the spray liquid, ensure sufficient cleanliness in order that risks may be kept as low as possible (e.g. thoroughly wash used gloves before removing them and dispose of the washing water and cleaning fluid in the proper manner). • The prescribed water and agent spray rate can be found in the directions for use for the crop protection agent. • Read the directions for use for the agents and observe the specified precautions. UF BAG0012.6 03.15 Using the machine WARNING Danger for people and animals from accidental contact with spray liquid while filling of the spray liquid tank is underway. • Wear personal protective equipment when handling crop protection agent / dumping spray liquid from the spray liquid tank. The type of personal protective equipment required depends on the manufacturer's instructions, the product information, the directions for use, the safety datasheet or the user manual for the crop protection agent in question. • Never leave the field sprayer unattended during filling. ο Never fill the spray liquid tank beyond the nominal volume. ο When filling the spray liquid tank, never exceed the permissible load of the field sprayer. Pay attention to the respective specific weight of the liquid in question. ο During filling, always watch the fill level indicator to avoid overfilling the spray liquid tank. ο Pay particular attention while filling the spray liquid tank to sealed surfaces; no spray liquid may be allowed to get into the sewerage system. • Check the field sprayer before each filling for damage, e.g. for leaking tanks and hoses, as well as for the correct positioning of all control elements. During filling, pay attention to the permissible load capacity for your field sprayer. Always take into account, when filling your field sprayer, the differing specific weights [kg/l] for individual liquids. Specific weights of different liquids Liquid Water Urea AUS NP solution Density [kg/l] 1 1.11 1.28 1.38 AMATRON 3: On the AMATRON 3, call up the fill indicator from the Work menu. UF BAG0012.6 03.15 133 Using the machine • As it is difficult to dispose of residues in an environmentallyfriendly manner, carefully calculate the required filling quantity or re-fill quantity to avoid leaving any residue at the end of spraying operation. ο To calculate the required re-fill quantity for topping up the spray liquid tank, use the "Filling table for remaining spray area". To do this, subtract the technical, undiluted residue in the sprayer boom from the calculated re-fill quantity. Refer to the section "Filling table for remaining areas" Procedure 1. Determine the required water and agent spray rate by consulting the directions for use for the crop protection agent. 2. Calculate the filling quantity or re-fill quantity for the area to be treated. 3. Fill the machine and blend in the agent. 4. Agitate the spray liquid before commencing spraying operation, in accordance with the instructions of the spraying agent manufacturer. Fill the machine preferably using a suction hose and blend in the agent while filling. The induction area is thereby flushed with water constantly. • During the filling process, start blending in the agent once the tank filling level has reached more than 20%. • When using more than one agent: • ο Clean the canister immediately after each induction of an agent. ο Flush the induction port after each induction of an agent. When filling, no foam must escape from the spray liquid tank. The addition of a froth-inhibiting agent also prevents the spray liquid tank from frothing over. The agitators normally remain switched on from the initial filling to the end of the spraying operation. The instructions of the agent manufacturer, however, have priority. 134 UF BAG0012.6 03.15 Using the machine • With the agitator running, feed the water-soluble plastic film bag directly into the spray liquid tank. • Before spraying, fully dissolve the urea by circulating the liquid. When dissolving large quantities of urea, the temperature of the spray liquid falls more sharply; the urea consequently dissolves more slowly. The warmer the water, the faster and more completely the urea can dissolve. • Carefully wash the empty agent canisters, render them unusable, collect and dispose of them in a proper manner. Do not reuse them for other purposes. • If only spray liquid is available for washing the agent canisters, first use this to carry out preliminary cleaning. Then wash them meticulously when clear fresh water is available, e.g. before preparing the next load for the spray liquid tank or when diluting the residue from the last load. • Carefully wash out the empty agent tank (e.g. using canister flushing) and add the flushing water to the spray liquid! To prevent limescale, the degree of hardness of the water may not exceed 14°dH (German degrees of hardness)! UF BAG0012.6 03.15 135 Using the machine 11.2.1 Calculating the filling and re-fill quantity To calculate the required re-fill quantity for final filling of the spray liquid tank use the "Filling table for remaining spray area", Seite 137.9 Example 1: The following are given: Tank nominal volume 1,200 l Residue in the tank 0l Water consumption 400 l/ha Agent required per ha Agent A 1.5 kg Agent B 1.0 l Question: How many litres of water, how many kg of Agent A and how many litres of Agent B must be used to treat a surface of 2.5 ha in area? Answer: Water: 400 l/ha x 3 ha = 1,200 l Agent A 1.5 kg/ha x 3 ha = 4.5 kg Agent B 1.0 l/ha x 3 ha = 3l Example 2: The following are given: Tank nominal volume 1,200 l Residue in the tank 200 l Water consumption 500 l/ha Recommended concentration 0.15 % Question 1: How many litres or kg of agent are needed to fill the tank? Question 2: How large is the area to be treated in ha if a residue of 20 l remains in the tank after spraying? 136 UF BAG0012.6 03.15 Using the machine Formula and answer to Question 1: Refill amount of water [l] x Concentration [%] 100 (1,200 – 200) [l] x 0.15 [%] 100 = Addition of agent [l or kg] = 1.5 [l or kg] Formula and answer to Question 2: Quantity of liquid available [l] – Residue [l] Water consumption [l/ha] 1,200 [l] (Tank nominal volume) – 20 [l] (Residue) 500 [l/ha] Water consumption 11.2.2 = Area to be treated [ha] = 2.36 [ha] Filling table for remaining spray area To calculate the required re-fill quantity for final filling of the spray liquid tank use the "Filling table for remaining spray area". Deduct the residue in the spray line from the calculated re-fill quantity. Refer to the "Spray lines" section, Seite 99. The specified re-fill quantities apply for a spray rate of 100 l/ha. For other spray rates, the re-fill quantity increases by a multiple. Distance travelled [m] Re-fill quantities [l] for sprayer booms with working widths of 10 m 12 m 15 m 16 m 18 m 20 m 21 m 24 m 10 1 1 2 2 2 2 2 2 20 2 2 3 3 4 4 4 5 30 3 4 5 5 5 6 6 7 40 4 5 6 6 7 8 8 10 50 5 6 8 8 9 10 11 12 60 6 7 9 10 11 12 13 14 70 7 8 11 11 13 14 15 17 80 8 10 12 13 14 16 17 19 90 9 11 14 14 16 18 19 22 100 10 12 15 16 18 20 21 24 200 20 24 30 32 36 40 42 48 300 30 36 45 48 54 60 63 72 400 40 48 60 64 72 80 84 96 500 50 60 75 80 90 100 105 120 UF BAG0012.6 03.15 137 Using the machine Example: Distance still to travel (travel distance): 100 m Spray rate: 100 l/ha Sprayer booms: Q-plus boom Working width: 15 m Number of part width sections: Spray line residue: 5 5.2 l 1. Calculate the re-fill quantity using the filling table. For the example, the re-fill quantity is 15 l. 2. Deduct the residue in the spray line from the calculated re-fill quantity. Required re-fill quantity: 15 l – 5.2 l = 9.8 l 138 UF BAG0012.6 03.15 Using the machine 11.3 Filling with water WARNING Danger for people and animals from accidental contact with spray liquid while filling of the spray liquid tank is underway. • → UF BAG0012.6 03.15 When filling the spray liquid tank using a mains water supply, never allow the filling hose and the contents of the spray liquid tank to come into direct contact. This is the only way to prevent spray liquid from being sucked or pushed into the mains supply. Secure the end of the filling hose at least 10 cm above the filling opening on the spray liquid tank. The free flow which this creates offers the absolute maximum levels of safety against the backflow of spray liquid into the mains water supply. • Avoid the formation of froth. No froth should escape from the spray liquid tank during filling. A large-cross-section funnel extending down the base of the spray liquid tank is an effective obstacle to the formation of froth. • Only fill the spray liquid tank using a used filling sieve. 139 Using the machine 11.3.1 Filling the spray liquid tank via the filling opening 1. Determine the precise water filling quantity (refer to the section "Calculating the filling quantity or re-fill quantity", Seite 136). 2. Open the hinged/screw lid on the filling opening. 3. Fill the spray liquid tank via the filling opening with a "free flow" from the mains water supply. 4. Always pay attention to the fill level indicator during filling. 5. At the latest, you should stop filling the spray liquid tank • when the pointer on the fill level indicator reaches the fill limit mark. • before the field sprayer's authorised load is exceeded by the quantity of liquid poured in. 6. Close the filling opening properly using the hinged/screw lid. 11.3.2 Filling the spray liquid tank via the suction port on the control terminal • Always pay attention to the fill level indicator during filling. • At the latest, you should stop filling the spray liquid tank ο when the pointer on the fill level indicator reaches the fill limit mark. ο before the field sprayer's authorised load is exceeded by the quantity of liquid poured in. Preferably perform the filling from a suitable container and not from an open water access point. 140 UF BAG0012.6 03.15 Using the machine 1. Determine the precise water filling quantity (refer to the section "Calculating the filling quantity or re-fill quantity", Seite 136). 2. Couple the suction hose to the filling connection using the quick coupling. 3. Place the suction hose in the extraction point. 4. On the control terminal, move the switch tap to the specified position: 4.1 Move switch tap F to position 0. 4.2 Move switch tap E to position 0. 4.3 Move switch tap D (optional) to the position. 4.4 Move switch tap B to the tion. posi- 4.5 Move switch tap A to the tion. posi- 5. Run the pump at approx. 540 rpm. 6. If the tank is full 6.1 Remove the suction hose from the extraction point so that the pump is able to suck up all remaining liquid in the suction hose, Fig. 113 6.2 Switch tap A in position 7. Close the filling opening properly using the hinged/screw lid. Increasing the suction power by cutting in the injector: Switch tap F in position . The injector must not be cut in until the pump has drawn in water. UF BAG0012.6 03.15 • The water being sucked via the injector does not flow through the suction filter. • Comfort equipment with filling stop: The auxiliary injector must not be switched on, otherwise the automatic filling stop will not work. 141 Using the machine First of all, place suction chest lever A in position then, if the suction hose has not been removed from the water extraction point, uncouple the suction hose from the suction port. Filling from open water access points Preferably fill them from a suitable tank and not from an open public water extraction point. 11.4 Filling the fresh water tank WARNING Unauthorised contamination of the fresh water tank with crop protection agent or spray liquid. Only fill the fresh water tank with clear fresh water, never with crop protection agent or spray liquid. When using the field sprayer, ensure that there is always an adequate supply of clear fresh water. When filling the spray liquid tank, also check and fill the fresh water tank. 11.5 Inducting agents WARNING While inducting agents, wear appropriate protective clothing as prescribed by the crop protection agent manufacturer. Induct the respective agent via the induction bowl (Fig. 114/1) into the water of the spray liquid tank. A distinction is drawn here between the induction of agents in liquid and powder form and of urea. Fig. 114 142 UF BAG0012.6 03.15 Using the machine 11.5.1 Inducting liquid agents Fig. 115/... 1. Fill the spray liquid tank halfway with water. 2. Move switch tap F to the position. 3. Move switch tap E to the position. 4. Move switch tap D (optional) to the position. 5. Move switch tap B to the position. 6. Move switch tap A to the position. 7. Open the induction bowl lid. 8. Pour the quantity of agent calculated and measured for filling the tank into the induction bowl (max. 60 l). → Fully evacuate the contents from the induction bowl. 9. Run the pump at approx. 400 rpm. 10. Move switch tap E to position 0. 11. Move switch tap F to position 0. 12. Close the induction bowl lid. Fig. 115 13. Top up with water. For simultaneous filling of the spray liquid tank via the suction port on the control terminal: Move switch tap A to the UF BAG0012.6 03.15 position 143 Using the machine 11.5.2 Ecofill Fig. 116/... 1. Fill the spray liquid tank halfway with water. 2. Move switch tap F to position 0. 3. Move switch tap E to position 0. 4. Move switch tap D (optional) to the position. 5. Move switch tap B to the position. 6. Move switch tap A to the position. 7. Run the pump at approx. 400 rpm. . 8. Move switch tap F to position 0. 9. Move switch tap F to position 0 open the switch tap on the Ecofill connection. → Close the switch tap on the Ecofill connection when the desired quantity has been evacuated from the Ecofill container. 10. Top up with water. Fig. 116 144 UF BAG0012.6 03.15 Using the machine 11.5.3 Inducting agents in powder form and urea Before spraying, fully dissolve the urea by circulating liquid. When dissolving large quantities of urea, the temperature of spray liquid will fall more sharply, meaning that the urea will only dissolve slowly. The warmer the water, the faster and more completely the urea will dissolve. Fig. 117/... 1. Fill the spray liquid tank halfway with water. 2. Move switch tap F to position 3. 0. Move switch tap E to position 0. 4. Move switch tap D (optional) to the position. 5. Move switch tap B to the position. 6. Move switch tap A to the position. 7. Open the induction bowl lid. 8. Pour the quantity of agent or urea calculated and measured for filling the tank into the induction bowl (max. 60 l). 9. Run the pump at approx. 400 rpm. position. 10. Move switch tap E to the Pump liquid through the induction bowl, until its contents have fully dissolved. 11. When the agent has fully dissolved, move position until the switch tap F to the contents have been fully evacuated from the induction bowl. 12. Move switch tap E, F, to position 0. Fig. 117 13. Close the induction bowl lid. 14. Top up with water. For simultaneous filling of the spray liquid tank via the suction port on the control terminal: Move switch tap A to the UF BAG0012.6 03.15 position 145 Using the machine 11.5.4 Preliminary cleaning of the canister using spray liquid Fig. 118/... 1. Move switch tap F to the position. 2. Move switch tap E to position 0 3. Move switch tap D (optional) to the position. 4. Move switch tap B to the position. 5. Move switch tap A to the position. 6. Open the induction bowl lid. 7. Run the pump at approx. 400 rpm. 8. Wash the canister or other containers using canister flushing. Move switch tap E to the position. 9. Press the canister down for at least 30 secs and wash it. 10. Move switch tap E to position 0 and remove canister. position 11. Move switch tap F to the until the contents have been fully evacuated from the induction bowl. 12. Move switch tap F to position 146 Fig. 118 0. UF BAG0012.6 03.15 Using the machine 11.5.5 Cleaning the canister with flushing water Cleaning the canister with flushing water dilutes the concentration of the spray liquid. Fig. 119/... 1. Move switch tap F to position 0. 2. Move switch tap E to position 0. 3. Move switch tap D (optional) to position 0. 4. Move switch tap B to the position. 5. Move switch tap A to the position. 6. Open the induction bowl lid. 7. Run the pump at approx. 400 rpm. 8. Wash the canister or other containers using canister flushing. Move switch tap E to the position. 9. Press the canister down for at least 30 secs and wash it. 10. Move switch tap E to position 0 and remove canister. 11. Move switch tap A to the position. 12. Move switch tap D to the position. Fig. 119 13. Move switch tap F to the position until the contents have been fully evacuated from the induction bowl. 14. Move switch tap F to position UF BAG0012.6 03.15 0. 147 Using the machine 11.6 Spraying operation Depending on how the machine is fitted out, observe • the separate operating manual for the operating terminal or • the "Manual operation HB" section, page 62. Special instructions for spraying operation • • • • • • Test the field sprayer by carrying out calibration ο before the start of the season. ο in the case of deviations between the actual indicated spray pressure and the spray pressure prescribed in the spray table. Before commencing spraying operation, precisely determine the required spray rate with the help of the crop protection agent manufacturer's directions for use (refer to the section "Preparing the spray liquid", Seite 132). ο AMATRON 3 / AMASPRAY+: Before spraying commences, enter the required spray rate (target rate) into the operating terminal. ο AMASET+: Before spraying commences, enter the required spray pressure into the operating terminal. During spraying operation, precisely adhere to the required spray rate [l/ha] ο in order to achieve the best possible results from your crop protection measure. ο to avoid unnecessary pollution of the environment. Select the required nozzle type from the spray table before spraying starts, taking account of ο the intended operational speed, ο the required spray rate and ο the required atomisation characteristic (fine, medium or coarse-dropped) of the crop protection agent used for the crop protection measure. Refer to the section "Spray tables for flat-fan, anti-drift, injector and airmix nozzles", Seite 200. Select the required nozzle size from the spray table before spraying starts, taking account of ο the intended operational speed, ο the required spray rate and ο the target spray pressure. Refer to the section "Spray tables for flat-fan, anti-drift, injector and airmix nozzles", Seite 200. Select a low operational speed and a low spray pressure to prevent wastage from drifting. Refer to the section "Spray tables for flat-fan, anti-drift, injector and airmix nozzles", Seite 200. 148 UF BAG0012.6 03.15 Using the machine • At wind speeds of 3 m/s, take additional drift reduction measures (refer to the section "Measures for drift reduction", Seite 152. • Even lateral distribution can only be achieved with the swing compensation unlocked. • Refrain from use if average wind speeds top 5 m/s (leaves and thin twigs move). • Only switch the sprayer boom on and off during travel to avoid the application of excessive doses. • Avoid the application of excessive doses from overlapping caused by imprecise bout tracking from one spray path to the next and/or when cornering on the headland with the sprayer boom switched on. • When increasing operational speed, make sure that the maximum permissible pump drive speed of 550 rpm is not exceeded. • During spraying operation, constantly check actual spray liquid consumption with reference to the area treated. • If spraying operation is interrupted due to bad weather, clean the suction filter, the pump, the valve chest and the spray lines. Refer to Seite 164. • Spray pressure and nozzle size influence drop size and the volume of liquid sprayed. The higher the spray pressure, the smaller the droplet diameter of the spray liquid. The smaller droplets are subject to increased, undesirable drifting. AMASET+/ Manual operation HB: • If the spray pressure is increased, the spray rate also increases. • If the spray pressure is decreased, the spray rate also decreases. • If the operational speed is increased while the nozzle size and spray pressure remain constant, the spray rate decreases. • If the operational speed is decreased while the nozzle size and spray pressure remain constant, the spray rate increases. AMATRON 3 / AMASPRAY+: UF BAG0012.6 03.15 • Operational speed and pump drive speed can be selected within broad limits, owing to the automatic, area-based spray rate control. • The pump delivery capacity is dependent on the pump drive speed. Select the pump drive speed (between 400 and 550 rpm.) so that there is always an adequate flow rate to the sprayer boom and for the agitator. When making this choice, always take account of the fact that more spray liquid needs to be conveyed at higher operational speeds and higher spray rates. 149 Using the machine 11.6.1 • The agitator normally remains switched on from filling to the end of spraying operation. On this account, the instructions of the agent manufacturer are decisive. • If there is a sudden significant drop-off in spray pressure, the spray liquid tank is empty. • Residues in the spray liquid tank can be applied correctly up to a pressure drop of 25%. • If the spray pressure drops off while conditions remain otherwise unaltered, the suction or pressure filter are blocked. Applying the spray liquid • Properly couple the field sprayer to the tractor. • Before starting spraying, check the following machine data on the operating terminal ο the values for the permitted spray pressure range of the spraying nozzles installed in the sprayer boom. ο the value "Pulses per 100m". • Check the indicated spray pressure during spraying operation. AMATRON 3 / AMASPRAY+: Ensure that the indicated spray pressure does not deviate under any circumstances by more than ± 25 % from the target spray pressure given in the spray table, e.g. by changing the spray rate using the plus/minus buttons. Larger deviations than this from the target spray pressure make it impossible to achieve the best possible results from your crop protection measure and cause pollution of the environment. • Decrease or increase the operational speed until you are back within the permissible spray pressure range for the target spray pressure. • Never keep spraying until the spray liquid tank is empty (does not apply at the end of spraying operation). Refill the spray liquid tank before the fill level reaches approx. 50 litres. • At the end of spraying operation, when the fill level falls below approx. 50 litres, switch off the agitator. Example: Required spray rate: 200 l/ha Intended operational speed: 8 km/h Nozzle type: AI Nozzle size: '05' Permissible pressure range for the spraying nozzle when fitted: min. pressure 2 bar max. pressure 7 bar Target spray pressure: 3.7 bar Permissible spray pressure: 3.7 bar ±25 min. 2.8 bar and max. 4.6 bar % 150 UF BAG0012.6 03.15 Using the machine UF with HB volumetric remote control, see also page 62! 1. Prepare and stir the spray liquid correctly in accordance with the instructions from the crop protection agent manufacturer. Refer to the section "Preparing the spray liquid", Seite 132. 2. Set the desired stirring stage (normally stirring stage "2"). Refer to the "Agitator" section, page 66. 3. Switch on the operating terminal. 4. Fold out the sprayer boom, see page 81. 5. Depending on the nozzles being used, set the working height of the sprayer boom (gap between the nozzles and the crop) according to the spray table. 6. Move switch tap F to position 0. 7. Move switch tap E to position 0. 8. Move switch tap D (optional) to the position. 9. Move switch tap B to the position. 10. Move switch tap A to the position. 10.1 Move switch tap C to a medium stirring stage. 11. AMATRON 3 / AMASPRAY+: Enter the "target rate" value for the required spray rate or check the stored value. Fig. 120 AMASET+: Manual operation HB: Set the calculated spray pressure. 12. Run the pump at pump operating speed (min. 400 rpm). 13. Select the right tractor gear and move off. 14. Switch off spraying via the operating terminal. UF BAG0012.6 03.15 151 Using the machine Driving to the field with the agitator switched on 1. Switch off spraying. 2. Switch on the universal joint shaft. 3. Set the desired stirring stage. If this stirring stage differs from that required for spraying operation, reset the stirring stage selected for the journey before commencing spraying operation. 11.6.2 11.6.3 Drift reduction measures • Reschedule treatment for the early morning or the evening hours (there is generally less wind). • Choose larger nozzles and a higher water spray rate. • Reduce spray pressure. • Precisely maintain the working height of the boom, because the risk of drifting rises very sharply as the distance between the nozzles increases. • Reduce operational speed (to below 8 km/h). • Use so-called anti-drift (AD) nozzles or injector (ID) nozzles (nozzles which produce a high proportion of coarse drops). • Observe the distance requirements of the respective crop protection agent Dilute the spray liquid with flushing water 1. Activate the pump, adjust pump speed to 450 rpm 2. Move switch tap A to position . 3. Move switch tap B to position . 4. Control the flushing water supply using the auxiliary agitator. Once the desired amount of flushing water has been supplied:: 5. Move switch tap A to position 152 . UF BAG0012.6 03.15 Using the machine 11.7 Residues There are three types of residue: • excessive residue remaining in the spray liquid tank when the spraying operation is finished → This excessive residue is discharged diluted or pumped-out and disposed of. • the technical residue that remains in the spray liquid tank, the suction chest and the spray line when the spray pressure drops off by 25% The suction chest is composed of the suction filter, pump and pressure controller sub-assemblies. Observe the values for the technical residues given on page 99. → This technical residue is discharged diluted onto the field while cleaning the field sprayer. • The final residue that remains in the spray liquid tank, the suction chest and the spray line after being cleaned with air discharge from the nozzles. → This final diluted residue is drained off after cleaning. • Ensure that the residue in the spray line is still being sprayed at an undiluted concentration. Always spray this residue on an untreated area. The distance needed to use up this undiluted residue can be found in the section entitled "Spray lines and nozzles", Seite 99. The residue contained in the spray line is dependent on the sprayer boom working width. • When the residue in the spray liquid tank falls below 5%, switch off the agitator to spray the spray liquid until the tank is empty. With the agitator switched on, the technical residue increases compared to the specified values. • Measures intended for the user's protection apply when emptying residues. Observe the instructions from the crop protection agent manufacturer and wear appropriate protective clothing. Disposing of residues UF BAG0012.6 03.15 153 Using the machine 11.7.1 Diluting the residue in the spray liquid tank and spraying the diluted residue at the end of spraying operation For machines with comfort equipment, see operating manual for AMATRON 3. Fig. 121/... 1. Switch off the sprayer boom. 2. Move switch tap F to position 0. 3. Move switch tap E to position 0. 4. Move switch tap D to the position. 5. Move switch tap B to the position. 6. Move switch tap A to the position. 7. Run the pump at approx. 400 rpm. 8. Dilute the residue in the spray liquid tank with approx. 60 litres from the flushing water tank. Fig. 121 154 UF BAG0012.6 03.15 Using the machine Fig. 122/... 9. Move switch tap A to the position. 10. Move switch tap B to the position. 11. Move switch tap D to the position. 12. Switch on the sprayer boom. → Then spray the diluted residue on an untreated area. 13. When the residue in the spray liquid tank falls below 50 litres, switch agitator C to 0. 14. Change five times between spraying on and spraying off • Each time keep spraying switched off for at least 10 seconds. • The spray pressure should be at least 5 bar 15. Repeat steps 3 to 14. Fig. 122 When spreading residues on already treated areas, observe the maximum permissible spray rate of the agents. UF BAG0012.6 03.15 155 Using the machine 11.7.2 Draining the spray liquid tank using the pump Fig. 123/... 1. Connect a drainage hose to the male connector on the machine side using a two-inch camlock coupling. 2. Push the guard plate to the side and move switch tap D to the position. 3. Move switch tap B to the position. 4. Move switch tap A to the position. 5. Run the pump at pump operating speed (540 rpm). 6. After draining, move switch tap D to position 0 Fig. 123 156 UF BAG0012.6 03.15 Using the machine 11.8 Cleaning the field sprayer • Keep the exposure time as short as possible, for example by daily cleaning after the spraying operation is complete. Do not leave the spray liquid in the spray liquid tank for an excessively long period, i.e. overnight. The service life and reliability of the field sprayer mainly depend on the exposure time of the crop protection agent on the materials of the field sprayer. • Clean the field sprayer thoroughly before applying a different crop protection agent. • Carry out the cleaning process on the field where you last carried out the treatment. • Carry out the cleaning process using water from the flushing water tank. • You can carry out the cleaning process in the courtyard if you have a collecting facility installed (e.g. a Biobed). Observe all national regulations involved. • When spreading residues on areas already treated, observe the maximum permissible spray rate of the agents. For machines with comfort equipment, see operating manual for AMATRON 3. UF BAG0012.6 03.15 157 Using the machine 11.8.1 Cleaning the sprayer with the tank empty • Clean the spray liquid tank on a daily basis! • The flushing water tank must be filled completely. • The cleaning process should be carried out in a threefold reduction procedure. Fehler! Verweisquelle konnte nicht gefunden werden./... 1. Set the pump drive pumping speed to 450 rpm. 2. Switch tap A in position . B in position . 3. Switch tap 4. Agitator C completely to remove deposits in the in the hose.. → Flush the agitators with 10 % of the flushing water supply. 5. Switch off the agitator(s). DUS: Spray lines are automatically rinsed. To do so, use 10 % of the flushing water supply. 6. Switch tap → B in position Perform internal cleaning with 10 % of the flushing water supply. 7. Switch tap 8. Switch tap B in position A in position . Fig. 124 . 9. Spreads residues already diluted on the treated area when driving. 10. Using the on-board computer, switch sprayer on and off several times for several seconds. The valves and return lines are flushed by switching on and off. → 158 Keep flushing the diluted residues until air escapes from the nozzles. UF BAG0012.6 03.15 Using the machine Repeat the procedure three times. Third run: • Flushing the DUS and agitator is not necessary on the third run. • Use the rest of the flushing water supply for the internal cleaning. 11. Drain the final residue, see page 159. 12. Clean the suction filter and pressure filter, see page 160, 160. 11.8.2 Draining the final residues • On the field: Spread the final residues over the field. • In the courtyard: ο Place a suitable collecting container under the drain opening of the suction chest and the drain hose for the pressure filter and collect the final residues. ο Dispose of the collected spray liquid residue in accordance with the corresponding legal guidelines. ο Collect the spray liquid residues in suitable containers. 1. Place a suitable collection vessel under the outlet opening of the suction side VARIO switching mechanism. position 2. Move switch tap A to the and dump the final residue from the spray liquid tank into a suitable collection vessel. position 3. Move switch tap A to the and dump the final residue from the suction chest into a suitable collection vessel. 4. Place a suitable collection vessel under the outlet opening of the pressure filter. 5. Push back the guard plate, position Move switch tap C to the and dump the final residue from the pressure filter. 6. Then move switch tap C back to position 0. Fig. 125 UF BAG0012.6 03.15 159 Using the machine 11.8.3 Cleaning the suction filter Clean the suction filter (Fig. 126) on a daily basis after spraying operation. 1. Undo the thumb screw (Fig. 126/1) on the suction filter. 2. Remove the filter cup (Fig. 126/2) while turning it gently left and right. 3. Pull out the filter insert (Fig. 126/3) and clean with water. 4. Check the O-rings (Fig. 126/4) for damage. 5. Reassemble the suction filter in the reverse sequence. Fig. 126 Make sure that the O-rings (Fig. 126/4) are correctly fitted. 11.8.4 Cleaning the suction filter when tank is full 1. Run the pump 300 U/min. 2. Move switch tap D to position . 3. Move switch tap E to position . 4. Move switch tap A to the position and dump the technical residue from the valve chest and the suction hose into a suitable collection vessel; see Seite 159. 5. Undo the thumb screw (Fig. 127/1) on the suction filter. 6. Remove the filter cup (Fig. 127/2) while turning it gently left and right. 7. Pull out the filter insert (Fig. 127/3) and clean with water. 8. Check the O-rings (Fig. 127/4) for damage. 9. Reassemble the suction filter in the reverse sequence. 10. Move switch tap E to position . 11. Check the suction filter for leak tightness. Fig. 127 160 UF BAG0012.6 03.15 Using the machine 11.8.5 Cleaning the pressure filter when the tank is empty 1. Undo the sleeve nuts. 2. Remove the pressure filter (Fig. 128/1) and clean with water. 3. Refill the pressure filter. 4. Check the screw connection for leaks. Fig. 128 11.8.6 Cleaning the pressure filter when the tank is full 1. Manually move suction chest B to position . 2. Move switch tap C to position → . Drain the residue into the pressure filter. 1. Undo the sleeve nuts. 2. Remove the pressure filter (Fig. 128/1) and clean with water. 3. Refill the pressure filter. 4. Check the screw connection for leaks. 5. Move switch tap C to position 0. 6. Manually move suction chest B to position . UF BAG0012.6 03.15 161 Using the machine 11.8.7 External cleaning Fig. 131/... 1. Move switch tap F to position 0. 2. Move switch tap E to position 0. 3. Move switch tap D (optional) to the position. 4. Move switch tap B to the position. 5. Move switch tap A to the position. 6. Run the pump at pump operating speed (at least 400 rpm). 7. Clean the field sprayer and the sprayer boom with the spray gun. Fig. 129 162 UF BAG0012.6 03.15 Using the machine 11.8.8 Cleaning the sprayer during a critical agent change 1. Clean the sprayer in three runs as always, see page 158 2. Fill up the flushing water tank. 3. Clean the sprayer, two runs, see page 158. 4. If the sprayer has been previously filled via the pressure connector: Clean the induction bowl using the spray pistol and extract the content of the induction bowl. 5. Drain the final residue, see page 159. 6. By all means, clean the suction filter and pressure filter, see page 160. 7. Clean the sprayer, one run, see page 158. 8. Drain the final residue, see page 159 UF BAG0012.6 03.15 163 Using the machine 11.8.9 Cleaning the sprayer with a full tank (work interruption) • If spraying operation is interrupted due to bad weather, clean the suction filter, the pump, the valve chest and the spray line. Fig. 130/... 1. Switch off the sprayer boom. 2. Switch off agitator C. 3. Move switch tap B to the position. 4. Move switch tap A to the position. 5. Run the pump at pump operating speed (at least 400 rpm). 6. Approx. 20 seconds after switching on the pump, close the DUS tap (DUS option) to avoid separation of the spray liquid. 7. Then spray the undiluted residue out of the sprayer boom onto an untreated area. 8. Then spray the residue - which has been diluted with water from the flushing water tank - out of the suction filter, pump, valve chest and spray line on to an untreated area. 9. Dump the technical residue from the valve chest into a suitable collection vessel; see Seite 158. 10. Clean the suction filter; see Seite 160. 11. Switch off the pump drive. 12. Reopen the DUS tap. Fig. 130 Continuing the spraying operation Before continuing with the spraying operation, activate the pump for five minutes at 540 min-1 and switch on the agitators completely. 164 UF BAG0012.6 03.15 Faults 12 Faults WARNING Risk of crushing, shearing, cutting, being caught and/or drawn in, trapping or impact through • unintentional falling of the machine raised using the tractor's three-point linkage. • unintentional falling of raised, unsecured machine parts. • unintentional start-up and rolling of the tractor-machine combination. Secure the tractor and the machine against unintentional start-up and rolling before eliminating faults on the machine. See page 118. Wait for the machine to stop before entering the machine danger area. Fault Cause There is no suction from the pump Blockage on the suction side • (suction filter, filter insert, suction hose). Remove the blockage. Pump is sucking in air. • Check the hose connection of the suction hose (optional) on the suction port for leak tightness. Suction filter and filter insert dirty. • Clean suction filter and filter insert. The valves are jammed or dam- • aged. Change the valves. Pump is sucking in air, recognisable from the air bubbles in the spray liquid tank. • Check the hose connections on the suction hose for leak tightness. Irregular delivery flow from the pump. • Check, and if necessary replace, the suction and pressure-side valves (see Seite 187). Oil/spray liquid mixture in the Pump diaphragm defective. oil filler neck or clearly visible consumption of the oil • Change all six piston diaphragms (see Seite 187). AMATRON 3 / AMASPRAY+: • Reduce the operational speed and increase the pump drive speed until the fault message disappears and the audible alarm signal stops Deviation from the prescribed • operational speed, which has an effect on the spray pressure Alter your operational speed to return to the prescribed operational speed range set for spraying operation The pump does not have any power The spray cone vibrates High operational speed; low pump drive speed; Remedy The required spray rate entered is not achieved AMATRON 3 / AMASPRAY+: There has been a deviation from the permissible spray pressure range for the nozzle fitted to the sprayer boom UF BAG0012.6 03.15 165 Cleaning, maintenance and repairs 13 Cleaning, maintenance and repairs WARNING Risk of crushing, shearing, cutting, being caught and/or drawn in, or impact through • unintentional falling of the machine raised using the tractor's three-point linkage. • unintentional falling of raised, unsecured machine parts. • unintentional start-up and rolling of the tractor-machine combination. Secure the tractor and machine against unintentional start-up and rolling, before carrying out cleaning, maintenance or repair work on the machine; see page 118. WARNING Risk of crushing, shearing, cutting, being caught and/or drawn in, or impact through unprotected danger points. • Mount protective equipment removed when cleaning, maintaining and repairing the machine. • Replace defective protective equipment with new equipment. DANGER • When carrying out maintenance and repair, observe the safety instructions, particularly "Field sprayer operation" section, Seite 33. • You may only carry out maintenance or repair work under moving machine parts that are in a raised position if such parts are secured with suitable, positive-fit locking devices against accidental lowering. Before each start-up 1. Check hoses/tubes and connection pieces for any visually obvious defects/leaking connections. 2. Repair any areas of chafing on hoses and pipes. 3. Immediately replace worn or damaged hoses and pipes. 4. Immediately repair leaking connections. 166 UF BAG0012.6 03.15 Cleaning, maintenance and repairs • Regular and proper maintenance will keep your trailed sprayer in good condition for a long time, and will prevent early signs of wear. Regular and proper maintenance is a requirement of our warranty conditions. • Use only genuine AMAZONE spare parts (see "Spare and wear parts and aids" section, page 16). • Use only genuine AMAZONE replacement hoses, and hose clamps made of V2A for assembly. • Specialist knowledge is the requirement for carrying out testing and maintenance operations. This specialist knowledge is not given here in this operating manual. • Observe environmental protection measures when carrying out cleaning and maintenance work. • Observe legal requirements when disposing of lubricants, e.g. oils and grease. Also affected by these legal requirements are parts that come into contact with these lubricants. • Do not exceed a greasing pressure of 400 bar when greasing with high pressure grease guns. • The following are prohibited: • UF BAG0012.6 03.15 ο drilling the running gear. ο drilling through pre-existing holes on the transport frame. ο welding load-bearing components. Protective measures are necessary, such as covering lines or extending lines in particularly critical locations ο during welding, drilling and grinding work. ο when working with cut-off wheels near plastic lines and electric wires. • Clean the field sprayer thoroughly with water before carrying out repair work. • Carry out repair work on the field sprayer with the pump switched off. • Thorough cleaning must be carried out before repair work can be carried out inside the spray liquid tank. Keep out of the spray liquid tank. • Disconnect the machine cable and power supply from the onboard computer when carrying out any cleaning or maintenance work. This applies especially to welding on the machine. 167 Cleaning, maintenance and repairs 13.1 Cleaning • Pay particular attention to the brake, air and hydraulic hose lines. • Never treat brake, air and hydraulic hose lines with benzene, benzene, petroleum or mineral oils. • After cleaning, grease the machine, in particular after cleaning with a pressure washer / steam jet or liposoluble agents. • Observe the statutory requirements for the handling and removal of cleaning agents. Cleaning with a pressure washer / steam jet • 168 Always observe the following points when using a pressure washer / steam jet for cleaning: ο Do not clean any electrical components. ο Do not clean any chromed components. ο Never aim the cleaning jet from the cleaning nozzle of the pressure washer / steam jet directly on lubrication and bearing points. ο Always maintain a minimum jet distance of 300 mm between the pressure washer or steam jet cleaning nozzle and the machine. ο Comply with safety regulations when working with pressure washers. UF BAG0012.6 03.15 Cleaning, maintenance and repairs 13.2 Winter storage and long periods out of operation 1. Clean the field sprayer thoroughly before placing it in winter storage; see Seite 168. 2. Remove and clean the suction filter (Fig. 131/1); see Seite 160. 3. Run the pump at a universal joint shaft speed of 300 rpm and let it "pump dry" when flushing is complete and liquid is no longer coming out of the spraying nozzles. 4. Switch off the universal joint shaft. 5. Agitator: 5.1 Drain the pressure filter (Fig. 131/2) via tap C. Move switch tap C to the tion. posi- 5.2 Unscrew the agitator hose (Fig. 132/4) (which comes out of tap C) from the spray liquid tank. 6. Unscrew the supply hose (Fig. 132/1) from the control valve. The supply hose (Fig. 132/1) connects the VARIO control on the pressure side (Fig. 131/B) with the suction chest. 7. Unscrew the return hose (Fig. 132/2) for the part width section valve from the VARIO control on the suction side (Fig. 131/A). Fig. 131 8. Remove the cap (Fig. 133/1) on switch tap F. Swivel switch tap F (Fig. 133/2) to the position. 9. Remove the internal cleaning hose (Fig. 132/3) for the VARIO control on the pressure side (Fig. 131/B). 10. Remove the pressure hose (Fig. 134/1) for the pump so that any remaining water can flow out of the pressure hose and VARIO control on the pressure side (B). Fig. 132 UF BAG0012.6 03.15 169 Cleaning, maintenance and repairs 11. Switch the universal joint shaft back on and run the pump for approx. ½ a minute until liquid is no longer coming out of the pressure-side connection. Do not refit the pressure hose until it is needed again. 12. Remove all the spray lines from the part width section valves (Fig. 135/1) and blow out with compressed air. 13. Remove all the nozzles. 14. Move the VARIO control on the suction side (Fig. 131/A) and the VARIO control on the pressure side (Fig. 131/B) several times between all their switch positions. Fig. 133 15. Move all remaining switch levers several times between all their switch positions. Store the removed suction filter until it is needed again in the field sprayer filling sieve. 16. Cover the pump pressure connection to protect it from dirt. 17. If the sprayer is also equipped with a pressure circulating system ο unscrew the drain plug on the pressure-relief valve. ο open the DUS switch tap. Fig. 134 18. Lubricate the universal joints on the PTO shaft and, for longer periods out of operation, grease the section tube. 19. Before winter storage, change the oil in the pump. • • 170 At temperatures below freezing, hand crank the piston diaphragm pumps before starting to prevent residual ice from damaging the piston and piston diaphragm. Fig. 135 Keep electronic equipment free from frost. UF BAG0012.6 03.15 Cleaning, maintenance and repairs 20. Drain the pressure sensor of the boom fitting with the boom lowered by removing the hose from the pressure sensor (Fig. 136/1), Fig. 136 21. Drain off the flushing water tank by removing the hose. Fig. 137 Before starting up again: UF BAG0012.6 03.15 • Install all of the dismantled parts. • Close the suction port drainage tap. • At temperatures below freezing, hand crank the piston diaphragm pumps before starting to prevent residual ice from damaging the piston and piston diaphragm. • Store the pressure gauge and any other electronic accessories in a place where they are safe from frost! 171 Cleaning, maintenance and repairs Winter storage of the Manual operation HB For winter storage or longer periods out of operation, the hose lines of the HB valve chest must be drained. 1. Undo the sleeve nut from the pressure-relief hose (Fig. 138/1) and the return hose (Fig. 138/2) and dump the residue. 2. Swivel the switch tap and part width section valves several times until liquid is no longer coming out. 3. Resecure the pressure-relief hose and return hose to the valve chest. Fig. 138 4. Release the spring clips (Fig. 139/1) on all the butt joint connectors. 5. Pull apart the butt joint connectors on all the part width section hoses, thus disconnecting the part width section hoses. 6. Let the residue run out and blow out the hoses at the nozzle end with compressed air. 7. Resecure the butt joint connectors with spring clips. Fig. 139 172 UF BAG0012.6 03.15 Cleaning, maintenance and repairs 13.3 Lubrication instructions Lubricants For lubrication, use a lithium saponified, multipurpose grease with EP additives: Company Lubricant designation Normal use conditions Extreme use conditions ARAL Aralub HL 2 Aralub HLP 2 FINA Marson L2 Marson EPL-2 ESSO Beacon 2 Beacon EP 2 SHELL Retinax A Tetinax AM Lubricating the PTO shaft For winter operation, grease the protective tubes to prevent them from freezing. Also observe the installation and service instructions from the PTO shaft manufacturer, which are fastened to the PTO shaft. Fig. 140 UF BAG0012.6 03.15 173 Cleaning, maintenance and repairs 13.4 Maintenance schedule – overview • Carry out maintenance work when the first interval is reached. • The times, continuous services or maintenance intervals of any third party documentation shall have priority. On a daily basis Component Maintenance work Pumps • Check the oil level • Clean and/or flush • Condition check Fluid filter (Profi-folding only) Spray liquid tank Clean and/or flush 185 179 168 168 Spraying nozzle Electric lighting Specialist workshop 168 Line filter in the nozzle lines (if present) • Valve chest Hydraulic hose lines see page 168 • Check for defects • Check for leak tightness • Replace defective bulbs 193 X 197 Every three months / 200 operating hours Component Maintenance work Line filter • Clean 168 / • Replace damaged filter inserts 109 174 see page Specialist workshop UF BAG0012.6 03.15 Cleaning, maintenance and repairs Annually / 1,000 operating hours Component Maintenance work Pumps • Oil change every 500 operating hours • Check valves and, if necessary, replace see page Specialist workshop 185 X 187 • Check the piston diaphragm and, if necessary replace 187 Fluid filter • Replace 179 Flow meter and return flow meter • Calibrate the flow meter 197 • Align the return flow meter Nozzles • Calibrate the field sprayer and check the lateral distribution; if necessary, replace worn nozzles 187 Volumetric remote control • Adjust 193 X As necessary Component Maintenance work Super-S boom • see page Correct the settings 182 181 Q-plus boom Volumetric remote control • Adjust each time a nozzle is changed 193 Upper and lower link pins • Check for defects and, if necessary, replace worn pins 197 Solenoid valves • Cleaning 179 Hydraulic throttle valve • Adjusting speed Hydraulic plug • Rinse / exchange the filter in the hydraulic plug UF BAG0012.6 03.15 Specialist workshop the actuation 181 180 175 Cleaning, maintenance and repairs 13.5 Hydraulic system WARNING Risk of infection through the high pressure hydraulic fluid of the hydraulic system entering the body. 176 • Only a specialist workshop may carry out work on the hydraulic system. • Depressurise the hydraulic system before carrying out work on the hydraulic system. • When searching for leak points, always use suitable aids. • Never attempt to plug leaks in hydraulic hose lines using your hand or fingers. Escaping high pressure fluid (hydraulic fluid) may pass through the skin and ingress into the body, causing serious injuries. If you are injured by hydraulic fluid, contact a doctor immediately. Risk of infection • When connecting the hydraulic hose lines to the tractor hydraulic system, ensure that the hydraulic system is depressurised on both the tractor and the trailer. • Ensure that the hydraulic hose lines are connected correctly. • Regularly check all the hydraulic hose lines and couplings for damage and soiling. • Have the hydraulic hose line checked at least once a year by a specialist for proper functioning. • Replace the hydraulic hose line if it is damaged or worn. Only use genuine AMAZONE hydraulic hose lines. • The hydraulic hose lines should not be used for longer than six years, including any storage time of maximum two years. Even with proper storage and approved use, hoses and hose connections are subject to natural ageing, thus limiting the length of use. However, it may be possible to specify the length of use from experience values, in particular when taking the risk potential into account. In the case of hoses and hose connections made from thermoplastics, other guide values may be decisive. • Dispose of old oil in the correct way. If you have problems with disposal, contact your oil supplier. • Keep hydraulic fluid out of the reach of children! • Ensure that no hydraulic fluid enters the soil or waterways. UF BAG0012.6 03.15 Cleaning, maintenance and repairs 13.5.1 Labelling of hydraulic hose lines Valve chest identification provides the following information: Fig. 141/... (1) Manufacturer's mark on the hydraulic hose lines (A1HF) (2) Date of manufacture of the hydraulic hose lines (02 04 = February 2004) (3) Maximum approved operating pressure (210 BAR). Fig. 141 13.5.2 Maintenance intervals After the first 10 operating hours, and then every 50 operating hours 1. Check all the components of the hydraulic system for tightness. 2. If necessary, tighten screw unions. Before each start-up: 1. Check hydraulic hose lines for visible damage. 2. Eliminate any scouring points on hydraulic hose lines and pipes. 3. Immediately replace worn or damaged hydraulic hose lines. 13.5.3 Inspection criteria for hydraulic hose lines For your own safety and in order to reduce pollution, ensure the following inspection criteria. Replace hoses if the respective hose fulfils at least one of the following criteria: • • • • • • Damage to the outer layer up to the ply (e.g. scouring points, cuts, cracks). Brittleness of the outer layer (crack formation of the hose material). Deformations which do not match the natural shape of the hose. Both in a depressurised and pressurised state or when bent (e.g. layer separation, bubble formation, pinching, bends). Leak points. Installation requirements not complied with. Life span of 6 years has been exceeded. The date of manufacture of the hydraulic hose line on the assembly is decisive for determining these six years. If the date of manufacture on the assembly is "2004", then the hose should not be used beyond February 2010. See also "Labelling of hydraulic hose lines". UF BAG0012.6 03.15 177 Cleaning, maintenance and repairs Common causes for leaking hoses / pipes and connection pieces include: • missing O-rings or seals 13.5.4 • damaged or badly fitting O-rings • brittle or deformed O-rings or seals • foreign bodies • badly fitting hose clips Installing and removing hydraulic hose lines Use • only genuine AMAZONE replacement hoses. These hoses stand up to chemical, mechanical and thermal loads. • hose clips made from V2A for fitting hoses, as a rule. When installing and removing hydraulic hose lines, always observe the following information: • Ensure cleanliness. • Always install the hydraulic hose lines to ensure the following in all operating positions ο There is no tension, apart from the hose's own weight. ο There is no possibility of jolting on short lengths. ο External mechanical influences on the hydraulic hose lines are avoided. Use appropriate arrangements and fixing to prevent any scouring of the hoses on components or on each other. If necessary, secure hydraulic hose lines using protective covers. Cover sharp-edged components. ο 178 The approved bending radii may not be exceeded. • When connecting a hydraulic hose line to moving parts, the hose length must be appropriate so that the smallest approved bending radius is not undershot over the whole area of movement and/or the hydraulic hose line is not overtensioned. • Fix the hydraulic hose lines at the specified fixing points. There, avoid hose clips, which impair the natural movement and length changes of the hose. • The coating of hydraulic hose lines is not permitted. UF BAG0012.6 03.15 Cleaning, maintenance and repairs 13.5.5 • Fluid filter Profi-folding only: Hydraulic fluid filter (Fig. 142/1) with contamination indicator (Fig. 142/2). • Green Filter fully functional • Red Replace filter To remove the filter, twist off the filter cover and remove the filter. WARNING Beforehand, depressurise the hydraulic system. Otherwise there is a risk of injury from hydraulic fluid escaping at high pressure. After replacing the filter, press the contamination indicator back into place. Fig. 142 → Green ring again visible. 13.5.6 • Cleaning the solenoid valves hydraulic block for Profi-folding To eliminate impurities from the solenoid valves, they must be flushed through. This may be necessary if deposit prevent the slider fully opening or closing. 1. Unscrew the magnetic cap (Fig. 143/1) abschrauben. 2. Remove the solenoid (Fig. 143/2) abnehmen. 3. Unscrew the valve rod (Fig. 143/3) with valve seats and clean with compressed air or hydraulic fluid Fig. 143 CAUTION Beforehand, depressurise the hydraulic system. Otherwise there is a risk of injury from hydraulic fluid escaping at high pressure. UF BAG0012.6 03.15 179 Cleaning, maintenance and repairs 13.5.7 Clean / exchange the filter in the hydraulic plug Not with Profi-folding. The hydraulic plugs are equipped with a filter (Fig. 144/1) that may block and then have to be cleaned / exchanged. This is the case when the hydraulic functions run slower. 1. Unscrew the hydraulic plug from the filter housing. Fig. 144 2. Remove the filter with compression spring. 3. Clean / exchange the filter. 4. Re-fit the filter and compression spring correctly. 5. Screw back on the hydraulic plug. In doing so, observe the correct seating of the O-ring seal. CAUTION Danger of injuries from escaping hydraulic oil at high pressure! Work on the hydraulic system only in a depressurized state. 180 UF BAG0012.6 03.15 Cleaning, maintenance and repairs 13.6 Adjusting the hydraulic throttle valve The operating speeds of the individual hydraulic functions are set in the factory. However, depending on the type of tractor, it may be necessary to correct these speed settings. The operating speed for a hydraulic function can be adjusted by screwing the hexagon socket head screw on the corresponding throttle in or out. • • Reduce operating speed = screw in hexagon socket head screw. Increase operating speed = screw out hexagon socket head screw. Always adjust the two throttles in a throttle pair equally when correcting the operating speed of a hydraulic function. 13.6.1 Q-plus boom Fig. 145, Fig. 146/ ... (1) Hydraulic throttle valve - fold out the boom. (2) Hydraulic throttle valve - lock and unlock the swing compensation. (3) Hydraulic throttle valve - fold in the left-hand boom. (4) Hydraulic throttle valve - fold in the righthand boom. (5) Hydraulic joint - height adjustment (the throttle is on the left-hand hydraulic cylinder for the height adjustment). When correcting the operating speed at which the boom folds in and out, always adjust all three hydraulic throttle valves (Fig. 145/1 and Fig. 145/3) equally. Fig. 145 Fig. 146 UF BAG0012.6 03.15 181 Cleaning, maintenance and repairs 13.6.2 Super-S boom Folding via the tractor control unit Fig. 147/… (1) Hydraulic throttle valve - height adjustment. (2) Hydraulic throttle valve - fold down the lefthand boom. (3) Hydraulic throttle valve - fold down the righthand boom. (4) Hydraulic throttle valve - lock and unlock the swing compensation. Fig. 148/… (5) Hydraulic throttle valve - fold out the boom. Fig. 147 (6) Hydraulic throttle valve - fold in the boom. Fig. 148 182 UF BAG0012.6 03.15 Cleaning, maintenance and repairs Profi-folding I Fig. 149/... (1) Throttle - fold in the right-hand boom. (2) Throttle - fold out the right-hand boom. (3) Throttle - lock the swing compensation. (4) Hydraulic joint – height adjustment (the throttle is located on the left-hand hydraulic cylinder for the height adjustment). (5) Hydraulic joints – tilt adjustment (the throttles are located on the hydraulic cylinder for the tilt adjustment). (6) Throttle - fold in the left-hand boom. (7) Throttle - fold-out the left-hand boom. Fig. 149 Profi-folding II Fig. 150/... (1) Throttle - lower the right-hand boom. (2) Throttle - raise the right-hand boom. (3) Throttle - fold in the right-hand boom. (4) Throttle - fold out the right-hand boom. (5) Throttle - lock the swing compensation. (6) Hydraulic joint – height adjustment (the throttle is located on the left-hand hydraulic cylinder for the height adjustment). (7) Hydraulic joints – tilt adjustment (the throttles are located on the hydraulic cylinder for the tilt adjustment). (8) Throttle - fold in the left-hand boom. (9) Throttle - fold-out the left-hand boom. (10) Throttle - lower the left-hand boom. (11) Throttle - raise the left-hand boom. Fig. 150 UF BAG0012.6 03.15 183 Cleaning, maintenance and repairs 13.7 Settings on the folded-out sprayer boom Alignment parallel to the ground When the sprayer boom is folded out and correctly adjusted, all the spraying nozzles must be parallel and at an equal distance from the ground. If this is not the case, with the swing compensation unlocked, align the folded-out sprayer boom using counterweights (Fig. 151/1). Secure the counterweights to the boom in an appropriate fashion. Fig. 151 Horizontal alignment As seen in the direction of travel, all the boom sections of the sprayer boom must be in alignment. Horizontal alignment may be necessary ● after an extended period of use ● or if the sprayer boom comes into hard contact with the ground. Inner boom section 1. Unscrew the lock nut on the adjusting screw (Fig. 152/1). 2. Turn the adjusting screw against the stop until the inner boom section is in alignment with the sprayer boom centre section. 3. Tighten the lock nut. Outer boom section 1. Undo the screws (Fig. 151/2) for the fastening lug (Fig. 151/3). Alignment is carried out right on the plastic jaw (Fig. 151/4) via die slotted holes on the fastening lug. Fig. 152 2. Align the boom section. 3. Tighten the screws (Fig. 151/2). 184 UF BAG0012.6 03.15 Cleaning, maintenance and repairs 13.8 Pump 13.8.1 Checking the oil level • Only use 20W30 branded oil or 15W40 multi purpose oil. • Ensure the correct oil level. Damage may be caused both by the oil level being too low or too high. • Foam generation and cloudy oil are signs of a faulty pump membrane. 1. Check whether the oil level is visible at the mark (Fig. 153/1) with the pump not running and standing on a flat surface. 2. If the oil level is not visible at the mark (Fig. 153/1), remove the lid (Fig. 153/2) and top up with oil. Fig. 153 13.8.2 Changing the oil • Change the oil every 400 to 450 operating hours, or at least once every year. • After a few operating hours, check the oil level; top up if necessary. 1. Remove the pump. 2. Remove the lid (Fig. 153/2). 3 Drain the oil. 3.1 Turn the pump on its head. 3.2 Rotate the drive shaft (Fig. 153/3) by hand until the used oil has all run out. The option also exists to drain the oil from the drain plug. However, with this procedure a slight oil residue remains in the pump; we therefore recommend the first approach. 4. Place the pump on an even surface. 5. Turn the drive shaft (Fig. 153/3) left and right alternately and slowly fill with new oil. The right quantity of oil has been reached when the oil is visible at the mark (Fig. 153/1). UF BAG0012.6 03.15 185 Cleaning, maintenance and repairs After each use, thoroughly clean the pump by pumping clear fresh water for several minutes. 186 UF BAG0012.6 03.15 Cleaning, maintenance and repairs 13.8.3 Checking and replacing the suction and pressure-side valves • Pay attention to the respective installation positions of the valves on the suction and pressure sides before removing the valve groups (Fig. 154/5). • When reassembling, ensure that the valve guide (Fig. 154/9) is not damaged. Damage may cause the valves to jam. • Always tighten the screws (Fig. 154/1) in a crosswise fashion using the specified torque. Improper tightening of the screws causes warping, which results in leaks. Fig. 154 1. If necessary, remove the pump. 2. Remove the nuts (Fig. 154/1,2). 3. Remove the suction and pressure port (Fig. 154/3 and Fig. 154/4). 4. Remove the valve groups (Fig. 154/5). 5. Check the valve seat (Fig. 154/6), valve (Fig. 154/7), valve spring (Fig. 154/8) and valve guide (Fig. 154/9) for wear or damage. 6. Remove the O-ring (Fig. 154/10). 7. Replace defective parts. 8. After testing and cleaning, fit the valve groups (Fig. 154/5). 9. Insert new O-rings (Fig. 154/10). 10. Mount the suction (Fig. 154/3) and pressure port (Fig. 154/4) on the pump housing. 11. Tighten the nuts (Fig. 154/1,2) in a crosswise fashion using a torque of 11 Nm. UF BAG0012.6 03.15 187 Cleaning, maintenance and repairs 13.8.4 Checking and replacing piston diaphragms (workshop work) • At least once a year, check that the piston diaphragm (Fig. 155/8) is in perfect condition by removing it. • Pay attention to the respective installation positions of the valves on the suction and pressure sides before removing the valve groups (Fig. 155/5). • Check and replace the piston diaphragm for each piston individually. Only remove the next piston in sequence after the currently removed piston has been completely checked and refitted. • Always swivel the piston to be checked upwards so that the oil in the pump housing does not run out. • As a rule, replace all piston diaphragms (Fig. 155/8), even if only one piston diaphragm distorted, punctured or porous. Fig. 155 Checking the piston diaphragm 1. If necessary, remove the pump. 2. Remove nuts (Fig. 155/1, 2). 3. Remove the suction and pressure port (Fig. 155/3 and Fig. 155/4). 4. Remove the valve groups (Fig. 155/5). 5. Remove the nuts (Fig. 155/6). 6. Remove the cylinder head gasket (Fig. 155/7). 7. Check the piston diaphragm (Fig. 155/8). 8. Replace the damaged piston diaphragm. 188 UF BAG0012.6 03.15 Cleaning, maintenance and repairs Replacing the piston diaphragm • • • Ensure the correct position for the recesses and/or holes on the hydraulic cylinders. Secure the piston diaphragm (Fig. 155/8) with a washer disc and a screw (Fig. 155/11) on the piston (Fig. 155/9), so that the rim shows on the cylinder head side (Fig. 155/7). Always tighten the nuts (Fig. 155/1,2) in a crosswise fashion using the specified torque. Improper tightening of the screws causes warping, which results in leaks. 1. Undo the screw (Fig. 155/11) and remove the piston diaphragm (Fig. 155/8) and the washer disc from the piston (Fig. 155/9). 2. If the piston diaphragm has been punctured, drain the oil/spray liquid mixture from the pump housing. 3. Remove the hydraulic cylinder (Fig. 155/10) from the pump housing. 4. Clean the pump housing by flushing it thoroughly with diesel oil or paraffin. 5. Clean all sealing faces. 6. Insert the cylinder (Fig. 155/10) back into the pump housing. 7. Fit the piston diaphragm (Fig. 155/8). 8. Mount the cylinder head (Fig. 155/7) on the pump housing and tighten the screws (Fig. 155/6) an equal amount in a crosswise fashion. Use adhesive for medium tight screw connections for the screw connection! 9. After testing and cleaning, fit the valve groups (Fig. 155/5). 10. Insert new O-rings. 11. Mount the suction (Fig. 155/3) and pressure port (Fig. 155/4) on the pump housing. 12. Tighten the nuts (Fig. 155/1,2) in a crosswise fashion using a torque of 11 Nm. UF BAG0012.6 03.15 189 Cleaning, maintenance and repairs 13.9 Calibrating the field sprayer Test the field sprayer by carrying out calibration • before the start of the season. • each time a nozzle is changed. • to check the setting information in the spray tables. • in the case of deviations between the actual and required spray rate [l/ha]. Any deviations between the actual and required spray rate [l/ha] may be caused by: • the difference between the actual operational speed and that indicated on the tractor meter and/or • natural wear to the spraying nozzles. Calibration equipment: (1) Suitable collection vessel, e.g. bucket, (2) A measuring container or dosing cylinder, (3) A stopwatch. Method: Determining the actual spray rate [l/ha] The actual spray rate [l/ha] can be determined 190 • by driving a calibration distance. • while standing via the nozzle output of individual spraying nozzles (individual nozzle output). UF BAG0012.6 03.15 Cleaning, maintenance and repairs 13.9.1 Determining the actual spray rate by driving a calibration distance Also with AMATRON 3 / AMASPRAY+ adjust the rate in manual mode according to the spray pressure as per the spray table. 1. Fill the spray liquid tank with water. 2. Switch on the agitator (normally at stirring stage "2"). 3. Switch on spraying and check that all nozzles are functioning perfectly. 4. Set the spray pressure for the desired rate [l/ha] in accordance with the spray table. 5. Switch off spraying. 6. Fill the spray liquid tank with water up to the full mark that appears on both sides (it may be necessary to reattach the mark). 7. In the field, measure out a calibration distance of precisely 100 m. Mark the beginning and end points. 8. Adjust the tractor engine speed to a constant rate with the manual accelerator lever, taking into account the pump drive speed (min. 400 rpm and max. 550 rpm). 9. With a rolling start, drive the calibration distance from the beginning to the end point at the prescribed operational speed. Switch on the sprayer boom precisely at the beginning point of the calibration distance and off again at the end point. 10. Determine the volume of water applied by refilling the spray liquid tank ο using a measuring container, ο by weight or ο using a water meter. a [l] x 10,000 = Spray rate [l/ha] b [m] x c [m] a: Water consumption over the calibration distance [l] b: Working width [m] c: Length of the calibration distance [m] Example: Water consumption a: 80 l Working width b: 20 m Length of the calibration distance c: 80 [l] x 10,000 20 [m] x 100 [m] UF BAG0012.6 03.15 = 100 m 400 [l/ha] 191 Cleaning, maintenance and repairs 13.9.1.1 Determining the actual spray rate while stationary via the individual nozzle output Also set the spray rate of the AMATRON 3 / AMASPRAY+ in manual mode via the spray pressure according to the spray table. Collect the nozzle output from at least 3 different spraying nozzles. To do this, check one spraying nozzle on both the left and right-hand boom, as well as one on the sprayer boom centre section. Then calculate the actual spray rate [l/ha] from the collected nozzle output [l/min] or read the appropriate value directly from the spray table. 1. Determine the precise spray rate [l/ha] required for the crop protection measure. Refer to the section "Calculating the filling and re-fill quantity", Seite 136. 2. Determine the required spray pressure. 3. 4. 5. 6. Fill the spray liquid tank with water. Switch on the agitator (normally at stirring stage "2"). Manually set the required spray pressure. Switch on spraying and check that all nozzles are functioning perfectly. 7. Switch off spraying. 8. Determine the individual nozzle output [l/min] from multiple nozzles, e.g. using a stopwatch,a dosing cylinder and a measuring container. 9. Calculate the average individual nozzle output [l/min]. Example: Nozzle size: '05' Intended operational speed: 8.0 km/h Required spray pressure: 3.2 bar Nozzle output on the left-hand boom: 1.9 l/min Nozzle output in the middle section: 2.0 l/min Nozzle output on the right-hand boom: 2.1 l/min Calculated average value: 2.0 l/min 192 UF BAG0012.6 03.15 Cleaning, maintenance and repairs 13.10 Setting the volumetric remote control Not for UF with AMATRON 3 / AMASPRAY+: AMASET+ : see operating manual AMASET+. Manual operation HB : see below. Adjust the volumetric remote control • once a year. • each time a nozzle is changed. 1. Fill the coupled sprayer with approx. 400 l of water. 2. Fold out the boom and run the pump at the operating speed (e.g. 450 rpm). 3. Switch on all part width sections. 4. Set the switch tap on the valve chest to Spray. → Water escapes from the nozzles. 5. On the pressure control valve, set the spray pressure to 3 bar. → Check the spray pressure using the pressure gauge. 6. Close one part width section. → The set spray pressure changes. 7. Set the rotating knob for the switched-off part width section so that the spray pressure returns to 3 bar. 8. Reopen the part width section. 9. Proceed this way with all part width sections. 10. After adjustment is complete, close all part width sections. → The indicated pressure should now also be 3 bar. If this is not the case, repeat the volumetric remote control adjustment process. 11. Set the switch tap on the valve chest to Spray. UF BAG0012.6 03.15 193 Cleaning, maintenance and repairs 13.11 Nozzles From time to time, check the seating of the slider (Fig. 156/7). To do this, insert the slider into the nozzle body (Fig. 156/2) as far as possible using moderate thumb pressure. Do not insert the slider up to the stop when in a new condition under any circumstances. After changing the nozzle: → Calibrate the sprayer. → Adjust the volumetric remote control (AMASET+, manual operation HB). Fig. 156 13.11.1 Fitting the nozzle 1. Insert the nozzle filter (Fig. 156/1) into the nozzle body (Fig. 156/2) from below. 2. Insert the nozzle (Fig. 156/3) into the bayonet nut (Fig. 156/4) Different coloured bayonet nuts are available for the different nozzles. 3. Insert the rubber seal (Fig. 156/5) above the nozzle. 4. Press a rubber seal into the seat for the bayonet nut. 5. Position a bayonet nut on the bayonet connection. 6. Screw on the bayonet nut up to the stop. 13.11.2 Removing the diaphragm valve if the nozzle is dripping Deposits on the diaphragm seat (Fig. 156/6) can cause the nozzles to drip after the boom is shut-off. If this occurs, clean the diaphragm in question as follows: 1. Pull the slider (Fig. 156/7) out of the nozzle body (Fig. 156/2) towards the bayonet nut. 2. Remove the spring element (Fig. 156/8) and the diaphragm (Fig. 156/9). 3. Clean the diaphragm seat (Fig. 156/6). 4. Reassembly occurs in the reverse sequence. Note the correct orientation for installing the spring element. For installation, the stepped, upwards-sloping edges on the left and right of the housing of the spring element (Fig. 156/10) must slope up in the direction of the boom profile. 194 UF BAG0012.6 03.15 Cleaning, maintenance and repairs 13.12 Line filter • Clean the line filters (Fig. 157/1) 3 - 4 months depending on operating conditions). • Change damaged filter inserts. Fig. 157 UF BAG0012.6 03.15 195 Cleaning, maintenance and repairs 13.13 Instructions on testing the field sprayer • Only authorised centres are permitted to carry out spray tests. • According to law, a spray test must be carried out: ο 6 months after commissioning (if not performed at time of purchase) at the latest, then ο every two years thereafter. Field sprayer test kit (optional), order no.: 930 420 Fig. 158/... (1) Hose connection (order no.: GE 112) (2) Push-on cap (order no.: 913 954) and connector (order no.: ZF 195) (3) Flow meter connection (4) Pressure gauge connection Fig. 158 Pump test - testing pump performance (delivery capacity, pressure) 1. Undo the sleeve nut (Fig. 159/1). 2. Attach the hose connection (GE112) with the test instrument (flow meter) connected. 3. Tighten the sleeve nut. 4. Check pump performance. 5. Follow steps 1-4 in reverse sequence. Fig. 159 196 UF BAG0012.6 03.15 Cleaning, maintenance and repairs Flow meter test 1. Remove all spray lines from the part width section valves (Fig. 160/1). 2. Connect the flow meter connection (Fig. 158/3) to a part width section valve and connect to the tester. 3. Block the connections for the remaining part width section valves using blanks (Fig. 158/2). 4. Switch on the sprayer boom. Fig. 160 Pressure gauge test 1. Remove a spray line from a part width section valve (Fig. 160/1). 2. Connect the pressure gauge connection (Fig. 158/4) to the part width section valve with the help of the turned socket. 3. Screw the check gauge 1/4 of an inch into the inside thread. 13.14 Electric lighting system Replacement of light bulbs: 1. Unscrew the safety glass. 2. Remove the defective bulb. 3. Insert the replacement bulb (note the correct voltage and wattage). 4. Insert and screw on the sight glass. 13.15 Upper and lower link pins WARNING Risk of crushing, catching, trapping or impact when the machine unexpectedly releases from the tractor. Check the upper and lower link pins for visible damage each time you couple the machine. Replace the upper and lower link pins in the event of clearly visible wear. UF BAG0012.6 03.15 197 Cleaning, maintenance and repairs 13.16 Screw tightening torques M S M8 13 M 8x1 M 10 16 (17) M 10x1 M 12 18 (19) M 12x1,5 M 14 22 M 14x1,5 M 16 24 M 16x1,5 M 18 27 M 18x1,5 M 20 30 M 20x1,5 M 22 32 M 22x1,5 M 24 M 27 41 M 27x2 M 30 46 M 30x2 M 198 10.9 12.9 25 35 41 27 38 41 49 69 83 52 73 88 86 120 145 90 125 150 135 190 230 150 210 250 210 300 355 225 315 380 290 405 485 325 460 550 410 580 690 460 640 770 550 780 930 860 1050 710 1000 1200 780 1100 1300 1050 1500 1800 1150 1600 1950 1450 2000 2400 1600 2250 2700 1. 36 M 24x2 8.8 610 M4 M5 M6 M8 M10 M12 M14 M16 M18 M20 M22 M24 2,3 4,6 7,9 19,3 39 66 106 162 232 326 247 314 UF BAG0012.6 03.15 Cleaning, maintenance and repairs 13.17 Disposing of the field sprayer Carefully clean the whole field sprayer (inside and out) before disposing of the field sprayer. The following components are eligible for energy recovery*: spray liquid tank, induction bowl, flushing water tank, fresh water tank, hoses and plastic fittings. Metal parts can be scrapped. Follow the statutory requirements for each individual material. * Energy recovery is the process of reclaiming the energy contained in plastics by burning them and using the energy released to generate electricity and/or steam or to supply process heat. Energy recovery is suitable for mixed and contaminated plastics, in particular for any plastics which have come into contact with pollutants. UF BAG0012.6 03.15 199 Spray table 14 Spray table 14.1 Spray tables for flat-fan, anti-drift, injector and airmix nozzles, spraying height 50 cm • The spray rates [l/ha] listed in the spray tables are only valid for water. To convert the spray rates given into AUS, multiply these by 0.88 and, for NP solutions, by 0.85. • Fig. 161 helps with the selection of the right nozzle type. The nozzle type is determined by • ο the intended operational speed, ο the required spray rate and ο the required atomisation characteristic (fine, medium or coarse-dropped) of the crop protection agent used for the crop protection measure. Fig. 162 is used to ο determine the nozzle size. ο determine the required spray pressure. ο determine the required individual nozzle output for calibrating the field sprayer. Permissible pressure ranges for different nozzle types and sizes Nozzle type Nozzle size Permissible pressure range [bar] min. pres- max. pressure sure XRC TeeJet 1 5 AD Lechler 1,5 5 Air Mix agrotop 1 6 1 6 2 8 2 8 1 7 IDK / IDKN ID3 Lechler AI TTI TeeJet AVI Twin agrotop 2 8 TD Hi Speed agrotop 2 10 For further information about the nozzle characteristics, see the nozzle manufacturer's website. www.agrotop.com / www.lechler-agri.de / www.teejet.com 200 UF BAG0012.6 03.15 Spray table Selecting the nozzle type Fig. 161 Example: Required spray rate: 200 l/ha 8 km/h Intended operational speed: UF BAG0012.6 03.15 Required atomisation characteristic for the crop protection measure: coarse-dropped (low drifting) Required nozzle type: ? Required nozzle size: ? Required spray pressure: ? bar Required individual nozzle output for calibrating the field sprayer: ? l/min 201 Spray table Determining the nozzle type, nozzle size, spray pressure and individual nozzle output 1. Determine the working point for the required spray rate (200 l/ha) and the intended operational speed (8 km/h). 2. At the working point, trace a line down the table. Depending on the position of the working point, this line will run through the cells for various nozzle types. 3. Select the best nozzle type for the crop protection measure in question, with reference to the required atomisation characteristic (fine, medium or coarse-dropped). Nozzle choice for the example given above: Nozzle type: AI or ID 4. Go to the spray table (Fig. 162). 5. In the column with the intended operational speed (8 km/h), find the required spray rate (200 l/ha) or a figure which is as close as possible to the required spray rate (in this case, for example, 195 l/ha). 6. In the line with the required spray rate (195 l/ha), 202 ο read the nozzle sizes in question. Select a suitable nozzle size (e.g.'03'). ο where the nozzle size column intersects with the selected nozzle size, read the required spray pressure (e.g. 3.7 bar). ο read the required individual nozzle output (1.3 l/min) for calibrating the field sprayer. Required nozzle type: AI / ID Required nozzle size: '03' Required spray pressure: 3.7 bar Required individual nozzle output for calibrating the field sprayer: 1.3 l/min UF BAG0012.6 03.15 Spray table Fig. 162 UF BAG0012.6 03.15 203 Spray table 14.2 Spraying nozzles for liquid manure Nozzle type Manufacturer Permissible pressure range [bar] min. max. pressure pressure 3- jet agrotop 2 8 7- hole TeeJet 1,5 4 FD Lechler 1,5 4 AMAZONE 1 4 Drag hose 14.2.1 Spray table for three-ray nozzles, spraying height 120 cm AMAZONE - Spray table for three-ray nozzles (yellow) Pressure Nozzle output Water (bar) 1,0 1,2 1,5 1,8 2,0 2,2 2,5 2,8 3,0 AUS AUS spray rate (l/ha) / km/h 6 7 8 9 10 11 12 14 16 64 69 78 85 88 92 98 103 106 55 60 67 73 75 78 84 88 91 48 52 59 64 66 69 74 77 80 43 47 53 57 59 62 66 69 71 39 42 47 51 53 55 57 62 64 35 38 43 47 48 50 54 56 58 32 35 39 43 44 46 49 52 53 28 30 34 37 38 39 52 44 46 24 26 30 32 33 35 37 39 40 (l/min) 0,36 0,39 0,44 0,48 0,50 0,52 0,55 0,58 0,60 0,32 0,35 0,39 0,42 0,44 0,46 0,49 0,52 0,53 AMAZONE - Spray table for three-ray nozzles (red) Pressure Nozzle output Water (bar) 1.0 1.2 1.5 1.8 2.0 2.2 2.5 2.8 3.0 204 AUS AUS spray rate (l/ha) / km/h 6 7 8 9 10 11 12 14 16 108 118 132 138 142 147 155 163 168 93 101 114 119 122 126 133 140 144 81 88 99 104 107 111 117 122 126 72 78 88 92 95 98 104 109 112 65 70 79 83 85 88 93 98 101 59 64 72 76 78 80 84 87 92 54 59 66 69 71 74 78 82 84 47 51 57 60 61 63 67 70 72 41 44 50 52 54 56 59 61 63 (l/min) 0.61 0.67 0.75 0.79 0.81 0.84 0.89 0.93 0.96 0.54 0.59 0.66 0.69 0.71 0.74 0.78 0.82 0.84 UF BAG0012.6 03.15 Spray table AMAZONE - Spray table for three-ray nozzles (blue) Pressure Nozzle output Water (bar) 1.0 1.2 1.5 1.8 2.0 2.2 2.5 2.8 3.0 AUS AUS spray rate (l/ha) / km/h 6 7 8 9 10 11 12 14 16 152 166 186 196 202 212 224 234 240 130 142 159 167 173 182 192 201 206 114 124 140 147 152 159 168 176 180 101 110 124 131 135 141 149 156 160 91 99 112 117 121 127 135 141 144 83 91 102 107 110 116 122 128 131 76 83 93 98 101 106 112 117 120 65 71 80 84 87 91 96 101 103 57 62 70 74 76 80 84 88 90 (l/min) 0.86 0.94 1.05 1.11 1.15 1.20 1.26 1.32 1.36 0.76 0.83 0.93 0.98 1.01 1.06 1.12 1.17 1.20 AMAZONE - Spray table for three-ray nozzles (white) Pressure Nozzle output Water (bar) 1.0 1.2 1.5 1.8 2.0 2.2 2.5 2.8 3.0 14.3 AUS AUS spray rate (l/ha) / km/h 6 7 8 9 10 11 12 14 16 206 224 252 277 290 307 325 342 356 177 192 217 237 249 263 279 293 305 155 168 190 207 217 230 244 256 267 137 149 168 184 193 204 216 228 237 124 134 151 166 174 185 195 205 214 213 222 138 151 158 168 178 187 194 103 112 126 139 145 154 163 171 178 89 96 109 119 125 132 140 147 153 78 84 95 104 109 115 122 128 134 (l/min) 1.16 1.27 1.42 1.56 1.64 1.73 1.84 1.93 2.01 1.03 1.12 1.26 1.38 1.45 1.54 1.62 1.71 1.78 Spray table for 7-hole nozzles AMAZONE Spray table for 7-hole nozzle SJ7-02VP (yellow) Pressure Nozzle output per dosing disc Wasser (bar) 1,5 2,0 2,5 3,0 3,5 4,0 AUS spray rate AHL (l/ha) / km/h AHL 6 7 8 9 10 11 12 14 16 98 114 128 142 150 164 84 98 110 122 129 141 74 86 96 107 113 123 65 76 85 95 100 109 59 68 77 85 90 98 53 62 70 77 82 89 49 57 64 71 75 82 42 49 55 61 64 70 37 43 48 53 56 62 (l/min) 0,55 0,64 0,72 0,80 0,85 0,93 0,49 0,57 0,64 0,71 0,75 0,82 UF BAG0012.6 03.15 205 Spray table AMAZONE Spray table for 7-hole nozzle SJ7-03VP (blue) Pressure Nozzle output per dosing disc Wasser (bar) 1,5 2,0 2,5 3,0 3,5 4,0 AUS spray rate AHL (l/ha) / km/h AHL 6 7 8 9 10 11 12 14 16 154 176 194 208 224 232 132 151 166 178 192 199 116 132 146 156 168 174 103 117 129 139 149 155 92 106 116 125 134 139 84 96 106 113 122 127 77 88 97 104 112 116 66 75 83 89 96 99 58 66 73 78 84 87 (l/min) 0,87 1,00 1,10 1,18 1,27 1,31 0,77 0,88 0,97 1,04 1,12 1,16 AMAZONE Spray table for 7-hole nozzle SJ7-04VP (red) Pressure Nozzle output per dosing disc Wasser (bar) 1,5 2,0 2,5 3,0 3,5 4,0 AUS spray rate AHL (l/ha) / km/h AHL 6 7 8 9 10 11 12 14 16 208 236 256 274 295 304 178 202 219 235 253 261 156 177 192 206 221 228 139 157 171 183 196 203 125 142 154 164 177 182 113 129 140 149 161 166 104 118 128 137 147 152 89 101 110 117 126 130 78 89 96 103 110 114 (l/min) 1,17 1,33 1,45 1,55 1,66 1,72 1,04 1,18 1,28 1,37 1,47 1,52 AMAZONE Spray table for 7-hole nozzle SJ7-05VP (brown) Pressure Nozzle output per dosing disc Wasser (bar) 1,5 2,0 2,5 3,0 3,5 4,0 AUS spray rate AHL (l/ha) / km/h AHL 6 7 8 9 10 11 12 14 16 264 298 324 346 374 382 226 255 278 297 321 327 198 224 243 260 281 287 176 199 216 231 249 255 158 179 194 208 224 229 144 163 177 189 204 208 132 149 162 173 187 191 113 128 139 148 160 164 99 112 122 130 140 143 (l/min) 1,49 1,68 1,83 1,95 2,11 2,16 1,32 1,49 1,62 1,73 1,87 1,91 AMAZONE Spray table for 7-hole nozzle SJ7-06VP (grey) Pressure Nozzle output per dosing disc Wasser (bar) 1,5 2,0 2,5 3,0 4,0 206 AUS spray rate AHL (l/ha) / km/h AHL 6 7 8 9 10 11 12 14 16 314 356 388 416 562 269 305 333 357 396 236 267 291 312 347 209 237 259 277 308 188 214 233 250 277 171 194 212 227 252 157 178 194 208 231 135 153 166 178 198 118 134 146 156 173 (l/min) 1,77 2,01 2,19 2,35 2,61 1,57 1,78 1,94 2,08 2,31 UF BAG0012.6 03.15 Spray table AMAZONE Spray table for 7-hole nozzle SJ7-08VP (white) Pressure Nozzle output per dosing disc Wasser (bar) 1,5 2,0 2,5 3,0 4,0 14.3.1 AUS spray rate AHL (l/ha) / km/h AHL 6 7 8 9 10 11 12 14 16 404 470 520 558 612 346 403 446 478 525 303 353 390 419 459 269 313 347 372 408 242 282 312 335 367 220 256 284 304 334 202 235 260 279 306 173 201 223 239 262 152 176 195 209 230 (l/min) 2,28 2,66 2,94 3,15 3,46 2,02 2,35 2,60 2,79 3,06 Spray table for FD- nozzles AMAZONE Spray table for FD-04- nozzle Pressure Nozzle output per dosing disc Water (bar) 1,5 2,0 2,5 3,0 4,0 AUS spray rate AHL (l/ha) / km/h AHL 6 7 8 9 10 11 12 14 16 200 230 258 282 326 171 197 221 241 279 150 173 194 211 245 133 153 172 188 217 120 138 155 169 196 109 125 141 154 178 100 115 129 141 163 86 99 111 121 140 75 86 97 106 122 (l/min) 1,13 1,31 1,46 1,60 1,85 1,00 1,15 1,29 1,41 1,63 AMAZONE Spray table for FD-05- nozzle Pressure Nozzle output per dosing disc Water (bar) 1,5 2,0 2,5 3,0 4,0 AUS spray rate AHL (l/ha) / km/h AHL 6 7 8 9 10 11 12 14 16 248 288 322 352 406 213 247 276 302 348 186 216 242 264 305 165 192 215 235 271 149 173 193 211 244 135 157 176 192 221 124 144 161 176 203 106 123 138 151 174 93 108 121 132 152 (l/min) 1,41 1,63 1,83 2,00 2,31 1,24 1,44 1,61 1,76 2,03 AMAZONE Spray table for FD-06- nozzle Pressure Nozzle output per dosing disc Water (bar) 1,5 2,0 2,5 3,0 4,0 AUS spray rate AHL (l/ha) / km/h AHL 6 7 8 9 10 11 12 14 16 298 344 386 422 488 255 295 331 362 418 224 258 290 317 366 199 229 257 282 325 179 206 232 253 293 163 188 211 230 266 149 172 193 211 244 128 147 165 181 209 112 129 145 158 183 (l/min) 1,70 1,96 2,19 2,40 2,77 1,49 1,72 1,93 2,11 2,44 UF BAG0012.6 03.15 207 Spray table AMAZONE Spray table for FD-08- nozzle Pressure Nozzle output per dosing disc Water (bar) 1,5 2,0 2,5 3,0 4,0 AUS spray rate AHL (l/ha) / km/h AHL 6 7 8 9 10 11 12 14 16 398 460 514 563 650 341 394 441 483 557 299 345 386 422 488 265 307 343 375 433 239 276 308 338 390 217 251 280 307 355 199 230 257 282 325 171 197 220 241 279 149 173 193 211 244 (l/min) 2,26 2,61 2,92 3,20 3,70 1,99 2,30 2,57 2,82 3,25 AMAZONE Spray table for FD-10- nozzle Pressure Nozzle output per dosing disc Water (bar) 1,5 2,0 2,5 3,0 4,0 14.4 AUS spray rate AHL (l/ha) / km/h AHL 6 7 8 9 10 11 12 14 16 498 576 642 704 813 427 494 551 604 697 374 432 482 528 610 332 384 429 469 542 299 345 385 422 488 272 314 350 384 444 249 288 321 352 407 214 246 275 302 348 187 216 241 264 305 (l/min) 2,83 3,27 3,65 4,00 4,62 2,49 2,88 3,21 3,52 4,07 Spray table for drag hose unit AMAZONE Spray table for dosing disc 4916-26, (dia. 0.65 mm) Pressure Nozzle output per dosing disc Water (bar) 1,0 1,2 1,5 1,8 2,0 2,2 2,5 2,8 3,0 3,5 4,0 208 AUS spray rate (l/ha) / km/h AUS 6 7 8 9 10 11 12 14 16 71 78 85 92 99 103 110 113 120 127 138 61 67 73 79 85 88 94 97 103 109 118 53 58 64 69 74 77 82 85 90 96 104 47 52 57 61 66 68 73 76 80 85 92 43 47 51 55 60 62 66 68 72 77 83 37 43 47 50 54 56 60 62 66 70 76 36 39 43 46 50 52 55 57 60 64 69 31 34 37 40 43 44 47 49 52 55 59 27 29 32 35 37 39 41 43 45 48 52 (l/min) 0,20 0,22 0,24 0,26 0,28 0,29 0,31 0,32 0,34 0,36 0,39 0,18 0,19 0,21 0,23 0,25 0,26 0,27 0,28 0,30 0,32 0,35 UF BAG0012.6 03.15 Spray table AMAZONE Spray table with dosing disc 4916-32, (dia. 0.8 mm) Pressure Nozzle output per dosing disc Water (bar) 1,0 1,2 1,5 1,8 2,0 2,2 2,5 2,8 3,0 3,5 4,0 AUS AUS spray rate (l/ha) / km/h 6 7 8 9 10 11 12 14 16 110 120 135 145 152 159 170 181 188 202 216 94 103 115 124 130 137 146 155 161 173 185 82 90 101 109 114 119 127 135 141 151 162 73 80 90 97 101 106 113 120 125 135 144 66 72 81 87 92 96 102 109 113 121 130 60 66 74 79 83 87 93 98 103 110 118 55 60 68 73 76 80 85 91 94 101 108 47 52 58 62 65 69 73 78 81 87 93 41 45 51 55 57 60 64 68 71 76 81 (l/min) 0,31 0,34 0,38 0,41 0,43 0,45 0,48 0,51 0,53 0,57 0,61 0,27 0,30 0,34 0,36 0,38 0,40 0,42 0,45 0,47 0,50 0,54 AMAZONE Spray table for dosing disc 4916-39, (dia. 1.0 mm) (standard) Pressure Nozzle output per dosing disc Water (bar) 1,0 1,2 1,5 1,8 2,0 2,2 2,5 2,8 3,0 3,5 4,0 AUS AUS spray rate (l/ha) / km/h 6 7 8 9 10 11 12 14 16 153 167 187 204 216 227 240 251 262 280 302 131 143 160 175 185 194 206 215 224 236 259 114 124 141 154 162 170 180 189 197 210 226 101 110 126 137 144 151 160 168 175 186 201 92 100 112 122 130 136 142 151 158 168 181 84 91 102 112 118 124 132 137 143 153 165 77 84 94 102 108 114 120 126 131 140 151 66 72 80 88 93 97 103 108 112 118 130 57 62 71 77 81 85 90 95 99 105 113 (l/min) 0,43 0,47 0,53 0,58 0,61 0,64 0,68 0,71 0,74 0,79 0,85 0,38 0,41 0,47 0,51 0,53 0,56 0,59 0,62 0,64 0,69 0,74 AMAZONE Spray table for dosing disc 4916-45, (dia. 1.2 mm) Pressure Nozzle output per dosing disc Water (bar) 1,0 1,2 1,5 1,8 2,0 2,2 2,5 2,8 3,0 3,5 4,0 AUS AUS spray rate (l/ha) / km/h 6 7 8 9 10 11 12 14 16 202 219 248 273 287 304 326 340 354 389 411 173 188 212 234 246 261 279 291 303 334 352 151 165 186 204 215 228 244 255 266 292 308 135 146 165 182 192 203 217 227 236 260 274 121 132 149 164 172 183 196 204 213 234 246 110 120 135 148 157 166 178 186 193 213 224 101 110 124 137 144 152 163 170 177 195 206 87 94 106 117 123 131 140 146 152 167 176 76 83 93 102 108 114 122 128 133 146 154 (l/min) 0,57 0,62 0,70 0,77 0,81 0,86 0,92 0,96 1,00 1,10 1,16 0,50 0,55 0,62 0,68 0,72 0,76 0,81 0,85 0,89 0,97 1,03 UF BAG0012.6 03.15 209 Spray table AMAZONE Spray table for dosing disc 4916-55, (dia. 1.4 mm) Pressure Nozzle output per dosing disc Water (bar) 1,0 1,2 1,5 1,8 2,0 2,2 2,5 2,8 3,0 3,5 4,0 210 AUS spray rate (l/ha) / km/h AUS 6 7 8 9 10 11 12 14 16 304 329 372 407 432 450 478 506 520 563 598 261 282 319 349 370 385 410 434 446 482 513 228 247 278 305 324 337 358 380 390 422 449 203 219 248 271 288 300 319 337 347 375 399 183 198 223 245 259 270 287 304 312 338 359 166 180 203 222 236 245 261 276 284 307 327 152 165 186 204 216 225 239 253 260 282 299 131 141 160 175 185 163 205 217 223 241 257 114 124 139 153 162 168 179 190 195 211 225 (l/min) 0,86 0,93 1,05 1,15 1,22 1,27 1,35 1,43 1,47 1,59 1,69 0,76 0,82 0,93 1,02 1,08 1,12 1,19 1,27 1,30 1,41 1,50 UF BAG0012.6 03.15 UF BAG0012.6 03.15 33.3 38.9 44.5 50.0 55.5 61.6 66.7 75.0 77.8 83.4 89.0 94.5 100.0 105.6 111.0 116.8 122.2 127.9 133.3 12 14 16 18 20 22 24 26 28 30 32 34 36 38 40 42 44 46 48 139.0 27.8 10 178.6 171.5 164.3 157.1 150.0 143.0 135.9 128.7 121.4 114.2 107.1 100.0 92.9 85.6 78.5 71.5 64.3 57.1 50.0 42.9 35.8 Sol. N kg 92 90 88 86 84 82 80 78 76 74 72 70 68 66 64 62 60 58 56 54 52 N kg 255.7 250.0 242.2 238.6 233.3 227.9 222.1 216.5 211.6 204.9 200.0 194.5 188.9 183.4 177.9 172.3 166.7 161.1 155.7 150.0 144.6 Sol. N l 328.3 321.7 314.1 307.5 300.0 292.8 285.8 278.3 271.8 264.2 257.2 250.0 243.0 235.9 228.3 221.7 214.2 207.3 200.0 193.0 186.0 Sol. N kg 134 132 130 128 126 124 122 120 118 116 114 112 110 108 106 104 102 100 98 96 94 N kg 372.0 367.0 361.0 356.0 350.0 344.0 339.0 333.0 328.0 322.1 316.5 311.1 305.6 300.0 294.2 285.5 283.7 278.0 272.0 266.7 261.2 Sol. N l 478.0 471.0 465.0 457.0 450.0 443.0 436.0 428.0 421.0 414.3 407.5 400.0 393.0 386.0 378.3 371.8 364.2 357.4 350.0 342.7 335.8 Sol. N kg 200 195 190 185 180 175 170 165 160 155 150 148 146 144 142 140 138 136 N kg 556.0 541.0 527.0 514.0 500.0 486.0 472.0 458.0 445.0 431.0 417.0 411.0 406.0 400.0 394.0 389.0 384.0 378.0 Sol. N l 714.0 696.0 679.0 660.0 643.0 625.0 607.0 589.0 572.0 554.0 535.0 529.0 521.0 515.0 507.0 500.0 493.0 485.0 Sol. N kg 14.5 50 Sol. N l N kg (Density 1.28 kg/l, i.e. approx. 28 kg N for 100 kg of liquid fertiliser or 36 kg N for 100 litres of liquid fertiliser at 5 - 10 °C) Spray table Conversion table for spraying ammonium nitrate / urea solution (AUS) liquid fertiliser 211 H. DREYER GmbH & Co. KG Postfach 51 Tel.: D-49202 Hasbergen-Gaste e-mail: Germany http:// + 49 (0) 5405 501-0 [email protected] www.amazone.de Plants: D-27794 Hude • D-04249 Leipzig • F-57602 Forbach Branches in England and France Manufacturers of mineral fertiliser spreaders, field sprayers, seed drills, soil cultivation machines and communal units