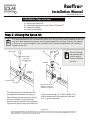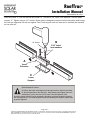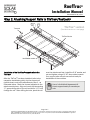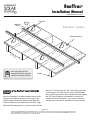
1
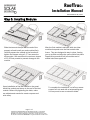
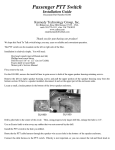
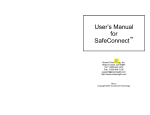
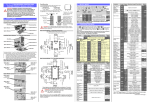
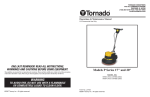
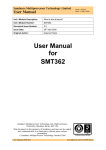
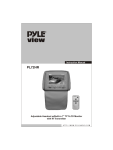
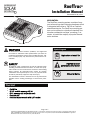
RoofTrac® Installation Manual Date Modified: 08/13/07 APPLICATION: The RoofTrac mounting system consists of support rails and top-down clamping hardware which is integrated with either a TileTrac or FastJack attachment device. The RoofTrac mounting system can be utilized on virtually all standard construction residential roof-tops, mounting 4’ on center, to install the majority of popular framed solar modules. WARNING Symbol Legend All Professional Solar Products (ProSolar) are engineered and tested to withstand stated specifications (as stated on published specification sheets) when installed properly. Failure to install properly may decrease the performance of installation. Explanation or Install Tip SAFETY Important product performance information All regional safety requirements should be followed when installing Professional Solar Products. All tools and equipment located on the roof should be secured to avoid falling object hazards. All equipment/tools should be properly maintained and inspected prior to use. Any exposed studs should be protectively capped to help avoid injury. This installation manual is intended for use by professional installers with a working knowledge of construction principles. Critical for Safety Tool List Chalk line 3/16” carbide masonry drill bit 3/8” masonry drill bit (for tile roof) Cordless drill Cordless impact wrench with 1/2” socket Page 1 of 7 COPYRIGHT PROFESSIONAL SOLAR PRODUCTS 2007: All information contained in this manual is property of Professional Solar Products (PSP). TileTrac® is a registered trademark for PSP and is covered under U.S. patent #5,746,029. RoofTrac® and FastJack® is a registered trademark for PSP and is covered under U.S. patent #6,360,491. RoofTrac® Installation Manual Date Modified: 08/13/07 Installation steps overview 1) 2) 3) 4) Utilizing the Splice Kit Attaching Support rails to the TileTrac®/FastJack® Installing modules Clean up and safety Step 1: Utilizing the Splice Kit It is recommended that you pre-install the splice kit on the ground for easier handling of the support rails. After installing the splices, set the lengths against the building. Typically, the installer on the roof can pull the lengths to the roof without any mechanical equipment and handle the lengths as one unit. Felt Tip Pen Drill Splice holes— mark with permanent ink pen Use of a Unibit® will decrease drill time to approximately 3 seconds per hole Uni-Bit® V-groove drill guide Lower Support 1/8” Gap SU P PO RT R SU P AIL Intersections of the reference mark and extended “V” groove. Turn the support rails upside down (as illustrated) so the bottom is facing up. Place the lower support over the rails to use as a template. Center the lower support over the rails and mark along the V-groove drill guide using a small felt pen. PO RT R AIL Drill two holes using a 1/2” #10 UniBit®. Drill at the intersection of the reference mark and the “V” groove drill guide. Page 2 of 7 COPYRIGHT PROFESSIONAL SOLAR PRODUCTS 2007: All information contained in this manual is property of Professional Solar Products (PSP). TileTrac® is a registered trademark for PSP and is covered under U.S. patent #5,746,029. RoofTrac® and FastJack® is a registered trademark for PSP and is covered under U.S. patent #6,360,491. RoofTrac® Installation Manual Date Modified: 08/13/07 Insert the splice “A” into the channel and install “B” —the two 5/16” bolts / lock washers— into the lower support “C”. Tighten using a 1/2” socket. Splice insert is designed to expand into the extrusion walls forcing the rails into alignment, do not over tighten. Roof Trac® support rails can now can be handled and installed as one solid rail. B 1/2” Socket 5/16” bolts/ lock washers A Insert Extrusion C Lower Support Splice Expansion Feature: RoofTrac® splice kits are designed to hold support rails in alignment and allow for thermal expansion of the aluminum. After fastening the support rails to the attachments, remove one of the 5/16” bolts. Thermal expansion of the aluminum support rails will now be absorbed in the splice connection instead of stressing the roof attachments. The remaining splice kit bolt and assembly will keep the support rails in perfect alignment. Page 3 of 7 COPYRIGHT PROFESSIONAL SOLAR PRODUCTS 2007: All information contained in this manual is property of Professional Solar Products (PSP). TileTrac® is a registered trademark for PSP and is covered under U.S. patent #5,746,029. RoofTrac® and FastJack® is a registered trademark for PSP and is covered under U.S. patent #6,360,491. RoofTrac® Installation Manual Date Modified: 08/13/07 Step 2: Attaching Support Rails to TileTrac®/FastJack® 1 TileTrac® version T-wrench (FastJack version on next page) 2 TileTrac Device Nut/Washer combo Installation of the RoofTrac® support rails to the TileTrac®. After the TileTrac® has been installed (refer to the respective installation guide), lay the support rail (upside down) next to the attachments, step 1, as illustrated above. Mark the channel adjacent to the attachment devices. Align and mark the intersecting “V” groove drill guide on the rail and drill a 1/2” hole through the rail. After drilling the hole, place the rail over the attachment feet, install the 3/8” washer and nut and tighten using a 9/16” deep socket wrench. Your support rails are now secure and ready for installation of the modules. Use of a Unibit® will decrease drill time to approximately 3 seconds per hole Page 4 of 7 COPYRIGHT PROFESSIONAL SOLAR PRODUCTS 2007: All information contained in this manual is property of Professional Solar Products (PSP). TileTrac® is a registered trademark for PSP and is covered under U.S. patent #5,746,029. RoofTrac® and FastJack® is a registered trademark for PSP and is covered under U.S. patent #6,360,491. RoofTrac® Installation Manual Date Modified: 08/13/07 FastJack® Unibit #10 Drill bit FastJack® version Standard Flashing 2’ Ce n ter s Use of a Unibit® will decrease drill time to approximately 3 seconds per hole Rafters Installation of the RoofTrac® support rails to the FastJack®. After the FastJack® has been installed (refer to the respective installation guide), lay the support rail (upside down) next to the attachments. Mark the channel adjacent to the attachment devices. Align and mark the intersecting “V” groove on the rail and drill a 1/2” hole through the rail. After drilling the hole in the support rail, place the rail over the attachment feet, make any necessary final adjustments and tighten the 3/8” Bolt & Washer combination to attach the support rail to the FastJack®. Your support rails are now secure and ready for installation of the modules. Page 5 of 7 COPYRIGHT PROFESSIONAL SOLAR PRODUCTS 2007: All information contained in this manual is property of Professional Solar Products (PSP). TileTrac® is a registered trademark for PSP and is covered under U.S. patent #5,746,029. RoofTrac® and FastJack® is a registered trademark for PSP and is covered under U.S. patent #6,360,491. RoofTrac® Installation Manual Date Modified: 08/13/07 For convenience, it is advisable to pre-assemble the bolt, lock washer and clamp into the sliding insert prior to bringing them up to the roof. Fig. 2 Fig. 1 Attachment and clamping of the solar modules to TileTrac® or FastJack® attachments works exactly the same. After the support rails have been fastened, you are ready to install the solar modules. There are two sets of clamps; the outside clamps (end clamp) (Fig. 1) and the inter-module clamps (Fig. 2) that install between the modules. NOTE: Clamping hardware is not engineered or intended for use on support rail/strut other than the Professional Solar Products brand. Please note that all module end clamps are specially extruded to fit a specific brand of module as specified in the ordering guide. Page 6 of 7 COPYRIGHT PROFESSIONAL SOLAR PRODUCTS 2007: All information contained in this manual is property of Professional Solar Products (PSP). TileTrac® is a registered trademark for PSP and is covered under U.S. patent #5,746,029. RoofTrac® and FastJack® is a registered trademark for PSP and is covered under U.S. patent #6,360,491. RoofTrac® Installation Manual Date Modified: 08/13/07 Step 5: Installing Modules Slide the two end clamps near the end of the support rail and install your end module (first). Carefully square the module to the frame and tighten the clamps using a 1/2” box wrench or drive socket. We recommend a maximum torque of 12-15 foot pounds to prevent damage to the module. After the first module is secured, slide two intermodule clamp sets onto the first module side frame. They are designed to stay in place, freeing you up to slide and align the next module into place. Repeat this procedure until all modules are installed onto the support rail. Upon installation of the last module in the panel, install the module end clamp to the end of the last module. Before fully tightening the bolts, make any adjustments needed to create a square and even array. Page 7 of 7 COPYRIGHT PROFESSIONAL SOLAR PRODUCTS 2007: All information contained in this manual is property of Professional Solar Products (PSP). TileTrac® is a registered trademark for PSP and is covered under U.S. patent #5,746,029. RoofTrac® and FastJack® is a registered trademark for PSP and is To complete the installation, cut off any excess support rail not used with a reciprocating saw. You may want to use an extrusion blade.