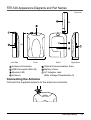
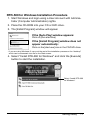
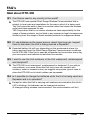
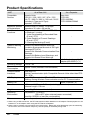
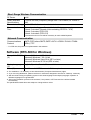
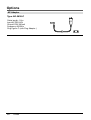
1
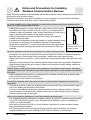
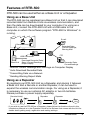
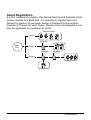
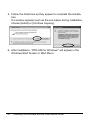
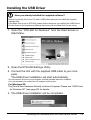
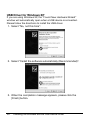
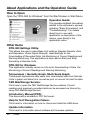
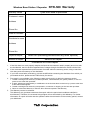
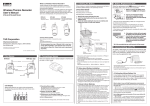
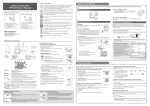
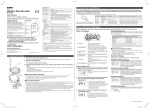
Wireless Base Station / Repeater
RTR-500
Introductory Manual
Thank you for purchasing our product. This
manual provides a brief explanation of how to set
up and get started with the RTR-500.
Details about how to use the software "RTR-500
for Windows" and its functions can be found in the
Software "Operation Guide (Help)".
If the RTR-500 is to be used as a Repeater, please
follow directions found in the Software and in the
Introductory Manual that came with the Base Unit.
Only after getting the Base Unit ready please get the
Repeater(s) ready.
© Copyright T&D Corporation. All rights reserved. 2013.03. 16504580027 (4th Edition)
Table of Contents
Introduction
Notices--------------------------------------------2
Safety Precautions and Instructions-----3
Explanation of Symbols-------------------------3
Features of RTR-500----------------------9
Using as a Base Unit ----------------------------9
Using as a Repeater-----------------------------9
Base Units: RTR-500, RTR-500GSM,
RTR-500NW/500AW-------------------------- 10
Remote Units: RTR-501 / 502 / 503 / 505 /
507 / 574 / 576--------------------------------- 10
Repeaters: RTR-500--------------------------- 10
About Registration ---------------------------- 11
Basic Procedures ----------------------- 12
Getting Ready
Package Contents----------------------- 14
Connecting the Antenna ---------------------- 15
Before Installing the Software---------- 16
RTR-500 for Windows Installation Procedure- 17
Installing the USB Driver---------------- 19
USB Driver for Windows XP------------------ 20
Other
About Applications and the Operation
Guide ------------------------------------- 22
How to Open----------------------------------- 22
Other Items------------------------------------- 22
Registering Devices and Making Settings-- 23
1. Base Unit Settings ------------------------- 23
2. Remote Unit Registration ------------------ 23
3. Base Unit Operational Settings ----------- 24
4. Repeater Registration (Only if necessary)-24
About LED Display----------------------- 25
Power Sources--------------------------- 26
FAQ's------------------------------------- 27
Q&A about RTR-500--------------------------- 27
Product Specifications------------------ 28
Software (RTR-500 for Windows)------------ 29
Options----------------------------------- 30
Warranty------------------------------- Back
Notices
Carefully read this manual so that you can properly use this product.
T&D Corporation accepts no responsibility for any malfunction of and/
or trouble with this product or with your computer that is caused by
the improper handling of this product and will deem such trouble or
malfunction as falling outside the conditions for free repair of the
attached warranty.
--All rights of this Introductory Manual belong to T&D Corporation. It is prohibited to use,
duplicate and/or arrange a part or whole of this Introductory Manual without the permission
of T&D Corporation.
--Microsoft ® and Windows ® are registered trademarks of Microsoft Corporation USA and
are binding in the USA and all other countries.
--Company names and product names are trademarks or registered trademarks of each
company.
--Specifications, design and other contents are subject to change without notice.
--On screen messages in this manual may vary slightly from the actual messages.
--Please notify the shop where you purchased this product or T&D Corporation of any
mistakes, errors or unclear explanations in this manual. T&D Corporation accepts no
responsibility for any damage or loss of income caused by the use of our product.
--This product has been designed for private or industrial use only. It is not for use in
situations where strict safety precautions are necessary such as in connection with medical
equipment, whether directly or indirectly.
--We are not responsible for any malfunction or trouble caused by the use of our product or
by any problem caused by the use of measurement results of our Unit. Please be fully
aware of this before using our product.
--Some of our products, which come under the category of strategic goods in foreign trade
law, need the permission of the Japanese government to be exported outside of Japan.
--The Manual itself can be downloaded from our Website: http://www.tandd.com/
2
Introduction
Safety Precautions and Instructions
Before using please read the following precautions and
instructions.
The following items should be strictly obeyed for the safe
usage of this Unit, and for protecting yourself and other people
from bodily harm and/or damage to property.
Explanation of Symbols
Explanation of Warning Symbols
DANGER
These entries are actions that absolutely under no
circumstance should be taken. The taking of
such an action may cause serious personal
physical damage or death.
CAUTION
These entries are actions that if taken may lead to
physical injury or damage to persons or things.
Explanation of Picture Symbols
Denotes a forbidden action.
Denotes a forbidden action. Inside or near the symbol will
appear another symbol giving details.
Denotes an action that you must take.
Introduction
3
DANGER
Be sure to follow the warnings and notices about use from your
PC maker when installing and using the Unit.
Do not take apart, repair or modify the Unit.
Doing so may cause fire or electrocution.
If water or a foreign body enters the Unit, immediately disconnect
the cables, remove batteries, and stop using.
Continued use may cause fire or electrocution.
Do not use this Unit in wet or humid places, such as a bathroom.
It may cause a fire or other trouble including malfunction.
Store the Unit, batteries and communication cables out of the
reach of children.
It is dangerous to touch or swallow them.
If any smoke or strange smells are emitted from the Unit,
immediately disconnect the cables, remove batteries, and stop
using.
Continued use may cause fire or electrocution.
Do not drop the Unit, or expose it to a strong impact. If that
happens, immediately disconnect the cables, remove batteries,
and stop using.
Continued use may cause fire or electrocution.
Make sure to periodically remove dust and dirt from the AC
adaptor plug.
If dust is allowed to accumulate on the plug, moisture may cause poor insulation
and result in fire.
Do not unplug the AC adaptor with wet hands.
This may cause electrocution.
4
Introduction
CAUTION
This Unit has been designed for private or industrial use only. It is
not for use in situations where strict safety precautions are
necessary such as in connection with medical equipment, whether
directly or indirectly.
Harmful gases or chemicals may cause corrosion and/or other
danger to the Unit. Also, by coming in contact with hazardous
substances, harm may occur to the people handling the Unit.
Therefore, do not use in any environment that is exposed to
chemicals and harmful gases.
This Unit is not water-resistant.
If the Unit gets dirty, wipe it with a clean cloth and a mild detergent.
Please do not insert your fingers or any foreign objects into any of
the Units' jacks.
Make sure that the cable and AC adaptor are inserted fully, so as
not to cause an improper connection. Also, when unplugging the
cable from the Unit, do not pull the cord, but hold the connector to
disconnect.
Battery life depends on the measurement environment, communication frequency, recording interval and battery quality.
Do not use any other batteries and AC adaptor than those that are
specified in this Introductory Manual.
It may cause a fire or other trouble including malfunction.
Do not put anything on top of the AC adaptor.
This may cause overheating.
Remove batteries from any Unit that is not to be used for a long
period of time.
Batteries left in a Unit not being used for a long time may leak and cause a
malfunction.
Battery terminals may provide insufficient contact due to age or
vibration.
This may lead to data loss.
Introduction
5
Condensation may occur if the Unit is moved from one environment to another where the difference in temperature is great.
Use the Unit in an environment where the ambient temperature is from -10 to 60˚C
and the humidity is 90%RH (no condensation) or less.
To prevent damage to the Unit from static electricity, remove static
electricity from your body by touching metal around you (door
knob, window frame) before touching the Unit.
Static electricity may cause not only damage to the Unit, but may cause breaks in
or a loss of data.
Please take extra caution when plugging in and pulling out the USB
plug while another USB device such as CDD/HDD is in operation. It
may cause problems to your CD-RW or other device.
We shall not guarantee the operation of our device if you have connected it to your
computer using a USB hub or a USB extension cable.
Do not use or store the Unit in any of the following places. Doing
so may cause electrocution, fire and/or other adverse effects to the
device and/or your computer.
- Areas exposed to direct sunlight.
This will cause the inside of the device to become overheated and may cause fire,
deformation, and/or other damage including malfunction.
- Areas prone to strong magnetic fields.
This may cause damage including malfunction.
- Areas exposed to water leakage.
This may cause electrocution or other damage incluing malfunction.
- Areas exposed to static electricity.
This may cause damage including malfunction.
- Areas exposed to excessive vibration.
This may cause injury, malfunction, damage or loss of proper electrical contact.
- Areas that are not flat or level.
This may cause the Unit to fall and result in injury and/or damage.
- Areas near fire or exposed to excessive heat.
This may cause damage including malfunction and deformation.
- Areas prone to smoke, dust and dirt.
This may cause damage including malfunction.
6
Introduction
Compliance Information
CE Statement
This device complies with technical specifications required
under EN 301 489 (with battery and AC Adaptor), EN
300-220, and EN 60950-1.
Important Notice
Wireless products cannot be used in countries other than where those products have
been approved for use, according to that country's wireless regulations.
T&D Corporation shall in no manner whatsoever take responsibility for the usage of these
products, nor be liable in any manner for legal consequences stemming from the usage of
these wireless products in unapproved areas.
Introduction
7
Notes and Precautions for Installing
Wireless Communication Devices
When installing wireless communication devices take special care in selecting locations so as
to ensure proper communication.
Note that even after a successful installation, due to changes in environmental conditions,
communication errors may occur when restarting the system.
As far as possible, try to keep wireless communication devices away from metals and set
them up in high unobstructed positions.
--Please take note that in many instances, walls, floors, stairs, fences
and desks will contain metals. In order to carry out communication
between indoor and outdoor Units, please locate indoor Units near a
window so that radio waves can be easily transmitted.
--Please install these devices more than 30cm away from walls or
boards containing metal.
--If wireless communication Units are placed in a metal container such
as a freezer or refrigerator, the possible wireless communication
range will be shortened. In most cases radio waves are transmitted
Place so that the
via doors and door openings so place devices as near to doors as
antenna is away from
objects or walls.
possible.
As far as possible, keep the devices away from noise-emitting sources.
--Equipment such as some industrial instruments, electronic devices or fluorescent lamps
generate noise. Please place Units more than 1 meter away from such devices.
--Please place Units more than 1 meter away from computers and other devices which emit
noise.
--Keep all wires as far away from wireless communication devices as possible. Please be
careful about placing near any wiring or cables such as power supply cables, telephone
wires or LAN cables.
Objects which contain lots of water, such as plants or soil, absorb radio waves. We highly
recommend that such materials should not be placed between or near wireless communication Units.
--When measuring temperature in a greenhouse it has been reported that as plants grew,
communication errors also increased.
--Do not place Units directly on the ground.
Do not place devices which are using the same communication frequency channel in the
same area.
--If the same channel is used for multiple devices not only will more communication errors
occur, but battery life will also be shortened.
--If there is a possibility that devices with the same frequency channel will be in wireless
communication at the same time, please make sure to make changes to the frequency
channels so they are not the same.
After having made an installation, check the wireless signal strength.
--The supplied software application includes a feature to check for wireless signal strength.
In the RTR-500 Settings Utility in the "Wireless Route Settings" menu it is possible to
check click signal strength.
--Note that by moving Units 20 cm in any direction may result in communication results
being significantly changed.
--If no change occurs after moving the Units to several nearby locations, we strongly
suggest adding one or more Repeaters (RTR-500) to enhance communication.
8
Introduction
Features of RTR-500
RTR-500 can be used either as a Base Unit or a Repeater.
Using as a Base Unit
The RTR-500 can be registered as a Base Unit so that it can download
recorded data from Remote Units via wireless communication, and
then the data can be downloaded to your computer. For using as a
Base Unit, connect the RTR-500 Unit with a USB cable to the
computer on which the software program "RTR-500 for Windows" is
running. Plant
E-mail
Remote Unit(s)
Recorded Data,
Current Readings,
Warning Mail
Office
FTP
USB Connection
Base Unit
Download Recorded Data/
Save / Current Readings/
Graph Display
Recorded Data,
CurrentReadings
* Monitor Current Readings and Warnings on Computer Display
* Auto-Download Recorded Data
* Transmitting Data via a Network
* Sending Warning Report Mails
Using as a Repeater
By registering an RTR-500 Unit as a Repeater and placing it between
a Base Unit and a Remote or another Repeater, it can be used to
expand the wireless communication range. For using as a Repeater, it
is necessary to use our optional AC adaptor or two AA batteries.
Please purchase a power supply separately.
Remote Unit(s)
Repeater
Repeater
Send
Return
Base
Unit
--If you wish to use the RTR-500 as a Repeater, please follow the directions found in this
Introductory Manual or in the Operation Guide in the Sofware that comes with the Unit for
details about getting ready, registration and making settings. Introduction
9
What are Base Units, Remote Units and Repeaters?
Base Units: RTR-500, RTR-500GSM, RTR500NW/500AW
A Base Unit can collect data measured by and recorded in Remote
Units via wireless communication, and send the collected data either
by FTP or e-mail to a server whereby the data can be downloaded to
your computer via an external network, such as the Internet. Also, by
setting Upper and Lower Limits, warning monitoring can be carried out
for each Remote Unit at each Location.
Remote Units: RTR-501 / 502 / 503 / 505 / 507 / 574 /
576
A Remote Unit is a Data Logger designed to measure and record
various items such as temperature, humidity and so on. The wireless
communication range between a Remote Unit and a Base Unit, if
unobstructed and direct, is about 150m (500ft).
RTR-501/502---------------- Temperature
RTR-503 / 507---------------- Temperature and Humidity
RTR-574--------------------- Illuminace, UV Intensity, Temperature, and Humidity
RTR-576--------------------- CO2 Concentration, Temperature, and Humidity
RTR-505*
RTR-505-TC / 505-Pt----- Temperature
RTR-505-V----------------- Voltage
RTR-505-mA--------------- 4-20mA(current)
RTR-505-P----------------- Pulse
--RTR-505-TC, 505-Pt, 505-V, 505-mA, and 505-P are collectively referred to as the
"RTR-505".
Repeaters: RTR-500
If wireless communication cannot successfully be carried out due to
obstacles, or if you wish to extend the wireless communication range,
please add Repeater(s) between Remote Unit(s) and the Base Unit.
10
Introduction
About Registration
It is first necessary to register the desired Remote and Repeater Units
(where needed) to a Base Unit. It is possible to register them into
Groups by place or by purpose. Assign a Wireless Communication
Frequency Channel for each Group. Remote Units and Repeaters can
only be registered to one Group at a time.
Remote Unit(s)
Group1
Repeater
1
Base
Unit
Group2
Repeater
1
Repeater
2
Group3
Introduction
11
Basic Procedures
The following outline shows the Basic Procedures when an
RTR-500 Unit is being used as a Base Unit.
Getting Ready
1. Get the Base Unit (RTR-500) ready to use 2. Install the software "RTR-500 for Windows"
3. Install the USB Device Drivers and confirm their operation
--Checking the USB Device Driver for Base Unit and Remote Unit (RTR-574)
4. Get Remote Units ready to use
--For details, see the User's Manual that accompanies the Remote Unit.
5. Get Repeaters ready to use (only if necessary)
Making the RTR-500 Unit Settings (using the supplied
software)
1. Make Base Unit operational settings
2. Register Remote Units and Repeaters and make necessary
settings
3. Make settings for the transmission of Current Readings,
Warning Reports, and for the Auto-Downloading of Data
4. Carry out transmission tests
12
Introduction
Getting Ready
This section explains what needs to be done before registrations and settings can be made.
Package Contents
The following items are included in the package.
Wireless Base Station
RTR-500 x 1
Antenna x 1
Memo Sticker * x 1
Introductory Manual
(including Warranty) x 1
Software
CD-ROM
x1
USB Communication
Cable (US-15C) x 1
** Please write Repeater names, numbers or any other memos on the sticker and fasten it to
the Unit.
Before connecting a Unit to your computer, make sure to install
the supplied software into the computer.
If you have connected a Unit to your computer before installing the supplied software,
make sure to click the [Cancel] button in the Wizard window when it pops up on the
computer display.
14
Getting Ready
RTR-500 Appearance Diagrams and Part Names
Unit:mm
109
96
65
Left Side
Front
Antenna Connector
USB Connector (Mini-B) Monitor LED Antenna
25
Back
Right Side
Optical Communication Area Battery Cover AC Adaptor Jack (EIAJ Voltage Classification 2)
Connecting the Antenna
Connect the supplied antenna to the antenna connector.
Getting Ready
15
Before Installing the Software
Before connecting an RTR-500 to your computer, make sure to
install the supplied software into the computer.
If you have connected a Unit to your computer before installing the software, make
sure to click the [Cancel] button in the Wizard window when it pops up on the computer display and then disconnect the USB cable from the Unit.
Note that the software "RTR-500 for Windows" is used in conjunction with RTR-500 Base Units.
If your Base Unit is not an RTR-500, it is not necessary to install the software "RTR500 for Windows" into the computer.
Is Windows working properly?
If Windows is not activated properly, it may be impossible to install and run
"RTR-500 for Windows".
Make sure to check that the OS you are running and "RTR-500 for Windows"are
compatible.
Microsoft Windows 8 32 / 64 bit
Microsoft Windows 7 32 / 64 bit
Microsoft Windows Vista 32 bit (SP1 or later)
Microsoft Windows XP 32 bit (SP3 or later)
--For details about the necessary operating environment, see page 29.
Quit all applications.
If you are running other applications, make sure to quit them before installation. If
you have any permanently active software, such as a virus check or scan program
in your computer, make sure to also quit it.
To install RTR-500 for Windows, it is necessary to have Administrator rights
(Computer Administrator) for the computer in which you wish to install it.
16
Getting Ready
RTR-500 for Windows Installation Procedure
1. Start Windows and login using a User Account with Administrator (Computer Administration) rights.
2. Place the CD-ROM into your CD or DVD drive.
3. The [Install Program] window will appear.
If the [Auto Play] window appears:
Click on [Run start.exe].
If the [Install Program] window does not
appear automatically:
Click on the [start.exe] icon in the CD/DVD drive.
--If you are using Windows 8, carry out the rest of the installation process on the “desktop”
which can be accessed via a tile on the Start screen.
4. Select “Install RTR-500 for Windows” and click the [Execute]
button to start the installation.
Select "Install RTR-500
for WIndows"
Getting Ready
17
5. Follow the directions as they appear to complete the installation.
If a window appears such as the one below during installation,
choose [Install] or [Continue Anyway].
6. After installation, “RTR-500 for Windows” will appear in the
Windows Start Screen or Start Menu.
18
Installing the Software and the USB Device Driver
Installing the USB Driver
Have you already installed the supplied software?
Before connecting a Unit to a PC with a USB cable make sure to install the supplied
software first.
If the Base Unit is not an RTR-500, please follow directions for installing the USB Device
Drivers found in the Introductory Manual that came with the Base Unit you are using.
1. Open the “RTR-500 for Windows” from the Start Screen or
Start Menu.
2. Open the RTR-500 Settings Utility.
3. Connect the Unit with the supplied USB cable to your computer.
The USB driver installation will start automatically.
--Do not connect a Unit to your computer until the software has been installed.
--It is not necessary to connect the AC adaptor at this point.
For Windows XP:
The [Found New Hardware Wizard] window will appear. Please see “USB Driver
for Windows XP” (see page 20) for details.
4. The USB driver installation will be completed.
Installing the Software and the USB Device Driver
19
USB Driver for Windows XP
If you are using Windows XP, the “Found New Hardware Wizard”
window will automatically open when a USB device is connected.
Please follow the directions to install the USB driver.
1. Select “No, not this time”.
2. Select “Install the software automatically (Recommended)”.
3. When the completion message appears, please click the
[Finish] button.
20
Installing the Software and the USB Device Driver
Other
About Applications and the Operation Guide
How to Open
Open the “RTR-500 for Windows” from the Start Screen or Start Menu.
Operation Guide:
This provides detailed information
related to the software in general,
including “Basic Procedures” and
“Troubleshooting”. For details
about how to use each
application or description of the
menus, open [Help] in the
application menu.
Other Items
RTR-500 Settings Utility:
This allows the user to make Base Unit settings, Register Remote Units
and Repeaters, Check Signal Strength, make settings for the
Downloading of Recorded Data, the Monitoring of Current Readings and
Warning Monitoring. This application is also used to Start and Stop
Recording in Remote Units.
RTR-500 for Windows:
This application actually carries out the Auto-Downloading of Data, the
Monitoring of Current Readings and Warning Monitoring.
Temperature / Humidity Graph, Multi-Scale Graph:
These graph applications help users view downloaded data from Remote
Units in graph and table form, as well as print or convert into text file data.
T&D WebStorage Service:
Click here to open the T&D WebStorage Service website. Current
readings and previously recorded data can be accessed via Internet by
using T&D WebStorage Service.
Introductory Manual (PDF):
This document is available in PDF file format.
Help for Unit Recognition Failure:
Click here for information on how to check and install the USB driver.
Update Information
Click here for Information about software and firmware updates.
22
Other
Registering Devices and Making Settings
This section briefly explains in sequence what needs to be
done in order to carry out registration of devices and the
making of settings. 1. Base Unit Settings
Before making initial settings please confirm the following:
Is the Unit connected to a PC with the USB cable?
Are the LED lamps on the Unit both lighted up?
Is the PC clock showing the correct date and time?
Open the "RTR-500 Settings Utility" from the Applications Menu, and make settings for the Base Unit.
2. Remote Unit Registration
1. After having completed the Base Unit Settings, in the RTR-500
Settings Utility, open the [Remote Unit Settings] Menu.
2. When the direction appears in the application window connect
the Data Logger to enable communication with the Base Unit
and/or PC.
- Only carry out Remote Registration on one Unit at a time; do not connect
multiple Units at the same time.
RTR-501 / 502 / 503 / 505 / 507
(Optical Communication)
Place a Data Logger (Remote Unit)
face down on the Base Unit
connected to your PC so that the
optical communication areas meet.
RTR-574 / 576
(USB Communication)
USB Connection
Optical Communication
Areas
With a USB cable, connect the Data
Logger (Remote Unit) to your PC.
USB Connection
When using RTR-574/576 with Windows XP,
the [Found New Hardware Wizard] window will appear. Please see “USB
Driver for Windows XP” (see page 20 for details.
Other
23
If the screen does not change after connecting RTR-574 / 576,
the USB driver installation may not have been installed correctly. Please see
[Help for Unit Recognition Failure] and check the USB driver.
3. Base Unit Operational Settings
Next please make all Base Unit operational settings from the Menu of
the RTR-500 Settings Utility.
4. Repeater Registration (Only if necessary)
Repeaters can be registered to help increase range and improve
wireless communication.
1. In the RTR-500 Settings Utility, open the [Repeater Unit
Settings] Menu.
2. When the direction appears in the application window,
connect the Repeater with a USB communication cable to the
computer.
--Do not connect multiple RTR-500 Units at the same time.
PC into which software
has been installed
USB Connection
After all registrations and settings have been completed, place the
Base Unit, Remote Units and Repeaters in their actual positions and
carry out signal strength tests to test transmission.
24
Other
About LED Display
The appearance of the lamp in the LED changes to show the
current status of the RTR-500.
Lamp
Status
Lamp ON
Connected via USB
Blinking
During wireless communication or communication with a PC
Other
25
Power Sources
When an RTR-500 is used as a Base Unit, power comes from the
PC through the USB connection; there is no need for any other
power source.
When an RTR-500 Unit is being used as a Repeater, please prepare
one of the following separately.
AC Adaptor (T&D Option AD-0638-C)
or Batteries (Two AA alkaline batteries)
AC Adaptor
Connection Jack
Estimating Battery Life
If the Unit is used as a Repeater for wireless communication five minutes
a day, new batteries can be expected to last about six months.
--Battery life varies depending upon the type of battery, the battery performance, the measuring environment and frequency of use.
Note
--Always use two batteries of the same type.
--Make sure that + and - are in the correct direction.
--Batteries cannot be charged inside the Unit.
--The LED lamp will blink once when usable batteries are installed.
--- Leaving alkaline batteries in the unit for a long period of time may cause battery leakage
and corrosion. When using as a backup source, we recommend that you change the
batteries every few years.
26
Other
FAQ's
Q&A about RTR-500
Q1: Can this be used in any country in the world?
A: The RTR-500 uses special Short Range Wireless Communication that is
subject to local rules and regulations for the area in which it is being used.
This Unit cannot be sold or used in countries other than where the wireless
units have been approved for use.
T&D Corporation shall in no manner whatsoever take responsibility for the
usage of these products, nor be liable in any manner for legal consequences
stemming from the usage of these wireless products in unapproved areas.
Q2: If I use batteries as the power source, about how long can I expect
them to last when the Unit is being used as a Repeater?
A: Expected battery life will vary depending on the environment where it is
being used and upon the Short Range Wireless Communication conditions
for the RTR-500. If the Unit is used as a Repeater for five minutes every day,
you can expect new batteries to last about six months.
Q3: I want to use the Unit outdoors, is the Unit waterproof, moistureproof
and dustproof?
A: The RTR-500 is not waterproof, moistureproof or dustproof. If you wish to
use outdoors, or in areas where the Unit may come into contact with
moisture, water or excessive dust, we suggest using some type of case to
place the RTR-500 out of which cables can be passed.
Q4: Is it possible to change the batteries while the Unit is being used as a
Repeater and is in operation?
A: Except for when the Unit is carrying out wireless communication (the Unit's
LED is blinking), the batteries can be changed at anytime.
(If changed during wireless communication, the communication will fail.)
Other
27
Product Specifications
UNIT
Compatible
Devices
Maximum Number
of Registrations
Features and
Functions
Types of Warning
Monitoring
Power
Operating Voltage
Current
Consumption
Communication
Interfaces
LED Display
Battery Life
Dimensions
Weight
Operating
Environment
Other
As a Base Unit
Remote Units:
RTR-501 / 502 / 503 / 507 / 574 / 576 /
505-TC / 505-Pt / 505-V / 505-mA / 505-P
(Including L Type and H Type)
Repeater: RTR-500
Remote Units: 32 units x 20 groups
Repeaters: 30 units x 20 groups
When connected to a PC with "RTR-500
for Windows" running:
1. Auto-Downloading of Recorded Data (E-mail / FTP)
2. Auto-Sending of Current Readings
(E-mail / FTP)
3. Warning Monitoring (E-mail)
Remote Unit Measurement Warnings,
Cumlative Illuminance/Amount of UV Light
Warnings (RTR-574),
Remote Unit Wireless Communication Error
Warnings,
Remote Unit Battery Level Warnings, and
Remote Unit Sensor Error Warnings
USB bus power
As a Repeater
Base Unit:
RTR-500,
RTR-500GSM,
RTR-500NW/500AW
-
-
-
AA alkaline battery x 2, AC
adaptor (AD-0638-C) (*1)
2.5V to 7.0V
Approx. 50mA (Wireless Communication)
USB (with PC)
Optical Communication (with Compatible Remote Units other than RTR574 / 576)
Lamp ON: Connected to PC with USB cable
Blinking: During Wireless Communication and/or PC Communication
About 6 months (*2)
H 96 mm x W 65mm x D 25mm (excluding protrusions)
Antenna Length: 109 mm
About 71g (Batteries not included)
Temperature: -10 to 60˚C
(-30 to 60˚C when external power connected)
Humidity: 90%RH or less (No condensation)
Not waterproof, moistureproof, or dustproof
*1When using a USB connection, the RTR-500 requires neither batteries nor AC adaptor. Please prepare two AA
batteries or an AC adaptor when using the RTR-500 as a Repeater.
*2When used for wireless communication five minutes a day. Battery life varies depending upon the measuring
environment, the communication frequency, and the quality of the battery being used.
28
Other
Short Range Wireless Communication
RF Power
Radio Standard
Specifications
Transmission Range
Communication
Time
5mW
ETSI EN 300 220 (Frequency Range: 869.7 to 870MHz, RF Power: 5
mW)
About 150m if direct and unobstructed.
When downloading one Remote Unit at full storage capacity:
About 2 minutes* (Remote Units excluding RTR-574 / 576)
About 3 minutes *(RTR-576)
About 4 minutes* (RTR-574)
* The same amount of time will be necessary for each added Repeater.
Network Communication
Communications
Protocol
SMTP (POP before SMTP, SMTP-AUTH <LOGIN / PLAIN / CRAMMD5>), FTP*
* For RTR-500, the protocol is implemented in the software.
Software (RTR-500 for Windows)
Compatible OS (*3) Microsoft Windows 8 32 / 64 bit
(*4)
Microsoft Windows 7 32 / 64 bit
Microsoft Windows Vista 32 bit (SP1 or later)
Microsoft Windows XP 32 bit (SP3 or later)
Display Languages English, Spanish, French, German, Italian
(*5)
Other (*6)
The Microsoft .NET Framework 2.0 is required.
*3: For installation, it is necessary to have Administrator (Computer Administrator) rights.
*4: If you are using Windows 8, please note that our software is designed to be used in "Desktop" mode only.
*5: We recommend using an operating system in the same language as the display language. Operation in
different languages is not guaranteed.
*6: During the installation process of the software, if not present, .NET Framework 2.0 will be installed
automatically.
The specifications listed above are subject to change without notice.
Other
29
Options
AC Adaptor
Type: AD-0638-C
Cable length: 1.8m
Input:AC100-240V
Output:DC6V 500mA
Frequency:50/60Hz
Plug Figure: C (with Plug Adaptor )
30
Other
Product Support
For support, please contact the distributor from which you
purchased the product.
A list of distributors can be found at:
http://www.tandd.com/about_tandd/contactus/
Product Information
Product information can be found at:
http://www.tandd.com/product/
Wireless Base Station / Repeter RTR-500
Introductory Manual
T&D CORPORATION
817-1 Shimadachi, Matsumoto, Nagano 390-0852, Japan
Website : http://www.tandd.com/
FAX : +81-263-40-3152 E-mail : [email protected]
© Copyright T&D Corporation. All rights reserved.
Printed on recycled paper.
Wireless Base Station / Repeater
Warranty Period
RTR-500 Warranty
1 year from date of purchase
Customer's name
Address
Phone No.
Date of Purchase
Distributor's name
Address
Phone No.
Object of Repair
Method of Repair
Main Unit (excluding sensors and any other options.)
Send in for Repair
Provisions for Free Repair
1. If the Unit does not work properly despite the fact that the customer used it properly and in line with
the the Manual, the Unit shall be repaired free of charge through the distributor which sold the Unit.
2. If the customer requests free repair because of trouble within the warranty period, bring or send the
Unit along with the warranty to the distributor. 3. If you have moved after purchasing, or there are difficulties contacting the distributor from which you
purchased the Unit, please contact T&D directly for service.
4. Free repair is not available in the following cases even though it is within the warranty period:
1.Trouble or damage was caused by careless operation, natural disaster, fire, public pollution, or use of a
power source other than specified.
2.If repair, adjustment, disassembly or modification of the Unit has been carried out by a person other than
a T&D authorized engineer.
3.Trouble or damage was caused by transportation, movement or dropping of the Unit after purchase.
4.Failure to submit the Warranty or failure to fill in all items required in the Warranty.
5. The Warranty cannot be reissued.
This Warranty only promises customers free repair within the period and conditions clarified in
this Warranty. Therefore, the customer’s legal rights will not be limited by this Warranty. For further
information on repair and other service questions after the termination of the warranty period, contact
your distributor.