1
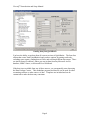
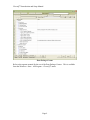
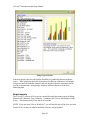
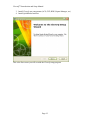
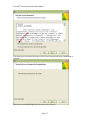
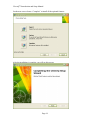
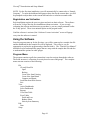
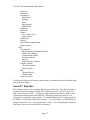
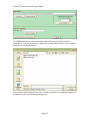
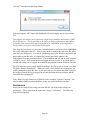
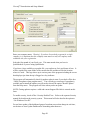
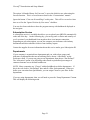
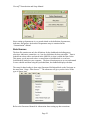
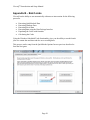
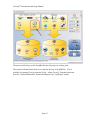
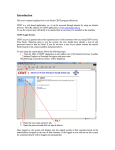
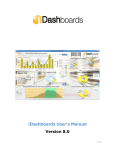
Introduction and Setup Copyright © 2008-2012, Better Days Enterprises, LLC. 3213 West Main Street #119 Rapid City, SD 57702-2314 Revision: February 4, 2012 Version: 1.917 CleverQ® Introduction and Setup Manual Table of Contents Introduction ......................................................................................................................... 4 Features ........................................................................................................................... 4 Requirements ................................................................................................................ 10 Installation......................................................................................................................... 11 Licensing ....................................................................................................................... 11 The Setup Program ....................................................................................................... 11 File Locations................................................................................................................ 15 Starting the Software..................................................................................................... 15 Registration and Activation .......................................................................................... 16 Using the Software ............................................................................................................ 16 Program Menu .............................................................................................................. 16 CleverQ™ Data Files .................................................................................................... 17 Preferences .................................................................................................................... 19 Subscription Service ................................................................................................. 21 Departments .............................................................................................................. 21 Data Sources ................................................................................................................. 22 Support .............................................................................................................................. 23 User Manuals and Help ................................................................................................. 23 Introduction and Setup Manual ................................................................................. 23 General User Manual ................................................................................................ 23 Customization Manual .............................................................................................. 23 Extractors Manual ..................................................................................................... 23 Security Manual ........................................................................................................ 23 Report Manager Manual ........................................................................................... 23 Data Package Creator ................................................................................................ 23 SDK (Software Developers Kit) Programmer’s Reference Manual ......................... 24 Adobe Reader............................................................................................................ 24 Installation............................................................................................................. 24 Using the Reader ................................................................................................... 24 Websites ........................................................................................................................ 26 Support Website ........................................................................................................ 26 Support Blog ............................................................................................................. 27 Program Updates ........................................................................................................... 27 Technical Support ......................................................................................................... 27 Training ......................................................................................................................... 27 Customization ............................................................................................................... 27 Appendix A – Setting Up QuickBooks® .......................................................................... 28 Appendix B – Batch Jobs .................................................................................................. 30 Copyright © 2008- 2012, CleverQ Patent Pending Designed for use with QuickBooks® CleverQ® Introduction and Setup Manual QuickBooks® is a trade mark and service mark of Intuit Inc., registered in the United States and other countries. Microsoft Excel® and Microsoft Access® are trademarks and service marks of Microsoft., registered in the United States and other countries. CleverQ® is a trade mark and service mark of CleverQ and Better Days Enterprises, LLC. CleverQ™ Introduction and Setup Manual Introduction This document is to be used as an introduction to the CleverQ™ software and to help you get familiar with the software prior to installation. It should also be used as a guide during the setup of the software. Features This software has the following features…. Simple to use Dashboards and ScoreCards for executives, managers, and staff Display as many as 64 gauges organized into groups of 8 gauges on each dashboard Unlimited number of dashboards can be defined. Ability to display critical and key business indicators graphically for easy viewing and comprehension Use the predefined gauges or create your own. Gauges can display data, indicators, or any calculated value from information retrieved from external sources Easy to use “Navigator” for power users Ability to get data from all current versions of QuickBooks®. In the multi-company mode, you can load data from multiple QuickBooks company files and display dashboards across multiple companies. Schedule a time of day to load/extract data, like in the evening. In addition to QuickBooks®, you can get data from any Microsoft Access or ODBC compliant database or a Microsoft Excel workbook You can configure the software to get real time data from databases, Excel, and Web Queries and then have the gauges on the dashboard update in real time. Data Package Creator provides a simple to use method to enter data manually when it can’t be loaded automatically from another source. Built in and user definable templates are included. Use predefined parameters or indicators, or create your own. Parameters are based on data loaded from different data sources. Parameter and indicator formulas can be as simple or as complex as you need. Numerous built-in functions provide flexible and powerful formulas Built in capabilities include calculating seasonal trends and forecasting. Based on 4 different forecasting models, you can have the program automatically select the best model. Indicators can contain up to 3 colored ranges and include advice or tips for each range. Tips are available on a gauge based on the value of the indicator. Additional indicator properties, categories, and notes provide additional functionality. There are numerous tools to assist in developing and documenting the parameters, indicators, gauges, and dashboards. Numerous gauge types provide limitless flexibility in graphically showing indicator values. Gauges can default to specific data ranges or be specific to departments. Page 4 CleverQ™ Introduction and Setup Manual Flexible filtering system allows you to use the same gauge design multiple times based on different filters. Many gauges include a drilldown feature to look at the underlying data. Drill down from a single gauge to a graph, then drill down to the data, then export the data to Excel for further analysis. Additional drilldowns defined by the user include other dashboards, gauges, reports, external files, and web pages. Compare data from previous periods There are options for working with departments including defining them based on QuickBooks® classes or allocating them based on predefined percentages of common elements or user defined breakdowns. Unlimited number of dashboard definitions can be saved and conveniently loaded for display or be printed as a ScoreCard. When enabled, the built in security system can limit what gauges and report users have access to, and their ability to modify them. You can import or export gauges, indicators, and/or parameters from different QBD data files. A custom interface can be designed to drilldown to specific data in another application. If you subscribe to the on line web based subscription service, you can see your dashboards using a browser anywhere there is an internet connection. The integrated Report Manager provides the ability to design your own reports. Create reports from almost any data source including CleverQ QBD files, Microsoft Access, or any ODBC source including SQL Server, MySQL, Oracle, etc. Run reports immediately or later based on a scheduled time using a familiar calendar view (day, week, month, timeline) or a simple list view Reports can be saved in different file formats including: PDF, HTML, MHT, RTF, TXT, CSV, XLS, XLXS, BMP, EMF, GIF, JPEG, PNG, TIFF, and WMF Reports can be predefined as a system report or a user report User reports can be optionally shared among other users Reports can be categorized based on a system or user defined category Reports can be grouped so a group of reports can be scheduled with a single selection Reports can be scheduled to run once or in a recurrence pattern (i.e. daily, weekly, monthly, etc.) Report designs and definitions can be copied to make new designs or definitions easily Report output can be saved in a user defined folder or repository Reports can include data grouping, sorting, sub-reports, pictures, advanced styles, summaries, calculated fields, scripting, watermarks, bookmarks, charts, pivot tables, and more Online user manuals make getting help easy. Search manuals using the familiar Adobe Reader software. Available Software Development Kit (SDK) so you can display dashboards and reports from your own applications. Page 5 CleverQ™ Introduction and Setup Manual Some of these features are illustrated in the following figures. Typical Dashboard The dashboard is the main user interface for the software. The program will open to this screen. From here the user can select a different tab to get a different dashboard as well as use the various controls to change date ranges, copy the dashboard to the clipboard to use as an illustration in another document, print a copy of the dashboard, or print a ScoreCard report showing all the important information associated with all the dashboards, indicators, and tips. By right mouse clicking on a single gauge the user can drilldown to see the gauge details, see the data behind the gauge, compare the data with prior periods, view tips, change the setup of the gauge, change options, or refresh the gauge. There is a button on the bottom of the gauge fill the screen. Another button than one dashboard at a time. to increase the size of the dashboard to will open up another window so you can see more Page 6 CleverQ™ Introduction and Setup Manual CleverQ™ Navigator For power users, or users who will create parameters, indicators, gauges, and dashboards, the easy to use Navigator form provides a roadmap to the program and data organization. Refer to the “Customization” User Manual for a detailed description of the various elements controlled by this form. Page 7 CleverQ™ Introduction and Setup Manual Loading data from QuickBooks You have the ability to get data from all current versions of QuickBooks. The form lists all data that comes from QuickBooks® and you have options for getting totals only, excluding some reports, sending data to filters, and selecting different date ranges. There are similar forms for add-on’s where you can get data from any Microsoft Access database, ODBC Source, or Microsoft Excel workbook If the data is not available from any of these sources, you can manually enter data using the Data Package Creator. This standalone program and data file can be used for other accounting software or other sources of data. Templates are included and can be customized to make the data entry consistent Page 8 CleverQ™ Introduction and Setup Manual Data Package Creator Refer to the separate manual for the use of the Data Package Creator. This is available from the Windows - Start – All Program – CleverQ™ menu. Page 9 CleverQ™ Introduction and Setup Manual Gauge Type Selection Numerous gauge types provide limitless flexibility in graphically showing indicator values. These gauges are generally chosen based on the type of data they will display. Gauges are based on indicator formulas and can default to specific data ranges and be specific to departments. Many gauges include a drilldown feature to look at the underlying data. Requirements The CleverQ™ software will run on any current Microsoft operating system including: Windows XP, Windows Vista, Windows 7, Windows 2003 Server, and Windows 2008 Server. This includes both 32 bit and 64 bit versions. NOTE: If you are using Vista or Windows 7, you will need to turn off the User Account Control (UAC) feature in order to install the software, and get updates. Page 10 CleverQ™ Introduction and Setup Manual The software uses Microsoft Access and is compatible with Access 2002/XP, Access 2003, Access 2007, and Access 2010. If you do not have Access installed on your system, the installation program will provide an option to install a runtime version of Access so you do not need to purchase Access if you do not have it. Also required is Microsoft .net Framework 3.5. This is generally already part of your operating system update, and if you do not have this installed, the installation program will inform you and direct you to a website where you can download it and install it. There are no special requirements for your computer hardware, but the faster the CPU in your system and the more RAM/memory you have, the better performance you will have with the software. The software once loaded will occupy approximately 100 Mb of disk space. Installation Licensing There are four options for licensing the software: CleverQ Standard Edition Single User – Single Company Single User – Multiple Companies CleverQ Professional Edition Multiple Users – Single Company Multiple Users – Multiple Companies Single user licensing is for installation on a single user operating system like Windows XP, Windows Vista, or Windows 7. Multiple User licensing is for installation on a server based operating system like Windows 2003 Server or Windows 2008 Server. If you have or want to monitor multiple companies, you will want to choose the Multiple Companies licensing option. The Single Company license will only allow you to use one specific company. The Setup Program The setup or installation program is generally downloaded from our website. Once downloaded, run the file and you will see various screens to guide you through the installation. The same setup program is used no matter what your licensing option is. This installation needs to be done by a user with administrative privileges. The administrator can install for a non-administrator using a separate setup program discussed later in this section. The installation consists of four steps: 1. Check for installation of Microsoft Access and if not available, automatically install Microsoft Access 2002 Runtime. 2. Install CleverQ Std/Pro Page 11 CleverQ™ Introduction and Setup Manual 3. Install CleverQ .net components (ACE, GVP, RDE, Report Manager, etc) 4. Install QuickBooks Interface This is the first screen you will see with the CleverQ setup program. Page 12 CleverQ™ Introduction and Setup Manual You must agree and accept the terms of the License Agreement for the installation to continue. This next screen should display the screen as you see above. Page 13 CleverQ™ Introduction and Setup Manual On the next screen choose “Complete” to install all the optional features. After the installation is complete, you will see this screen. Page 14 CleverQ™ Introduction and Setup Manual For the Professional version of CleverQ which is installed on a server, you may want to install the software for other specific users. The previous run setup program only installs the software for a single user, who must be the administrator. To install the software for other non-administrative users, use the “User Install” option on the CleverQ Setup menu. This will run a program with an interface as shown in the following figure. Enter the Windows user name for the person you wish to install the software for. Then press the Install button. You will either see messages indicating the software was installed or a message indicating there was a problem. You can do this for as many users as you want. Press the Done button when completed. The user installation only installs the ability to run CleverQ and not perform the administrative tasks like installing or uninstalling software or scheduled task features. File Locations The setup program installs the software in the following locations: Read/write files (data) for all users in Shared Documents under CleverQ Read/write files for specific users in their Documents and Settings folder under Application Data/CleverQ Read only files for all users in the Program Files folder under CleverQ Starting the Software To start the software, you simply double click on the CleverQ shortcut installed on your desktop or choose the “Start” button, then all programs, then CleverQ, and then Run CleverQ again. Page 15 CleverQ™ Introduction and Setup Manual NOTE: For the first time installation, you will automatically be connected to a “Sample Company”. To make the dashboard and gauges show data for the current dates, you will be prompted to adjust dates to the current date and also re-calculate seasonal trends. Registration and Activation Each installation requires the user to register and activate their software. The software will run for 30 days after the first installation without activation. If you are only evaluating the software and choose not to purchase it, you may simply uninstall it after the 30 day period. There is an uninstall option on the program menu. Until the software is activated, the “Software License Activation” screen will popup every time the software is started. Using the Software Once the program starts up for the first time, you will be connected to a sample data file and the dashboard for that sample file will be displayed. This will give you an opportunity to explore the program and get familiar with it. The “General User Manual” should be used to understand the gauges that are setup with the sample data file and also to understand the options for other gauges. Program Menu The program contains a pull-down menu that is used to navigate through the software. The menu structure is a function of security based on users and groups. The complete menu structure consists of the following: File CleverQ Data File Open Backup Create New from Existing Create New from Blank Compact and Repair Load Data from Data Sources Exit View Active Dashboards Select Dashboards Reports View Data Table Pivot Tables Profit and Loss Balance Sheet Sales by Item Summary Edit Data Setup Page 16 CleverQ™ Introduction and Setup Manual Navigator Preferences Data Sources QuickBooks Database Excel Data Package QBD Merge Parameters Indicators Gauges View Gauge Types Setup Gauges Dashboards Security Object Relationships/Export Import Objects Help User Manuals Introduction and Installation Manual General User Manual Customization Manual Extractors Manual Security Report Manager Manual Program Updates Check for Updates Install Updates Web Support Website Support Blog About CleverQ™ The details of what occurs with these menu items are contains herein and within the other user manuals available. CleverQ™ Data Files The software consists of two elements, the program and the data. The data is stored in a separate file from the program and this file is referred to as the “CleverQ™ Data File” with a file extension of “qbd”. The blocks on the Navigator form that are gold in color represent those items stored in the QBD file. When the program first starts up, it is connected to a sample file with the name “CleverQDataSample.qbd” located typically in the folder “C:\Users\Pubic\Documents\CleverQ”. You can connect to a different file by using the menu item “File - CleverQ Data File – Open”. This will display the following form where you can select the data file to connect to. Page 17 CleverQ™ Introduction and Setup Manual The QBD Data File box is a drop down box that will list previous files you have connected to. Use this or press the “Choose File” button which will give you a Windows dialog box to choose the data file. Once you have selected the file, press the “Connect to Data File” button and within a few seconds you will see the following message box. Page 18 CleverQ™ Introduction and Setup Manual After pressing the “OK” button, the dashboard will load using the newly selected data file. The software also allows you to connect to a SQL Server database and transfer a QBD file to SQL Server. This is provided as an option for large organizations and requires assistance from our technical support department for installation and configuration. Please contact us if you are interested in this option. This form also provides a way to create a scheduled task to send your selected QBD Data File to the Subscription Service. Select a time in the evening at the end of the day when your file is not being used. You will be prompted to enter your Windows user name and password to create this task. You must have already previously entered your Subscription ID on the preferences form. This scheduled task will run on your computer as long as it is on. You do not need to be logged on for it to work. It is a good idea to run this task while you are logged on to unblock the program from the Windows firewall. The File menu also gives you the ability to backup a data file as well as create a new data file from a blank or existing file. When you create a new file from an existing one, you will be prompted to purge the data. If you reply with yes, the report data table is purged, the cache is cleared, the log is purged, the account and item tables are purged, and the new QBD file is compacted. Note: When CleverQ connects to a QBD file with a company "Sample Company", you may be asked whether to adjust the dates so they are current to the present date. Preferences When you are ready to start using your own data file, you first need to setup your preferences. This is done from the menu item “Setup – Preferences”. The following form will be displayed. Page 19 CleverQ™ Introduction and Setup Manual Enter your company name. Warning! If you have licensed the program for a single company, it is important that this company name match exactly the company name submitted with your registration. Select the first month of your fiscal year. This must match what you have in QuickBooks® if you are using QuickBooks. If you have a logo available as a graphic file, you can browse for it and choose it here. It will be copied to the same folder as the current data file and that will be the location where it is used. This logo shows up in various parts of the program including the screen that displays tips when the tip is flagged as a key indicator. The program will automatically check for updates when it starts if you check off the box “Check for updates when program starts”. You will only get a message if an update is available and to install the update you will need to choose the option “Install Updates” from the Help menu. The program will close when you do an update. NOTE: Getting updates requires a valid and current Support ID which is entered on this form. To enable security, check off the “Security Enabled” box. Refer to the separate Security manual for details on the security system. This manual will also describe the option to “Use Windows User ID”. For real time update of the dashboard gauges from data sources that change in real time, set the time to Auto Update Dashboard to something other than zero. Page 20 CleverQ™ Introduction and Setup Manual The option “# Months History for Forecasts” is set as the default to use when using the forecast function. This is covered in more detail in the “Customization” manual. Ignore the button “Clear out all tested flags” at this point. This will be covered at a later time as well as the “Ignore Division by Zero errors” checkbox. You can also choose whether to have the program start up with dashboards displayed or the navigator. Subscription Service A subscription service is available that allows you to upload your QBD file automatically at the end of the day. On the following day, you can log onto a website and actually see a web version of your dashboard from anywhere there is an internet connection. Depending on your subscription, you can also compare your indicators with industry benchmarks and also subscribe to advice from industry experts. Contact the supplier for more information about this service and to get a Subscription ID. Departments If your company is organized into departments and you wish to base gauges and indicators on departments that are not utilizing filters, choose “Allocations” on the Preferences form. If you are not going to use departments, then choose “Not Defined”. The “Allocation” option is for allocating values based on predefined percentages of common elements or user defined breakdowns. NOTE: Many companies use “Classes” within QuickBooks to define departments. If this is the case choose “Not Defined” here and set a filter for departments. When you define your extraction from QuickBooks, you can assign Classes to your filter for the departments. If you are using departments, then you will need to press the “Setup Departments” button. This will display the following menu. Page 21 CleverQ™ Introduction and Setup Manual Since setting up departments is very much related to the definition of parameters, indicators, and gauges, the details of department setup is contained in the “Customization” manual. Data Sources The data file contains not only the definitions for the dashboards including gauge selections, indicators, parameters, etc., but also definitions for data extraction. Data is loaded from a data source and stored in the QBD file is what is called the Data Cache. This means you do not need to have a connection to QuickBooks® or even have QuickBooks® loaded on your computer. The data extraction process occurs on demand or on a schedule and then using this preloaded data, the dashboard displays the data. The setup for data loading is done using Extractors Definition block on the Navigator or the menu item “Setup - Data Sources”. The submenus will give you the choice of the type of data to load. Refer to the Extractors Manual for information about setting up data extractions. Page 22 CleverQ™ Introduction and Setup Manual Support There are a number of resources for you to get support. User Manuals and Help There are eight user manuals available. These are available in the pdf file format and require Adobe Reader to be installed on your computer. You can access the manuals from the Windows Program Menu or the Help menu within the Program. Introduction and Setup Manual To be read by the user before buying or installing the software. It includes a description of the software features, its use, how to install it, and how to setup it up. General User Manual Includes all the information a user needs to use the software without knowing the details of getting the gauges set up. It assumes the parameters, indicators, and gauges are all setup and the manual will describe each gauge and how to setup the dashboards. This is primarily for the executive or manager using the dashboard. Customization Manual This manual includes the details to allow the user to create parameters, indicators, and gauges. Includes the details of the QuickBooks® reports used. The target audience is the power user. Extractors Manual This manual describes the extractors and how to use them. It includes getting data from QuickBooks, Microsoft Access databases, ODBC databases, and Microsoft Excel workbooks. Security Manual The Security manual is to be used to setup and use the security system within the CleverQ™ software. It is to be used by administrators. It is assumed that all other user manuals have been read prior to reading this manual. Report Manager Manual This document is to be used to learn how to use Report Manager both as a user viewing reports, and also as a user who creates reports. It is highly recommended that you have previously read all other CleverQ manuals. Data Package Creator This manual is used for the standalone software used to enter data manually and outside of the CleverQ™ software. It is also applicable for the Edit Data option within the CleverQ™ software. Page 23 CleverQ™ Introduction and Setup Manual SDK (Software Developers Kit) Programmer’s Reference Manual The CleverQ SDK (Software Developers Kit) provides programmers and developers a way to interface their applications with certain elements of the CleverQ program. This allows other applications to expand their functionality and use the powerful features of CleverQ. This includes displaying dashboards, reports, a report selection list, a report selection carousel, as well as other functions. This document is to be used as a reference to the programmer and provides the interface information needed to utilize the CleverQ program functionality. This manual is only available from the Windows Program Menu. Adobe Reader Installation If you do not already have Adobe Reader installed on your computer, go to the following website to download and install the software. http://www.adobe.com/products/acrobat/readstep2.html Using the Reader Refer to the Adobe Reader help system for details of how to use this program to view your user manual. Here are a couple of suggestions…. User manuals have a table of contents in the front of the document. You can display the table of contents and press on a section, and the program will automatically jump to that section of the manual. There is also a bookmark feature in the program that allows you to navigate the manual. Page 24 CleverQ™ Introduction and Setup Manual There is also a powerful search feature built in. Select the “Edit” Menu, choose “Search” or press the Search button on the toolbar, the Search dialog window appears, enter your word of phrase you want to search for, and then press the “Search” button. You will then get a search results window displayed with all the places in the document that your word or phrase was found. Select a search result, and that result will be displayed in the document. Page 25 CleverQ™ Introduction and Setup Manual Websites Support Website The support website http://www.CleverQ.com/support/ provides tips, tricks, user manuals, demos, and other informative links. Page 26 CleverQ™ Introduction and Setup Manual Support Blog Our support blog can be found at http://www.cleverq.com/Blog/ or by choosing the menu item off of the Help menu. Here you can search for informative information about the program as well as post comments. Program Updates Updates to the software is done via the Help Menu within the program. You must have a valid and current Support ID entered on the Preference form in order to get updates. Choose “Check for Updates” to determine if an update is available. This can also be automatically done by setting a preference on program startup. Choose “Install Updates” to close the program and install the new version. Occasionally changes are made to the structure of the CleverQ™ Data File, you will be prompted when this occurs. Having a backup prior to these updates is a good idea, but a temporary backup will be created automatically when this update occurs. Technical Support By pressing the Technical Support button on the About Box, you will see information about getting technical support. Or, visit the website http://www.CleverQ.com/support/ Training Training is available. Visit the website below for more information. http://www.bigticketsolutions.com Customization Customization of the CleverQ™ software is available. Visit the website below for more information. http://www.CleverQ.com Page 27 CleverQ™ Introduction and Setup Manual Appendix A – Setting Up QuickBooks® Whenever you start using a new QuickBooks® company file with the CleverQ™ software, you need to have QuickBooks® open with that company file at the same time you press the “4a - Get QuickBooks® Data Now” button on the QuickBooks® Data Source Setup form in the CleverQ™ software. This is necessary the first time only, because you have to tell QuickBooks® that you are allowing the software to access the QuickBooks® data. QuickBooks® will display this window when this occurs... You should select “Yes, always; allow access even if QuickBooks® is not running”. Also login as “Admin” to make sure you can get to all the reports required. It is optional to check off “Allow this application to access personal data....” Then press “Continue” and you will get the “Access Confirmation” screen. Press “Done” and the loading process will continue. After the first data load, close QuickBooks® and you should not have to repeat this procedure again for this specific company file. Page 28 CleverQ™ Introduction and Setup Manual If you need to change or remove the access to this company file from CleverQ™, go to the preferences in QuickBooks® (Edit Menu). Select “Integrated Applications” on the left pane of the Preferences form. Click on the Company Preferences tab. You should see a list of applications that have access including the CleverQ™ application. To remove access, select CleverQ™ and press the remove button. To modify the access, press the Properties button. There is an issue with QuickBooks® that will affect the Inventory Valuation Summary data. When Items in the items list are marked inactive, they will show up in the Sales by Item Summary when you run a report for a past date, but they will be excluded in the Inventory Valuation Summary for the same past report date. This means that any items which are desired to be included in the items ROI cannot be marked inactive in QuickBooks® even if it is a child item of a total that is active. If they are inactive, there will be no asset value for them. Page 29 CleverQ™ Introduction and Setup Manual Appendix B – Batch Jobs CleverQ has the ability to run automatically without user intervention for the following processes: Extracting QuickBooks® Data Extracting Database Data Extracting Excel Data Extracting data using the Data Package Interface Populating the Cache with formulas Calculating the Cache Using the Windows Scheduled Tasks functionality gives you the ability to run this batch jobs at a certain date and time and also on a recurring basis. This process can be setup from the QuickBooks Options form as previous described or from the Navigator. Page 30 CleverQ™ Introduction and Setup Manual The process will always use the last QBD file that CleverQ was working with. The results of all these Batch Jobs are recorded in the Log of the QBD file. This is available by opening CleverQ, selecting “Help – About CleverQ” from the main menu. Press the “System Information” button and then press the “Log Report” button. Page 31