1
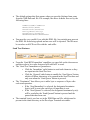
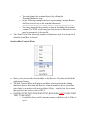
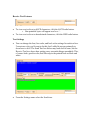
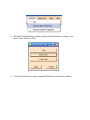
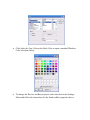
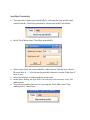
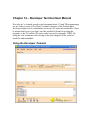
Chapter 14 – Developer Terminal User Manual
Now that we’ve learned enough serial communications, C# and VB programming
we are ready to create a Developer Terminal with most of the features that a
developer might need to communicate between a PC and a microcontroller. I have
to assume that by now you don’t need the cookbook format for writing this
program, so the C# and the VB source code is posted in Appendix TODO. By
using the code comments and referring to the prior chapters all the software
should be understandable.
Using the Developer Terminal
Port Settings
• Click the Setting menu item and click ‘Port’
•
In the Settings dialog select the device and the UART parameters.
•
•
The terminal is now ready to send and receive data.
The ‘Open Port’ menu item has toggled and reads ‘Close Port’
o Click this to close the port
•
The default settings that first appear when you open the Settings form come
from the XMLData.xml file. For example, the above defaults were set by the
following lines:
<COMPort>COM1</COMPort>
<Baud>19200</Baud>
<Databits>8</Databits>
<Parity>None</Parity>
<Stopbits>1</Stopbits>
<Handshake>None</Handshake>
•
You must be very careful if you edit this XML file. Any mistake may prevent
the XML file from being opened and no error will be reported. The file must
be saved as an ASCII text file with the .xml suffix.
Send Text Features
•
•
•
•
From the ‘Send HEX Immediate’ comoBox you can click on the down arrow
and then select a hex value between 0x00 and 0xFF to send.
The ‘Send Text’ Immediate or Queued area.
o Click the ‘Immediate’ radio button to send each character as they
are input into the Send Text box.
o Click the ‘Queued’ radio button to enable the ‘Send Queue’ button
which will allow characters to be queued in the Send Text box and
only sent when the ‘Send Queue’ button is pressed.
The ‘Terminator?’ box allows you to add a byte or sequence of bytes after
each send operation.
o If the ‘Send Immediate’ is selected, the designated terminator
byte(s) will be sent after each byte of input data is sent.
o If the ‘Send Queued’ is selected, the designated terminator byte(s)
will be send after the ‘Send Queued’ button is pressed and the
queued data has been sent.
The terminal byte(s) used are set in the XMLData.xml file, which must be
present in the same directory as the Developer Terminal executable.
o You can change the terminal byte(s) by editing the
TerminalCharacters item
o In the following example the bytes representing Carriage Return
and Line feed are set as the terminal characters:
<TerminalCharacters>0x0A,0x0D,</TerminalCharacters>
•
o You must input the data exactly as shown, including the terminal
comma. The XML reader may just skip incorrect data and no error
may be generated, so be careful.
The ‘Send Count’ box shows the number of characters sent. It is cleared to 0
when the Send Box is cleared
Send textBox Context Menu
•
•
•
Move your cursor to the Send textBox or the Receive Text box and click the
right mouse button.
The Edit Context Menu will appear and allow you to perform the editing
functions shown. Note that the Receive Context menu has fewer selections
since there is no need to edit received data. (Okay… maybe, but if you want
that you have the source code so DIY!)
PASTING TEXT INTO THE SEND TEXT BOX DOES NOT CAUSE THAT
TEXT TO BE SENT!
o It could be done, and if someone wants to add this code, I’d like to
see it.
Receive Text Features
•
•
To view received text as ASCII characters, click the ASCII radio button.
o Non-printable bytes will appear as a box: .
To view received text as hexadecimal characters, click the HEX radio button.
Text Settings
•
You can change the font, fore color, and back color settings for each text box.
I’m not sure why you’d want to do this, but I added it anyway primarily to
show how to do it. The Send Text box below may look cool to some, but the
Receive Text box shows how getting crazy can make things unreadable. This,
of course looks good in color, and like crap in the printed book as black and
white.
•
From the Settings menu select the Send item:
•
The Send TextBoxSettings dialog as shown below has three settings: Font,
Back Color, and Fore Color.
•
Click the Font button to open a standard Windows font selection dialog:
•
Click either the Fore Color or the Back Color to open a standard Windows
Color selection dialog:
•
To change the Receive textBox properties select that item in the Settings
Menu and follow the instructions for the Send textBox properties above.
Send Byte Periodically
•
You can send a single byte periodically by selecting the byte and the send
period from the ‘Send byte periodically’ menu item in the Tools Menu.
•
In the Tools Menu select ‘Send byte periodically’.
•
Select a byte from the send comboBox, which shows both the byte value in
Hex and after a ‘- >’ also shows the printable character version if that byte if
there is one.
Select the number of milliseconds between sends.
In the above dialog, the byte 0x41 was selected to be sent once every 500
milliseconds.
You can stop sending this byte by selecting the Tools Menu item ‘Stop
sending bytes!’ menu item.
•
•
•
Sending Macros
By convention, strings of text that can be loaded into a terminal and sent as a unit
are called macros. The macro feature is based on lines of text entered into an
XML file. Each macro has three parameters: a macro name, the macro data, and a
macro type. The macro name will be displayed on a line in the Send Macro box.
When that name is selected and clicked the associated macro data will be sent.
The macro type determines whether the data will be sent as shown in the macro
data field or if it will be interpreted as an ASCII representation of a hex value and
the hex value will be sent.
For example:
<MacroText1>Start Motor</MacroText1>
<MacroData1>CMDstmtr</MacroData1>
<MacroType1>ASCII</MacroType1>
Including these lines in XMLData.xml will cause the Developer Terminal to put
the string ‘Start Motor’ in the Send Macro box.
Repeat: You must be very careful if you edit this XML file. Any mistake may
prevent the XML file from being opened and no error will be reported. The file
must be saved as an ASCII text file with the .xml suffix..
If the user clicks this line then the characters ‘C’, ’M ’, ’D ’, ’s ’, ’t ’, ’m ’, ’t ’,
and ’r’ will be sent to the microcontroller could have code that parses this as a
command to start a motor.
The second line in the above image shows the results of the following lines:
<MacroText2>Send PORTB0: off</MacroText2>
<MacroData2>0xFE,0x01,0xFF,</MacroData2>
<MacroType2>HEX</MacroType2>
If the user clicks on the “SendPORTB0” macro, then the terminal will parse the
data characters in the string “0xFE,0x00,0xFF,” and send the three hex bytes
indicated.
Modem Lines
•
•
•
•
Toggle the state of the RTS line by clicking the RTS button.
Toggle the state of the DTR line by clicking the CTS line.
The states of the CTS, DSR, and DCD lines are indicated by the Virtual LEDs.
The RI indicates a change of state, not an absolute state due to the SerialPort
class function that will only indicate that the RI pin has changed and not its
state.
‘Ideal’ Terminal Specification:
I solicited comments on AvrFreaks.net for what features should be in an ‘ideal’
developers terminal. I couldn’t put in everything suggested, but since I’m
providing the source code, anyone needing extended features should be able to
add them. I’d like to hear about such additions.
Ideal Terminal Wish List:
• Separate Send and Receive text windows.
o Clear text button.
• Show received bytes as text or hex.
• Save sent text to file.
• Save received text to file.
• Send an ASCII text file.
• Send a hex data file.
• Send text box accepts data dragged and droped or pasted from the clipboard.
• Send Hex byte combo box with 0x00 to 0xFF selections.
•
•
•
•
•
•
•
•
•
•
•
•
Send text immediately or queued option radio buttons.
Send with terminal character(s) check box.
o Terminal character(s) read from XML file.
Count boxes for characters sent and received.
Select font and backcolor for send text box.
Select font and backcolor for receive text box.
COM port set up dialog.
o Support COM ports 0 to 255.
o COM ports available for selection list box.
o Combo boxes with standard selectios fo:
Baud rate
Data bits
Parity
Stop bits
o Handshaking:
Hardware: RTS/CTS
Software: Xon/Xff
None
o Xon and Xoff character selection combo box.
Open/Close Port button.
Port status in form text line.
Macro feature
o Macros from XML files
Show macro name in a text box.
Macro text is sent when macro name is double clicked.
Macro can send either characters or hex codes.
o Macro from user input to 3 text boxes
Input as text or hex.
Timed auto send with repeat mode for macros.
Help feature to show how to use the terminal.
Virtual LED state indicators for DCD,DSR,CTS, and RI.
Radio buttons to set state of DTR and RTS.
Things suggested by AVRFreaks folks, but not included:
• Log and timestamp both sent and received data
• Alarm Mode:
•
•
•
•
•
•
•
•
•
o On specified time or received string match
Generate alarm condition.
Or, send preset text (macro).
Option to show received bytes as ‘printable’ text and if no displayable
character is available:
o Show the hex value.
o Or we could allow control codes to either be used as control codes
or shown as an indicator for the code such as (lf) for ‘line feed’.
Checksum feature for hex macros:
o Variable source destination width.
o Positive/Negative/XOR sums.
o Little/big endian.
CRC (CCITT) calculation:
o Append to hex strings.
o Show for received strings.
Monitor input to assure that no characters are dropped.
For inputting hex characters to send, have an auto complete feature that adds a
0x before two hex characters and a comma or space between them.
User programmable function keys.
Option to use a single window for input and output like a ‘real’ terminal.
o VT100 emulation with full ANSI support.
“Read a nominated ASCII file and send each line at a nominated time
interval.”
Mode to “automatically toggle one of the handshaking lines to control the data
direction pin of a half-duplex RS232<->RS485 transceiver.”