1
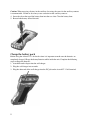
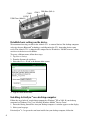
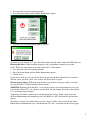
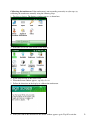
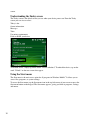
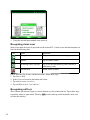
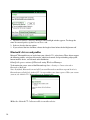
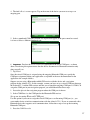
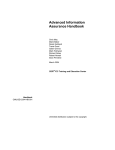
User Manual
Ashtech FT-1 Field Terminal
$VKWHFK)7)LHOG7HUPLQDO1
Installing the battery packs
The $VKWHFK)7 is equipped to handle two battery packs at a time. Both batteries are not needed for
operation. Using two battery packs will extend the operating time of the unit.
1. Use the edge of a key or a flat point screwdriver to open the two quarter turn latches that
release the battery door from the unit.
2. Remove the battery door.
Note: The hand strap is attached to the battery door and does not need to be removed to open
battery compartment.
3. Insert the battery pack(s) so battery contacts match up. The bottom slot is the main battery
while the upper slot is the auxiliary battery.
Note: When using one battery pack, the pack can be placed in either compartment. The unit will
feel more balanced if placed in the bottom slot.
1
Caution: When not using a battery in the auxiliary slot, using the cover for the auxiliary contacts
is recommended. Failure to do so may cause corrosion on the auxiliary contacts.
4. Insert the tab on the top of the battery door into the case slots Close the battery door.
5. Reattach the battery door of the unit.
Charge the battery pack
Before using the $VKWHFK)7 for the first time it is important to make sure the batteries are
completely charged. Charge the battery/batteries while inside the unit. Complete the following
steps to charge the batteries:
1. Attach the outlet adapter into the wall charger.
2. Plug the wall charger into an outlet.
3. Plug the other end of the wall charger into the DC jack on the $VWHFK)7ILHOGWHUPLQDO.
2
4. Charge the $VKWHFK)7 at least 4 hours per battery to get a full charge.
Note: When charging two battery packs in the unit the charge time increases. The bottom battery
will charge first. The left LED light blinks while charging. When the unit is fully charged the
LED will be solid when fully charged. The unit will not be damaged if left connected to the wall
charger for extended periods of time.
Charging temperatures
Only charge your battery pack in temperatures between 32° F and 104° F (0° C and 40° C). For
best results, charge the battery pack at room temperature (68° F or 20° C).
Ashtech FT-1 Hand Strap
To remove the hand strap of the field terminal, press the latch down toward the unit and then slide
down. Either end of the hand strap can be removed.
Anatomy of Ashtech FT-1 Field Terminal
Pictured below is the available ports on the Ashtech FT-1 field terminal.
3
COM 2
12 VDC
USB Client (Mini B)
COM 1
USB Host (Full A)
Establish basic settings on the device
We recommend creating a name for the Ashtech FT-1 so external devices like desktop computers
or devices that use Bluetooth® technology can differentiate the FT-1 from other devices more
easily. The Ashtech FT-1 is shipped with a unique Device ID which is “FieldPCxxxxxxx” where
xxxxxxxx is the device serial number.
To create a different name, follow these steps:
1. Tap Start > Settings.
2. From the System tab, tap About.
3. Select the Device ID tab at the bottom of the screen.
4. Type in a new device name.
Installing ActiveSync® on a desktop computer
Follow the steps below if your desktop computer has Windows® XP or 2000. If your desktop
computer has Windows Vista™ see Installing Windows Mobile® Device Center.
1. Insert the Getting Started Disc into your desktop computer. A window appears on the display.
2. Select your language.
If ActiveSync® 4.5 or greater has not been installed on your desktop computer, follow the
4
directions on the screen to install it.
Creating an ActiveSync® connection
1. Plug USB Client end (mini B) of the USB communications cable into your Ashtech FT-1.
2. Plug the USB Host end (full size A) of the USB communications cable into your desktop
computer.
3. Establish an ActiveSync® partnership by following the instructions on the desktop computer
screen.
Installing Windows Mobile® Device Center
If your desktop PC has Windows Vista™ complete the following steps:
1. Connect your device to your PC by plugging the USB Client (mini B) into the unit and the
USB Host (full size A) into the desktop.
2. Download the Windows Mobile® Device Center Installer to your PC by clicking on the
download link.
3. Select “Run this program from its current location” and click OK.
4. Follow the instructions on the screen.
Creating Windows Mobile Device Center Connection
Once Windows Mobile® Device Center has been installed, plug a USB cable into available port
on the computer and the other end into the Ashtech FT-1. Windows Mobile® Device Center will
automatically open. Follow the steps on the screen.
Note: For more information about connecting to a PC using either ActiveSync® or Windows
Mobile® Device center visit Microsoft’s Windows® Mobile website at http://www.microsoft.com/
windowsmobile/default.mspx.
5
Specialized keyboard keys
Sticky keys
The Shift, Alt, Ctrl, and 2nd keys are called sticky keys. Each sticky key has three modes, Next
Key, ON, and OFF. The sticky key mode is determined as follows:
By default all sticky keys are OFF.
Pressing the sticky key once toggles the mode only for the next key pressed. For example, with
shift mode OFF (lower case), pressing SHIFT then K displays an upper case K.
Double pressing the sticky key toggles and locks the sticky mode. For example, with the shift
mode OFF, double tapping SHIFT locks the shift mode ON (caps lock). All subsequent nonsticky keys pressed are then upper case keys. With the shift mode ON, tapping SHIFT turns caps
lock off and all non sticky key presses result in lower case characters.
If you hold down a sticky key it is on for every key stroke until the sticky key is released. The
colored backlights indicate when a sticky key is on.
Window Key
Press the window key to display the Start Menu regardless of the application running.
Suspending, powering off, resetting, and restoring factory defaults
The Power button allows you to suspend, power off, or reset the device. A series of keyboard
actions also lets you restore the hard drive, settings, and icons to their original factory defaults.
Below are instructions for each action.
Suspending the device. Suspending the Ashtech FT-1 is different from powering it off: Suspending
puts the device to sleep, and when turned back on, the device remembers where it was. Some
battery power is used. We recommend suspending your device if you plan to turn it off for less
than two weeks.
To suspend your device, briefly press the Power button and release. To resume the device from
suspend mode, press the Power button again.
Powering off the Ashtech FT-1. Powering off the device closes all programs and removes power
from all system components except for the real-time clock. Unlike suspend mode, the device
resets when it is powered on again. To preserve battery power, we recommend you power off the
device if it will be left unused for two weeks or longer.
To power off the Ashtech FT-1 field terminal,
6
1. Save open files and close running programs.
2. Press the Power button until the Power Button menu appears.
3. Tap Power Off. A warning dialog appears. Tap OK.
To power on your Ashtech FT-1, press the Power button until the amber notification LED comes on.
Resetting the device. When installing programs, you are sometimes required to reset your
device. Follow the steps below to reset the Ashtech FT-1 field terminal:
1. Save open files and close running programs.
2. Press the Power button until the Power Button menu appears.
3. Choose Reset.
If your device locks up, you can reset the device by pressing the Power button for 10 seconds or
until the screen goes dark. After a few seconds, the device turns on again.
Restore factory settings. Follow the steps below to restore the user storage, settings, and icons
on your Ashtech FT-1 to their original factory defaults.
WARNING! Restoring the Ashtech FT-1 to its original factory state will permanently erase data
saved on the Ashtech FT-1, any software you installed, and any changes you made to the Ashtech
FT-1, including settings changes.
To perform a clean boot, which restores everything but the “storage” folder, select reset from
the Power Button menu and immediately press and hold Ctrl + Alt + Del until the splash screen
appears.
To perform a storage clean, which only erases the “storage” folder, select reset from the Power
Button menu and immediately press and hold down Ctrl + Alt + 2 until the splash screen appears.
7
Using the stylus
Below are directions for performing shortcuts using the stylus.
To do this . . .
Follow these steps
Select an item
Open an item or file
Cut or copy
Tap once.
Tap the item or file.
Tap and hold until the context menu appears. Select Cut or
Copy.
Tap and hold the area where you want to paste. Select Paste
from the context menu that appears.
Tap and hold the item. The context menu appears.
Tap and drag the item to the destination and lift up the
stylus.
Drag the stylus over the items.
Paste
Open a context menu for an item
Drag and drop
Select multiple items
Using the touchscreen
This section explains how to disable, protect, clean, and calibrate the touchscreen.
Disabling the touchscreen. The touchscreen can be disabled to help prevent unwanted
keystrokes when using the device in certain situations, such as walking through bushes between
locations. To disable the touchscreen press the 2nd key followed by the right soft key. To reenable the touchscreen use the same keystrokes.
Protecting the touchscreen. The touchscreen is sealed to protect your device against water and
dust. To protect your touchscreen, we recommend that you apply a touchscreen protector to the
screen.
CAUTION: Be sure to replace the screen protector as often as the screen protector packaging
directs.
Cleaning the Touchscreen.
1. Press the 2nd key + right soft key to disable the touchscreen.
2. Use a clean cotton cloth to wipe off the screen.
Note: Do not use anything abrasive that could scratch the screen (including tissues and paper
towels).
3. Press the 2nd key + right soft key to enable the touchscreen.
8
Calibrating the touchscreen. If the touchscreen is not responding accurately to stylus taps, try
calibrating the touchscreen manually using the following steps:
1. Tap Start > Settings. The Settings window appears, as shown here.
2. Select the System tab at the bottom of the display.
3. Scroll down and tap on the Screen icon.
4. When the Screen window appears, tap Align Screen.
5. Follow the directions on the display to calibrate the touchscreen.
6. After you calibrate the touchscreen, the Screen window appears again. Tap OK to exit the
9
screen.
Understanding the Today screen
The Today screen is the default screen you see when your device powers on. From the Today
screen you can view or select
Today’s date
Owner information
Messages
Tasks
Upcoming appointments
Lock or unlock your device
To lock the device, simply tap on the words “Device unlocked.” To unlock the device, tap on the
word “Unlock” on the two screens that appear.
Using the Start menu
The Start menu is the main access point for all programs in Windows Mobile®. It allows you to
access files, programs, or system settings.
To access the Start menu, tap the Start menu icon in the top left corner of your screen or press the
Start menu button on the keypad. The Start menu appears, giving you links to programs, settings,
and menus.
10
Entering information
At the bottom of the display is a data entry icon. Tapping on the icon allows you to enter
information using the stylus. Specifically, you can choose to:
Select alphanumeric characters from the on-screen Keyboard utility (the default input
method).
Use
Letter Recognizer. This input method recognizes character strokes and gestures.
Enter
text using Block Recognizer. This utility recognizes letters from single strokes.
Use Transcriber, a program that allows you to enter data using cursive, print, or mixed
handwriting.
Note: For more details about using each input method, go to Start > Settings > Input and choose
the input method from the Input method window.
When you are ready to enter text, you can switch from the default input method (keyboard) by
following these steps:
1. On the bottom center of the screen, tap the arrow next to the input method icon (shown). If
the input selector arrow is not displayed, tap the input method icon.
2. The input method menu appears. Tap the input method you want from the list of options.
11
3. Using the selected input method, enter your text.
Recognizing status icons
Status icons show the status of operations on the Ashtech FT-1. Status icons and their functions are
listed in the following chart.
Icon
Name
Function
Charge indicator
Tells you when the device is charging.
Speaker
Tap to control volume.
Remaining battery capacity
Tap to see how much battery power remains in
both battery packs.
Touch screen disabled.
Touch Screen
For an additional list of icons and their functions, follow these steps:
1. Tap Start > Help.
2. Select Contents located in the bottom left corner.
3. Tap on Start using your device.
4. Tap on What do these icons indicate?
Recognizing soft keys
These context-sensitive keys appear as words, buttons, or tabs on the menu bar. Tap on these keys
located at the top of the keyboard can be used
to perform actions or open menus. The keys
to select the soft keys.
12
Backlight
Dimming or turning off the display backlight saves battery power when the device is running. To
dim or turn off the backlight, follow these steps:
1. Tap Start > Settings > System > Backlight.
2. Select the Brightness tab. The Brightness window for battery power appears.
3. Drag the backlight slider slightly down to dim the backlight, and drag the slider up to
brighten the backlight.
The Backlight Enabled checkbox applies when the device is running on battery power. To
completely disable the backlight when on battery power, uncheck this checkbox.
Adjusting the backlight timer
By default, the display backlight is set to turn off after one minute of inactivity. To adjust the
time when your backlight turns off, follow these steps:
13
1. Tap Start > Settings > System > Backlight. The Backlight window appears. To change the
timer for external power, tap the External Power tab.
2. Select or deselect the two options.
3. If you selected the first checkbox, choose the length of time before the backlight turns off.
Bluetooth drivers and profiles
®
Microsoft® Bluetooth drivers are loaded onto your Ashtech FT-1 at the factory. These drivers support
the following profiles: serial port, file transfer, audio/visual control, dial up networking, object push,
human interface device, and advanced audio distribution.
Identify the power status of Bluetooth using Wireless Manager
To determine the power status of the Bluetooth tap Start > Settings > Connections tab >
Bluetooth > Mode tab.
Note: By default, Bluetooth is turned off. If you turn Bluetooth on and then suspend the device,
Bluetooth turns off while the $VKWHFK)7 is suspended to save battery power. When you resume
(turn on) the $VKWHFK)7, Bluetooth turns on automatically.
Make the Ashtech FT-1 discoverable to another device
14
To allow other devices that use Bluetooth wireless technology to detect the Ashtech FT-1 and
communicate with it, you must make your device discoverable or establish a partnership with the
other device.
Follow these steps to make your device discoverable:
1. Tap Start > Settings > Connections tab.
2. Tap Bluetooth.
3. Select the Turn on Bluetooth checkbox, and then select the checkbox to Make this device
discoverable to other devices.
Create a Bluetooth partnership
A partnership is created between the Ashtech FT-1 and another device that uses Bluetooth wireless
technology to help exchange information securely. Follow the steps below to create a partnership:
1. Make sure the two devices are turned on, discoverable, and within at least 30 feet of one
another.
2. Tap Start > Settings and then tap the Connections tab.
3. Tap Bluetooth > Devices tab > Add New Device. Your device searches for other devices with
Bluetooth capabilities and displays them in the list.
4. The name of the Bluetooth device appears. Tap the name, then tap Next.
15
5. If the Bluetooth device has an assigned passkey, enter the number. If the device has not
already been assigned a passkey but requires one, enter an alphanumeric passkey on the Ashtech FT-1
between 1 and 16 characters. Tap Next.
Note: If you are unsure whether your device requires a passkey and whether one has already
been assigned to your Bluetooth device, see the user documentation that came with the Bluetooth
device.
Important: If the Bluetooth device does not use a passkey, leave
the passkey blank and tap Next. A message appears, asking if you
want to add the device to the device list. Choose No and skip to
step 7.
Note: It is important to choose No when you are asked whether you want to add to the device to
the device list; choosing Yes sends you back to the passkey screen.
6. Enter the same passkey on the other device.
7. In the Partnership Settings screen on the Ashtech FT-1, you can assign a new name to the device in
the Display Name option.
8. Select the service you want to use from the Services box, then tap Finish.
Bluetooth virtual COM ports
Some application programs connect using a virtual COM port (serial port) when making a
Bluetooth connection. To make a connection possible for such programs, you must first set up
a virtual COM port on the $VKWHFK)7. Once created, this virtual port can be used like any other
COM port. For example, you can use a virtual COM port for programs that connect to a GPS
receiver. You can also use it to connect to a printer that is enabled with Bluetooth technology.
When setting up a virtual COM port, you must specify if the COM port is an outgoing COM port
or an incoming COM port.
An outgoing COM port means that the $VKWHFK)7 initiates communication with the other device.
For example, when you are using a Bluetooth GPS receiver, the $VKWHFK)7 initiates the request for
data; thus, the virtual COM port connecting with the receiver would be an outgoing COM port.
An incoming COM port means that the other device is initiating the communication with the
$VKWHFK)7. For example, a desktop computer might initiate a Bluetooth ActiveSync connection with
the device via the virtual COM port.
For more details about setting up outgoing and incoming COM Ports, read the following
sections.
Set up an outgoing Bluetooth COM port
Use this option if you want to assign the virtual COM port as an outgoing COM port (i.e., you
want to use the $VKWHFK)7 to initiate communications with another device).
Follow the steps below to set up an outgoing Bluetooth COM port.
1. Make sure you have paired with the serial port device you want to communicate with. To do
this, follow the steps in the section called Create a Bluetooth partnership in this chapter.
2. Select the COM Ports tab.
3. Tap New Outgoing Port, the second option shown.
16
4. The Add a Device screen appears. Tap on the name of the device you want to set up as an
outgoing port.
5. Select a numbered COM port from the list of ports that appear. If the port cannot be created,
it is in use. Select a different numbered port.
6. Important: Deselect the Secure Connection option below the list of COM ports, as shown
above. Deselecting this option ensures that the device disconnects its Bluetooth connection only
when you tell it to.
7. Tap Finish.
Once the virtual COM port is assigned using the outgoing Bluetooth COM port, specify the
COM port assignment within your application as explained in the user documentation for the
application. An example follows.
Suppose you are using a Bluetooth-enabled GPS receiver with the device and a navigation
program on the $VKWHFK)7. In this example, assume you have set up a virtual COM port between
the $VKWHFK)7 and the GPS receiver and that you assigned the outgoing COM port as COM 6. To
assign the COM port in your navigation program, you would then follow these steps:
1. Locate the place in the navigation program where the COM port is chosen.
2. Select COM Port 6 as the COM port for the Bluetooth GPS receiver.
Set up an incoming Bluetooth COM port
Use this option if you want to assign the virtual COM port as an Incoming COM port (i.e., you
want another device to initiate communications with the $VKWHFK)7). If you are connected with a
Bluetooth device that supports serial communications, follow these steps to set up the incoming
Bluetooth COM port:
1. Press the COM Ports tab.
17
2. Tap on New Incoming Port.
3. Select a numbered COM port from the list.
Note: If the port cannot be created, it is in use. Select a different numbered port.
4. Important: Deselect (clear) the Secure Connection checkbox. Deselecting this option
ensures that the device disconnects its Bluetooth connection only when you tell it to.
Wi-Fi
When the terminal is connected through Wi-Fi, the icon
appears in the tool bar.
Connecting to Wi-Fi Network
Many times when entering an access point a bubble will pop up on your screen asking if the
network connects to the network or a private or corporate network. Choose the correct network
and tap Connect. The choice will be stored in the Connection Manager for future use.
To actively look for a network connection complete the following steps:
1. Activate Wi-Fi by going to Start > Settings > Connections tab > Wireless Manager.
2. Turning the Wi-Fi on automatically scans the area for available networks.
18
3. When the Ashtech FT-1 has completed the scan a list of available networks and their strengths
will appear in Start > Settings > Connections tab > Wi-Fi
4. Tap on the desired network to connect.
Note: If the network is password protected a window will appear for the password to be inserted.
Managing Connections
To adjust the Wi-Fi settings access the Managing Connections window go to Start > Settings >
Connections tab > Connections.
19
Battery warnings
WARNING! This device comes with a lithium ion rechargeable battery pack. To reduce the
risk of fire or burns, do not disassemble, crush, puncture, short external contacts, or expose the
battery pack to fire.
Risk of explosion if battery is replaced by an incorrect type.
Follow these additional safety guidelines:
Use only battery packs approved for use with this device.
Do not store or leave your device or battery pack near a heat source such as a radiator, fireplace,
stove, electric heater, or other heat-generating appliance, or otherwise expose it to temperatures
in excess of 140° F (60° C).
Do not try to open the battery pack.
Do not carry a battery pack in your pocket, purse, or other container where metal objects (such as
car keys or paper clips) could short-circuit the battery pack terminals.
Keep the battery pack contacts clean. If they get dirty, wipe them off with a soft cloth.
Dispose of the battery pack properly. See the section called Disposing of your $VKWHFK)7 and
battery packs in this manual for instructions.
Do not install the battery pack backwards so that the polarity is reversed.
Do not connect the positive terminal and the negative terminal of the battery pack to each other
with any metal object (such as wire).
Do not solder directly onto the battery pack.
Do not place the battery pack in direct sunshine.
In the rare event that the battery pack leaks and fluid gets into the eye, do not rub the eye. Rinse
well with water and immediately seek medical care.
Equipment warnings
WARNING! To reduce the risk of personal injury, electrical shock, fire or damage to the
equipment:
Plug the wall charger into an electrical outlet that is easily accessible at all times.
Disconnect power from the equipment by unplugging the wall charger from the electrical outlet
or unplugging the synchronization cable from the host computer.
Do not place anything on the wall charger cord or any of the other cables. Arrange them so that
no one may accidentally step on or trip over them.
Do not pull on a cord or cable. When unplugging the wall charger from the electrical outlet, pull
on the plug, not the cord.
Use only wall chargers intended for the $VKWHFK)7. Using any other external power source can
damage your product and void your warranty.
CAUTION: Do not operate this device within 20 cm of anyone when radios are enabled due to
RF exposure.
Repairing the $VKWHFK)7
20
If the Ashtech FT-1 is in need of repair, call your service center for a Return Materials Authorization
number (RMA).
IMPORTANT: Do not attempt to service the device yourself. This action voids the warranty.
Disposing of battery packs
The lithium-ion battery packs for your Ashtech FT-1 are recyclable. Avoid placing them in the trash
or municipal waste system.
To find the nearest battery recycling center in the USA, visit the Rechargeable Battery Recycling
Corporation’s website at www.rbrc.org/call2recycle/index.html or call 1-800-8-battery.
Product Specifications
Ashtech FT-1
Operating System
Processor
Memory
Primary Storage
Display
Touchscreen
Micro SD Card
Slots
Keyboard
Operating
Temperature
Storage
Temperature
Battery Charging
Temperature
Dust proof, water
proof rating
Batteries
I/O Module
Nine-way directional button,
standard key functions
–4° to 122° F (–20° to 50° C)
Microsoft® Windows Mobile® 6
Intel® XScale® PXA270, 624 MHz
128 MB RAM
512 MB
3.5” (89 mm) QVGA active matrix
color TFT transflective LCD with
LED backlight; 240 x 320 pixels
Sealed, resistive, pressure sensitive,
enable/disable
microSD header 3.3 V; user
accessible
Nine-way directional button,
standard key functions
–4° to 122° F (–20° to 50° C)
–22° to 140° F (–30° to 60° C)
–22° to 140° F (–30° to 60° C)
32° to 104° F (0° to 40° C)
32° to 104° F (0° to 40° C)
IP67 Sealed rating, waterproof and
dustproof
Intelligent, rechargeable Li-Ion
battery pack,
Serial port 9-pin D-sub connector,
USB Host (Full A), USB Client
(Mini B), 12 VDC jack for power
input and battery charging
IP67 Sealed rating, waterproof and
dustproof
Intelligent, rechargeable Li-Ion
battery pack,
Serial port 9-pin D-sub connector,
USB Host (Full A), USB Client
(Mini B), 12 VDC jack for power
input and battery charging
3.5” (89 mm) QVGA active matrix
color TFT transflective LCD with
LED backlight; 240 x 320 pixels
Sealed, resistive, pressure sensitive,
enable/disable
21
COM 1 Port
Current Limits
Power
Wireless
Communication
Options
Internal Clock
Enunciators
9-pin D-sub connector; full modem
control signals, 5 V @ 200 mA
available on DTR pin 4; controlled
by DTR signal; conformal coated
USB Host: 5 V; 9-pin D-sub
connector: 5 V on DTR line;
recommended maximum combined
output current: 500 mA; short
circuit protected
Voltage +12 VDC; Range 10–20
VDC; Current: Max 12 V @ 850
mA; reverse polarity protection;
over voltage protection; auto shut
off
External power/charge LED and
notification LED; other enunciators
on system tray
USB Host: 5 V; 9-pin D-sub
connector: 5 V on DTR line;
recommended maximum combined
output current: 500 mA; short
circuit protected
Voltage +12 VDC; Range 10–20
VDC; Current: Max 12 V @ 850
mA; reverse polarity protection;
over voltage protection; auto shut
off
Integrated Bluetooth and Wi-Fi
Battery-backed real time clock
External power/charge LED and
notification LED; other enunciators
on system tray
Regulatory information
This equipment has been tested and found to comply with the limits for a Class B digital
device, pursuant to Part 15 of the FCC Rules. These limits are designed to provide reasonable
protection against harmful interference when the equipment is used in a commercial or
residential environment. This equipment generates, uses, and can radiate radio frequency energy
and, if not used in accordance with the reference guide, may cause harmful interference to
radio communication. If this equipment does cause harmful interference to radio or television
reception, which can be determined by turning the equipment off and on, the user is encouraged
to try to correct the interference by one or more of the following measures:
Reorient or relocate the receiving antenna.
Increase the separation between the equipment and receiver.
Connect the equipment into an outlet on a circuit different from that to which the receiver is
connected.
Consult the dealer or an experienced radio/TV technician for help.
This device complies with Part 15 of the FCC Rules. Operation of this equipment is subject to
the following two conditions:
1. The device may not cause harmful interference.
2. This device must accept any interference received, including interference that may cause
undesired operation.
22
CAUTION: Only approved accessories may be used with this equipment. In general, all cables
must be high quality, shielded, correctly terminated, and normally restricted to two meters
in length. Wall chargers approved for this product employ special provisions to avoid radio
interference and should not be altered or substituted.
CAUTION: Changes or modifications to the Ashtech FT-1 that are not expressly approved by the
manufacturer could void the user’s authority to operate the equipment.
Industry Canada
This Class B digital apparatus complies with Canadian ICES-003.
Operation is subject to the following two conditions: (1) this device may not cause interference,
and (2) this device must accept any interference, including interference that may cause undesired
operation of the device.
Industrie Canada
Cet appareil numérique de classe B est conforme à la norme sur le matériel brouilleur canadienne
ICES-003.
Son utilisation doit être soumise aux deux conditions suivantes : (1) cet appareil ne doit pas
générer d’interférence, et (2) cet appareil doit accepter toute interférence captée, y compris celles
qui peuvent nuire à son bon fonctionnement.
European Union
The telecommunication functions of this device may be used in the following EU and EFTA
countries: Austria, Belgium, Bulgaria, Cyprus, Czech Republic, Denmark, Estonia, Finland,
France, Germany, Greece, Hungary, Iceland, Ireland, Italy, Latvia, Liechtenstein, Lithuania,
Luxembourg, Malta, Netherlands, Norway, Poland, Portugal, Slovak Republic, Romania,
Slovenia, Spain, Sweden, Switzerland, and United Kingdom.
Restrictions apply to the operation of the 802.11b/g radio in this device. Use of channel 14 is
outside of the band of frequencies permitted in the European Union and should not be used.
CE marking
Products bearing the CE marking comply with the EMC Directive (89/336/EEC), the R&TTE
Directive (1999/5/EC), and the Low Voltage Directive (73/23/EEC) issued by the Commission of
the European Community.
CE compliance of this device is valid only if powered with/by a CE-marked wall charger
provided by the manufacturer. Compliance with these directives implies conformity to the
following European Norms (in parentheses are the equivalent international standards and
regulations):
EN 55022 (CISPR 22)—Electromagnetic Interference
EN 55024 (IEC 61000-4-2, 3, 4, 5, 6, 8, 11)— Electromagnetic Immunity
EN 60950 (IEC 60950)—Product Safety
23
To comply with FCC and other national RF exposure safety requirements this device may not be operated in conjunction with, or co‐located with, other transmitting devices. The product is designed for hand‐held use and with a separation distance of at least 20 cm from the head/body. 24
Ashtech FT-1 Field Terminal
Ashtech Contact Information:
In USA +1 408 572 1103 n Fax +1 408 572 1199
In South America +1 786 220 2579
In France +33 2 28 09 38 00 n Fax +33 2 28 09 39 39
In Russia +7 495 980 5400 n Fax +7 495 981 4840
In Singapore +65 9838 4229 n Fax +65 6777 9881
In China +86 10 5802 5174 n Fax +86 10 5802 5135
www.ashtech.com
Ashtech follows a policy of continuous product improvement; specifications and descriptions are thus subject to change without notice. Please contact Ashtech for the latest product information.
©2010 Ashtech. All rights reserved. The Ashtech logo is a trademark of Ashtech LLC. All other product and brand names are trademarks or registered trademarks of their respective holders. P/N 631651