1
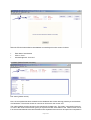
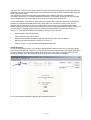
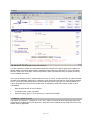
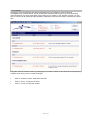
Patient Registry User Manual
Content
1. Introduction................................................................................................................................................ 2
1.1 System Requirements.......................................................................................................................... 2
1.2. General Information for Participants ................................................................................................... 2
2. Patient Data Entry ..................................................................................................................................... 3
2.1 Access from Web Site.......................................................................................................................... 3
2.2 Login .................................................................................................................................................... 4
2.3 Change Password................................................................................................................................ 5
2.4 Welcome Page..................................................................................................................................... 5
2.5 Selecting a Patient ............................................................................................................................... 6
2.6 New Patient (Create Pseudonym) ....................................................................................................... 7
2.7 Examination Date................................................................................................................................. 9
2.8 Matrix (Patient Record Overview)...................................................................................................... 10
2.9 Form................................................................................................................................................... 13
2.10 Buttons - specific for forms .............................................................................................................. 13
2.10.1 Queries...................................................................................................................................... 14
2.10.2 Comments ................................................................................................................................. 15
2.10.3 Audit Trail .................................................................................................................................. 16
2.11 Buttons for Specific Questions......................................................................................................... 16
2.11.1 Help ........................................................................................................................................... 17
2.11.2 Comment................................................................................................................................... 18
2.11.3 Query......................................................................................................................................... 19
2.12 Validity Checks ................................................................................................................................ 21
2.13 Print, Print Dialog and Print View..................................................................................................... 23
Page 1 of 23
1. Introduction
This manual will help you using the EuroPa patient registry online application. By means of this
application you will enter patient data into the central database – the EuroPa patient registry and
administer the records of your centre.
The manual will show you each step that is necessary to create a new record, to complete the minimal
data set and to manage and update the patient data once entered.
1.1 System Requirements
No special software needs to be installed on your PC in order to enter data in the EuroPa patient registry.
The required application software is implemented at the central server in Marburg and will interact with
you via the Internet by means of a normal web browser (e.g. Microsoft Internet Explorer).
So, all you need is a PC that is connected to the Internet and has a current browser installed.
System recommendations:
Windows, MacOS or Linux operating system
Browser Microsoft Internet Explorer version 5.x or later or Netscape 4.7 or later, ideally 6.x or later.
Your browser settings are important:
JavaScript must be enabled, your browser must accept cookies and SSL must be activated. If possible,
the cache should be set to zero (for security reasons). You can deactivate Java and ActiveX. For
assistance, please ask your local system administrator.
1.2. General Information for Participants
As you know, you use the software via your web browser. Certain features (e.g. window appearance,
menus, printouts) can vary slightly depending on the type or browser version you use. However, all
essential functions have been tested with all the different standard browsers.
Page 2 of 23
For data entry, a new fixed-size window opens. The advantage of this is that the user interface always
looks the same, whatever PC and monitor you are working with. In addition, the browser’s command
elements (back, print etc.) are hidden when this window appears.
When you use the program, you should only use the buttons in the EuroPa user interface – don’t use the
browser buttons. Otherwise, it is possible that not yet saved data will get lost.
By clicking on the “CANCEL” button you will always get one step back to the previous window. By clicking
on the “CLOSE” button, the current window will close and you can proceed with the next step. By clicking
on the “LOGOUT” button, you will be logged out completely of the application. You have to enter your
password again when you want to continue with data entry. The EuroPa software buttons always appear
at the top of the window.
There is an additional security feature. If there is no contact with the server for more than 20 minutes, you
are logged out automatically. This measure will ensure that no unauthorised person gain access to the
database and make any changes to your records in case you have to leave your desk without having
logged out first. If you are logged out automatically, any data that you have entered in forms but not yet
saved (click on “SAVE”!) may be lost. If you need to look something up or leave your desk, save the form
first (even if it’s not complete) and then open it again later. Data entered into the forms in your browser
window will not be saved at the central server right away. You need to click on the “SAVE” button in order
to start the data transfer to the database. Consequently, if you know that you will be interrupted from
active data entry for a while, save your data first by clicking on “SAVE”.
2. Patient Data Entry
2.1 Access from Web Site
You can access the application via the EuroPa website:
http://www.europarkinson.net
Under INTERNAL you will enter the password-protected area that only EuroPa participants can access.
Using the links on the left side you can access the EuroPa patient registry, the training mode or the area
to download documents.
The INTERNAL pages lead either to EuroPa documents that are available for download, to the registry
training mode where no valid patient data will be entered or – the EuroPa patient registry.
Page 3 of 23
By clicking on PATIENT REGISTRY ENTRY you will enter the EuroPa patient registry.If you have not yet
received a user ID and password, please contact Regina Wick ([email protected]).
Please use only this route to access the software. Otherwise the windows may not open in the size
intended. We may also change the (hidden) address of the application.
2.2 Login
In order to log in, user name (ID) and password are requested. Your user ID was assigned to you along
with your password.
•
Enter user name (exactly as received. The user name is case-sensitive)
•
Enter password
•
Click on “LOGIN”
The Login page to the EuroPa database.
Page 4 of 23
2.3 Change Password
When you log in for the first time, you will be asked to change your password first. This will ensure that
you are the only person who knows your password.
You get to the page for changing
your password:
a) automatically the first time you
log in,
b) by clicking on “CHANGE
PASSWORD” on the login page (2).
For security reasons there are
minimum standards that your
password must meet:
•
The password must be at
least eight characters long
and must contain at least
one special character
(digits, full stop, hyphen
etc.) It may not be identical
to the previous password.
•
At intervals of three months,
you are prompted to change your password again.
•
After three incorrect entries, your password is locked. If this happens, please consult the registry
administrator who can assign a new password to you.
•
Please also observe the practice directions (SOPs) as regards choosing your own password.
2.4 Welcome Page
This is the opening page for
data entry. It serves as a central
point for various page groups:
messaging, help and statistics
views. If there are any new
messages, these are displayed
in a new window straight after
logging in.
At the top left, you can see your
name and the current date.
Always check these details first
to make sure you haven’t
inadvertently logged in to the
wrong account. The “LOGOUT”
button here and in other
windows logs you out of the
system immediately. Changes
are not saved. Please, log out
whenever you leave your
computer so that nobody can use the system under your name. After twenty minutes without making
contact with the server, you will be logged out automatically (timeout). If this happens, you will also lose
any unsaved changes!
From your user ID, the system recognises which centre(s) you have access to. The “New Patient” button
lets you enter a new patient and create the according patient record. In order to access an already
existing patient record, enter the patient pseudonym (PID) into the free text field. Then click on “Select” to
Page 5 of 23
view the according record for the patient.By clicking on the “HELP” Button you will always receive
additional information and explanations for the features available at the current page.
“STATISTICS” and “REPORTS” will be explained further below.
From anywhere in the programme you can go back to the Welcome-page by clicking on the “WELCOME”
button.
2.5 Selecting a Patient
To select a patients record from the
database, you need to know his or her
pseudonym (PID). Enter the
pseudonym in the input field and click
on “Select”. If you do not have access
rights for the selected pseudonym or a
record under this pseudonym does not
exist yet, you will see an error
message
Steps for patient selection:
-
Enter the patient’s pseudonym (PID) into the text field
-
Click “Select” or press enter
Page 6 of 23
2.6 New Patient (Create Pseudonym)
In order to enter data of a certain patient for the first time, a pseudonym needs to be allocated. You will
first enter the patient personal data (core data). Only after all mandatory fields (those that are underlined)
are filled in and a signed patient consent can be confirmed, a pseudonym can be allocated.
After completing all mandatory fields, click on “GENERATE PSEUDONYM AND PRINT”. A new window opens
with a print view of the core data and the pseudonym (PID) allocated to the patient. Confirm the print
message that appears automatically, and the sheet will be printed out.
The patient personal data will NOT be stored in the database. The only information that will later be
transferred to the central server is the pseudonym. Therefore, make sure that you will be able to reidentify the patient later on. Save the print out with both information, the patient’s pseudonym and his/her
identifying data at a safe place at your centre.
The window that appears after a pseudonym has been allocated also contains a separate text field with all
personal data listed, separated by semicolons. You can copy this data and paste it into a different
programme, for example Excel. This will give you the opportunity to create your own little database for reidentification purposes. Please make sure that those data are not stored at a computer connected to the
Internet. You have to follow you local data protection guidelines and security policies for data mangement.
Page 7 of 23
Core data and the pseudonym (PID) allocated to the patient can be printed using the print menu (“Ok”Button).
Steps to enter a new patient
•
Click on “New patient”
•
Enter core data for the new patient
•
Complete all fields, paying attention to formats
•
Click on “GENERATE PSEUDONYM AND PRINT”
•
Confirm print message
•
Close print preview by clicking on “CLOSE”
Page 8 of 23
2.7 Examination Date
Next, you will enter the date of examination when the patient was recruited for the EuroPa patient registry.
It is either the present or an earlier day. Future dates are not possible.
In order to include the pseudonym into the database the date of examination needs to be entered
The new patient (and his or her PID) is transferred to the database only when you leave this window by
clicking on “SAVE”.
As soon as the PID has been added to the database a notice of success is presented to you.
Page 9 of 23
After the PID has been added to the database successfully this notice screen is shown.
•
Enter date of examination
•
Click on “SAVE”
•
Acknowledge with “CONTINUE”
2.8 Matrix (Patient Record Overview)
The matrix (patient record)
Now, the new patient has been entered into the database with his/her referring pseudonym and the date
of examination. The window shows an overview of all forms for the current visit.
The matrix (patient record overview) is the central point for data entry. The matrix, composed of symbols
or icons in the centre of the window, gives you a quick overview of the status of the various forms. Part AE of the minimal data set have been transferred into separated forms that can be opend and completed in
Page 10 of 23
any order. The “PREVIOUS VISIT” button (which is shown only when there already are previous visits, see
below lets you view any preceeding visits. For a each visit a new set of forms will be provided. Visits are
shown next to each other.
The appearance of the icons will change with respect to the status of the forms (completeness,
comments, queries etc.). For further information consult the “icon legend” which you can find using the
“HELP” Button on the top of this page. Clicking on an icon opens the according form.
In the header region of the window, participant (your name), date, centre and from now on the patient
pseudonym should all be displayed correctly. Once again you can see the “LOGOUT” and “CANCEL”
(discard changes and return to welcome page) buttons. If you want to log off and leave the system,
please always use this button rather than closing the window or exiting the browser program. Finally, you
can also switch to a different patient record by entering the pseudonym in the text field clicking on
“SELECT”. A new patient will always be entered by clicking on “NEW PATIENT”.
•
Check details in the area at the top
•
Click on the form you want to edit or
•
Switch to other patients by entering the PID and clicking on the “SELECT” button or
•
Return to the welcome page by clicking on “CANCEL” or
•
Click on “LOGOUT” to log yourself off and leave the input area
Create New Visit
For the EuroPa patient registry it is required to examine each patient at least once a year and to fill out
again the minimal data set. Therefore, a case visit plan has been implemented in the registry application.
In order to define a new visit for the patient, click on the “NEW VISIT” button. The date of the new visit
should be the date, when the patient will be seen again for a new EuroPa examination.
For a new visit the examinitation date has to be entered and saved.
Page 11 of 23
After having added another visit the most recent is shown in the patient matrix.
The complete patient matrix (in the example containing 2 visits) is shown after having used the “Previous
Visit” link.
Page 12 of 23
2.9 Form
The structure of a form: header, footer and questions.
This is the first form in which the examination results are entered. In the upper region (form header) the
familiar details and buttons appear again. Additional buttons refer to the present form: Print, Comments,
Queries, Audit Trail. To the right, next to the questions, there are buttons for Help, Comment and Query .
For more details see below.
Once you have filled in a form, please make sure to click on “Save” or “Save and Print” in order to transfer
the data to the database. Otherwise, the data will not be stored and could get lost. After having submitted
a form, you receive confirmation that your entries have been saved. Here you can choose whether you
want to jump directly to the next form (if Next Form is available) or back to the matrix (if Next Form is
unavailable).
•
Enter answers and/or click on to answer
•
If required, enter or view comments
•
Save form using “SAVE” or “SAVE AND PRINT” if a print out is needed
2.10 Buttons - specific for forms
The buttons for “QUERIES”, “COMMENTS”, “AUDIT TRAIL” lead to overview windows that supply views of all
actions that have taken place in this open form. The buttons are located at the top edge of the form in the
header area, as applicable.
Page 13 of 23
2.10.1 Queries
Queries are a tool for Monitors and other authorised users, for example to conduct follow-up
investigations into unclear entries. These are therefore questions that are put to you as an examining
doctor and which you can a) view and b) if they apply to you, answer. In the “Queries” window, you can
see an overview of all queries and the answers in response to them that have been created for the entire
form.
Using the “QUERIES”-Button at the top of the page an overview is shown of all queries and corresponding
answers of the form you are currently looking at.
•
Click on “QUERIES” button, browse the overview
•
Click on “PRINT” to print out the list or
•
Click on “CLOSE” to close the window
Page 14 of 23
2.10.2 Comments
Every participant of a centre can enter comments. Comments are used to either leave remarks for unclear
answers or to ask questions to yourself or other participants. All comments entered for the present form
are shown in an overview.
In the header you find the “COMMENTS”-Button to see all comments to the question in the present form.
•
Click on “COMMENTS” button, view comments
•
Click on “CLOSE” to close the window or
•
Click on “PRINT” to print out the list
Page 15 of 23
2.10.3 Audit Trail
The Audit Trail is an overview of all changes that have ever been made to any questions of the present
form. It is important e.g. for studies and forensic purposes, in order to be able to retrace what was
changed by whom and when, and what values (see screenshot of the AuditTrail below) the fields used to
contain.
Tthe Audit Trail of a form displays all changes made and saved.
•
Click on “AUDIT TRAIL” to see the overview
•
“PRINT” to print out the list or
•
Click on “CLOSE” to close the window
2.11 Buttons for Specific Questions
The buttons found next to the questions offer functions related to the particular question or question
group. There are buttons for “HELP”, “COMMENT” and “QUERY”.
Page 16 of 23
2.11.1 Help
Behind the “HELP” button you will find further information and instructions for the particular question. If you
are ever unsure how to answer a question, first of all check to see if the “HELP” can clarify the situation.
A form and a separate „Help“-window which is opened after having used the respective button.
•
Click on “HELP”
•
“PRINT” the help text, if needed
•
Click on “CLOSE” to close the window (return to the form)
Page 17 of 23
2.11.2 Comment
You can write a new comment here. If you only want to read existing comments, click on “COMMENTS” in
the upper area of the form window.
On the right hand side you find the “COMMENT”-Button to enter a comment to the respective
question/answer.
•
Type a comment
•
Submit by clicking on “SAVE” or
•
Cancel by clicking on “CLOSE” and close the window without saving the comment
Page 18 of 23
2.11.3 Query
As an examining doctor this button gives you the option to answer a query (Monitors enter their queries
using this button).
Patient matrix with an open (unanswered) query.
Respective form with an open (unanswered) query indicated by the question mark. The query to question
1 is shown and can be answered by pressing the “Query”-Button next to it. An overview of all queries to
this form is shown when using the “Query”-Button at the top of the page.
Page 19 of 23
Query to question 1. and possibility to compose an answer to it which is saved by using “SAVE ANSWER”.
Patient matrix where all queries have been answered.
•
Click on “QUERY”
•
answer a given query in the answer field
•
Click on “SAVE” to save in the database or
•
Cancel by clicking on “CLOSE” and close the window without saving the comment
Page 20 of 23
2.12 Validity Checks
To minimise the likelihood of erroneous entries in the EuroPa patient registry and thereby increase data
quality, a number of checks have been implemented that point out any improbable or incorrect data to you
when you save a form.
Validity check findings are marked red and become visible after saving the form.
Checks will concern formats (for example, you cannot enter “30th February” as a date!), and logic,
probabilities and limit values (e.g. UPDRS III can not be negative or larger than 66).
By default, the application checks each form when it is saved against these predefined rules. If
discrepancies or errors are present, the form is reloaded with red markings to show you where the errors
are and what the problem is (almost always in plain text). Please correct erroneous entries and click on
“SAVE” once again.
If there are problems or real discrepancies that cannot be resolved at that time (e.g. a patient does not
meet a certain criterion, but you want to check this afterwards), you can circumvent the form-checking
feature by clearing the “Check Details”-checkbox at the bottom right in the form footer (no tick in the box).
By default, this checkbox is set (tick in the box) each time a form is loaded.
Page 21 of 23
You can switch off the check functionality by un-ticking the box.
This option can also be useful if you have to stop work or leave your desk in a hurry but want to save the
entries without doing any checks (‘fast save’): in this case, clear the ‘Check details’ checkbox, click on
“SAVE”, click on “LOGOUT”, and that’s it! However, disabling the validity check should be used as an
exception only!
Page 22 of 23
2.13 Print, Print Dialog and Print View
There are two ways to print out each form:
The “PRINT” button in the header prints the last version saved in the database (you will find this button
only when the form has already been saved at least once).
The “SAVE AND PRINT” button first saves the form with all data that you have added or modified, and then
prints it. In both cases, a new print preview window opens, which you can close afterwards.
The two possibilities to print a form.
Page 23 of 23