1
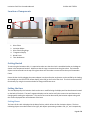
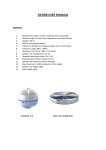
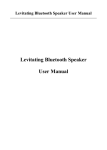
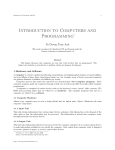
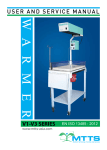
ROCHESTER INSTITUTE OF TECHNOLOGY User Manual P13321 – Levitation Clock Trong Duong, Kevin Fronczak, Holden Sandlar 4/4/2013 Levitation Clock Test Procedure Manual P13321-DOC-TESTW Table of Contents Introduction ..................................................................................................................................................3 Overview.................................................................................................................................................................3 Specifications ..........................................................................................................................................................3 Features ..................................................................................................................................................................3 Package Contents...........................................................................................................................................3 Location of Components ................................................................................................................................4 Getting Started ..............................................................................................................................................4 Setting the time .............................................................................................................................................4 Setting Hours ..........................................................................................................................................................4 Setting Minutes ......................................................................................................................................................5 Care and Maintenance ...................................................................................................................................6 Cleaning Clock.........................................................................................................................................................6 Moving the clock ....................................................................................................................................................6 Servicing .................................................................................................................................................................6 Page 2 of 6 Levitation Clock Test Procedure Manual P13321-DOC-TESTW Introduction Overview The levitation clock is a clock that uses magnetic properties to levitate objects and display time. The clock’s main purpose is to appear “magical”, which means that the object levitation mechanism is unambiguous to the viewer. Due to the nature of the clock’s ability to display accurate minutes, it is use as an art display or decorative object. The internal clock used to keep track of the time in this in clock is very accurate and can be set using the three buttons on the rear of the clock. The approximated minutes within the hour are shown by the use of color lights on the bottom of the frame. These colors came from an RGB LED, which displays certain colors for different minutes within the hour. The colors that indicate minutes can be shown in this document for user accessibility. Specifications Power Source: 110VAC/60Hz Clock Accuracy: ±30 Minutes Viewing angles: 360 Degrees Power Indicator: ON/OFF Features Compact design for desktop or display case Binary ON/OFF display shows hours of the day Color RGB LEDs displays approximated minutes of the hour Built-in power conversion and does not require battery operation Manual time set using rear buttons Display of time set/current time on 7-segment display Package Contents a. Clock e. Tube rings 4 pc b. Manual c. Glass Tubes 4 pc d. Power Cord f. Levitation objects 4 pc Page 3 of 6 Levitation Clock Test Procedure Manual P13321-DOC-TESTW Location of Components 1 2 4 6 3 5 1. 2. 3. 4. 5. 6. Glass Tubes Levitation Object Glass Tube Fitting Rings 7-Segments Display Wood Frame Time-Set Buttons Getting Started To start using the levitation clock, it is required to make sure that the clock is assembled similar to the diagram shown in the component location. Make sure that the rings are secured onto the glass tubes. The levitation objects can be inserted into the top of the glass tubes once the tubes are secured into the top of the wooden frame. Power ON the clock by plugging the power adapter into the wall outlet, and power can be verified by the looking at the display on the back or the minute display (color LED) on the front of the clock. The clock can be tested for functionality by using the instruction below to change to different times. Setting the time The time displayed by this levitation clock can be set or modified using the display and the three buttons located on the back of the clock. The two 7 segments displays can be used to verify the current time and observe time changing while making the adjustment. The current time can be observed by the levitation objects along with the current displayed color at the bottom of the base. Setting Hours The hours of this clock is displayed in the Binary fashion, which utilizes the four levitation objects. The hour indicating objects are ordered from left to right, with object representing numbers of 8, 4, 2, and 1 respectively. Page 4 of 6 Levitation Clock Test Procedure Manual P13321-DOC-TESTW The following conversion shown in Table 1 can be used to determine the exact hour currently being displayed. The table is layout exactly as the orientation of the levitating objects, which is from left to right and correspond to 8, 4, 2, and 1. It the Low means that the object is currently not levitating and High simply means that is it currently levitating. To verify that the hour indicator is correctly indicating the time, follow the instruction below to change the hours of the clock and verify with the table below. An alternative way of telling the current hour is by adding up all the stripes of the current levitating object(s). The stripe(s) in each object represent its value, simply as 8, 4, 2, and 1. Time(Hours) 1 2 3 4 5 6 7 8 9 10 11 12 Levitating Object(s) Low Low Low Low Low Low Low High High High High High High = Levitating Low Low Low High High High High Low Low Low Low High Low High High Low High High Low Low Low High High Low High High Low Low Low High High Low High High Low Low Low = Not Levitating Table 1: Levitating object(s) to hour conversion table To set/reset the hours Press and Hold the first button (closest to the 7-segment display) The time in the display will start blinking but continue on holding the first button To change the hours, press and hold the second button (to the right of the first button) Once time has been adjusted, simply release all buttons and verify correct time Setting Minutes The minutes are characterized using the color chart shown in Table 2 below. Each color represents a 10 minutes period, which illuminates the bottom of the frame. The table can be used to reference the 10 minutes block that the clock is currently displaying. Color Time Division (Minutes) RED 0-9 ORANGE 10-19 YELLOW 20-29 GREEN 30-39 BLUE 40-49 PURPLE 50-59 Table 2: Color to Minute Division Table Page 5 of 6 Levitation Clock Test Procedure Manual P13321-DOC-TESTW The color indication of the clock can be physically tested by changing the time to every 10 minutes of the hour and verify the actual color. To set/reset the minutes Press and Hold the first button (closest to the 7-segment display) The time in the display will start blinking but continue on holding the first button To change the minutes, press and hold the third button (last button away furthest away from display) Once time has been adjusted, simply release all buttons and verify correct time Care and Maintenance Cleaning Clock Once the clock has been set up at a desired location and time are set correctly, the clock can potentially be used for years. Some maintenance such as dusting the exterior of the clock can be done to keep the clock aesthetically pleasing. The glass tubes can also be taken out and clean, one important thing to remember is placing the levitating object back in the tubes with the correct magnetic pole. The inside of the clock should not be open and clean as it will not be necessary. The user should never have the clean on the interior of the clock, unless instructed by operator or technician. Moving the clock Firstly, carefully unplug the power adapter to make sure that the clock is completely turned OFF. Make sure that the glass tubes are tightly secured on the top of the clock. If necessary, remove the glass tubes and the rings before lifting the clock. The glass tubes could easily shatter once dropped and could potentially be hazardous. If the glass tubes are removed for moving purposes, make sure that the levitating objects are placed back into the tubes correctly with the correct corresponding magnetic poles. Servicing If the clock seems to be producing an excess amount of heat, please unplug the power adapter and consult a service representative. If necessary, the clock can be send back to the manufacturer for service. The user should not try and fix the heat problem, without professional instructions. The second minor issue that may arise is the levitating objects may not levitate at the same level. The first thing to do is to try and clean the inside of the glass tube and make sure that the object is rubbing against the tube. The friction between the object and glass tube may cause the object to not levitate as high as others or what how high it used to levitate. But if cleaning out the glass tubes does not take care of the problem, please consult a service representative. The clock may require to be sent back for calibration. Any other problem relating to the functionality of the clock needs to consult with a service representative. Once again, the user should NEVER have to open or deal with anything from the inside of the clock. Page 6 of 6