1
Welcome
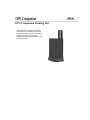
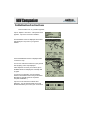
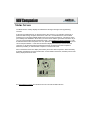
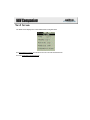
Thank you for your purchase of the Magellan GPS Companion and Map Companion CD. With the
GPS Companion attached, your Palm™ OS Handheld Organizer becomes a complete travel tool that
will not only save you time but completely removes the phrase “Where am I?” from your vocabulary.
No matter where you go or what you do, the GPS Companion and your Palm organizer will provide
you with all the information you need to get you where you are going.
Using
GPS Companion
with Palm V/ Vx Series
of Handhelds
Using
GPS
Companion with
Handspring
Visor
WARNING
Driver shall not use this device while operating a vehicle to assist the driver to navigate.
Copyright 2000 by Magellan Corporation. All rights reserved.
690928 A
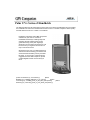
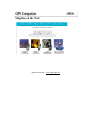
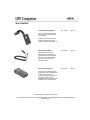
GPS Companion Packing List
Make sure that the contents of your GPS
Companion box is complete and matches
the contents listed on the side of the box. If
anything is missing, please contact
Magellan Corporation for replacement parts
at 1-866-737-8605.
Tips on Satellite Signal Reception
The signals received from the satellites are extremely weak and getting a good “view of the sky” is
important to any GPS receiver. However, the GPS Companion uses 12-channel technology to
overcome a lot of the lost signals due to poor or blocked view of the sky.
Early GPS receivers were notorious for losing lock (not being able to compute a position fix) in
seemingly mild conditions. If you owned one of these receivers you are going to love the way the
GPS Companion performs. Still, signal blockage can occur and you may have to move slightly to
regain enough signal strength to continue computing position fixes.
Some areas that may cause signal problems are:
•
Inside buildings.
•
City areas where large tall buildings block the view.
•
Under dense tree cover (especially if the leaves are wet due to rain or morning dew).
•
In tunnels.
•
In valleys where the hills around you block your view of the sky.
If you find yourself in one of these conditions, or a similar condition, all you need to do is move to a
place that has a better view of the sky. The GPS Companion will automatically begin computing fixes
as soon as it gets the information it needs from the satellites.
Palm V/Vx Series of Handhelds
The GPS Companion is the perfect add-on for the Palm V/ Vx series of handhelds for anyone needing
the combination of a Palm V/Vx handheld and a GPS receiver. The GPS Companion works equally
well with either the Palm™ V or Palm™ Vx handheld.
Install NAV Companion and/or Map Companion
software into your Palm™ V Series of
Handhelds and the days of folding maps and
searching through endless pages of map
guides are a thing of the past. Highways,
streets and a host of points of interest can now
be stored into your organizer and found on a
map in a moments notice.
We hope that you enjoy your GPS Companion
and we will continue to bring you software and
accessories that will make your life just a little
bit easier. If you have any comments and/or
suggestions for the GPS Companion, please
contact Magellan and let us know what you
think.
{button Accessories,JI(`',`Accessories')}
{button
Batteries,JI(`',`Installing_Batteries_in_PV_Comp')}
{button
Connecting,JI(`',`Installing_Palm_V_into_GPS_Companion')}
{button
Removing,JI(`',`Removing_Palm_V_from_GPS_Companion')}
Accessories
Vehicle Mounting Bracket
PN: 701219
$44.99
PN: 730338
$17.99
PN: 701220
$12.99
Mount your GPS and Palm V/Vx
organizer to any flat surface for
hands-free operation.
Includes a suction cup mount and
cradle for holding both the GPS
Companion and Palm V/Vx/Vx.
External Power Cable
Indefinitely power your GPS
Companion from a standard 12V
cigarette lighter plug and eliminate
the need to carry extra batteries.
Ideal for use with the Vehicle
Mounting Bracket.
Canvas Carrying Case
Protect both your GPS Companion
and Palm V/Vx handheld with this
attractive carrying case. Includes a
soft inner liner, belt loop and zipper
closure. Ideal for protecting your
GPS Companion and Palm V/Vx/Vx
while traveling.
Prices subject to change without notice.
Look for these accessories at your Magellan dealer or contact Magellan directly at 909-394-5000 or
800-669-4477.
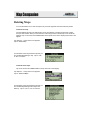
Installing Batteries
The GPS Companion uses two AAA batteries that are installed as shown in the accompanying
picture.
The expected battery life for the GPS Companion is 10 hours.
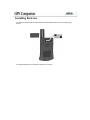
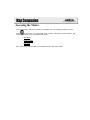
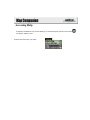
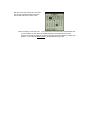
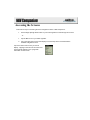
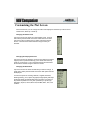
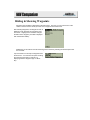
Installing Palm V/Vx into GPS Companion
The Palm V/ Vx snaps into the GPS Companion
as shown. Set the bottom of the Palm V/ Vx into
the GPS Companion cradle so that the
connectors on the Palm V/ Vx and the GPS
Companion line up. Push the top of the Palm
V/Vx towards the GPS Companion. As it seats
in, you will feel the locking plate “snap” into
position, locking the Palm V/ Vx securely to the
GPS Companion.
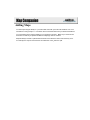
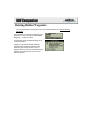
Removing Palm V/Vx from GPS Companion
To remove the Palm V/ Vx from the GPS
Companion, push the release lever on the back
of the GPS Companion to the left. As you do,
place your other hand over the Palm V/Vx to
prevent it from falling as the locking mechanism
is released. Carefully lift the Palm V/ Vx out of
the GPS Companion cradle.
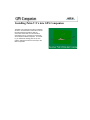
Contents
The Map Companion CD contains the Map Companion application along with its associated maps
and the NAV Companion Application.
Map Companion Application
MapCompanion.prc
Map Companion Maps
<mapname>.pdb
NAV Companion Application
NavComp.prc
Installing Software
Software installation is done through the HotSync operation supplied with your Palm handheld.
Installing the Map Companion software involves installing the Map Companion application as well as
any maps you want to use. Installation of the NAV Companion software is done by installing the NAV
Companion application. (There are no maps associated with NAV Companion.)
Map Companion Software
To install the Map Companion software, first locate the Map Companion application file
(MapCompanion.prc) and any map files you would like to use. Map files can be found in the folder
“USA” in the the MapCompanion folder. Inside the “USA” folder is folders for all 50 states and inside
the state folders are folders for the counties in each state. You will find the city map files in the
counties folder. (If you are unsure about which county the city you are looking for is in, you can use
Windows Find File function. This can be found under the Start button in Windows.) Map files always
end with a .pdb filename extension and contain the name of the area they cover. For example, the
map for San Francisco has a filename of San_Francisco.pdb .
Sometimes you will find a county map inside the county folder. For example:
USA > California > Los Angeles > Los_Angeles_County.pdb.
These county files are for the unincorporated areas of the county.
Use the HotSync operation supplied with your Palm organizer to upload the selected files to your
organizer. Information on how to upload files using HotSync can be found in the user’s manual
that came with your Palm V Desktop organizer.
NAV Companion Software
For the NAV Companion software, locate the application file (NavComp.prc) in the NAV Companion
folder and use your HotSync operation to upload it to your Palm organizer.
Magellan Technical Support
Hopefully you won’t need to contact Magellan for technical support but if you do, call us at 1-866737-8605. Technical Support is available Monday through Friday from 7 AM to 5 PM, PST. One of
the Magellan Technical Support members will assist you on any problem you have encountered.
If your question can be answered using email, you may want to try that first. Email questions can be
sent to [email protected] .
You can also FAX your questions/comments to Magellan at 1-909-394-7070.
Magellan on the Web
Magellan Home Page - www.magellangps.com
GPS Companion Warranty
All Magellan GPS receivers are navigation aids, and are not intended to replace other methods of
navigation. Purchaser is advised to perform careful position charting and use good judgment. Read
the help files carefully before using the product.
1. MAGELLAN CORPORATION’S WARRANTY
Magellan Corporation warrants their GPS receivers and accessories to be free of defects in material
and workmanship for a period of one year from the date of original purchase. This warranty applies
only to the original purchaser of this product.
In the event of a defect, Magellan Corporation will, at its option, repair or replace the product with no
charge to the purchaser for parts or labor. The repaired or replaced product will be warranted for
ninety (90) days from the date of return shipment, or for the balance of the original warranty,
whichever is longer.
2. PURCHASER’S REMEDY
PURCHASER’S EXCLUSIVE REMEDY UNDER THIS WRITTEN WARRANTY OR ANY IMPLIED
WARRANTY SHALL BE LIMITED TO THE REPAIR OR REPLACEMENT, AT MAGELLAN
CORPORATION’S OPTION, OF ANY DEFECTIVE PART OF THE RECEIVER OR ACCESSORIES
WHICH ARE COVERED BY THIS WARRANTY. REPAIRS UNDER THIS WARRANTY SHALL
ONLY BE MADE AT AN AUTHORIZED MAGELLAN SERVICE CENTER. ANY REPAIRS BY A
SERVICE CENTER NOT AUTHORIZED MAGELLAN CORP. WILL VOID THIS WARRANTY.
3. PURCHASER’S DUTIES
To obtain service, the purchaser must obtain a Return Merchandise Authorization (RMA) number
from Magellan Corporation (800-707-7845 / [email protected]) prior to shipping. If under
warranty, the purchaser must return the receiver or accessories postpaid with a copy of the original
sales receipt, purchaser’s return address and the RMA number clearly printed on the outside of the
package to:
MAGELLAN AUTHORIZED SERVICE CENTERS
MAGELLAN CORPORATION WILL NOT BE RESPONSIBLE FOR ANY LOSSES OR DAMAGE TO
THE PRODUCT INCURRED WHILE THE PRODUCT IS IN TRANSIT OR IS BEING SHIPPED FOR
REPAIR. INSURANCE IS RECOMMENDED. MAGELLAN SUGGESTS USING A TRACKABLE
SHIPPING METHOD SUCH AS UPS OR FEDEX WHEN RETURNING A PRODUCT FOR
SERVICE.
4. LIMITATION OF IMPLIED WARRANTIES
Except as set forth in item 1 above, all other expressed or implied warranties, including those of
fitness for any particular purpose or merchantability, are hereby disclaimed.
Some states do not allow limitations on how long an implied warranty lasts, so the above limitation
may not apply to you.
5. EXCLUSIONS
The following are excluded from the warranty coverage.
*
INSTALLATION
*
BATTERIES
*
FINISHES
*
DEFECTS RESULTING FROM INSTALLATION
* ANY DAMAGE DUE TO ACCIDENT, RESULTING FROM INACCURATE SATELLITE
TRANSMISSIONS. INACCURATE TRANSMISSIONS CAN OCCUR DUE TO CHANGES IN THE
POSITION, HEALTH OR GEOMETRY OF A SATELLITE.
* ANY DAMAGE DUE TO SHIPPING, MISUSE, ABUSE, NEGLIGENCE OR TAMPERING, OR
IMPROPER USE.
* SERVICING PERFORMED OR ATTEMPTED BY ANYONE OTHER THAN AN AUTHORIZED
MAGELLAN SERVICE CENTER.
* MODIFICATIONS TO THE RECEIVER WHICH MAY BE REQUIRED DUE TO ANY CHANGE IN
THE GLOBAL POSITIONING SYSTEM (GPS).
(Note: All Magellan GPS receivers use GPS to obtain position, velocity and time information. GPS
is operated by the U.S. Government, which is solely responsible for its accuracy and maintenance.
Certain conditions can cause inaccuracies which could require modifications to the receiver.
Examples of such conditions include but are not limited to changes in the GPS transmission. SUCH
MODIFICATIONS ARE NOT COVERED BY THIS WARRANTY.)
OPENING OF THIS PRODUCT BY ANYONE OTHER THAN AN AUTHORIZED MAGELLAN
SERVICE CENTER WILL VOID THIS WARRANTY.
6. EXCLUSION OF INCIDENTAL OR CONSEQUENTIAL DAMAGES
MAGELLAN CORPORATION SHALL NOT BE LIABLE TO PURCHASER OR ANY OTHER
PERSON FOR ANY INCIDENTAL OR CONSEQUENTIAL DAMAGES WHATSOEVER, INCLUDING
BUT NOT LIMITED TO LOST PROFITS, DAMAGES RESULTING FROM DELAY OR LOSS OF
USE, LOSS OF OR DAMAGES ARISING OUT OF BREACH OF THIS WARRANTY OR ANY
IMPLIED WARRANTY EVEN THOUGH CAUSED BY NEGLIGENCE OR OTHER FAULT.
MAGELLAN CORPORATION SHALL NOT BE LIABLE TO THE PURCHASER OR ANY OTHER
PERSON FOR ANY INCIDENTAL OR CONSEQUENTIAL DAMAGES WHATSOEVER ARISING
OUT OF THE NEGLIGENT USAGE OF THE PRODUCT. IN NO EVENT WILL MAGELLAN
CORPORATION BE RESPONSIBLE FOR SUCH DAMAGES, EVEN IF MAGELLAN
CORPORATION HAS BEEN ADVISED OF THE POSSIBILITY OF SUCH DAMAGES.
Some states do not allow the exclusion or limitation of incidental or consequential damages, so the
above limitation or exclusion may not apply to you.
7. MERGER
This written warranty is the complete, final and exclusive agreement between Magellan Corporation
and the purchaser with respect to the quality of performance of the goods and any and all warranties
and representations. THIS WARRANTY SETS FORTH ALL OF MAGELLAN CORPORATIONÕS
RESPONSIBILITIES REGARDING THIS PRODUCT.
This warranty gives you specific legal rights and you may also have other rights which vary from state
to state.
8. FOR PURCHASER’S OUTSIDE OF THE UNITED STATES
THIS WARRANTY GIVES YOU SPECIFIC RIGHTS. YOU MAY HAVE OTHER RIGHTS WHICH
VARY FROM PROVINCE TO PROVINCE AND CERTAIN LIMITATIONS CONTAINED IN THIS
WARRANTY MAY NOT APPLY TO YOU.
If you purchased this product outside of the United States this limited warranty is governed by the
laws of the State of California and shall benefit Magellan Corporation, its successors and assigns.
Magellan Corporation
960 Overland Court
San Dimas, CA 91773
USA
909-394-5000
Handspring Visor
The GPS Companion is the perfect add-on to the Handspring Visor for anyone needing the
combination of a Palm OS handheld and a GPS receiver.
Install NAV Companion and/or Map Companion
software into your Handspring Visor and the
days of folding maps and searching through
endless pages of map guides are a thing of the
past. Highways, streets and a host of points of
interest can now be stored into your organizer
and found on a map in a moments notice.
We hope that you enjoy your GPS Companion
and we will continue to bring you software and
accessories that will make your life just a little
bit easier. If you have any comments and/or
suggestions for the GPS Companion, please
contact Magellan and let us know what you
think.
{button Installing Batteries,JI(`',`Installing_Baterries_for_Visor')}
Connecting,JI(`',`Connecting_to_Handspring_Visor')}
{button
Installing Batteries
The GPS Companion uses two AAA batteries that are installed as shown in the accompanying
picture.
The expected battery life for the GPS Companion is 10 hours.
Connecting to the Handspring Visor
The GPS Companion attaches to the
Handspring Visor as shown.
The GPS Companion has built-in software that
is launched as soon as it is connected to the
Handspring Visor. This basic GPS application
will compute and display your present position
as well as the status of the satellites.
Accessories
Vehicle Mounting Bracket
PN: 701223
$44.99
PN: 730338
$17.99
PN: 701220
$12.99
Mount your GPS and Handspring
Visor to any flat surface for handsfree operation.
Includes a suction cup mount and
cradle for holding both the GPS
Companion and the Visor Handheld.
External Power Cable
Indefinitely power your GPS
Companion from a standard 12V
cigarette lighter plug and eliminate
the need to carry extra batteries.
Ideal for use with the Vehicle
Mounting Bracket.
Canvas Carrying Case
Protect both your GPS Companion
and Handspring Visor handheld with
this attractive carrying case.
Includes a soft inner liner, belt loop
and zipper closure. Ideal for
protecting your GPS Companion and
Handspring Visor while traveling.
Prices subject to change without notice.
Look for these accessories at your Magellan dealer or contact Magellan directly at 909-394-5000 or
800-669-4477.
Starting the Application
Tap the Map Companion application icon from the list of applications on your organizer.
If this is the first time you have used the Map Companion software, you will be asked to read and
agree or disagree with the Software License Agreement that covers the use of the software.
If this is not the first time you have used the
Map Companion software or you have just
agreed to the Software License Agreement, you
will be presented with the Map Companion
Startup Screen. This screen will inform you of
the version of software, who this copy is
registered to and the number of maps that have
been installed to your organizer.
Software License Agreement
PLEASE READ THIS SOFTWARE LICENSE AGREEMENT ("LICENSE") CAREFULLY.
1. License. The software and documentation accompanying this License
whether on disk, in read only memory, on any other media or in any
other form (the "Software") are licensed to you by Magellan
Corporation. ("Magellan"). You own the media on which the Software is
recorded but Magellan and/or Magellan's licensor(s) retain title to
the Software. The Software in this package and any copies which this
License authorizes you to make are subject to this License.
2. Permitted Uses and Restrictions. This License allows you to
install and use the Software on a single computer at a time. This
License does not allow the Software to exist on more than one
computer at a time. You may make one copy of the Software in
machine-readable form for backup purposes only. The backup copy must
include all copyright information contained on the original. Except
as expressly permitted in this License, you may not decompile,
reverse engineer, disassemble, modify, rent, lease, loan, sublicense,
distribute or create derivative works based upon the Software in
whole or part or transmit the Software over a network or from one
computer to another. THE SOFTWARE IS NOT INTENDED FOR USE OR AID IN
THE OPERATION OR NAVIGATION OF ANY VEHICLES SUCH AS AUTOMOBILES AND
AIRPLANES, IN WHICH CASE THE FAILURE OF THE SOFTWARE COULD LEAD TO
DEATH, PERSONAL INJURY, OR SEVERE PHYSICAL OR ENVIRONMENTAL DAMAGE.
Your rights under this License will terminate automatically without
notice from Magellan if you fail to comply with any term(s) of this
License.
3. Limited Warranty on Media (if applicable). Magellan warrants the
media on which the Software is recorded to be free from defects in
materials and workmanship under normal use for a period of ninety
(90) days from the date of original retail purchase. Your exclusive
remedy under this paragraph shall be, at Magellan's option, a refund
of the purchase price of the product containing the Software or
replacement of the Software which is returned to Magellan or a
Magellan authorized representative with a copy of the receipt. THIS
LIMITED WARRANTY AND ANY IMPLIED WARRANTIES ON THE MEDIA INCLUDING
THE IMPLIED WARRANTIES OF MERCHANTABILITY AND FITNESS FOR A
PARTICULAR PURPOSE ARE LIMITED IN DURATION TO NINETY (90) DAYS FROM
THE DATE OF ORIGINAL RETAIL PURCHASE. SOME JURISDICTIONS DO NOT ALLOW
LIMITATIONS ON HOW LONG AN IMPLIED WARRANTY LASTS, SO THIS LIMITATION
MAY NOT APPLY TO YOU. THE LIMITED WARRANTY SET FORTH HEREIN IS
EXCLUSIVE AND IN LIEU OF ALL OTHERS, WHETHER ORAL OR WRITTEN, EXPRESS
OR IMPLIED. Magellan SPECIFICALLY DISCLAIMS ALL OTHER WARRANTIES.
THIS LIMITED WARRANTY GIVES YOU SPECIFIC LEGAL RIGHTS, AND YOU MAY
ALSO HAVE OTHER RIGHTS WHICH VARY BY JURISDICTION.
4. Disclaimer of Warranty on Software. You expressly acknowledge and
agree that use of the Software is at your sole risk. The Software is
provided "AS IS" and without warranty of any kind and Magellan and
Magellan's licensor(s) (for the purposes of provisions 3 and 4,
Magellan and Magellan's licensor(s) shall be collectively referred to
as "Magellan") EXPRESSLY DISCLAIM ALL WARRANTIES AND/OR CONDITIONS,
EXPRESS OR IMPLIED, INCLUDING, BUT NOT LIMITED TO, THE IMPLIED
WARRANTIES AND/OR CONDITIONS OF MERCHANTABILITY OR SATISFACTORY
QUALITY AND FITNESS FOR A PARTICULAR PURPOSE AND NONINFRINGEMENT OF
THIRD PARTY RIGHTS. MAGELLAN DOES NOT WARRANT THAT THE FUNCTIONS
CONTAINED IN THE SOFTWARE WILL MEET YOUR REQUIREMENTS, OR THAT THE
OPERATION OF THE SOFTWARE WILL BE UNINTERRUPTED OR ERROR-FREE, OR
THAT DEFECTS IN THE SOFTWARE WILL BE CORRECTED. FURTHERMORE, MAGELLAN
DOES NOT WARRANT OR MAKE ANY REPRESENTATIONS REGARDING THE USE OR THE
RESULTS OF THE USE OF THE SOFTWARE OR RELATED DOCUMENTATION IN TERMS
OF THEIR CORRECTNESS, ACCURACY, RELIABILITY, OR OTHERWISE. NO ORAL OR
WRITTEN INFORMATION OR ADVICE GIVEN BY MAGELLAN OR A MAGELLAN
AUTHORIZED REPRESENTATIVE SHALL CREATE A WARRANTY OR IN ANY WAY
INCREASE THE SCOPE OF THIS WARRANTY. SHOULD THE SOFTWARE PROVE
DEFECTIVE, YOU (AND NOT MAGELLANOR A MAGELLAN AUTHORIZED
REPRESENTATIVE) ASSUME THE ENTIRE COST OF ALL NECESSARY SERVICING,
REPAIR OR CORRECTION. SOME JURISDICTIONS DO NOT ALLOW THE EXCLUSION
OF IMPLIED WARRANTIES, SO THE ABOVE EXCLUSION MAY NOT APPLY TO YOU.
THE TERMS OF THIS DISCLAIMER DO NOT AFFECT OR PREJUDICE THE STATUTORY
RIGHTS OF A CONSUMER ACQUIRING MAGELLAN PRODUCTS OTHERWISE THAN IN
THE COURSE OF A BUSINESS, NEITHER DO THEY LIMIT OR EXCLUDE ANY
LIABILITY FOR DEATH OR PERSONAL INJURY CAUSED BY MAGELLAN'S
NEGLIGENCE.
5. Limitation of Liability. UNDER NO CIRCUMSTANCES, INCLUDING
NEGLIGENCE, SHALL MAGELLAN BE LIABLE FOR ANY INCIDENTAL, SPECIAL,
INDIRECT OR CONSEQUENTIAL DAMAGES ARISING OUT OF OR RELATING TO THIS
LICENSE. SOME JURISDICTIONS DO NOT ALLOW THE LIMITATION OF INCIDENTAL
OR CONSEQUENTIAL DAMAGES SO THIS LIMITATION MAY NOT APPLY TO YOU. In
no event shall Magellan's total liability to you for all damages
exceed the amount of fifty dollars ($50.00).
6. Export Law Assurances. You may not use or otherwise export or
reexport the Software except as authorized by United States law and
the laws of the jurisdiction in which the Software was obtained. In
particular, but without limitation, the Software may not be exported
or reexported (i) into (or to a national or resident of) any U.S.
embargoed country or (ii) to anyone on the U.S. Treasury Department's
list of Specially Designated Nationals or the U.S. Department of
Commerce's Table of Denial Orders. By using the Software, you
represent and warrant that you are not located in, under control of,
or a national or resident of any such country or on any such list.
7. Controlling Law and Severability. This License shall be governed
by the laws of the United States and the State of California. If for
any reason a court of competent jurisdiction finds any provision, or
portion thereof, to be unenforceable, the remainder of this License
shall continue in full force and effect.
8. Complete Agreement. This License constitutes the entire agreement
between the parties with respect to the use of the Software and
supersedes all prior or contemporaneous understandings regarding such
subject matter. No amendment to or modification of this License will
be binding unless in writing and signed by Magellan.
Operating Modes
The software is divided into three operating modes:
•
GPS:
Displays information about the GPS position fix and the satellites used to
compute this fix.
Directory:
Displays a list of the maps that you have loaded into your organizer.
Map:
Used to view and interact with the maps stored in your organizer.
see also: Accessing the Modes
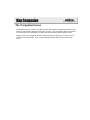
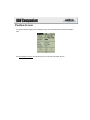
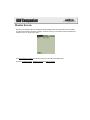
Directory Mode
The Directory Mode allows you access to the maps you have loaded in your Palm organizer.
After accessing the Directory Mode, a screen similar to
the one shown here will be displayed. From here you
can select the map to be viewed on the Map screen or
delete maps from the directory.
•
see also: Accessing the Modes
•
see also: Viewing the Map
•
see also: Deleting Maps
Accessing the Modes
You can access any of the three operating modes (GPS, Directory or Map) by pressing the menu
button
on your screen. If you tap “Mode” in the menu bar, a drop down menu will appear. Tap
on the desired mode name to access the other mode.
GPS Mode
Directory Mode
Map Mode
Note: The mode you are presently in is not displayed in the drop down window.
Viewing the Map
From the Directory Mode, you can use the Up/Down arrows in the bottom right corner of the display
to scroll through the list of maps that you have loaded in your Palm organizer. When you see the
name of the map you wish to view, tap it once and it will highlight. Now tap on the
the lower left corner of the display.
You are taken to the map mode with the map chosen displayed in the center of the display.
button in
Deleting Maps
You can also delete one or all of the maps from your Palm organizer while in the Directory Mode.
To delete one map:
Use the Up/Down arrows in the bottom right corner of the display to scroll through the list of maps
that you have loaded. When you see the name of the map you wish to delete, tap it once and it will
highlight. Tap on the screen name DIRECTORY in the top left corner of the display and the menu will
appear.
Tap “Options”. A drop-down menu appears.
Tap on “Delete Map”.
A confirmation screen is presented to protect you
from accidentally deleting a map. Tap on “Yes”
or “No” to continue.
To delete all the maps:
Tap on the screen name DIRECTORY in the top left corner of the display.
Tap “Options”. A drop-down menu appears.
Tap on “Delete All Maps”.
A confirmation screen is presented to protect you
from accidentally deleting all the maps in the
directory. Tap on “Yes” or “No” to continue.
Adding Maps
You add maps using the HotSync procedure that came with your Palm OS Handheld. For more
information on using HotSync consult the user’s manual that came with your Palm OS Handheld.
You can install as many maps as will fit into your organizer’s memory. Maps vary in size from less
than 5K for a small city to upwards of 800K for really large cities or counties.
Map files always end with a .pdb filename extension and contain the name of the area they cover.
For example, the map for San Francisco has a filename of San_Francisco.pdb .
Accessing Help
A Help file is available for every screen displayed. To view the help file, press the menu button
and tap the “Options ” menu.
From the drop-down menu, tap “Help”.
Map Mode
Access the Map Mode either by selecting a map from the Directory or by choosing Map from the
Mode Menu. If this is the first time you have viewed the map (i.e., selected from the Directory), Map
Companion will attempt to zoom out to show you as much of the map as possible. You can then
zoom in to a scale that shows you the detail that you need.
As you zoom in, more and more detail is shown. To avoid clutter, road names and symbols are
displayed as you zoom in. You can disable the symbols and road names if there is still too much
clutter.
Note: If you need to access the menu bar while in the map mode, you need to press the Menu
button
.
See also: Accessing the Map, Viewing the Map, Zooming In/Out, Panning, Setting Map Preferences .
Zooming In/Out
There are several ways to zoom in or out on the map screen.
c)
a)
Use the Page Up and Page Down buttons found at the bottom center of your Palm organizer.
b)
Use the Graffiti Box on your Palm organizer and enter the letters “I” to zoom in and “O” to
zoom out.
Tap and Hold on the map. A popup
menu will appear giving you the
options of zooming in or zooming
out. The center of the displayed
map will be the point you selected
to Tap and Hold.
Note: The Set In Center option of the popup centers the point selected on the map display without
changing the zoom level. This performs the same function as just tapping on the point.
Panning
Panning (or scrolling) can be performed in two ways. The first is to tap anywhere on the map. The
point tapped will be moved to the center of the map display.
Note: You can also Tap and Hold on the point desired and select Set In Center from the popup menu.
The other method involves dragging an imaginary line on the map. As you do, the display will begin
to pan in the direction that you drew the line. The map will continue to scroll until you lift the pen from
the display surface. As it’s panning, you can even change direction of the pan just by moving the
pen again in the direction you want to pan. The rate of panning is governed by the length of the
imaginary line you drew. The longer the line, the faster the map will pan.
Setting Map Preferences
The Map Preferences display allows you to set the map for optimum view and
performance for your needs.
[Click on the desired preference for more information.]
Show Points of Interest (POI)
Turns on (checked) or off (unchecked) the points of interest that are displayed on the map. This
includes shopping centers, schools, hospitals, airports, etc.
Show Road Names
Turns on (checked) or off (unchecked) the names of roads that are displayed on the map.
Show Road Prefixes
Turns on (checked) or off (unchecked) the prefixes for road names that are displayed on the map. This will
remove all of the N, E, W, or S designators from street names to reduce clutter. (i.e., W. Colorado Blvd.
becomes Colorado Blvd.)
Show Road Name Types
Turns on (checked) or off (unchecked) the road name types that are displayed on the map. This
removes street, boulevard, avenue, etc. references from road names. (I.e., W. Colorado Blvd.
becomes W. Colorado.)
Show Road Name Suffixes
Turns on (checked) or off (unchecked) the suffixes that are sometimes applied to the roads that are
displayed on the map. For example, 4th St. NW becomes 4th St.
Warn of Multiple Instances
Turns on (checked) or off (unchecked) the warning of multiple “finds ” while searching for items on the
map. Some roads start and stop throughout an entire city. After performing a “Find” command and there
are more than one instance of the road found, you will be presented with a warning of the number of
instances that were found. This option turns that warning on or off.
Darken Roads
Darkens (checked) or lightens (unchecked) the roads that are displayed on the map. Using this
preference, along with the contrast control on your Palm organizer, you can adjust the display for optimum
viewing.
Smooth Zooming
Turns on (checked) or off (unchecked) the smooth zooming option. With smooth zooming on, the display
“steps ” to the next zoom level giving you a graphical representation of the zooming process. (You actually
see the display zooming in or out.) While with smooth zooming turned off, the display quickly “jumps ” to
the next zoom level.
Show Scale
Turns on (checked) or off (unchecked) the map scale displayed at the bottom left corner of the map.
GPS Mode
In the GPS Mode there are four screens that you can use.
The first is the Initialization Screen. This screen is used to initialize the GPS receiver as well as
provides information about your present position.
The Navigation Screen has four customizable windows displaying navigation data.
The Satellite Screen provides information about the satellites used to compute your
position fix.
The Sky Chart Screen gives a graphical indication of the location of the satellites to
your position.
To access any of the screens, tap on the upper right corner of the display in the area that says what
GPS Mode screen you are viewing. A drop down menu appears allowing you to select the screen
you want to view.
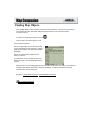
Finding Map Objects
From the Map Mode you can find roads, intersections and landmarks. If more than one occurrence
of a road with the same name exists, Map Companion will allow you to view each of these
occurrences in turn.
To search for a Map Object, tap the menu icon
.
From the menu bar, select Options > Find.
The Find Screen Features.
Tap on the upper right corner to select the road
or type of landmark you are looking for. (Click on
it here in this sample to see a list of the possible
landmarks.)
Tap the “In” field to select a different city or
county to search in.
To scroll the list, use the up/down arrows in the
lower right corner or use the Graffiti pad to enter
a name.
When the name you are seeking appears in the scroll list, tap the name once and you are returned to
the Map Screen with the found item centered on the display. A target icon is shown to help you
locate the item you were looking for.
See also: Turning off the Target Icon, Finding Multiple Occurrences
Tips on Highway Searches
Tips on Highway Searches
Map Companion does not currently have support for map features with multiple names. For that
reason, highways and freeways are almost always labeled with their numerical equivalent, rather
than a locally known name. If you are searching for a highway by name and cannot find it, this is the
most probable reason. Whenever possible, interstate highways, U.S. highways and state highways
are labeled I-ddd, US Hyw ddd and State Hwy ddd respectively, where dddd represents a
combination of digits or letters.
Turning off the Target Icon
After completing a “Find”, the map is displayed with a “Target Icon” displayed over the item found.
To turn off the icon:
Tap the menu icon
.
Select Options > Hide Find Target
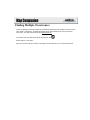
Finding Multiple Occurrences
If after completing a Find, Map Companion has determined that there are multiple occurrences of the
same street or intersection, you will be presented with an alert indicating how many occurrences
were found. This alert can be turned off in Map Preferences .
To examine each successive item found, tap the menu icon
.
Select Options > Find Again
When you reach the last item, another Find Again command will return you to the first item found.
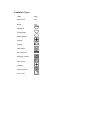
Landmark Types
Type
Icon
Intersections
N/A
Roads
N/A
Interstates
U.S Highways
State Highways
Airports
Lodging
Train Stations
Bus Terminals
Shopping Centers
Office Centers
Hospitals
School/University
Golf Courses
Navigating on the Map
In the Map Mode you can select a destination, use the Tracker to provide line-of-sight
direction indication to your destination and view your present position as computed by the
GPS receiver in your GPS Companion.
Selecting a Destination
The procedure for selecting a destination is similar to that as described in Finding Map Objects.
To select your destination, tap the menu icon
.
From the menu bar, select Navigate > Select Destination.
Tap on the upper right corner to select the road
or type of landmark you are looking for.
Tap the “In” field to select a different city or
county to search in.
To scroll the list, use the up/down arrows in the
lower right corner or use the Graffiti pad to enter
a name.
When the name you are seeking appears in the scroll list, tap the name once and you are returned to
the Map Screen. If Map Companion finds multiple occurrences for this destination you can step
through each until you find the one you want using Navigate > Select Again from the menu bar.
The destination is marked on the map with an “X”
When a destination is selected, the Tracker indicator
the direction of your destination.
is displayed. The Tracker icon “points ” to
Alternate Method for Selecting Destination
If you locate a place on the map that you want to present as your destination, you can do so
without going to the Destination screen.
Tap and hold on the map the point that you want to assign as the destination. A popup menu
appears. Select Set Destination. The destination icon will appear when the menu closes.
See also: Using the Tracker
Using the Tracker
The Tracker
provides a line-of-sight indication to visually assist you in reaching your selected
destination. The Tracker can be turned on or off anytime using the command Navigate > Tracking
On/Off.
To use the Tracker effectively, allow the GPS receiver to compute your present position
and then select the destination. You will then have the GPS Position Icon
on your
starting point, and the Tracker indicating the direction of travel needed to reach the
destination. You then need to visually guide yourself from one symbol to the other,
scrolling and zooming out as necessary to maintain your bearing.
Viewing Present Position
After a position has been computed, your present position is displayed on the map represented by
the
icon.
Turning GPS Positioning On or Off
At any time you can turn on or off the GPS Positioning. From the Map screen, access the
menu bar and select Navigate > GPS Position On/Off. If GPS Positioning is on, selecting this
will cause the GPS icon to disappear and you will be able to scroll around the map normally.
(With GPS Positioning turned on, you can pan around the map but as soon as you lift the pen
the display “snaps ” back to put your present position on the center of the display.) If GPS
Position is currently off, selecting this will center your map to your present position and display
the GPS icon.
Turning GPS Scrolling On or Off
In normal modes, when GPS Positioning is on the display is “locked” to your present position.
However, you may want to scroll on your map and still keep the GPS positioning active. To
turn GPS Scrolling on (or off), from the Map screen, access the menu bar and select Navigate
> GPS Scrolling On/Off.
See also: GPS Mode
#$
Initialization
GPS receivers need to know their approximate location to quickly compute their position the first time they
are turned on.
For more information on initialization, see the chapter under Getting Started, "Initializing the GPS".
#
$
Initialization
Initialization
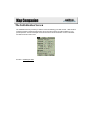
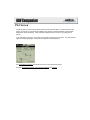
The Initialization Screen
The Initialization Screen provides you with the means of initializing your GPS receiver. After the GPS
Companion begins computing position fixes, this screen also provides you with the lat/lon for your
present position. Click on the sample screen shown here for more information on each of the fields
and buttons found on this screen.
See also: Initializing the GPS
The Navigation Screen
The Navigation Screen contains four windows that are used to display navigational information. Each
window is customizable to display the information you need. Tap on the heading above each window
to reveal a popup menu that allows you to select from speed, heading, altitude, position or time.
Tapping on any of the navigational windows reveals a popup menu allowing you to set the units of
measure for the selected data. (Note: windows displaying position data do not have this popup
menu.)
The Satellites Screen
The Satellites Screen provides you with the technical information about the satellites being used to
compute the position fix.
CH
(Receiver Channel). This is the channel used by the GPS Companion to receive the
satellite data. (From 1 to 12)
SV
(Space Vehicle) This is the unique number assigned to each satellite. (From 1 to 32)
AZ
(Azimuth) The horizontal angle the satellite makes with respect to true North from your
position. (From 0 to 359)
EL
(Elevation) The vertical angle of elevation the satellite makes with respect to your
present position. (From 0 to 90)
SN
(Signal-to-noise Ratio) The incoming signal strength of the satellite signal measured in
decibels.
UP
(Used-in-position) Checked if the satellite is being used to calculate your position fix.
The Sky Chart Screen
The Sky Chart Screen shows the position of the satellites in the sky relative to your present position.
Your present position is displayed at the center of the concentric circles. The circles mark the 0, 30,
60 and 90 degree horizontal elevations of the satellite. The outermost circle also represents the
azimuth angle, where 0 degrees is true North.
Satellite values are shown in black for those satellites that are being tracked to compute your position
fix.
GPS Window Select
Tapping here brings up a menu that
allows you to select the different GPS
screens to view.
Position Fix Indicator
This area indicates the current status of the position fix that is being computed:
No Fix:
Present position is not being computed.
2D:
Present position is 2D (Two-dimensional). In a 2D position fix, altitude is not
computed and the last computed or entered altitude is used.
3D:
Present position is 3D (Three-dimensional). In a 3D position fix, altitude is being
computed by the GPS receiver.
Levels of position fixes are influenced greatly by how well the GPS Companion “sees ” the satellites. For
more information on getting good satellite signals see Tips on Satellite Signal Reception.
Receiver Type
The receiver type for the Map Companion software is “Magellan”.
Position Data
During the initialization process, Lat/Lon (Latitude/Longitude) information is input here. After computing a
position fix, the Lat/Lon of the computed fix is displayed. Altitude is also displayed as part of the position
data. If the position fix is 3D then the altitude is computed by the Map Companion. If the last fix was 2D,
then the altitude displayed is the last computed or entered altitude.
GPS Time Data
GPS time is extremely accurate as the time the satellites send to the GPS Companion is taken from the
atomic clocks on the satellites. However, the time transmitted is GMT (Greenwich Mean Time) and
requires an offset to adjust it to your local time. This offset and DST (Daylight Savings Time) flag are set
during initialization but can be changed at any time.
GPS Interval
GPS Interval is adjusts the rate that the Navigation, Satellite and Sky Chart screens are updated.
GPS Messaging
This window displays the string of NMEA data that is received to your Palm organizer from the Map
Companion.
Start GPS
This button starts the GPS communication between GPS Companion and the Map Companion. It is used
only if the Stop button has been pressed.
Stop GPS
This button stops the GPS communication between the GPS Companion and the Map Companion
software.
Set Time
The Set Time button sets your Palm organizer’s time & date to that received in the satellite signals.
Note: The GMT deviation and DST must be set correctly for this to work properly.
Initializing the GPS
Since the satellites are constantly rotating the earth, the GPS Companion wants to know
approximately where it is located, the date and the time. This information isn’t mandatory, the GPS
Companion can “poll” the sky looking for satellites and eventually get the information it needs but this
takes time. So to speed up this process the GPS Companion has a built in almanac of all the
satellites and where they will be at any given time for all positions. So now with the approximate
location and time, the GPS Companion just refers to its almanac and can immediately begin receiving
satellite data.
Where does it get this information? Well, every time the GPS Companion computes a fix it is stored
in memory. (Only the last fix computed is stored, not all of them.) The next time it is turned on and
needs to start computing a fix, the GPS Companion uses this last fix as a starting point.
What if the GPS Companion has never taken a fix or if it has been moved (more than 500 miles)
since the last time it took a fix? In this case, to speed up the TTFF (time to first fix) you should
access the Initialization Screen in the GPS Mode and enter the Lat/Lon for your position. (It doesn’t
have to be exact, anything close will work fine.) If you do not know your approximate Lat/Lon, a
simple chart showing you a Lat/Lon that you can use for each state is provided here. The time and
date used by Map Companion is the time and date you have stored in your Palm organizer.
Procedure for Initialization
From the application menu of your Palm organizer, tap the Map Companion icon.
If this is the first time you have used the Map Companion software, reply to the License
Agreement and the Directory Mode screen is displayed. Tap on “Directory” in the top left
corner of the display. Select GPS from the menu.
If this is not the first time you have used the Map Companion software, access the GPS
Mode and select “Initialization” as the screen to be viewed.
Using the Grafitti pad or the keyboard entry method on your Palm organizer, enter your
approximate Latitude and Longitude. Altitude (elevation) can be left blank or entered if you
know it.
{button Approximate Lat/Lon Chart,JI(`',`Lat_Lon_Chart')}
Set the GMT (Greenwich Mean Time) deviation and check the DST (daylight savings time)
box if it is in effect for your area. Note: This entry is optional. It is only used if you want to
use the Set Time button to update the clock in your Palm organizer to the time transmitted by
the satellites from their atomic clocks.
{button GMT Reference Chart,JI(`',`GMT_Reference_Chart')}
Tap the Start button. If your Palm organizer is seated properly in the GPS Companion and if
you have a reasonably clear view of the sky you will begin to see messages streaming in the
Messages box. This is the NMEA data coming from the GPS Companion. This indicates
that the receiver is working properly and should compute a position fix very soon.
After you see the message streams, tap on “Initialization” in the upper right corner of the
display. Select Satellites from the menu. You are now viewing the “techie” information
about the satellites being used to compute the position. To see a graphical indication of the
same information, tap on Satellites in the upper right corner and select Sky Chart.
At the top of the display the words “No Fix” was displayed when you began the initialization
process. No Fix will soon be replaced with 2D and finally 3D. When either 2D or 3D is
displayed, your position has been computed and you are ready to use Map Companion with
GPS information.
#$K
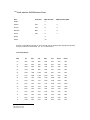
Lat/Lon Chart
State
Alabama
Alaska
Arizona
Arkansas
California
Colorado
Connecticut
Delaware
Florida
Georgia
Hawaii
Idaho
Illinois
Indiana
Iowa
Kansas
Kentucky
Louisiana
Maine
Maryland
Massachusetts
Michigan
Minnesota
Mississippi
Missouri
Montana
Nebraska
Nevada
New Hampshire
New Jersey
New Mexico
New York
N. Carolina
N. Dakota
Ohio
Oklahoma
Oregon
Pennsylvania
Rhode Island
S. Carolina
S. Dakota
Tennessee
Texas
Utah
Vermont
Virginia
Washington
W. Virginia
Wisconsin
Wyoming
Latitude Longitude
33
64
34
35
37
39
42
39
28
33
21
45
40
40
42
39
38
31
45
39
42
45
46
33
38
47
42
39
44
40
34
43
36
47
40
36
44
41
42
34
44
36
31
40
44
38
47
39
45
43
00.000
00.000
00.000
00.000
00.000
00.000
00.000
00.000
00.000
00.000
00.000
00.000
00.000
00.000
00.000
00.000
00.000
00.000
00.000
00.000
00.000
00.000
00.000
00.000
00.000
00.000
00.000
00.000
00.000
00.000
00.000
00.000
00.000
00.000
00.000
00.000
00.000
00.000
00.000
00.000
00.000
00.000
00.000
00.000
00.000
00.000
00.000
00.000
00.000
00.000
{button Back,Back()}
#
Lat_Lon_Chart
Lat/Lon Chart
K
Lat/Lon Chart
$
N87 00.000 W
N152 00.000 W
N112 00.000 W
N92 00.000 W
N119 00.000 W
N105 00.000 W
N73 00.000 W
N76 00.000 W
N82 00.000 W
N83 00.000 W
N158 00.000 W
N115 00.000 W
N89 00.000 W
N86 00.000 W
N93 00.000 W
N98 00.000 W
N85 00.000 W
N92 00.000 W
N69 00.000 W
N77 00.000 W
N72 00.000 W
N85 00.000 W
N94 00.000 W
N90 00.000 W
N92 00.000 W
N109 00.000 W
N99 00.000 W
N117 00.000 W
N71 00.000 W
N75 00.000 W
N106 00.000 W
N76 00.000 W
N78 00.000 W
N100 00.000 W
N83 00.000 W
N97 00.000 W
N121 00.000 W
N77 00.000 W
N71 00.000 W
N81 00.000 W
N100 00.000 W
N86 00.000 W
N98 00.000 W
N112 00.000 W
N73 00.000 W
N79 00.000 W
N121 00.000 W
N80 00.000 W
N90 00.000 W
N108 00.000 W
Map Accuracy
Map Companion maps are built using a proprietary system that takes complex source map data
obtained from other vendors and converts it into databases compatible with the Palm™ Operating
System. Therefore, the maps are only as accurate as the original source we purchased or licensed,
and are not meant to be used for high-precision measurement or navigation applications requiring
highly accurate measurements of the earth’s surface.
The maximum positional accuracy error claimed by our current source data provider is approximately
150 feet but in practice we have found the errors to be on the average of about 20 feet.
As much as we would like to, we cannot guarantee that all existing roads are present in the map data
because our sources do not guarantee it to us. Maps vary in age, and older cities like New York, for
example, are unlikely to have any missing streets at all. Newer, fast-growing cities are more likely to
be lacking some streets.
#$K
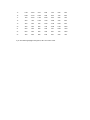
North America GMT Reference Chart
Area
Time Zone
Atlantic
GMT Deviation
GMT Deviation (DST)
-4
Eastern
EST
-5
-4
Central
CST
-6
-5
Mountain
MST
-7
-6
Pacific
PST
-8
-7
Alaska
-9
Hawaii
-10
Example: If the GMT is 1300 and you are in the PST and not observing DST (daylight savings time)
then your local time would be 0500. (13 – 8 = 5 or 0500 hours)
Time Chart (Hours)
#
GMT
Atl
EST
CST
MST
PST
Alaska
Hawaii
00
8PM
7PM
6PM
5PM
4PM
3PM
2PM
01
9PM
8PM
7PM
6PM
5PM
4PM
3PM
02
10PM
9PM
8PM
7PM
6PM
5PM
4PM
03
11PM
10PM
9PM
8PM
7PM
6PM
5PM
04
12PM
11PM
10PM
9PM
8PM
7PM
6PM
05
1AM
12PM
11PM
10PM
9PM
8PM
7PM
06
2AM
1AM
12PM
11PM
10PM
9PM
8PM
07
3AM
2AM
1AM
12PM
11PM
10PM
9PM
08
4AM
3AM
2AM
1AM
12PM
11PM
10PM
09
5AM
4AM
3AM
2AM
1AM
12PM
11PM
10
6AM
5AM
4AM
3AM
2AM
1AM
12PM
11
7AM
6AM
5AM
4AM
3AM
2AM
1AM
12
8AM
7AM
6AM
5AM
4AM
3AM
2AM
13
9AM
8AM
7AM
6AM
5AM
4AM
3AM
14
10AM
9AM
8AM
7AM
6AM
5AM
4AM
GMT_Reference_Chart
GMT Reference Chart
K
GMT Reference Chart
$
15
11AM
10AM
9AM
8AM
7AM
6AM
5AM
16
12AM
11AM
10AM
9AM
8AM
7AM
6AM
17
1PM
12AM
11AM
10AM
9AM
8AM
7AM
18
2PM
1PM
12AM
11AM
10AM
9AM
8AM
19
3PM
2PM
1PM
12AM
11AM
10AM
9AM
20
4PM
3PM
2PM
1PM
12AM
11AM
10AM
21
5PM
4PM
3PM
2PM
1PM
12AM
11AM
22
6PM
5PM
4PM
3PM
2PM
1PM
12AM
23
7PM
6PM
5PM
4PM
3PM
2PM
1PM
If you are observing daylight savings time, add 1 hour to the result.
Starting NAV Companion
Tap the NAV Companion application icon from the list of applications on your organizer.
If this is the first time you have used the Map Companion software, you will be prompted to initialize
the receiver. For information on initialization, see Initializing the GPS.
To prevent accidental battery drain, the NAV Companion application program will exit after 30
minutes if :
A.
a position fix has not been computed or
B. position fixes are being computed but there is no indication of movement.
Initializing the GPS
Since the satellites are constantly rotating the earth, the GPS Companion wants to know
approximately where it is located, the date and the time. This information isn’t mandatory, the GPS
Companion can “poll” the sky looking for satellites and eventually get the information it needs but this
takes time. So to speed up this process the GPS Companion has a built in almanac of all the
satellites and where they will be at any given time for all positions. So now with the approximate
location and time, the GPS Companion just refers to its almanac and can immediately begin receiving
satellite data.
Where does it get this information? Well, every time the GPS Companion computes a fix it is stored
in memory. (Only the last fix computed is stored, not all of them.) The next time it is turned on and
needs to start computing a fix, the GPS Companion uses this last fix as a starting point.
What if the GPS Companion has never taken a fix or if it has been moved (more than 500 miles)
since the last time it took a fix? In this case, to speed up the TTFF (time to first fix) you should
access the Initialization Screen and follow the instructions for initializing the GPS Companion.
Note: If you have initialized the GPS Companion with the Map Companion software you don’t need
to initialize it again with the NAV Companion software. Likewise, if you have initialized the GPS
Companion with the NAV Companion software you don’t need to do it again with Map Companion.
See Initialization Instructions .
Initialization Instructions
Press the Menu icon on you Palm organizer.
Tap on “Options ” menu item. A drop-down menu
appears. Tap on the menu item “Initialize”.
The initialization screen is displayed with a world
map displayed. Tap once on your general
location.
A second initialization screen is displayed with a
“zoomed in” map.
You can now narrow the selection of your general
area by taping on the map displayed.
If this map does not show your location, tap on
the BACK button to redisplay the world map and
try again.
If you know your elevation, use the up/down
arrows in the elevation area to set your elevation.
(Elevation is optional and is not required to
complete initialization.)
Tap once on the Time box to edit the time
displayed. You are presented with a time edit
window that allows you to enter your correct time.
With the correct time entered, tap on the Date
box. Use the calendar window to select the
present date and tap the “Today” button.
When everything is correct tap “OK”. If you entered the correct information for initialization and
you are outside in an area where the satellite signals are not being blocked, the GPS
Companion will begin acquiring the necessary information from the satellites to compute your
position. You can use the Status Screen to visually observe this process.
Status Screen
The Status Screen visually displays the satellites and the signal strength of the signals being
received.
At the top of the Status Screen, as well as all of the other screens, is an indication of the level of
position fix that is being computed, either No Fix, 2D or 3D. If it indicates No Fix, then the GPS
Companion is not acquiring satellite signals and is not computing a position fix. This may be due to
poor visibility of the satellites in which case you need to move a little to get a better view of the sky or
you may need to initialize the GPS Companion again. (See Initializing the GPS Companion.) A 2D
fix indicates that the GPS Companion can “see” just three satellites. It will compute a position fix but
cannot compute elevation. In this case the elevation displayed is based upon the last elevation
computed. In 3D, both the position and elevation is being computed by the GPS Companion.
Whenever possible, you want the GPS Companion to be in the 3D mode.
Also on the Status Screen is a display of the battery level in the GPS Companion. When the battery
is all black, the batteries are fresh and at full life. As the batteries wear down, the black portion of the
battery displayed will move down.
See Accessing the Screens for instructions on how to access the Status Screen.
Accessing the Screens
There are two ways of accessing the seven navigation screens in NAV Companion.
1.
Use the Page Up/Page Down button on your Palm organizer to scroll through the screens.
– or –
1.
Tap the Menu icon on your Palm organizer.
2.
Tap in the upper right corner of the display to reveal a drop-down menu that lists the
available navigation screens.
Tap on the name of the screen you want to
display. Tapping on the name of the screen now
in this help file will take you to a page with
information on that screen.
Position Screen
The Position Screen displays the coordinates of your last computed position and basic navigation
data.
See Accessing the Screens for instructions on how to access the Position Screen.
Speed Screen
The Speed Screen displays your heading, bearing and speed. (The data displayed is customizable
to allow other data items to be displayed.) Heading is the direction you are traveling in degrees. If
you were traveling due North, your heading would be 0 degrees, East would be 90 degrees, South is
180 degrees and West is 270 degrees. Bearing (measured the same as heading) is the direction that
you should be heading to arrive at your destination in the shortest time possible. So your goal would
be to change your direction (heading) so that it matches the bearing to arrive at your destination.
(Note: bearing is displayed only if a route or go to waypoint is active.)
The Speed Screen also displays your speed using a familiar speedometer format. The speed marker
marks your actual speed, the dot marks your average speed.
At the bottom of the display is the odometer and trip odometer. Both odometers work the same and
both can be reset. You may want to use the trip odometer to display your distance traveled for the
entire trip and reset the other odometer every morning to display how far you have traveled each day.
See Accessing the Screens for instructions on how to access the Speed Screen.
See Customizing the Speed Screen.
Plot Screen
The Plot Screen is a mini map that shows where you have traveled and if you have an active route,
where you want to go. The Plot Screen displays your distance, speed and heading (customizable
fields) at the top of the display. (Note: distance is displayed only if a route or go to waypoint is
active.)
It can also display your track. Your track is an indication of where you have been. You also have the
option of starting, stopping or clearing the tracklog that is being displayed.
See Accessing the Screens for instructions on how to access the Plot Screen.
See also Customizing the Plot Screen, Setting Tracklog.and Panning.
Nav2 Screen
The Nav2 Screen displays five customizable fields of navigation data.
See Accessing the Screens for instructions on how to access the Nav2 Screen.
See also Customizing the Nav2 Screen.
Waypoints Screen
The Waypoints Screen lists all of the waypoints you have stored in the NAV Companion software.
From this screen you can add new waypoints, delete waypoints or edit waypoints.
See Accessing the Screens for instructions on how to access the Waypoints Screen.
See also: Creating a Waypoint, Deleting a Waypoint and Editing a Waypoint.
Routes Screen
Similar to the Waypoints Screen, the Routes Screen displays all of the routes that you have created
and stored in the NAV Companion software. From this screen you can select a route to be deleted or
edited and you can create a new route.
See Accessing the Screens for instructions on how to access the Routes Screen.
See also: Creating a Route, Deleting a Route and Editing a Route.
Using the Trip Odometer
There are two odometers in your NAV Companion and they are displayed on the Speed Screen. As
you travel with your GPS Companion, the NAV Companion will be recording your distance and
updating the odometers.
These odometers can be reset independently of each other. You may wish to use the main odometer
as a total counter since you started using the GPS Companion and use the trip odometer just to
record the distance traveled on your present route. In this case you would never reset the main
odometer and reset the trip odometer right after you activated the route.
Or you may be on a long trip and you want to use the odometer to record the complete trip and use
the trip odometer to record your activities on a daily basis. For this example, you would reset both
odometers when you activate the route, and reset the trip odometer at the beginning of each day.
Resetting the Odometers
1.
Tap the Menu Icon on you Palm organizer.
2.
From the Tools menu, tap on Odometer Reset or Trip Reset.
3.
A confirmation screen is displayed. Tap OK to complete the odometer reset or tap Cancel to
abort.
Resetting the trip odometer also resets the average and maximum speed.
Note: for average speed to be computed correctly, you need to be computing a 3D position fix while
resetting the trip odometer.
Customizing the Plot Screen
On the Plot Screen you can change the scale of the display and what the top of the screen is
referenced to, North up or Track up.
Changing the Plotter Scale
Tap on the arrow to the left of the current display scale. A popup
menu will be presented with a list of the scales that can be used.
Tap on the scale you desire and you will be returned to the Plot
Screen. The Plot Screen will be redrawn using the scale you
selected.
Changing the Display Reference
Tap on the arrow to the left of the current screen reference indicator.
A popup menu is presented allowing you to select from North Up,
Track Up or Course Up. Tap on the desired option and the Plotter
Screen will be redrawn using the reference chosen.
Changing the Data Fields
Tap on the arrow to the left of the data field you want to change. A
popup menu will be presented with a list of the data options that can
be displayed.
You have the option of choosing Latitude, Longitude, Elevation,
Heading, Bearing, Turn, Speed, Avg spd (average speed), Max Spd
(maximum speed), ETA (Estimated Time of Arrival), TTG (Time To
Go), Distance (Distance To Go), Odo (Odometer), Trip odo (Trip
Odometer), trip time, Last fix, Bat Level, Bat Max, Date, Time, UTC
or Blank.
Customizing the Nav2 Screen
Any of the five data fields on the Nav2 Screen can be changed to display information that is valuable
to you. You have the option of choosing Latitude, Longitude, Elevation, Heading, Bearing, Turn,
Speed, Avg Spd (average speed), Max Spd (maximum speed), ETA (Estimated Time of Arrival), TTG
(Time To Go), Distance (Distance To Go), Odo (Odometer), Trip odo (Trip Odometer), trip time, Last
fix, Bat Level, Bat Max, Date, Time, UTC or Blank.
Changing the Data Fields
Tap on the arrow to the left of the data field you wish to change. A
popup menu is displayed with the various options available. Tap on
the desired data type to select. You can tap on the up/down arrows
to view more items in the list.
Setting Distance Units and Lat/Lon Display
The units of measure for data displayed can be US (miles/feet), Metric (kilometers/meters) or
Nautical (nautical miles/knots).
To Select the Distance Units
1.
Tap on the menu icon on your Palm organizer. Tap on “Options” in the menu bar and tap on
“Preferences ” from the drop-down menu.
2.
Tap on the arrow to the right of “Units:”.
3.
Select the desired units of measure from the list displayed by tapping on the item.
4.
Tap on the OK button to close out the Preferences window.
Lat/Lon information can be displayed in one of three formats: Deg, Deg-Min or Deg-Min-Sec.
To Select the Lat/Lon Format
1.
Tap on the menu icon on your Palm organizer. Tap on “Options” in the menu bar and tap on
“Preferences ” from the drop-down menu.
2.
Tap on the arrow to the right of “Lat/Lon:”.
3.
Select the desired format from the list displayed by tapping on the item.
4.
Tap on the OK button to close out the Preferences window.
Creating a Waypoint
Waypoints are reference points that can be used later in creating a route or a simple GOTO
destination route. Whenever you think you may want to return to your present location you should
create a waypoint and give it a name that will best describe it.
There are two ways of creating a waypoint. The simplest and most common used method would be
to MARK your position. Marking is handy as it can be done from any screen.
To Mark Your Position as a Waypoint
1.
Tap on the menu icon on your Palm organizer.
2.
Under the Tools Menu, tap on “Mark…”.
3.
Using the Keyboard or Graffiti pad, enter a name for this waypoint or make no changes and
use the default name supplied by the NAV Companion.
4.
You can also, if desired, add a description for the waypoint, edit the Lat/Lon coordinates or
change the elevation.
5.
When the information for the waypoint is correct, tap on OK to create the waypoint and close
the window.
To Create a Waypoint from the Waypoints Screen
1.
While viewing the Waypoints Screen, tap on the New button in the bottom left of the screen.
2.
Follow the same instructions as 3 through 5 above.
Editing a Waypoint
You can change (edit) any waypoint in your waypoint list. If the waypoint is used in a route, any
changes you make to the waypoint will also be reflected in the route.
To Edit a Waypoint
1.
Access the Waypoints Screen.
2.
From the list of waypoints, tap on the waypoint you wish to edit. You may need to use the
scroll bars on the right side of the list to view all of the waypoints in the list.
3.
Using the Keyboard or Graffiti pad, edit any of the fields desired.
4.
Tap on Done when all of the changes have been made.
Deleting a Waypoint
You can delete any waypoint in your waypoint list as long as it is not being used in a route.
To Delete a Waypoint
1.
Access the Waypoints Screen.
2.
From the list of waypoints, tap on the waypoint you wish to delete. You may need to use the
scroll bars on the right side of the list to view all of the waypoints in the list.
3.
Tap on the Delete button. If the waypoint is not used in a route, a confirmation window will
be displayed. If the waypoint is being used in a route, a window is displayed informing you of
the route it is used in. You need to edit the route to remove the waypoint or delete the route
and then try to delete the waypoint again.
Creating a New Route
You can create and save a route in your NAV Companion. This will allow you to reuse a route if you
need to. This is handy when you want to repeat a trip or journey at some future time.
To Create a Route
1.
Access the Routes Screen and tap on the “New” button.
2. Enter a name for the route or use the default name
supplied.
3. A list of waypoints in the order that you will be using
them to navigate is displayed. To change one of
the waypoints, tap on the arrow next to the
waypoint name. A popup menu is displayed with a
list of the available waypoints. Using the scroll
bars, locate the waypoint you want to use and tap
on it.
4. You can also add a waypoint to the end of the list
by tapping on the “New” button. A new leg is
added (in this case, leg #3) with the first waypoint in
your list as a default. Just as you did in step 3, you
can change this waypoint to one you want.
5. At this point your route could look like the one
shown here. This route begins at the waypoint
name “Home”. It will navigate us from “Home” to
the waypoint named “Camp”. Once we arrive at
the “Camp” waypoint, it will continue to navigate us
to the waypoint named “CanyonView”.
6. You can continue to add waypoints to the end of
the route. When you are done, tap on the “OK”
button to save the route and close the window.
You are returned to the routes list with your newly
created route ready to be activated or edited.
Editing an Existing Route
You can edit a route you have already created. In the edit mode, you can add waypoints to the end
of a route, change waypoints in the route and delete waypoints from the route.
Editing a Route
1.
Access the Routes Screen. Tap on the name of the route you want to edit.
2.
The route is displayed just as it was the last time
you saved the route. To change a waypoint, tap
on the arrow next to the waypoint name and
select the new waypoint from the drop-down
menu. To insert a waypoint, tap on the number of
the waypoint you want the new waypoint inserted
before, and then tap on the “New” button. Select
the waypoint for this new leg by tapping on the
arrow next to the waypoint name. To add a
waypoint, tap on the “New” button and select a
different waypoint for the newly created leg by
tapping on the arrow next to the waypoint name.
3.
To delete a waypoint, tap on the number next to
the waypoint name.
Next, tap on the menu icon on the Palm organizer
and access the Tools menu.
Tap on “Remove Waypoint” . The waypoint is now
removed from the route.
4.
When you are done editing the route, Tap on the “Done” button to save your changes and
return to the Routes Screen.
Activating a Go To Waypoint
A Go To Waypoint is simply a 1-leg route with a start point of your present position and a destination
point that you select from the list of waypoints. Once you activate a Go To Waypoint, the NAV
Companion will provide you with the information necessary to arrive at the destination.
To Activate a Go To Waypoint
1.
From any screen, tap the menu icon on the Palm organizer.
2.
From the Tools Menu, tap on Go To Waypoint…
3.
A list of waypoints stored is displayed. Tap on the waypoint you want to go to. It may be
necessary to use the scroll bars at the right of the list to view all of the available waypoints.
4.
If you want an alarm to sound when you have arrived at your destination, tap on the alarm
box in the lower right corner.
5.
Tap on the “OK” button at the bottom of the display.
6.
You are returned to the last screen viewed. If you view the Speed, Plot or Nav2 screen you
will notice that at the top of the window the black header bar now displays “TO: <waypoint
name>”. All of the data and navigational information is now based on your present position
and what is necessary to arrive at the destination.
Activating a Route
Any route that you have created can be activated and used to navigate on. Once a route has been
activated, the NAV Companion will navigate you to all of the waypoints in the route in the order that
you have saved them. Once the NAV Companion has computed that you have arrived at a waypoint
in the route it will automatically begin navigating you to the next waypoint in the route.
To Activate a Route
1.
From any screen, tap the menu icon on the Palm organizer.
2.
From the Tools Menu, tap on Activate Route…
3.
A list of routes stored is displayed. Tap on the route you want to go to. It may be necessary
to use the scroll bars at the right of the list to view all of the available routes.
4.
If you want an alarm to sound when you have arrived at the destination of each leg and at the
final destination of the route, tap the alarm box in the lower right corner.
5.
Tap on the “OK” button at the bottom of the display.
You are returned to the last screen viewed. If you view the Speed, Plot or Nav2 screen you will
notice that at the top of the window the black header now displays “TO: <waypoint name>”. All of the
data and navigational information is now based on your present position and what is necessary to
arrive at the destination.
Note: Activating a route will override any GOTO or route that was active.
Signal Strength Indicators
This is a bar graph showing the strength of the signals received from the satellites. Black bars
indicate signals that are being used to compute positiong.
Satellite Signal Chart
The two circles indicate satellilte elevation. The outer circle represents the horizon and the inner
circle represents 45 degrees from the horizon. The center of the circle represents 90 degrees from
the horizon. Satellites displayed as a black box with white numbers indicate satellites that are being
used to compute the position.
Position Fix Indicator
Displays the status of the position fixes being computed.
No fix: Indicates poor signal strength and no position is being computed
2D: Position fix is being computed but elevation is not.
3D: Both Position and Elevation is being computed.
Last Position Computed
This is the latitude/longitude coordinates for the last position fix that was computed by the GPS
Companion.
Elevation
This displays the elevation of the last computed postion fix. If in 2D mode the elevation is not
computed but instead is based upon the last computed or entered elevation. If in 3D mode, the
elevation is computed using the satellite signals.
Trip Distance
This is the distance from the last point that you reset the trip odometer to the last computed position.
Speed
This is the speed that you are traveling.
Heading
This is the direction that you are presently heading. Note: you must be moving to display the correct
heading.
Heading Compass
This is a display of your heading using a familar compass design. Here again, you must be moving
for this value to be correct.
Bearing to Destination
This is the direction you should be heading to arrive at your destination or current route leg.
Speed
This is your present computed speed.
Heading
This is your present computed heading. You must be moving for this value to be accurate.
Speedometer
This is your present computed speed displayed using a familiar speedometer format.
Odometers
These odometers display how far you have traveled since they were reset. They can be reset
independently of each other.
Destination Waypoint Name
This is blank if you do not have an active route.
Heading
Your current computed heading.
Speed
The speed you are travelling as computed by the GPS Companion.
Distance to Destination
This distance is computed as a straight line from your present position to your destination.
Plotter
The arrow in the center of the plotter is your current position. The dashed line is your track (where
you have actually gone). The solid line is a visual representation of your active route. Any waypoints
that are stored in your organizer and are visible at the scale selected are displayed.
Plot Scale
Tap on the arrow to select a new plotter scale.
North Up or Track Up Selection
You can select to have the plotter drawn with North being referenced at the top of the screen or the
direction of your present track as the reference for the top of the display.
Data Fields
Press the arrow to the left of the field name to view a drop-down menu of other data types available.
Deleting a Route
The only limit to the number of routes you can have stored is the memory of your Palm organizer, yet
you still may want to delete an existing route. There is no undo. Once a route has been deleted, the
only way to get it back is to create it all over.
To Delete a Route
1.
Access the Routes Screen and tap on the route you want to delete.
2.
The edit route window is displayed. Tap on the “Delete” button at the bottom of the window.
3.
A confirmation window is displayed requiring you to tap on “OK” to continue with the
deletion, or “Cancel” to abort.
Deactivating a Go To or Route
This will allow you to turn off (deactivate) the route you are navigating on.
To Deactivate a Route
1.
Tap on the menu icon on the Palm organizer.
2.
From the “Tools ” menu, tap on “Clear Destination”.
3.
Tap on “OK” on the Information window.
Setting Tracklog
As you are moving and the GPS Companion is computing position fixes, the NAV Companion can
display a visual representation of where you have been (also referred to as Track or Tracklog). While
viewing the Plot Screen the NAV Companion allows you to:
A.
Start Tracklog:
This begins the process of recording your track.
B.
Stop Tracklog:
This stops any further movement from being recorded to your track
until you start the tracklog again.
C.
Clear Tracklog:
This erases the tracklog from your plotter display.
To Start the Tracklog
1.
Tap on the menu icon on your Palm organizer.
2.
Tap on “Plot” in the menu bar.
3.
Tap on “Start Tracklog”. (This is not displayed if a Tracklog is already in progress.)
To Stop the Tracklog
1.
Tap on the menu icon on your Palm organizer.
2.
Tap on “Plot” in the menu bar.
3.
Tap on “Stop Tracklog”. (This is not displayed if there is no Tracklog being recorded.)
To Clear the Tracklog
1.
Tap on the menu icon on your Palm organizer.
2.
Tap on “Tracklog” in the menu bar.
3.
Tap on “Clear Tracklog…”.
Beaming Waypoints and Routes
You can beam your stored waypoints and routes to another Palm organizer using the Beam function
in your organizer.
To Beam Waypoint(s) or Route(s) to another Palm organizer
1.
In order to beam a single waypoint or route, go to the Waypoints or Routes screen and select
the waypoint or route you want to beam. Tap the menu icon on your Palm organizer. From
the Tools menu, tap on "Beam Waypoint" or "Beam Route".
2.
In order to beam ALL waypoints or routes, tap the menu icon on your Palm organizer while
the foreground screen is other than Waypoints or Route. From the Tools menu, tap on
"Beam All Waypoints" or "Beam All Routes".
3.
Turn on the Palm organizer that is receiving the data. Tap on the Applications Icon and point
the IR port at the Palm organizer that is sending the data. You have the option to accept or
not the received waypoint(s) or route(s).
If you have any problems beaming the data, consult your Palm organizer user manual.
Accessing Help
Help files are available for screens in the NAV Companion. These help files provide you with
information about the screen you are viewing.
Accessing Help
1.
Tap on the menu icon on your Palm organizer.
2.
Tap on “Options ” .
3.
Tap on “Help…” from the drop-down menu.
About the NAV Companion
The “About NAV Companion” screen allows you to see what version of software you are currently
using in your Palm organizer.
Accessing Help
1.
Tap on the menu icon on your Palm organizer.
2.
Tap on “Options ” .
3.
Tap on “About NAV Companion…” from the drop-down menu.
#$
Battery Level Indicator
All black indicates full battery life in the GPS Companion. As the battery levels go down, so will the
black portion of the battery symbol.
#
$
Battery_Level_Indicator
Battery Level Indicator
Hiding & Showing Waypoints
Waypoints can be hidden or displayed on the Plot screen. This way you can control some of the
clutter on the Plot screen should you have a lot of waypoints in the same area.
After selecting Waypoints, the Waypoint screen is
displayed. Each waypoint has a checkbox next
to its name. Tapping on the checkbox changes
the status of the waypoint, (checked is displayed
and unchecked is hidden).
Addtionally you can hide or show all of the waypoints in the list by selecting the desired option from
the menu bar.
Tap on the Menu icon and tap on Waypoints from
the menu bar. You now have the option of hiding
all of the waypoints (tap on “Hide All” ) or
displaying all of the waypoints (tap on “Show
All”).
Deleting Hidden Waypoints
You can easily delete all waypoints that you have marked as hidden (see Hiding & Showing
Waypoints).
Tap on the Menu icon and tap on Waypoints from
the menu bar. Tap on the option “Delete Hidden
Waypoints…” from the menu list.
A confirmation screen is displayed asking you to
confirm the deletion.
Tapping on “OK” will permanently delete all
waypoints that have been marked as hidden
unless they are currently used in a route. A
waypoint used in a route cannot be deleted until it
has been removed from the route or the route
has been deleted.
Reversing a Route
Any route in your list of routes can be reversed. This is handy if you have created and navigated on
a route that you now want to use to navigate back to the place you started.
Reversing a Route
Access the Routes Screen. Tap on the name of the route you want to reverse.
Tap on the Menu icon. Tap on Routes in the
Menu bar. Tap on “Reverse Route” from the
menu list.
The order that the waypoints are now listed have
been reversed. Tap on the “OK” button to
complete the operation.
Deleting All Routes
You can easily delete all the routes from your route list.
1.
Access the Route screen.
2.
Tap on the Menu icon and then tap on “Routes ” from the menu bar.
3.
Tap on the menu item “Delete All…”
4.
A Confirmation screen is displayed. Tap on “OK” to complete the deletion or tap on
“Cancel” to abort.
Panning
While you are viewing the Plot screen you can pan to any point on the display and then recenter
the cursor when you are done.
Panning
1.
Tap on the menu icon on your Palm organizer.
2.
Tap on “Plot” in the menu bar.
3.
Tap on “Enable Panning”.
You can now use the stylus or your finger to move (“pan”) the cursor to any point on the display.
To Recenter the Cursor
4.
Tap on the menu icon on your Palm organizer.
5.
Tap on “Plot” in the menu bar.
6.
Tap on “Recenter Map”.
Customizing the Speed Screen
Any of the five data fields on the Speed Screen can be changed to display information that is
valuable to you. You have the option of choosing Latitude, Longitude, Elevation, Heading, Bearing,
Turn, Speed, Avg spd (average speed), Max Spd (maximum speed), ETA (Estimated Time of
Arrival), TTG (Time To Go), Distance (Distance To Go), Odo (Odometer), Trip odo (Trip Odometer),
trip time, Last fix, Bat Level, Bat Max, Date, Time, UTC or Blank.
Changing the Data Fields
Tap on the arrow to the left of the data field you wish to change. A
popup menu is displayed with the various options available. Tap on
the desired data type to select. You can tap on the up/down arrows
to view more items in the list.