1
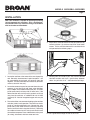
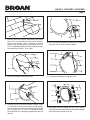
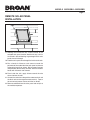
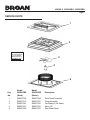
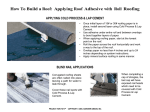
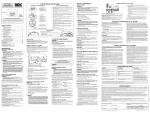
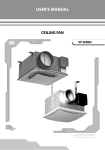
MODELS 355RSOBK • 355RSOBR
Page 1
ROOF-MOUNT REMOTE
SOLAR POWERED
ATTIC VENTILATOR
READ AND SAVE THESE INSTRUCTIONS
WARNING
CAUTION
TO REDUCETHE RISK OF FIRE, ELECTRIC SHOCK, OR INJURY
TO PERSONS, OBSERVE THE FOLLOWING:
1. Usethisunitonlyinthemannerintendedbythemanufacturer.
Ifyouhavequestions,contactthemanufacturerattheaddress
ortelephonenumberlistedinthewarranty.
2. Beforeservicingorcleaningunit,disabletheventilatorbycoveringthesolarpanelwithcardboardordisconnectingthewires
fromthemotorterminals(notewirelocationswhendisconnecting).
3. Installationworkmustbedonebyaqualifiedperson(s)inaccordance with all applicable codes and standards, including
fire-ratedconstructioncodesandstandards.
4. Ifremovinganexisting120VACpoweredatticventilator,use
only a qualified person(s) to remove any electrical wiring in
accordancewithallapplicablecodesandstandards.
5. Sufficientairisneededforpropercombustionandexhausting
ofgasesthroughtheflue(chimney)offuelburningequipment
topreventbackdrafting.Followtheheatingequipmentmanufacturer'sguidelinesandsafetystandardssuchasthosepublished
by the National Fire ProtectionAssociation (NFPA), and the
AmericanSocietyforHeating,RefrigerationandAirConditioningEngineers(ASHRAE),andthelocalcodeauthorities.
6. When cutting or drilling into wall or ceiling, do not damage
electricalwiringandotherhiddenutilities.
1. Forgeneralventilatinguseonly.Donotusetoexhausthazardousorexplosivematerialsandvapors.
2. Toavoidmotorbearingdamageandnoisyand/orunbalanced
impellers,keepdrywallspray,constructiondust,etc.offpower
unit.
3. Thisunithasanunguardedimpeller.Donotuseinlocations
readilyaccessibletopeopleoranimals.
4. This ventilator operates when the solar panel is exposed to
sunlight.Toreduceriskofinjurywhileinstalling,servicingor
cleaningunit,coverthesolarpanelwithcardboardordisconnectthewiresfromthemotorterminals(notewirelocations
whendisconnecting).
5. The recommended open air inlet for this ventilator is 4.25
square feet.The best location for these air intake vents are
undertheeaveswithdirectaccesstotheattic.Failuretoprovidetheseintakescouldcausenatural-draftgasappliancesto
backdraft.
6. Youratticfaninstallationwillcreateascreenedopeninginto
youratticspace.Duringaheavyrainstormtherecouldbea
lightsprayofrainintothisatticspace.Thisisanormalconditionwithallatticventilatorsandwillnotcauseanydamageto
thestructure.Werecommendthatyoudonotstoreanyvaluablearticlesdirectlyunderthefanopeningintheroof.
7. Thisventilatorisintendedforroofinstallation.BroanModels
353 & 353SOBK Gable Mount Ventilators are available for
sidewallapplications.
8. The plastic ventilator dome and base may be painted with
highqualitypaint.Followthepaintmanufacturer'srecommendationsforacrylicandABSplasticasappropriate.Takecare
toavoidgettingpaintonthesolarpanel.
9. Pleasereadspecificationlabelonproductforfurtherinformationandrequirements.
10.The installation instructions contained in this document are
only a recommendation and individual professionals may
have their own methods of installation. If your roof has an
existingwarranty,installationofthisproductbyanyoneother
thanthosewhoinstalledtheroofmayjeopardizeanyfuture
warrantyclaim.Pleasecheckwiththeoriginalinstallerofyour
roofifthisisaconcern.
11. When working with asphalt shingles in cold weather (below
400F),takecaretoavoiddamagetotheshingleedgesand
corners.
TOOLS AND MATERIALS REQUIRED
SlottedScrewdriver
r
Drill
r
1/4"DrillBit
r
SabreSaworKeyholeSaw
r
Hammer
r
Ruler/TapeMeasure
r
Pencil,MarkerorScribe
r
UtilityKnife
r
PryBar(toremoveroofingnails)
r
5/16"SocketandExtension
r
RoofingCement
r
GalvanizedRoofingNails(1¾"min.)
r
Register your product online at:
www.broan.com/register
MODELS 355RSOBK • 355RSOBR
Page 2
INSTALLATION
Note: This ventilator is capable of replacing an existing
120 volt powered attic ventilator. Only a qualified person should remove any electrical wiring in accordance
with local codes and standards.
4. Separatetheventilatordomefromtheventilatorbaseby
removingthefour(4)stainlesssteel5/16”sheetmetal
screws.Lifttheventilatordomeofftheventilatorbase
andproceedtothefollowingsteps.
1
1. Locatetheventilatoratthecenteroftherearslopeofthe
roof.Generally,werecommendapointlocated24”–36”
on center below the roof peak and centrally along the
ridgeline.Theroofshouldbefreeofobstacles(television
antenna,electricallines,etc.).
2
3
4
5
6
7
8
9
5. Workingfromtheinsideofyourattic,findthedesired
ventilator location and mark a spot halfway between
raftersatapointthatis24”–36”belowtheroofridge.
2. Locatetheremotesolarpanelonyourroofwherethesun’s
exposure is best barring shade (trees, other buildings
etc)at4:00pminthehottestmonthoftheyear.Thesolar
panelcomesfromthefactorywith15feetofwire.Ifthe
desiredlocationofthesolarpanelisgreaterthan15feet
awayfromtheventilator,anadditional50ftof14AWG
(minimum)ULlistedorrecognizedcopperwiremaybe
used.
3. Priortoinstallation,werecommendsettinguptheventilator
andsolarpaneltoverifyoperation.Takethefanandsolar
panel to a location exposed to sun. Connect the solar
panelwirestothemotorterminals(redwiretopositive
terminalandblackwiretonegativeterminal).Removing
thecardboardcoverfromthesolarpanelshouldcause
theventilatortooperate.Placecardboardoversolarpanel
(forsafety),disconnectwirefrommotorterminals.
6. Drillaguideholethroughtheroofatthismark.
MODELS 355RSOBK • 355RSOBR
Page 3
7. Fromtheroofside,usingtheguideholeasthecenter
point,useanailandstringtoscribea16-1/2”diameter
circle on the shingles. Note: If replacing an existing
ventilator,theholediametermaybelargerthan16-1/2”.
Thisisacceptableprovidedtheroofingmaterialoverlaps
theventilatorbyatleast1”onallsides.
10.Drillalargestartingholeforthesabresawjustinsideof
thelineorthe14"circlecreatedinStep8.
8. Cutouttheshinglesinsideofthecircle.
11. Cutouttheroofboard(s)insideoftheline.
9. Usingthesamenailandstringshowninstep6,scribe
a14”diametercircleontheblackpaperorroofdecking.
Note:ifreplacinganexistingventilatortheholediameter
may be larger than 14”. This is acceptable provided
theventilatorbaseisadequatelysupportedbytheroof
decking.
12.Forproperremovalofroofingnails,drawa26"square,
centeredaroundthehole.Removenailsholdingshingles
downfromtoptwo-thirdsofsquare.
MODELS 355RSOBK • 355RSOBR
Page 4
13.Apply a large bead of roofing cement in the molded
grooveonthebottomsideofventilatorbase.Making
surethearrowontheventilatorbaseispointedtoward
theroofridge,starttwo-thirdsofthewaydownfromthe
topofthe26”squareandslidetheventilatorbaseunder
theshingles.Donotbendtheshinglesanymorethan
necessary.Centertheventilatorbaseoverthehole.
15.Using a good grade of roofing cement material, seal
shinglesandallnailheads.DONOTsealthebottom
edgeoftheventilatorbase.
NAIL UNDER SHINGLES
16.Installtheventilatordometotheventilatorbaseusingthe
four(4)stainlesssteel5/16”sheetmetalscrewsremoved
duringstep4.
14.Makesuretheventilatorbaseisparalleltotheroofridge,
carefullyliftshinglesandnailorscrewbasesecurelyto
theroofusinggalvanizedroofingnailsorscrews.Nailall
cornersandaroundperimeterofbaseevery6inches.
MODELS 355RSOBK • 355RSOBR
Page 5
REMOTE SOLAR PANEL
INSTALLATION
17. Working from inside the attic, find the center of the
selectedsolarpanellocationidentifiedinstep2,drilla
smallholeintheroofdeckinglargeenoughforthesolar
panelwiretofitthrough.
18.Feedthesolarpanelwirethroughtheholeintotheattic.
19.Run a bead of silicone or roof cement around the
perimeteroftheundersideofthesolarpanelandsecure
totheroofusingnailsorscrews.Nailorscrewallcorners
andperimeterofbaseevery6inches.Sealthefastener
headswithsiliconeorroofcement.
20.From inside the attic, apply silicone around the wire
whereitenterstheroof.
21. Connecttheredwiretothepositivemotorterminaland
theblackwiretothenegativemotorterminal.Tapeor
tieextrawiretopreventcontactwiththefanblade.
22.Removecardboardfromthesolarpanelandverifythat
theventilatoroperates.
MODELS 355RSOBK • 355RSOBR
Page 6
SERVICE PARTS
1
2
Replacement parts
can now be ordered
on our website.
Please visit us at
www.Broan.com
3
4
5
Key
No.
Model
355RSOBK
(Black)
Model
355RSOBR
(Brown)
Description
1
2
3
4
5
S99527255
S99527273
S99527261
S99527257
S99527250
S99527256
S99527274
S99527261
S99527257
S99527251
SolarPanelAssembly
DomeAssembly
FanBladew/SetScrew
Motor,DC
RoofSheetPanel
MODELS 355RSOBK • 355RSOBR
Page 7
WARRANTY
BROAN-NUTONE LLC
– Exclusive Limited Warranty –
The Exclusive Limited Warranty Agreement (the “Warranty”) is entered into by and between Customer and Broan-NuTone LLC
(“Broan”). Customer has carefully reviewed thisWarranty and agrees that Broan’s performance of its obligations hereunder will
provideCustomerwithanadequateremedywhichwillservetheessentialpurposeoftheparties’agreementrelatingtotheproducts
manufacturedbyBroanandidentifiedonthereversesidehereof(the“Products”).Customeracknowledgesandagreesthathe/sheis
purchasingtheProductsforresidentialpurposes(andnotforindustrialorcommercialpurposes)aftercarefulinspectionofthesame.
Customer’srightsandbenefitshereunderinuresolelytoCustomer,astheoriginalpurchaseroftheProducts,andarenon-assignable
andnon-transferable.Nootherpartyorentity,including,withoutlimitation,subsequentpurchasersorownersoftheProductsshall
haveorbeentitledtoassertanyrightsorbenefitshereunder.
EXCLUSIVELIMITEDWARRANTY;LIMITATIONOFREMEDIES.BroanherebywarrantstheCustomerthattheProducts’motors
areandwillremainforaperiodoftwo(2)yearsfromthedateofdeliverytoCustomer;andtheProductsareandwillremainfora
periodofsix(6)yearsfromthedateofdeliverytoCustomer(collectively,the“WarrantyPeriod”),freeofdefectsinmaterialsand
workmanship,providedthatsuchProductsareusedfortheirintendedpurposeandareproperlyservicedinaccordancewiththe
User’sManualprovidedtoCustomer.Subjecttotheforegoing,ifatanytimeduringtheWarrantyPeriodanyProductfailstoconform
totheforegoingwarrantybyreasonofdefectsinmaterialsorworkmanship,CustomershallproperlynotifyBroaninwritingandshall
includewithsuchnoticeasalesreceiptorproofofpurchaseofthedefectiveProduct,andBroanatitsoptionshallrepairorreplace
thedefectiveProductorcomponentpartwithoutchargetoCustomer,exceptfor:(A)costsincurredintransportingtheProductsor
componentpartstoandfromBroan’sdesignateddealeroritsmanufacturingplantinHartford,Wisconsin;and(B)chargesforlabor
orothercostsincidentaltotheremovalorremountingofcomponentpartsrepairedorreplacedunderthisWarranty,bothofwhich
shallbebornebyCustomer.Notwithstandinganyprovisionhereintothecontrary,thisWarrantyshallnotextendorobligateBroan
totakeanyactionwithrespectto:(A)Productswhichhavebeenmodified,altered,installed,usedoroperatedinamannerwhichis
notrecommendedbyBroan,includinganyProductsinwhichpartsnotmanufacturedorapprovedbyBroanhavebeeninstalled;(B)
ProductswhichhavenotbeenregularlyorproperlyservicedinaccordancewiththeUser’sManualorwhichhaveotherwisebeen
neglected;and(C)ordinarywearandtear,serviceandmaintenanceandreplacementitems.THISWARRANTYAPPLIESONLY
TOMACHINERY,EQUIPMENTANDCOMPONENTPARTSMANUFACTUREDBYBROAN.THISWARRANTYDOESNOTAPPLY
OR EXTENDTO:(A)PARTSPURCHASEDSEPARATELYFROMSUCHMACHINERYANDEQUIPMENT,WHICHARECOVERED
BYASEPARATEWRITTENWARRANTY;OR(B)ITEMSOFEQUIPMENTORACCESSORIESMANUFACTUREDBYPARTIES
OTHERTHANBROAN.
EXCEPT AS SPECIFICALLY STATED IN THE PARAGRAPH IMMEDIATELY ABOVE, BROAN MAKES NO WARRANTY OR REPRESENTATION, EXPRESS OR IMPLIED, INCLUDING, WITHOUT LIMITATION, ANY WARRANTY OF MERCHANTABILITY OR
FITNESS FOR A PARTICULAR PURPOSE. THE WARRANTY SET FORTH IN THE PRECEDING PARAGRAPH AND THE OBLIGATIONS AND LIABILITIES OF BROAN THEREUNDER REPRESENT CUSTOMER’S SOLE AND EXCLUSIVE REMEDIES
AND ARE EXPRESSLY MADE IN LIEU OF ANY AND ALL OTHER REMEDIES, WARRANTIES, GUARANTIES OR LIABILITIES,
EXPRESS OR IMPLIED, ALL OF WHICH ARE HEREBY EXPRESSLY WAIVED BY CUSTOMER. THERE ARE NO WARRANTIES
WHICH EXTEND BEYOND THE DESCRIPTION ON THE FACE HEREOF. IN NO EVENT SHALL BROAN’S LIABILITY HEREUNDER EXCEED THE PURCHASE PRICE FOR THE PRODUCTS. ADDITIONALLY, BROAN SHALL NOT BE LIABLE FOR ANY
SPECIAL, INDIRECT, INCIDENTAL OR CONSEQUENTIAL DAMAGES OF ANY NATURE WHATSOEVER.
Broanreservestherighttomodify,alterorimproveanyproductsorequipmentmanufacturedbyBroanwithout incurringanydutyor
obligationtomodify,alter,improveorreplaceanyoftheProductscoveredhereby.
THIS WARRANTY SETS FORTH THE PARTIES’ FINAL, COMPLETE AND EXCLUSIVE AGREEMENT CONCERNING THE
PRODUCTS AND BROAN’S WARRANTY OBLIGATIONS. NO AFFIRMATION OF FACT, PROMISE, DESCRIPTION, DEMONSTRATION, SAMPLE OR MODEL CONSTITUTES A WARRANTY OR OTHERWISE MODIFIES, EXTENDS OR ALTERS THIS
WARRANTY UNLESS IN A WRITTEN INSTRUMENT SIGNED BY AN AUTHORIZED BROAN OFFICER.
ThisWarrantyshallbegovernedbyandconstruedinaccordancewiththelawsoftheStateofWisconsin.Thevenueforanyaction
arisingoutoforrelatedtothisWarrantyshallbeinWashingtonCounty,Wisconsin.
MODELS 355RSOBK • 355RSOBR
Page 8
99527270B