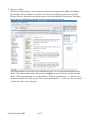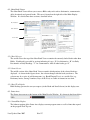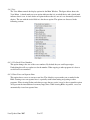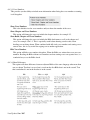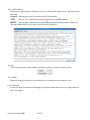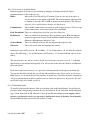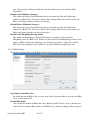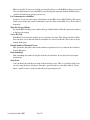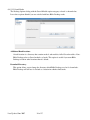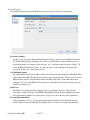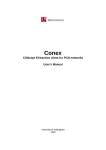
1
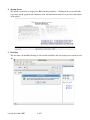
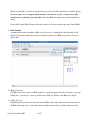
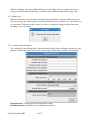
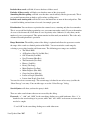
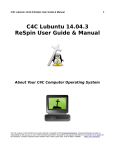
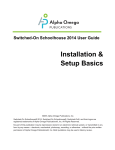
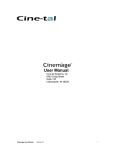
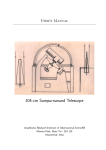
Bible Desktop User Manual v 1.0.7 1. Introduction “Let the word of Christ dwell in you richly...” (Col 3:16) is our desire for you. From daily reading to deep, serious Bible study, Bible Desktop lets you do it all. With over 300 Bibles, Commentaries, Daily Devotions, Dictionaries and other theological works in more than 40 different languages, Bible Desktop is the perfect addition to your library. 2. Installation Bible Desktop is available for Windows (98SE to Vista), Mac (Panther, Tiger and Leopard) and Unix (Linux, AIX, BSD, and so forth). Bible Desktop requires Sun's Java version 1.4 or later. It runs best with the most recent version. Bible Desktop will run with as little as 32M of RAM but 256M or more is best. Download Bible Desktop from http://www.crosswire.org/bibledesktop/download.html, choosing the installer for your platform. The information on that web page provides complete instructions on installation. 3. Differences on a Mac Bible Desktop is a native Apple MacOSX application. When run on a Mac it differs from what it looks like on any other platform. This manual gives images from Linux, so a bit of explanation of the differences is needed. Bible Desktop, like every Mac application, has an application menu. On the Bible Desktop menu you will find Preferences, About and Quit. In this manual, these are located on other menus. Preferences is called Options and is found on the Tools menu. About is found on the Help menu. And Quit is found on the File menu, called Exit. The other major difference is the appearance of Bible Desktop. As you would expect, tabs are centered and rounded and when too many are present to fit on a line, you will see right and left navigation arrows. Scroll bars are always present in every window needing scrolling. The menus don't have mnemonics (underlined letters). Also, the keys Command, Option and Control work as you'd expect. In this manual the images show Control and Alt instead of Command and Option. Last Updated June 2007 1 of 27 4. Startup Screen The splash screen below is displayed as Bible Desktop initializes. Clicking on the screen will make it go away, but the program will continue to start. An initialization status bar is present at the bottom of the splash. 5. First Run The first time you run Bible Desktop it will not find any Bibles and will prompt you to install at least one. Last Updated June 2007 2 of 27 When you click OK, it will access the Internet to get a list of all the books that are available. If you live in a country or at a company which monitors your Internet activity, you may want to find another means of obtaining Sword modules. Note that Bible Desktop refers to Sword modules as books. If you click Cancel, Bible Desktop will not be useful. At least not until you get some Sword Bibles. 6. Main Window Assuming that you have installed a Bible, you will now see something like the following. It will differ based upon the books that you have installed. It consists of a Bible viewer and a viewer of other books. 6.1. Bible View Area The Bible View Area consists of Bible picker(s), a quick navigation of book and chapter, a passage lookup area, a search area, a passage sidebar (not visible, by default), and a Bible text display. 6.1.1.Bible Picker(s) Each Bible picker provides the list of all installed Bibles. The name displayed is the short name of the Bible. Hovering over a name in the picker with the mouse will give you the full name of the Last Updated June 2007 3 of 27 Book. The “” button will remove the last Bible picker. The “+” button will add a new Bible picker to the end of the list. These buttons are disabled when you cannot add or remove any more Bible pickers. The leftmost translation is used for searching. And all are use to show requested passages and search results. 6.1.2.Passage Lookup Area The “Show Passage” text box allows you to enter one or more verses to lookup and display in the Bible Text Display. You don't have to use whole Bible book names when typing, you can use pretty much what ever makes sense to you. You can use a period or a colon to separate chapters from verses. You can use a dash to indicate a range, as in “Gen 1.32.5” or “Gen 1.310” You can use “ff” for the last verse in a chapter as in Gen 1:5ff. When you have more than one range just use spaces, semicolons or commas to separate them. You don't have to repeat the book name or chapter name, when the later verse is in the same book or chapter, as in “Gen 1.1 57 2.315” Bible Desktop can figure out what you mean most of the time. After entering the desired verse(s), either hit enter or click the button labeled ‘Go’ to the right of the text box. Alternatively, you can choose passages using the Select Passage Dialog, below. Last Updated June 2007 4 of 27 To use this dialog, you click the ‘Select’ icon adjacent to the text box. The Select Passage dialog presents you with a collapsible tree view of the Bible in the left column of the dialog. When collapsed, each book and chapter is represented by a file folder icon with an expand control (here it is a lever, but it might be a “+” and “” signs) before it. Double clicking on the folder or clicking on the expand control will expand the tree to show the indented contents of the folder. Doing that again will collapse it. You can select books, chapters and verses and then clicking the ‘Add >’ button to add them. You can select multiple verses for addition by using the CTRL or SHIFT key in the typical fashion. The right column displays the currently selected verses. The verses are also shown in the text box at the bottom of the dialog. Verses and ranges can be removed by clicking on an entry in the right column, then clicking on the ‘Remove <’ button. When the desired verses are listed in the ‘Selected’ column, you click ‘OK’ to dismiss the dialog and loads the values into the ‘Show Passage’ text box of the Passage Lookup Area. The requested passage will be fetched immediately. 6.1.3.Search Area The Search Area allows you to search Bible texts for words or phrases. It is located directly below the Passage Lookup Area on the main window. This section describes the components that make up the Search Area. 6.1.3.1.Quick Search Help The Quick Search Help Icon (located to the left of the ‘Search:’ label) presents the following explanation of the Quick Search Syntax. The syntax allows you to create complex searches. 6.1.3.2.“Enable Search” Button To make searches faster and more effective Bible Desktop uses a search index for each Bible translation. Before you can perform a search, you will need to let Bible Desktop build the index for you, by clicking on the “Enable Search” button. It should take 2 to 5 minutes to build an index, depending on how capable your computer is. If you have more than one Bible selected, it will index the first one. Last Updated June 2007 5 of 27 While it is building, you can use Bible Desktop to do other things. Just not searching. If for any reason you want to cancel the indexing, just click on the red button in front of the progress bar. 6.1.3.3.Entry Area When a search index is present for the translation, the Index Button is replaced with a text box. In here you can type any search request you wish and either hit enter or click on “Go”. All searches are case insensitive. When the search is done, you will see a dialog box letting you know how many matching verses were found. 6.1.3.4.Advanced Search Options The “Advanced” button brings up the Advanced Search dialog, below. Advanced search serves two purposes: It shows the proper way to write search requests and it makes available “Prioritization.” Detailed Search: You can specify what you want to search. Include this phrase: will find all verses with that exact phrase. Last Updated June 2007 6 of 27 Includes these words: will find all verses that have all those word. Excludes all these words: will find verses that have none of the given words. Something like this spelling: will find verse that have words remotely like the given words. This is very useful for names that are hard to spell or whose spelling varies. Include words starting with: will find all verses that match one or more of the word prefixes. This is useful for finding various forms of a word, for example, grace and Prioritization: You can choose to prioritize the returned verses, returning only the closest matches. This is very useful for finding a particular verse you cannot remember exactly. If you set the number of verses to be shown to 0, it will show all verse in priority order. Otherwise, it only show you the number of verses you requested. This option remains in effect until you uncheck it. This is the only Advanced Search option that is persistent. Range Restriction: The middle portion of the dialog is optional and allows the operator to restrict the range of the search to a limited portion of the Bible. You can restrict the search range by selecting a preset value from the pulldown menu. The following preset ranges are available: • The Whole Bible • All Prophecy (Deu 28, IsaMal, Rev) • Old Testament (GenMal) • New Testament (MatRev) • The Pentateuch (GenDeu) • History (JoshEst) • Poetry (JobSong) • Major Prophets (IsaDan) • Minor Prophets (HosMal) • Gospel and Acts (MalAct) • Letters to People (RomHeb) • Letters from People (JamJude) You can also select a custom range. The custom range is defined in one of two ways, just like the “Show Passage” text entry. You can either type or use the “Select Passage” dialog. Search Syntax: will show you how the query is built. There are other search features that are not covered by this dialog: Keywords: “+”, “&&” and “AND” do the same thing, finding verses with both terms. Note “+” is attached to the word needing to be present, while “&&” and “AND” are between two terms that need to be sought. “||” and “OR” do the same thing, finding verses with either term. Last Updated June 2007 7 of 27 To exclude “”, “!” and “NOT” will find verses not having. The “” needs to be attached to the word, but the other two stand before. Please note, if you want to search for the word “or”, “and” or “not” then don't capitalize them. Parentheses: You can use parentheses to make very complex queries. Proximity Search: Typically a search request must be satisfied by each verse. Sometimes, this is not useful. You can use “~5” to find a verse that is near another. For example “Jesus ~5 John” will find all verses with Jesus that are within 5 verses of those with John. You can use numbers other than 5. Additional Range Restrictions: The range restriction must be at the front of the search request and is a passage surrounded by []. If it is preceded by a “+” then the search is restricted to those verses. But if it is preceded by a “” then those verses are excluded. If you don't prefix it, then that verse will be added even if it does not otherwise match. Note Search: If the Bible you are searching has notes, you can search just notes with “note:(....)” then you will just search notes. This syntax is very picky. There can be no space before or after the “:” and “note” must be in all lowercase. If the search is just a single word then the parentheses are not needed. Strong's Number Search: You can search for verses with a particular Strong's Number. This uses a form similar to Note Search. “strong:h3068” will find all verses that have YHWH in them. Prefix Hebrew numbers with H or h and Greek with G or g. You can follow the letter with any number of zeros and then the number. If the Bible does not have Strong's numbers it won't find anything. Heading Search: Some Bibles have headings. You can search these with “heading:(...)”. Cross Reference Search: Some Bibles have crossreferences. You can search for these with “xref:(....)”. Within the parentheses, you can use anything that Bible Desktop will recognize as a verse, verse range or passage. Lucene: Bible Desktop uses Lucene to index Bibles. You can use the full power of Lucene to do searching. For more information see: http://lucene.apache.org/java/docs/queryparsersyntax.html Last Updated June 2007 8 of 27 6.1.4.Passage Sidebar The Passage Sidebar allows you to modify the amount of text displayed in the Bible Text Display. By default the Passage Sidebar is not shown. You will need to enable it on the View menu. The Passage Sidebar is opened/closed using the arrows to the left of the Bible Text Display. The figure below shows the Main Display Window with the Passage Sidebar displayed. The sidebar contains a list of all passages currently displayed. It also contains three buttons above the list. The leftmost button allows the operator to highlight a passage in the list and delete it from the list. The remaining buttons are ‘expand’ buttons. The first expand button (‘~1’) adds one verse of context on either side of the passage. The second expand button (‘~5’) adds five verses of context on either side of the selected passage. Last Updated June 2007 9 of 27 6.2. Other Book Viewer The Other Book Viewer allows you to access Bible study tools such as dictionaries, commentaries, daily devotionals and general books. This area is located on the right side of the Main Display Window. It is divided into three sections, described below. Book Selector Item Selector Book Text 6.2.1.Book Selector The scrolled list at the top of the Other Book Viewer contains the currently loaded books other than Bibles. Each book is preceded by an icon indicating it's type. “D” for dictionaries, “R” for Daily Devotionals or Daily Readings. “C” for Commentaries. And all other books get “O”. 6.2.2.Item Selector The middle section of the Other Book Viewer controls which portions of the selected book are displayed. As shown in the figures above, the selector changes with the book you choose. The selector may be a series of pulldown menus (e.g. Book/Chapter/Verse) or a scrolled list (e.g. Dictionary entries, Strong’s numbers, Days of the Year) or a table of contents in tree form. 6.2.3.Book Text Display Bible Desktop presents the text you request (via the Book and Item Selectors) in this display area. 6.3. Status Area The Status Area appears at the bottom of the Main Display Window. It is shown in the figure below. 6.3.1.Status/Hint Display The leftmost portion of the Status Area displays current program status as well as hints that expand on the program Tool Tip text. Last Updated June 2007 10 of 27 6.3.2.Process Feedback The rest of the Status Area gives feedback for long running operations such as downloading or indexing a book. This may show more than one process. Clicking on the red octagon will cancel the process. 6.4. Menus The Bible Desktop menus provide you control over the performance of the program. Many of the menu items have keyboard shortcuts listed next to the menu item title. These shortcuts work in an identical fashion to the menu items themselves. 6.4.1.File Menu 6.4.1.1.New Bible View This option adds another Bible View in a tab (or subwindow) to the Bible View Area. Initially it will be untitled, but it's title will track the last passage lookup or search request. 6.4.1.2.Open This option opens a previously saved verse list (.lst) file. The verses contained in the file are loaded in the currently selected Bible View. 6.4.1.3.Close the Current View This option removes the currently selected Bible View from the Bible View Area. 6.4.1.4.Clear the Current View This option clears the passages from the currently selected Bible View in the Bible View Area. 6.4.1.5.Close Other Views This option removes all but the currently selected Bible View from the Bible View Area. Last Updated June 2007 11 of 27 6.4.1.6.Close All Views This option removes all Bible Views from the Bible View Area. 6.4.1.7.Save This option allows you to save the set of verses in the currently selected Bible View as a verse list (.lst) file. If a file has not been created, a ‘Save As’ dialog is displayed, allowing you to select the location for the file. This file can later be loaded using the ‘Open’ option, above. 6.4.1.8.Save As This option allows you to save the set of verses in the currently selected Bible View as a verse list (.lst) file. A ‘Save As’ dialog is displayed, allowing you to select the location for the file. This file can later be loaded using the ‘Open’ option, above. 6.4.1.9.Save All This option allows you to save the set of verses in each Bible View as a verse list (.lst) file. A ‘Save As’ dialog is displayed, allowing you to select the locations for the files. These filed can later be loaded using the ‘Open’ option, above. 6.4.1.10.Exit This option terminates Bible Desktop. 6.4.2.Edit The only entry under the Edit Menu is Copy. This option allows you to copy highlighted text from the Bible Text Display. Note you can always copy any text you can select with CtrlC (CmdC on the Mac). Last Updated June 2007 12 of 27 6.4.3.View The View Menu controls the display options for the Main Window. The figure below shows the View Menu. A check mark next to an option indicates that it is an on/off choice and a check mark indicates that it is on. A circle before an option indicates that it is one of a set of mutually exclusive choices. The one with the circle filled in is the chosen option. The options are discussed in the following sections. 6.4.3.1.Use Small Verse Numbers This option changes the size of the verse numbers. By default, they are small superscripts. Unchecking this will use regular text for the number. When copying to other programs it is best to use full sized verse numbers. 6.4.3.2.Start Verses on Separate Lines This option forces verses to start on a new line. The default is to present the text as marked in the Bible. Starting verses on separate lines is especially useful when cutting and pasting to other programs. When viewing Psalms and other passages that are poetic, it may be best to turn this option off to prevent the introduction of too many empty lines. When viewing Bibles in parallel, verses are automatically viewed on separate lines. Last Updated June 2007 13 of 27 6.4.3.3.Verse Numbers This provides you the ability to include more information when listing the verse numbers or turning it off altogether. Show Verse Numbers This is the default view for verse numbers and just shows the number of the verse. Show Chapter and Verse Numbers This option will change the verses to include the chapter number, for example 2:3. Show Book, Chapter and Verse Numbers This option will change the verses to include the Bible book name as well as the chapter and verse, for example: Gen 1:1. This is especially useful when showing search results, when headings are not being shown. When combined with full sized verse numbers and starting verses on new lines, this is very useful for copying text to another application. Hide Verse Numbers This option will hide verse numbers altogether. When the Bible was written there were no verse numbers. Reading the Bible without verse numbers and not starting verses on separate lines, is a wonderful way to see the Bible afresh. 6.4.3.4.Show Differences This option will show differences between adjacent Bibles of the same language when more than one are shown. Text that is crossed out is text from the first Bible that is not in the second. Text that is underlined is not in the first but is in the second. Last Updated June 2007 14 of 27 6.4.3.5.Show Headings This option will show or hide headings and titles. The titles in the Psalms are canonical and are not affected by this option. By default headings are shown. This option also affects the passage headings that Bible Desktop inserts. When searching, turning this on or showing verse numbers as book, chapter and verse is really useful. 6.4.3.6.Show Study Notes Some Bibles have study notes. This option will show or hide notes. BibleDesktop shows notes as “margin notes” in the left margin. If the passage you are viewing does not have notes, then nothing will be shown. Unlike other Bible programs, Bible Desktop does not draw the distinction between different kinds of notes. It may at a later date. 6.4.3.7.Use Cross Reference Links This option controls whether cross references are active hyperlinks or just text. These most often appear in Notes, but on occasion will appear elsewhere. 6.4.3.8.Show Strong's Links Strong's Numbers are a feature of some Bibles, indicating that a particular word or phrase has been translated from one or more Hebrew or Greek words. If you have installed Strong's Hebrew and Greek Dictionaries, then showing Strong's numbers makes sense. Strong's Numbers are indicated with a hyperlink on the page in the form <S5>, where S stands for Strong's Number and 5 is the position of the number in the verse (that is, the number is not meaningful). Clicking on the hyperlink will open the entry in the installed Strong's Dictionary. When you hover over the link you can see the actual Strong's Number in the status area. 6.4.3.9.Show Word Morphology Word morphology concerns itself with the grammatical information of the word from the original text. Some Bibles have word morphology as a feature, such as the KJV. To make this feature useful you will need to install Robinson's Morphological Analysis Codes, which is for Greek words. At this time there is no corresponding book for Hebrew codes. When you hover over the link you can see the actual morphological code in the status area. 6.4.3.10.Tabbed Mode This option changes the Bible View Area so it displays each view as a separate tab. This is the default mode. Last Updated June 2007 15 of 27 6.4.3.11.SubWindow Mode This option changes the Bible View Area so it displays each view as a separate subwindow. In the past, this was the only way to view Bibles in parallel. It's usefulness is questionable and this feature may go away in a later release. 6.4.3.12.Show Tool Bar Toggling this option allows you to determine whether or not the Tool Bar shortcut buttons are displayed below the menus. 6.4.3.13.Show Tool Bar Text Toggling this option allows you to determine whether or not the Tool Bar shortcut buttons have descriptive text displayed below them. 6.4.3.14.Large Tool Bar Toggling this option allows you to determine whether the Tool Bar shortcuts are displayed using large or small buttons. 6.4.3.15.Show Tool Tips Toggling this option allows you to determine whether the Tool Tips are displayed. Tool Tips are small, informational notes that appear when you place a cursor over a menu item or button. These are especially important for lists of Bibles and Bible book names. 6.4.3.16.Show the Status Area Toggling this option allows you to determine whether the Status Area is displayed. 6.4.3.17.Show the Passage Sidebar Toggling this option allows you to determine whether the Passage Sidebar is available for display. Last Updated June 2007 16 of 27 6.4.3.18.View Source Selecting this option displays the Source Viewer, as shown in the figure below. This window has three tabs: Original: showing the text as it is encoded in the Sword module. OSIS: the text as it is transformed from the original into an OSIS document. HTML: the text that is transformed from the OSIS document into the form that is displayed. The copy button allows you to copy selected text to the clipboard. 6.4.4.Go The Go menu provide you the ability to navigate to passages you have already visited. 6.4.4.1.Back Back will change the display to show what you were visiting prior to the current view. 6.4.4.2.Forward If you went back, then forward will change the display to show what you were visiting when you chose to go back. Last Updated June 2007 17 of 27 6.4.5.Tools The Tools Menu gives you more advanced configuration options. The menu is shown in the figure below and the menu items are discussed in the following sections. Note: On the Macintosh, Options is on the Bible Desktop application menu and is called Preferences. 6.4.5.1.Books Selecting the Books item displays the Available Books dialog, shown below. There will be a tab for Installed Books and a tab for each Download site. When you bring up the dialog for the first time, it will contact each Download site for a list of its books. Clicking on Update Available Books will also get a fresh listing. If you live in a country or at a company which monitors your Internet activity, you may want to find another means of obtaining Sword modules. Note that Bible Desktop refers to Sword modules as books. Last Updated June 2007 18 of 27 6.4.5.1.1.Overview of Available Books Each tab organizes the books by type and then by language. Selecting a book will display information about it. The book types are: Bibles: Most of these are Old and New Testament. Some are just one or the other. A few are limited to a few books of the Bible. The most frequently asked question is whether we have the NIV, NASB or another recent translation. The simplest answer is, if it is not listed here, then no, we don't have it. Commentaries: The available commentaries are keyed by book, chapter and verse. The coverage of the commentaries varies from a book to the entire Bible. Daily Devotionals: These are reading plans, keyed for every day of the year. Dictionaries: There are all kinds of dictionaries. There usefulness varies. Bible Desktop has integrated support for Strong's Greek and Hebrew Bible Dictionaries and for Robinson's Morphological Analysis Codes. General Books: These are all kinds of mostly old, but important theological works. Glossaries: These map words from one language into another. Each book is preceded by an icon. “B” for Bibles, “C” for Commentaries, “R” for Daily Devotionals (that is, R for Readings), “D” for Dictionaries and Glossaries, “O” for General Books (that is, O for Other). The icon may have one or more overlays. In the lower left corner you may see a red “?” indicating that the book is questionable theologically. You will see this on the Jehovah's Witness and Mormon bible translations. In the lower right corner you may see a gray lock, indicating that the book requires an unlock key. You can download these books but you will need the unlock key to be able to read it. At Crosswire Bible Society, we are not involved in the purchase of unlock keys. Generally, the book's information will give you instructions on how to purchase the key. Once you obtain a key, keep it safe. We will not be able to help you, should you lose it. 6.4.5.1.2.Installing Books To install a book from the Internet, click on it and then click on the Install button. You will then be presented with a dialog letting you know the size the download. If you don't mind downloading that large a book, then click on OK, otherwise Cancel. If you live in a country or at a company which monitors your Internet activity, you may want to find another means of obtaining Sword modules. Note that Bible Desktop refers to Sword modules as books. Last Updated June 2007 19 of 27 6.4.5.1.3.Working with Installed Books To work with installed books click on the Installed Books tab. Delete Book If you need to remove a book, select it and click Delete Book. You will be presented with a simple confirmation dialog just in case you want to change your mind. Deleting the book will also delete its search index and the unlock code, if it has either of them. Unlock This button will be enabled whenever the book requires an unlock key to be readable. Enter the unlock code in the dialog and click OK. If you made a mistake or want to see what you entered, you can click on the button again. Remove Search Index The Remove Search Index button will become active if the book you selected is indexed. If you need to get rid of the search index, click on this button. You may want to do this if Bible Desktop offers new search features that were not available when you originally indexed the book. Last Updated June 2007 20 of 27 6.4.5.2.Options Selecting the Options menu item displays the Desktop Options dialog. The figure below shows the dialog. There are five categories of options (Bibles, Bible View, Sword Books, Passages, Application) displayed in the dialog. Select an option category by clicking on the title in the left hand portion of the dialog. Hovering over the title of an option will give a tool tip with a brief explanation of the option. Clicking OK or Apply will save all your changes on all the pages. 6.4.5.2.1.Bibles The Bibles option category is shown below. Unless you set the option, the default books will be the first in the list and as you add books, these lists will change and will probably produce surprising results. To prevent surprises, click on Apply or OK. Use Current Bible: The Current Bible is the last Bible you selected in a Bible View. This setting determines whether Bible Desktop will use the Default or Current Bible, when you create a Bible View, click on a Bible link in a Daily Devotional or Commentary, or add another parallel Bible picker. Default Bible: The default Bible is your favorite translation. It will be used when Bible Desktop starts to set the selected translation in the Bible picker. The “Use Current Bible” option indicates when it is used at other times. Default Daily Devotional: When Bible Desktop starts, it opens your Default Daily Devotional. Bible Desktop has a built in Reading Plan helping you to read the New Testament twice a year and the Old Testament once a Last Updated June 2007 21 of 27 year. Until you pick a different default, this stays the default even as you add other Daily Devotionals. Default Greek Definitions (Strong's): This defines the Strong's Greek Dictionary that is used when you click on Greek Strong's Numbers in a Bible View. You have to choose Show Strong's Links from the View menu on a Bible with Strong's Numbers for this to be effective. Default Hebrew Definitions (Strong's): This defines the Strong's Greek Dictionary that is used when you click on Greek Strong's Numbers in a Bible View. You have to choose Show Strong's Links from the View menu on a Bible with Strong's Numbers for this to be effective. Default Greek Morphology/Parsing Guides: This defines the Morphology or Parsing Guide that is used when you click on Greek Morphology codes in a Bible View. You have to choose Show Word Morphology from the View menu on a Bible with Greek morphology codes for this to be effective. At this time, only the KJV has Greek morphology codes and there is no guide for Hebrew morphology codes. 6.4.5.2.2.Bible Display The Desktop Options dialog with the Bible Display option category selected is shown below. Open links in same Bible View: By default the current Bible View is used to open a link. If you want links to open in a new Bible View, set this option to No. Parallel Bible Limit: You can limit the number of Bibles that can be shown in parallel. If you set it to 1, then the you won't be able to add more Bible pickers to the Bible View, effectively turning off the viewing of Last Updated June 2007 22 of 27 Bibles in parallel. If you set it too high you won't be able to see all the Bible pickers you can add. Also, the performance of viewing Bibles in parallel depends upon the number of Bible pickers you have and what view options you have set. List Commentaries with Bibles: Set this to Yes if you want to have commentaries in the Bible View's Bible Pickers. This option allows you to index and search Commentaries and view them in the Bible View. This feature is temporary. Show the Passage Sidebar: By default Bible Desktop starts with the Passage Sidebar hidden. With this option you can have it displayed on startup. Verses Per Tab: Each Bible View limits the number of verses shown at one time. This defines that limit. When there are more verses than the limit the remainder are viewed in subtabs. These tabs are at the bottom of the page. Default Number of Matched Verses: This determines the initial value for the number of prioritized verses to show in the Advanced Search dialog box. Font Smoothing: Font smoothing may make the display of book text look better. It may also adversely impact performance. Select Font: You can choose the font that you want all book viewing to use. This is especially useful if you are not seeing the letters, but boxes, diamonds, question marks or some other kind of “I don't know” symbol. And it is useful to make the text big enough to read. Last Updated June 2007 23 of 27 6.4.5.2.3.Sword Books The Desktop Options dialog with the Sword Module option category selected is shown below. Leave these options blank if you are satisfied with how Bible Desktop works. Additional Book locations: A book location is a directory that contains mods.d and modules, full of Sword modules. Note: Bible Desktop refers to Sword modules as books. This option is useful if you want Bible Desktop to look in other locations than it's default. Download Directory: This option allows you to change the directory which Bible Desktop uses for it's downloads. Bible Desktop will still use it's default as a location in which to find books. Last Updated June 2007 24 of 27 6.4.5.2.4.Passages The Desktop Options dialog with the Passages option category selected is shown below. Persistent Naming: Set this to yes if you don't like how Bible Desktop changes what you use for Bible book names. By default, Bible Desktop will figure out as best as possible what you mean when you type a partial book name. For example, when you type “ge”, it will guess that you mean “Genesis”. If you want Bible Desktop to keep the “ge” that you type, you are wanting your typing to be persistent. In that case, set this option to Yes. Use Full Book Names: By default, Bible Desktop is designed to help new believers to learn the books of the Bible. This option affects how Bible Desktop chooses how to represent book names. If this is set to No, then Bible Desktop will use standard abbreviations for Bible book names. Note, that if Persistent Naming is set to Yes, then Bible Desktop won't use either full or short names for what you type, but will everywhere else. Book Case: The Book Case option determines what case is used to display references. The available selections are lower, Sentence, and UPPER. When Bible Desktop displays a Bible book name, this will determine whether it is in lower case, upper case or have the first letter capitalized. Passage Expansion Rules: When expanding a verse or passage, this option controls whether it will expand beyond the current chapter or the current book. The default, None, is to allow it to expand beyond both. Last Updated June 2007 25 of 27 Chapter will restrict expansion to the chapter, and Book will restrict expansion to the book. This affects the Passage Sidebar and the ~N search feature. 6.4.5.2.5.Application The Desktop Options dialog with the Application option category selected is shown below. All these options require take effect the next time you start Bible Desktop. Language: You can choose to change Bible Desktop's to display in another language. This list provides all the translations that are currently available. They may be incomplete. Initial Layout: Indicates whether Bible Desktop should start with a Tabbed or a Windowed view. The Windowed view is deprecated and may go away in a later release. Maximum Window Width and Height: This determines the maximum size of Bible Desktop when it starts. If you set it too large, Bible Desktop will use the size of your monitor instead. General Font: The General Font is used throughout Bible Desktop to display all text except book content. This allows you to pick a more complete font (for example, Farsi) or make the font big enough to be seen. Last Updated June 2007 26 of 27 6.4.6.Help The Help menu presents the following options: 6.4.6.1.Contents The Contents option presents the builtin help, as available and directs you to online help sources, which is this document. 6.4.6.2.About This option displays the About Dialog. The About Dialog presents the current software version. 6.5. Toolbar 6.5.1.New Bible View This button is a shortcut for the File>>New Bible View menu selection. 6.5.2.Open This button is a shortcut for the File>>Open menu selection. 6.5.3.Save This button is a shortcut for the File>>Save menu selection. 6.5.4.Copy This button is a shortcut for the Edit>>Copy menu selection. 6.5.5.Help Contents This button is a shortcut for the Help>>Contents menu selection. 6.5.6.About This button is a shortcut for the Help>>About menu selection. 7. Conclusion/Feedback If you have comments about Bible Desktop, are interested in helping with its development, or just want to follow its progress, please consider joining one or more of the JSword mailing lists (http://www.crosswire.org/jsword/maillists.html). Last Updated June 2007 27 of 27