1
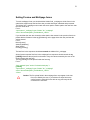
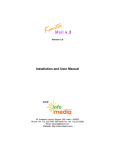
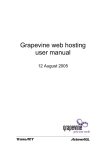
1
Version 4.0
Installation and User Manual
44, Ambazari Layout, Nagpur, MH, India – 440033
Phone: +91 712 223 7066, 395 8918 Fax: +91 712 223 5838
Email: [email protected]
Website: http://www.kkeim.com
2
Contents
Using This Help...........................................................................................................3
Text Conventions....................................................................................................4
Special Messages ...................................................................................................5
Locating Help ..........................................................................................................6
About Kmita Mail v.4..................................................................................................7
What's New in Kmita Mail v.4?.............................................................................8
Kmita Mail V4 Requirements ................................................................................9
Getting Started ..........................................................................................................10
Uploading to the Server ......................................................................................11
Setting Folder Permissions ................................................................................12
Entering License Information.............................................................................13
Creating and Editing Form Configurations .........................................................15
Creating a Form Configuration ..........................................................................16
Error and Success page configuration ............................................................18
Data Email Configuration ....................................................................................19
Autoresponder Email Configuration.................................................................21
Data Storage ..........................................................................................................22
Setting form validations ......................................................................................23
CAPTCHA Image configurations ...........................................................................25
Building HTML Forms..............................................................................................26
Calculations and Formula...................................................................................28
Setting Preview and Multipage forms...............................................................29
3
Chapter 1
Using This Help
4
Thank you for downloading Kmita Mail V4 manual. Please take a moment to familiarize yourself
with the special text and messages used throughout this guide.
Text Conventions
The examples below explain the specially formatted text used in this guide.
HTML code appears in Green colored Text :
<form method=”post” action=””>
The names of the input form tags appear in Bold Type : formname, Email
PHP code appears in Brown colored Text :
<? $to = [email protected]; ?>
File names appear in Italics Text : setup.php , setup.asp
URL appear in Bold Blue text : http://www.kmita-mail.com
Email address appears in Blue text : [email protected]
5
Special Messages
The following words and symbols have special meaning in this guide.
Note : Important information concerning the operation of Kmita Mail V2
Caution: Failure to follow directions may result in malfunctioning and data loss.
//
Error: Failure to follow directions could lead to the errors listed in this box.
6
Locating Help
Kmita Mail provides you with several ways to find help.
1. Setup Manual
2. Knowledgebase : http:// support.kkeim.com/faq
3. Website Support : http:// support.kkeim.com/
4. Email Support : [email protected]
Note: Always mention Location of Kmita Mail on your server and the form you are
trying to integrate with Kmita Mail when communicating with Support.
7
Chapter 2
About Kmita Mail V4
8
What's New in Kmita Mail V4?
Kmita Mail V4 is the latest version for Kmita mail. The new version now has
•
New 4 step spam check.
•
Uses OOP (php 4 compatible).
•
CAPTCHA image security.
•
Advanced settings to control CAPTCHA image, font, font size and image text.
•
Tab based configuration menus for easy understanding and use.
•
Individual Upload settings for each form.
•
Individual Validation Settings for each form (POST and FILE data).
•
Powerful validation with options to create custom validation rules.
•
Integrates into Kmita Admin.
•
Intuitive menus.
•
Kmita mail configuration page.
•
Advanced settings page to control key mail options (for ex : SMTP Port, from suffix)
•
Banned IP Address page.
•
Banned Email Page.
•
Ability to copy old form settings while creating new forms.
•
Ability to export form data to CSV format
•
Ability to export form data to excel (.xls) format.
•
Ability to save data to multiple MySQL tables and report to view the saved data.
•
Support for multiple MySQL queries.
•
Support for multi page forms.
•
Full customization for error and success pages.
•
Full customization for data email and auto responder email.
•
Ability to make calculations and save in MySQL database/CSV file/excel file and display
the calculation in data email, auto responder email, success page.
9
Kmita Mail V4 Requirements
To install Kmita Mail V4 on your server. You server should fulfill the following requirements. Kmita
Mail can be installed on mostly any Linux, UNIX or Windows Server as we have kept the PHP
requirements to very low.
•
PHP 4 or higher installed on the server running in Normal Mode.
•
Send Mail installed or any SMTP server with or without authentication.
•
GD2 Library ( for CAPTCHA Image Security )
•
MySQL Writing privileges (if you want to save form data to MySQL table)
10
Chapter 3
Getting Started
11
Uploading to the Server
You have downloaded the ZIP file from your account [ http://login.kkeim.com ]
Since the script is in PHP therefore follow the procedure below.
Note: On UNIX and Linux folder is referred to as “directory”. Since most of the
people use Windows as their operating system, we would refer directory as
folder in this help document.
Unzip the contents of the ZIP on your local hard drive, preferably on your desktop.
Now connect to Internet, open your favorite FTP program. Some of the most common FTP
programs are CuteFTP, WS_FTP, AceFTP (Freeware), etc.
Upload the “Kmitaadmin” and “kmitam” folders to the HTML root of your website. The root of
your website may be called as htdocs, httpdocs, wwwroot, www_public, www etc.
Caution: The files have to be in the HTML root of the website; else Kmita
Admin and Kmita Mail will not work.
12
Setting Folder Permissions
Kmita Mail creates files and folders on your server and requires read, write and execute
permissions. The image below shows the view of ACE_FTP. Right Click on the “kmitaadmin”
folder and click properties.
Select all the checkboxes or type CHMOD value directly to 777 and click “OK”.
The following files and folders require CHMOD 777
File / Folder
Permission [CHMOD]
/kmitaadmin/login.php
777
/kmitaadmin/kmitam.php
777
/kmitaadmin/kmitam/data/
777
/kmitaadmin/kmitam/config/
777
/kmitaadmin/kmitam/config/config.php
666
/kmitaadmin/kmitam/config/bannedemails.php
666
/kmitaadmin/kmitam/config/bannedips.php
666
/kmitaadmin/kmitam/config/captchavars.php
666
/kmitaadmin/kmitam/config/vldrules.php
666
/kmitam/temp/
777
13
Entering License Information
Now that you have uploaded and set permissions, you now need to open your browser window.
Enter: http://www.yourwebsite.com/kmitaadmin/ to get page like this.
Enter your username and password which are set as “admin” and “admin” respectively. You can
change the password once you login into Kmita Admin.
14
Go to http://login.kkeim.com .Using your username and password sent to you, login into your
account and create your Kmita Mail V4 Key.
Enter the key in the field shown in the figure above and press “Save License”.
If you get several PHP warnings after saving the password, there is a problem with the
Permissions provided to “kmitaadmin/kmitam.php”. Please see “Setting Folder Permissions”
15
Chapter 4
Creating and Editing Form Configurations
16
Creating a Form Configuration
To create form configuration click “List of forms” on the “Kmita Mail Administration” menu to view
the page below.
The page display list of forms created with all the configurations that have been set for the
particular form, you can view the forms data MySQL report, Excel Report or view it in CSV format.
The page also provides the links to edit form configurations and deleting the forms.
To create new forms press “Click here to create new form” link to view the page below.
17
The newer version also provides you the option to copy settings of previously created forms
saving you from the repetitive task of entering common details. Once you enter the above details
you will be redirected to the settings configurations page shown below.
18
Error and Success page configuration
You can set the success and error page path to either server path or http path, we recommend
using server path for the error and success pages as this give you the ability to customize the
pages.
In case you are using http path (for ex: http://www.mysite.com/error.html), the script will only
redirect to the http path on error/success it wont be able to display the errors/custom data.
By default the Kmita Mail V4 uses relative path for error and success page (you can find the
thankyou.htm and error.html files in “kmitam/” folder the path is set relative to “kmitam/” folder).
You ca also customize the error and success page to display the form fields values if you wish by
adding the tag [|exactfilename|] in the pages.
For ex:
[|Name|] will get replaced by the form field Name, you can add as many form fields as you like
kmita mail V4 also supports displaying calculated files on the success page.
19
Data Email Configuration
Kmita Mail V4 allows you to customize how you receive the form details from your website visitor.
1. HTML
2. Plain Text
You have an option to receive the data in following formats
1. Kmita Mail Default [No Customization]
2. My own HTML/Text [Full Customization]
If you select option # 2 i.e. My own HTML/Text [Full Customization], you’ll need to provide
complete email body.
To start with, you can make a table with two columns. One column will hold the label for the
particular field and the other will show the value filled by the visitor. The name of the field if
enclosed by vertical bars and square braces substitutes the value filled in the form.
[| exact name of the field|]
20
The name of the field mentioned in the Data Email should be exactly the same. Even the change
in the case or capitalization takes place, Kmita Mail V4 will not work. That is, the value in the form
field will not be substituted.
You can use the following code to add IP address, date and Time in your form results.
Value
Code
IP
[|IP|]
Date
[|DATE|]
Time
[|TIME|]
Unique ID
[|UNIQUEID|]
Date Time
[|DATETIME|]
21
Autoresponder Email Configuration
Kmita Mail V4 allows you to customize how you send your autoresponder email to your visitor.
1. HTML
2. Plain Text
The name of the field if enclosed by vertical bars and square braces substitutes the value filled in
the form.
[|exact name of the field|]
The name of the field mentioned in the Autoresponder Email should be exactly the same. Even
the change in the case or capitalization takes place, Kmita Mail V4 will not work. That is, the
value in the form field will not be substituted.
You can also use the code to add IP address, date and Time in your custom layout the same way
as for “Data Email” explained earlier.
22
Data Storage
“Kmita Mail V4” provides you the option to store data in CSV file, excel sheet and MySQL table
you can specify the form fields that you want to save and view the report in CSV, excel or MySQL
according to your preference.
In case you want to save the form data the MySQL, you must provide the MySQL connection
parameters. Kmita Mail V4 allows you to execute multiple queries; you can execute INSERT,
UPDATE queries depending upon your requirement. If you want to execute more than one query
please separate the queries using “;”.
23
Setting form validations
“Kmita Mail V4” allows powerful form validations, you can choose either from predefined rules or
even create your own custom validation rules.
“Kmita Mail V4” allows you to validate POST and well as FILE field data.
To add a field validation click “+Add New Field”.
The field should be the exact name of the field in the form and the field type should be
appropriately set if the field to be validated is a file upload field then choose the field type as
“FILE”, the above screen shot has the field type set to “POST” for the form field Height (any
number greater than or equal to 6.0).
The button besides the Validation Rule selection box is the custom rules definition link if you want
to add your custom rule you will see the pop up form on clicking the button.
24
The image below shows a screen shot of the custom rule creation form.
25
Chapter 5
CAPTCHA Image configurations
“Kmita Mail V4” allows you to customize the form CAPTCHA, you can change the background
image, captcha font, size, color and text.
If you want to add your own background images to the CAPTCA you should upload the images to
the folder “kmitaadmin/kmitam/captchaimages/”.
Note: The script will only support .png images for the CAPTCHA background.
If you wish to use a custom font for the CAPTCHA upload the font file in “kmitaadmin/kmitam/”
folder (the script will support any true type font i.e. .ttf for the image text)
Sample CAPTCHA Image generated based on custom settings.
26
Chapter 6
Building HTML Forms
There are few basic requirements that a form must fulfill to be processed using “Kmita Mail V4”.
1) A hidden field in the form by the name formname, the value of this field must be set to the
name of the form being created in the “kmitaadmin” panel. (For ex: contact, registration
etc).
Sample Code:
<input name="formname" type="hidden" id="formname" value="contact" />
2) A primary email address field in the form re_Email, the email field in the form must
always be named as re_Email and must be present in the form.
Sample Code:
<input name="re_Email" type="text" id="re_Email" size="25" maxlength="100" />
3) The Captcha image and security number input field if “Image challenge” has been
enabled for the form. The security image field must be named as secnum.
Sample Code:
<img src="/kmitaadmin/kmitam/image.php" width="150" height="80" /><br />
Enter the characters shown in the above image [0-9, A-F]:
<input name="secnum" type="text" id="secnum" />
Note: if you have enabled file uploads for the form then the form tag must also
include the declaration enctype="multipart/form-data". The forms action property
should be set to “/kmitam/submit.php”.
We recommend building your forms using the HTML code generated by the script for the form,
the script generated this code based on the form settings. To view this code click “HTML Code”
tab on the form settings page.
27
The HTML code generated by the script is the minimal code that you need in the form to be
processed, the screen shot below shows a sample code generated for the form contact.
28
Calculations and Formula
You can perform calculations based on the form fields by adding a hidden field to the form
and settings its value to an arithmetic expression using form field names.
For ex:
= price1+price2+price3
Note: the “=” sign is required in the value being set and should not be ignored.
Please see the sample code below.
You can perform three operations on the resultant number ROUND, CEIL and FLOOR
For ex: if you wish to round the above summation to 2 decimal digit then set the fields value
as ROUND,2=num1+num2+num3
The digit after “ROUND,” is the number of decimal places you wish to add to the result if this
number is ignored then 0 is the default value.
Sample Code:
<input name="sum" type="hidden" id="sum" value="ROUND,2=num1+num2+num3" />
<input type="hidden" name="avg" id="avg" value="ROUND,2=(num1+num2+num3)/3" />
<input name="perc" type="hidden" id="perc"
value="ROUND,2=(num1+num2+num3)*100/100000" />
<input name="sum" type="hidden" id="sum" value="CEIL=num1+num2+num3" />
<input name="total" type="hidden" id="sum" value="FLOOR=price1+price2+price3" />
You can save the calculated value to database table, CSV file or Excel sheet by using the
same convention as used for other field as [|fieldname|] for ex [|sum|], in case saving this field
to MySQL table use the fieldname without [| |] i.e. sum as field name.
This value can also be displayed on preview page using the tag [|sum|].
Caution: All the form fields used in the calculation must have names in the
character set [a-z0-9A-Z_-]. The field’s name should not contain any
character other than the above character set.
29
Setting Preview and Multipage forms
To make multipage forms you should add the hidden field _multipage to all the forms in the
submission stages except the last form that you wish should get submitted and processed.
The hidden field _multipage must contain the server path or relative path to the next form that
the user needs to fill.
For ex:
<input name="_multipage" type="hidden" id="_multipage"
value="/home/kmita/public_html/feedback_2.html">
If you wish that the user also views the values that he has entered in the previous form then
please add the fieldname in the tag [|fieldname|] on the page where the user previews the
values entered.
For ex:
Name [|name|]
Address [|address|]
State [|state|]
Country [|country|]
The last form in the sequence should not contain the hidden field _multipage.
All the forms except the first form in the multipage form sequence should contain the tag
[|CODE|] otherwise the script will not be able to carry the values entered by the user in the
earlier forms to the next form.
The tag [|CODE|] must be placed inside the form tag.
For ex:
<form method="post" action="/kmitam/submit.php" >
[|CODE|]
<input name="_multipage" type="hidden" id="_multipage"
value="/home/kmita/public_html/feedback_3.html">
</form>
Caution: The file upload fields in the multipage form must appear in the last
form to be filled by the user, if you add the file input field to the
earlier forms the script will not be able to copy and carry the file
contents to the next form.