1
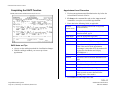
STUDENT EMPLOYEE ACTIONS 5.9 STUDENT RECLASSIFICATION Overview The procedures described in this section are to offer guidance to Service Centers about updating the EDB with a student reclassification. Policy Summary A student may be reclassified upward or downward if s/he assumes duties of greater or lesser responsibility. Reclass from Title Code II-III with up to 10% increase above the employee’s current pay rate does not require pre-consultation or approval by the Career Center. The Service Center ends the old job and begins the new appointment at new pay rate, with PAN comments include the rationale for reclass, % increase over current pay, increase in cents, and new pay rate. A revised ER (employee request) should be maintained in the Service Center for this reclass action. If the reclass increase exceeds 10% of current pay rate, the Service Center would pre-consult with the Career Center for approval, and upon OEU the PAN comments would include: reclass to Title III, % increase over previous pay rate, increase in cents, new pay rate, and “approved by _____ on ____ date.” The revised ER remains at the Service Center. OEU with PAN comments to include: reclass to Title IV ER# and pay rate, and “approved by ___ on ____ date.” Before you Start Service Centers can proceed to update the EDB with the new appointment once they have the Service Center documentation (for reclass from II to III) and the pay rate authorization (if required) or the Career Center pre-approved ER (for reclass from III to IV). Data Entry Enter the data for the employee’s new appointment via the EAPP screen. The data collection documents would be the new Employee Request form and cover letter requesting the reclassification. Accessing the EAPP Function. 1. Log on to the Payroll/Personnel System. 2. At Next Function, type EEDB and press Enter. 3. Type EAPP and the employee ID number and press Enter. The EAPP screen will be displayed for the selected employee Since the Career Center determines the Title IV classification and pay rates, reclassification from Title III to IV involves submitting a revised ER request to the Career Center with reference to the current title III ER# and current pay rate. The Career Center will review the Service Center’s recommendation for Title IV pay rate, and once the ER is approved, the Service Center will process the 5.9—1 Payroll/Personnel System July 2011, University of California, Santa Cruz Student Re-classification PPS User Manual STUDENT EMPLOYEE ACTIONS Completing the EAPP Function EAPP (APPOINTMENTS/DISTRIBUTIONS) FUNCTION Appointment Level Procedure 1. End current appointment and distributions the day before the reclassification action is effective. 2. F9 Jump to the command line and use the “copy xx to xx” command to set up the next available appointment. 3. Enter data in the following fields, as applicable. Actions (Action Code) EAPP Notes and Tips Typ Student Employment positions are always casual/restricted, type 4 Appt Begin Enter the appropriate begin date. Appt End Enter the end-date specified on the ER. Title-Code Enter the title code (TC) from approved ER % Full Enter the estimated percentage of full-time (Note if the total of all the appointment percentages is more than 50%, the student will be placed in Safe Harbor and will pay DCP/Medicare.) Enter “V” for variable Always use the end/begin method for classification changes. With the end/begin method, you can set-up a future appointment. Enter Personnel Action Code 38 (Upward Reclassification). F/V Ann/Hr This field is derived from the distribution rate field. Rt “H” for hourly time-reporting Sch “MA” for monthly arrears Time “A” for positive time-reporting Lv “F” for accrual of sick-leave (effective if total hours reported are more than half of the working hours of the month). 3. Press Enter to invoke range/value edits. 5.9—2 Payroll/Personnel System July 2011, University of California, Santa Cruz Student Re-classification PPS User Manual STUDENT EMPLOYEE ACTIONS Distribution Level Procedure 1. F9 Jump to the command-line and type “add d” to add a distribution to your new appointment (or use the special command “copy xx to xx” command to duplicate the old distribution). 2. Enter or change the data in the following fields, as applicable Review Review all entered data for accuracy and consistency. Updating the Employee Database Press F5 Update to display the PAN Subsystem Notification Preparation screen. L Enter in 7 for UCSC location number Acct Enter ‘organization’ FOAPAL number CC Enter cost center Fund Enter fund number PC Enter in activity-code (optional, not required) S Enter “2” only (there is no other option for student employees) Dis% Enter percentage with four decimal places Pay Begin Enter begin-date (same day as appt) Pay End Enter end-date as appropriate. Rate/Amt Enter rate of pay, (four decimal places for hourly rates) Press F5 Update to invoke PAN. DOS Enter description of service code, (REG in most cases). Press F2 Cancel twice to cancel the update and leave the EDB unchanged. WSP Enter “F” for federal (almost always), “P” for president’s (rare); enter WSP code ONLY IF STUDENT IS WORK-STUDY. Consistency Edits If there are consistency edits, the Consistency Edit (ECON) screen is automatically displayed. Review all error messages and make necessary corrections. How to Correct Consistency Errors From the ECON screen you may: Correct errors directly on the ECON screen. F3 Return to the last data entry screen, make any corrections, then do one of the following: See Consistency Edit Messages (ECON) in Section 1.6, System Messages for more information and instructions. 3. Press Enter to invoke range/value edits. You should see the account name/description appear as it is established in the system. 5.9—3 Payroll/Personnel System July 2011, University of California, Santa Cruz Student Re-classification PPS User Manual STUDENT EMPLOYEE ACTIONS PAN Preparation Disposition of Forms After pressing F5 Update from a data entry screen (if there are no consistency edits) or an ECON screen, you are automatically positioned at the PAN Comments Entry screen. From here you can add comments and additional reviewers to the PAN. Forward the appropriate approval document to the mandatory reviewer and then maintain the reclass documentation within the Service Center. For reclass from Title Code III to Title Code IV approved ER will constitute required documentation. 1. Add a description of the action and any significant details in the Comments Entry screen. There are no forms to forward outside the Service Center. 2. Press F10 NotfPrep to display the Notification Preparation screen, where you can add reviewers as desired. 3. Press F11 Detail to display the Activity Review screen, where you can review the notification before sending it. 4. Press F5 Update to complete the update and send the notification. If the update is successful, the EAPP function appears and displays: U0007 UPDATE PROCESS COMPLETE For more information about PANs and additional PAN features, please refer to Section 1.8, Post Authorization Notification (PAN). Accessing IMSG 1. To access the Message Report Screen go to the Next Function field, type IMSG and press Enter. 2. When the IMSG screen is displayed, review any remaining messages and take the appropriate action. You may now start another appointment or distribution level action. 5.9—4 Payroll/Personnel System March 2003, University of California, Santa Cruz Student Re-classification PPS User Manual