1
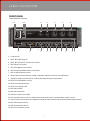
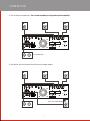
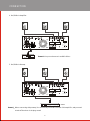
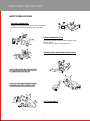
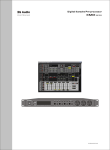
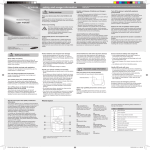
VK Series
VK9303
VK8302
User Manual
ENGLISH
ED-VK-MA-091201-001
ATTENTION
Thanks for purchasing our amplifier. Please review this user manual carefully before operation. and keep this
manual for future reference.
1. To reduce the risk of Electric Shock, do not open the cover; only qualified personnel can repair.
2. Do not expose this product to rain or moisture.
3. Install this product in the place with good ventilation.
4. Confirm the product has the right AC cord and rating for your region.
5. Unplug the product when unused for a long time.
6. Please connect the load according to the manual. Do not overload this product for long time.
Before power on the product, please make sure the local voltage complies with the instruction indicated at
the back (AC 220/50Hz) and no damage occurred to the connector or power cord. Please unplug the
product after power off.
2
CONTENTS
INTRODUCTION
INSTALLATION
OPERATION
ADDITIONAL
INSTRUCTION
VOLTAGE
4
FEATURES
5
SIGNAL CABLE
5
FRONT PANEL INSTRUCTION
6
REAR PANEL INSTRUCTION
7
PRE-CONNECTION
8
SYSTEM HOOKUP EXAMPLES
8
OPERATION METHOD
11
SAFETY REGULATIONS
12
SPECIFICATION
13
MAINTENANCE
13
3
VOLTAGE
Before operating, please make sure the local voltage complies with the range of this product.
How to select the right voltage input?
There's a voltage switch (110V or 220V) on the back panel of this unit and default voltage is 220V.
Choose the right one as per your local voltage rating.
Note: please unplug the amplifier before adjusting the voltage switch.
ACCESSORIES
Please check if below accessories are included when unpacking:
Manual
1 PC
Remote Controller
1PC
Battery (AAA#)………
2PCS
4
INTRODUCTION
INTRODUCE THE FEATURES OF AMPLIFIER
Please read this manual carefully before operation, and keep it for future reference.
FEATURES
>> This is a Karaoke amplifier with excellent performance and multi-functions.
>> Three Channel or two channel power output. Offer record output, line output, pre-output, bass output,
middle channel output and line output.
>> Three-way input for audio and video. sound resource is switchable in both automatically and manually.
>> Five microphones input in 2 groups. The volume of each group can be adjusted separately, and each
group provides +/- 12dB adjustment for treble, mediant, and bass.
>> Music channel provides +/- 12dB adjustment for treble, and bass.
>> Build in mic general volume, mic effect volume and music volume control knob.
>> Build in music key changer function, S terminal control function.
>> Build in L/R output, middle output volume control function.
>> Sub channel has 80-250Hz adjustment function.
>> Background Music(BGM) channel is in first priority, and it's available to adjust the input signal sensitivity.
SIGNAL CABLE:
RED
RCA plugs available
WHITE
Note: RED RCA plug should be inserted into RED jack.
WHITE RCA plug should be inserted into WHITE jack.
5
PANELS' INSTRUCTION
FRONT PANEL
(Take VK9303 for example)
1112
131415
16
17
3
4
18
19
20
MIC EX
VK9303
3-Channel Mixing Karaoke Amplifier
1
2
5
6
7
8
9 10
1. Power on/off.
2. MIC1, MIC2, MIC3 inputs.
3. MIC1, MIC2/4, MIC3/5 volume control knob.
4. MIC Delay control knob.
5. MIC effect Repeat control knob.
6. MIC Gain/bass/middle/treble control knob.
7. MIC sound subsidiary control.
8. Music volume control for bass, median, and treble, balance control for L and R channel.
9. Signal pre output volume control, to adjust the rear panel pre output volume.
10. Music sound subsidiary control.
11. Music tone changer button.
12. Music tone changer LED.
13. MIC stimulus LED.
14. MIC stimulus button.
15. Remote control receiver LED.
16. Sub channel volume control, to adjust the rear panel sub output volume and pre output volume .
17. Center channel volume control, to adjust the rear panel center channel output volume and pre output volume.
18. MIC effect master volume.
19. MIC sound master volume.
20. Music sound master volume.
6
PANELS' INSTRUCTION
REAR PANEL
(Take VK9303 for example)
1
MIC 4
3
2
MIC 5
REMOTE
C
SUB
4
5
OUT
IN
MIC INPUT
6
7
8
C/SUB
L
9
EXT EFT
R
SPEAKERS OUTPUT
CATION:SYSTEM IMPEDANCE 4-16 Ohm/SPAKER
SUB OUT C OUT
BGM
SENS
FUSE
L
90 110 120
160
80
R
Hz
250
LOW PASS
BGM
10
POWER
CABLE
210
85
AUX1
AUX2
AUDIO INPUT
LINE PRE
OUT
SEND
RETURN
11 12 13 14 15 16
NO.
17 18 19
20
~ 220V-230V 50Hz/60Hz
21
1. Microphone Rear input MIC4, MIC5.
2. S Remote control terminal (connect VOD control panel ,computer control software).
3. Center output or sub output switch.
4. MIC output, to connect external equipment input.
5. MIC input, to connect external equipment output.
6. Right channel speaker output.
7. Center channel speaker output or sub speaker out put (only available for three channels amplifier by
C/SUB switch).
8. Left channel speaker output.
9. Fuse holder.
10. BGM signal sensitivity adjustment knob.
11. BGM signal input.
12. AUX1 signal input.
13. AUX2 signal input.
14. Signal pre output, controlled by front panel pre output knob.
15. Line send, output signal is out of control by front panel;(It is not allowed to take off short-circuit plug if
no external connection).
16. Line return, input signal is controlled by front panel volume knob.
17. Adjust knob for Sub channel frequency, range: 80-250Hz.
18. Sub channel pre output.
19. Center channel pre output.
20. Ventilation window for fan.
21. AC power cord.
7
CONNECTION
PRE-CONNECTION
Speaker cable connection
1. Turn the bolt counter-Clock-wise to get space for
C/SUB
R
L
the cable cord.
2. Turn the bolt clock-wise to screw the cable cord tightly.
Be attention to connect the cable correctly, or else the sound quality will become un-nature and lack
Low frequency.
Attention:
C/SUB
R
L
The end of cord cannot touch another cord.
SPEAKERS OUTPUT
CATION:SYS TEM IMPEDANCE 4-16 Ohm/SPAKER
SYSTEM CONNECTION
1. R+C/SUB+L: Please select Center or Sub by C/SUB knob.
MIC 4
MIC 5
REMOTE
C
SUB
MIC INPUT
OUT
IN
EXT EFT
R
C/SUB
L
SPEAKERS OUTPUT
CATION:SY STEM IMPEDANCE 4-16 Ohm/SPAKER
SUB OUT C OUT
BGM
SENS
FUSE
L
90 110 120
160
80
POWER
CABLE
210
85
R
Hz
250
LOW PASS
BGM
AUX1
AUX2
AUDIO INPUT
LINE PRE
OUT
SEND
RETURN
NO.
~ 220V-230V 50Hz/60Hz
C
8
SUB
CONNECTION
2. R+C+L+A1 active subwoofer: The recommended best configuration of this amplifier.
MIC 4
MIC 5
REMOTE
C
SUB
OUT
MIC INPUT
IN
EXT EFT
R
C/SUB
L
SPEAKERS OUTPUT
CATION:SY STEM IMPEDANCE 4-16 Ohm/SPAKER
SUB OUT C OUT
BGM
SENS
FUSE
L
90 110 120
160
80
POWER
CABLE
210
85
R
Hz
250
LOW PASS
BGM
AUX1
AUX2
AUDIO INPUT
LINE PRE
OUT
SEND
RETURN
NO.
~ 220V-230V 50Hz/60Hz
ACTIVE SUBWOOFER
3. R+C/SUB+L+A1 active subwoofer+A2 active full range speaker.
MIC 4
MIC 5
REMOTE
C
SUB
MIC INPUT
OUT
IN
EXT EFT
R
C/SUB
L
SPEAKERS OUTPUT
CATION:SY STEM IMPEDANCE 4-16 Ohm/SPAKER
SUB OUT C OUT
BGM
SENS
FUSE
L
90 110 120
160
80
POWER
CABLE
210
85
R
Hz
250
LOW PASS
BGM
AUX1
AUX2
AUDIO INPUT
LINE PRE
OUT
SEND
RETURN
NO.
~ 220V-230V 50Hz/60Hz
ACTIVE FULL-RANGE SPEAKER
ACTIVE SUBWOOFER
9
CONNECTION
4. R+C/SUB+L+ Amplifier.
MIC 4
MIC 5
REMOTE
C
SUB
OUT
MIC INPUT
IN
EXT EFT
R
C/SUB
L
SPEAKERS OUTPUT
CATION:SY STEM IMPEDANCE 4-16 Ohm/SPAKER
SUB OUT C OUT
BGM
SENS
FUSE
L
90 110 120
160
80
POWER
CABLE
210
85
R
Hz
250
LOW PASS
BGM
AUX1
AUX2
AUDIO INPUT
LINE PRE
OUT
SEND
RETURN
NO.
~ 220V-230V 50Hz/60Hz
Remark: Line pre out has music and MIC effects.
AMPLIFIER
5. R+C/SUB+L+ Preamp.
MIC 4
MIC 5
REMOTE
C
SUB
MIC INPUT
OUT
IN
EXT EFT
R
C/SUB
L
SPEAKERS OUTPUT
CATION:SY STEM IMPEDANCE 4-16 Ohm/SPAKER
SUB OUT C OUT
BGM
SENS
FUSE
L
90 110 120
160
80
POWER
CABLE
210
85
R
Hz
250
LOW PASS
BGM
AUX1
AUX2
AUDIO INPUT
LINE PRE
OUT
SEND
RETURN
NO.
~ 220V-230V 50Hz/60Hz
PREAMP
Remark When connecting with preamp, it is controlled by the master volume of this amplifier, and you need
to take off the short circuit plug as well.
10
OPERATION
1. To connect the system as per the connection drawing, after checking the voltage is correct, power on this
equipment.
2. To adjust the MIC volume: adjust MIC1, MIC2/4 or MIC3/5 and MIC Master to select a suitable volume for
the speaker.
3. To adjust the MIC vocal tone: adjust MIC Tone by TRE, MID and BAS knob.
4. To adjust the MIC vocal effect: adjust the DEL to select the delay time and adjust REP to select the repeat
times, adjust Effect Master to set the effect volume.
5. To adjust the music volume by MISIC Master.
6. To adjust the music tone by TRE, BASS knob.
7. To adjust the LINE VOL can set the line pre out volume.
8. To adjust C VOL can set the Center Channel output volume.
9. To adjust SUB VOL can set the sub channel output volume.
10. To use MIC vocal stimulus function by pushing the MIC EX button, to make vocal sound is full and clear.
11. To use changer function by pushing b, # buttons.
12. External effect application has line external effect and MIC external effect:
A. When taking off the short circuit plug from send-return, the input signal of this equipment can go to
external effecter by SEND, and external effects can go to this equipment by RETURN;
B. When this equipment connect the external MIC effecter by rear panel EXT EFT out, and go back to this
equipment by its EXT ETD in, then this equipment MIC effects will be replaced by external MIC effecter.
11
ADDITIONAL INSTRUCTION
SAFETY REGULATIONS
ABNORMAL PHENOMENA:
Please turn off the power and pull out the plug when
you find unusual sound or smell when operation.
POWER CORDS PROTECTION
Don't touch power cords with wet hands to avoid
electric shock.
Don't put the cords in crowded people.
KEEP AWAY FROM WATER AND SUNDRY GOODS
DON'T OPEN THE COVER IF NOT GUIDED
BY A QUALIFIED ELECTRICIAN
PULL OUT THE POWER CORDS TO AVOID
FIRE WHEN YOU DON'T USE THIS UNIT
NO!
DON'T OVERLOAD IT
12
ADDITIONAL INSTRUCTION
SPECIFICATION
Output Power (rms)
Load Impedance
VK9303
300W x 3(1kHz,8
)
Output Impedance
VK8302
300W x 2(1kHz,8
)
Recommendatory Impedance
THD
Power Supply
(1kHz,100W,8 )0.02%
Frequency Response
4-16
20Hz-20kHz 1dB
8
~220V,50Hz
Power Consumption
VK9303
1250W
VK8302
850W
Input Sensitivity/impedance
MIC
20mV/2k
Line
200mV/10k
Static Power Consumption
Pitch Control
35W
Net Weight
Music
LF(100Hz)
12dB
HF(10kHz)
12dB
VK9303
14.5kg
VK8302
13.0kg
MIC
LF(100Hz)
12dB
Gross Weight
MF(1kHz)
12dB
VK9303
16.0kg
HF(10kHz)
12dB
VK8302
14.5kg
Effect Type
ECHO
Package Dimension
561 x 454 x 226(mm)
* Subject to change without notice.
MAINTENANCE
>> Use dry clean cloth to clean the equipment when it is necessary. If the machine is very dirty, take a dry
cloth with clean detergent, dump it into vase for 5 or 6 seconds, then use it to clean the dirt and absorb
the clean the body.
>> Do not use alcohol, Soluene agent and other volatile etchant solution to clean the surface, otherwise the
machine surface paint will fade or fall off.
>> If the equipment is not use for a long time, please keep it in a dry place appropriately.
13
www.elderaudio.com